Hawker Hurricane Mk.1, RAF, GiNA,1/48th, Airfix

Started by Chuck A. Villanueva · 73 · 4 years ago
  • Profile Photo
    Spiros Pendedekas said 4 years, 3 months ago:

    A truly great result, Chuck @uscusn!
    Looks definitely sharp and extremely cool!
    Can I imagine it near the Eurofighter?
    What a modelling pair will they be!

  • Profile Photo
    Chuck A. Villanueva said 4 years, 3 months ago:

    George. thanks, yes, when you remove the masks, to me personally is the turning point to finally add the finishing touches. Most builds the next step is to get it on it's feet, or gear in this case. Almost finished.
    Thanks Spiros, separate shelf, but will definitely have it part of the presentation.

  • Profile Photo
    Chuck A. Villanueva said 4 years, 3 months ago:

    Lets get this Hurricane on it's feet. Starting with the tail wheel.

    Fragile looking but actually sturdy and should last for years on the shelf. Attaching it inline with the turned rudder.

    Next is to assemble the landing gear. Not a complicated system, again Airfix provides the main struts and retraction arms. Again the parts looking delicate yet sturdy once assemble with positive contact points with in the wheel bay well.

    The retraction arms are attached. Both sides completed.

    Standing on her own before the wheels are attached, nice and level.

    Another set of arms are attached on the back side of the struts

    Next to attach the gear doors and assemble the wheels.

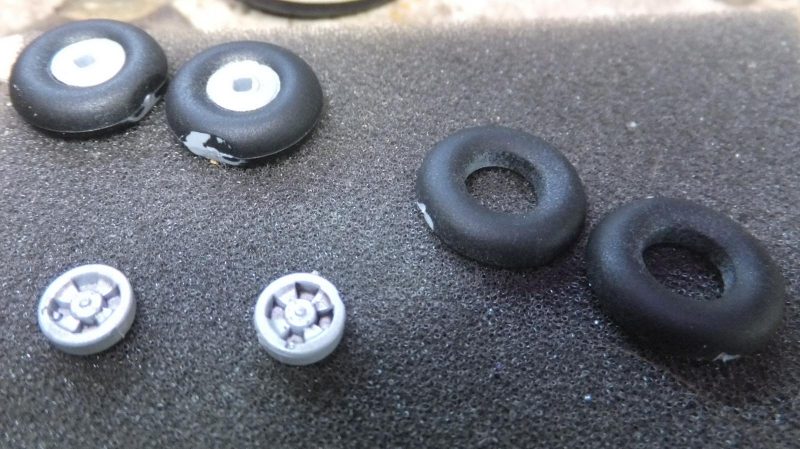
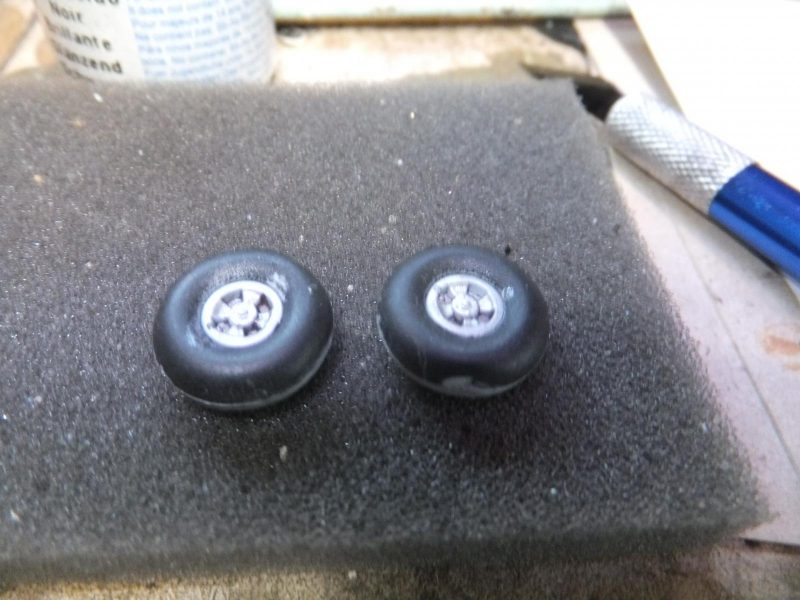
    Was going to get a set of resin wheels, but with Airfix providing weighted wheels in the kit. And they looked just fine detail wise. I decided to use the kit wheels.

    After assembling the wheels, they are place on the spindles and then rotated to where the weighted part is level with the ground.

    Next attach the gear bay doors. Designed in a way to support the landing gear when placed on the shelf.

    Once attached, again the contact point to the strut is positive, no muss or fuss.

    The tires are touched up and ready for the final bit of details.

    1 additional image. Click to enlarge.

  • Profile Photo
    Erik Gjørup said 4 years, 3 months ago:

    Always a joy when the little ones are up on their own three feet 🙂
    Dunno if I mentioned this, but I like the way they have included weighted wheels.

  • Profile Photo
    Chuck A. Villanueva said 4 years, 3 months ago:

    Yes Eric, it is always another moment of the build when you get to the point when you have your project sitting on it's gear. A sign your almost finished.

  • Profile Photo
    George R Blair Jr said 4 years, 3 months ago:

    Almost hate to see this end, it has been quite a journey. Still, it will be nice to see it all come together. Looks awesome.

  • Profile Photo
    Spiros Pendedekas said 4 years, 3 months ago:

    Great progress, Chuck @uscusn! Great attention to detail, too!
    Also, my impressions on the Airfix Hurricane become more and more positive as your build proceeds: looks Airfix have gotten it right, taking care of all (or most of) the little things a modeller should wish for, when buillding some older, but sttill nice, other manufacturers' Hurricanes.

  • Profile Photo
    Chuck A. Villanueva said 4 years, 3 months ago:

    The final chapter, the last bits of detail to add to final finish on GiNA. The Pitot is placed under the LH wing.


    Next the step stirrup is attached just aft of the trailing edge of the wing where it meets the fuselage.

    Next the canopy is placed in the open position on the upper rear spine.

    The exhaust manifolds are painted and installed on each side of the nose.

    ID and landing lamps are placed on the wing tips, and leading edge of the wings.

    The LH landing lamp is installed.

    The wing tip ID marker lamps

    Finally the upper antenna is mounted on the spine.

    And that is it, My first new mould Airfix kit The Hawker Hurricane Mk.1 is done.

    yay!

  • Profile Photo
    Spiros Pendedekas said 4 years, 3 months ago:

    Congratulations Chuck @uscusn!
    This was a fantastic buld! Sure the detailed an well designed Airfix kit was your ally, but your excellent skills transformed into a masterpiece.
    I loved tha final clear details addition.
    Thanks for having me as a passenger in this fantastic building ride!
    You Hurry GINA looks superb. Your Euro GINA will have her companion now!

  • Profile Photo
    Erik Gjørup said 4 years, 3 months ago:

    Thanks for the ride @uscusn!

  • Profile Photo
    Chuck A. Villanueva said 4 years, 3 months ago:

    Thanks Spiros and Eric, it was good to have you aboard. The experience was fun and just the right amount of challenges though minor to keep you on your toes. Especially the very start with that tubular interior which you can really get out of alignment if you don't take your time. And don't break anything as the parts are quite fragile with too much pressure could break some really key components. Overall I would recommend this kit to those with some experience. It is not a starter kit. Thanks for all of your encouragement throughout the process.

  • Profile Photo
    George R Blair Jr said 4 years, 3 months ago:

    This build came out great, Chuck (@uscusn). These new Airfix kits are really nice and you have brought out the best in it.

  • Profile Photo
    Chuck A. Villanueva said 4 years, 2 months ago:

    Thanks George, your work on the Maryland is much more impressive. The Airfix though not quite Tamiya in building it, the quality is. Your doing very well on a tough Special Hobby kit.