Messerschmitt Bf109 G-4 Italian Air Force, Eduard, 1/48 FINISHED

Started by Erik Gjørup · 108 · 3 years ago · 1/48, Bf109, Eduard, WWII
  • Profile Photo
    Erik Gjørup said 5 years, 4 months ago:

    Pitting in

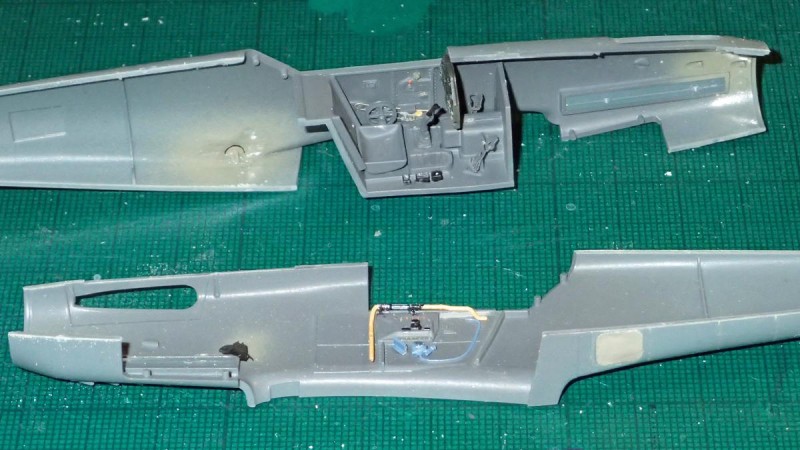
    Cockpit and fuselage gets some really NOT necessary details

    • but nice ones I think.

    Now, the basic eduard has a lot to offer, but in this build it is planned to leave some of the windows open, and all the glass on the canopy will be clear panels from acetate, so the details must be convincing for the nerd!

    First up, the standard etch is used, along with quickboost and Löök extras


    Ready for first round of RLM 66

    Löök mom – no hands.


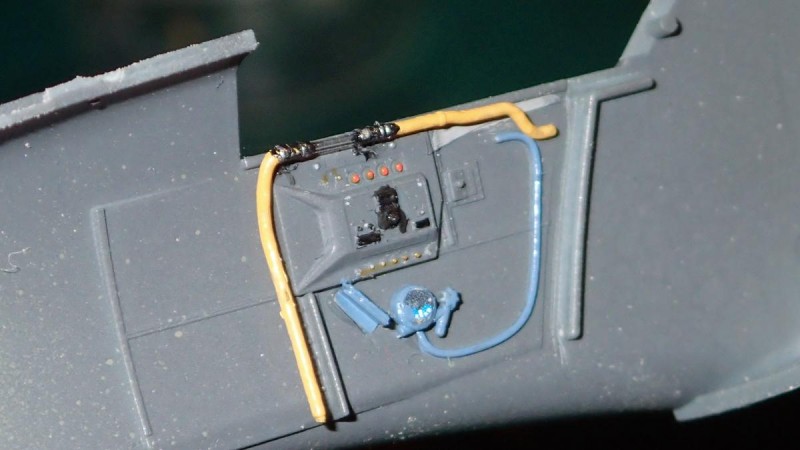
    With the Löök dashboard installed, here is a look at the fitted well. Eduard wants you to install this on the other wall, but to protect the instruments and ease installation of the fuel-line, I prefer the left wall. That makes it so much easier to get the fuel in place. And the spring that holds the plate on the footstep seems to be ready for replacement as the hatch is not entirely closed.

    The fuel-line has two small tabs that need to fit into the curcuitbraker panel, failing to do so makes it look like it is in mid-air, and so, deviating from instructions, it is glued to the wall


    Sits just right when the fuselage is assembled.

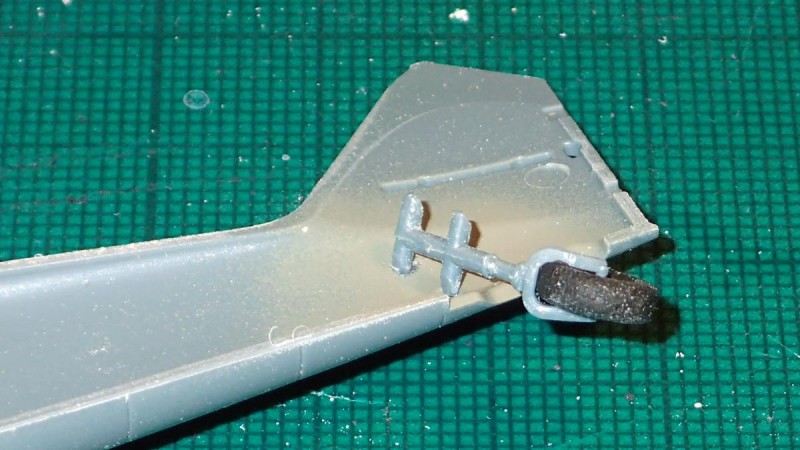
    The plane has straight pedals, but has been pushed aroung for parking, and so the tailwheel is placed at an angle.
    This is achieved by carving the ends of the four locating pins.

    Next time some more assembly, perhaps more detailing?. Comments are welcome

  • Profile Photo
    Erik Gjørup said 5 years, 3 months ago:

    safety first!

    As some may have noticed the tailwheel snapped on Marseilles’ Friedrich, and so I made a desparate attempt to keep this one safe.


    If it helps, time will tell – the other one snapped during painting, and I do think this contraption may have to come off for painting.

    A snapshot of the cockpit – Löök panel lööks nice!


    (I have ordered some from Yahu – they are near perfect!)

    The wings in a squeeze


    And before you know it, it will look like a plane!

    OK – have to admit, this one and the Rumanian one are in the slow lane, as I needed to get something simpler in the fast track to clear the head

  • Profile Photo
    Don Mk1a said 5 years, 3 months ago:

    Wow! Details indeed. The canopy modification is very brave, knowing how brittle clear plastic is.

    But you didn't tighten the cowling fasteners. That's a major flight safety goof. It might come off in flight! (Oh, I forgot. It's a model.)

  • Profile Photo
    Erik Gjørup said 5 years, 2 months ago:

    Shooters and straps

    Still on a detailing frenzy, I have a few AM products in this one, and this time I will get to the guns and straps

    First I made a plasticcard fairing inside the hood to hold the brass-gunports in place. They have to be staggered, and pointing the same way. . .


    Some whitetack helped find the right spot

    And, after fiddling, they were left to dry, and I pressed on with the very detailed seatbelts that came with the Löök set. I should have installed the lap-belts BEFORE assembling the fuselage, but with a bit of sweat they went in OK.


    Those eduard belts are really nice. Please note the correct placement of the fittings – many 109’s got them all over the place, but this is the place for a F and onward. (will get into the Emils in a later build)

    With the canopy hood nearing completion it was placed on the plane just for fun.


    I really love that clear glass! – I plan to keep it closed, and those clear panes really lets you see the interior.

    And with the whitetack out of the engineroom the guns look very nice too – even though they are generally hidden it was the outer openings I wanted to improve on – I think it is some great improvement on the plastic?


    And that concludes this installment – you are very welcome to let me have your opinion here – it is expensive, but is it also worth it?

    Where to go next? I really have no clue, so stay tuned. As always, comments are welcome

  • Profile Photo
    Greg Kittinger said 5 years, 2 months ago:

    Love the tailwheel jig! We modelers can be downright crafty when we need to be! Everything taking shape nicely, and love your attention to details.

  • Profile Photo
    Erik Gjørup said 5 years ago:

    Keep your hat on

    Or should that be keep your hut on?

    While life has intervened lately, the season is slowly starting up for me again. Some minor progress has been made in the last month; The ailerons have been shaped to be deflected as per my plan, and they have been installed.


    I think it adds a lot of interest to place moveable surfaces deflected – and remember to place the controls in the ‘pit accordingly!

    Today I fitted the front and aft windscreen, painted them RLM66 (the inside color) and simply had to testfit the hood.


    Not bad at all.

    The intake has been installed too – I took the time to drill a hole inside, just to see if that sort of detail is justifiable.


    Probably not – I will try and remember to post a picture of that when it is finished – till then you get to enjoy the turned guns once more 🙂 (I know – also difficult to see, but I know they are there)

    Next time I may get around to some photoetch details!?

  • Profile Photo
    Erik Gjørup said 4 years, 10 months ago:

    Legs and coolers

    Trying to get around some of the waiting 109’s I revisit this one

    not photoetch yet as I thought last time – or rather I did not get pictures. Anyway, it was the coolers that got some faces done, and off-camera I installed the oilcooler. This time the legs and water coolers get some attention

    Legs got a spray of RLM02 (xtracolor)


    On to the watercoolers. . .

    I decided they would be closed, and as the front of these also closes up a bit, the fronts were sanded down to make a thin lip.


    They also got the pushrod installed, and were then glued in place.

    I hope the next post won’t be as far away as this one was – stay tuned

  • Profile Photo
    Erik Gjørup said 4 years, 10 months ago:

    Those details. . .

    Ailerons re-visited

    Having had some time to do a bit of armchair aviation, I discovered that all the work I put into cutting off the base of the ailerons was wasted!

    In reality the part that holds the hinge stays put, the rest moves!


    And so some more scrabing and filing and sanding – lesson learned?

    Next up, well not really able to tell, but kinda hoping some flaps or tailfeathers. Maybe both as there are quite a few 109’s in progress right now – stay tuned

  • Profile Photo
    Greg Kittinger said 4 years, 10 months ago:

    Live and learn (and model-on!)!

  • Profile Photo
    Erik Gjørup said 4 years, 10 months ago:

    Flappin’ n slattin’

    Having decided to show it in the mediterranian heat, the coolers will be wide open instead!

    And so it was possible to fiddle a bit with the flaps and slats. The slats were relatively straightforward, as it will be a just-landed aircraft, and the slats have not yet been reset in the closed position


    The flaps were fighting a bit, I suppose it had something to do with me adding gunboats and strong clamps in the assembly. As mentioned in another post, the rear of the cooler will be mounted before assembling the wing in future builds.

    The cooling flaps upper parts has been modified to sit flush with the wing, the lower parts fully open as I have seen that on a picture in one of my many reference books. (I know - in an earlier post I said they would be closed, but having stumbled upon a picture of the opposite, that was the final verdict on this one!)

    Next I suppose the tail has been assembled and some primer will have been airbrushed – stay tuned

  • Profile Photo
    Erik Gjørup said 4 years, 9 months ago:

    All primed and feathers in place

    Just a short update on the Italian job . . .

    As mentioned last time, I chose to prime this one – one thing that I have not been used to in the past.

    A primer really helps you out if you airbrush acrylics, but it is really great to give a super surface. I finally understand why it is done, and will be doing this on most, if not all, of my coming builds.


    Now, one layer really tells you where to re-visit with a sanding stick or even some filler. I am still driving around in the kit-world with a big “L” (for LEARNER) and hope to get better with every build.

    The primer is one good example – seems a lot of extra trouble, but really saves you a lot of misery!

    Well – that wraps this one up for now – it just came out with the second coat added (no pictures of that though - this is the sanded first layer), and I have to get that sanded smooth to start painting – really excited about that I have to confess – it looks very interesting on paper!

    Untill next time, happy modeling to y’all - comments are welcome

  • Profile Photo
    James B Robinson said 4 years, 9 months ago:

    Looking pretty good Erik. When I was young and dumb using enamels, I never primed. Now that I'm older and slightly less dumb, I'm a firm believer in priming. Especially with older kits and the use of Acrylic paint.

  • Profile Photo
    Erik Gjørup said 4 years, 8 months ago:

    Colors!

    As the day was spent in the paintshop, this one got some colors too

    First off, some white (OK – that was a few days ago but it had to dry)


    And then the yellow under the nose. I took the liberty of de-masking the nav-lights as they are in the white areas that has to be fully masked for the rest of the process.

    Next I think I will have done some more painting – stay tuned

  • Profile Photo
    James B Robinson said 4 years, 8 months ago:

    Nice progress on all your builds Erik. Looking good!

  • Profile Photo
    Erik Gjørup said 4 years, 7 months ago:

    Thank you @jamesb. More to follow shortly here. . .