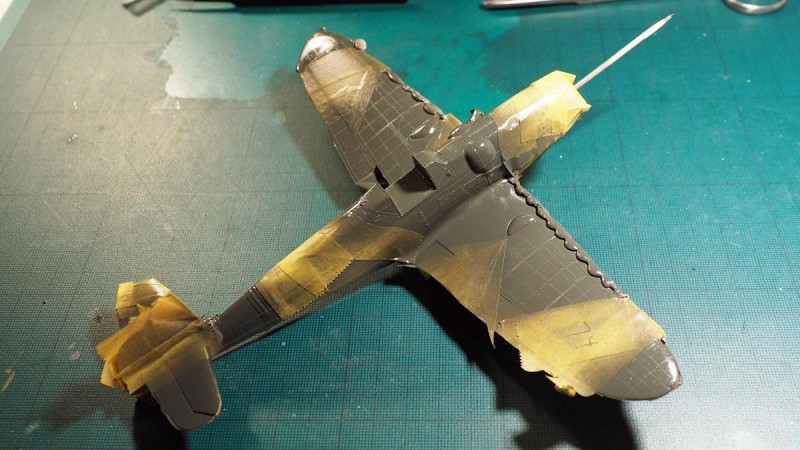
Messerschmitt Bf109 G-6 WNr 161742, Slowak, Eduard 1/48 FINISHED

Started by Erik Gjørup · 53 · 3 years ago · 1/48, Bf109, Eduard, Slowak uprising
  • Profile Photo
    Erik Gjørup said 4 years, 9 months ago:

    On with the wing

    The wings also gets some extras

    There are a small gap at the root that needs attention


    Oh – and some more detailing inside the wing;

    The gearactuator cylinders are made up of a chromed needle and a stretched cotton-swob handle


    In order to see the rod and cylinder, the undercarriage well has had its holes opened

    (you can also buy AM resin replacements, but where is the fun in that? (OK – it saves an hour or two))

    The G-6 quite often had a strip of doped cloth to streamline the gap at the wingtip.


    That was fashioned from filler between tape, then sanding to make it thinner

    With the wingroot filled and sanded, the paint is coming closer.

    but first up next time will be more details I think

  • Profile Photo
    Erik Gjørup said 4 years, 9 months ago:

    Closer look – details’n stuff

    Well – mostly cooling thingies

    Eduard is kind enough to supply you with two oilcoolers, and so you can take the major part you need, and cut the flap from the other


    That enables you to make an open oilcooler to depict a plane that just landed (thermostat operating the flap as it is on the watercoolers)

    Speaking of wich – they have to be in “hot” stance too if the oilcooler is open.


    Here you have to use available parts as there is only one of each – careful scribing and cutting gets you there.

    Some Tamiya super thin to eradicate scratches..


    Not the best I’ve seen, - got hit by “get-there-itis” and forgot to take my time.. – better next time?

    next up will be a bit more details before painting commences!

  • Profile Photo
    Greg Kittinger said 4 years, 9 months ago:

    Very nice! Love the details - if I built 1/48 I'd use all your stuff as tutorials. Luckily for me, at 1/72, most of it a) I couldn't do and b) would rarely be visible!

  • Profile Photo
    Don Mk1a said 4 years, 9 months ago:

    Your depth of knowledge is astonishing. Great detailing work too. I couldn't resist checking against a museum example and you seem to have those lights spot on.

    https://www.cybermodeler.com/aircraft/bf109/images/rafm_bf109g_06.jpg

  • Profile Photo
    George R Blair Jr said 4 years, 9 months ago:

    Get-there-itis is tough and almost impossible to resist. And every time I succumb to it I mess something up. Like they always say, the first step in overcoming a problem is recognizing it. You realize when it sets in, so you are miles ahead of me. Great job, and your patience in detailing all of your 109s is miles ahead of me.

  • Profile Photo
    Erik Gjørup said 4 years, 9 months ago:

    Thanks for comments guys - appreciated

  • Profile Photo
    Erik Gjørup said 4 years, 9 months ago:

    Details’n stuff

    A closer look at the cockpitfittings

    With yellow paint on and masked off (had to spray another project, and did the markings on this one while the airbrush was loaded with Humbrol Signal Yellow (154 as far as I recall)


    And with the yellow markings done, it is on to the details in the cockpit.

    For the Revi, a quickboost resin version were pressed into service


    Testfitting the windscreen. Usual nice eduard fit!

    And after some brushwork (valejo acrylics mostly) the windscreen and rear window was glued in place with Tamiya thin glue – just a drop in the corner and you can see it flow to bond the glass


    I can live with the result. With acrylic paint you can simply use a cocktailstick to remove it if the paint has wandered off to some place it shoud not be.

    next up the painting commences for real

  • Profile Photo
    Erik Gjørup said 4 years, 9 months ago:

    Painting in progress

    With the canopy tacked in place, painting the exterior commences

    First the undersides get some RLM 76 - Humbrol 147


    The basic paint has to go quite high as a background for later mottling.

    Masking tape before RLM 75 is added

    • In order to prevent the next layer from getting under the tape a thin layer of RLM 76 is painted on top.

    And the leading edge gets whitetack to make the wavy lines


    A layer or two more, and masking for RLM 74 can take place – using Xtracolor gloss to ease the later decaling and save a gloss layer until after decals are in place. I think it looks better, as the gloss tends to be a bit thick in places and make the decals “hover” over the surface. That may just be me still a learner, but anyhow..

    next post may be when ready for decals – depending on progress

  • Profile Photo
    Erik Gjørup said 4 years, 8 months ago:

    Still Painting

    More masking and painting taking place

    I have to admit that the painting process is a lot more fun than it was as I am getting to understand my airbrush a bit better – and learning how the different paints behave. So far this one has been painted with enamels, Humbrol matt was my preferred paint as it seemed to dry fast, but xtracolor 50:50 with their fast-drying thinner is very easy to use, and dries fast!

    With the RLM75 having had the last layer, the wings and fuselage is masked for RLM74


    Xtracolor with thinner can be masked after a few hours drying, and does not peel off with the maskingtape.

    With the tape off, the basics are revealed
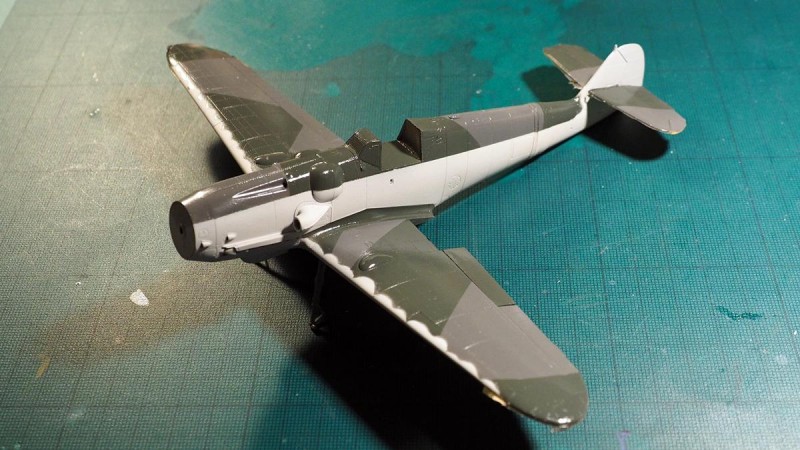

    It is almost a shame to start mottling, but alas – there are a lot of places that need touch-up as the whitetack had been moved by clumsy handling!

    The airbrush is still the old Badger 150 with a fine needle and low pressure – I still find the low placed / sidestepped cup a bit annoying, and will have to look for an airbrush with a top-cup (have to find the funds, but you must never go down on gear. . . )

    If the mottling / repairs warrant a few pictures these will be next, or perhaps it will be decaling that is next in line on this one – feel free to comment

  • Profile Photo
    George R Blair Jr said 4 years, 8 months ago:

    Interior looks awesome, Erik. I feel like I could hop in and start the engine. Painting is coming along nicely. You are right about losing track of masking during painting. On a German plane, I once masked what should have been green instead of what should have been gray, so the pattern colors were opposite of what they should have been. I left the colors like that & I am the only one around the house who knows. :o)

  • Profile Photo
    Michel Verschuere said 4 years, 8 months ago:

    I like every one of your 109's Erik! Thanks for sharing this build with all of us!

  • Profile Photo
    Erik Gjørup said 4 years, 8 months ago:

    @gblair - the keys are left in. . . - regarding paint, remember as I just said over on Michels build that it is the owner that decides the colors! Anyway those 109's did get some rather mixed paintjobs in the field, so almost anything may have happened 🙂

    @michel-verschuere Thank you for the kind words! - and to quote you;

    Happy modelling

  • Profile Photo
    Erik Gjørup said 4 years, 4 months ago:

    Specks and dots all over

    With the new airbrush I got, mottling is easy!

    As mentioned in another post I got a new airbrush for my birthday, and that is quite something else.


    The old badger was quite good for some jobs, but the new H+S Infinity with the superfine needle – what a difference!

    I am rather pleased with the result of my first go at mottling with this airbrush, even though still not at all a pro, it is an instant improvement, and once again (in my opinion) proves that you might just as well buy the best you can afford! Work becomes a real joy with the right tools.

    Some detail work will take place when it is dry, so again a bit of a wait before next post on this one

  • Profile Photo
    George R Blair Jr said 4 years, 4 months ago:

    Mottle looks great. I am sure you appreciate the new airbrush, but skill also plays a big part.

  • Profile Photo
    Ryan Boerema said 4 years, 4 months ago:

    Just FYI, first Messerschmitt v Messerschmitt was German 109E-7s against Yugoslavian 109E-3s.