P-51D Mustang Tamiya – 1/32

Started by Colin Gomez · 94 · 12 months ago
  • Profile Photo
    Colin Gomez said 2 years, 8 months ago:

    As I work through the various Luftwaffe builds I have in progress I am also returning to some Allied aircraft that I shelved a while back. The Tamiya P-51D is a gorgeous kit and I have three in my stash to do in various markings and one I have made substantial progress on. The first started will eventually be the P-51D-5 "Hun Hunter Texas" completed with Barracuda Cast decals, wheels, and cockpit detail decals.

    Almost a year ago, I developed mixed feelings about how it was going together for me. The Tamiya IP was surprisingly dull and toy-like when assembled following instructions. I had carefully painted up the pit and side consoles but was waffling about how to bring out the detail in the black consoles or using an oil wash on the Interior Green that wouldn't look too messy (IMO). Here's how the build looked when I put it it away. In spite of my dissatisfaction with this overall look, I despaired about applying the teeny weeny Barracuda decals to the consoles. How could this not end up in disaster? Anyway, I finally worked up the gumption recently to pull the kit out of storage and start applying the cockpit details. I also came across the Eduard "Look" IP that did proper justice to the complexity of this key part and was a drop-in replacement for the lackluster Tamiya piece. I am glad I finally broke out of my "gumption trap" (to borrow a term from Robert Pirsig) on this one. The tiny decals required 2 days of careful work with tweezers and a needle but they are surprisingly easy to work with and reposition when necessary. They also respond beautifully to Micro Sol. I think the results speak for themselves. A later update will show the seat. I am still doing the kit cushion and paper belts from HGW.

    After the pit is done,I have to work on detailing the engine, which I have already painted and assembled and will show in an update later. After getting over the hump on the pit, I have energy to work on the engine mount painting, which is a tricky mix of aluminum and Zinc Chromate.

    For those curious, I also hope to do Pierce McKennon's P-51D- 20 Ridge Runner III and Richard Peterson's P-51D-5 "Hurry Home Honey". Or at least that's the plan for now, since I have decals for some other famous aircraft as well (Missouri Armada, Big Beautiful Doll, etc.). So many Mustangs, so little time.

    I hope you like this demo of how things are working out. Happy modeling!

  • Profile Photo
    Colin Gomez said 2 years, 8 months ago:

    Sorry for the multiple posts, guys. I will try to figure out how to delete the others. I was having major technical difficulties posting - without results. I even redid the whole thing before all of my previous efforts suddenly came back all at once. I guess persistence does not always pay off. 🙂

    OK, fixed now. Many thanks to whoever did that!

  • Profile Photo
    Colin Gomez said 2 years, 8 months ago:

    Here is the assembled engine.

    Wiring to be added will have to be scratchbuilt. I am actually having trouble finding pics of how the wiring on top looks, if anyone can help with a clear pic. 🙂

  • Profile Photo
    Spiros Pendedekas said 2 years, 8 months ago:

    Looking absolutely amazing, my friend @coling!. Love how all these innards turn out!

  • Profile Photo
    John vd Biggelaar said 2 years, 8 months ago:

    Tiny decals indeed, Colin @coling.
    They do however give that interior a very realistic view.
    Clearly an improvement over the one when you stowed it.

  • Profile Photo
    George R Blair Jr said 2 years, 8 months ago:

    Interior looks great, Colin (@coling). Interior looks like you could hop in, start the engine, and take off. For your posting problems, have you tried using a different browser to access iModeler? I was having some similar problems with posting and discovered it had to do with the browser. Switching browsers fixed the problem, and then after I re-installed Firefox, it worked fine, too.

  • Profile Photo
    Colin Gomez said 2 years, 8 months ago:

    Thanks, Spiros. Good to know you are following this one. I am glad to be back in the saddle on this kit. It definitely rewards patience.

    Thanks, John. I am glad I decided to use the decals after all. I can strongly recommend all Barracuda productions products. They appear to be well-tested as well as well-designed.

    Thanks, George. I am happy that the cockpit looks realistic to you, especially as a pilot. I am finally finishing it up with more work below. Thanks for the tip on the browser. I may try out your suggestion. I like Firefox but I also have Chrome as a back-up. When I was teaching on-line, I alternated between them.

  • Profile Photo
    Colin Gomez said 2 years, 8 months ago:

    Here is a small update on some further painting, detailing and repair work done. I did finally get the metal portions of the engine mounts done. I masked the Green Zinc Chromate braces and "painted" the rest with thinned Rub N Buff (brush application followed by buffing).

    I find the stuff gives me the smoothest metallic finishes, with much better results than any paint I have tried - all of which are either grainy or goopy in texture. The Rub n Buff polishes super smooth with a finger tip and soft cloth. To deal with slight fragility of the finish, I also gave the metalized areas a shot of Tamiya clear. This was most easily done by temporarily installing the cockpit and firewall and masking the whole fuselage to avoid overspray in the pit.

    Now to the "repair' work. I discovered to my dismay that I had lost part W7 - the pipe attached to the oil tank, very visible with the engine cover removed. I considered simply stealing the part from one of my other two kits until it turned up but elected instead to create a new one based on the part from a twin kit. This approach meant I wouldn't have to clean up a seam on the pipe when painting, amongst other things, since I was making it from styrene rod. To make a long story short, here are the pics of the creation of the scratch-built part shown alongside the matching part for the spare kit. The grey pipe is for the Tamiya kit and the white piece is hand-made from punched-out styrene sheet and rod.

    Here's how the new part looks as test-installed compared to the kit part The bends in the pipe are quite complex but I matched them quite well, I think. Fitting the part to the oil tank and making sure it fit inside the fuselage was the ultimate test. I will "paint" the metal pipe with Rub n Buff and the cover/valve on top with careful brushwork.

    Next and far more work in terms of hour put in, I cut out, assembled and installed the HGW cloth seat belts. There are no instructions for these, just a numbering system and one photo of the finished belts! I looked at threads on-line at the Large Sale Modeler site and followed helpful suggestions from other frustrated modelers on assembly steps. The process was very difficult but mostly worked well with extreme patience, good pointed tweezers and minimal glue. You literally have to thread the tiny strips together through the buckles as if they were real belts! I tried to get the most out of the cloth for all of its bendiness but I glued some sections to the seat to make sure they hung down correctly. This was especially important to have them drape over the cushion and to the seat pan with realistic "weight." I am still experimenting with the hang of them. How do they look to you?

    Lastly, I did the detailed wiring for the radios. I studied pics from my books and on-line of the SCR-522 radios both installed in the P-51 and displayed outside. I created tiny cylinders of styrene rod as mounts for each wire and glued these over top of each attachment point on the kit radio. These I painted silver with Rub in Buff in advance. I also deepened the hole in the center of each hollow post with a twist drill to make test fitting the wires easier with out gluing them. I then created insulated wiring of two different gauges with stretched sprue - white for the thicker wires and black for the single thin one.

    . Colors were as per photos of real P-51 radios. These "wires" were bent to shape to follow contortions of the real thing and carefully hooked into each connector, positioned and finally glued in place when they looked right to me. All this worked out fine without smudging glue.

    So that's it for now. I hope this is interesting. It was a lot of fun for me, especially in solving the lost part problem and overcoming that particular anxiety quite readily. Comments welcome, if the spirit moves you. I will do a much more complete update next time as the engine, supercharger intake and other major parts get assembled. I may even be able to get to exterior painting fairly soon.. Thanks for looking. 🙂

  • Profile Photo
    Louis Gardner said 2 years, 8 months ago:

    Colin, @coling
    The details you always incorporate in your builds always look very good. I don't have a 1/32 Tamiya Mustang, but I do have two of the new (ish) tool Revell of Germany P-51D-5's that I started several years ago. I am building one as Major Preddy's "Cripe's a Mighty" (my favorite Mustang scheme), and the other one as "LOU IV" with the yellow nose. This build journal of yours is the motivation / inspiration that I need to get going on mine again.

    I have a very bad habit of starting a model and then getting sidetracked with another one...before the started one gets completed.

    I have been very fortunate to have been around quite a few full sized Mustangs as they were being restored, and I have taken a lot of pictures during the process. I know I have several pictures on my cell phone, that show the upper engine and all of the associated piping. Going from memory, there's not a lot of wiring located there, but there are some hoses and assorted plumbing. Restored aircraft do indeed differ somewhat from actual wartime planes, as certain things have been removed / eliminated, or replaced / updated to modern standards. Here are several engine pictures that I have stored on our home computer.


    These next pictures were taken of another Mustang.

    I hope these photos will be of assistance. Let me know if you want me to locate the topside pictures, as they are buried in the thousands of photos I have on my cell phone. I have way too many photos stored on my phone, well over 11,000 and still going... As you can imagine, the available memory capacity is dwindling.

    I am looking forward to your next installment.

  • Profile Photo
    Spiros Pendedekas said 2 years, 8 months ago:

    Wow, what a meticulous job, my friend @coling!
    Loved the scratchbuilt pipe.
    The belts look wonderful, as do the radios behind the headrest.
    This is simply a stunning build!

  • Profile Photo
    Colin Gomez said 2 years, 8 months ago:

    Thank you very much for the pictures, Louis. They are excellent shots and full of interesting details.

    If you come across any views of the top of the engine, that would be great. There is no rush, however, since I have found that I can proceed with major assembly and access the parts of the engine that may need wiring late even after the fuselage halves are together.

    I know exactly what you mean by having multiple,models on the go at the same time. No harm is that, really but it is nice to get things finished.

  • Profile Photo
    Colin Gomez said 2 years, 8 months ago:

    Thanks, Spiros. The Tamiya kit is really great. Happy to hear that you like the belts and radios. More to come very soon.

  • Profile Photo
    John vd Biggelaar said 2 years, 8 months ago:

    Wow, lost of words, Colin @coling
    The scratch build pipe looks like an exact copy of the original one.
    Also the seatbelts and radio units are looking very realistic.

  • Profile Photo
    George R Blair Jr said 2 years, 8 months ago:

    Amazing work, Colin (@coling). I appreciated your comment about getting all of the wiring in place without smudging the glue. I have a problem with hamfisting the small details and messing up the previous work. Well done.

  • Profile Photo
    Colin Gomez said 1 year, 8 months ago:

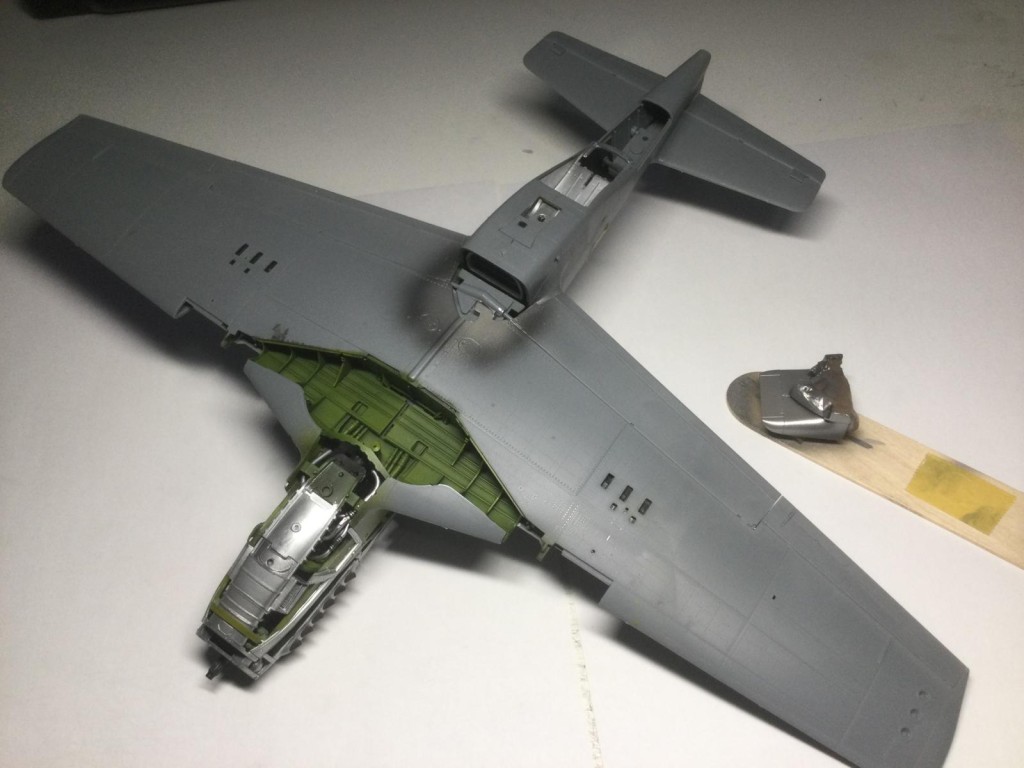
    Wow. Hard to believe I haven't posted anything on this build for a full year. After a very dramatic mishap with my Hawker Tempest build in 1/32 (more on that elsewhere), I turned to the Tamiya P-51 to work on something that was finely engineered to be less of a struggle and also held greater promise of a good result. In fact, it ended up being pretty challenging to get major work done, but well worth the effort. I think it is worth reflecting on how we usually call Tamiya kits "shake n bake", as if they don't really require real effort or modeling skill to put together. For me this has been one of the slowest and most difficult builds I have yet done. With all the detail and the precision fit required for all components, it positively demands great care. For example, getting all the engine parts and support structure to fit EXACTLY like their supposed to is no easy task. I had to do quite a bit of careful dry fitting and refitting to get things lined up and was constantly challenge in how to paint things so they would remain glueable and also not get marred in that process. In fact, I put this away partly because I was getting doubtful that I could get it all to work out.

    Anyway, I returned to the build and finally finished much of the main assembly over the last two weeks, short of clear parts. In the end, I did most of the metal parts for the engine bay with Rub n Buff silver, which allowed me to get on with assembly without doing complicated metalizer airbrushing at every turn. The Rub n Buff-coated parts are also pretty durable, compared to other ways of metalizing them. I left some of the wheel well details to paint later as I needed to just get the thing together and all the fine bits were really slowing me down.

    To get the working parts to operate correctly (mainly control surfaces), you have to study the instructions with manic care so that all the tiny metal parts are oriented correctly on assembly. Adding the ailerons and flaps to the wings has to be done in exactly the right order to avoid disaster ( in spite of all the time and care I took, I still did it wrong at first but managed to pry apart some glued parts to get it all to work).

    Finally, even though this is a Tamiya superkit, there are still a few pesky seams to fill in the fuselage spine and supercharger intake parts, since so much is sandwiched inside when you close it all up. Filling and sanding has to be done with great care so as not to damage all the fine detail and also to avoid surface scratches that will show up so easily with a metal finish. Anyway, so far, so good.
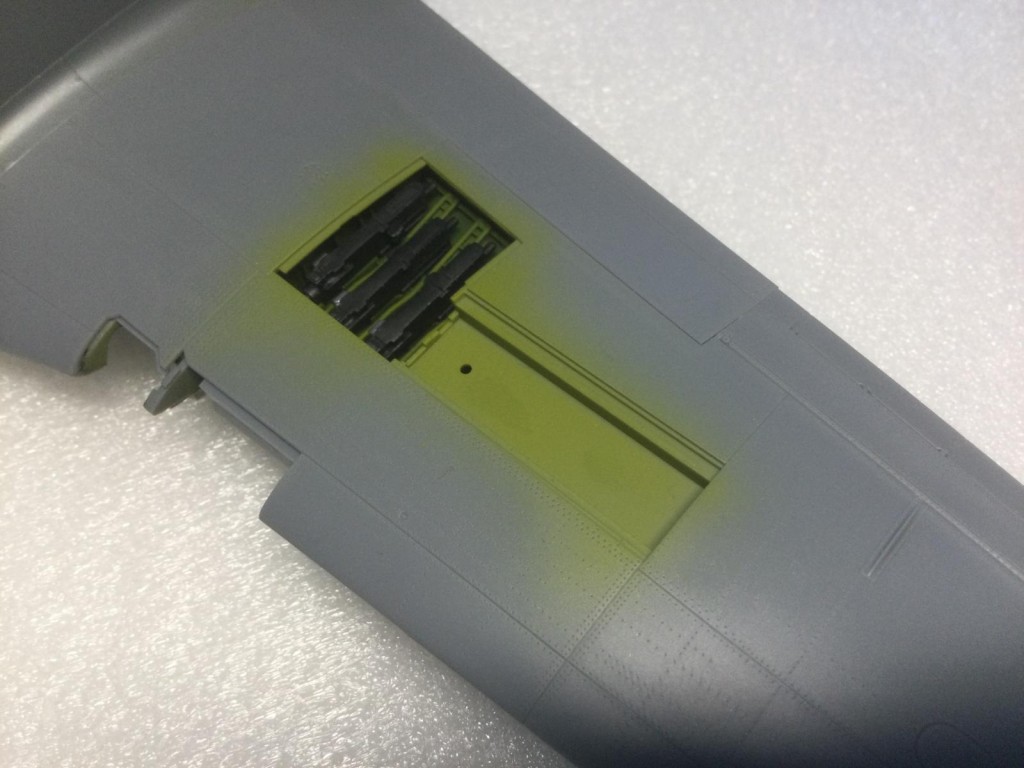
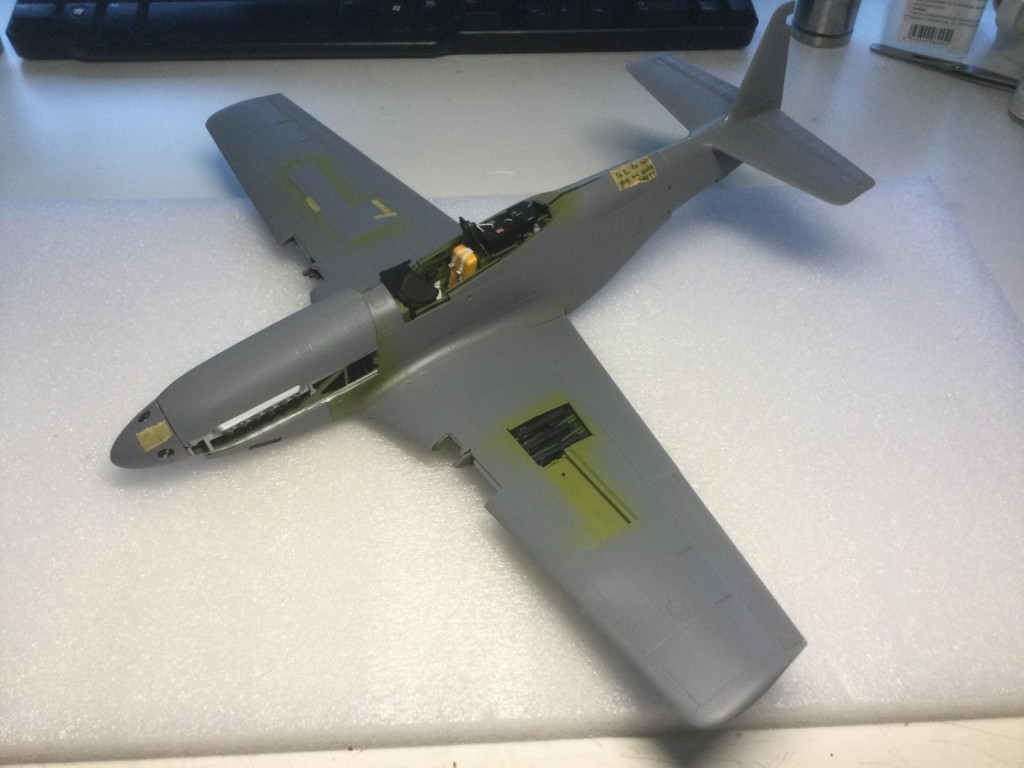
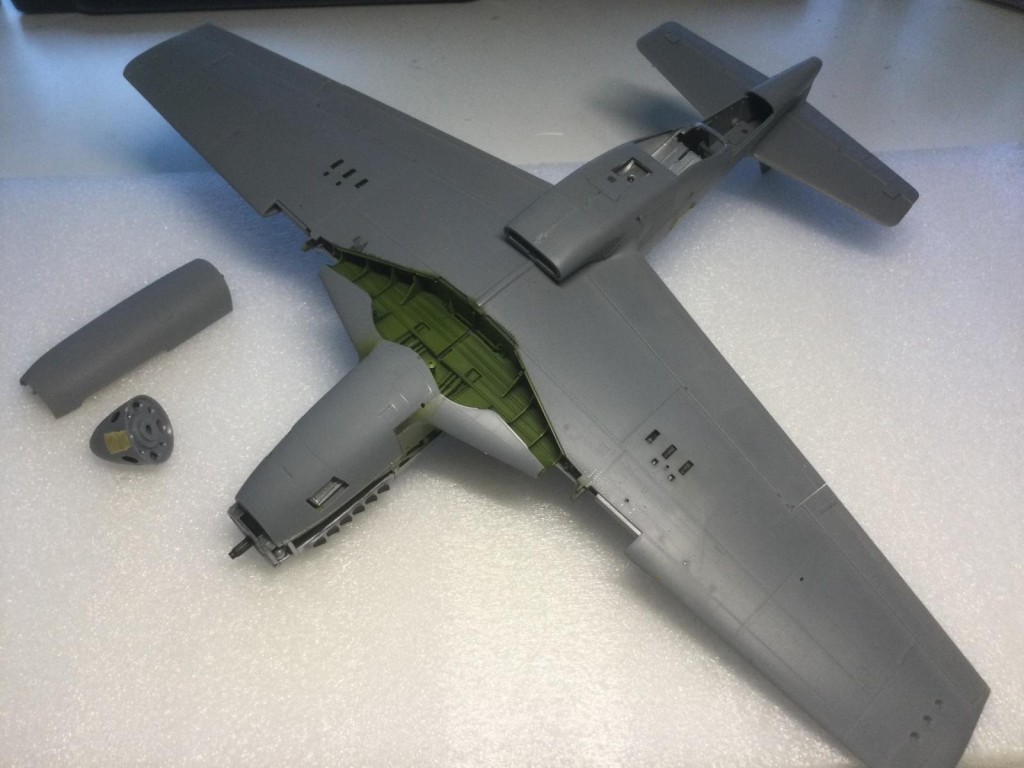
    So now I have the engine bay 95% done, with only a few magnets and final components to glue on. I tested the alignment of the access panels and found it all fits. Phew!

    I will proceed this week with sanding some tiny seams and smoothing out the surfaces. I did a tiny bit of preliminary painting on the underside because I knew it would be difficult to get proper coverage of primer and metalizer on the inside and underside of the supercharger intake. I hate getting puddling of paint when I am trying to spray around and underneath complex shapes. Pre-painting like this will save me that headache later.

    Next stages are to paint and assemble the gun sight and the windscreen armored glass. This will allow me to add the clear parts and mask them for painting. I have some piping detail to paint in the wheel bay and will paint the landing gear parts for swappable magnetic fit.

    I plan to do this as an early version of The Hun Hunter Texas, lacking the black panel/arrow, which seems never to have been actually painted with the aircraft's nickname as apparently intended (unlike the earlier P-51B version of the Hun Hunter). It's a handsome scheme partly in bare metal and partly in OD, with camo on the wings and top of the fuselage. Hope to get this one done soon. Keep watching!