Tamiya 1/48 Douglas F4D-1 Skyray

Started by Chuck A. Villanueva · 56 · 4 years ago
  • Profile Photo
    Chuck A. Villanueva said 4 years, 9 months ago:

    Hi Eric, so far yes with several models already wearing the finish they look the same as the day I applied the chrome. Still bright.
    Hi Don, the Skyray nose strut was extended when parked, but there are images of the Skyray with the front strut kneeling as well on aircraft that are on static display

    2 attached images. Click to enlarge.

  • Profile Photo
    Erik Gjørup said 4 years, 9 months ago:

    The extended strut might be to get the angle of attack right for carrier operations? - the Phantoms had a similar system AFAIK, though I'm no expert on this. To the best of my knowledge they had some sort of system to lock in extended position for catapulting them off.

  • Profile Photo
    George R Blair Jr said 4 years, 9 months ago:

    Painting hubs/tires are my nemesis. I have heard about using thinner to flow the black paint around the hub but never tried it. After seeing how yours came out I am convinced to give it a try. Everything on your build is coming together nicely.

  • Profile Photo
    Don Mk1a said 4 years, 8 months ago:

    That's a beautiful photo of the flight line. Yes, they seem to have an unusually tall oleo as standard. Angle of attack and long stroke for landings I guess. Tamiya, I'm sorry I doubted you.

    Now I'm thinking that the one on static display needs the attention of someone with a bottle of nitrogen.

  • Profile Photo
    Chuck A. Villanueva said 4 years, 8 months ago:

    Erik, all the US Navy shipboard aircraft had the ability to kneel when taxiing either on the boat or at the air station. Aircraft such as the P-3 did not have that ability as it was not required. From the Grumman Panthers to the current F/A-18's as far as I know each had that as a standard feature. The Royal Navy F-4's were more prominent in their stances when ready for launch off the cat, the US Navy F-4's were not as extended.

    George this is a technique I learned many years ago and don't know who it was that i got if from. It may have been from an article in a Scale Modeler magazine, it goes way back into the 70's. Long before wheel masks. Now a days I go both ways. Still use the old technique unless i have a set of canopy masks that happen to have wheel masks as well. Back to the mains mounts now.

    The main gear struts are of 3 pieces. Well fitting parts that build up to a solid unit.
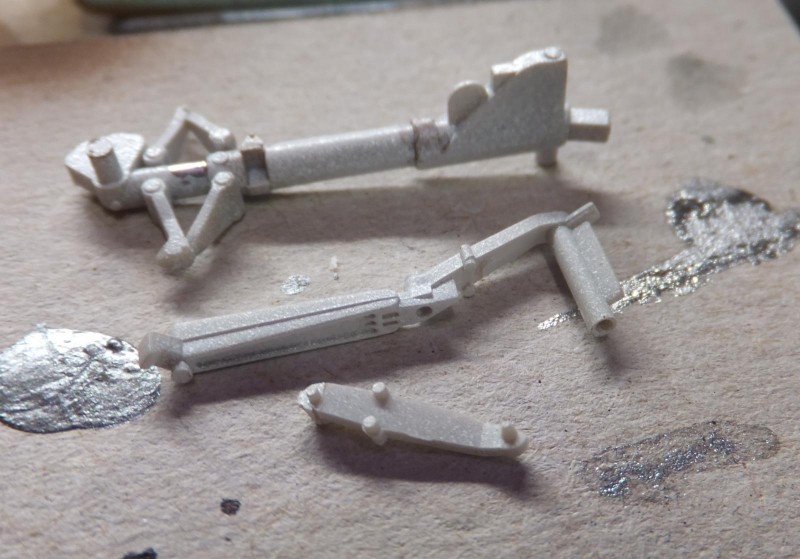
    The RH main gear strut has a perfect contact point within the wheel well bay. Solid fit that should last for years.

    The kit wheels have nice spoke details. And seem correct for this variant and time frame for the Sky Ray.

    Using Testors Rubber Enamel in the small bottle. I will do the capillary technique as I had done with the nose wheel. Using a #1 tip sable brush, with a bit more thinner than paint, touch the edge of the rim and let the paint flow around the edge. Just a dab at different points around the the tire and almost a perfect edge around the rim.

    Once the edge is set, then with a bit more paint than thinner, I fill in the areas on the tire to complete the process.

    Once the paint is dry, I attach the wheels to the struts. Paint the brake calipers Gun Metal.

    Now to set her on her feet once the cement dries and set.

    Next up to add the final bits. Drop tanks, missiles and the canopy. The next installment of this WIP should be the final one. More to follow.

    1 additional image. Click to enlarge.

  • Profile Photo
    Erik Gjørup said 4 years, 8 months ago:

    Thank you for getting back with the info on the gear. Also thanx for the great idea for wheels - I will most certainly give it at go!

  • Profile Photo
    Chuck A. Villanueva said 4 years, 8 months ago:

    Your welcome Eric, I'm always hoping that this help anyone down the road. The tips and techniques can be used on any model. And also to point out any issues I run across during the build and how I resolved it.

  • Profile Photo
    Chuck A. Villanueva said 4 years, 8 months ago:

    Finally the final step. Add the gear doors, drop tanks and the Sidewinders.

    First the nose gear doors, the forward door is closed when the nose gear is down.

    At this time period the warning red edges on the gear doors was not a requirement yet. The main gear doors, again the forward door is closed as well when the gear is down.

    Nice detail on the doors as provided in the kit. Nice subtle touched by Tamiya.

    Each of the doors were easy to attach as the contact points were well defined.

    Next up the drop tanks were attached.

    The Sidewinders were next and the wrapped up all the items under the airframe.

    Finally the folded outer wing panels.

    Retracting rods are first removed from the sprue.

    Then carefully placed within the wing fold well. The other end attaches to the outer wing panel and helps a little in keeping them stable. They look fragile, but they are actually quite sturdy. Once the cement sets, the wings should stay in position for the life of the model sitting on the shelf.

    Last shop of the cockpit before finally attaching the last part the canopy.

    She is finished.!

  • Profile Photo
    John Healy said 4 years, 8 months ago:

    Looking good, Chuck! I started one of these in early June and then stalled out two weeks later when I shelved it to build a couple of new Airfix Spitfires. Yours looks great, post more pics. I need inspiration to finish.

  • Profile Photo
    George R Blair Jr said 4 years, 8 months ago:

    These Skyrays look really cool. Great job. Yes, more finished pics, please.

  • Profile Photo
    David Mills said 4 years, 8 months ago:

    Nice work Chuck, your Skyray looks the part!