Tamiya 1/48 Me-109E-3 in Romanian Colors

Started by George R Blair Jr · 28 · 3 years ago · 1/48, Me-109E3, Romania, Tamiya
  • Profile Photo
    George R Blair Jr said 3 years, 9 months ago:

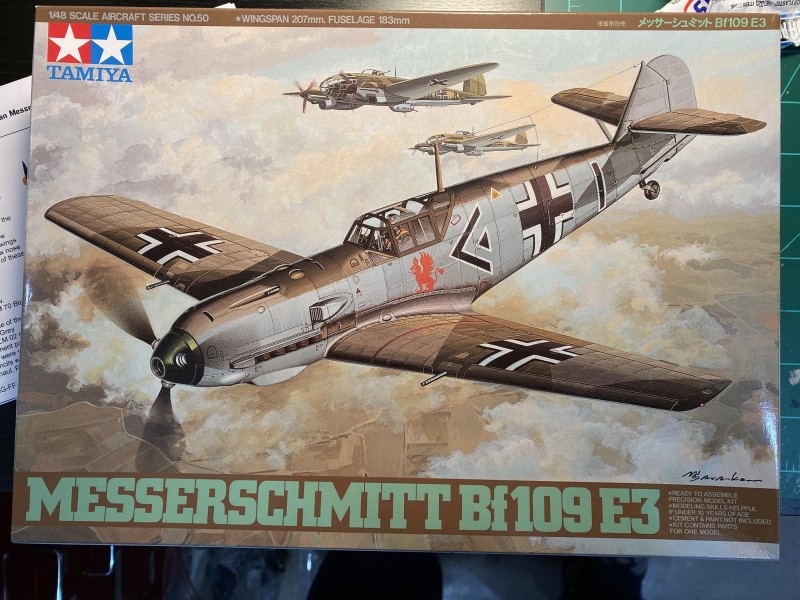
    I wasn't planning to do a WIP on this build, but I thought it might be fun to do a shorter post for this one. I found this paint scheme one day when I was looking at some of my references and then I was able to find the decals for the plane, so off we go. I was basically planning to use the model as a canvas for the paint scheme, so I wanted to build a kit straight out of the box. I figured the best kit for this would be the Me-109E-3 from Tamiya. With the decals and kit in hand, I started the build.


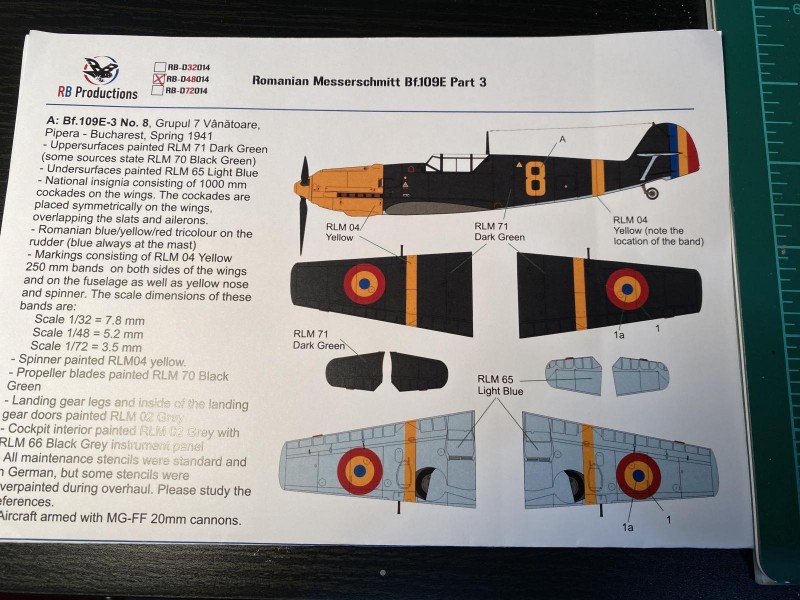
    Planning for this paint scheme would be interesting. It is dark green, but was painted over Luftwaffe camouflage that was visible under the paint on the wings. The nose is yellow, as well as bands on the rear fuselage and wings. I like to use white primer as a base under colors like yellow and red so that the colors remain bright, so I planned to start with a partial thin coat of white. The rudder has 3 broad stripes of yellow, blue and red Romanian colors that need to be painted, so it will need the white primer also.


    The nose of the model consists of 2 pieces that make up the upper and lower nose panels that are glued to the kit sub-structure, and I noticed that the back end of these two pieces is exactly at the demarcation line for the yellow on the nose. After a little dry-fitting, it looks like I can paint these pieces off of the model and save a ton of masking. The rudder is also a separate piece, so the painting of the Romanian colors can also be done off the plane.

    The last thing I am trying is on the two under-wing radiators. They both have some radiator screens inside the radiator structure that will be hard to get to once they are glued on the plane. Both of these radiators fit perfectly in their slots, so I am hoping to leave them off, paint the outside structure and radiator grills separately, then add them to the plane. I figure these late build add-ons will either look great, or not so much.

    The first part of the build went perfectly. The instrument panel had some really good representation of the various dials and gauges, and I decided to use the kit decal for the instrument faces and detail. I was worried that the decal wouldn't settle into the relief on the panel, so I used some really strong decal set called Solvaset. This is a product that is normally used by model railroaders. I almost never use it on airplane decals because it is very aggressive. I have actually had it dissolve some decals, but I thought the Tamiya decals would be fine. A couple of applications of the Solvaset settled the decal over the relief on the panel. After adding some drops of color on the panel, I moved on to the rest of the cockpit. I built the cockpit according to kit instructions.
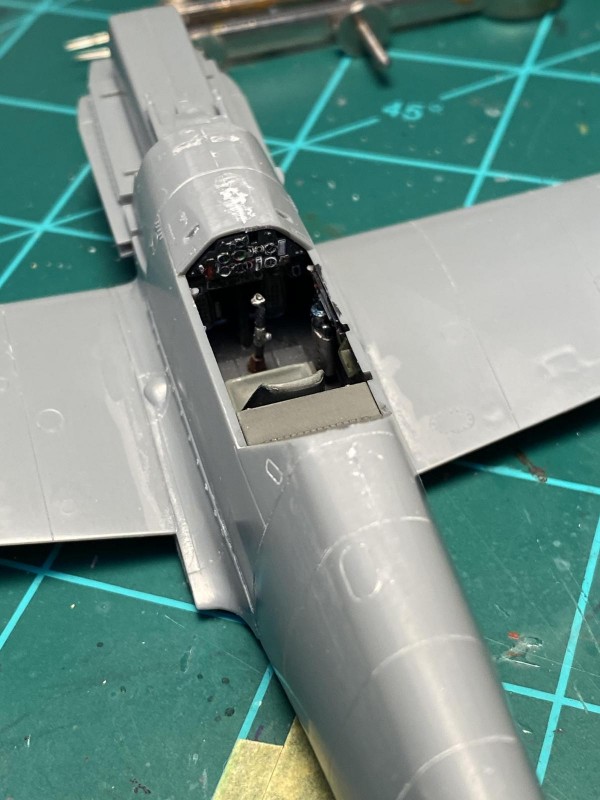

    I was planning to use the pilot supplied in the kit so that I wouldn't have to come up with any seatbelts, but he really appeared sort of clunky when I got him done. This was still the plan until I sprayed some clear flat on the pilot. For some reason, all of the paints darkened considerably, making it look like our pilot had spent several days on the beach. I finally decided to delete the pilot and add some seat belts from the spares box.
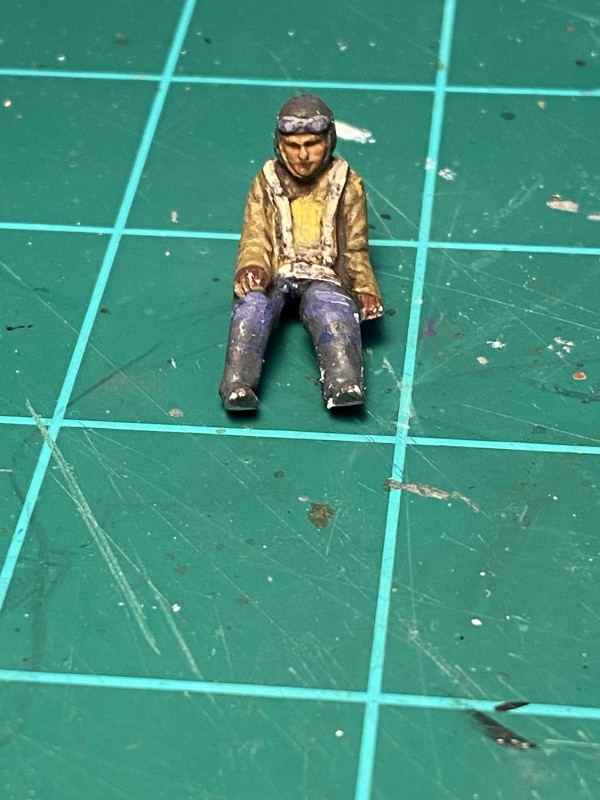
    The rest of the build to this point has been fairly uneventful. I did notice some sink marks that are visible in the area on the top of the wings over the flap area. This area would be really difficult to fill and sand, and then restore all the panel lines, so I took a vote an decided to continue the build and see if the depressions will be noticeable after painting. If they are, then I can decide if I am going to fix them.
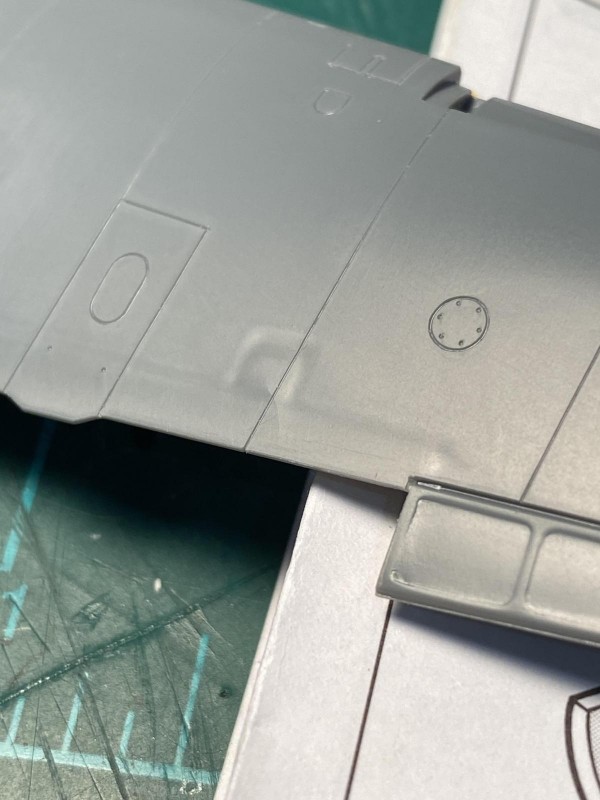
    I was ready to spray the white primer, and luckily I decided to check the decal instructions to be sure where the yellow stripes would be placed. There are decals for four different Romanian planes in this decal set, and two of them have stripes that are on different places on each wing, as well as having the wing roundels also placed asymmetrically. Luckily I had already decided on a plane that everything was in the same place on each side. There is a note that the old Luftwaffe camouflage was lightly visible under the green paint on the wings, as well as the German insignia that had been painted over. So, my painting plan is white primer first, followed by the yellow areas, then the simulated German camouflage, then the dark green overall in a thin coat, then some paint to simulate areas where the German insignia had been.

  • Profile Photo
    George R Blair Jr said 3 years, 9 months ago:

    Step 1: Apply Tamiya Fine White Surface Primer straight from the can in 2 or 3 very light coats. I am hoarding my bottles of white and black. The hobby shops here say all of their distributors are out of both and that the distributor says the manufacturer is out also. Is this the toilet paper crisis of the hobby world?

    Step 2: I thinned some RLM 04 from AL Real Colors and applied it to the plane in very thin coats. I have a tendency of trying to spray light colors in one really thick coat, which (as you know) doesn't work very well. I plan to let the yellow dry for several hours before I even think about masking over it.

    1 attached image. Click to enlarge.

  • Profile Photo
    Erik Gjørup said 3 years, 9 months ago:

    Good call on the two nosepanels George! Not only are they easier to paint without the masking, it also gives you a place to hold and handle the plane during painting and all. Remember to paint the front of the engine before assembly as it is partly visible on the Emils. As for the markings, I had not noticed the roundels and stripes were placed differently on the wings, so thank you for that information.

    The note that the Tamiya cans are in short supply is not at all good news - they work great for priming. I am afraid that the sinkmarks may need to be adressed, as from what I can see they may be close to the yellow stripes? If they are in the RLM 71 part they may be fine.

    I'm tuned in here @gblair - great choice of paint scheme!

  • Profile Photo
    George R Blair Jr said 3 years, 9 months ago:

    Thanks, Erik (@airbum). I started painting today, so I should know soon if the sink marks will miraculously disappear. Somehow I think not, but stranger things have happened. The sink marks cover the entire length of the flaps, so the yellow band is certainly part of the equation. Had another problem today with the kit, which was unexpected since I have never had problems with a Tamiya kit before. More info in the next post. The decals are really nice and there are 4 different schemes you can do with these decals: 2 with symmetric markings, and 2 that are asymmetric. I chose to do one of the symmetric schemes, just to keep things simple. Now I am curious why they ended up with some that were asymmetric.

  • Profile Photo
    George R Blair Jr said 3 years, 9 months ago:

    Today was supposed to be the step where I start painting the fuselage and wings, but I have been known to get ahead of myself. So, I start getting everything ready for the big painting session and I realize I had forgotten a few things that need to be done first. So...

    I started by masking the areas of the wings and fuselage that would remain yellow. My original plan was to attach the front and rear portions of the canopy, then temporarily attach the center section with white glue so that it would act as a mask during painting. Unfortunately, instead of using seat belts from the spares box (I didn't have any spare German belts), I ordered some Me-109 belts online. The belts haven't arrived yet, so I still needed to be able to add the belts later. I decided to add the front canopy and then mask the rest of the cockpit tub with tape.

    I realized I hadn't installed the gun sight yet. It is one-piece of clear plastic that includes the glass of the gun sight, as well as the structure beneath the glass. I used an alligator clip to hold the glass of the gun sight while I painted the rest of it, but I managed to ham-fist the process and broke the glass off. I replaced the glass with a piece I cut from some lunch meat packaging.


    To begin prepping the canopy, I ran a black marker around all of the mating surfaces of the clear plastic. This eliminates the weird look you sometimes get when light hits the canopy edge. I then dry fit the front canopy and found it had a couple of problems. First, it sat too low and didn't match up well with the fuselage, and second, the canopy is more narrow than the fuselage, leaving a small step where the triangular canopy windows meet the fuselage. I added some very thin plastic strips to the bottom of the front canopy which fixed the height problem, but the canopy was still too narrow. I didn't see any simply way to fix the width issue, so I decided to press on and see how noticeable this would be after painting. (I think this is the second time I have said this...I see a trend).


    I cleaned up all of the small parts that would also need to be painted along with the wings and fuselage, and then planned the painting on the bottom of the plane. I decided to spray some black on the bottom of the plane as a pre-shade. I followed this with some very thin coats of AK Real Colors in the appropriate light blue. Sometimes pre-shading works well for me, and sometimes not so much. The effect here is subtle, but I think will be OK.


    The last item on the list today was the rudder, which consists of three stripes in Romanian red, yellow, and blue. There was no decal for these stripes, which was fine since I prefer to paint them myself. Tamiya tape came through for me again with no bleed under the tape.

    The upper surfaces will take some additional planning. These Romanian planes were hand-me-downs from the Luftwaffe, so their original markings were covered by a coat of dark green that covers the entire upper surface of the plane. The decal instructions point out that the Luftwaffe camouflage shows through the green in some places, as well as the areas where the Luftwaffe wing markings were painted over. There are a couple of ways that might work to replicate this, but which I use will be a game-time decision.

    That's it for now. I should be able to paint the upper surfaces tomorrow. Stay safe!

  • Profile Photo
    Spiros Pendedekas said 3 years, 9 months ago:

    Hi George @gblair!

    That's a very nice project, a camo not very often seen.

    Even Tamiya kits can sport sink marks, it has happened to me, too. It is said that things like these occur when removing the still hot sprues of the mold sooner than "normal". A nasty thing that disappoints a bit, especially when the sink is not a small mark, but, rather, a large one, affecting the complex surrounding area...

    Great cockpit! Thanks for the info about Solvaset: I might need something stronger than the excellent Mr Mark Softer sometime.

    Good call on not attaching the nosepanels. Having the approval of THE 109 Expert (my friend @airbum) I might apply that trick too in a future 109 build.

    I love the asymmetric markings issue, too. As is the case in our great hobby: the more you build, the more you read, the more you learn, the more you think about...a wonderful and joyful improving circle.

    Your 109 looks fantastic, George, with equally fantastic step by step presentation.

  • Profile Photo
    Erik Gjørup said 3 years, 9 months ago:

    Wonderful post George (@gblair). In my humble opinion, the breakage of the sight is to be considered lucky - your replacement is VERY nice! (the cast version do have a mouldline in the middle) As goes for the windscreen fit, I do not recall problems in that respect. And the planes were after all, when in daily use, the targets of a lot of abuse, the panel right in front of the screen being taken off and laid on the ground almost after every flight, sometimes being changed in service when a panel was damaged, being replaced by one liberated from a unserviceable 109.

    So far the preshaded light blue looks great, and the rudder - what a nice job! For a all-dark green plane it gets a lot of interesting color, and is sure to brighten up the collection! Keep pushin' my friend.

  • Profile Photo
    George R Blair Jr said 3 years, 9 months ago:

    Thanks, Erik (@airbum) and Spiros (@fiveten). Your words of encouragement are appreciated. I keep reminding myself that the problems I have encountered are relatively minor, and that we have all encountered models with problems that are much worse. I suppose the real problem was that I had never had problems like this with a Tamiya kit, so there is a first time for everything. I think fixing the mold-line on the gun-sight is what led to the failure, since I thinned the glass to get rid of the mold line and make it more scale in thickness. It looked good right up to the point that it broke. :o) Topside painting later today. Cheers

  • Profile Photo
    George R Blair Jr said 3 years, 9 months ago:

    Today was the day to accomplish the major painting of the upper surfaces. The first thing I wanted to do was review what I was trying to depict. These Romanian 109s were former Luftwaffe planes that were handed over to the Romanians for their use. The planes, complete with Luftwaffe camouflage, were repainted a dark green on the upper surfaces and light blue on the bottom surfaces. The decal instructions point out that new paint often allowed the previous camouflage to show through on the wings. In addition, the German insignia was also painted over and often showed through the new paint. So, I wanted to depict a plane with a relatively fresh coat of dark green paint, but with the previous camouflage and insignia showing through the new paint. I wanted the previous camouflage to show in a subtle way. And, of course, "subtle" is my middle name. Not really. I have never been very subtle in my painting, so this could be a challenge.

    I had already painted the areas to receive yellow identification stripes in RLM 04 Yellow from AK Real Colors. I had previously painted the same area with white primer so the yellow would be a nice, vivid color. As I was painting the lower surfaces yesterday, I added some black pre-shading. In effect, what I had done was to create a real hodge-podge of colors that wasn't suitable as the canvas for what I was trying to create. Instead of putting the old camouflage on first, I decided to paint a light coat of RLM 71 Dark Green to give me a solid starting point.


    I first painted a solid coat of AK Real Colors RLM 71 Dark Green.


    I reasoned that the darker color of the previous camouflage would blend into the new dark green, so it would only be the lighter camouflage color that would show through. I masked off the surface accordingly.

    I mixed few drops of white with the RLM 71, and painted a very thin coat over the wings. I also used a template to add the areas where the German markings were painted over.

    As I feared, the difference between the two colors was a little stark, so I mixed some very thin (almost a wash) of pure RLM 71 and sprayed it lightly over the wings. This left just a hint of the underlying camouflage, which is exactly what I was looking for.


    I wanted to let the work from today dry for a while, since the last coat had a lot of thinner in it. The last thing I need to do is to put a bunch of finger prints in it. Later today I can pull off all the masking tape and then it will be time to start assembling all of the remaining parts of the plane and get ready for a gloss coat in preparation for the decals. The RB Decals allow you to make one of four different paint schemes. It is interesting that two of them have the wing insignia placed symmetrically, and two others with the markings placed asymmetrically. I have chosen to do one of the planes with symmetric markings, but I would love to find out why some were applied asymmetrically.


    I probably won't get anything done on this build for a few days. My daughter had a baby last week, and, thanks to the pandemic, tomorrow is the first time I will be able to see my daughter and baby Evelyn Rose. They were in the hospital for several days because the baby was turned the wrong way and had to be delivered surgically. My wife has been helping at their house, which is a couple of hours from here, for the last week. Everyone stay safe.

  • Profile Photo
    George R Blair Jr said 3 years, 9 months ago:

    Quick Update:
    I pulled off the masking tape and was pleased to see that Tamiya tape has come through yet again with no bleed or need for touch up. Overall I am pretty happy with the paint, so far. And the sink marks on the wings are very hard to see, so maybe it will all work out. Seat belts came in the mail today, so the last obstacle to completion is gone.

    4 attached images. Click to enlarge.

  • Profile Photo
    Spiros Pendedekas said 3 years, 9 months ago:

    Hi George @gblair! I somehow missed your gunsight/canopy prep/preshading job, as it was not visible before my last post, only shown afterwards, but BEFORE mine...(go figure, if I managed to explain what happened - probably not - LOL).

    I like what you did with the gunsight: I seize avery opportunity to replace them at my builds with whatever nice thin acetate pieces I have handy; they look way off better than the usually quite thick and typically with a diappointing middle mold line, as @airbum stated.

    I like the clever trick with the black marker along clear parts edges: live and learn from your modellers friends!

    Preshading looks nice! I usually do heavy spraying, meaning that preshading might not work efficiently for me; so, I prefer post shading.

    Rudder painting is a mini masterpiece! Excellent job!

    Also the "hidden" Luftwaffe camo turned out nicely; and Tamiya tape seems to do its job perfectly.

    This asymmetric roundel position, in the same manner at top and underwing seems weird and doesn't make sense! I try to understand its story, but there are so many possible scenarios.

    Again, best wishes for your lovely grandaughter!

  • Profile Photo
    Erik Gjørup said 3 years, 9 months ago:

    The first picture in the previous update made me think "Tigermeet". . .

    The hint of previous markings looks great, and now I shall be looking forward to the next post in due time.

    A word of caution on the belts; the 109E had the belts eithet passing through a hole in the backrest, or over the top of the seat on these, so you may want to cut them and let them go through or hide the metaltriangles behind the seatback. In my experience the paint on these will not take a lot of bending, so be prepared to touch the belts up after bending them.

    Enjoy your grandad-time the next days!

  • Profile Photo
    George R Blair Jr said 3 years, 9 months ago:

    Thanks, Spiros (@fiveten) and Erik (@airbum).

    Spiros: I get really good results from Tamiya tape. Sometimes it amazes me. I also usually spray a little heavy to have pre-shading work, especially using darker colors. Post-shading, followed by a very thin coat of the original color to blend everything seems to work much better, but then you worry about building up too much paint. I have been really happy with AK Real Colors because they seem to leave a really dense color and still remain thin. With all the masking I did yesterday, I didn't have any ridges build up against the tape.

    Erik: Thanks for the info on the belts. I just got the book from the Legends of Warfare: Aviation series on the Messerschmitt Bf 190E, and noticed them either coming over the seat or through a slot in the seat back. Since I have already mounted the seat, I figure it will be easier to bring it over the top. I have had similar problems with the Eduard colored photoetch. The color layer is fairly fragile and you get one, and maybe two bends before the colored layer starts flaking off. I was also doing some reading on the leading edge slats on the 109E to figure out if they would be up or down on the ground. I was surprised to read that the slats were not powered and moved either in or out based on the airflow over the wings. Very ingenious.

    I should be back tonight. Besides visiting the new baby, the purpose of the trip will be to bring my wife home for the weekend. She will be helping at their house during the week, but coming home for the weekends. One of the benefits of grandkids is that you get to enjoy them but not have them around all the time. My wife plans to help out for a few more weeks.

  • Profile Photo
    Erik Gjørup said 3 years, 9 months ago:

    George (@gblair) just to confuse matters the very early Emils sometimes had the belts "going through a belt" that was fixed to the top/rear of the area behind the seats! (also used on Tony's)

    As goes for the slats, they work just the same as on a "modern" Rallye. They are simply held out by a spring, and held in by airpressure. The springs need to be adjusted the same, or you get something very nasty. I once flew in a rallye where the springs were almost the same! Quite interesting and when you are at low speed in the transition the slats will go out with a clonk, then in again, then clonk etc - very interesting the first few times you try it. The 109's had a "hold" mechanism so they could be locked in for take-off (and combat - could be very nasty with different wingload in a dogfight I suppose).

    Sounds like a good plan to leave the baby to the mother for now, then you can spoil her later in life 🙂

  • Profile Photo
    George R Blair Jr said 3 years, 9 months ago:

    I saw some photos which looked like the shoulder belts were anchored to the flat "deck" just behind the seat. I'm figuring on putting the extra shoulder belt behind the seat. Most of the photos I saw of the slats looked like they were retracted on the ground, so I went with that. It also made painting easier.