Tamiya 1/48 Me-109E-3 in Romanian Colors

Started by George R Blair Jr · 28 · 3 years ago · 1/48, Me-109E3, Romania, Tamiya
  • Profile Photo
    Greg Kittinger said 3 years, 9 months ago:

    Nice work! Love the result of the subtle prior camo showing through. Modeling is always one big experiment! And congrats on the grandbaby!

  • Profile Photo
    Greg Kittinger said 3 years, 9 months ago:

    Nice work! Love the result of the subtle prior camo showing through. Modeling is always one big experiment! And congrats on the grandbaby!

  • Profile Photo
    Louis Gardner said 3 years, 9 months ago:

    George, @gblair
    Somehow I have completely missed this build thread... So I read it from the very beginning. I will borrow your idea to keep the nose section off until later the next time I build one of these. I also like the ideas about using a marker to shade the edges of the canopy, and keeping the under wing radiators off until the end. This will definitely make it much easier to paint the radiators. The last time I built one of these this area gave me a fit with painting the faces of the radiators. I followed the instructions to the letter and here's a prime example where thinking "outside the box" works exceptionally well.

    Congrats on the new grand baby... They all grow up way too fast so enjoy her as much as possible. I see you have a QC kitty too ! Yours is doing a better job than mine has lately... I had to scrub off all the paint on the Ki-44. More about that later.

    I will definitely be tuned in for future updates.

  • Profile Photo
    George R Blair Jr said 3 years, 9 months ago:

    Thanks, Louis (@lgardner) and Greg (@gkittinger). My supervisor long-hair cat has a way of getting hairs in everything. Things get interesting when I turn on the exhaust fan on my paint booth and all the hairs that were suspended in the air start slowly being pulled toward the wet paint on my model. And I never notice them until the paint is dry.

    Got back a little earlier than expected from visiting my new grandbaby. Mom and daughter (and dad) doing fine. Did a little work on the 109. I wanted to spray the clear gloss, and I always let the clear dry for 24 hours before I start putting decal chemicals on it.

    The first thing I needed to do was to add all of the parts and sub-assemblies I had left off until the end. I really hate this stage of the build because the end is in sight and it is still really easy to mess something up. Everything went on fine until I was literally gluing the last part onto the plane. I was using a drop of medium viscosity super glue to attach the air filter to the port side of the nose. I was in the process of congratulating myself on an accident free finish when I noticed there was a tiny, spider-web thin string of super glue that had hung on to the toothpick I was using as an applicator and parked itself on the top of the port wing. I went through all of the stages of grief: denial, sadness, anger, etc. I tried to convince myself that it wasn't that bad, but I knew deep down that this tiny blemish was a deal-breaker. So out came my sanding sticks and I removed the offending area, and then held my breath as I repainted the area. This is usually where I fix the first problem only to find I have created another problem, but everything went fine.
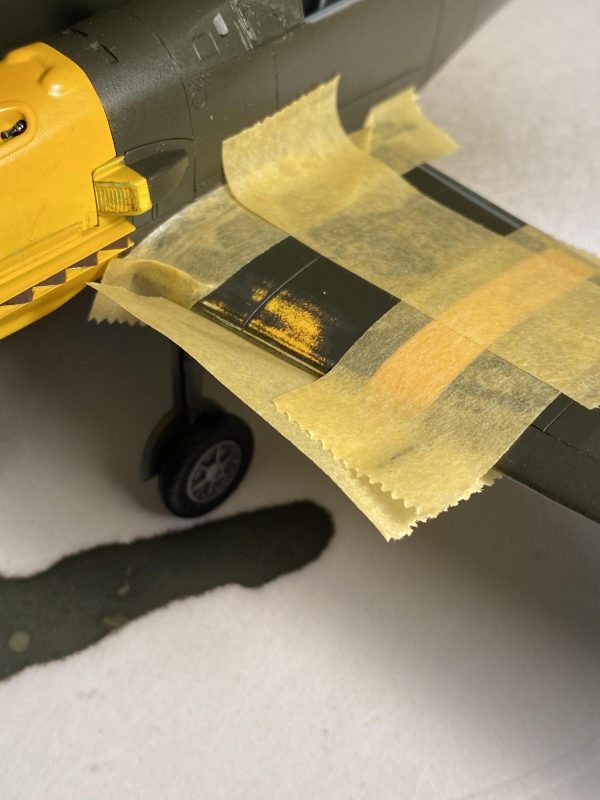


    By the way, if you haven't discovered them yet, I use sanding sticks that are normally used for doing ladies nails for my hobbies. A company called Tropical Shine makes a sanding stick that has four grits on it, from around 400 grit down to around 1500 grit on one stick. It is wet or dry sand, lasts forever, and cost about $9 on Amazon. I have been using one stick for almost two years and just got a replacement for it. They also make single grit sticks from very coarse down to very fine. If anyone is interested in adding this tool to your arsenal I can give you the item number for your visit to the one-stop shop (Amazon).

    Anyway, I let the wing dry for a while, and then sprayed a couple of thin coats of Tamiya Clear diluted with Tamiya Lacquer Thinner.
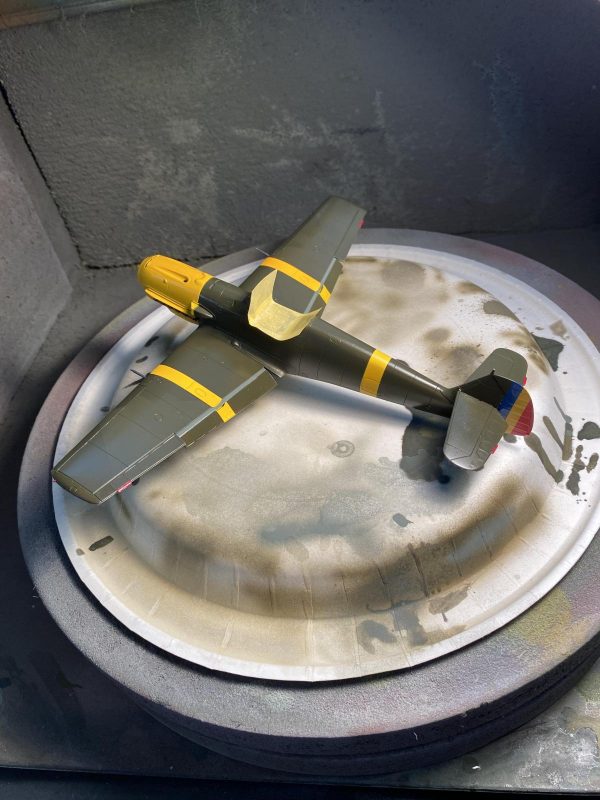

    I will start the decals 24 hours from now. In the meantime, it is time to work on some buildings for my model trains. Cheers and stay safe. :o)

  • Profile Photo
    Spiros Pendedekas said 3 years, 9 months ago:

    Hi George @gblair!
    Nice to see the remedial action after the cyano mishap.
    I also liked the idea to let the clear dry for 24 hours before decal action: In cases I had not done it, I had noticed milkyish spots at the places where decal solvent was applied. I will follow your way from now on.
    Your Messerschmitt looks great!

  • Profile Photo
    Erik Gjørup said 3 years, 9 months ago:

    Great that you discovered the cyanospiderweb in time - I most often see them in the pictures after the build is declared finished! It will be really great with the decals on George.

  • Profile Photo
    George R Blair Jr said 3 years, 9 months ago:

    Decal Update:
    The decals are on the plane and I usually let them dry for 24 hours. Like the military: Hurry up and wait. The RB Decal set I used for this build was nice, but it only included the Romanian roundels and numbers. All of the other stencils and markings came from the kit decals. The RB Decals were really nice and went into place easily. They reacted well to MicroSol and MicroSet. My only complaint has to do with the roundels. Like many decals, the roundels consisted of two parts: the outer two colors, with the center being a separate decal. I know the manufacturers do this to ease any registration problems that might crop up trying to get 3 different colors to line up. The other sets I have used like this make the center decal just a smidge larger than the hole it goes into on the roundel, allowing you to adjust the center and not worry too much about the center of the first decal showing on the edges. RB made the blue center decal the exact size of the hole it goes into on the first decal. What that meant was that if you took a breath after positioning the blue center you would push it out of alignment .00001 mm and a white edge would appear. It took me 45 minutes to position the 4 roundel centers. But all is well and now I am waiting to spray the flat on the plane, do a little weathering, and add the last bits. The antenna and center canopy will go on last.

    I also managed to finally put the seatbelts in place. They were deeper in the cockpit than I thought, but I think everything came out OK.

    Everyone stay safe and see you tomorrow.

    2 attached images. Click to enlarge.

  • Profile Photo
    Spiros Pendedekas said 3 years, 9 months ago:

    Looks nice George @gblair! Really interesting scheme.
    Cases like your blue decal dots test my patience...or is it making me more precise and patient? LOL

  • Profile Photo
    George R Blair Jr said 3 years, 9 months ago:

    Spiros (@fiveten), I think the blue dots are there to keep us humble. :o)

  • Profile Photo
    George Henderson said 3 years, 9 months ago:

    Just found this thread and what a great build with lots of info passed along. With regards to the asymmetrical markings; I wonder if its an Eastern European thing. The Poles did some of their pre and early war aircraft this way. It was done to momentarily confuse enemy pilots as to the attitude the aircraft was sitting while flying.

    Congrats about the grandkid

  • Profile Photo
    George R Blair Jr said 3 years, 9 months ago:

    Thanks for the info, George (@blackadder57). I had no idea this was done back then. It is very apparent on this Polish plane, but it seems very subtle on the 109. Sort of like the false canopies painted on planes like the F-18 & A-10. I guess in a dogfight you only need a fraction of a second confusion to turn the tables.

  • Profile Photo
    George R Blair Jr said 3 years, 9 months ago:

    The 109 is finally done. Despite the few problems that cropped up, it turned out OK. Thanks to everyone who commented and made suggestions during the build. The sink marks on the wings that I chose to ignore have basically disappeared in one of those visual sleight-of-hands that sometimes occurs when you add paint. The depressions are still there, but the dark paint on the wings make them almost unnoticeable.

    I wanted to depict a plane that had been repainted by the Romanians when they received the 109s from the Germans, but had relatively few flying hours since the repaint. I used some oil washes in the panel lines, and then some selected artists oils for the rest of the limited weathering. The information I had on the Romanian planes said that some had the armored headrest installed in the canopy, and some didn't. I couldn't find a picture of the exact plane in built, so I decided not to add the headrest.

    This Me-109E-3 will certainly not rival the 109s built by Erik (@airbum) or others on iModeler, but I think it is probably OK for a build that was basically straight from the box. Aside from the decals, the only thing I added was a set of Eduard seatbelts.

    I hope everyone stays safe.

    7 attached images. Click to enlarge.

  • Profile Photo
    Spiros Pendedekas said 3 years, 9 months ago:

    Congratulations on your Romanian Emil, George @gblair!
    It was a nice journey and a great finish!