Tamiya F4U-1A, 1/32. 'KD431'

Started by Harvey R. · 80 · 1 year ago
  • Profile Photo
    Spiros Pendedekas said 1 year, 3 months ago:

    Fantastic attention to detail, my friend @scalerambush!

  • Profile Photo
    Harvey R. said 1 year, 3 months ago:

    More Wing and Fuselage Work

    While I get round to starting the engine, I've been getting a few tasks crossed off the list. Firstly the rudder has been added, nothing special to say here. The elevators have been built but the horizontal stabilisers themselves have some interesting quirks on KD431 that unexpectedly will require seperate painting.


    The nose of the aircraft has also recieved some work while I get round to painting up the engine prior to assembly, so it looks a bit less gappy with a few panels and bulkheads added.

    The folding wings also begin to take shape, though these won't be assembled until I've given the inner part of the wings some filler across the leading edge. Regardless, this is simple construction and the only annoying part is the need to drill a hole for the formation light in each wing. Personally I think it would have been better to have this moulded into the wing but I'm sure Tamiya had their reasons.

    The left wing is a bit more problematic due to the landing light hole, on the F4U-1D kit exclusive parts like the lower wing parts without the landing light come as a seperate sprue. I'm thinking the best way to solve this is to add styrene as a back, and plug the hole with bits of sprue as much as possible and give it tamiya filler to do the rest of the work, before smoothing it off. Using some thin styrene I'll try and recreate the rib for the fabric parts.

  • Profile Photo
    John vd Biggelaar said 1 year, 3 months ago:

    Excellent progress as usual, Harvey @scalerambush
    Your approach to the landing light sounds good.

  • Profile Photo
    Spiros Pendedekas said 1 year, 3 months ago:

    Excellent indeed, my friend @scalerambush! Nice approach for the landing light.

  • Profile Photo
    George R Blair Jr said 1 year, 3 months ago:

    Things are looking great, Harvey (@scalerambush). Lot of work going on to create your specific plane. It will look awesome when you are done.

  • Profile Photo
    Harvey R. said 1 year, 3 months ago:

    One annoying thing of this kit is that it comes with the instructions for Big Hog, an F4U-1A I made a couple years ago (wow, time flies). Unfortunately the instructions keep pointing out minor things I've missed with that build that are so obvious now it's been shown, such as the cowl flaps going around the entire circumference of the engine and the missing part of the tail that plane has, oh well!

    Another R-2800


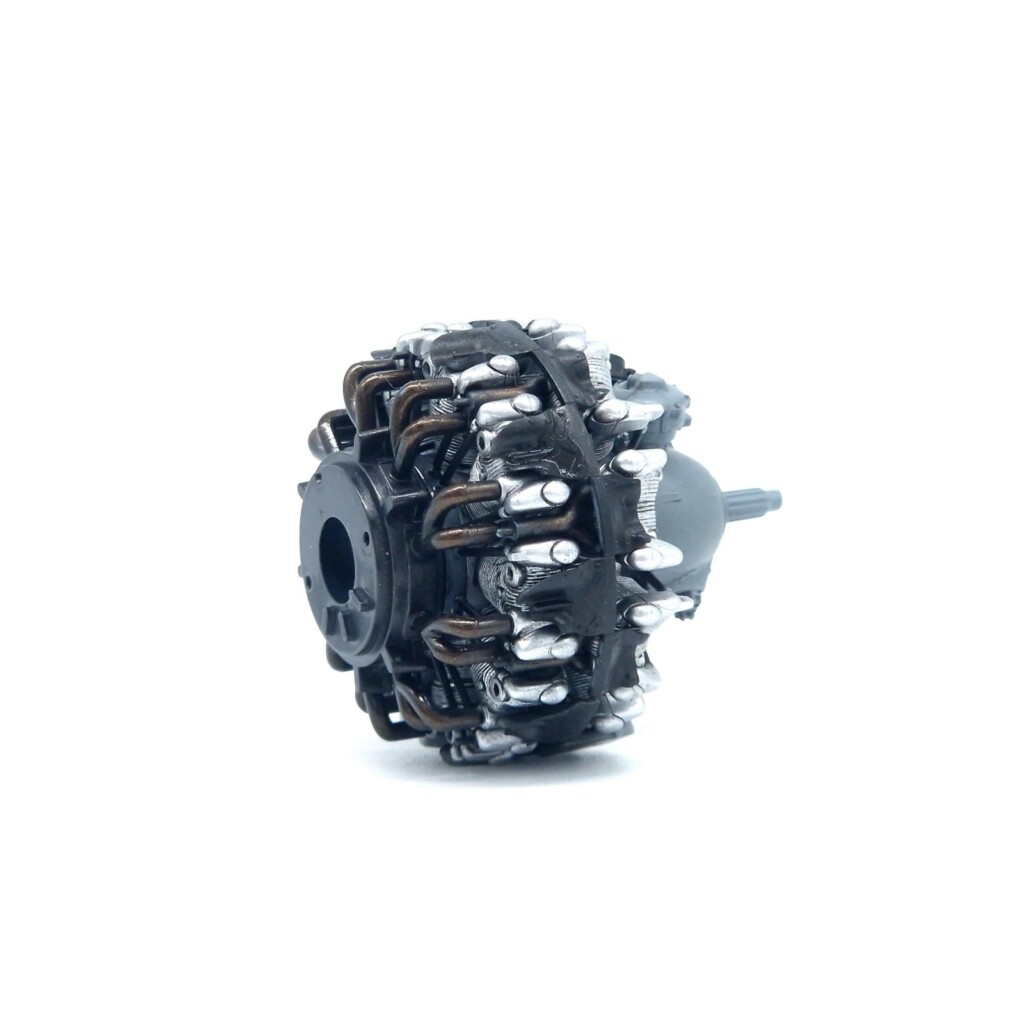
    I've built too many of these are this point, honestly after the Aires resin one where I tried to go super detailed due to the plan of having it visible I wasn't too excited to put this one together but in the end it went together well as expected.

    It could do with some touch ups, a little bit of filler to remove the line in the middle of the cylinders, but this engine isn't likely to be visible (you don't need to glue the engine panels on according to the instructions, but I'm planning to display it closed).

    Regardless it's come out quite well, and the colour used for the casing (Neutral Grey) seems appropriate to the real thing. Some brass wire could be added as a final enhancement of detail, which will be worth doing as the front of the engine will be naturally visible.

    Some little bits on the engine need some work, a little bit of touch ups with brush including that random yellow stripe, but I'll do this after the wires are done. Exhausts were painted in a 'Exhaust Black', with bronze sprayed over the top primarily at the bends. This is fine for the very hard to see parts inside the engine that will only be visible through the opened cowl flaps, but the exhaust stacks themselves will be repainted by brush after the main paint is applied.

    The inside of the cowling also needs to be painted, for this aircraft we can clearly see that it is a light grey/white, with the access panels being green. I'll do a bit more further research where possible and try and find some more photos of KD431, but I'll likely go with a zinc chromite here as it matches the interior of the aircraft aft of the engine. For purposes of the build the model will be painted with the engine/cowl seperate then will be glued later, unsprisingly the test fit shows the engine goes on with no issues.


  • Profile Photo
    John Healy said 1 year, 3 months ago:

    This is looking real good, Harvey.

  • Profile Photo
    Spiros Pendedekas said 1 year, 3 months ago:

    The engine looks superb, my friend @scalerambush!
    Great research on the cowl interior shades!

  • Profile Photo
    John vd Biggelaar said 1 year, 3 months ago:

    Very impressive, Harvey @scalerambush
    That engine looks exactly like the real one.

  • Profile Photo
    George R Blair Jr said 1 year, 3 months ago:

    Great replica of the real thing, Harvey (@scalerambush). I always struggle with creating engines that look good, and usually end up with using generic colors that may, or may not, match the real engine. Yours really replicates the real one. Well done.

  • Profile Photo
    Harvey R. said 1 year, 3 months ago:

    Thank you all! I think the simple trick with a radial engine is whatever wash you use over the metal colour, otherwise it can be hard to make it look interesting.

    Speaking of which..

    Engine Detailing


    Honestly after the previous resin R-2800, and R-4360, I wasn't really feeling this engine step hence why I've gone onto the wings and such which are steps after this.

    But the wiring was definitely that needed to be done, at least on the first row, as it would be a clearly obvious part of the model. Brass work is always a bit laborious/a large ballache but after doing it things sort of clicked and I was more motivated to get some work done.

    A decal from a 1/48 P-47 kit was used for the serial plate as its about the right size, that yellow mark was added, and the bolts were painted with a brown/red mix to resemble rust. Some staining was done simply with very watered down acrylics and dabbing off excess with my finger. All in all, a much closer result.

    1 additional image. Click to enlarge.

  • Profile Photo
    Spiros Pendedekas said 1 year, 3 months ago:

    That engine looks absolutely amazing, my friend @scalerambush!

  • Profile Photo
    John vd Biggelaar said 1 year, 3 months ago:

    Really stunning engine, Harvey @scalerambush
    A perfect miniature copy of the original one.

  • Profile Photo
    Harvey R. said 1 year, 3 months ago:

    Thank you all!

    Been a busy few days but I've managed to get some modelling done.


    Firstly the wing section has been glued on, and soon the folding part of the wing will be attached.

    Before that can be done some small bits had to be added, I sprayed it with sea blue in case any could be seen through the small windows in the leading edge, not much can be seen naturally so just painting it black would have sufficed.

    In the wings leading edges we have the gun camera on the right wing, and the landing light on the left wing. The clear pieces are placed in from the inside, and will be masked off later.

    Speaking of which, I masked off the canopy front glass. The HGWModels masks seem accurate so far, and the internal masks are very nice. Normally I don't bother with such, but being able to mask the internal parts of the canopy and spray them to ensure a matt finish is useful on this scale.

    The left wing's early landing light lamp has been filled in and a rib has been made with Tamiya putty rather than a styrene strip as I suggested before, after a bit more sanding since this photo it's more in line with the rest.

    On the same vein is modifications done to the characteristic FAA wingtip. I'm sure there's some resin set, but as we can see from photos the FAA wingtip isn't exactly a super perfect and prestine. Regardless using some nice diagrams we can sand down the original tip to a decent replication, it's only slightly larger than wing without the wingtip insert added but nonetheless modifying the original part is easier than making a new one.

  • Profile Photo
    John vd Biggelaar said 1 year, 3 months ago:

    Really great work done, Harvey @scalerambush
    The landing light closure and creation of the rib looks perfect.
    Wingtip looks great as well.