Tamiya F4U-1A, 1/32. 'KD431'

Started by Harvey R. · 80 · 1 year ago
  • Profile Photo
    George R Blair Jr said 1 year, 3 months ago:

    All of the extra work on the engine will be worth the effort, Harvey @scalerambush. Most people look at either the engine or the cockpit when they walk up to a model, so all of this extra work really sets the tone.

  • Profile Photo
    Spiros Pendedekas said 1 year, 3 months ago:

    This is indeed superb job, my friend @scalerambush!

  • Profile Photo
    Harvey R. said 1 year, 3 months ago:


    Currently the model is moving towards priming, I've been wanting to get that done the last few days but got sidetracked. That being said some painting has been done, and the Corsair certainly looks more together.

    Assembling the Folding Wings


    With the tips sanded down to what I think is a reasonably accurate representation, the next step was to add those wings to the plane.

    I found that the gap between the folding wings was a little unreasonably large on the left wing, upper and lower joins were given Mr. Dissolved Putty, and excess was removed immediately with a cotton bud soaked in Mr. Levelling Thinner. The result is that the putty is largely removed, but what remains is pushed into the gap so that there should be just enough of a surface difference to allow a wash to be visible without needing to rescribe. The parts are sprayed in grey to check, and a wash will be tested soon.

    The inserted parts of the wing that fold were added and fit perfectly fine on the right wing, but issues presented on the left. I just don't think for whatever reason the left wing was able to fit as close as it should have been.

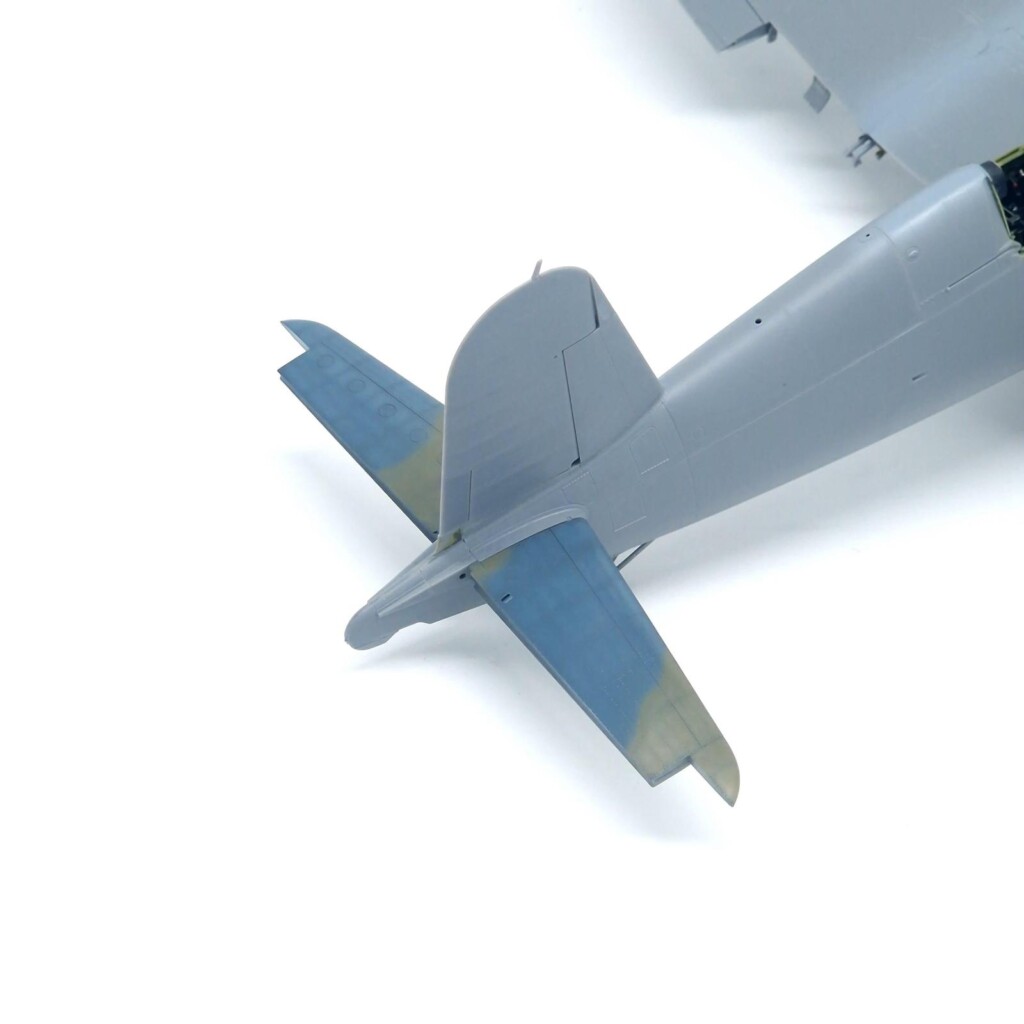
    I turned my attention to making the landing gear whilst glue dried, lots of detail in this area despite the small size. These at least allow a few nice pictures to be taken now.

    The Elevators


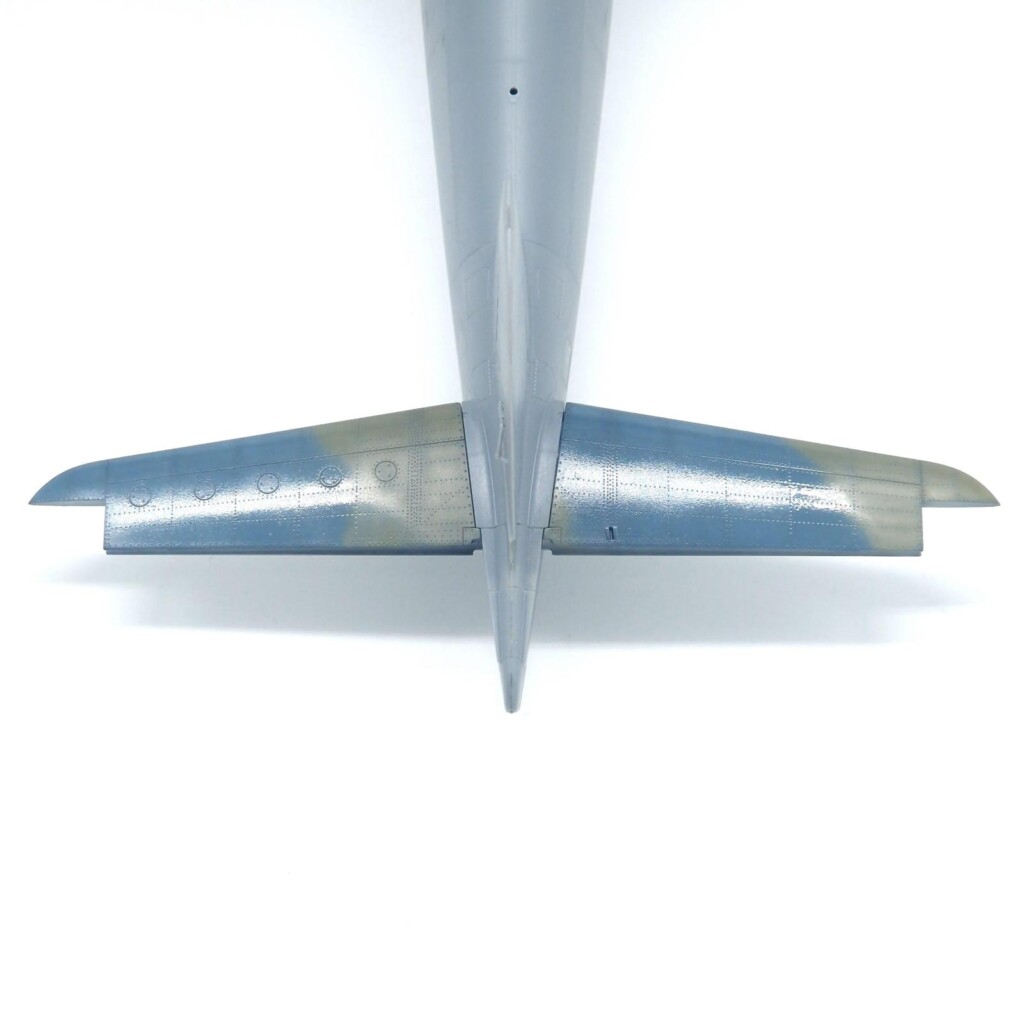
    KD431, clearly, is a Sea Blue Corsair and left the factory this way. Curiously enough when the restoration was underway it was found that the Sea Blue on the horizontal stabilisers was not the lowest level of paint and in fact underneath was a factory applied scheme for the FAA camouflage. Aircraft at the time were rolling off the production line in Sea Blue, so why was this?

    This is a great example of why assuming that everything was done they way it should have been doesn't always work out. Having factory applied paint would indicate that either these were unsprisingly factory fitted or they came from another aircraft as a repair. Documentation never indicates KD431 had tail damage nor does the airframe itself show signs of that, furthermore in the factory whilst the folding wings, canopy and some fabric parts were pre-painted before being attached to the aircraft, the horizontal stabilisers were not.

    It is suggested that these parts originate in the Brewster factory which closed not long before KD431 started being built, parts that were finished as well as partially completed Corsairs were sent to Goodyear to be used. Evidence can possibly be seen in one photograph (annoyingly on a double spread) in which one aircraft in the background has a camoflauged horizontal stabiliser, whilst the one in the foreground has pre-painted camouflaged wings, no paint on the stabiliser, but a sea blue elevator.

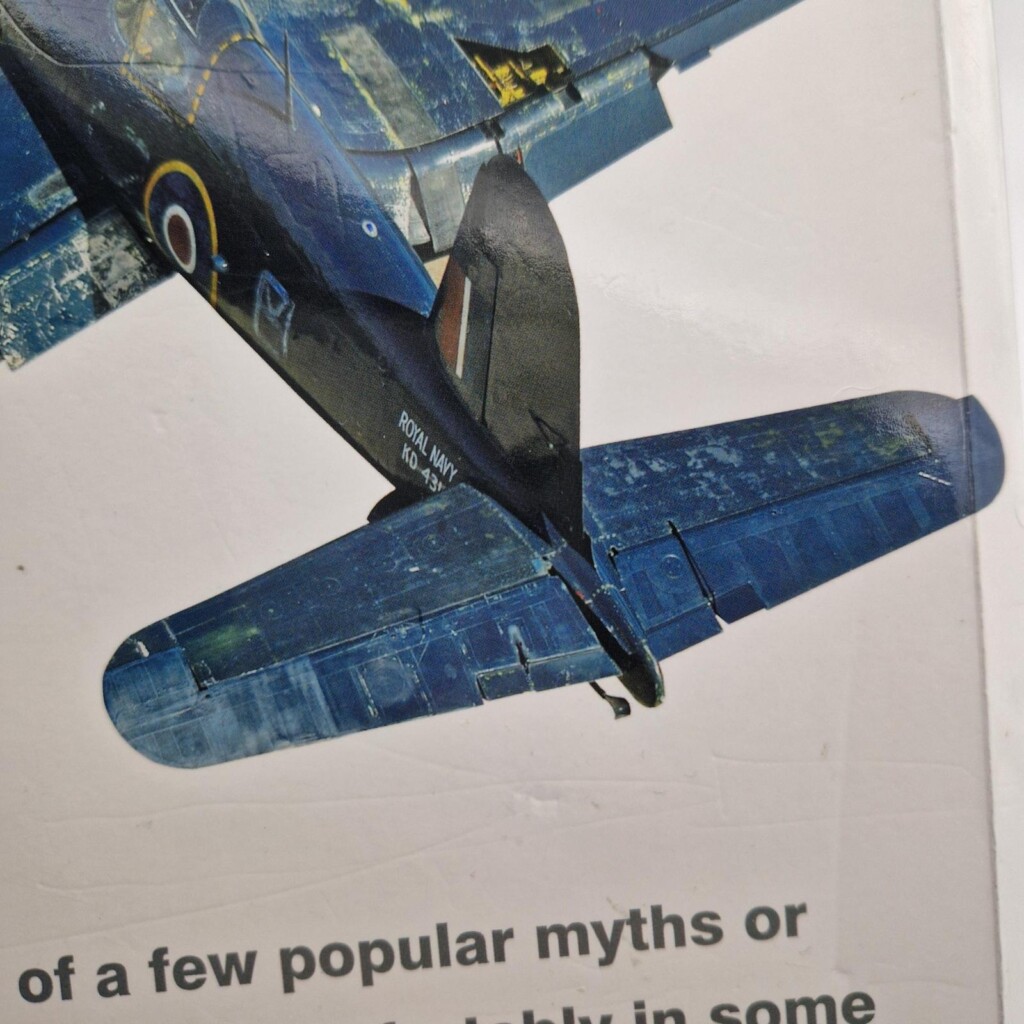
    Regardless of the exact reasoning this does mean some interesting weathering opportunities open up on KD431's tail, frustratingly two really good photos in the book of this are printed in black and white (not particularly helpful), but on the blurb shows a coloured photo where you can clearly see the grey and green peaking through the chipped blue.

    So that brings us back to the model, these parts were first painted black with Tamiya and white preshading applied. Paints used on the real thing weren't British, but American equivalents which were close but not precise (and leads to some patchy looking service aircraft when carriers repainted areas with British paint over the American original). A mix for ANA 610 'Sky' was made using tamiya sky, a decent amount of white, and a tiny bit of flat earth. ANA 603 'Gunship Grey' is the substitute for Dark Sea Grey, and was made by mixing Tamiya RAF Ocean Grey with a bit of medium blue. Finally, the green itself is the ever reliable ANA 613 Olive Drab which I had a bottle of MRP on deck for.

    With this done it'll recieve chipping fluid and the Sea Blue, in the future though as it will be interesting to see it against the rest of the aircraft when it's painted. On a similar vein a couple of ammunition box panels are green, presumably gained during its service which isn't too surprising as there's a lot of photos out there with aircraft using different panels. You'll find US Navy Corsairs with very weird wing stars due to these panels being from different aircraft, as well as FAA camo'd Corsairs with blue panels and vice versa.

    2 additional images. Click to enlarge.

  • Profile Photo
    Spiros Pendedekas said 1 year, 3 months ago:

    Fantastic paint research and implementation here, my friend @scalerambush! Great filling of the unrealistic gap at one folding area. The main legs look really nice!

  • Profile Photo
    John vd Biggelaar said 1 year, 3 months ago:

    Very interesting information on the painted tail section, Harvey @scalerambush
    Progress is very good. The way you closed that gap is a very nice approach and looks good this way.
    The landing gear does indeed look quite detailed, especially those brake lines.

  • Profile Photo
    George R Blair Jr said 1 year, 3 months ago:

    Interesting research on an interesting paint conundrum, Harvey (@scalerambush). This information allows an interesting interpretation of the paint scheme. In my search for unusual planes and paint schemes, I have discovered that there is an exception for every rule applied to painting and marking aircraft, especially during wartime. Looking forward to the rest of the paint.

  • Profile Photo
    Harvey R. said 1 year, 2 months ago:

    Afternoon all, not a big update to provide as I'm mostly just doing last bits before primer is applied. The fuselage seam is sanded down but a touch of rivets need to be redone. I'm building up the flaps too but these will stay unattached for now.

    I've also received some new paint masks from 'The Crafting Well', they seem to be a very tiny UK based company but as far as I can tell the masks are cut into the ever reliable kubuki tape. I hadn't heard of this company until looking around for these roundel masks. Montex do sell roundel masks, but in their product images what they call a Type C1 roundel was wrong so why bother with them?

    For this Corsair we'll need Type C (blue, red and thin white) for the underside and C1 (same with yellow outer ring) on the fuselage. Now due to when this aircraft was built it was painted with Type B (red and blue) roundels on the upper wing surfaces, but in March 1945 they were turned into Type C roundels. Naturally with an in-service change the painting isn't perfect, the white is a little bigger than it should so I may need to find a way to replicate this. Thankfully painting was done using a curved 18inch template that was repeated to make a circle, so it's not exactly perfectly painted on anyways.

    Another note worth mentioning is the air scoops either side of the fuselage, these gather air in the fuselage and the idea was that this would create pressurised airflow to the rear of the aircraft that would prevent carbon monoxide build up. For whatever reason the British went for a big noticeable scoop, whereas the Americans used a small flush vent. This will need to be replicated. I'm not sure the best route but as it sits so closely to the roundel, so closely that it sits over the top of it, I think it's best to make the piece, paint it seperate, and glue it on with superglue after the painting has been done. FAA Corsair Mk.IV seemed to normally have 3 vents, one on the underside, but KD431 only has two (unless it was removed and there is just a hole somewhere underneath).

    3 additional images. Click to enlarge.

  • Profile Photo
    John vd Biggelaar said 1 year, 2 months ago:

    Great research on those roundels, Harvey @scalerambush
    To me your approach for the air scoops seems like the most practical one.

  • Profile Photo
    Spiros Pendedekas said 1 year, 2 months ago:

    Solid progress and great research, my friend @scalerambush!

  • Profile Photo
    George R Blair Jr said 1 year, 2 months ago:

    British roundels are another conundrum, Harvey @scalerambush. Not only did the style of roundels change frequently during the war, but there were also many exceptions in the application of the markings. Cool research on your markings.

  • Profile Photo
    Harvey R. said 1 year, 2 months ago:

    Thank you all.

    A little more progress, though it seems slow due to paint drying. Turns out 1/32 are difficult to find spaces to dry in.


    Primer

    Originally I was just going to use a random MRP grey colour I have and use that for primer, which I have done before, but I remembered I do have Mr. Surfacer so why not use that? It's cheaper by the ml at the very least.


    So far it's got one coat of white, normally I prefer grey but black would be ideal for metals but this stuff is a little uncommon here so I pick up whatever colour is on offer.

    No major issues have been identified as most trouble areas were fixed previously. The right wing leading edge needs some TLC so a tiny bit of filler is drying I unfortunately can't put a second prime coat on, hopefully later today I will.

    As you can see a big old stick has been shoved up the backside, helps with drying!

    Painting

    And since the tailplane was already painted up previously I gave it a gloss coat, brushed on some chipping fluid (which definitely is how I'll use chipping fluid from now on, no orange peel so far) and the Sea Blue was added.


    I tried to chip it as can be seen in photos, but there isn't a great deal of good images unfortunately. It seems to me that the right horizontal stabiliser is (obviously) well weathered but the left is pretty untouched aside from the leading edge. Underside seems untouched too but I chipped a little here. In that photo on the blurb it seems to have green on the far left side of the left stabiliser, but on diagrams in the book they don't show camouflage here and in a few photos on line I can't see an obvious green section so I wonder if that is some sort of light reflection? Either way it's been left alone.

    Also don't tell any one, while the Corsair has 5 inspection ports on the stabiliser it seems KD431 only has 4. I didn't notice that tiny detail until I was chipping so it's a bit late to fill it in.

    I was having issues with my 0.35mm airbrush, but a new nozzle seems to have fixed them which is appreciated when doing these large coats such as primer. After the silver is on I'll start working in sections, probably masking off the wings and painting/chipping the fuselage before sealing it in and doing the wings. Otherwise I think there's just going to be too much to do before the MRP Sea Blue seals up chipping opportunities.

  • Profile Photo
    Spiros Pendedekas said 1 year, 2 months ago:

    Once again, superb painting techniques, my friend @scalerambush!

  • Profile Photo
    John vd Biggelaar said 1 year, 2 months ago:

    Great painting session indeed, Harvey @scalerambush
    Your explanations about the used techniques are very helpful.

  • Profile Photo
    George R Blair Jr said 1 year, 2 months ago:

    Paint is looking great, Harvey (@scalerambush). I have never tried using chipping fluid over a gloss coat, but it looks like it works well. Glad your airbrush is working again. It can be very frustrating when the airbrush starts having problems. It always seems to be a rubber seal or O-ring when my Paasche starts having problems.

  • Profile Photo
    Harvey R. said 1 year, 2 months ago:

    The gloss coat depends on the paint you use, I could probably get away without it on MRP paints but the trouble you run into (at least in my experience) is that you can chip through the chipping fluid and straight down to the primer or bare plastic, not ideal. The gloss helps protect that layer you want to be the bottom, especially useful on multi-layer work.

    Speaking of which the model is currently drying after getting a second primer and then some metallic paints. I'll give this a gloss coat tomorrow. Multi-layer chipping fluid is a bit risky and I've had some great success, some less so. I'll give it a go though by putting a layer of chipping fluid and then zinc-chromite, then another layer for the sea blue.

    I'm not sure the best way to approach painting as the MRP sea blue will make chipping harder than if I used another brand like tamiya, but I'm going to try and mask off sections to get around this. Probably left wing, right wing, fuselage and then underbelly with the later two having not a huge amount of chipping compared to the upper sides of the wing. I'll then seal this off with more clear coat to prevent tape damage and then mask off the fabric parts and markings. Timing is key with this as chipping fluid gets more difficult to get through as time goes on, so ideally I need a long day where I can go from silver/glossed Corsair to a blue and chipped one. This will mean some paint work won't be ideal with less variation than I typically do with the airbrush to reduce overall paint layers and time, but in areas like the wing root there isn't really a substitute for chipping fluid.

    Alternatively I could just chip the zinc chromite to metal before applying more fluid and doing the sea blue, the downside to this is the need to guesstimate how much chipping to silver you'll want but would help spread out the work needing to be done. Both have advantages, working with 1/32 does come with a lot of extra questions I'm not used to!