Tamiya F4U-1A, 1/32. 'KD431'

Started by Harvey R. · 80 · 1 year ago
  • Profile Photo
    John vd Biggelaar said 1 year, 2 months ago:

    Speechless again, Harvey @scalerambush
    All this severe chipping looks very realistic.
    After using the compass, how did you cut out the circle, or does the compass have a blade installed.

  • Profile Photo
    George R Blair Jr said 1 year, 2 months ago:

    Your chipping is a clinic in how to do it, Harvey @scalerambush. I have only tried painting insignia once or twice, and that was limited to numbers, so there is apparently a learning curve to larger markings. I am getting ready to start an SBD, so I am taking lots of notes.

  • Profile Photo
    Harvey R. said 1 year, 2 months ago:

    It's a compass cutter to be precise, and it's the cheapest way to get circle masks done but it requires a steady hand or you get ovals or rough edges. I'm not a huge fan of it, but it cost £6 and those fancy circle cutters cost £60!

    I wouldn't want to do a whole roundel with it though, I'm sure it can be done but doesn't sound like fun.

  • Profile Photo
    Harvey R. said 1 year, 2 months ago:

    Letter Codes


    Next up on the Corsair was the letter codes. First KD431 simply had a white S, but this was changed to be a pale blue in preparation for heading East. Later in September 1945 it received the E2-M, and again later repainted in 1963 when it got to the museum but with inaccuracies.

    From the left side we can see that the E2 is very faded, I tried to replicate this with chipping fluid but chipping fluid is a fickle tool and not reliable, but makes good results when it works. I actually did this twice and tried to overspray it with blue to tone it down more, but it just leads to the white looking weird so I covered it up completely and restarted.

    For the S, located aft of the roundel, it is still clearly visible, this was masked off and painted very faded before the S was overpainted with a grey. According to the book it was painted by hand with a square of Dark Slate Grey before the M was added, this grey came out too bright on the model but it looks interesting enough and not worth redoing the whole thing. An M was added, it's noted that the E2 is pretty accurately done whereas the M on both sides are done by hand and look different, the E2-M are also slightly larger than the S but due to chipping it doesn't look that way.


    On the right side the markings are very unfaded, perhaps this is more due to deliberate work of the restoration. I tried to make the E2 the same but the M does look quite different, remnants of the S are not really visible on this side so it was omitted.

    Red was also added to the model's gun ports, this is residue from gun tape apparently. Some weathering will tie it together a bit more.

    Aside from that the gear covers, antenna, propeller and cockpit are being worked on but nothing worth showing yet. The model is also covered in a 'stone grey' wash, it looks quite decent from testing for replicating an older plane but more importantly is more obvious than black and not as in your face as white.

    1 additional image. Click to enlarge.

  • Profile Photo
    Spiros Pendedekas said 1 year, 2 months ago:

    Spectacular looks, my friend @scalerambush!

  • Profile Photo
    John vd Biggelaar said 1 year, 2 months ago:

    The letter coding looks perfect this way, Harvey @scalerambush

  • Profile Photo
    Harvey R. said 1 year, 2 months ago:

    Thank you two! A wash has been applied and looks quite nice, just drying under a clear coat so I can handle it without getting fingerprints.

    I just wanted to add on a curious headscratching moment with KD431 I am currently having. I was looking to order some last minute resin wheels due to the rubber ones included in the kit having a seam line that is proving difficult to remove, weighted wheels would also be a plus.

    Corsair wheels are interesting subjects, they can be all matter of patterns and sometimes aircraft have different patterns on each wheel. So of course, KD431 has two different patterns. Which means double the price! The left wheel is the diamond pattern, the right is an oval one.

    Now in photos I've never seen oval wheels, I've seen cross-thread, diamond, ribbed, and ribbed with diamonds. But oval? Looking online for resin wheels for F4U and F6F comes up with nothing with this pattern. It turns out in the 70s they decided to put Phantom wheels on the thing and you can see that in the 1980 photo in the first post, but these have been replaced since with more appropriate ones.

    The book mentions the museum's Hellcat had oval pattern tyres, and later they found the original tyres equipped to this Corsair in the 50s in storage. I can also find resin P-51 tyres, of supposedly the same size but a different connection, in many shops with oval patterns. So now I'm left wondering whether I should buy diamond + cross pattern F4U wheels, or diamond F4U + oval P-51 and try and somehow get it to attach.

    e: Current solution I think is to just get the diamond wheels, I need them anyways, and the P-51 ovals. If I can't make the P-51s fit then I'll just use both the diamonds, it's a minor detail and it saves buying three sets of resin wheels. I cannot find anything about oval pattern tyres on Hellcats or Corsairs, I'm sure it's in a book somewhere but it is a really bloody niche subject for an online forum. Either way it doesn't particularly matter if a book has mention of that pattern if no-one has a product of it to buy in 1/32.

    5 attached images. Click to enlarge.

  • Profile Photo
    Spiros Pendedekas said 1 year, 2 months ago:

    The tires' pattern is always an interesting topic, usually having to do with "the specific bird at the specific time". Your research is, as always, thorough and, as a matter of fact, spectacular, my friend @scalerambush!

  • Profile Photo
    John vd Biggelaar said 1 year, 2 months ago:

    Great information, Harvey @scalerambush
    Would be nice to see if the P51 tire will fit.

  • Profile Photo
    Harvey R. said 1 year, 2 months ago:

    A Wash And Some Details

    As previously mentioned I gave the Corsair a wash which was sealed in with gloss to make it easier to handle, this was was MIGs Stone Grey PLW and it came out quite nicely, it highlights the riveting a bit better where black would get lost against the blue but not as much as a white would stand out. It also allowed for some dirtying of certain parts, like that fabric panel on the left wing in order to weather the roundel a bit. I'm growing to be quite a fan of these washes though the need to shake them every couple minutes before the pigment sinks to the bottom of the bottle is a little annoying at times.


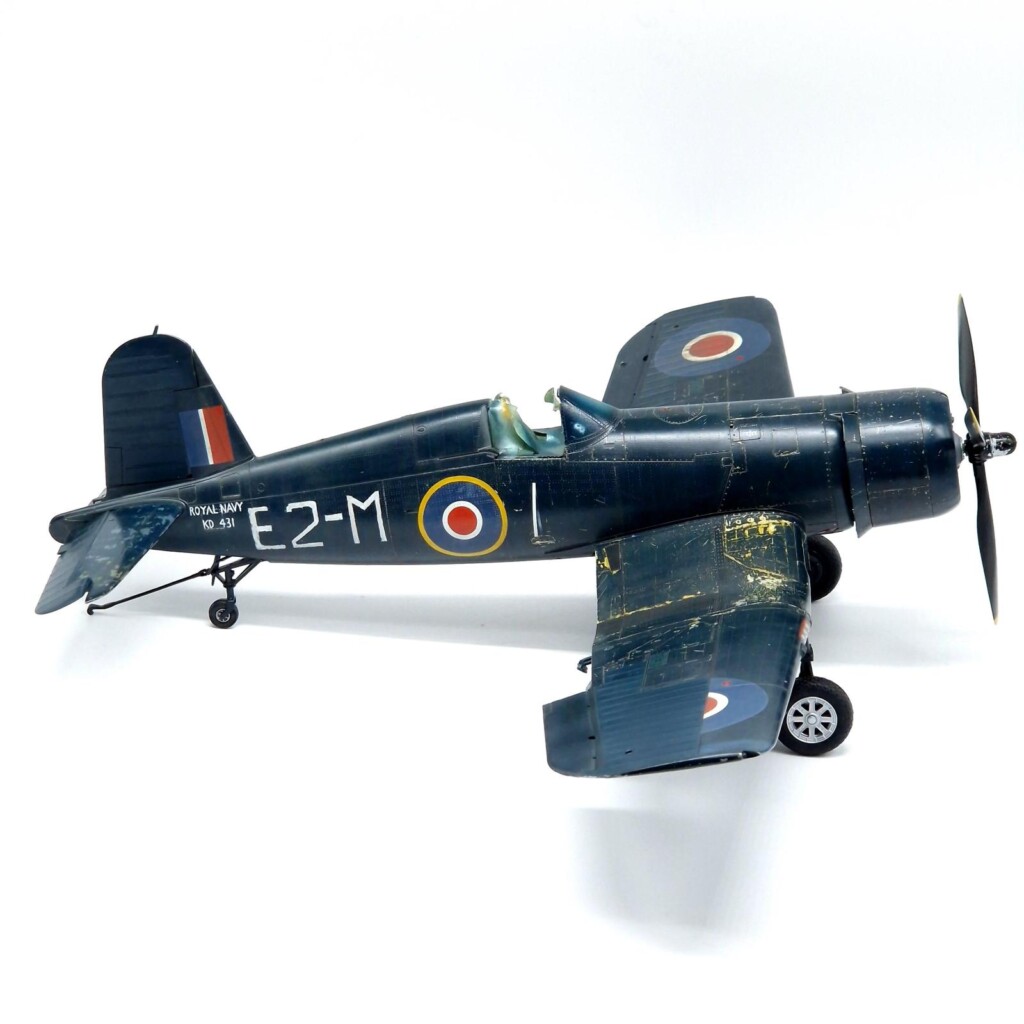
    Wish the wash done I went ahead and did some detail work, notably the serial number. It's certainly not perfect but unfortunately they painted the serial on by hand and I also didn't want to pay out for a generic decal sheet that would be the wrong size or font. It came out decent, looks fine at a distance. Thanks to that gloss coat fixes can be done by poking at it with a cocktail stick, allowing a few attempts of painting them. The right side is definitely the better side due to balancing this plane being a bit awkward.

    The red fuel tank filler caps were quickly done, and then a couple of markings by hand such as a faded '100 Oct Only' on the fuel tank, and 'T/XX' on a panel nearby. Gun ports were painted silver, needing a quick black wash.

    The propeller has finally been done, I actually instinctively painted it blue before remembering the entire propeller and hub is black. This was chipped with chipping fluid, this time remembering I have two versions. AK has a 'scratches effect' version which is the more appropriate product to use for aircraft, but the 'heavy chipping' which they demonstrate on a rusted train car has a place if you want, naturally, bigger sized chips.

    One propeller blade was beaten up, I don't have a photo on hand right now but you may be able to see it in earlier photos but one blade has received a bonk during this Corsair's lifetime but the rest are prestine. A decal and a wash will be needed tomorrow, also a couple of decals I forgot on the Corsair will be added.

    The landing gear is also largely done though I didn't take a photo, at the moment it's resting on blu-tacked kit wheels while the resin arrives. The landing gear doors and panels are painted up but need a bit of scratching up. On the wheels (which won't be used) one is silver, the other is blue in some photos and in others has had the majority of paint removed to reveal silver beneath it. There's a few minor things like this that appear in some photos and change over the years, either way I'll do the two different colour ones as it looks a bit snazzy.

    Flaps were added, but they're not a very strong connection so they kind of just fell off over the course of an hour of handling but otherwise they're ready to go.

    Next up is a few things but I have a ticklist as we approach the end, primarily tomorrow will focus on the somewhat neglected underside to make things a tad more interesting. Also I need to finish off that canopy, the yellow stripes are a bit tedious to mask but much needed.

  • Profile Photo
    Spiros Pendedekas said 1 year, 2 months ago:

    This looks wonderful, my friend @scalerambush! Amazing attention to every detail, in order to replicate the actual looks of the plane at the specific time. You are the man!

  • Profile Photo
    John vd Biggelaar said 1 year, 2 months ago:

    Amazing looks, Harvey @scalerambush
    A perfect copy of the original aircraft is arising.

  • Profile Photo
    Harvey R. said 1 year, 2 months ago:

    Just A Quick (And Penultimate) Update

    Afternoon all, had some technical difficulties with this phone not charging which in my case means no camera, as such not a lot of photos taken.

    But here is the Corsair in its current state as of last night now the phone is back working.

    Doors, flaps, and the such are all done. I spent this morning starting to assemble up the model ready for a final clear coat, primarily over these added parts which haven't had one to seal in the wash.


    The landing gear doors have also had a bit of work, there's a lot of variations on how these doors should be as restoration when on but the one I went for is what I can see on the cover of the KD431 book. The left gear leg has a handpainted 'S' in white, it looks rough but so does the real thing. The right gear leg also had an 'S' at some point but was overpainted in grey after, it later received a big red stencil on it. I can't replicate this stencil as it isn't an 'official' one and the writing is too small, but in the cover of the book I think the stencil may have been removed from the plane today or at the very least is extremely hard to see. I can barely see it on a photo dated from October 2020.

    As for the wheels, unfortunately this was a waste of money as I had gone ahead and assembled the landing gear one step too far and as such can't get the resin wheels on. Oop.

    The underside received some more work, the tape residue which was briefly done with different paint was added to with grey and chipping fluid. The tape residue on the guns was altered to be a bit more accurate too.

    The section of flaps towards the fuselage will be left off whilst I get the anti-slip mat done on it, but the part on the folding wing has been glued on. The surprisingly very chipped antenna has been added, and the pitot will be added before the final clear coat. I'm debating doing the damage to the left wings fabric, I may get the model all done and photographed and then add that detail in case it goes all wrong.

  • Profile Photo
    Spiros Pendedekas said 1 year, 2 months ago:

    Excellent and getting even better, my friend @scalerambush!

  • Profile Photo
    John vd Biggelaar said 1 year, 2 months ago:

    It keeps on getting better and better, Harvey @scalerambush