USN Douglas A-1H Skyraider Tamiya 1/48th

Started by Chuck A. Villanueva · 96 · 3 years ago
  • Profile Photo
    George R Blair Jr said 3 years, 10 months ago:

    Having just finished an ESCI Skyraider, I can really appreciate how much more detailed this kit really is. Looking forward to building mine at some point.

  • Profile Photo
    Chuck A. Villanueva said 3 years, 10 months ago:

    Thanks Spiros and Erik, it was this option I decided to use on the Skyraider, left the dive brakes and cowl flaps closed. I was also contemplating folding the wings. Being that this is quite a large aircraft. But the fold kit is quite expensive, so opted to keep the wings as they are. When I get to the A1-J USAF version I will configure that one a bit different.

    George-having built the Monogram and the Hasegawa 72nd scale version, and those were fun to build. The Tam kit is on a different level. You did a great job on the ESCI kit which is now in the Italeri box if I remember correctly.

  • Profile Photo
    Ramon R. Lomeli said 3 years, 10 months ago:

    Hey Chuck! I just found this thread and will be following with interest. i have this kit in my stash and am looking forward to getting to it one day. Awesome work so far!

  • Profile Photo
    Chuck A. Villanueva said 3 years, 10 months ago:

    Hi Ramon, welcome, good to hear from you, I hope this WIp will inspire you to break out your Skyradier soon. It is a great kit to build.

  • Profile Photo
    Chuck A. Villanueva said 3 years, 10 months ago:

    With the basic air frame assembled time to work on some sub assemblies. Starting with the weapon stations under the wings.


    The largest pylon is plumbed for drop tanks or the heaviest ordnance in this case 1000lb bombs

    These pylons are designed for either drop tanks or bombs that you can actually switch out with the polycaps in them. The firm fit(tested them already) does hold them in place at the proper angle. Very interesting concept. These mount right next to the main gear bays.

    Next are the smaller pylons, amazing the incredible amount of ordnance this plane can deliver, and several configurations to prosecute a target, napalm, rockets, bombs and toilet bowls.

    6 on each wing for a total of 15 hardpoints including the center pylon.
    1000lb and 250lb bombs are assembled.

    The center pylon under the fuselage. Which has a removable drop tank.

    All the stations attached.

    More to follow.

  • Profile Photo
    Erik Gjørup said 3 years, 10 months ago:

    I am always amazed by the number of stores on a Skyraider!

  • Profile Photo
    Spiros Pendedekas said 3 years, 10 months ago:

    So many stores pylons!
    Great subassembly time.

  • Profile Photo
    George R Blair Jr said 3 years, 10 months ago:

    Looking good, Chuck @uscusn. One of the things I discovered when I was doing my ESCI version was that you couldn't get the decals on the lower wings unless you put them on before the pylons. Hopefully not a problem with your paint scheme.

  • Profile Photo
    Stellan Schroeder Englund said 3 years, 10 months ago:

    Good observation, George. It is usually easier if one paint all pylons before attaching them, or at least prime them.

  • Profile Photo
    Chuck A. Villanueva said 3 years, 10 months ago:

    Flying tank, flying dump truck, yes gang many names to describe the Skyraider, it's long loiter times over target was a big help close air support and search air rescue as "Sandy's.

    George, Stellen, you brought up a great point, I now remember what I did when I built the Monogram and Hase Skyraiders, I left off the pylons around the lower decal. Those pylons were prepainted and weathered. After the decaling, it was then I attached the pylons. Sometimes you get so locked in you forget a certain detail. Doh!

  • Profile Photo
    George R Blair Jr said 3 years, 10 months ago:

    If you are like me, I seem to be constantly relearning the same lessons, over and over. Now I am old enough to blame it on age. :o)

  • Profile Photo
    Chuck A. Villanueva said 3 years, 10 months ago:

    Today will finish up most of the details around the fuselage as I prepare to clean up the air frame and prepare to paint. Working from the tail to the nose.

    Starting with the tail wheel strut. I will leave off the wheel for now. Then the strut is inserted into the tail wheel bay.
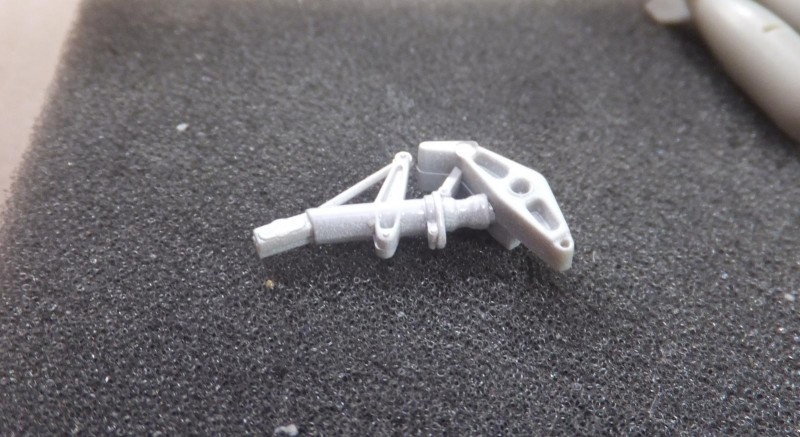
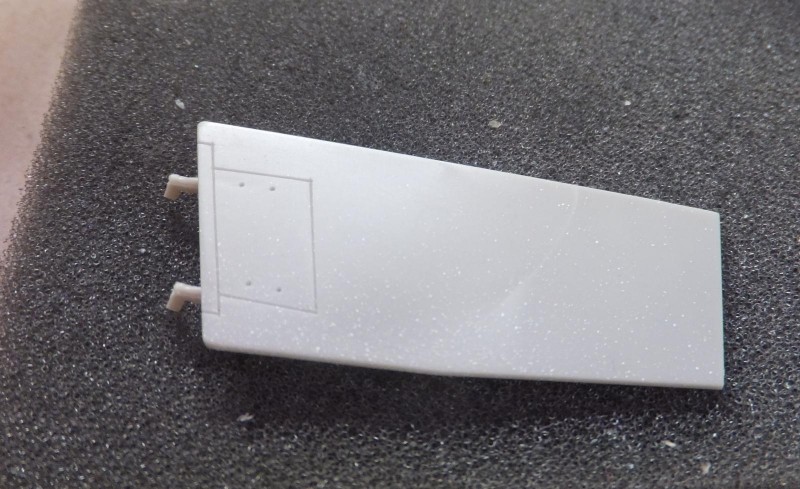
    Next is the lower dive brake door, quite large. I will leave all the dive brake doors closed.

    Next to prepare to install the side dive brake doors. Tamiya provides a very nicely detailed inner panel if you wish to display these open.
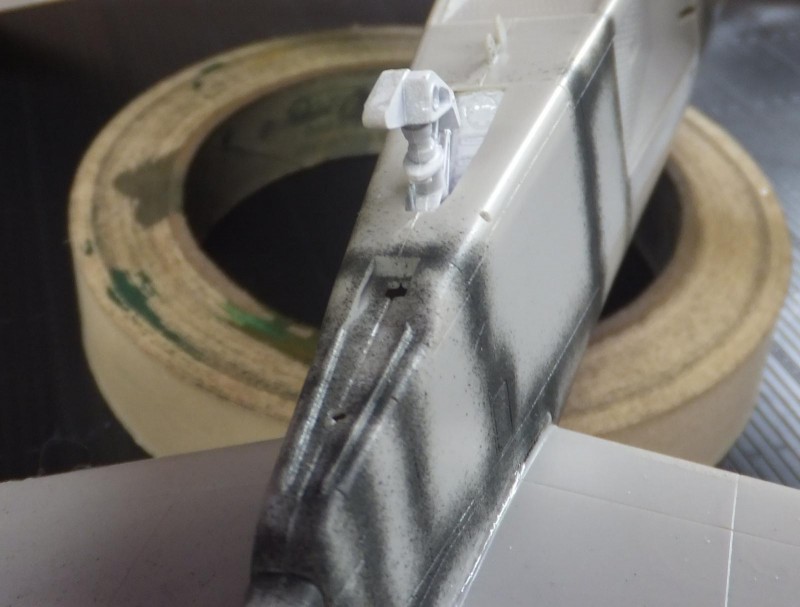
    All the dive brakes installed.

    Now the front air scoop and fuselage side fences,

    First though I will attach for now the kit provided canopy retracting system to the rear deck behind the pilots seat.

    Next up is the front upper air scoop.

    Next the 4 side fuselage fences or strakes are attached 2 on each side, just aft of the cowl flaps.

    With the basic air frame completed. I airbrushed Vallejo steel on the leading edges of the wings and vertical tail and the cowl ring.
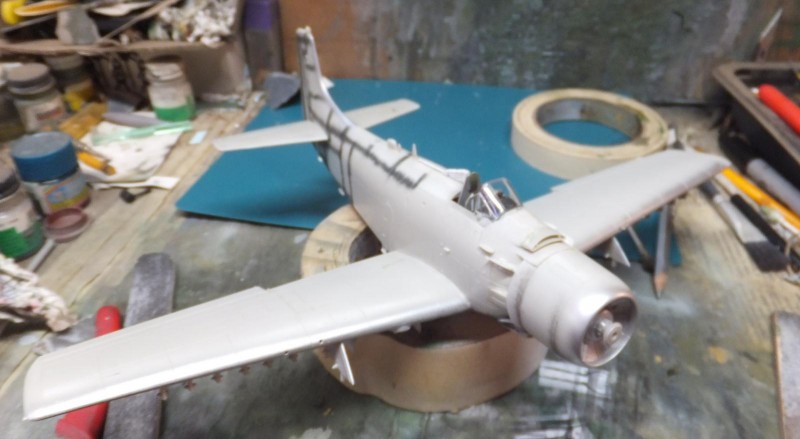
    Next up is to clean up the air frame and mask off the steel sections and start some paint work.

    more to follow.

  • Profile Photo
    Stellan Schroeder Englund said 3 years, 10 months ago:

    Looks like you are not priming plastic before airbrushing Vallejo paints? My experience is Vallejo needs a good coat to get a grip, especially if you handle model a lot and using masking tape. What is your experience on this?

  • Profile Photo
    Chuck A. Villanueva said 3 years, 10 months ago:

    Hi Stellan, great question, The main colors, Gloss White will be Tamiya, and the Lt Gull Grey will be Xtracolour Enamel. If the airframe was overall NMF, then I would base coat the whole air frame black like this Academy P-47N that will be NMF.

    My experience is that I am still learning, I only have built 2 NMF aircraft in my lifetime. A Monogram F-86 which is Alclad. And a recent Tamiya F-51 Mustang which is the first Vallejo finish I ever attempted and I did base that air frame black as well before applying the Vallejo metallics. I was satisfied with the result, and quite encouraged to do a bit more in the future, the P-47 now in progress and the next attempt would be a Hase P-38. Also with using Vallejo metallics over smaller areas like exhaust nozzles, panels that are bare, cannons and guns, I don't use a primer, like for example the leading edges on the Skyraider have not run into issues like rubbing or chipping off as yet.

    Prior to that I was not too confident in doing a lot of NMF schemes, very delicate finishes which show every blemish on the plastic like scratches, putty and any discrepancy anywhere at the seams if it is not properly cleaned up. So they do need a little extra care to get a great finish which they are.

  • Profile Photo
    Stellan Schroeder Englund said 3 years, 10 months ago:

    Chuck, I use mostly Vallejo acrylics and I would claim you would need a primer like Tamiya's fine grey or white for Vallejo to have something proper to bite into. The primer in my experience will not hide any detail. Vallejo can be very sensitive to scratches and a smooth Tamiya plastic will not help adherance. I am currently finishing two of Tamiyas Skyraiders and have two others that are in basic assebly stage so I follow your build with interest.