Welcome to Mystical Experiences (1/48 Fonderie Miniature Vautour IIB, Armée de l'Air )

Started by Spiros Pendedekas · 47 · 2 years ago · 1/48, Fonderie-Miniature, Vautour
  • Profile Photo
    Spiros Pendedekas said 3 years, 9 months ago:

    Thanks my friend @airbum!

    Started the party with the PE fret, which is absoloutely fantastic.

    Cockpit front and side consoles added.

    Pilot's seat done (sans the PE belts).

    Bombardiers seat done too (magician hands lightly applied).

    Ejection handles will be fabricated from stretched sprue (or, as Fonderie Miniature states: "tube and wire"!...)

    I have to admit that PE and resin stuff is generously and wonderfully supplied from Fonderie Miniature.

  • Profile Photo
    Erik Gjørup said 3 years, 9 months ago:

    What a wonderfully plentiful supply of brass! And happy to see the magician came by to help out - well done my friend.

  • Profile Photo
    George R Blair Jr said 3 years, 9 months ago:

    Cockpit looks great, Sprios (@fiveten), although those seats look like medieval torture devices for the pilots. And I thought the seat in a T-37 was uncomfortable. Things will go quickly now that everything is sealed up in the fuselage.

  • Profile Photo
    Spiros Pendedekas said 3 years, 9 months ago:

    Thanks my friends @airbum and @gblair!

    A plentiful supply it is! Those types of kits relied heavilly on resin and PE. In my case, the supplis are plenty and wonderful, I have to admit. It just takes time, effort and the occasional precision for not goofing things up. In later posts I will gradually make a presentation of them, even if they are installed already, as I did not do it at the start.

    Those seats are looking ike medieval torture devices indeed! Poor pilot and even poorer bomber/navigator...

    Their color is interesting too! "Apple" state the "instructions", a weird green is the reality, by checking actual photos...The fantastic PE seatbelts will be French Blue (by the way, the PE fret is made by Eduard).

    So, some small update, showing the bombardier's seat in the middle of painting process (this "green" is so ugly it's beautiful!)

    Still, some work needs to be done at the cockpits, especially the navigator's.

    There's also a "vent" down the starboard side, a thin sheet styrene was glued in the middle to look like the real thing.

    Some spot-detailed sanding will follow.

    All the best!

  • Profile Photo
    Erik Gjørup said 3 years, 9 months ago:

    Those small details makes it stand out - your scratchbuilding really rocks! Keep pushin' my friend. . .

  • Profile Photo
    Spiros Pendedekas said 3 years, 9 months ago:

    Thanks, my frriend @airbum!

  • Profile Photo
    Greg Kittinger said 3 years, 9 months ago:

    Coming along nicely! I've wanted to add A Vautour to my collection for some time, but I don't like the thin-nose version and that's all I've run across lately. Someday...

  • Profile Photo
    Spiros Pendedekas said 3 years, 9 months ago:

    Thanks Greg @gkittinger! I believe Azur make all variants. Don't know about their availability though.

  • Profile Photo
    Erik Gjørup said 3 years, 9 months ago:

    Greg (@gkittinger) as Spiros has pointed you towards Azur, I believe thy are re-packed by Special Hobby (specialhobby.eu) and on their site there are two available, one with the pointed radar and one standard. The price is the same even though the pointy nosed has a lot of resin extras. Hope you may have the time to squeeze one in with your (49?) Phantoms. Someday 🙂

  • Profile Photo
    Greg Kittinger said 3 years, 9 months ago:

    Thanks gents! @airbum, @fiveten. I may have to pick one of those up soon - perhaps a Christmas or birthday present... (best way to get my wife to agree to allow yet another kit to my stash...!)

  • Profile Photo
    Spiros Pendedekas said 3 years, 2 months ago:

    Revisiting!

    Tonight I gave my poor Vautour some attention, hoping to ccatch up with it full steam ahead not far from now..

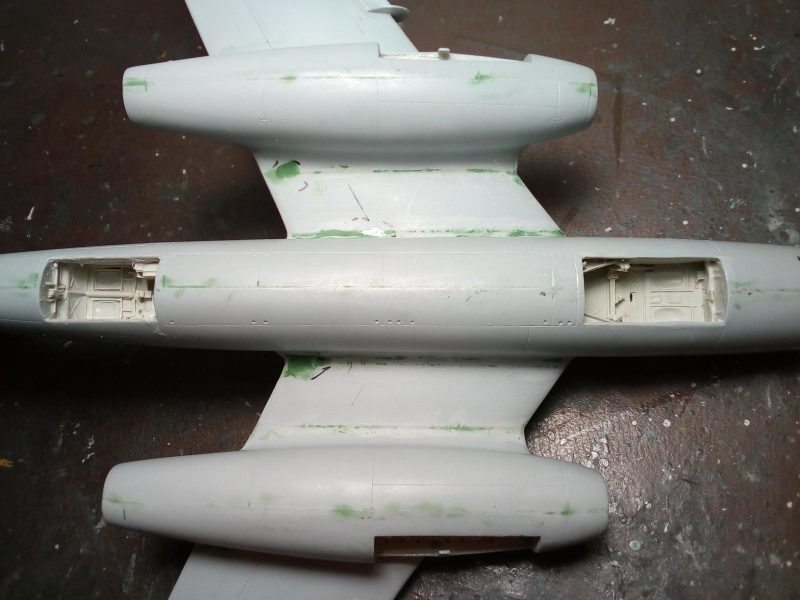
    The bicycle type front and rear wheel bays were two gorgeous resin pieces that had been affixed with cyano and some reinforcements from the inside, après- fuselage closure...

    Well, the joints proved not that strong and, after a couple of mishandles (my younger son's Vne proof tests...) they detached...

    The good thing is that I found out before proceeding further with the model; I don't think they would withstand the not that small pressure from the landing gear, upon installation. The bad thing was that the fuselage was already closed, so I seemed to have no means of pressing the bays onto the fuselage, in order to be glued.

    What I did, was to first apply thick cyano around the joint area, then a coating of liquefied styrene ONTO the cyano, then, carefully, by using my bent tweezers as a sort of "hook", I pulled the bays onto their attachment points, the cyano/lqs mixture oozing out of the gaps. This mixture, upon curing, formed a kind of strong bond between the resin bays and the stryrene fuselage. Here's how the bays look:

    Now all they need is a good cleanup and microfilling all gaps.

    Thanks for stopping by!

  • Profile Photo
    Michel Verschuere said 3 years, 2 months ago:

    Simply great! Love this build!

  • Profile Photo
    Spiros Pendedekas said 3 years, 2 months ago:

    Thanks my friend @michel-verschuere!

  • Profile Photo
    John Healy said 3 years, 2 months ago:

    This looks like a grudge match! You’re winning, Spiros!

  • Profile Photo
    Louis Gardner said 3 years, 2 months ago:

    Spiros, @fiveten
    I am happy to see you are finishing this one... as our friends have stated, I too have enjoyed watching this model come to life in front of our very own eyes. Keep it coming my friend.