Gypsy 203

Started by David Hansen · 69 · 5 years ago
  • Profile Photo
    Jeff Bailey said 6 years, 1 month ago:

    WoW! Old 203 is looking great! I love your attention-to-detail as well as your narrative.

  • Profile Photo
    Michel Verschuere said 6 years, 1 month ago:

    Impressive!

  • Profile Photo
    Louis Gardner said 6 years, 1 month ago:

    Same here ! This one is fantastic indeed ...

  • Profile Photo
    David Hansen said 6 years ago:

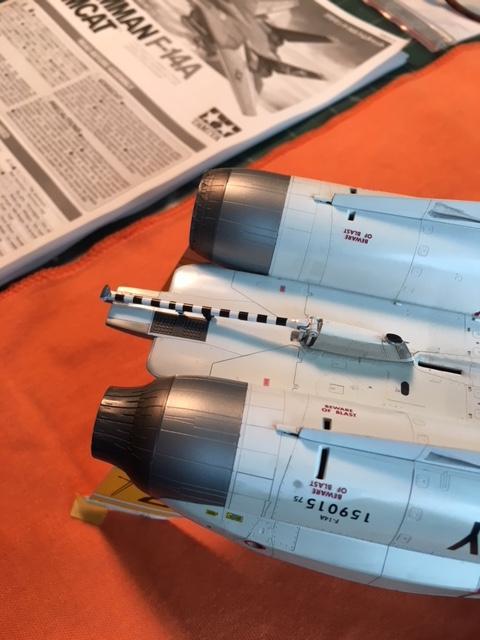
    Well, we've been busy on 203 here at Casa Del Mongoose, when work has permitted. Since we tuned in last, i finalized painting and installation of the afterburner cans.

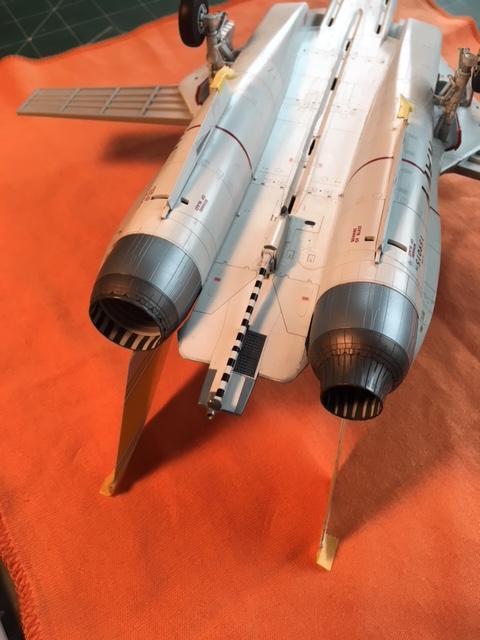
    First off, i got the New Ware Models F-14 exterior masking set. One of the nifty things it gives you are masks to paint the inside of the convergent/divergent afterburner iris. This device is a departure from the more conventional A/B setups we're used to seeing. It uses undulating segments that slide forward and back, rather than inward at the back end as we're used to seeing. As a result, the inside is made up of an array of sliding metal and ceramic and metal pieces surrounded by a "Crunch Ring" that keeps everything round. as a result, the inside of these things sorta look like a circus tent, when clean...

    The masks New Ware give you fit rather well, though with the unique concave/convex shape the contracted configuration masks are harder to apply on the inside, than the masks for the dilated iris are.

    I was a bit dubious as to the colours of the A/B exteriors that tamiya calls for. It seems they start out fairly bright, but as the planes got older and more cycles got on the engines, the metallic areas got darker. Since my plane was fairly new, i took paint swatches from all of my metalizer paints, and then compared them to the mixes that Tamiya recommended using their acrylics. I started off by wet sanding the outsides of the irises with 1500 grit sandpaper so the metalizer would have a bit more surface area to bond to. Then i laid down a primer coat of MM Metalizer non buffing steel. Over that, i laid down a coat of non buffing burnt iron, and on top of that a coat of buffing burnt metal...which of course i buffed out.

    Next, i applied the New Ware masks to the exterior- and boy did they fit good! A tremendous time saver; money well spent. Once these were laid in place, i painted the exposed areas with MM buffing Titanium (more buffing). The painted parts were glued onto the tubes, and then the assemblies were glued into the back of the rear fuselage.

    Once that was done, i installed the arresting hook. One big mistake i made was i installed the fairing for the hook on the belly before painting. This was a unwelcome aggravation and really complicated things when it came to painting and decalling the belly. Not only that, i had to shorten an actuator rod and i had to really push the hook into place. The hook itself i painted white, then masked and sprayed the black stripes. To be honest, i didn't trust the Tamiya decal to wrap around and conform to the tight curvature of the hook and the ribs molded onto it.

    The landing gear was finally installed for good. The fit is excellent. I'd say the toughest part of the whole landing gear installation is painting those annoying red edges along the landing gear doors. Once the gear was installed, i sanded flat spots on the tyres by carefully dragging a piece of wet 320 grit out from under the tires. It takes a while, but it gives you a lot of control. The landing gear struts are very robust once glued into place.

    It doesn't show in the photos, but after the gear was mounted, i drilled holes in the tyre flat spots to take .015 diameter brass rods that serve as locators for the model on the base. The rod locations were marked on the base once the final position was determined, holes were drilled in the base, and the rods glued into the base with white glue.

    While that operation was playing out, my name plate came back from the engraving shop, and i mounted it to the base with 4 brass screws provided.

    Lastly, i built up 2 AIM-7 Sparrow Missiles. Be very very careful to read the instructions and use the parts called for in the instructions. if you don't, you will run into issues when the decals go on. There are about 16 decals on each of my Sparrows (it varies by modeler). Once painted, the missiles press fit into the sockets on the shoulder pylons without glue.

    The pylons themselves are just friction fit in place for now; i still need to build up and paint the 2 AIM-9s for the model, and i wanna keep my options open.

    After that: Ejection Seats, Blade Antennae, then done.

    Stay tuned for the thrilling conclusion.

    -d-

  • Profile Photo
    Michel Verschuere said 6 years ago:

    Stunning work my friend! What a detailing on these sparrows...

  • Profile Photo
    Jeff Bailey said 6 years ago:

    I look forward to the finish.
    16 decals on EACH missile! Gadzooks! That's detailed!

    This whole aircraft is an outstanding piece of work.

  • Profile Photo
    David Hansen said 6 years ago:

    The AIM-54 Phoenix is even worse.

  • Profile Photo
    Greg Kittinger said 6 years ago:

    Looking fantastic!

  • Profile Photo
    David Hansen said 5 years, 12 months ago:

    A little bit more progress to report. The AIM-9G missiles are finally done...after re painting the front ends of them twice. Did i ever mention how much i hate painting missiles? No?


    The missiles are glued onto the pylons, but the pylons themselves i'm keeping off til the last possible moment. Handling the built up assembly is tricky, with lots of weird angles and pointy bits sticking out everywhere. Its sort of like handling a polystyrene hedgehog.
    Then the wings finally went on. I had to mask and re-spray the leading edges, since over the course of the build, the metalizer wore off in places, despite careful handling. I smeared white glue all over the "waffle pattern" of the wing spar, slid the wings on, and then applied glue to the little scalloped area where the wing root butts into the inboard end of the spar.

    So right now the model has been left aside to dry for about 12 days while i go back to work. All that remains now are the ejection seats, pitot/air data probes, antennae and the boarding ladder and steps.

    And then, i need to figure out how to get it to North Carolina...

    -d-

  • Profile Photo
    Louis Gardner said 5 years, 11 months ago:

    Sorry for the late reply... This Tomcat is spectacular ! You have made some serious progress since the last time I checked in. Wow... 🙂

    If you decide to go through Florida on your way to NC, you can leave it at my house... I wouldn't mind one bit, and have room for it in the display case.

  • Profile Photo
    David Hansen said 5 years, 11 months ago:

    Hi Everyone,
    This will probably be the last installment of my Gypsy 203 build before i post a new article on it.

    The boarding ladder and boarding steps installed with a minimum of fuss. The Pitot probes also installed easily, thanks to the narrow slots molded into the fuselage sides, which set the angle more or less correctly. The biggest challenge was holding them in a tweezers firmly enough to press them into the slots. I used Micro Krystal Kleer to glue them in place, and when the inevitable "ooze" came out, i brushed it with a wet brush that managed to dilute the ooze, which was then soaked up with a Q-tip. I used the same technique to install the blade antennae on the spine. The reasoning is the dried glue is slightly flexible and if the model gets "bonked" by accident, i hope the antennae or probes wil bend, rather than break at the glue joint. The TAT probe (on the right side only) was the hardest of the probes to install, as the sprue attached to the thinnest (outboard) end of the probe rather than the base.
    As of yesterday, the model is completed with the possible exception of ejection seats. I have painted and test-installed the kit seats but they just seem to be..well, meh. I tried applying the decal seatbelts and if you use them just as a decal, they look flat, lifeless, and cheesy. So, I've ordered the Quickboost seats. Some have said they don't fit, but not everyone agrees. I also bought the Eduard BRASSIN Cockpit set for the kit, but i don't want to sacrifice the whole set just for some ejection seats.

    In the interim, i've been tinkering with the base. Specifically, wheel chocks.
    On a whim, i ordered a set of 48th scale modern USN chocks from Wheeliant (no doubt a CIA-Backed front company for Aires). My results with the chocks were good enough for government work. The detail on them has to be seen to be believed, but its not obvious until they've been painted. The metal crossbar (the part the chocks slide on) is very delicate, and despite trying to be careful, i managed to snap one of them. Now, suitably chastened, if i choose to use them again, i'll know what to expect.


    There is supposed to be a lanyard , connected to a locking pin built into the sliding part. I will see if i can make this part passable. If not, i will leave it off.

    Final outcome of the ejection seats remains to be determined, but other than that...she's done.

    Thanks as always for your encouragement and support.

    -d-

  • Profile Photo
    Michel Verschuere said 5 years, 11 months ago:

    Congrats David! You must be one happy fellow now she's done! Congrats with this fine piece of work, I like the base very much as well.

  • Profile Photo
    david leigh-smith said 5 years, 11 months ago:

    A masterful build presented with stunning accuracy and attention to detail. Wonderful, David. If I had one small criticism...I'd be lying. For me this is close to perfect as is possible.

  • Profile Photo
    Nikola Pentić said 5 years, 11 months ago:

    Very nice indeed.

  • Profile Photo
    Louis Gardner said 5 years, 11 months ago:

    David,
    These last few pictures of Gypsy 203 look very realistic. If I didn't know any better I would have easily mistaken them for the real thing. This build has been a great journey and I sincerely appreciate your efforts. This has to be the best F-14 model that I have ever seen.

    You can tell from your knowledge base during your build that it has been a labor of love.

    Well done my friend. I'll be looking forward to seeing your next update, on the final outcome of the ejection seats.