FAA Corsair MkII
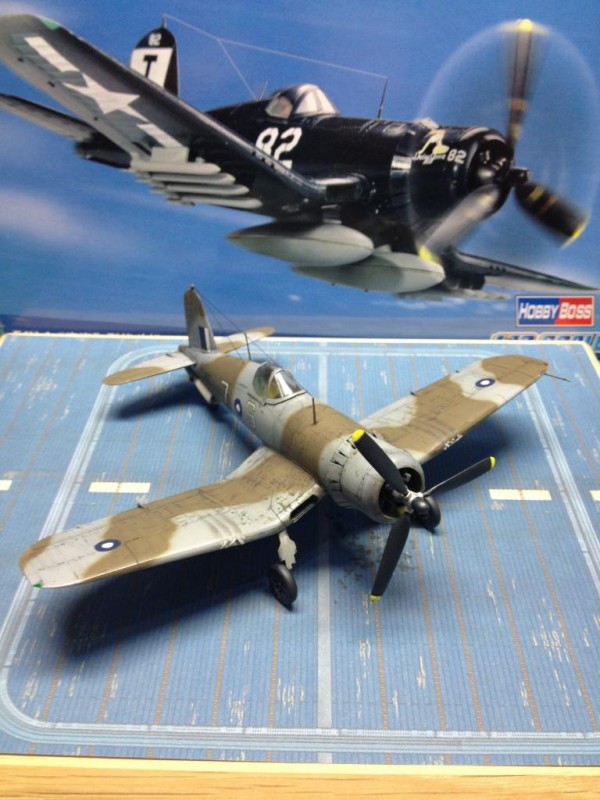
Hi All, Here is my 1/72 scale Hobby Boss Corsair F4U-1a or as the FAA called it
Corsair MkII.
The kit comes pretty much done its basically like a snap together with a minimal parts count
i like these kits a lot! i treat them like a pressure relief valve because every now and then i hit a wall with a build or lose my MoJo and some times i just want to quickly throw something together and slap some paint on without the worry of making a botch of it and the bonus is they are cheap about £5 each and theres quite a few kits to choose from in the line up.
Anyway i did this one because i had some Decals called Yanks with Roundels i cant remember who produced them possibly Tech-mod anyway i picked this one because of the camo finish plus i googled FAA Corsairs and got some good images some in colour showing to good effect the weathering and general well used appearance so i thought i would try to copy the look, the kit literally took an hour or so to snap together no serious filling required just a bit of Mr Surfacer at the wing root let it dry a quick wipe over with Mr Levelling Thinner on a ear bud ( Q tip? ) thats it job done on to the best bit the painting so the first thing to sort out was to decide what colours to use when these aircraft were ordered the American Factories were given the FAA Specifications including camouflage colour and pattern because the American paint producers didn't make the exact colours required they used the closest match these were
Sky Type S = US Light Aircraft Grey i used Aqueous Hobby Colour H51
DK Sea Grey = US Neutral Grey i used life color UA524
DK Slate Grey = US Olive Drab i used Aqueous Hobby Colour H78
Please dont take it as Gospel the above colours a correct like i said i googled it and there are different takes on what was actually used, even the three factories that produced the corsair didn't always us identical colours, (sometimes i thank God for Google and i love love love it but a lot of the times it causes more Confusion and annoyance) anyway on with painting i first painted Zinc Chromate on the wing root and around the areas where traffic and maintenance was carried out i then used liquid masking dapped on randomly in these areas with the hope of pulling it off to reveal the Zinc Chromate after the camo was done,
first the underside was sprayed (H51) then the top colours were all done free hand like i said i didn't worry about making a mess so no pressure to get it right and for once it all went on nicely (Typical) once dry i started to pull off the liquid masking and was quite happy with the effect then a quick coat of Mr Super Clear Gloss great stuff touch dry in less than ten mins and its tough hard as nails, then its dreaded Decal time again, i can be a bit hit and miss with decals but these proved to be trouble free, another quick coat off Mr Gloss then on with a wash i swear by Flory Models Wash Brilliant easy to use if you mess it up just wash it off i tend to use the dark dirt its not as stark as the black and that was pretty much it job done, the only couple of things that i wasn't happy with was the fit of the canopy as you can see from the photos theres bit of a gap at the front part and as i really didn't want to start filling and sanding and having to re-touch it up so i thought stuff it ill live with it and the other thing was the wash completely obscured my paint scuffs and chipping and turned it very dark so the lesson here my son is to leave the masking on until the very last job but you know how most of us modellers are as soon as we mask something then paint it we cant wait to peel it off to have a look at our handy work.
Hope you like it
More to follow if i can find photos or dig the camera out.
oops no photos dont know why there not there i uploaded them or downloaded em ill try again please be patient im new at this
love it mark...i'm a s****r for china burma roundels...Mountbattens theatre
I like that scheme...nice detail work as well.
Very nice little model! You got it right color-wise for your Corsair II. Here's the difference between factories:
Corsair I (Vought-built F4U-1): Along with Grumman (just down the road) Vought used correct FAA colors, Dark Sea Grey/Dark Slate Grey/Sky.
Corsair II (Goodyear-built FG-1A): "FAA equivalent" colors of Neutral Grey/Olive Drab/Light Aircraft Grey. The OD was early-war US green-base OD, which is the same color as RAF Dark Green, both based on the official specification for World War I "P.C.10" - however in the Pacific it faded to the shade you have here, as did the Neutral Grey. (One niggling bit is that the standard Type B upper wing roundels and C.1 fuselage roundels and underwing C roundels were overpainted before aplication of SEAC roundels - FAA Dark Sea Grey was used on the upper wing and fuselage, and Sky on the lower wing - that has frequently been misinterpreted in B/W photos as keeping the large Insignia Blue roundels and painting out the red centers)
Corsair III (Brewster F3A-1): USN tricolor (none of these were used operationally).
Corsair IV (Goodyear FG-1D): Glossy Sea Blue.
Wow Thanks for the info Tom,
i must admit i was getting confused with the colour options most of the built models in this scheme or one like it were all done in the correct FAA colours and no body mentioned the substituted paint colours but on further investigation i found what i was looking for and painted it in the Dupont colours i mention in my text and i must admit i was very happy with the result.
Thanks Tom
Mark
Mark,
Looks great, I really like it.
Cheers Frank,
Mark
Cool Corsair Mark. I built this kit with my son a while ago, and they are great for quick builds. Fantastic paint job, weathering looks spot on 🙂
Thanks Gregor,
Mark
Nice clean build, the flight deck is a great touch to display your fine aircraft.
Thank you Mike, Glad you like the flight deck its a download from Model Scenics i pay £3 or £4 and there were a few to pick from iv got them all Royal Navy Flight Deck US Wooden deck unpainted and late war painted and Japanese
there pretty good the down side is if your printer isn't great like my old one the images are pretty poor.
thanks for the kind comment
cheers
Mark
Very neat little model, Mark, and thanks for the info about the flight deck.
That looks very nice Mark, I like the way you got the panel lines just so.
Well done Mark.
Cheers Simon, no secret mate just flory models wash i love love love it
so easy to use splurge it all over (not on matt finish though) and when dry use a very slightly damp tissue i usually wet it on mi tongue and wipe off try not to do it in the direction of the panel line and hay presto easy panel lines and if you make a bugger of it simply wash it off, dont use the black though its a bit to much give it a go or check it out on uTube or google it flory models
ok mate here endeth the lesson
thanks for the kind comments Simon
Regards
Mark