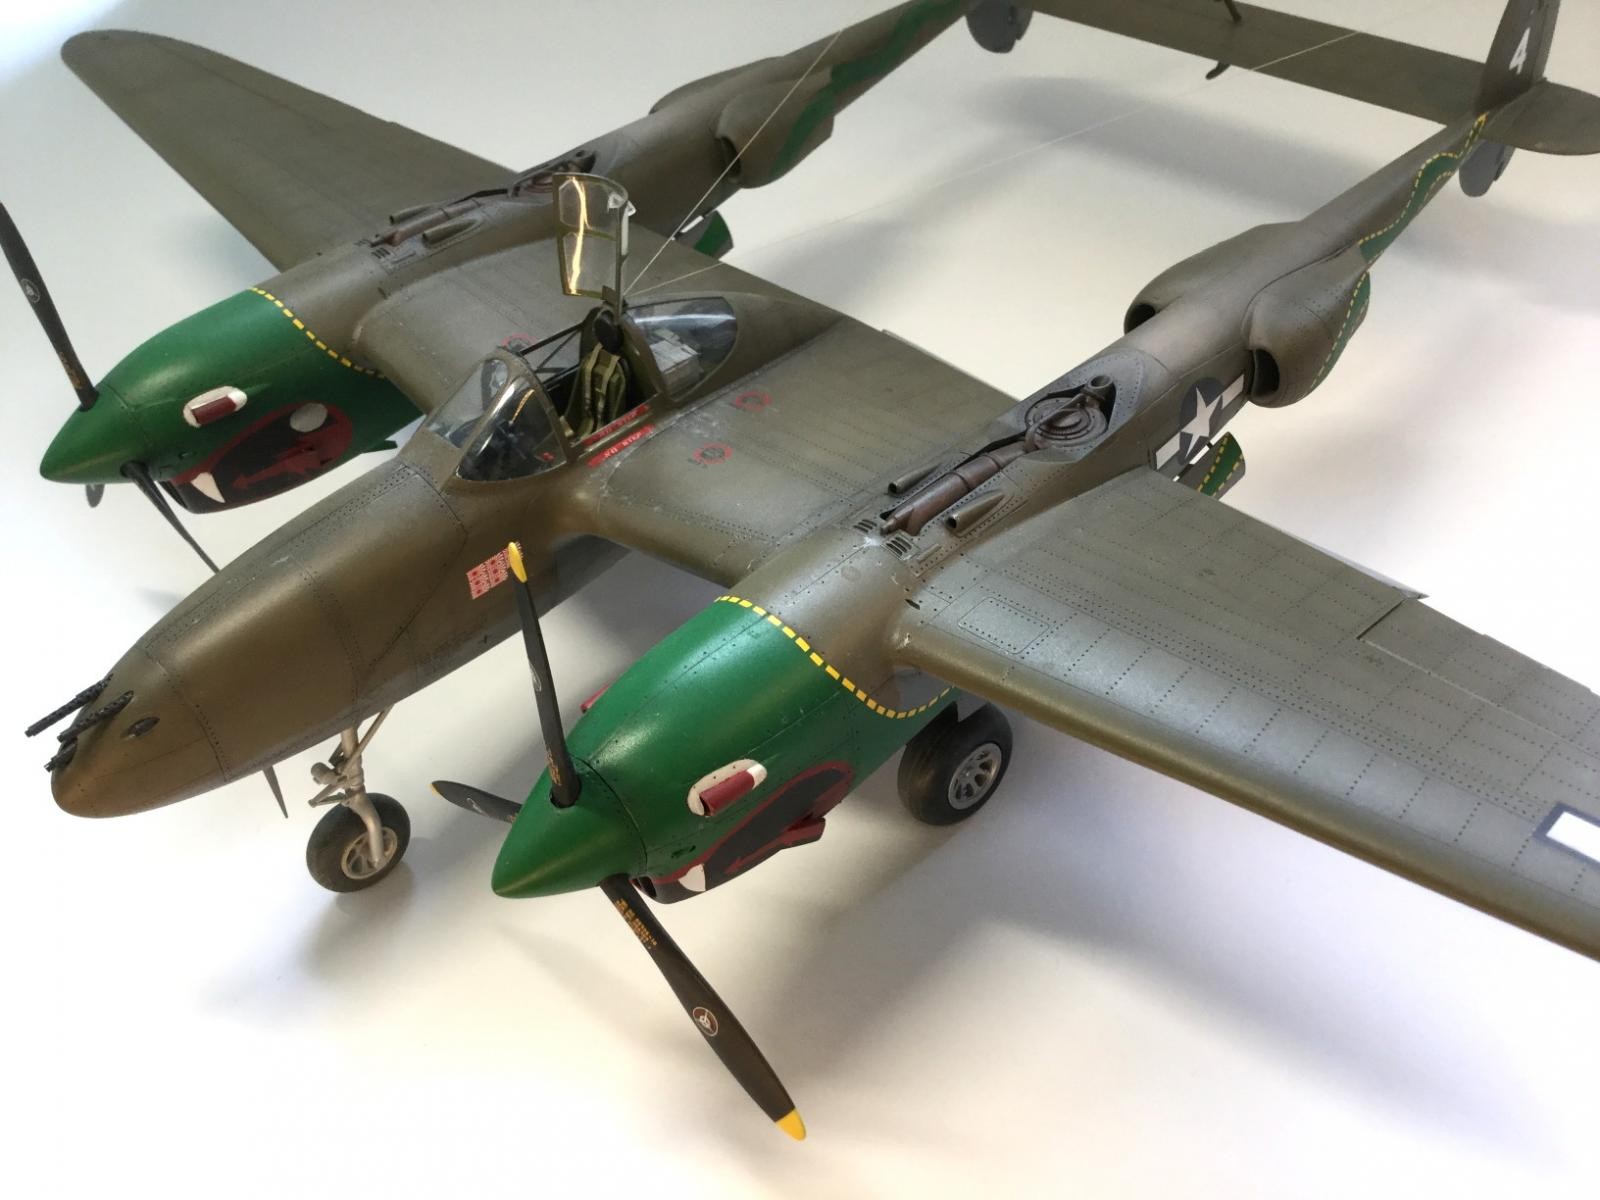
P-38J Lightning – Twin-Tailed Dragons 1/32
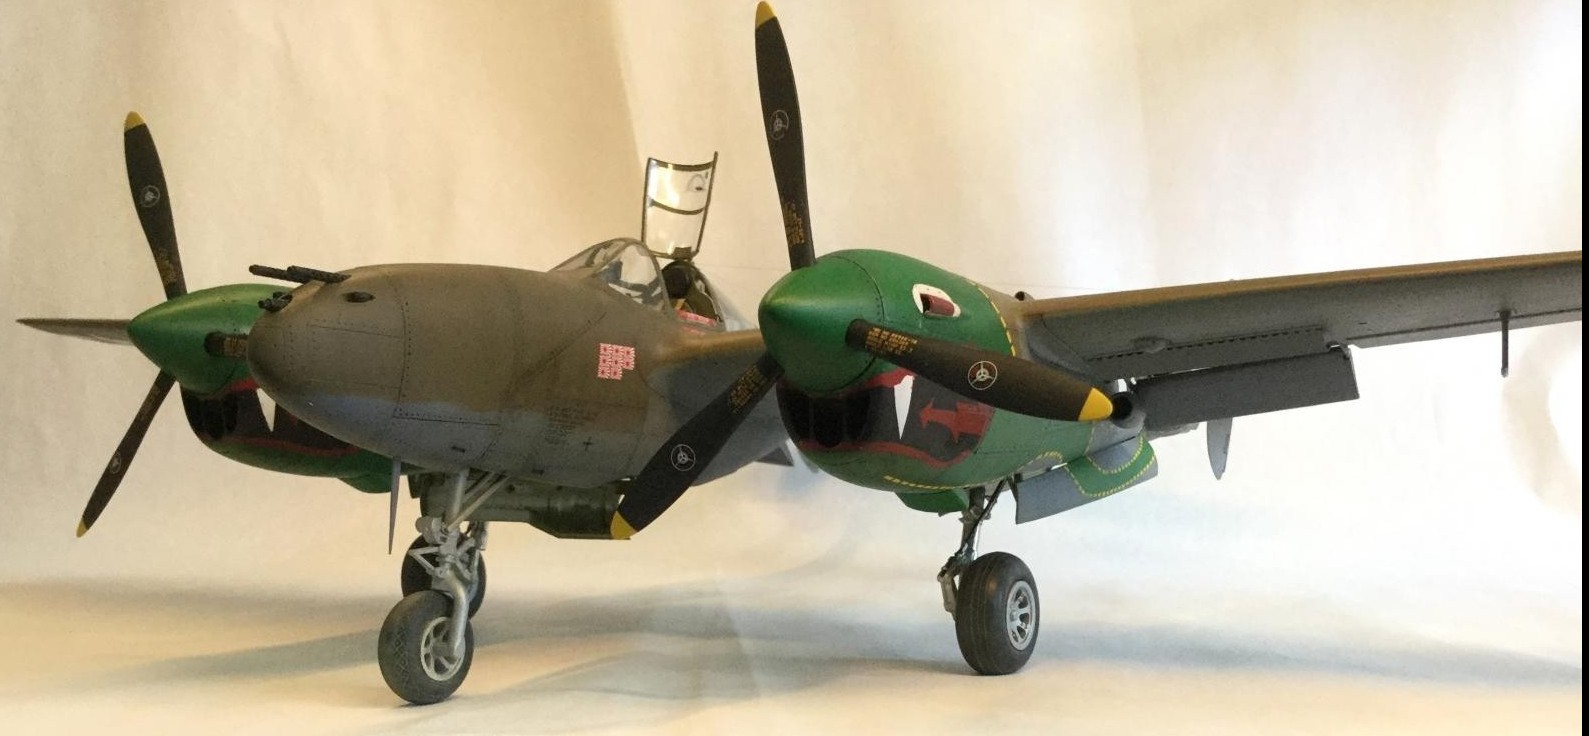
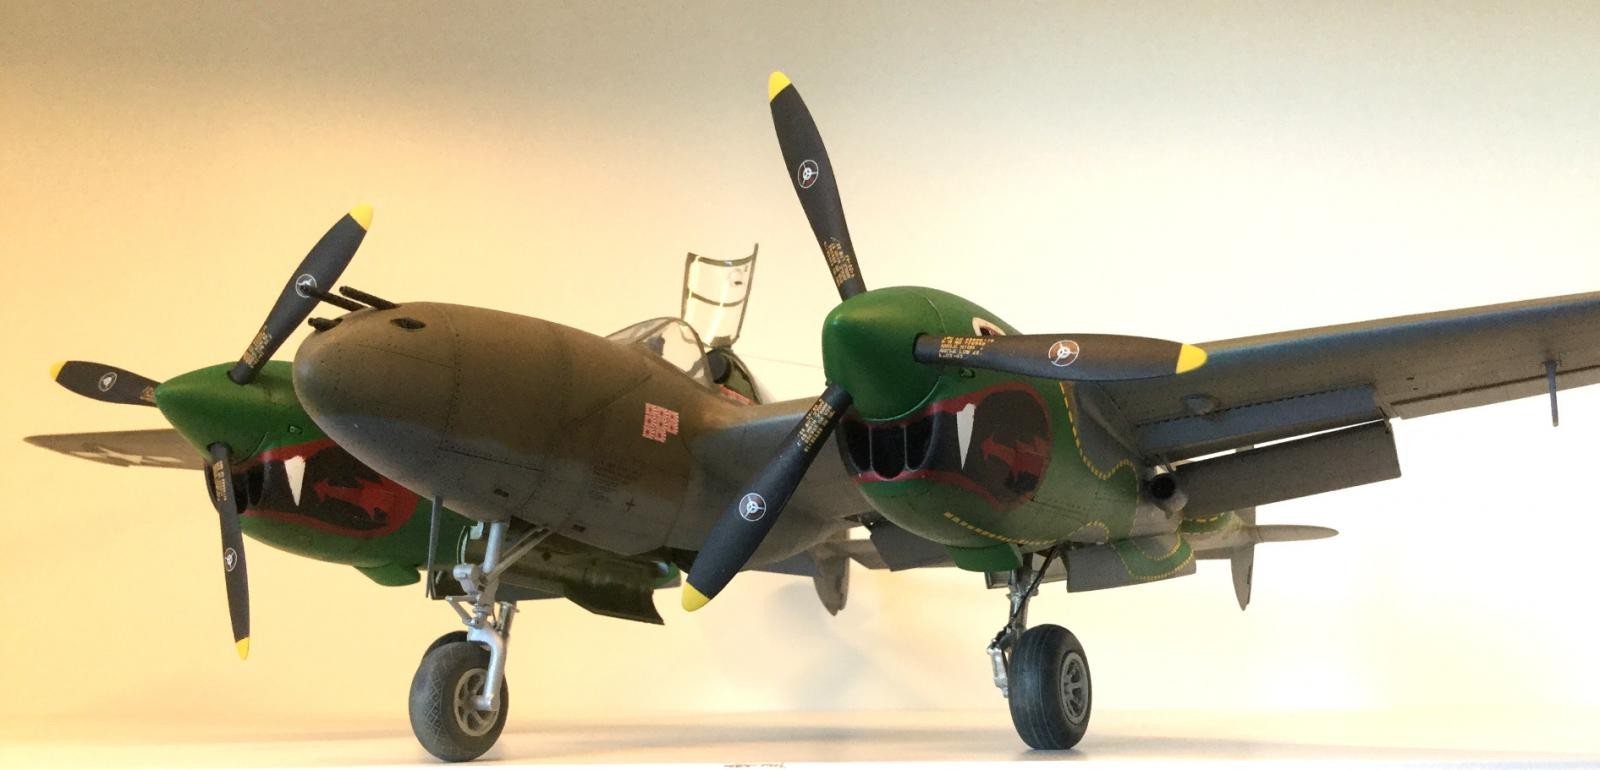
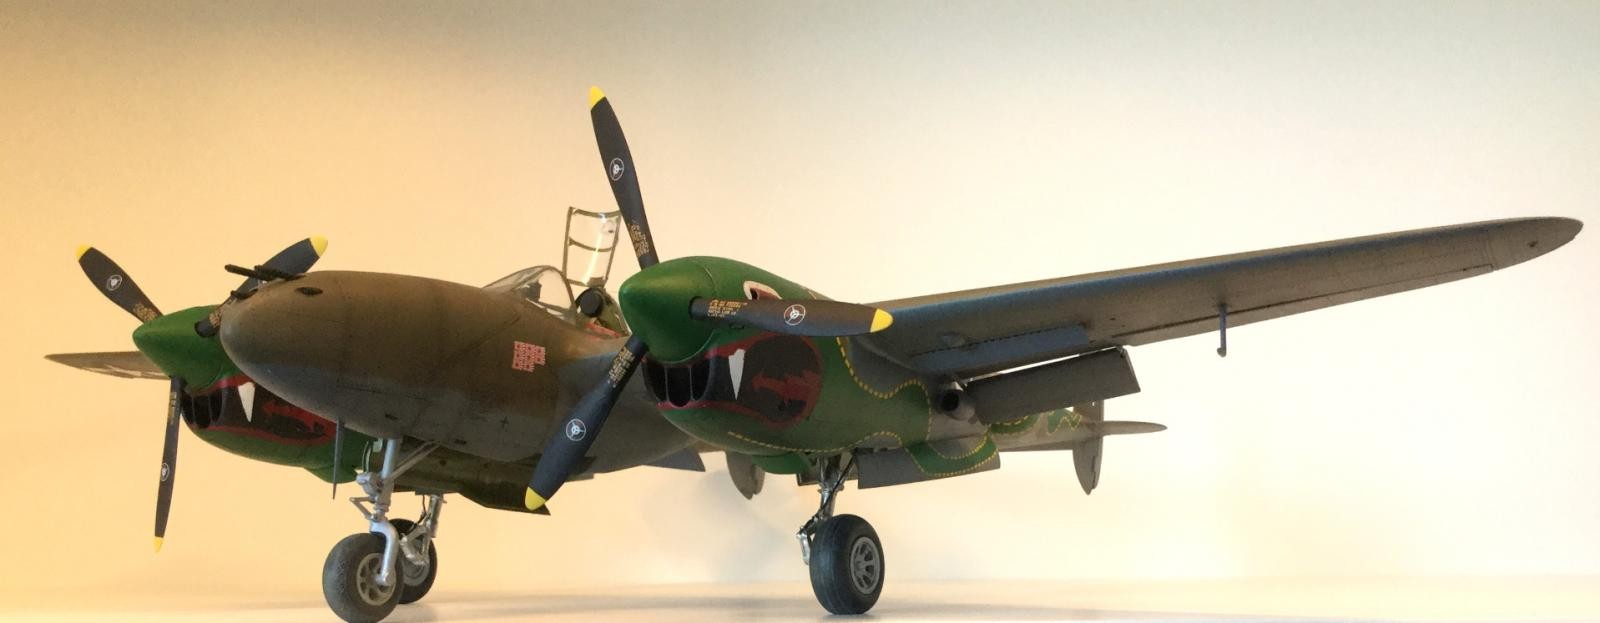
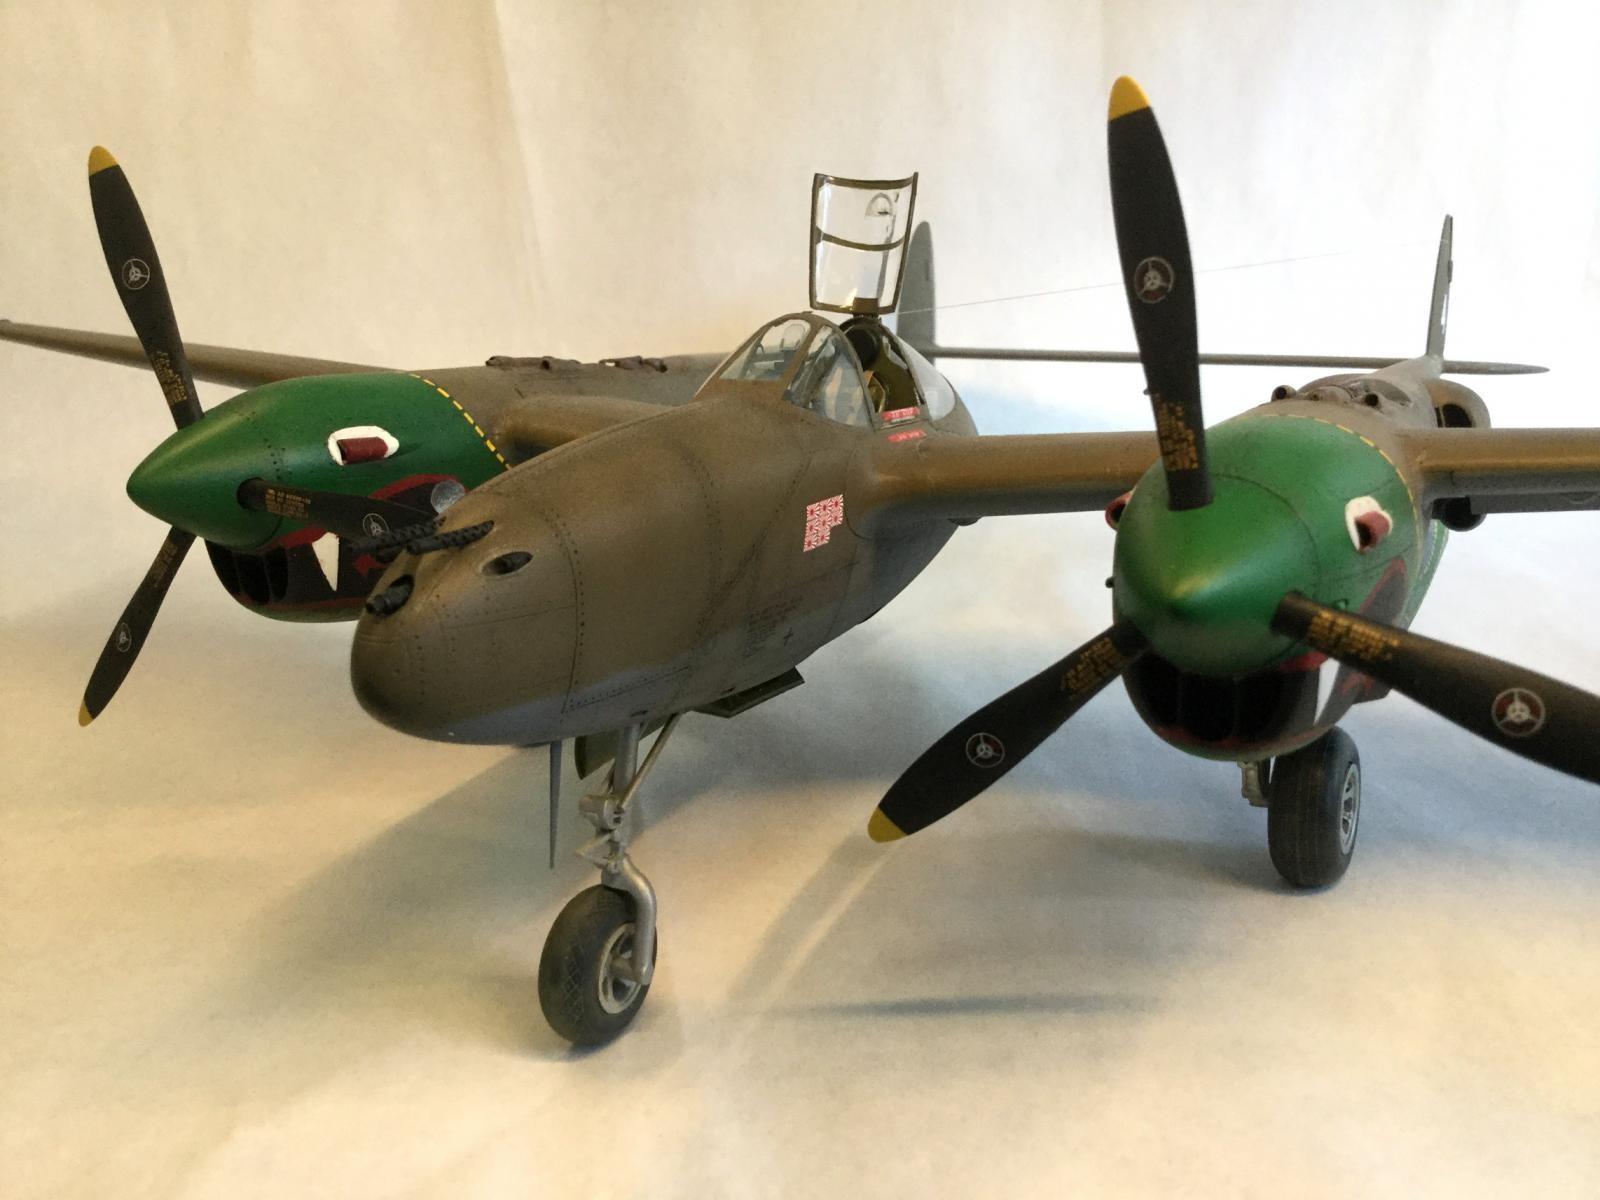
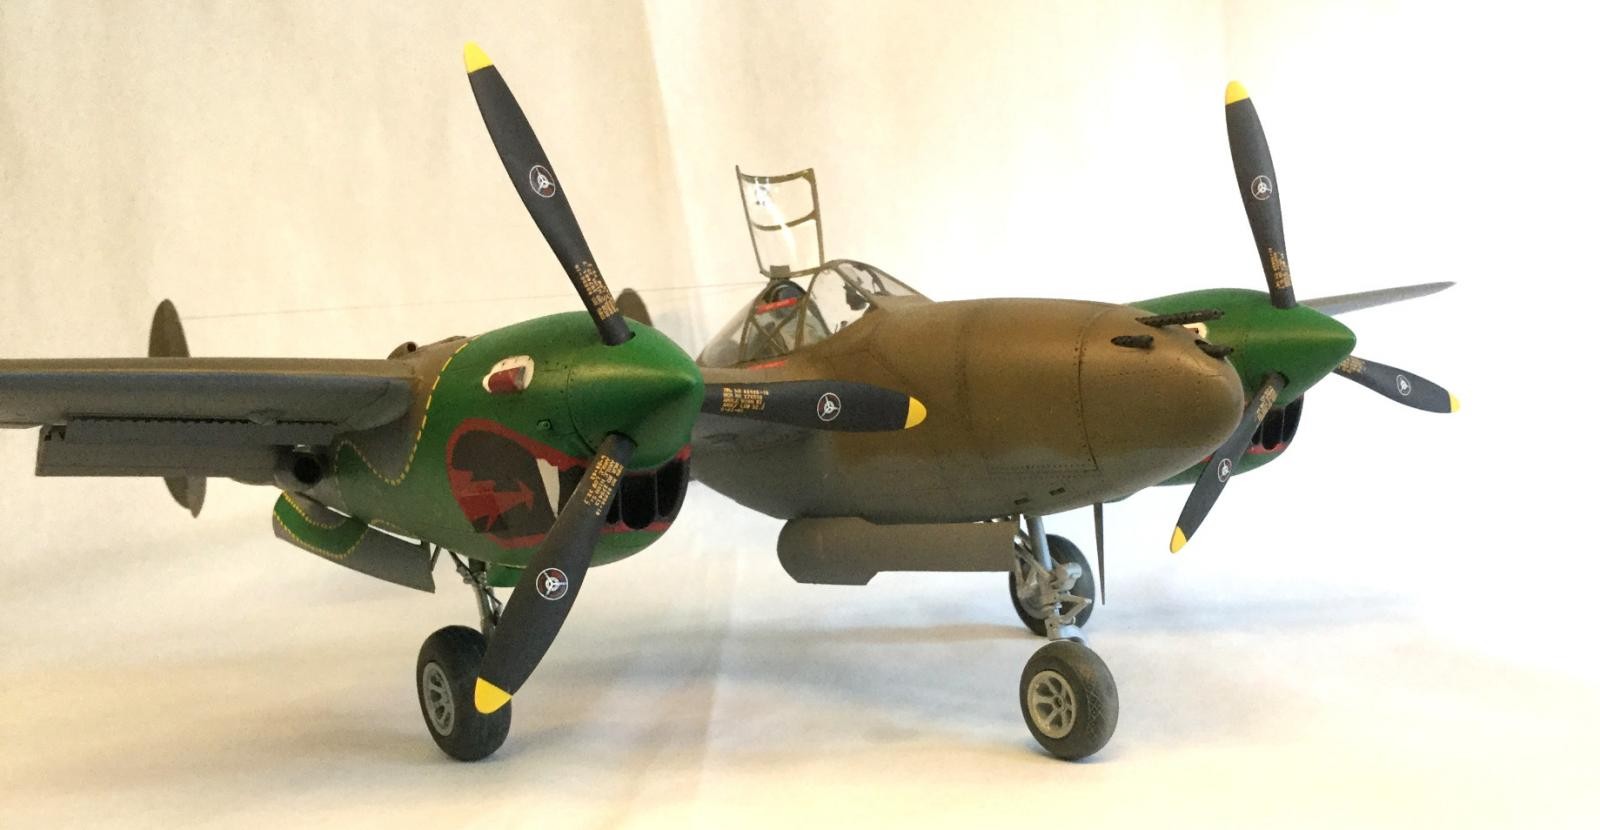
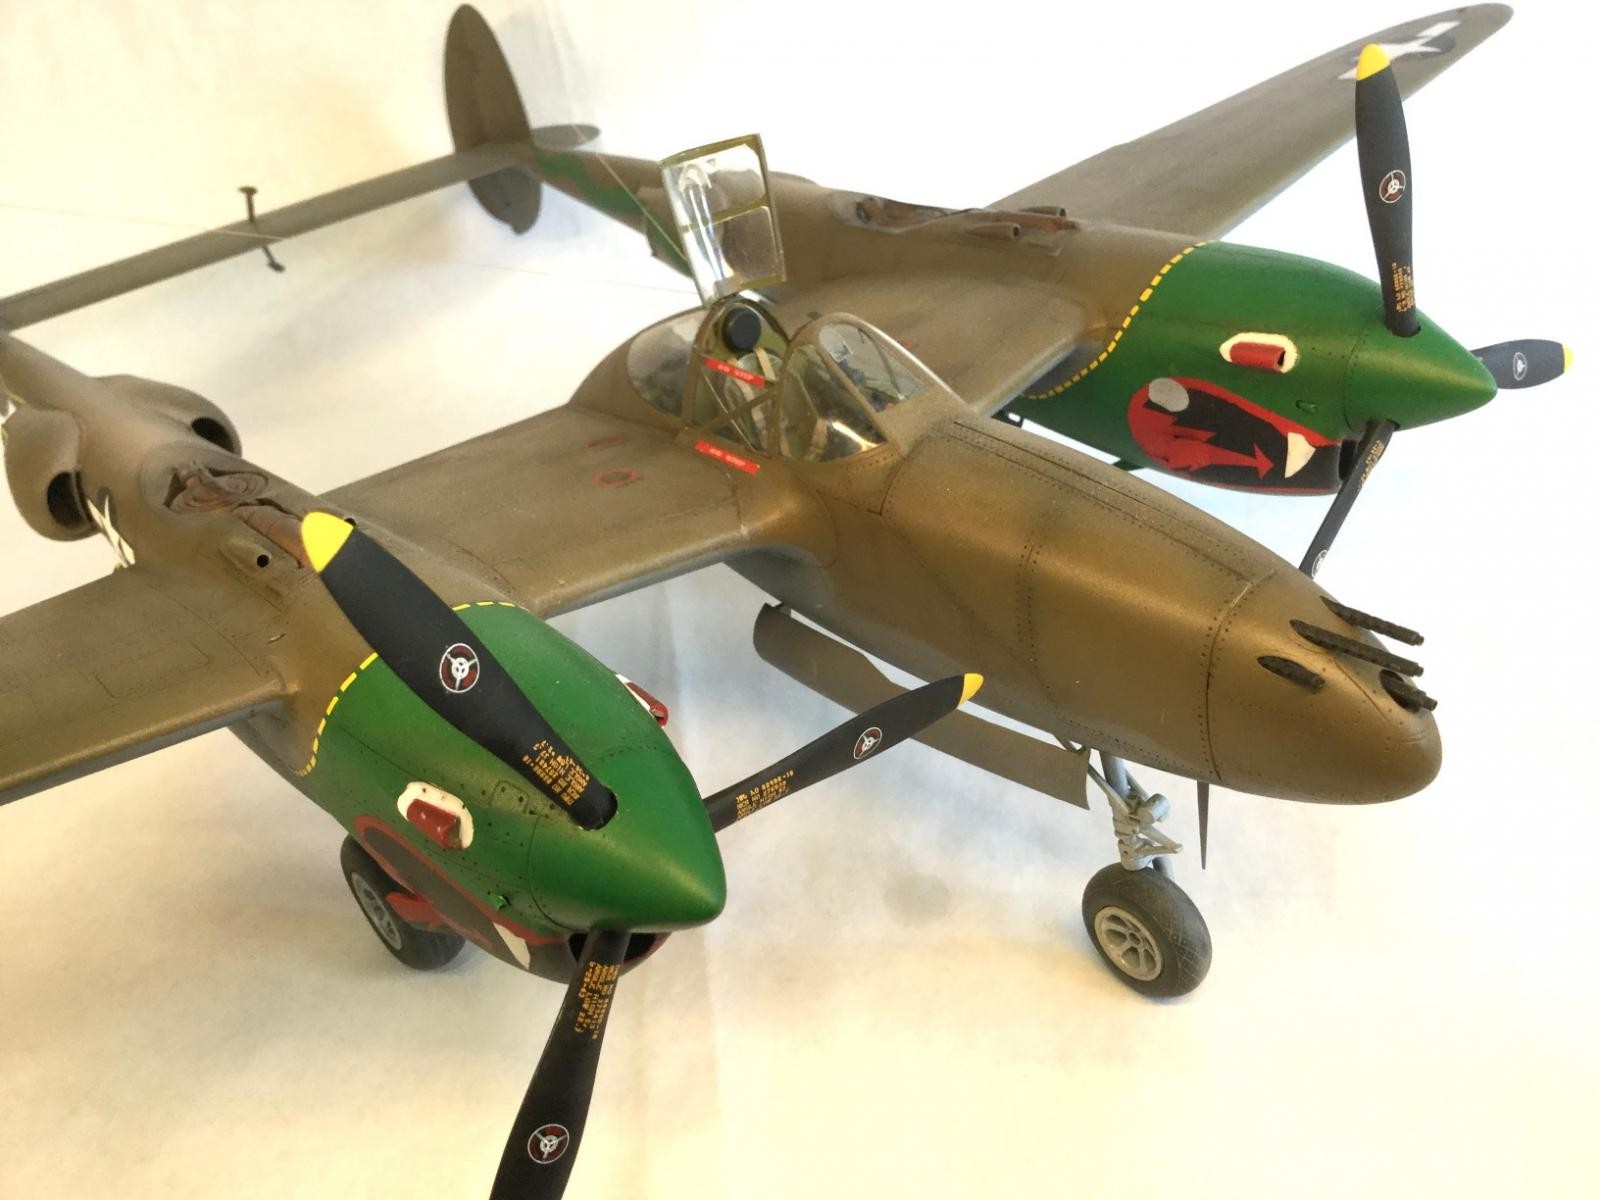
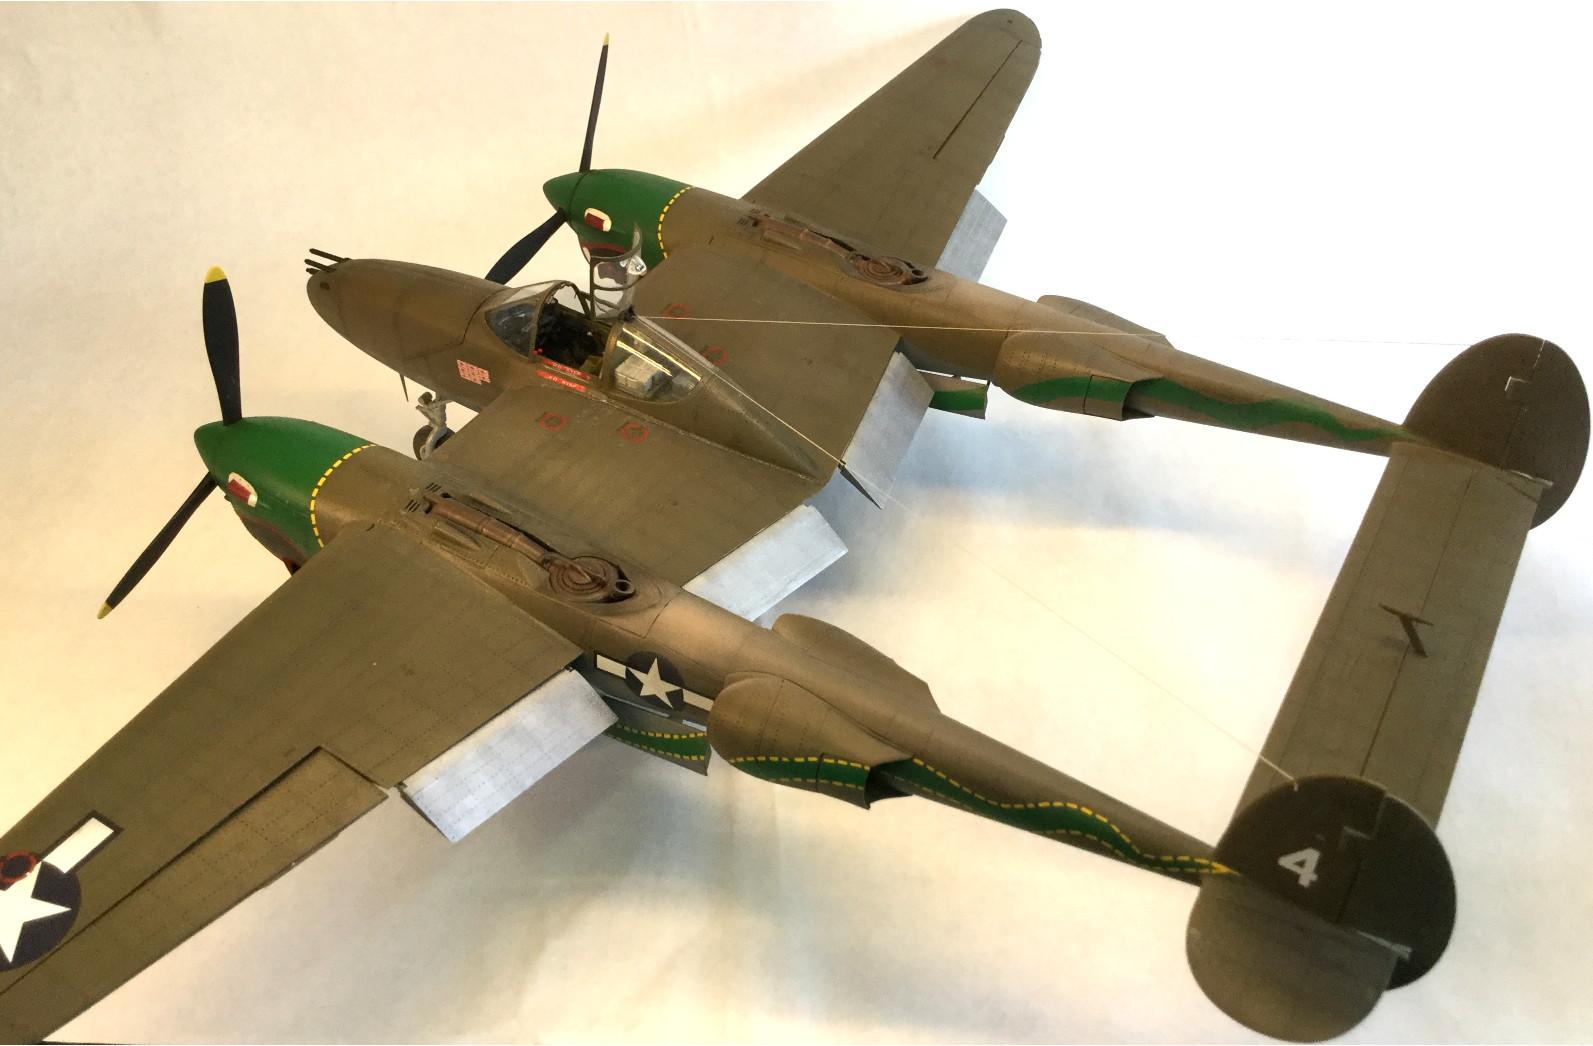
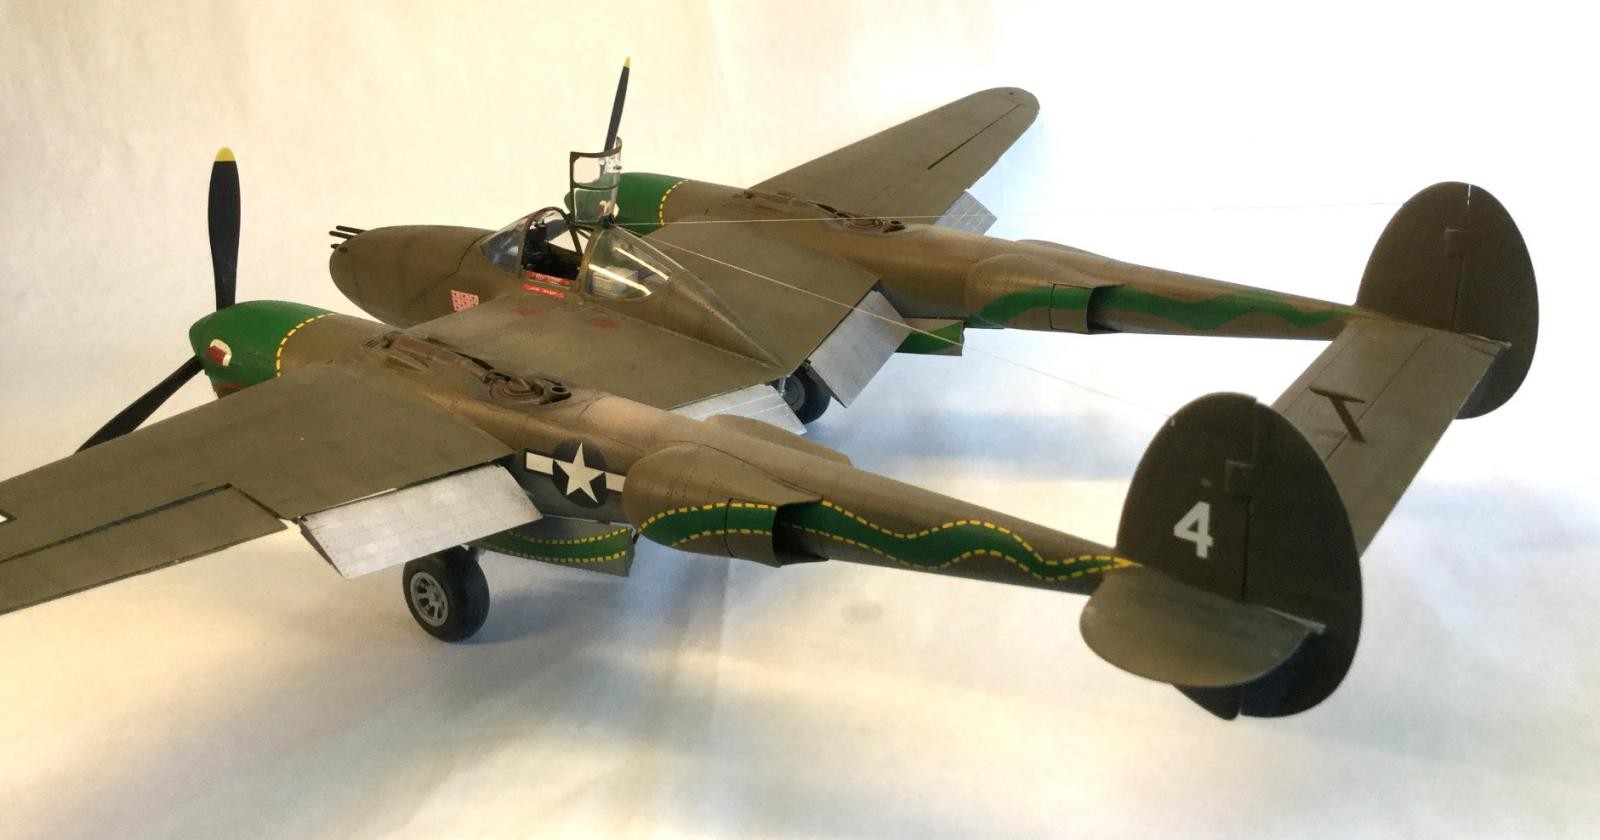
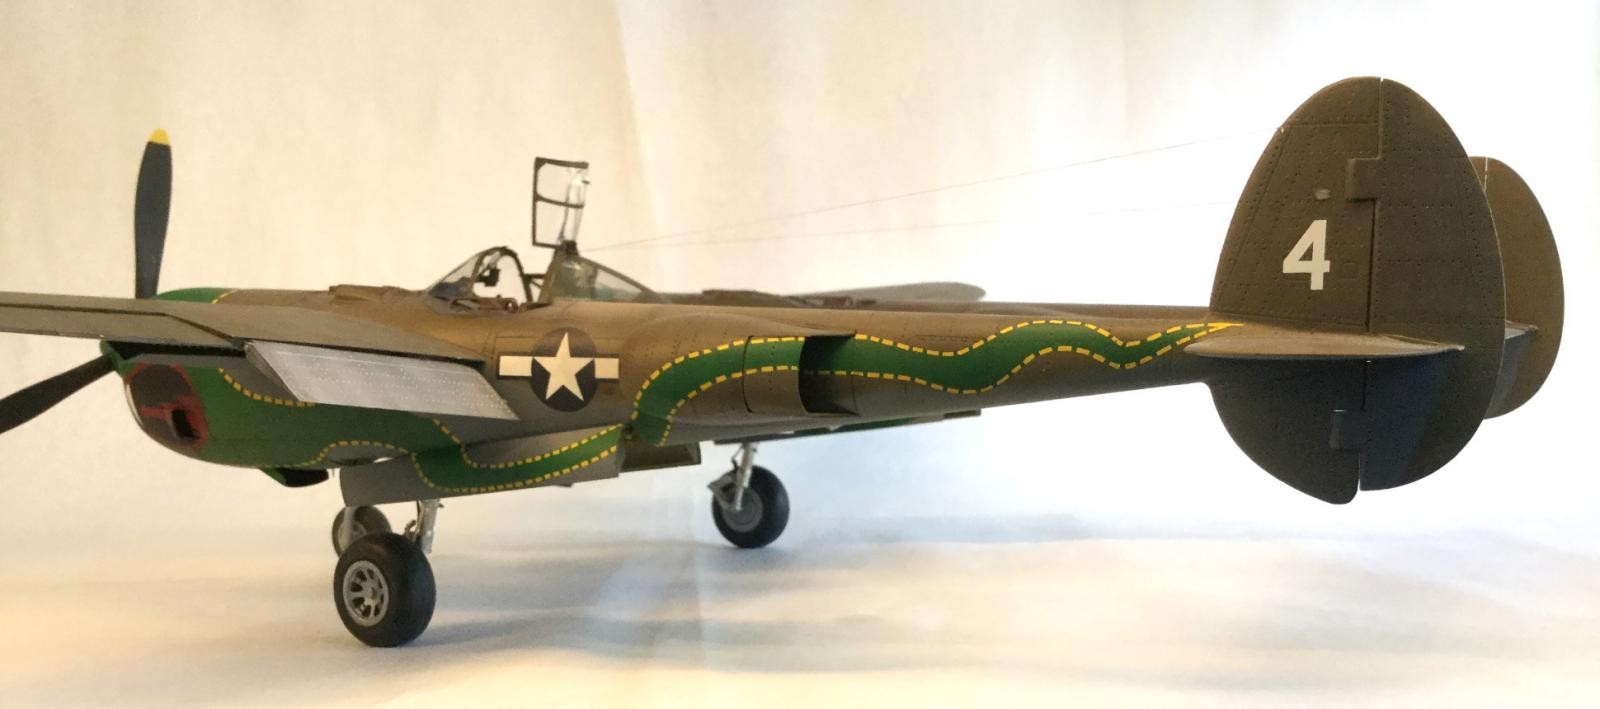
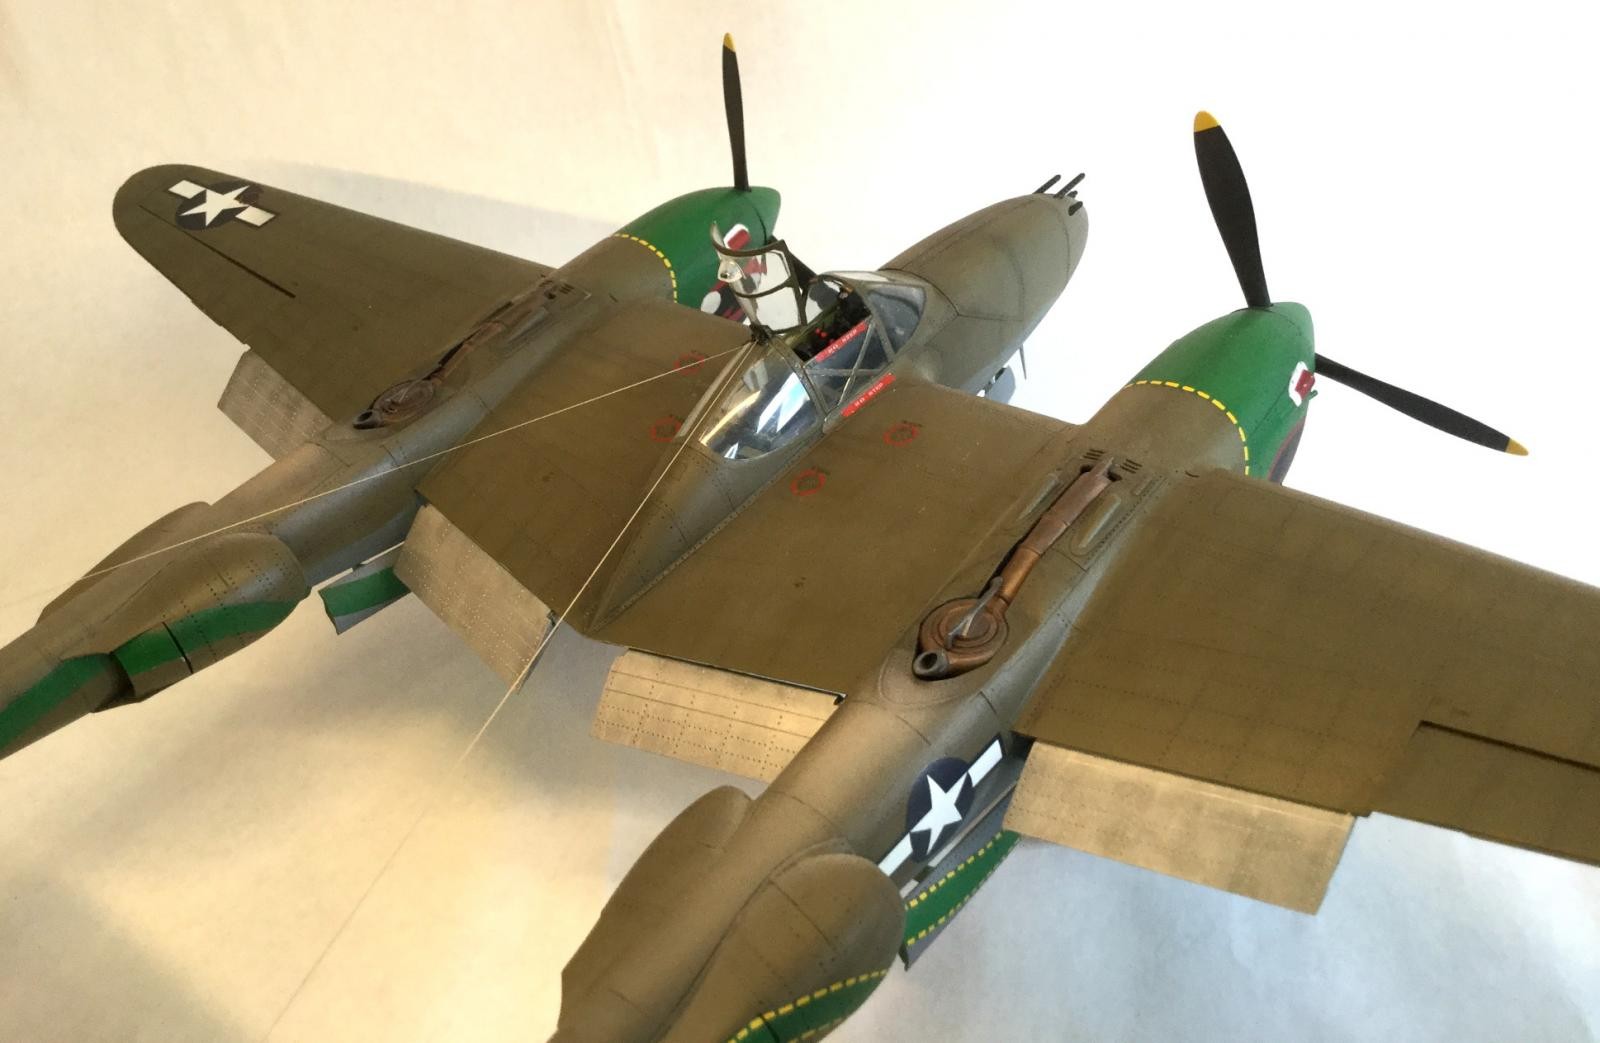
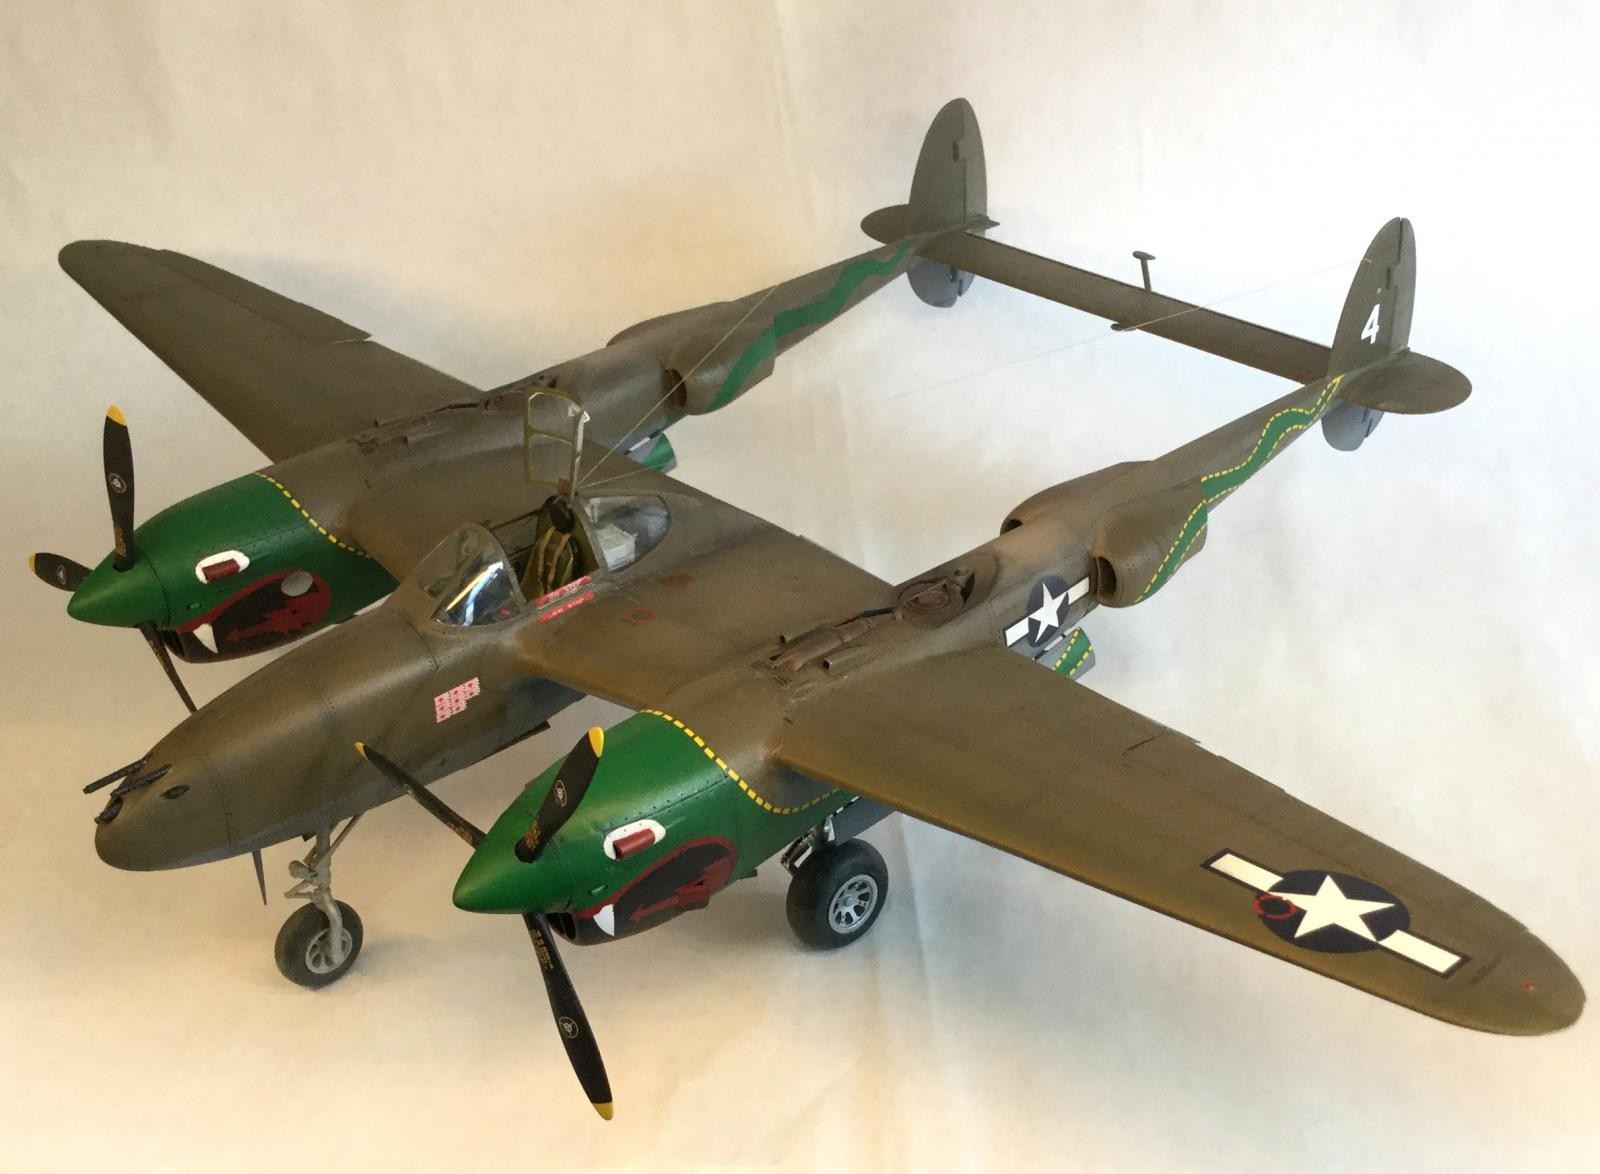
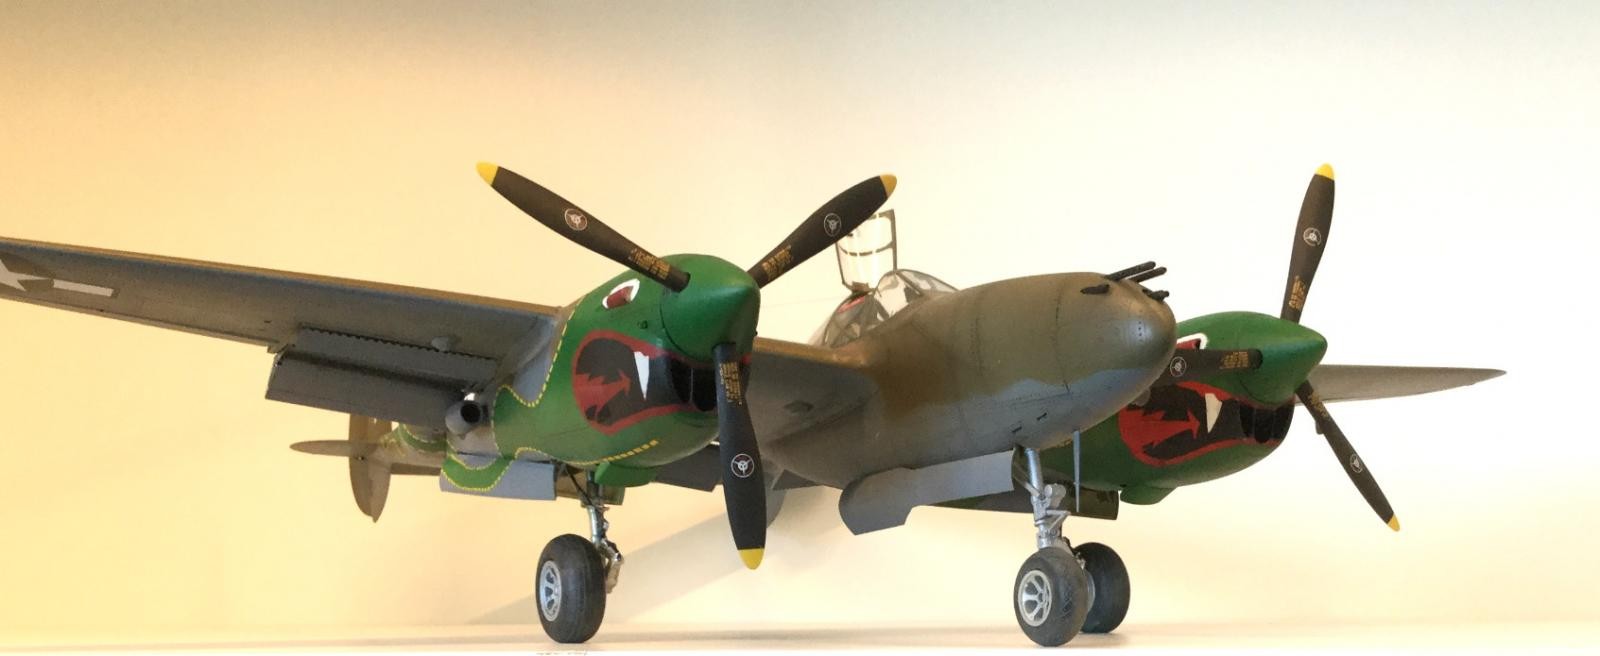
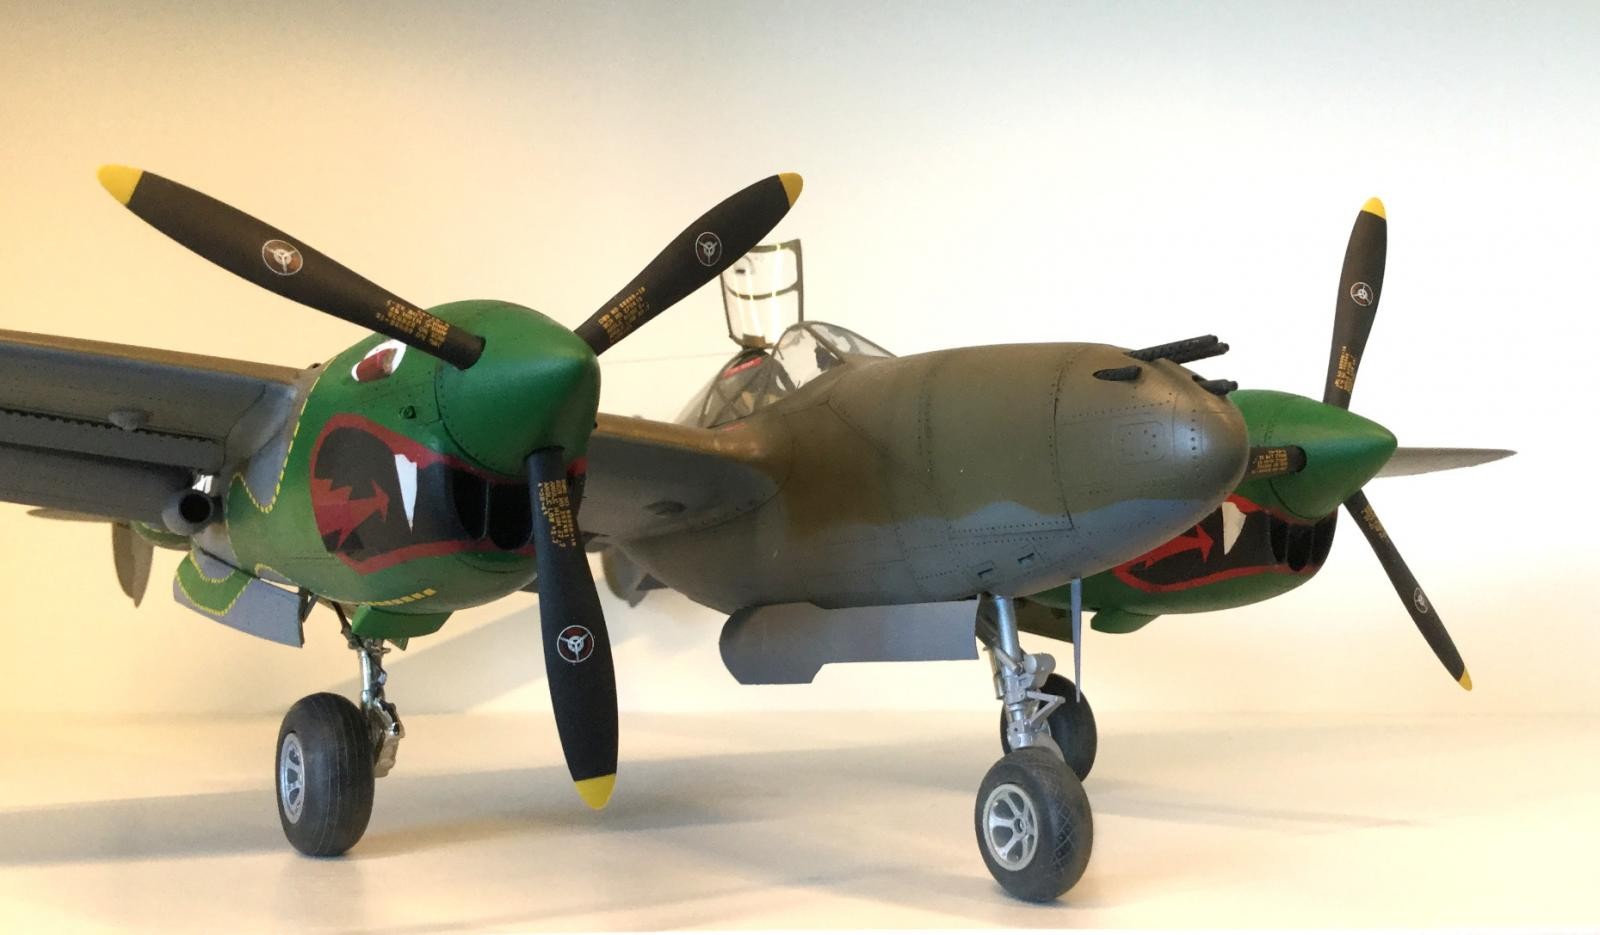
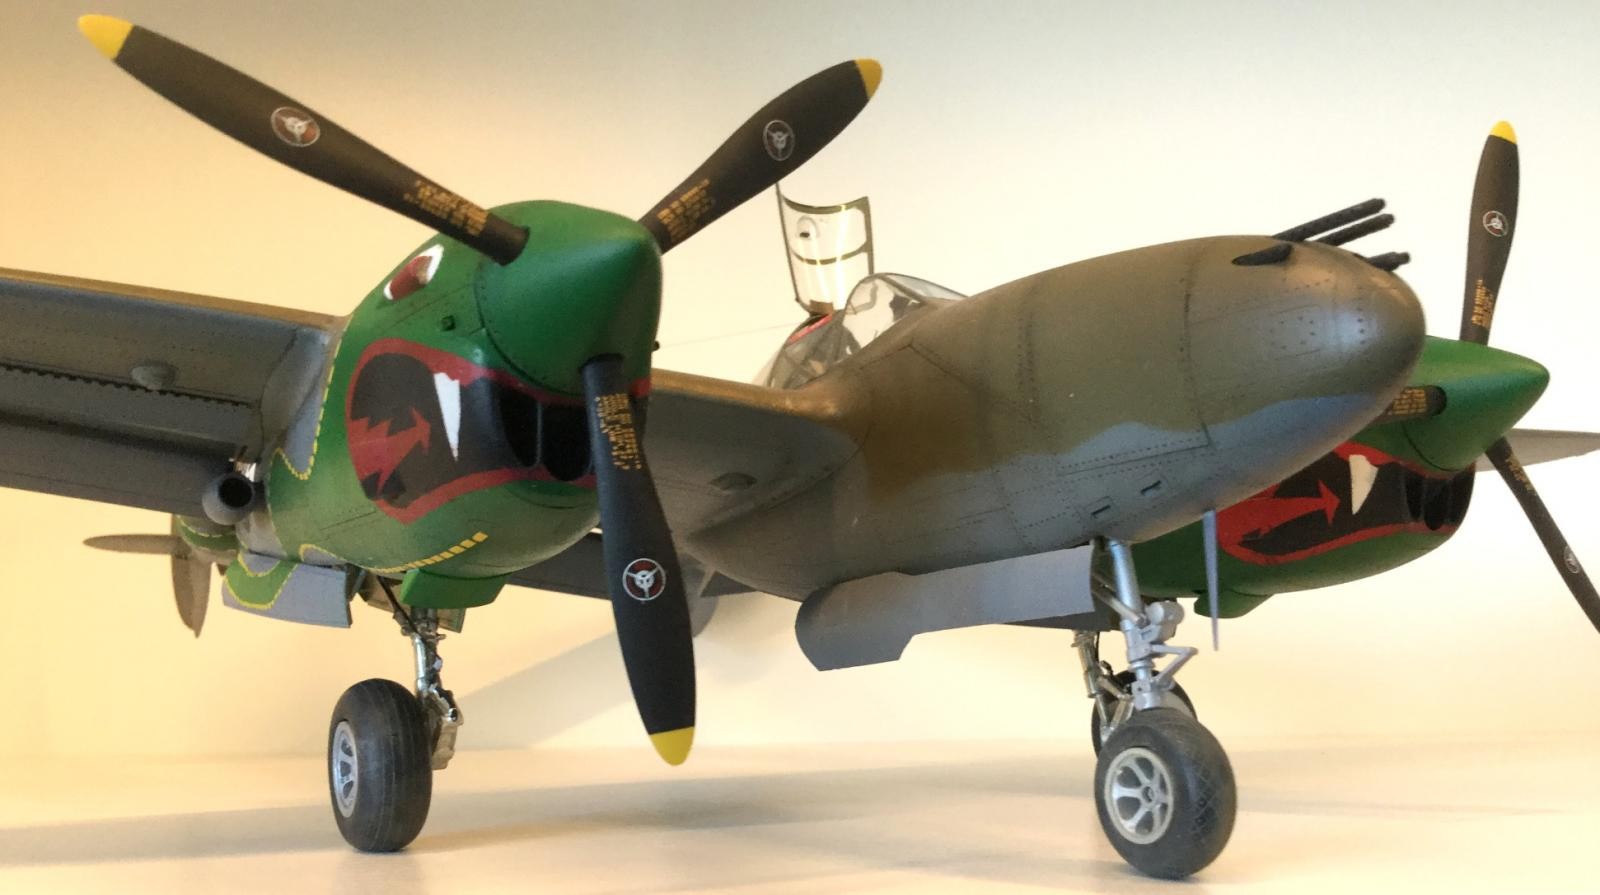
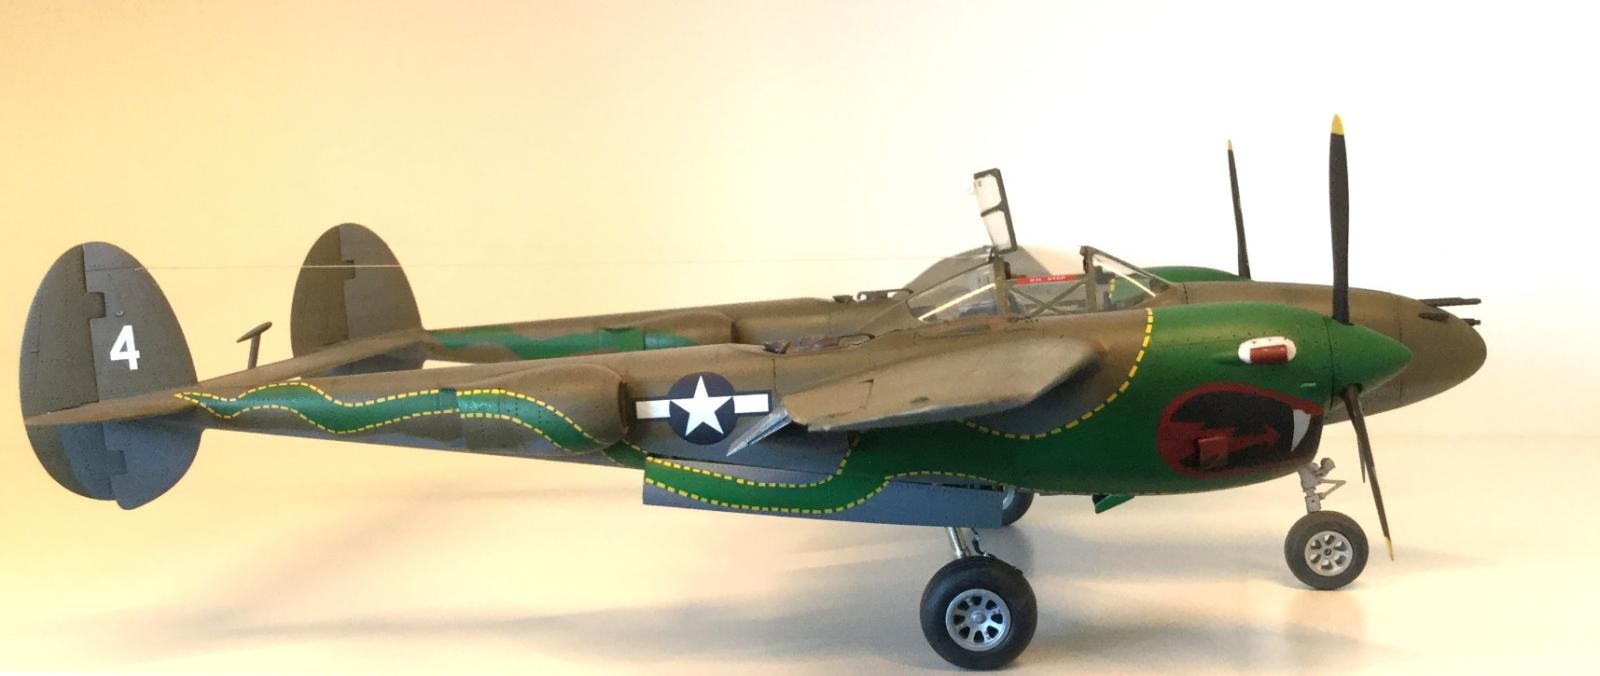
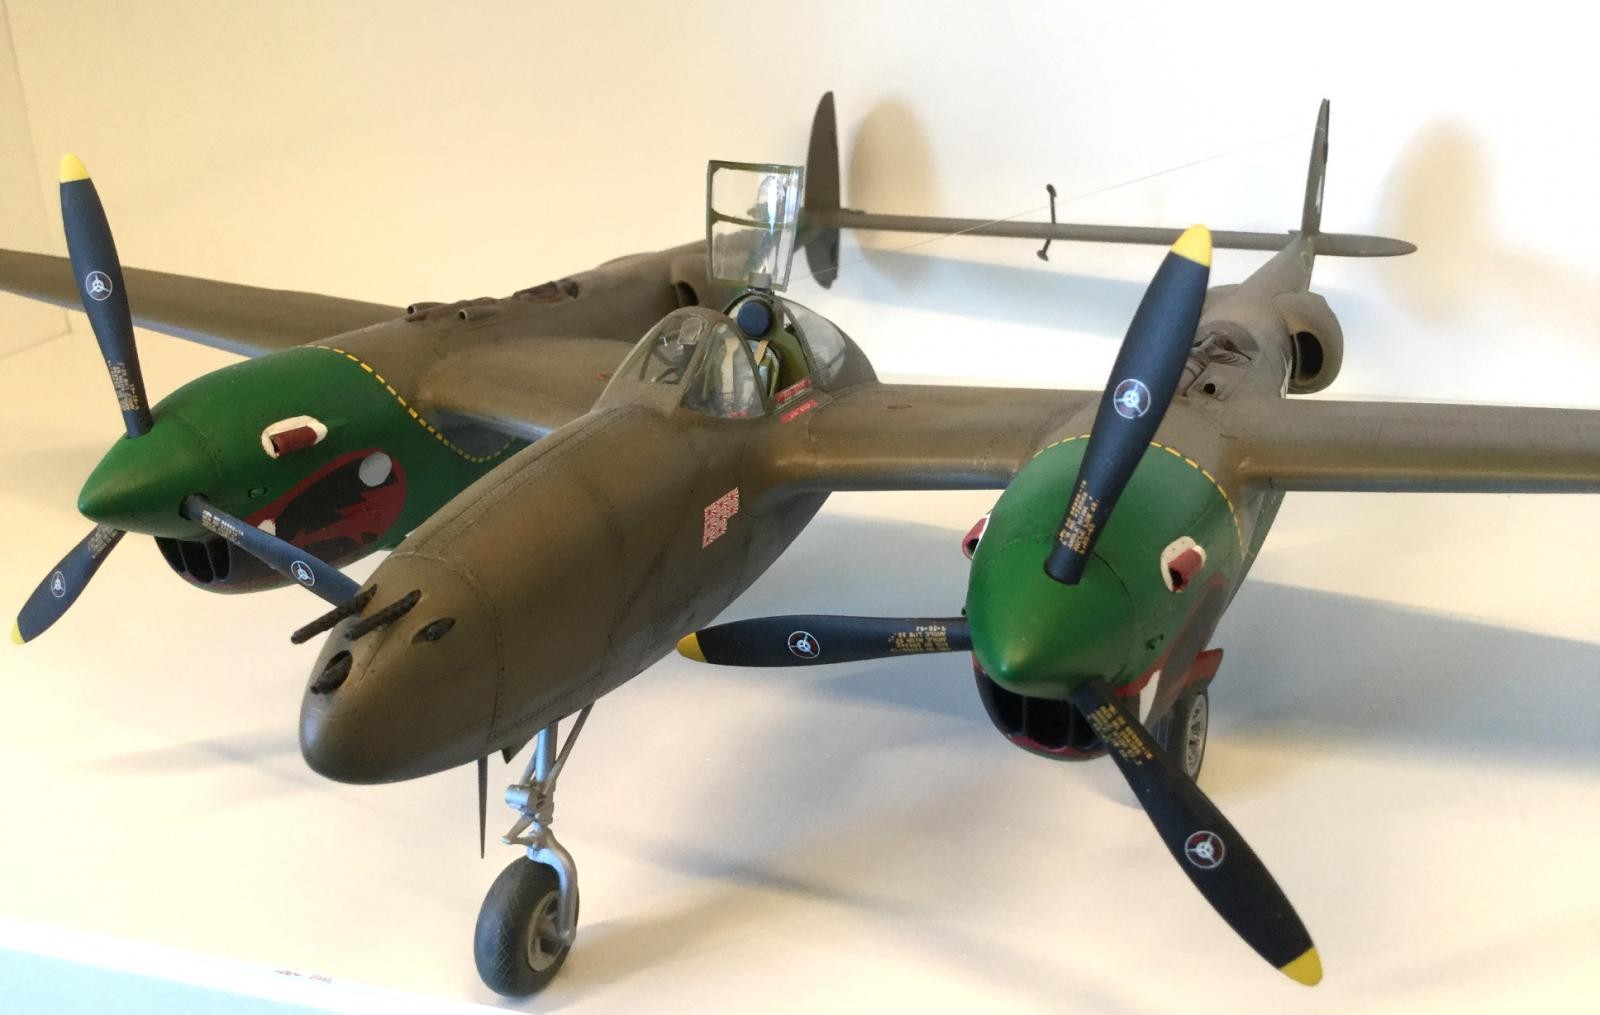
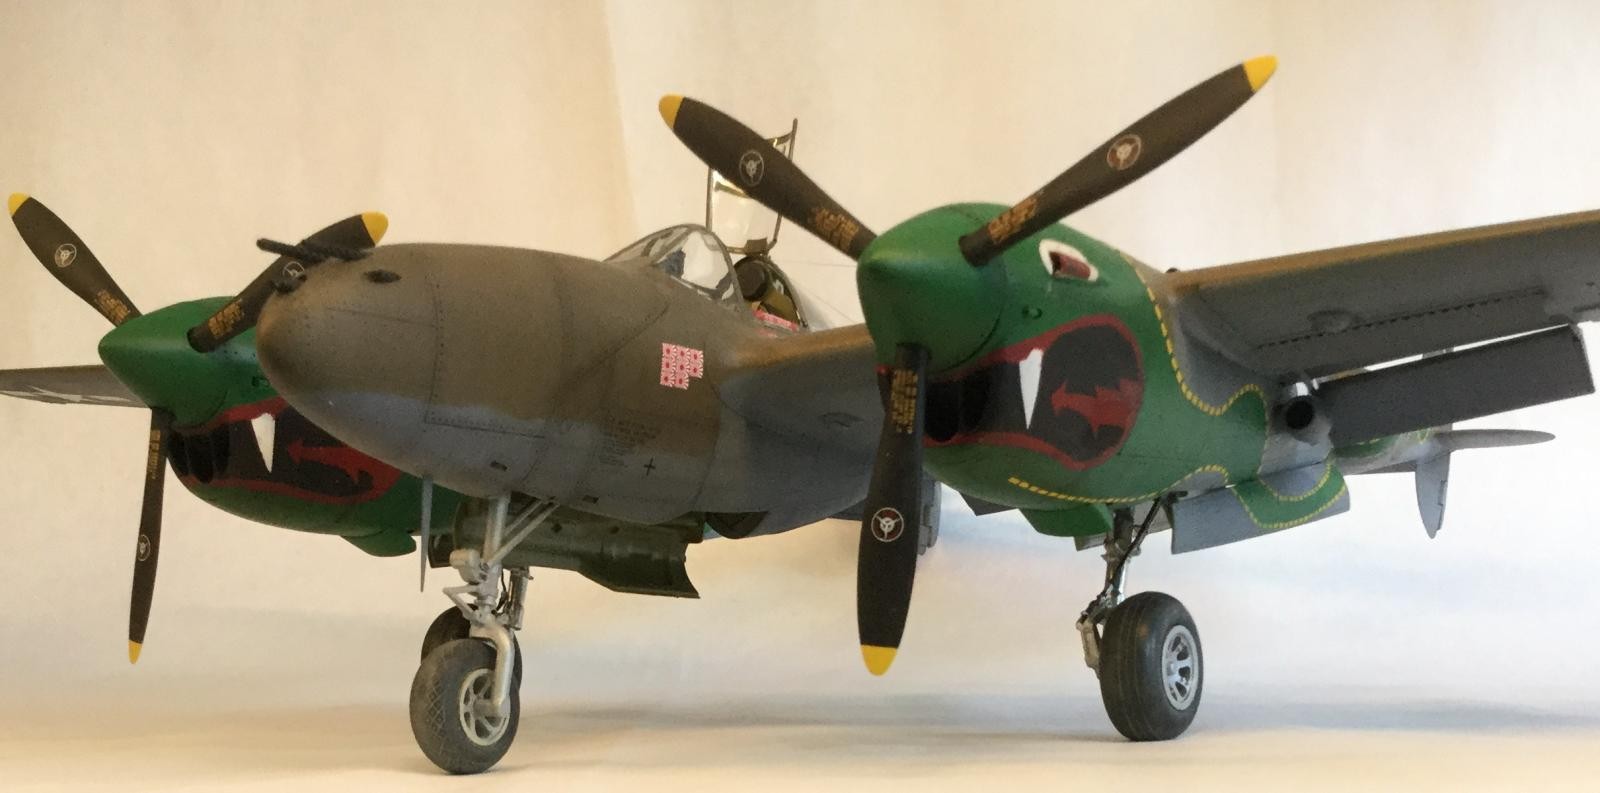
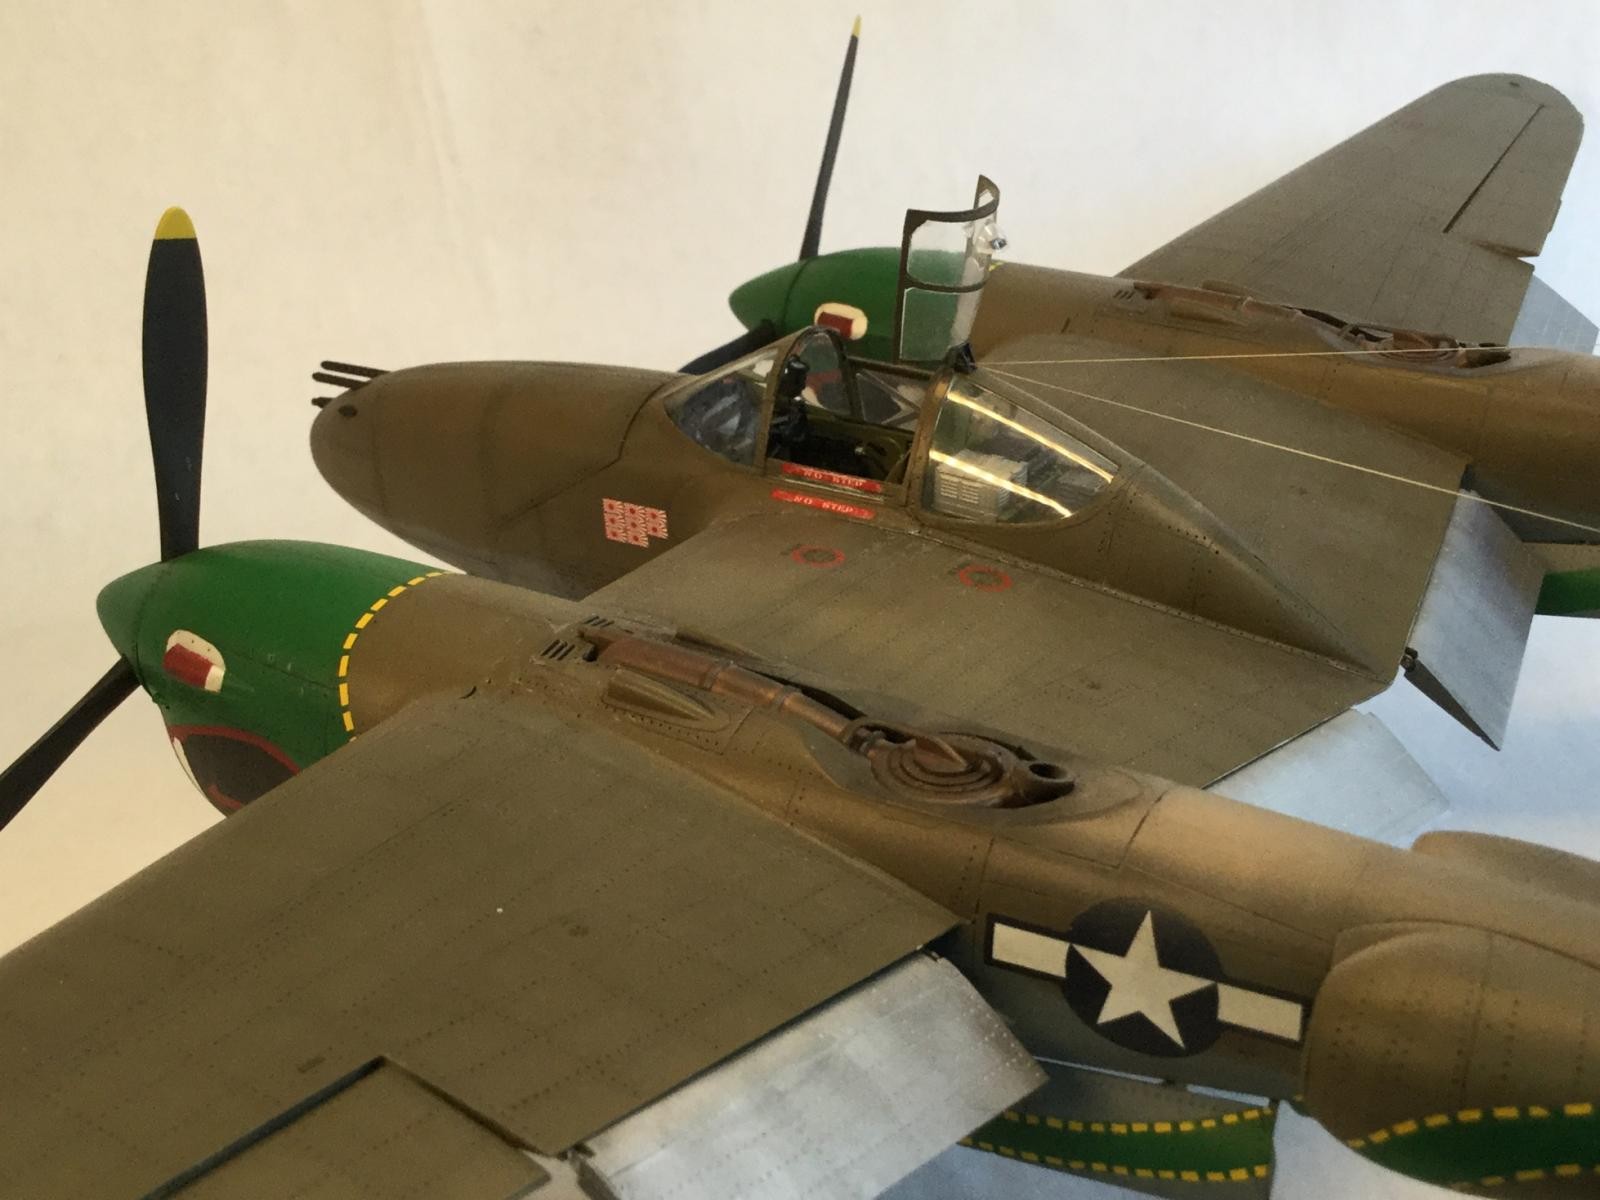
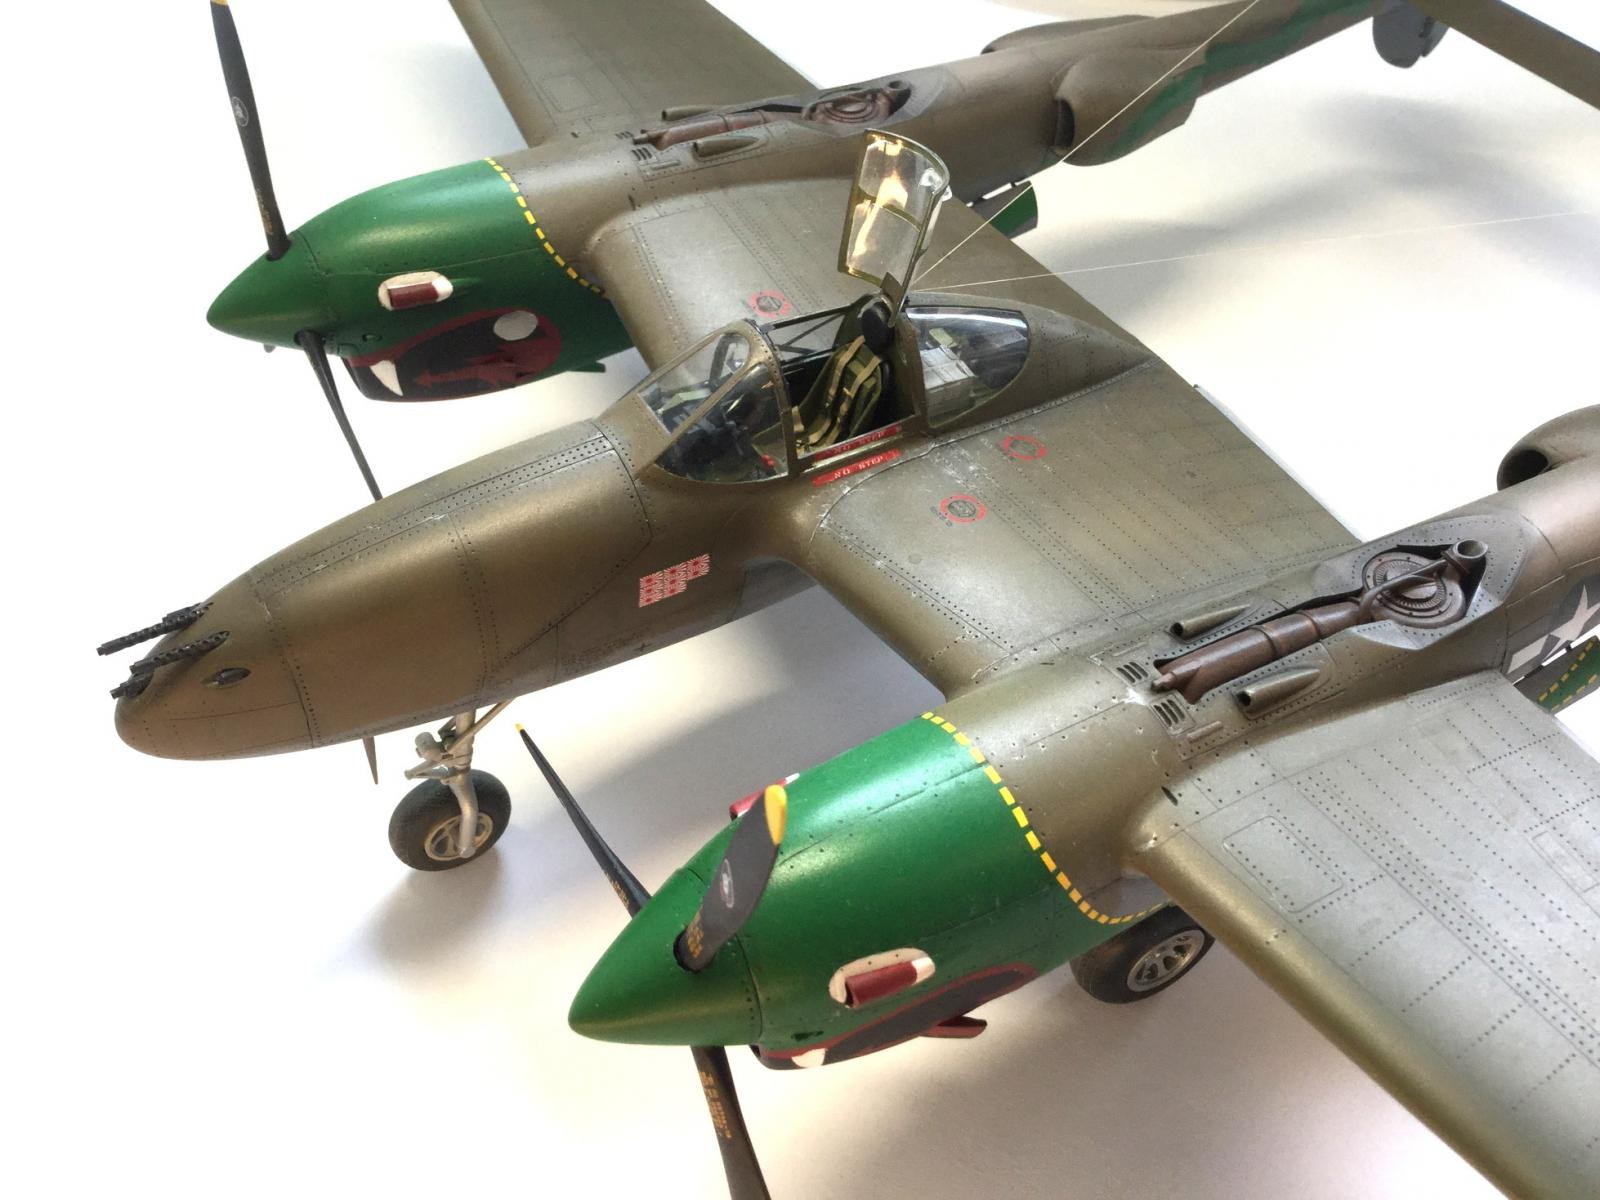
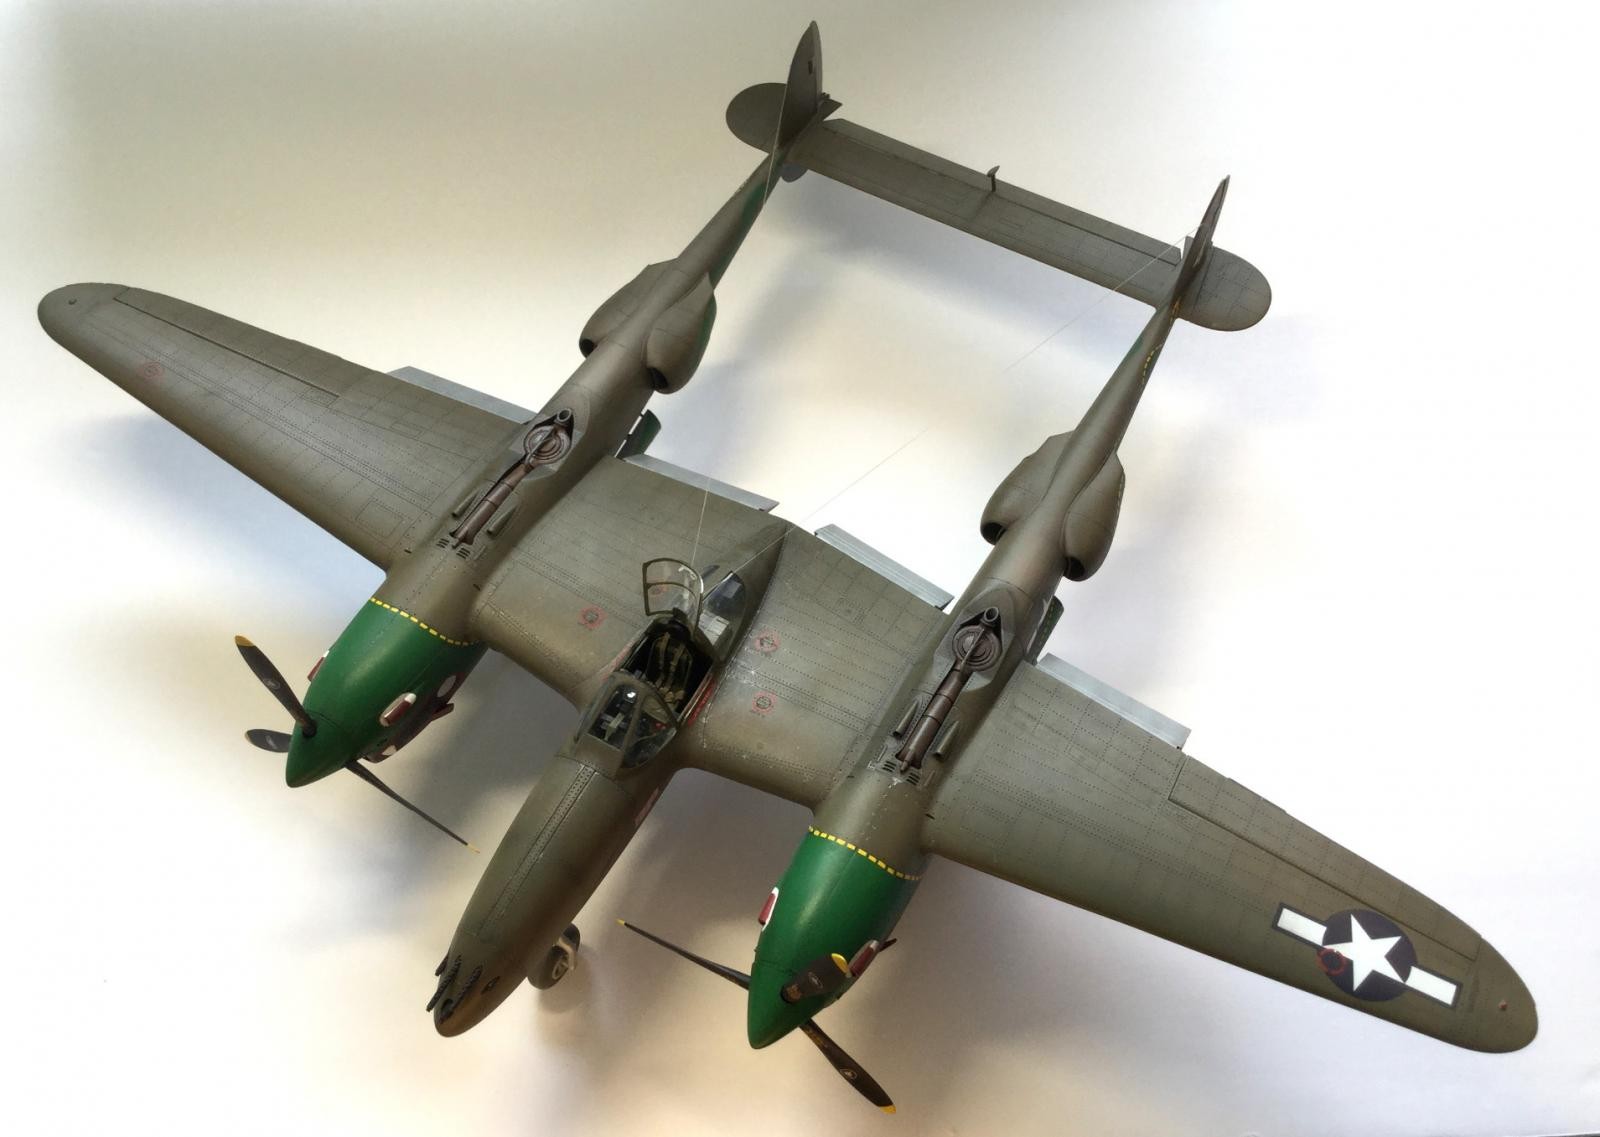
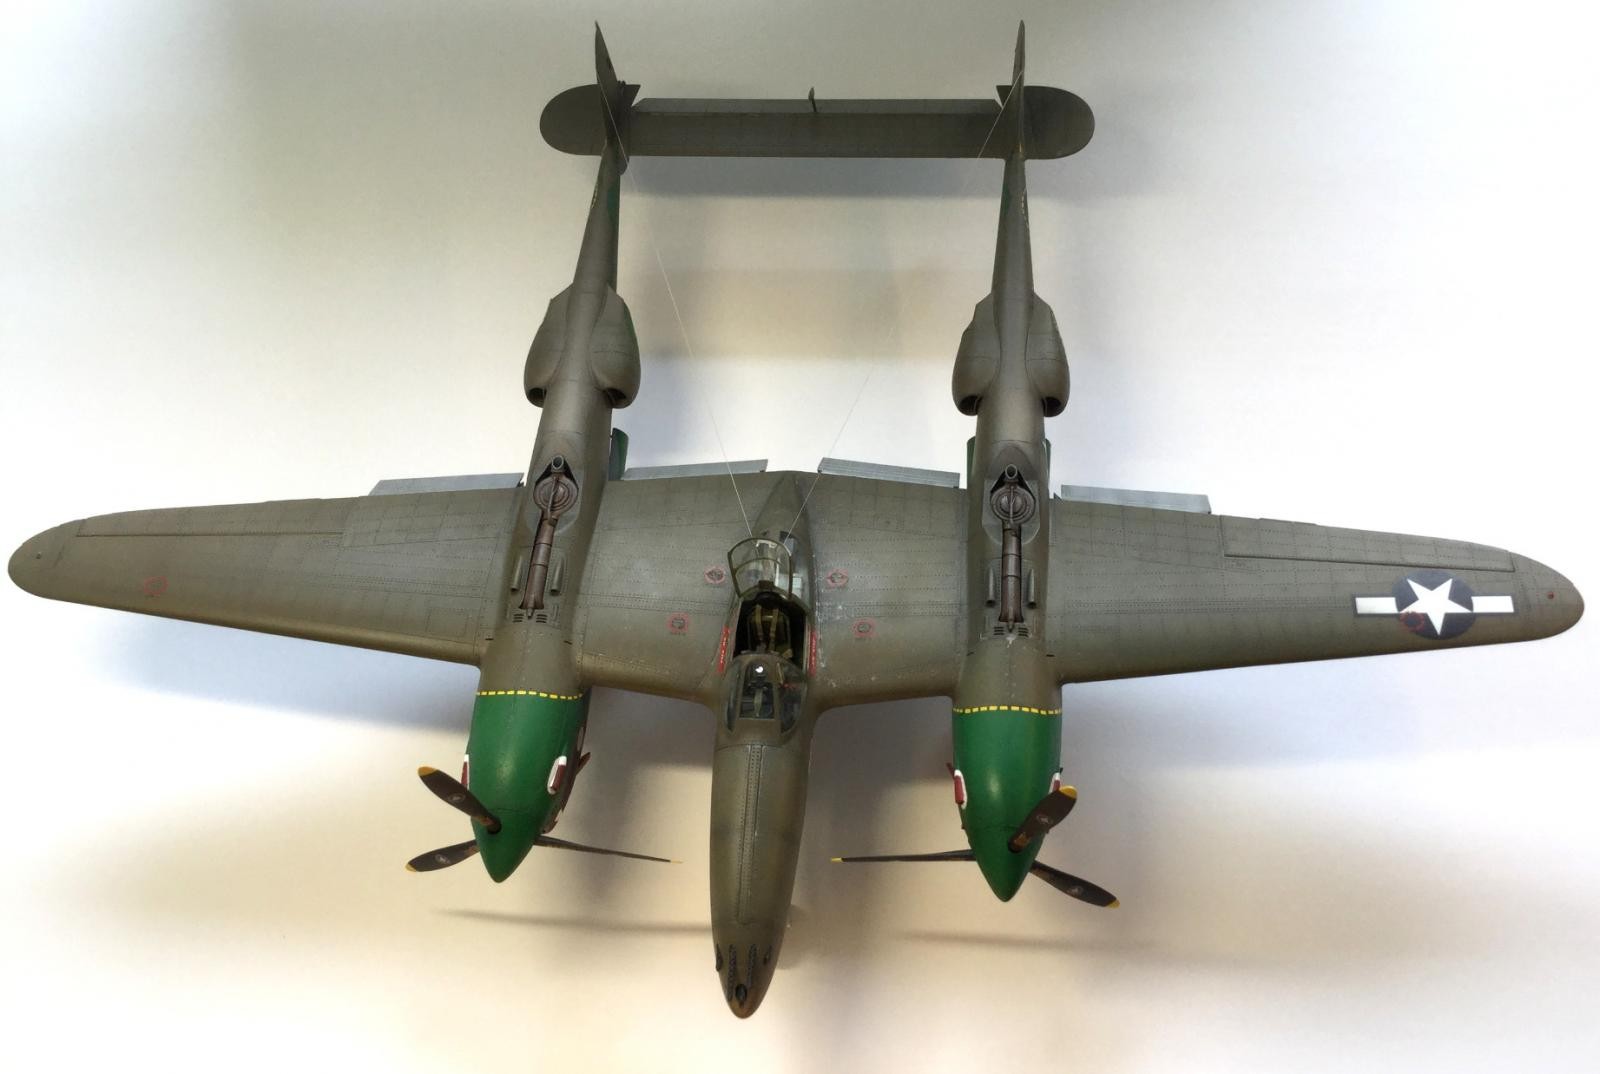
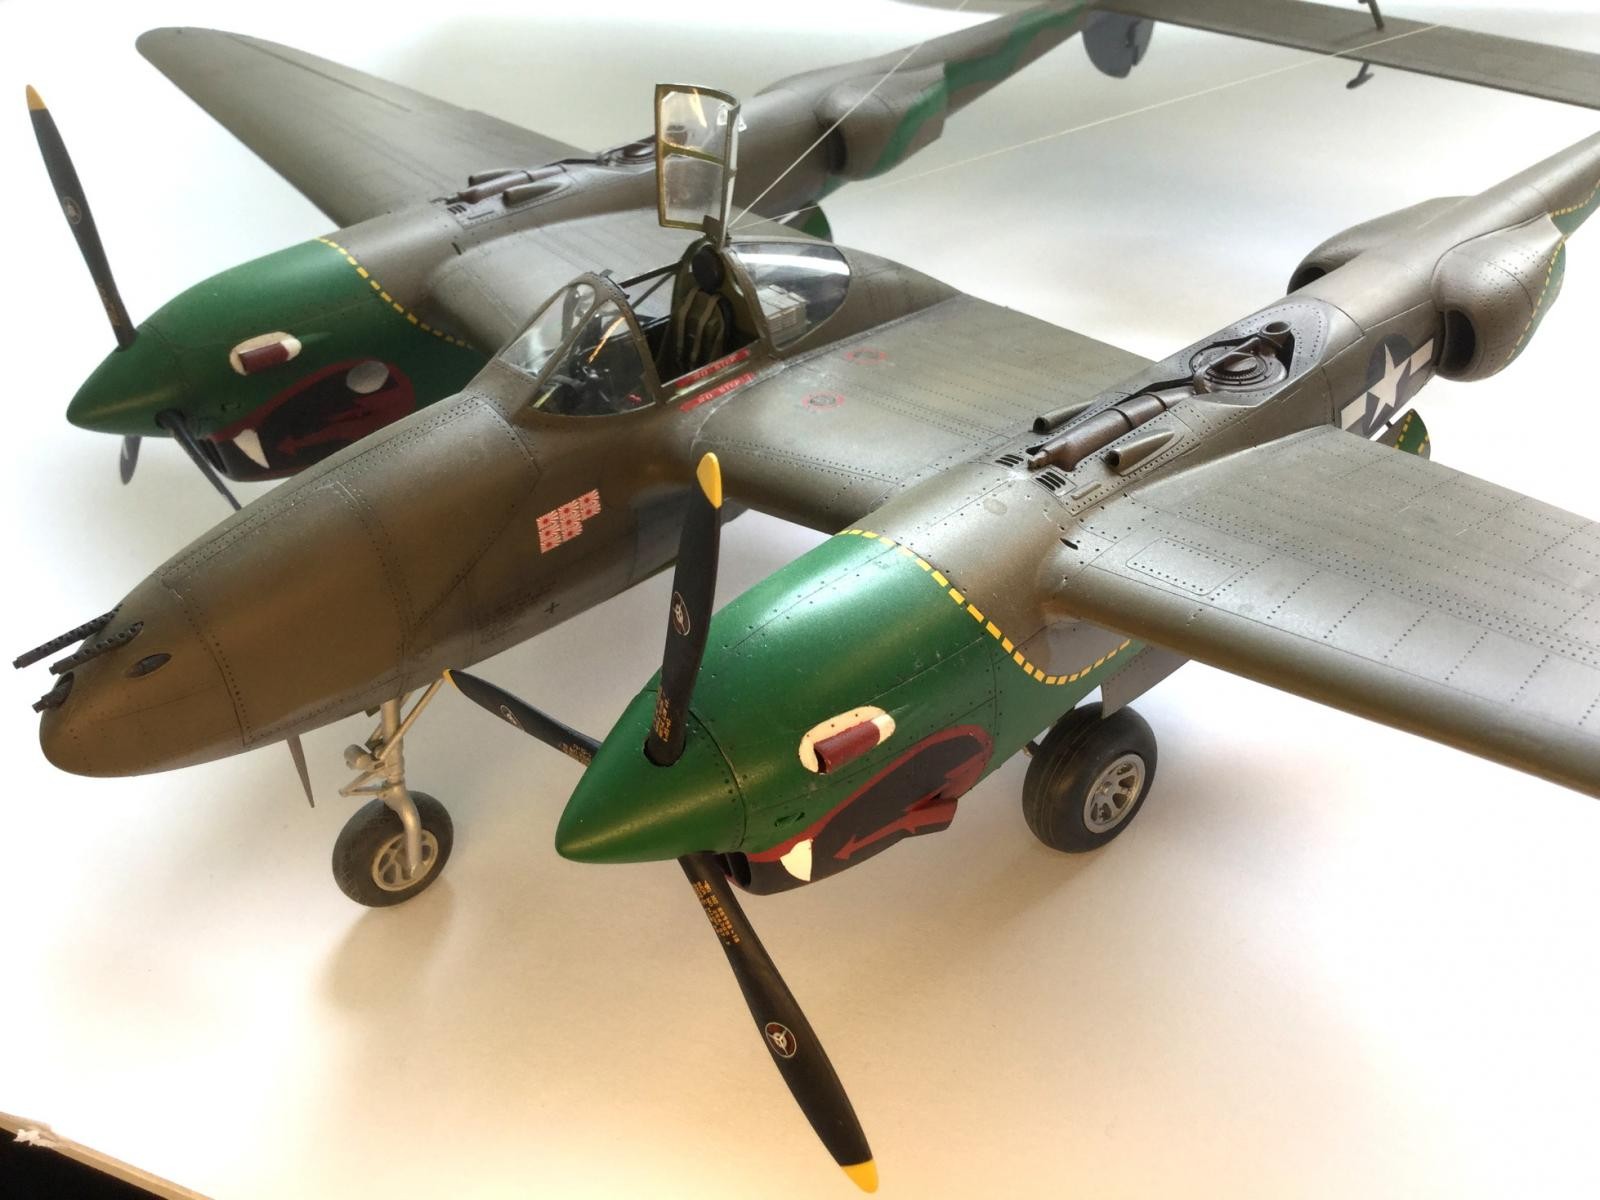
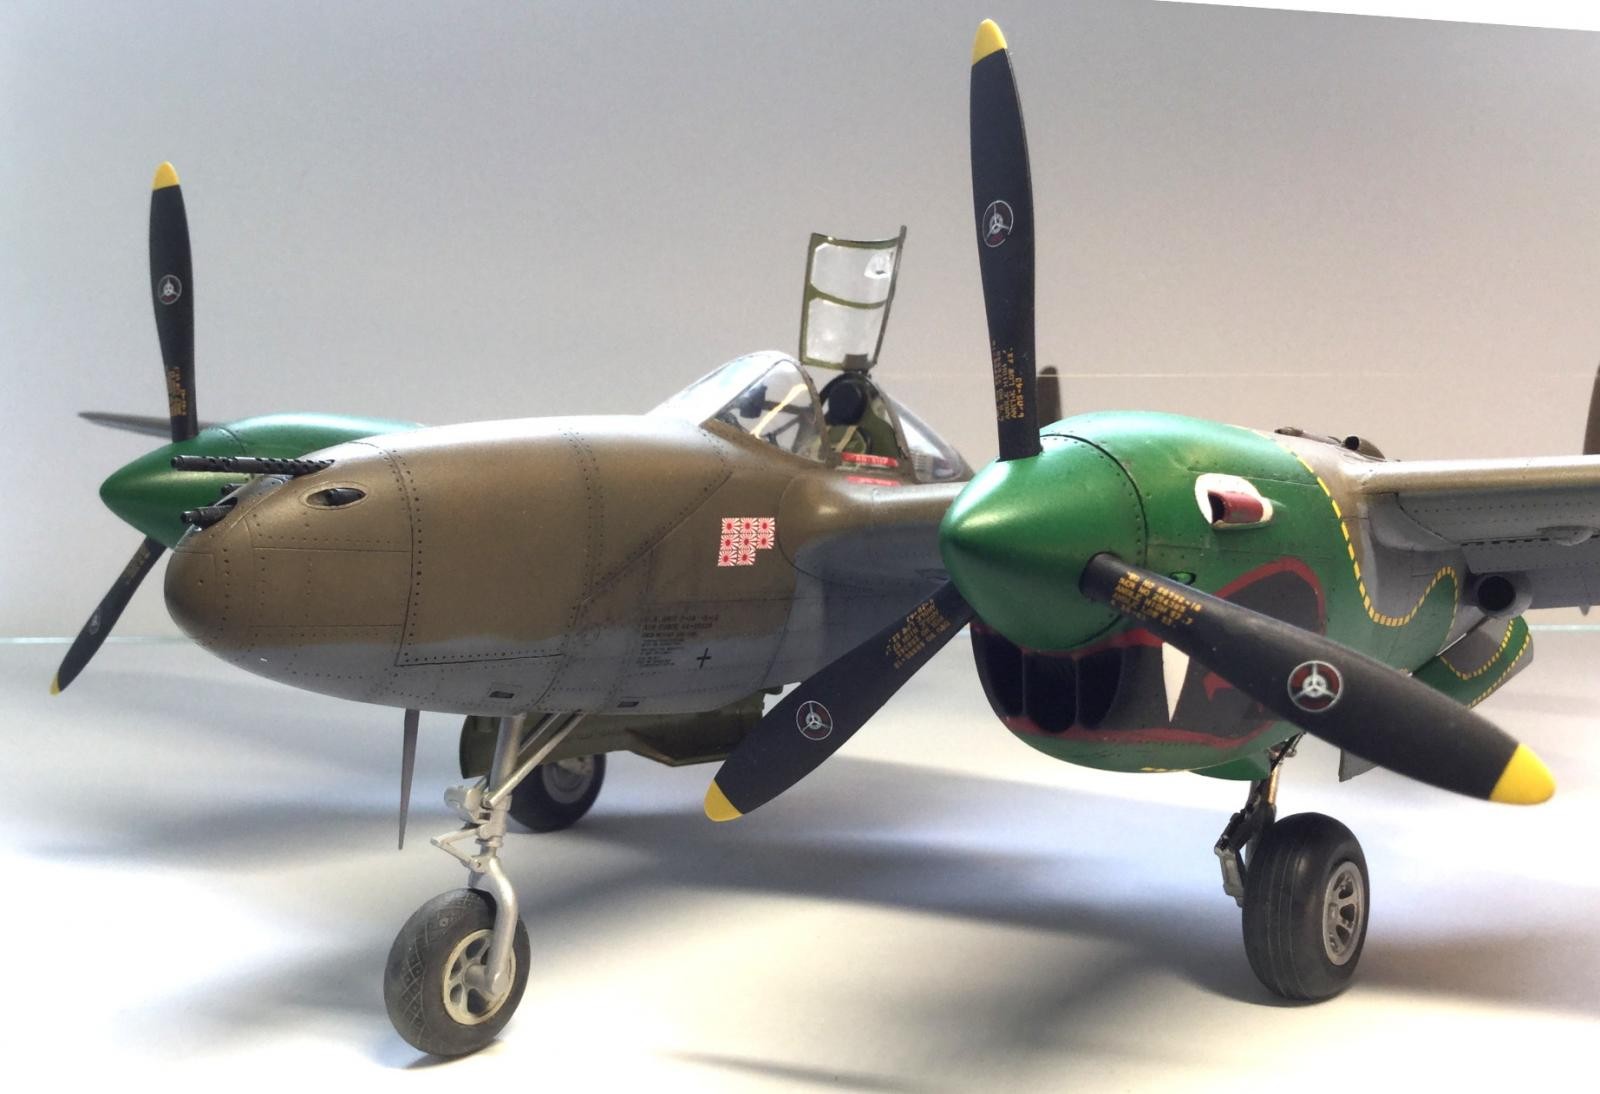
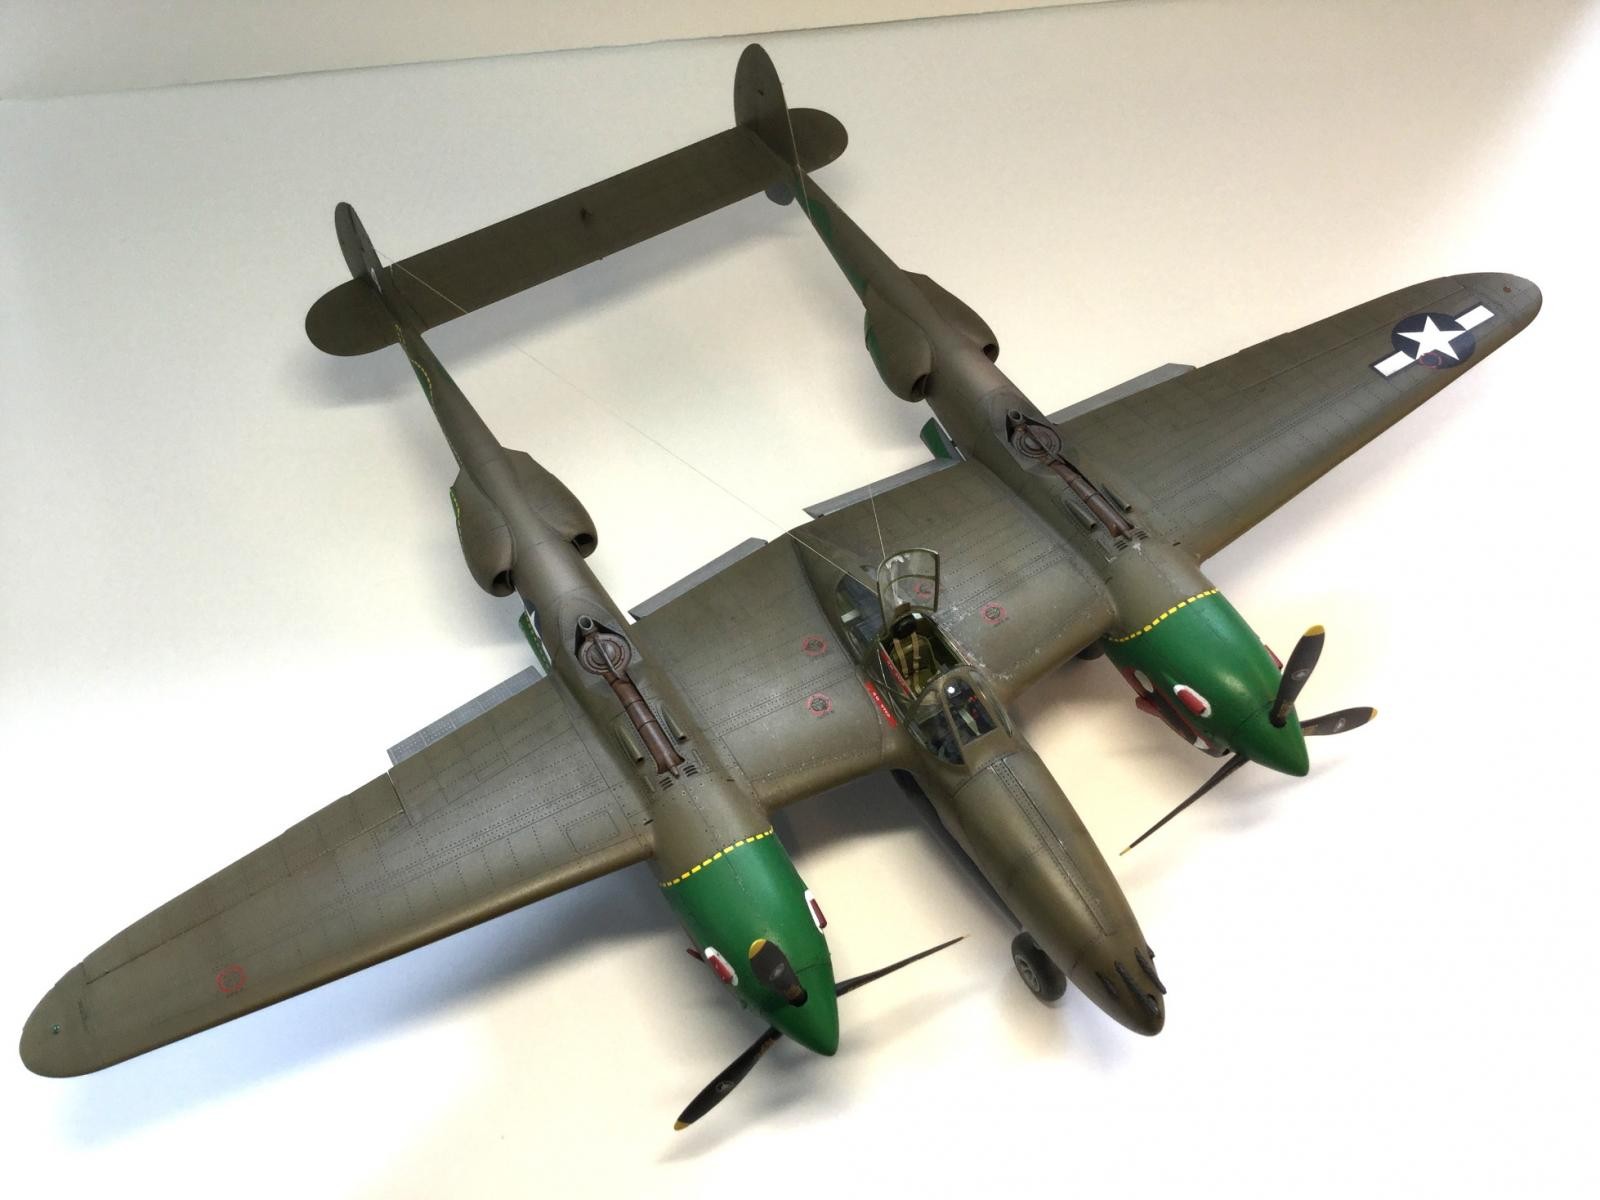
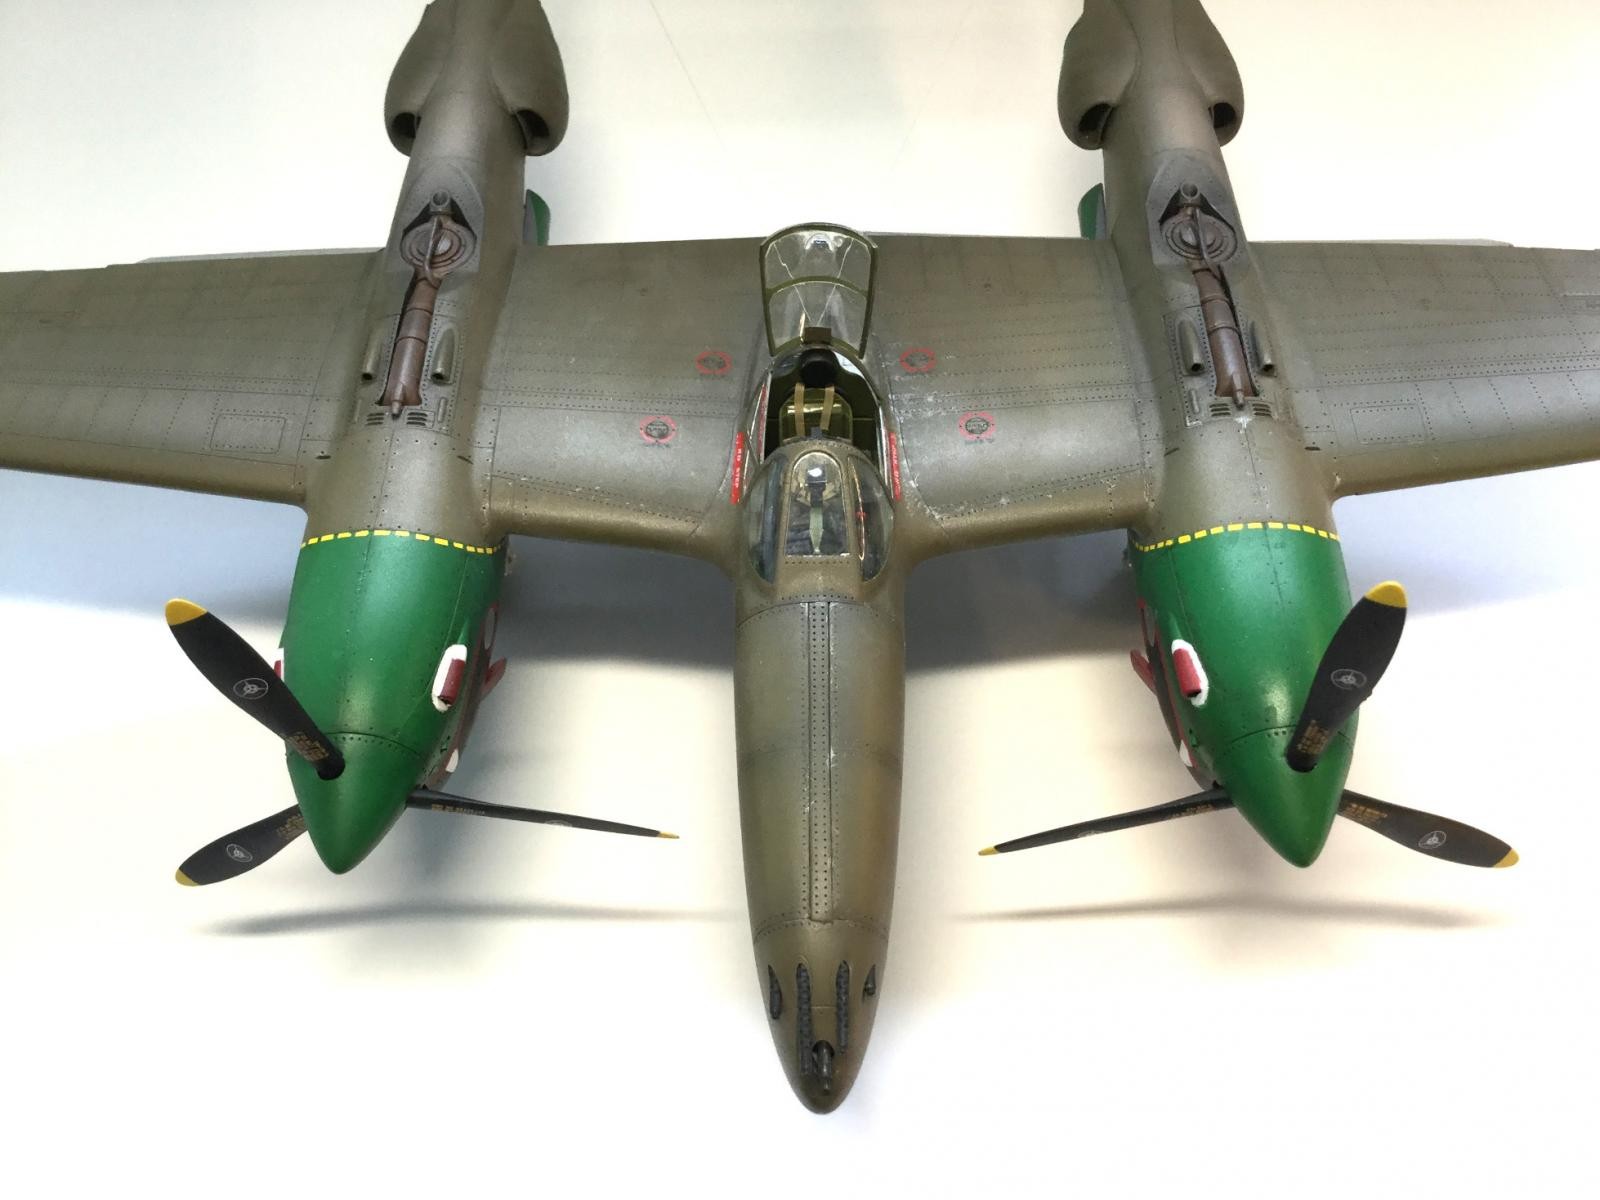
Here is Trumpeter's massive, over-engineered, but still impressive P-38J Lightning in 1/32nd scale. Some of you may know that this is not an easy kit. The sheer size of it, coupled with the fact that you need a ton a weight in the nose to get it to sit up, means that it keeps trying to twist itself apart in the painting and detailing process. I put months of work into this back in 2016 and actually just returned to it for about 16hrs this week to finish off some key details. The markings represent the aircraft of Major Willard Webb of the 459th FS (Twin- Tailed Dragons) in Chittagong, India, 1944, with all main details of the “dragon” motif masked and airbrushed with home-made stencils.
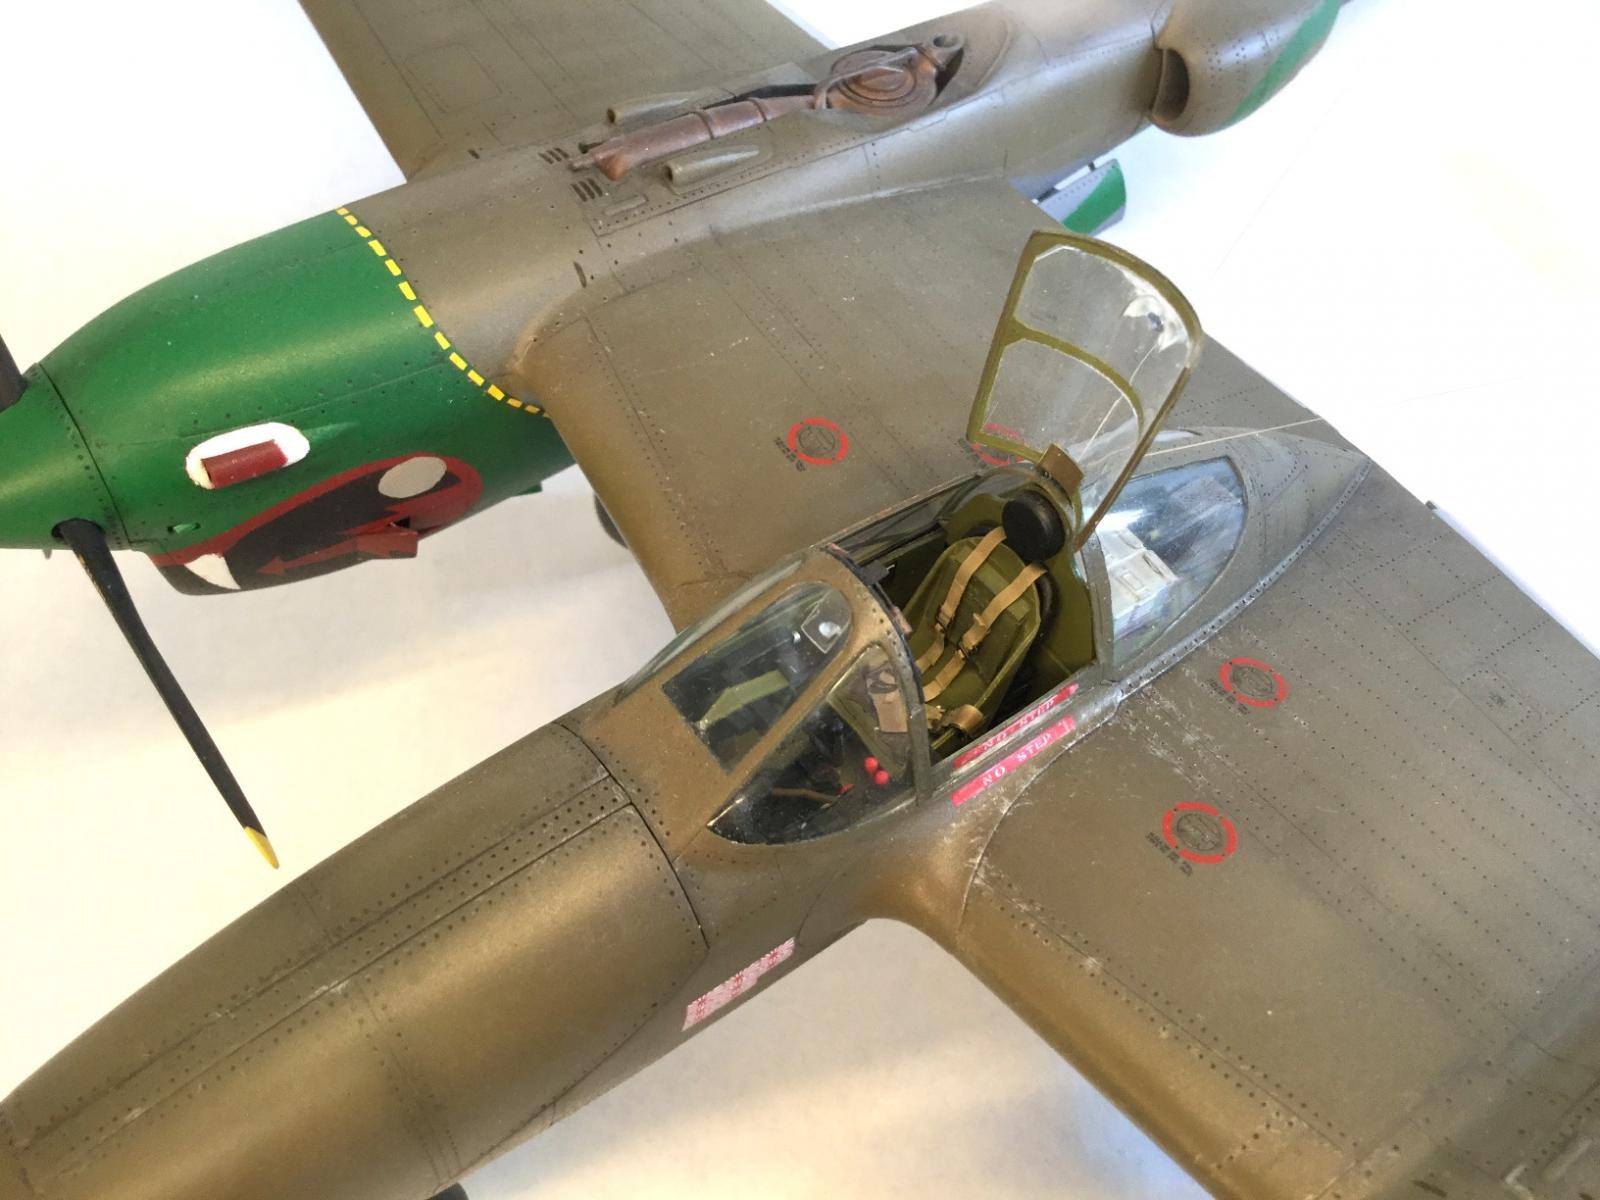
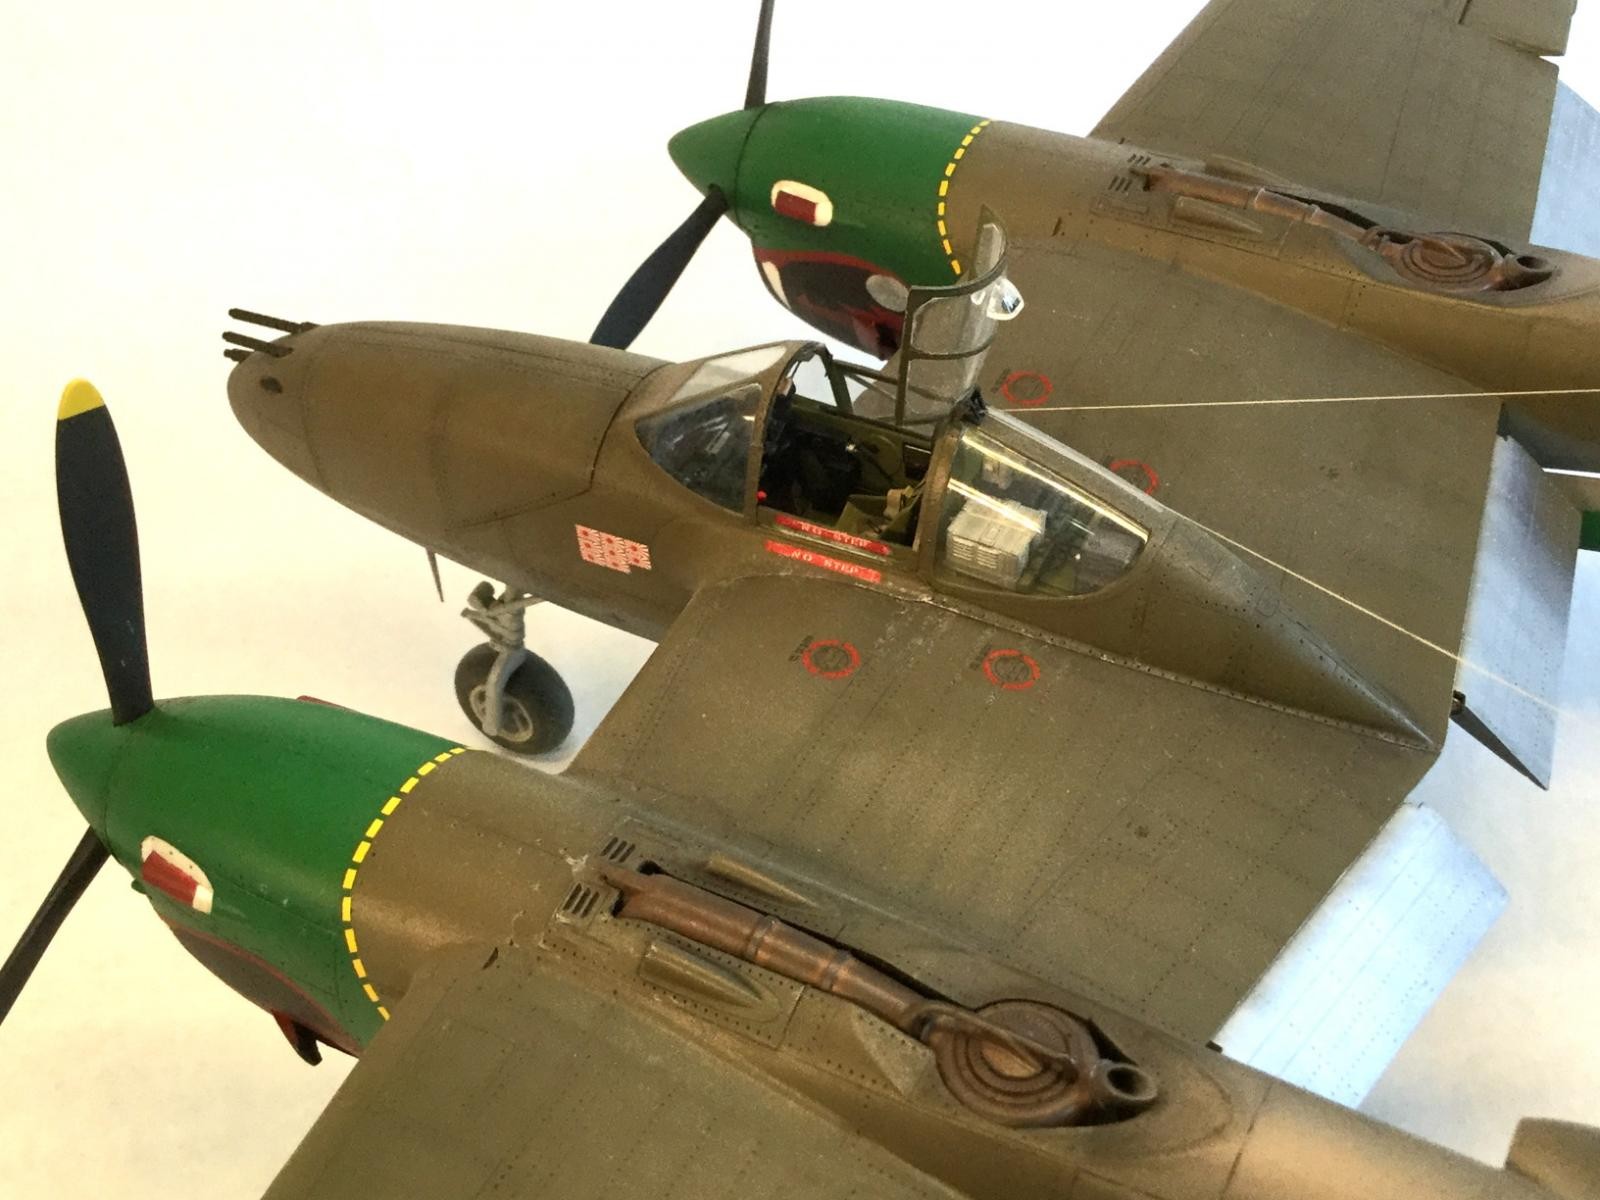
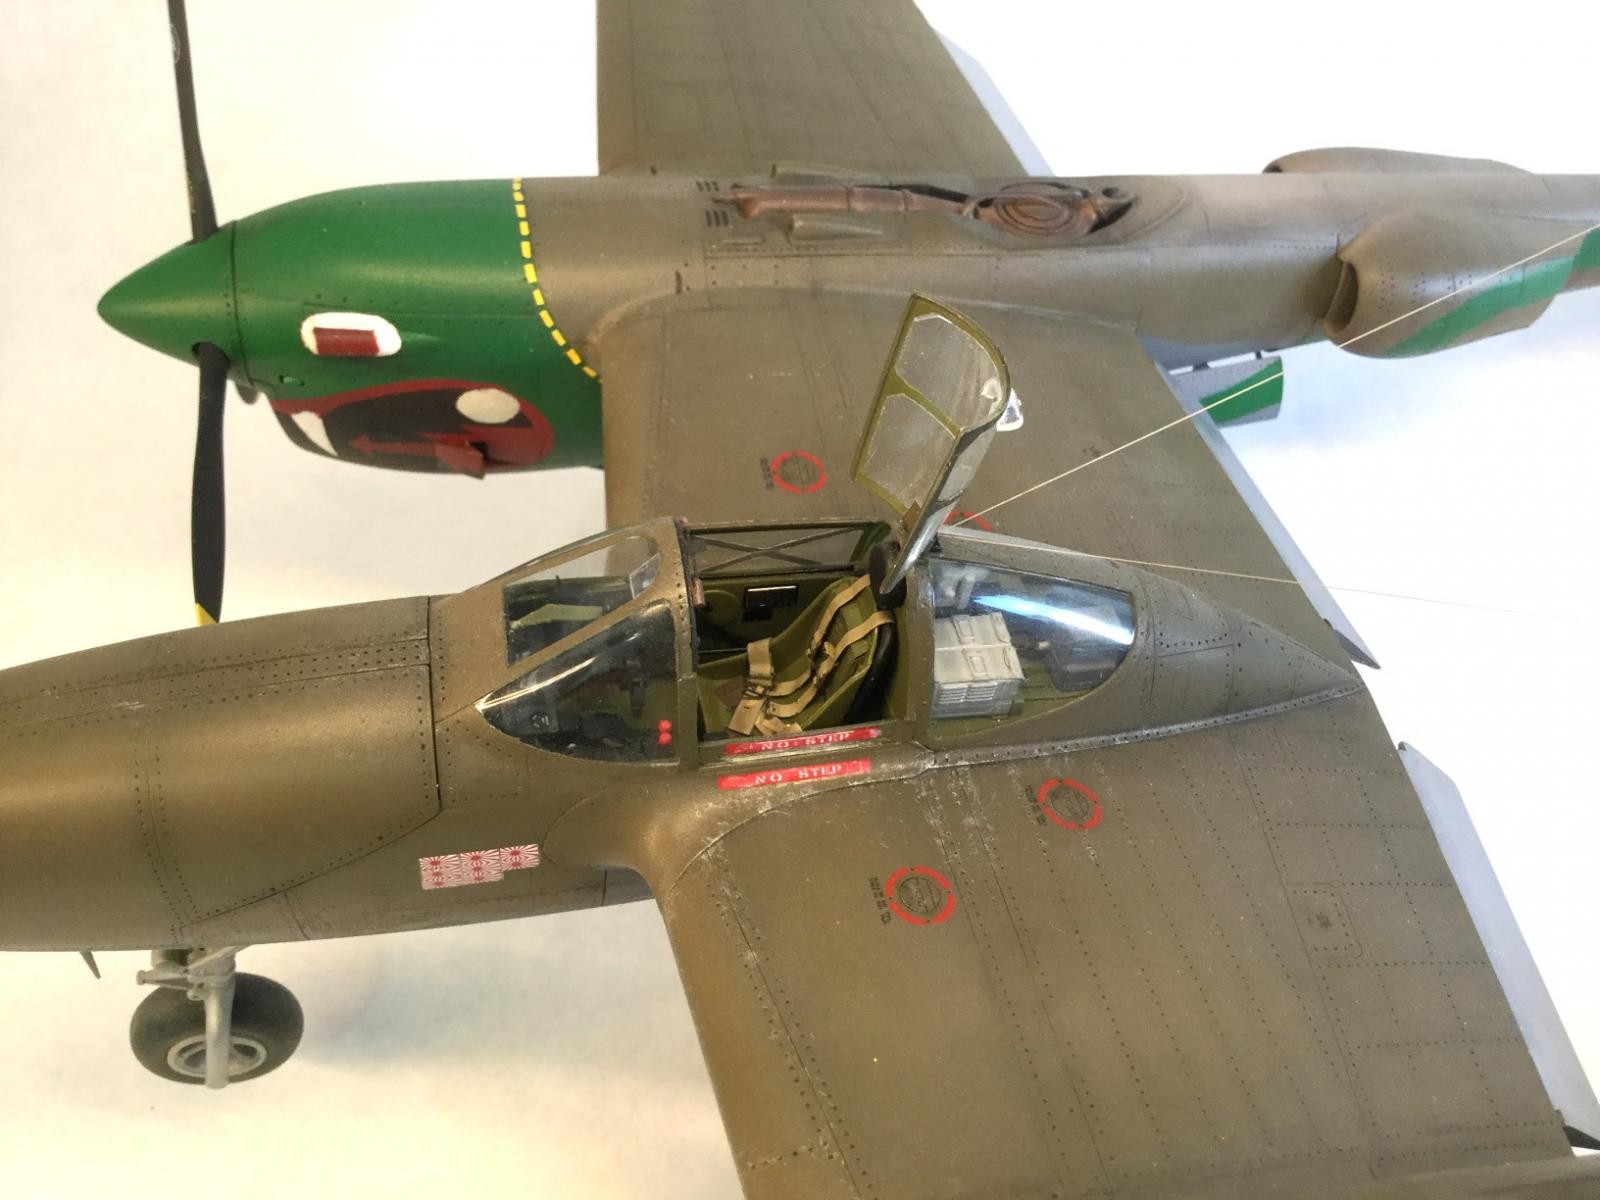
Here is a brief summary of the work I did, overall. I used the full-sized Eduard detail set to detail the cockpit but also added details using styrene, solder wire, decals, paper, masking tape, bare metal foil and other bits and pieces. I completely redid the throttle quadrant with photo etch and used blobs of white glue for knobs on the throttles. I really liked the radios that came with the kit but also detailed these somewhat by adding wiring, photo-etch segments and data plates. The Detail and Scale volume on the P-38 (vol. 58) by Bert Kinzey was really helpful as a reference. I actually did a lot of work on the gun bay too, only to find that the access panels did not close properly over the detail. There also wasn't enough space for adequate nose weight unless the bays were closed up so that decided that! What I really wanted was a big realistic P-38 and not a toy with loose paneling sagging all over the place. I wish that Trumpeter would learn from Hasegawa how to simplify and keep costs and headaches down.
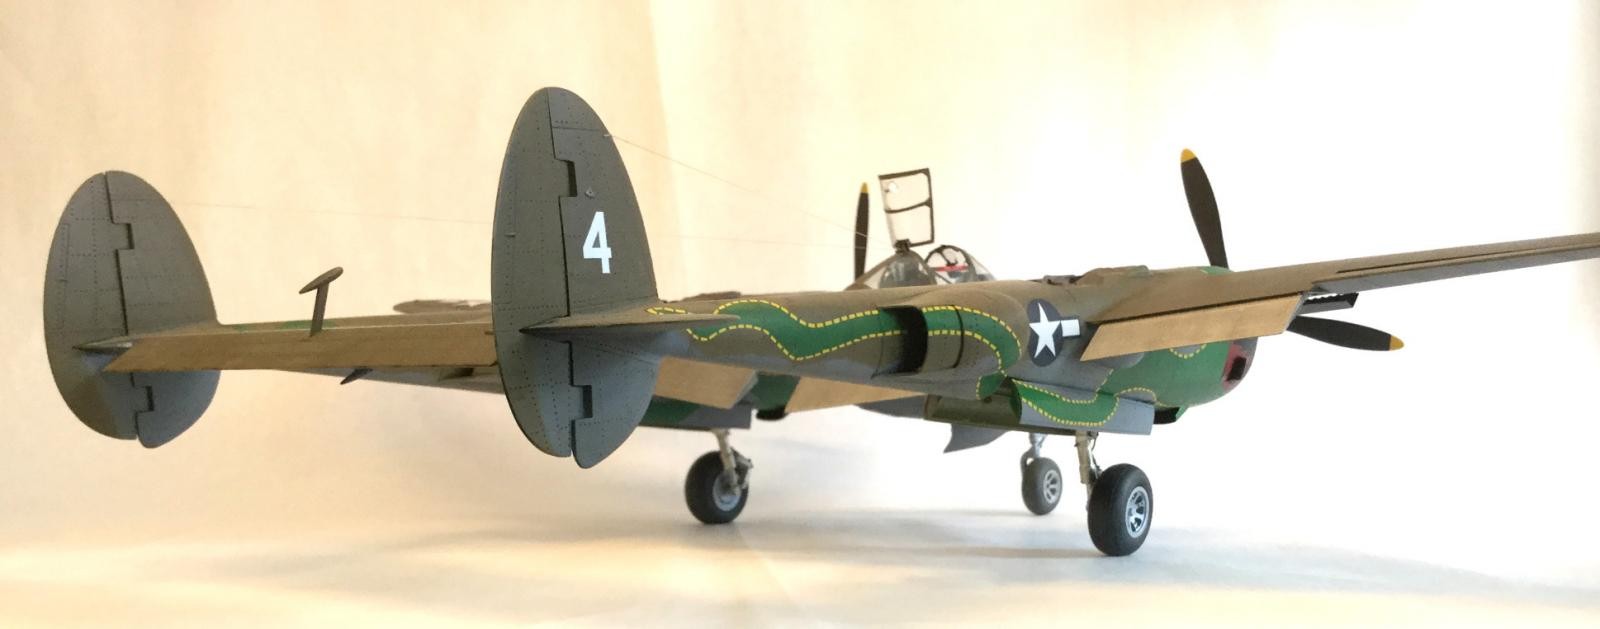
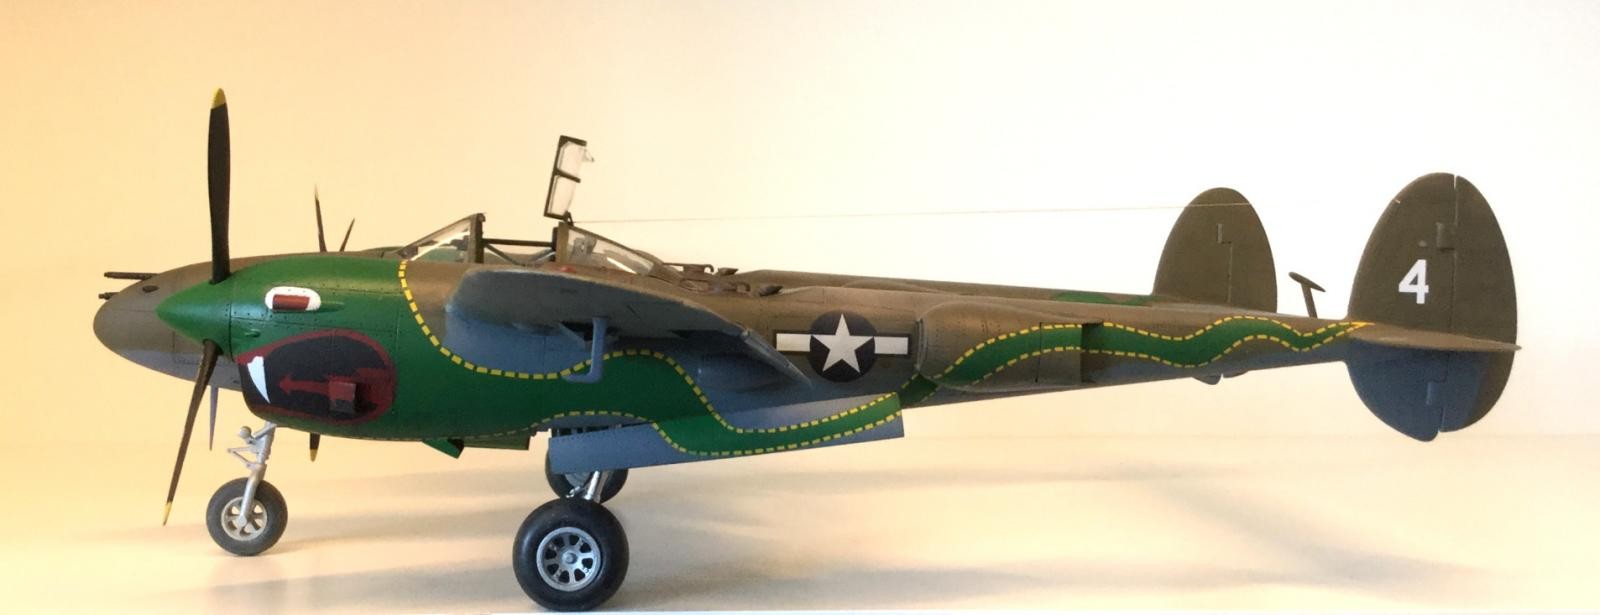
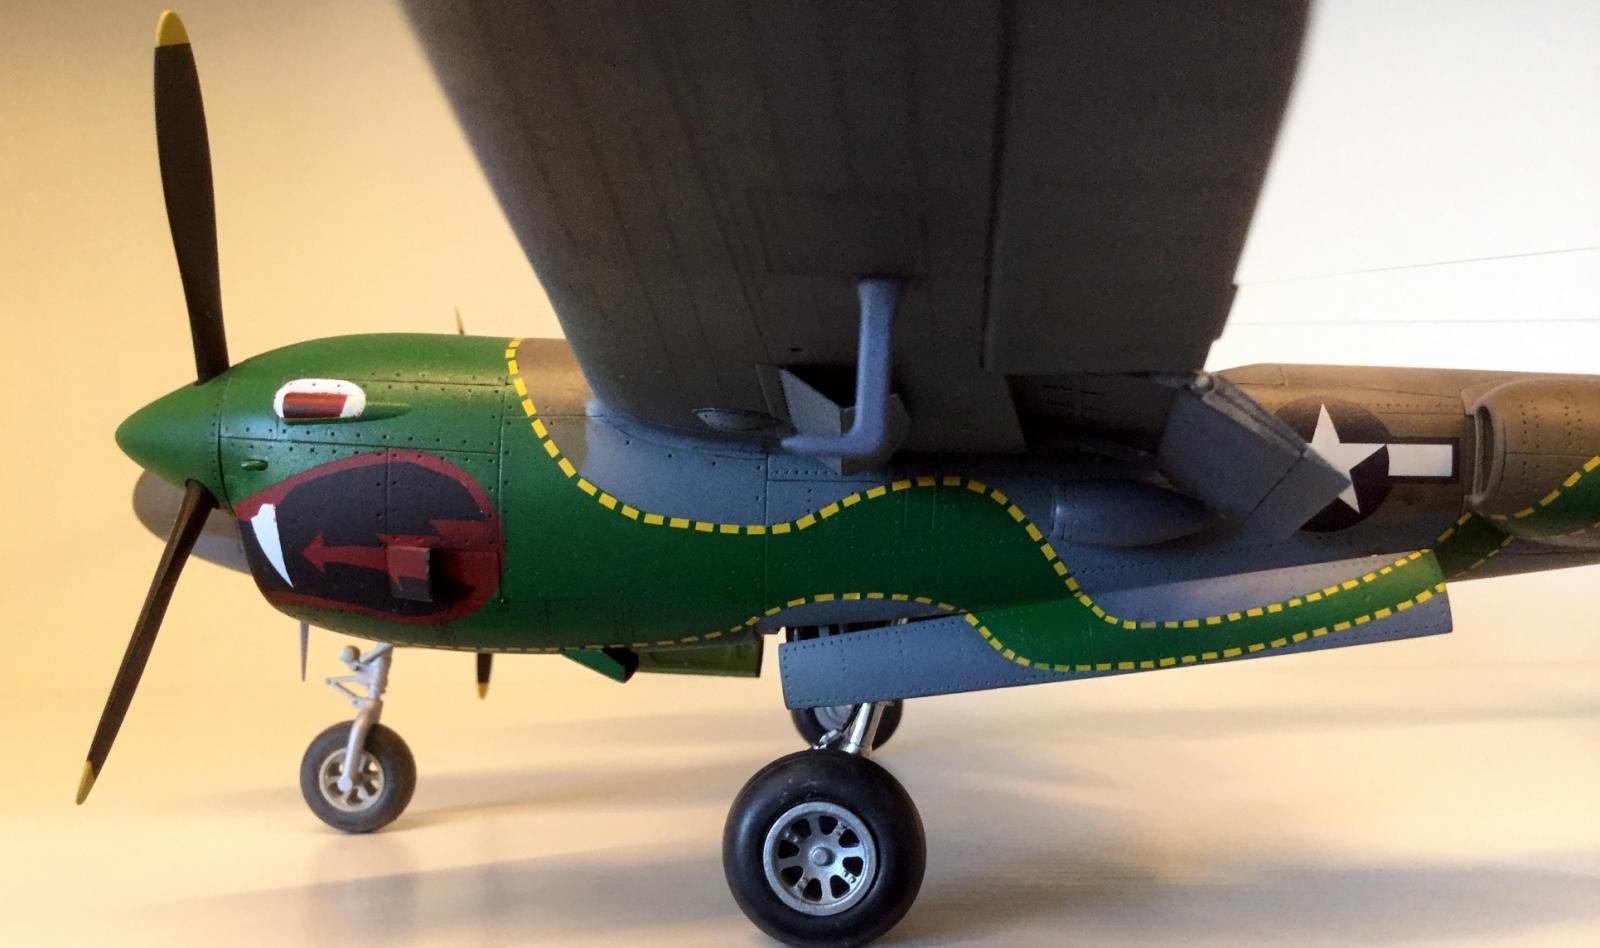
I turned next to the masking job for the dragons. This I did in layers, beginning with the white of the teeth then doing the red and finally the black segments. I masked over the mouths and eyes to do the garish green head and body of each dragon, inside and outside the booms. I did this to match available photos as closely as possible. The camo came last. I went with Tamiya Neutral Gray undersides and Gunze OD #1 over a dark pre-shade of dirty grey-black - this gave good panel line enhancement and streaking effects before the final oil wash. After many, many hours of work, the most intimidating subsequent task was how to do the yellow broken line all around the edge of each dragon. I decided to do each little dash mark with a separate piece of decal! I think it worked pretty well but I felt like an aging surgeon with my teasers and visor. Too bad nobody pays us for this stuff. BTW photos and profiles appeared to show no check marks for the dragons on the inside of the booms, so I didn't just give up on those.
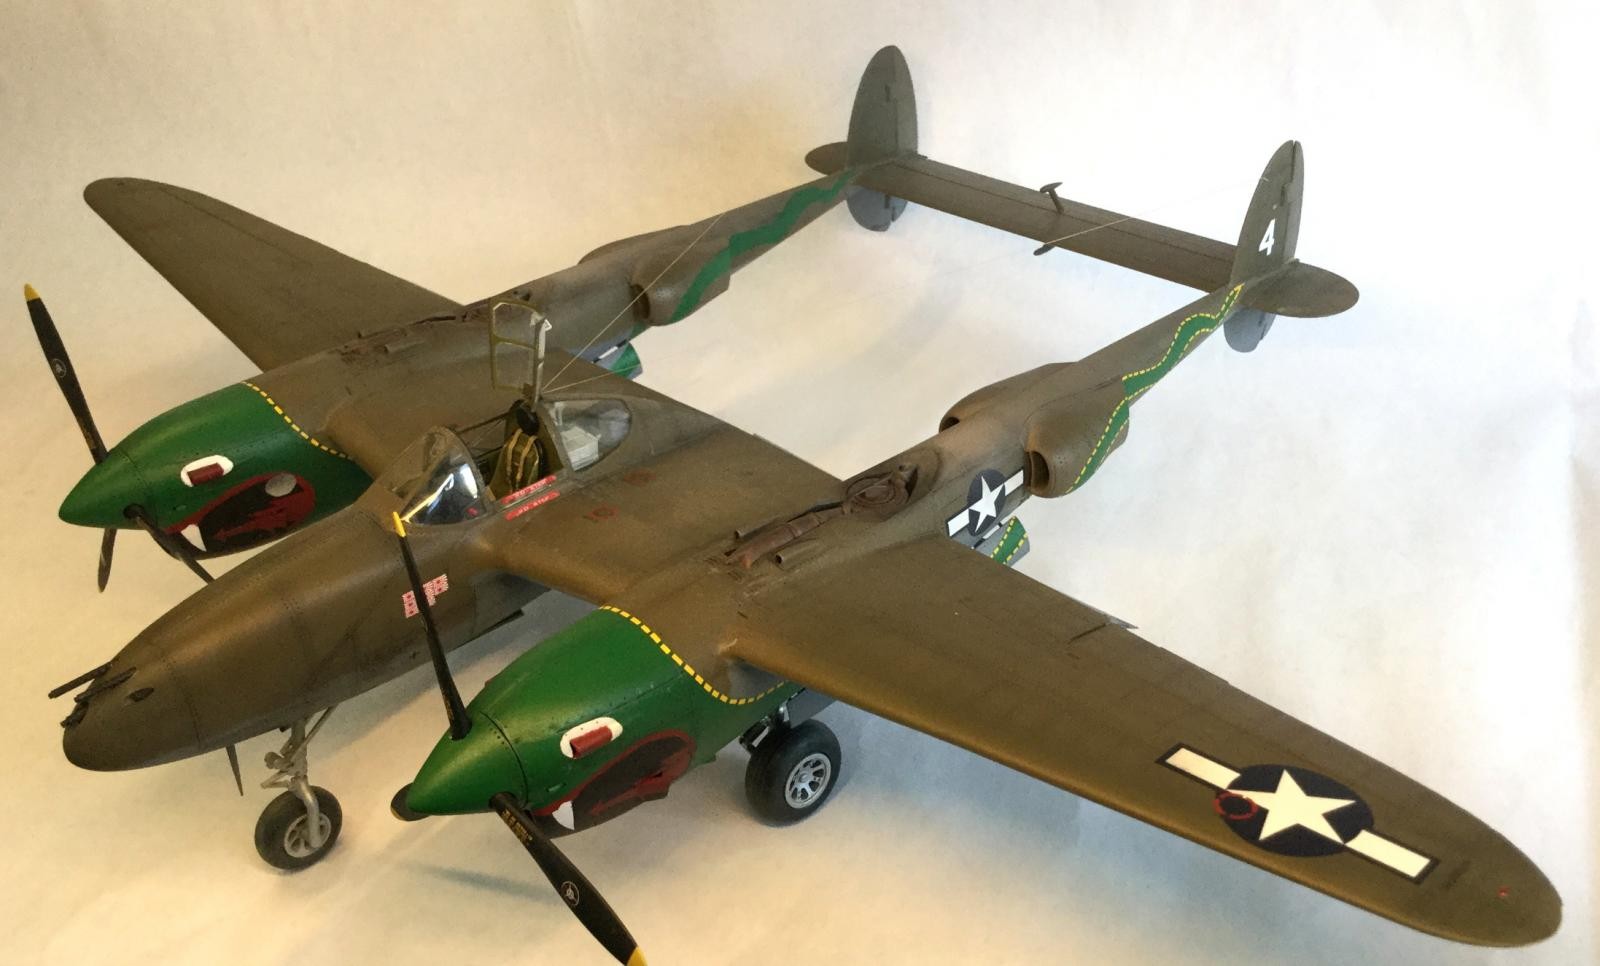
Eventually, I had to repair and repaint all the little details that got damaged in the completion process (sigh). I originally used the kit landing gear only to have it snap off mid-build. I cut the plastic gear off and replaced it with aftermarket gear struts in white metal, which I don't like working with but can't fault for strength. I was surprised that the replacement gear didn't give the typical high nosed sit of a p-38 at rest, but I imagine that this a/c is just fully loaded with ammo in the nose but not yet gassed up in the wing tanks. When the model was sitting nicely for me on solid gear, I worked on sinking the rolled down cockpit window on the port side and detailing the rolled up window on the starboard side. I used bare metal foil for this inside back of the cross frame and OD painted strips of decal for the outside. I detailed the sealing strips and latch mechanism on the edge of the windscreen with similar materials and methods. Chipping and scratches around the cockpit were done with a silver pencil.
This last week and a half in lockdown brought closure. I finally scratch built the L3 gunsight and inserted it into the cockpit to attach to the previously installed photo-etch mounting arm. This was almost the only way to go about it but so delicate and nerve wracking I put it off for four years (I didn't want blobs of glue or a runway gunsight messing up the super-detailed cockpit, particular if it broke off the photo etch arm)! Anyway it is done. I then applied stenciling to the fuselage and wings using Hobby Decal dry transfers. These worked really well on matt coated paint but man they are labor intensive and time-consuming to rub on!
That's it. I hope this doesn't seem like a litany of complaints because I really like the kit. I will just know enough next time to build it simply from the start. I have another one waiting to do in European Theater markings – maybe of Robin Olds machine to put next to his F-4C in 1/32. The P-38 is my favorite fighter plane of World War II and I am really happy to have one in my favorite scale. It even fits (just) in my Ikea glass cabinet! I hope you guys find I did it justice.
Added a few new pics with more natural light (less grainy). Comments welcome as always.
- Colin


I don't do 32, too big, but this is sweet.
Thanks, Dale. Glad you like it.
Great build of a fiddly kit. Well done.
Thank you, Haslam. Kind of you to comment.
I know what you mean about this kit, having built four of them in various versions. You've achieved a great result here, I like all the work you put in.
Thanks. Tom. Wow, you have built FOUR? You are a braver man than I.
Looks Great to me! I just finished an old Monogram 1/48 P-38 in bare metal. Kicked my rear. Looks like the 32 scale is huge! Thanks for posting!
Thanks for your kind comment, Jeff. It is a big one but I like to have the size to get the details right. Could be an eyesight thing too, at my age - 32nd is my preferred scale.
I absolutely LOVE that scheme, and you did a great job with it. That scheme got me to trade and get the Eduard kit in 1/48th. It is an eye catching scheme that really cool and attracts your attention. I did mine and while the kit like yours was a challenge to build I was happy with the results as you should be with yours. You can see my build here: https://imodeler.com/2020/05/p-38j-lightning-twin-tailed-dragons-1-32/
Thanks, Walt. I checked out your Frances Rebel P-38H. Very nice! Working with resin cockpits is something I am not very practiced at. Yours looks great and super-detailed at 1/48. I also like the little diorama you did with the PSP surface and palm tree. It really completes the look of the model.
Colin, thanks, I appreciate you taking the time to look. The resin wasn't too hard, in some ways easier than the plastic as the fit of some of the kit wasn't perfect. I had no idea at the time that Tamiya was preparing to release their kit. That Palm tree has quite the back story, I was initially going to do the palm fronds from feathers. When I went to Michael's to buy a package of them, my car was stolen while I was in the store. In the end I didn't use the feathers ….. at least not in the tree.
This is a fantastic work, Colin! And also A LOT of work! I've built the 1/32 Revell bomber version, so I feel what you mean by BIG!
I love the scheme and your excellent detailing.
Congratulations!
Thanks, Spiros. I have seen a couple of the Revell kits built up on-line. They seem quite nice, shape-wise. The Trumpeter kit will be much less work for me next time since I will be more prepared for mishaps. I am glad the detailing came through in photos. I added a few extra pics shot with some ambient sunlight - otherwise surfaces and cockpit details can look a little grainy.
Great looking Lightning Colin your efforts to finish her really paid off. Nice pics too.
Thanks, Tom. I am still working on the photography. It is hard to get even lighting on such a big model. I have added a few more pics since your comment to take in more of the whole aircraft without losing surface details.
Fabulous Lightning. Lotta folks don't realize there were a whopping two SQUADRONS of P-38's in the CBI, not groups, squadrons. A heavy load was put on them.
1/32 can get big can't it, this one must really be a space hog.
Great job on the dragons,If you don't mind can you discuss which paints you were using that survived all that masking, primer used, etc.
Thanks, Bill. Good of you to comment and put the 459th in historical context. I used Tamiya Neutral Grey for the under surfaces and X-5/XF-5 Green for the dragons. The OD upper surfaces is Gunze H52 Olive Drab 1. What really makes the surfaces durable and resistant to handling, though, is probably the Tamiya Clear gloss coat. I always use it (heavily thinned) before an oil wash on all my models. The last coat is MM Acryl Matt Clear. It is also very tough. I have literally had to grip the thing by one wing and tilt it on edge hundreds of times to get at what I need to paint, decal or fix. No finger prints left behind yet.
As for the model being a space hog, I find my Ikea Detolf cabinet easily takes all my 1/32nd aircraft. Even though the P-38 is bigger than my P-47, the twin boom configuration allows it to fit nicely on a diagonal (pics attached). Funnily enough though, the cabinet is not quite big enough for my 1/48 G4M Betty, so going with a smaller scale with multi-engine does not help me with that one.
4 attached images. Click to enlarge.
outstanding
Thanks, Bob. Kind of you to comment.
Great job!
Thanks, Robert. I appreciate you taking the time to comment. Happy modeling!
Great job on that big Lightning, Colin!
Thanks, Rick. It was a big job but well worth it in the end.
Maghnificent! I love 32 scale except for heavy bombers. 48 scale fighters seem disposable somehow!
When you say "over engineered" what do you mean?
Thanks, Ross. I appreciate your kind words. By "over engineered" I mean too much effort and expense put into kit features that could/should be simpler. Here are a few examples: The drop flaps, which are fully extended as designed in the kit are actually seldom down on parked P-38s. The ailerons, single slab elevator and twin rudders, like the dropped flaps all have complicated photo-etch metal pieces to deal with. The kit has full engines but no panels to remove to see them. The nose gun bay does have removable panels but these don't fit very well. I prefer Hasegawa 32nd scale kit design because they go for greater simplicity and buildability (and this keeps the parts count and price down). It's great that Trumpeter does so many interesting subjects though. Just my personal take on things.
I see. Yes I know what you mean. It's a bit like Eduard's 109s which have fabulous engines but cowling's dont go on and off, so if you want a buttoned up version it's a waste of time. I guess that's why Revell kits at 1/32 are such great value for money although cockpis sometimes lack.
A fine-looking Lightning! Well done!
Thanks, Greg. Always great to get your feedback!
Nice Job! Looks great ! Liked.
Thanks, Walt. I appreciate that you took the time to comment. It's always nice when something is noticed that hasn't been in the headline section for awhile. Happy modeling!