Scribing Templates
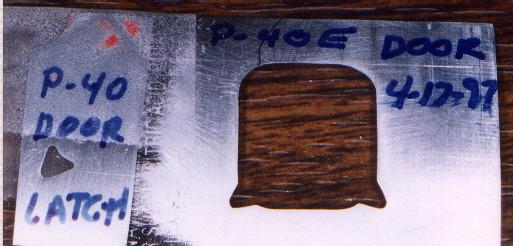
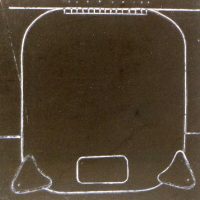
The Blue ink on the aluminum says: APRIL 17, 1997 and today is November 7, 2020. All I do is flatten the 0.05" thick aluminum can material then draw on my pattern with a pencil, then scribe it in with my pin vise that has an ordinary needle in it. Next I scribe in straight lines from the curved areas, to the center, then drill a 1/8" hole in the center. I reach in with a strong needle-nose tool and begins to bend one of the areas until the scribe line breaks. I continue doing this until all the scribe lines break and I pull out all the pieces. I sand the inside of the templet with 400, then 600 dry sandpaper. Presto, I now have a new scribing tool to use. I just tape it to the model and scribe-in the lines. So we subtract 1997 from 2020 it gives me 23 years since I made this piece of aluminum... Like I said before, put your man-made computer to work and click on "THINK." The p.c. is located between your two ear's and just behind your eyeballs.


Wow, Rodney @f2g1d!
Another of your fantastic techniques/ideas!
I love it!
Also, never crossed my mind to use a needle at my pin vise, in order to have a great scribing tool.
I live and learn!
I SO AGREE with your "man-made computer" comments. It all starts (and ends) there!
Thanks once more for sharing your experiences with us, my friend!
I found my needle photo, so hopefully I can add it here and maybe I can add my scratch built 1/32 scale Corsair gear strut. My gear. measurements came from the kit and a couple of Corsair photos. Remember this was all before we had the "INTERNET.
2 attached images. Click to enlarge.
Excellent!
Excellent!
Excellent!
Thanks @f2g1d!
Thanks, Rodney. I'll give it a try, for sure.
Thanks a lot for sharing, Rodney @f2g1d
Sometimes ideas from the past are indead better and more useful than modern tools.
Also agree with your comment that the best computer is still your own brain.
Superb! Almost makes the AM parts I buy seem like an unnecessary luxury! As always an inspiring post from you Rodney!
I don't know why I became what I am when it comes to modeling. In the beginning as mentioned, my models came out of the box on Friday night and was up on finished shelf by Saturday night.
Thanks guys for the fine compliments! RJW
Very cool technique! Thank you for sharing. May I ask how you flatten the aluminum sheet after you remove it from the can?
Carel
Flatten the aluminum is easy...all you do is place a piece of it on your work table.. Example: 2 inches/50mm... "the curved part up."
Start pushing it down in the center and working your hands to both ends. The aluminum will flatten out real fast.
Very informative. I’m Learning how to Use this technique today ! That and toothpicks for painting small details and cork stamps from wine bottles!
That Is all part of the fun. With patience the brain finds solutions to a lot of problems.
Thank you for being of that mindset and sharing.
Bernie/Bernard: How about posting a photo of your work, then I can see if you are doing it right.
Today I can no longer do any type of modeling like I'm asking you to do.
My modern day digital camera has "ANTI-SHAKE" built in but it does not work with me as my hands shake like a .7 earthquake.
Hi Rodney.I ’m a bit timid at the moment as I run into technical problems with paint etc.
I have not completed a model since spring.
Now that the workload diminishes and the days shorten i have a few kits to complete. I started a ship model and refining techniques for that. It is better that what I was expecting. Good luck with your hands. We work and fall apart. Take good care of yourself and yours. Thank you.
As age progresses, my hands get worse. I'm down to one finger typing on my Apple's keyboard. Soon I'll quit everything, as I'm almost 90 yrs old and have had 87 years of excellent life, marriage, scuba diving and several other things. Things will not get better, and the hot-shot doctors confirm that.
cheers and thanks for your comment! Rodney