RealSpace Gemini Titan 1/72
“After the flight our superiors at NASA let us know in no uncertain terms that non-man-rated corned beef sandwiches were out for future space missions.” – Gus Grissom, Gemini 3 astronaut
Project Gemini was the decisive series of missions between 1961 and 1966 that readied America for the moon. The two-man crews were to spend longer in space than ever before, practice EVAs, and, most crucially, demonstrate how to dock two orbiting space craft. The first two of twelve flights were unmanned; the first crewed mission (Gemini 3) saw Gus Grissom and John Young complete 3 orbits around the Earth and perform the first orbital maneuver. Most memorable, though, was the corned beef sandwich that John Young smuggled into the capsule: Grissom contends it was “one of the highlights” of the flight.
Project Gemini was brought to life by some of the preeminent spacemen of the day: Neil Armstrong, Jim Lovell, Pete Conrad, Gene Cernan, and Buzz Aldrin to name a few (Buzz wrote his PhD thesis on manned orbital rendezvous, so quite an apt postdoc!)
The Gemini launch vehicle was a converted Titan II ICBM. The Titan II was a two-stage, liquid-fuel rocket (using a combination of Aerozene 50 and nitrogen tetroxide; the two components spontaneously ignite on contact). This kind of hypergolic fuel made for simpler and more reliable engines. The rocket underwent several modifications to human-rate it for Project Gemini, most notable perhaps were changes to greatly reduce (so-called pogo) vibrations that traveled up and down the length of the rocket during launch, conferring g-forces sufficient to incapacitate the astronauts.
Project Gemini was an awesome success that broke ground on some of the major challenges of manned space flight, and eventual mission to the moon. So, let's build it!
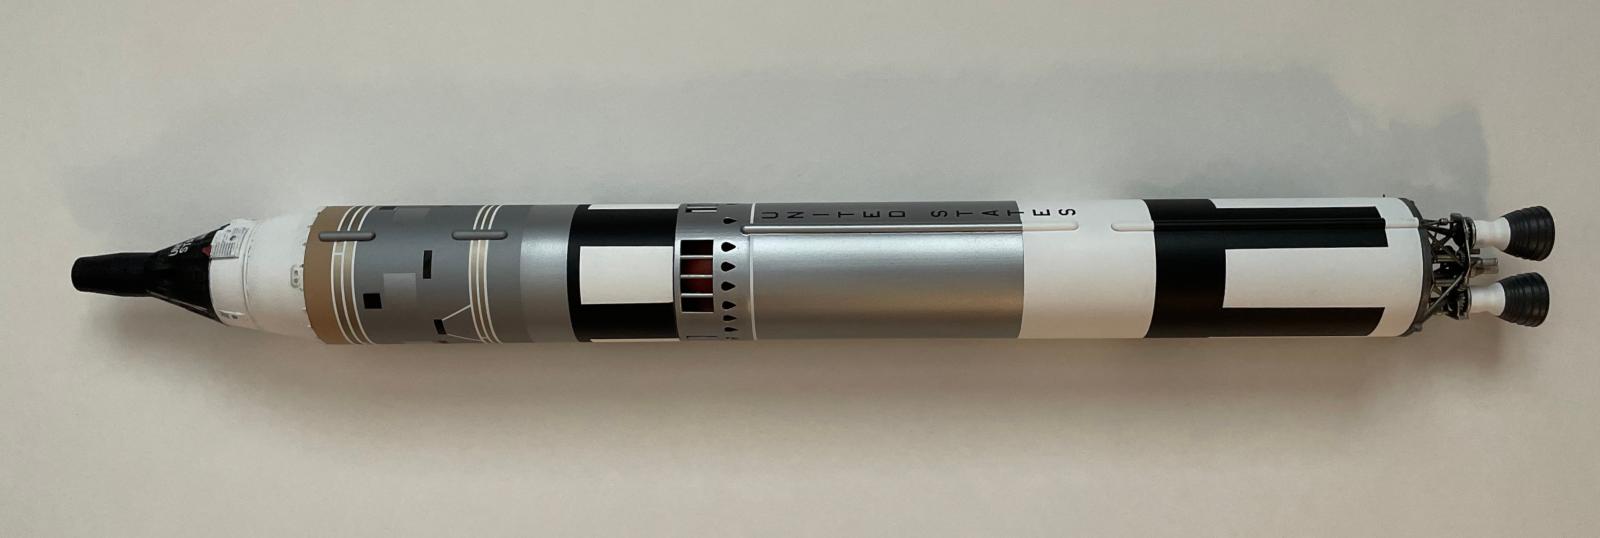
Now on to the kit. This is the 1/72-scale Gemini Titan by RealSpace. As far as I'm aware, it is the only Gemini Titan kit in this scale in existence. And that's why RealSpace is awesome: they make a wide variety of hard-to-find and niche subjects, catering to a passionate, if relatively small, space modeling community. I had earlier this year completed a 1/72-scale Mercury-Redstone (by Horizon Models, not RealSpace) and so was interested in keeping within this scale if possible.
The kit is molded in resin with only 18 parts:

It sure looks easy but I wasn't so easily fooled. First, I'd never built a resin model before. The biggest difference from styrene is no styrene cement (obviously); instead, one uses cyanoacrylate (i.e. super glue) which sets really fast and so has virtually zero margin for error in parts placement. But if you've got to dance with the devil, this stuff works great:

The other challenge is that the Titan has lots of smooth, polished metallic real estate, and that means excellent surface prep so that the model lusters and shines without blemishes, just like the real thing. I've never done this.
Two nits worth noting up front about this kit: first, the decals sucked. Hard. They were very thin and tore easily: the roll-pattern decals started ripping as soon as I lifted them (carefully) out of the water and became a tangled mess. I ended up having to paint the roll pattern. Some of the decals went down perfectly fine but then just flaked off; indeed, I hadn't sealed them yet but I'm talking light contact with paper towel would partially lift these guys off. This was after Solvaset and a few days setting time, so, yeah, I don't think my fault.
The other issue is with the resin molds themselves. The resin pieces tend to be textured, and the capsule and upper portion of the upper stage had various pits and other surfaces blemishes. Some of these weren't noticeable initially or even after a primer coat — they didn't jump out until a coat of white paint easily revealed them. The rocket body also had length-wise grooves: most of these were very light but I'm thinking natural metal finish and starting to worry.

I did a good amount of sanding on the rocket body to remove the larger grooves. Incidentally, the fact that these rocket body pieces are cylinders (no long vertical seams) is truly a blessing, particularly on a metal-surface rocket.
The first step is to cut of the various stick-like pieces to size and round off the edges: these are placed at diametrically-opposite spots on the rocket body. To line them up, I fashioned a mini plumb line out of thread and a fishing weight:

Now, on to priming. My initial impression was that I needed some kind of a filler primer, something like Mr. Surfacer 1000. My thinking was that it would nicely smooth out some of the issues on the rocket body and give me a nice surface for my metallics. But man, I had a time with this stuff! I watched several videos of people thinning it and spraying it on beautifully. Not me. Even when thinned greater than 1:1, my brush would sporadically spit out wads of gunk. I wondered whether the needle was too large (Paasche H Series middle needle, 0.75mm) and so I switched to my Badger Patriot with a 0.5mm tip and I also dropped the pressure down below 12 psi (a very non-scientific exploration). This worked better, but it still spattered. I decided to just go with the Stynelrez (which I've really grown to love, btw) and spray a nice, moderately heavy coat. I went over it with some 4000 grit sandpaper to be safe. Smooth as Tennessee whiskey:

Next, I painted the bottom portion of this stage white, masked it off, and applied a coat of Alclad Gloss Black Base to prepare the upper portion for the Alclad Aluminum finish, which went down pretty nicely:

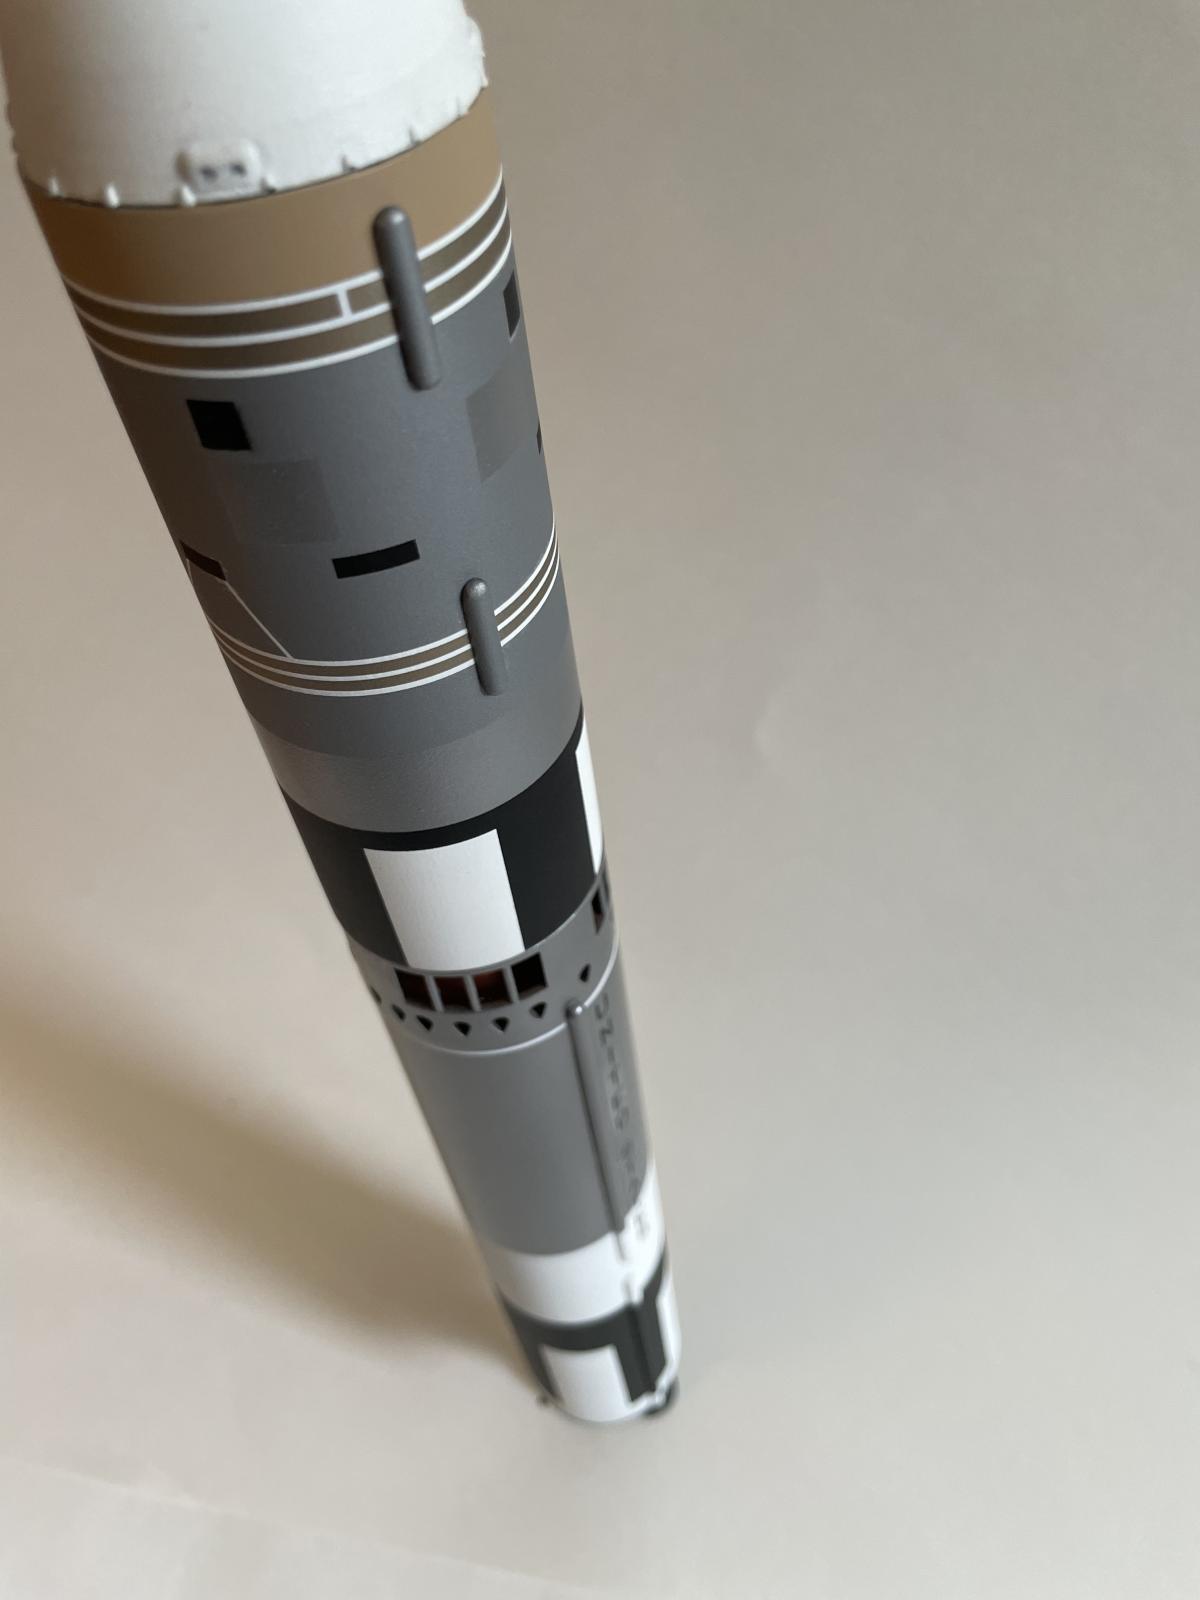
In photographs, the upper stage is a less shiny metal, and so I did not apply the gloss base first and I used Alclad Dull Aluminum here,

The instructions had some colors incorrect, at least according to online photos. For example, the second stage LR91 rocket is meant to be painted silver, but photographs show it to be a ruddy copper color:

Now on the model, this booster is barely visible, so I didn't go nuts. I mixed a rust color using Tamiya acrylics (left below), then misted some Alclad copper (middle) to give it a metallic sheen. Photo on the right is the engine fully assembled, with a light wash on the metallic parts. On the finished rocket, you can't see any of the engine components. Bummer.
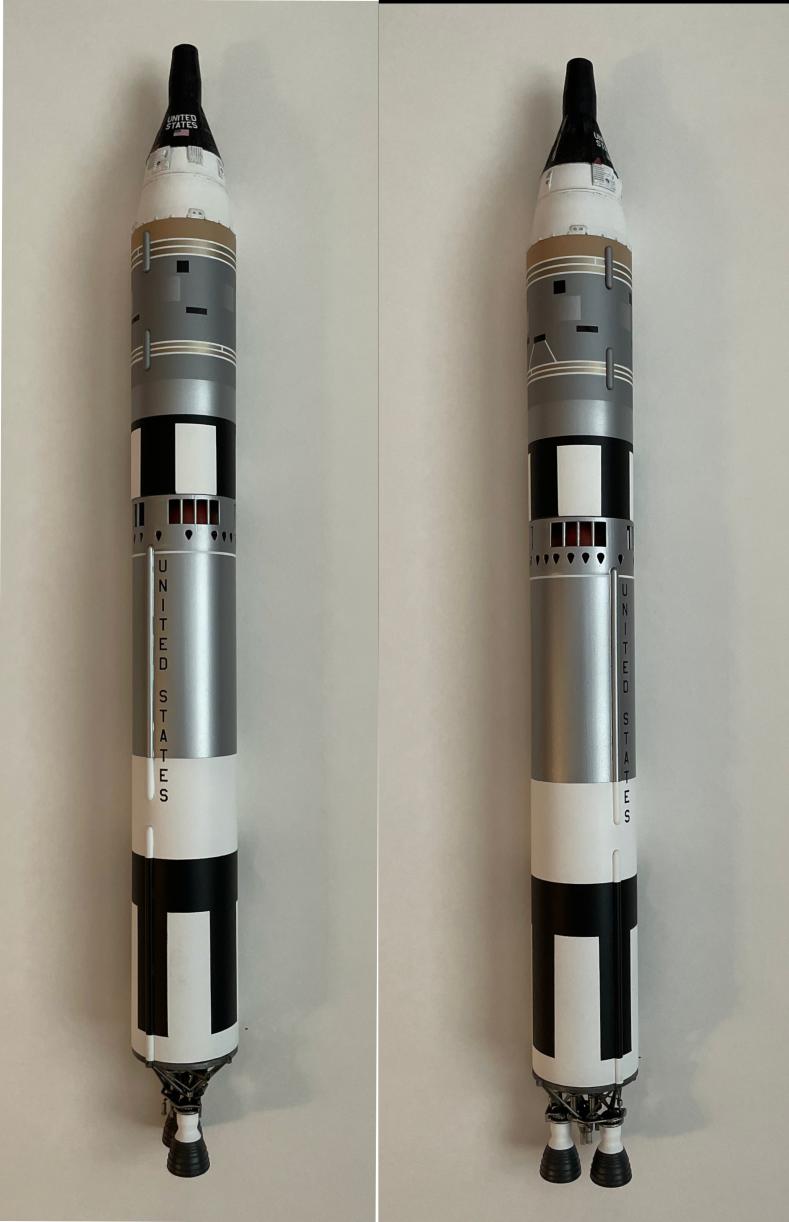
While the RealSpace kit is not of any specific Gemini mission, I was trying to reproduce the Grissom/Young Gemini 3 flight as closely as possible. Wikipedia has a decent shot of the launch vehicle:

One notices on the upper stage some pale gold coloration underneath the white stripes encircling the stage, as well as a row of shiny squares amidst the dull metal background. There's a lot of variation in finish, and the next challenge is how to deal with that. Ideally, I'd just let the Alclad do the talking here, but I wanted to gloss coat the model in preparation for decals. Now, I've read you can safely apply decals (some even say you can use setting and softening solutions) directly over Alclad without trouble. Maybe so. But regardless of this initial coat, I like to apply a gloss coat after the decals to bring the model up to a uniform shine before applying final dull coats. There is a lot of churn online about gloss coats hurting the finish of certain high-shine metallics, but Alclad Aqua Gloss seems to preserve the luster just fine. So what's the harm? I would gloss coat the whole thing, then go back at the end and selectively dull coat the aluminum and roll pattern on the upper stage, and white-painted part of the main stage. To minimize the amount of masking I'd have to do, I decided to paint the shiny aluminum squares on the upper stage at the very end, after the dull coat went down. Got it? Good. Here's the finished second stage, with some Alclad Pale Burnt Metal probably overdoing the pale gold hue seen in the photo above.

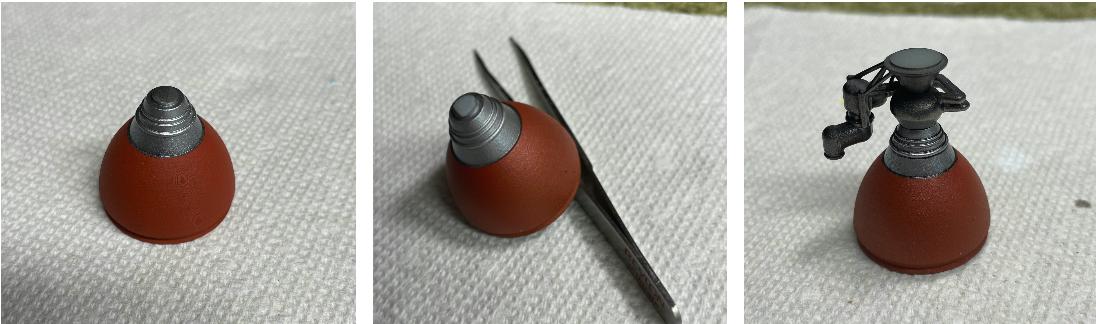
Finally, while some of the resin pieces were not ideally molded, the truss structure for the main engines was gorgeous:

I applied Alclad Stainless Steel over the gloss black base: the base shows through just vaguely enough to give some nice, subtle contrast. I was going to give it wash but there was no need. The only regret with having a single engineered piece like this is that you can't really get in there and paint any details; then again, on a kit like this (at this scale, especially) that might end up being a bad idea.
Despite the decal headaches, this was a fun one. I'm looking forward to tackling some more RealSpace offerings in the future. Thanks for reading!


Love it. I enjoy seeing real space models built up. A piece of mankind's collective history.
I've used stuff from Real Space. No real complaints other than the fragility of the parts, but that's the nature of resin.
Stynylrez is my usual go-to primer these days even for NMF. The bright side is that I can use it inside the house which allows me be build NMF models year round (I mostly use acrylics.)
However, I would suggest an alternative to Mr Surfacer. I've used Tamiya Lacquer Primer from the spray can (can only spray it outside.) It's quite nice and the Tamiya spray nozzle can be controlled rather easily to eliminate those pesky over spray blobs. Quite similar to Mr Surfacer and you don't need to thin it.
Great advice, thanks Dan. I will give it a try on my next go around.
A very impressive rocket, Brian @bapowellphys
Although I'm not into this space area, it sure looks like a perfect copy of the real one. Thanks for sharing your building experience. Well done.
Thanks John, appreciated!
This is a superb model, Brian! A challenging kit for sure, that you really mastered. The final result is an imposing model, not often seen built. Your supporting article equally rocks!
Congratulations!
Hey, thanks Spiros!
Beautiful work and a great result.
The real stories of the Space Program are soooo much better than NASA's "The perfect astronauts are doing perfect things perfectly." Gordo Cooper once told me the true story of Gemini-4, the 14 day mission that proved they could stay in space to go to the moon. It was the first spacecraft with a fuel cell for power. So they launch and the second orbit, the engineers start crying they have to come down because the fuel cell is operating "outside of parameters." The astronauts suggest that since no one has operated a fuel cell before, and this one is working just fine, perhaps the parameters are wrong; so the mission continues with the engineers reserving the right to end things any time the parameters change - which they don't. But by the third day, the control thrusters have all frozen up. So the ship is drifting most of the time. They "control" the ship with "strategic dumps" of solid and liquid waste! And that's how they got through the 14 days and proved they could stay in space long enough to go to the moon. "Strategic dumps" of liquid and solid waste.
Whole-heartedly agree that the true stories reveal the true grit of the program and all those who made it possible. Thanks for the story and compliment!
Loved reading this, my friend @tcinla!
Great work, Brian. Gemini gets lost in collective memory between Mercury and Apollo. If you ever get a chance, check out the museum in Huntsville.
You certainly made the most of this “simple” kit, Brian, great result. Mmmm corned beef sandwich washed down with Tennessee Whiskey, sounds like my sort of meal.
Really have to say excellent work, you really did a nice job on that kit. The paint work is really excellent, there is a lot more there than you would think and you got it all. When you are done is sure as hell looks like a lot more than just 18 parts!
@bapowellphys, That's very impressive work Brian! 👍 Great looking rocket, man!😁
Great build Brian @bapowellphys nice photos too.
Lovely to see the Titan and Gemini, that I remember from my boyhood
Beautiful work, this is a great looking build! A very historic time during the NASA’s space program that I feel it gets ignored.
Thanks everyone! I really appreciate the positive feedback!
Great work! Gemini was the first program I remember following in magazines and television.