Su-57 Felon
This article is part of a series:
In 1999 Russia initiated the PAK FA (Perspektivnyy Aviatsionnyy Kompleks Frontovoy Aviatsii, Prospective Aeronautical Complex of Front-line Air-forces) program for a next generation combat aircraft. The Sukhoi company developed the T-50 to the requirements which include stealth features, advanced, integrated avionics, super-manoeuvrability and a super-cruise capability. Novel features include;
-
N036-1-01 Active Electronically Scanned Array (AESA) X-band radar coupled with the N036B-1-01 side looking X-band AESA and N036L-1-01 wing leading edge L-band arrays
-
101KS electro-optical suite composed of the 101KS-V infrared search and track (IRST) forward of the cockpit, 101KS-O directional infrared counter measures (DIRCM) in the domes behind the cockpit and under the nose, 101KS-U ultraviolet missile approach warning sensors (MAWS) either side of the cockpit, under the nose and between the engines on the upper fuselage, 101KS-P thermal imager for low altitude flight and landing mounted in the port under-wing weapon bay fairing and 101KS-N navigation and targeting pod for air-to-surface mode
-
Tandem internal main weapon bays and auxiliary under-wing weapon bays housing short range missiles
-
Leading-edge vortex controllers (LEVCON) that are adjustable to improve high angle of attack control and stall recovery.
In April 2002 Sukhoi was announced as the winner of the PAK FA competition but it wasn't until the 29th of January, 2010, that the first prototype, T-50-1 Bort “Blue 51” (later 051), made the type's maiden flight.
In July 2017, the T-50 was designated Su-57 for service with the Russian air Force.
A further nine flying prototypes were produced before the first pre-production Su-57, T-50S-1, no 51001, Bort “Blue 01” was rolled out in 2019, but crashed on 24th December during factory trials, the pilot safely ejecting. A second pre-production aircraft, T-50S-2, no 51002, also “Blue 01” took to the air on the 31st of October, 2020.
Five production aircraft, no 52201, 52302, 52303, 52304 and 52405 (known Bort numbers “Blue 52”, “Red 02” and “Red 52”), are believed to have been produced in 2021 and at least a further two (RF-81777 “Red 53” and RF-81778 “Red 54”) in 2022.
The Su-57 NATO reporting name is “Felon”.
Construction
When it was released, the kit had some mixed reviews with early examples exhibiting a rough surface on the upper fuselage-wing and some soft details. My example, however, was quite satisfactory in these areas, so perhaps Zvezda refined the moulds.
The kit is split into top and bottom parts that combine the fuselage and wings. The fit of these parts is excellent although the wing leading edge is quite sharp so a little care is needed to get them right. While the kit has deceptively few parts, the engineering and fit is, for the most part, very precise and a joy to assemble. An example is the attachment of the open weapon bay doors. I thought that the four small hinges would present problems, but their fit in the corresponding slots is precise and they almost don't need glue. Mind you, that didn't prevent me from knocking one or two off a couple of times.
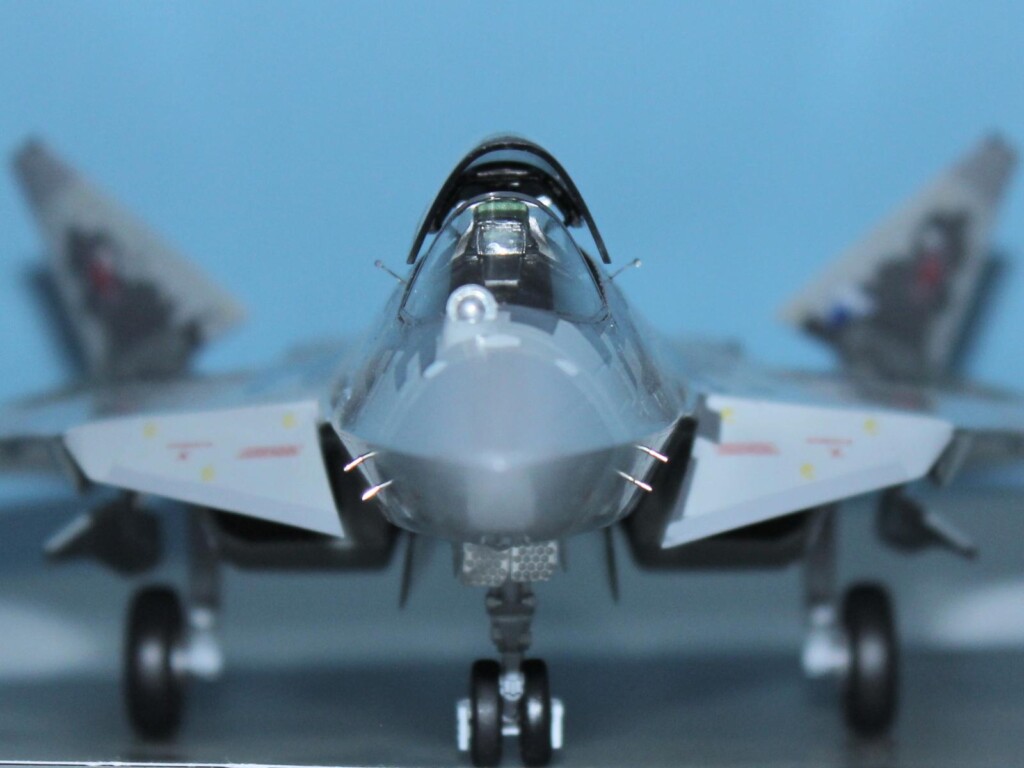
The clear parts are made from a soft, flexible plastic and are some of the best that I have seen. The canopy parts are scale thickness and crystal clear, as is the two-part, wide-angle Head Up Display (HUD). The IRST ball and DIRCM domes are represented nicely but the MAWS apertures, which on the aircraft are UV cameras behind small windows, are represented by etched outlines for four of the six locations. The final two are not represented at all, which is not too big a deal because I had to paint all six windows anyway.
As noted above, the main weapon bays can be modelled open but the kit supplies an alternative single piece to represent the doors closed. The two under-wing, short range air-to-air weapon bays are moulded closed, probably because there is currently no information on how they actually work.
Supplied weapons include six R-77 medium range active Radio Frequency (RF) seeker missiles (NATO designation AA-12 Adder) for the internal bays and two for external, under-wing hard points. These are the original version with the rear lattice controls that fold forward, although references indicate that the Su-57 has tested the R-77M, an upgraded version with AESA seeker, conventional fins and two-pulse motor. References also indicate that the aircraft will only carry two weapons each in the two main bays rather than the six supplied. However, as there was minimal detail in the bays, I decided to mount all six missiles.
Other external ordinance includes two fuel tanks, two K-74M (AA-11 Archer) short range Infra-Red (IR) seeker missiles and two Kh-31A/P (AS-17 Krypton) medium-range supersonic anti-shipping/anti-radiation missiles, but I wanted to build the aircraft in a clean configuration.
So, to the negatives. While the joystick and ejection seat are acceptable (although lacking belts), the side consoles are featureless and the instrument panel minimalist with details being provided by decals. The excellent Quinta Studio 3D cockpit decal sets, which also includes multi-layered seat cushions and belts, are a must. The decals are perfectly sized and the detail quite delicate, although it took a bit of searching to find the appropriate cockpit blue to match the decals.
The second negative, and the only really poor fitting part, is the flat and featureless rectangular piece that fills the hole in the middle of the upper fuselage. This part does not appear to represent any feature or panel on the aircraft and instead seems to be a necessary injection point for the moulds. Certainly, this could have been better designed. I filled the join lines for this piece using super glue and the effort required in sanding, checking, sanding some more and then re-scribing lost panel lines was considerable. This was probably the most onerous part of the build.
Finally, the undercarriage bays are rather plain. The nose gear doors are closed, so the lack of detail doesn't matter here, but the main gear doors are open and I decided to add something to the bays. The engine ducts have external rib detail but the rest of the main bays is bare and I decided to add cross-body ribs based upon the upper surface panel locations. These were designed on my computer and cut from plastic card stock using a craft cutting machine. I added some boxes and wires to the engine ducts based upon some images I found of the Russians using augmented reality headsets during manufacture of this area.
The configuration of the kit represents one of the later the prototypes. Indeed, the eighth prototype, “Blue 509”, and the tenth, and final, prototype, “Blue 511”, are two of the schemes offered. However, there are a few differences in the production aircraft and I decided to make some modifications to suit.
The key modification is the port air intake at the base of the all-moving vertical tail. On the prototypes, and the kit, the port and starboard intakes are identical but, on the production aircraft the port intake is of a revised size and shape.
I had already assembled the fuselage when I decided to do this modification, so I had to cut away the forward section of the intake. Truth be told, with the single piece upper fuselage and wing it probably wasn't that much more difficult than had I done it before assembling the fuselage. I then used plastic card stock to form the intake and faired it in with, variously, super glue and Tamiya putty. This took as much effort as the centre fuselage plug did, but at least this was my choice and, in my eyes at least, an improvement.
The second modification was the eight angular engine cowling vents, four new vents added underneath and the four existing vents on top being reshaped. This was done using pairs of small plastic card triangles, leaving the rear open.
The third modification was to drill a hole and insert a piece of metal tubing into the port under-wing weapon bay fairing to represent the low altitude flight and landing camera.
The final pieces to be added were the two air speed probes to the rear and below the cockpit canopy, fashioned from scrap plastic, and the two probes each side just aft of the side looking radar on the lower nose, using sections of dressmaker pins.
Colours and Markings
This model represents is an early production Su-57 and its features and camouflage scheme are based upon the second pre-production aircraft, "Blue 01", with a hypothetical bort number "Blue 06".
Having learnt my lesson when masking the digital camouflage on my Gripen, I decided to purchase some die-cut masks (New Ware, NWR-AM0809). These worked well, but they only provided for the upper surface.
After masking the canopy, I first sprayed the dark grey (H331 Dark Sea Grey BS381C/638) on the top surfaces and vertical fins. I then applied the digital camouflage masks and sprayed the light grey (Gunze H338 Light Grey FS36495) on the upper surfaces and vertical fins. There was a bit of bleed under the masks and I used the ‘negative' of the masks to respray the dark grey in places.
I sprayed the undersides with a pale blue (H418 RLM 78) and then reused the upper surface masks along with some custom masking to fill in the gaps that were due to the masks being designed for the smoother upper surfaces. Once I was happy with the masks, I painted the light grey on the under surfaces.
Masks were also supplied for the nose, tail and side radar apertures but I had to mask the leading-edge and fin tips before painting them a medium grey (H308 Grey FS36375).
I brushed on a coat of Vallejo clear gloss (because I haven't had any success in airbrushing it) and because I wanted the best possible surface for the very large stencilling decals. The entire upper surfaces stencils are provided for using five very large decals, one for each wing, one each for over the left and right engine duct areas and one for between the engines. Two medium sized decals sit over the forward left and right engine duct and two more over the leading-edge vortex controllers.
I was concerned that such extensive areas of clear decal could silver, however the decals went down flawlessly and, in spite of being so large, were easily moved into position without any danger of tearing.
I added all the remaining decals and sprayed a Vallejo clear semi-gloss coat, which is perhaps a bit too glossy.
The instructions don't indicate the location of wing navigation lights, nor are they represented on the kit, but photos show them to be on the wing leading-edge just outboard of the control surfaces, so I painted them with clear red and clear green over silver.
The engine nozzles were painted with different metallic shades to try and indicate frequent movement of the thrust-vectoring nozzles and give some temperature discolouration. This is something I haven't had much experience with and I am trying to improve my skill to achieving realistic effects.
Otherwise, I chose not to weather or dirty the aircraft.
Conclusion
This is the only option if you want a Su-57 Felon in 1/48 scale.
The lack of detail in some areas can be attributed to the lack of information on the real aircraft in those areas. The kit does represent the aircraft well, noting that modifications to the production aircraft occurred after the kit was produced. The fit is over all very good, the mould quality on my example was very good and the quality of the canopy and decals is excellent.
I thoroughly enjoyed this build and the resulting model.


@michaelt - Wow, this is an impressive build Michael. Your write up is excellent as is the final result with your modifications.
Great article and build Michael 👍The finished Felon looks impressive 😊
An impressive model indeed, Michael! Up to your usual standards!
Thanks for the historical background, the kit info and build details.
Well done!
Excellent build and ditto article, Michael @michaelt
Great scheme as well.
Thanks for this, it will be a valuable reference!
Very impressive project, excellent work and a great result.
I'm in the middle of building the 1/72 T-50 from this company, and it is definitely the earlier, grainy molds! Yours looks great. I see they've put out a later version intended to represent the Su-57, and will probably pick one up to represent the more updated aircraft in the digital camo scheme. Great work on the updates and getting as close to "actual" as one can about an emerging aircraft from a belligerent power.
Nice work on this, Michael. Thanks for the detail pics! It’s a sharp looking plane. I’m kind of leaning towards building one in 1/72.
WOW! A real-life Firefox! Having never heard of this aircraft I thoroughly enjoyed and appreciated your article. One of the great benefits to this forum is the education gleaned from other builders.
Your execution of the kit is superb. Those digital camo patterns look so cool when complete. It must be a great feeling of accomplishment when you pull the masks off.
Thanks for sharing. Liked!