The Somewhat Unappreciated Hasegawa F6F Hellcat
I've been away from iModeler for quite a while, but I haven't been sitting idle.
I've been tinkering with several "Shelf of Doom" projects in various stages of construction, and i decided to rebuild and repair a favourite of mine from 2007- The Hasegawa, 48th scale F6F-3 Hellcat. It had fallen into disrepair over time and a couple of relocations. However, it was a milestone in my modeling building history and it was too nice to simply bin it... or give away to the kids down the street.
Many articles have been written about the Hasegawa Hellcat kits. The Hasegawa F6F-3/5 pre-dates the better-known Eduard F6F kit, but despite the numerous re-boxings Hasegawa has done over the last 20-plus years, it remains something of a "sleeper". This is unfortunate, because while it isn't perfect the Hasegawa kit offers some qualitative advantages over the Eduard kit.
Since i said the kit isn't perfect, let's address the less-desirable features right off the bat so the modeler can decide for themselves just how "bad" these aspects are.

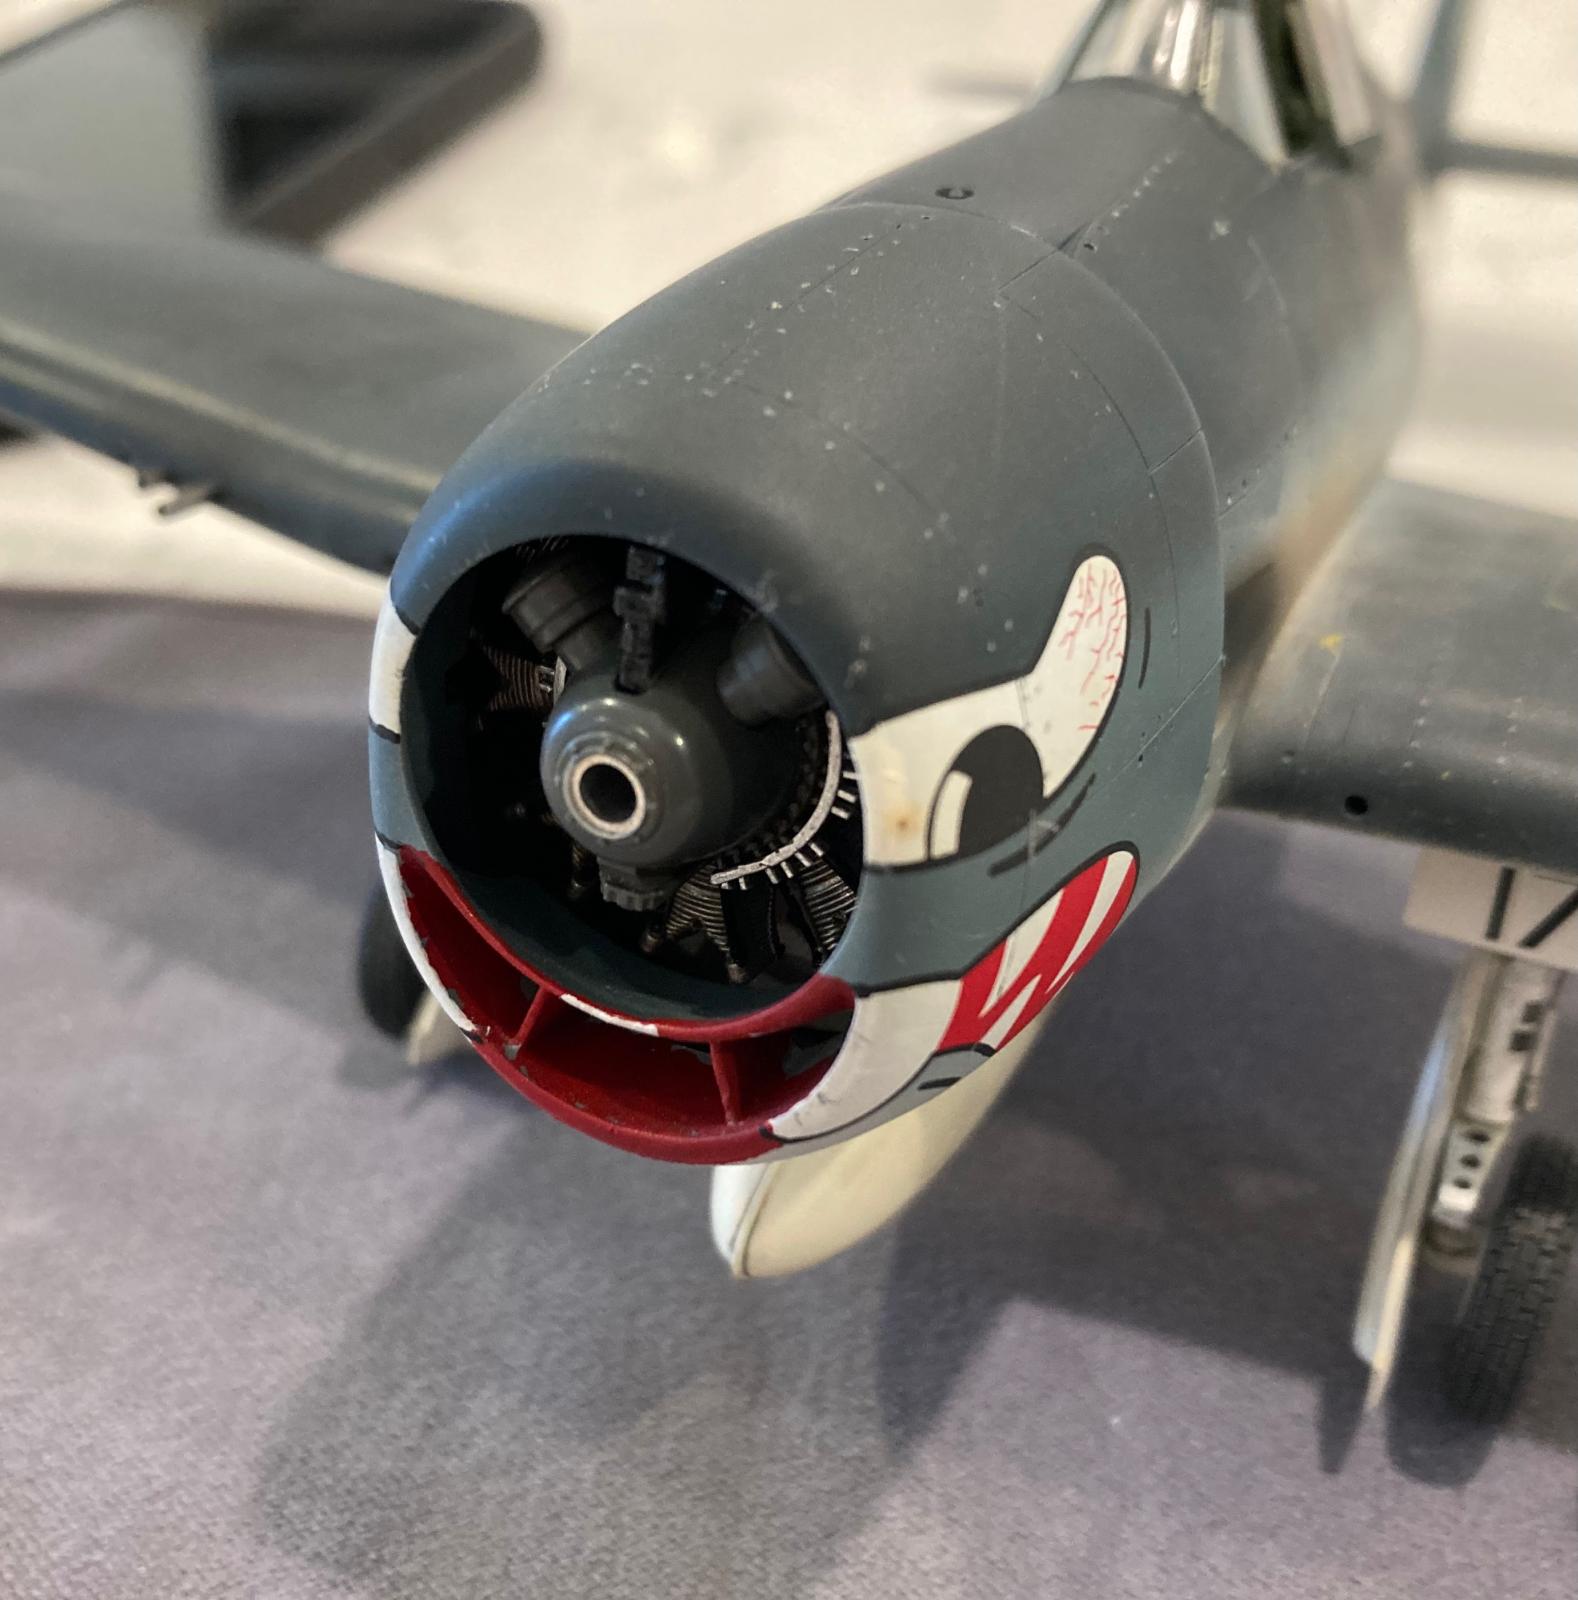
Starting at the nose, much has been written over the years about the shape of the induction air and oil cooler inlets located in the Nose Ring or, "Nose Bowl" (Vought's term of art). Better known as the "grin", models over the years have suffered from openings that were the wrong size and/or had incorrect spacing of the wedge shaped vanes separating induction air from oil cooling air.
Some of this problem stems from the acute downward "cant" of the cowling when viewed in profile, which has led to some projection and interpretation errors when drawn from head-on; sort of like Spitfire wheel wells. If you want the full-blown "Masters Thesis" on the shapes of the F6F Cowling, i refer you to the excellent drawings and models built by acclaimed Japanese modeler Junpei Temma (note: Junpei also used the Hasegawa kit and made far more changes to his model, but many i feel are difficult to discern unless you are totally hardcore about Hellcats).
The second place where something looks suspect is the profile of the cowling. It seems to have an ogival, slightly "Ballooned" upper profile. Hasegawa provides separate "Bumps" to be attached to the lower cowling flanks in order to cater to early-, mid-, and late- Hellcat exhaust stack variations. While its actually a dished-out depression on the actual cowling, it may have been too much to ask of injection molding technology of the time.
Hasegawa cockpits can be somewhat hit-and-miss, but fortunately this is definitely one of their better efforts. All the "basic" controls are there, and the instrument panel has raised detail that can be drybrushed, or the kit-supplied decal can be applied over it.
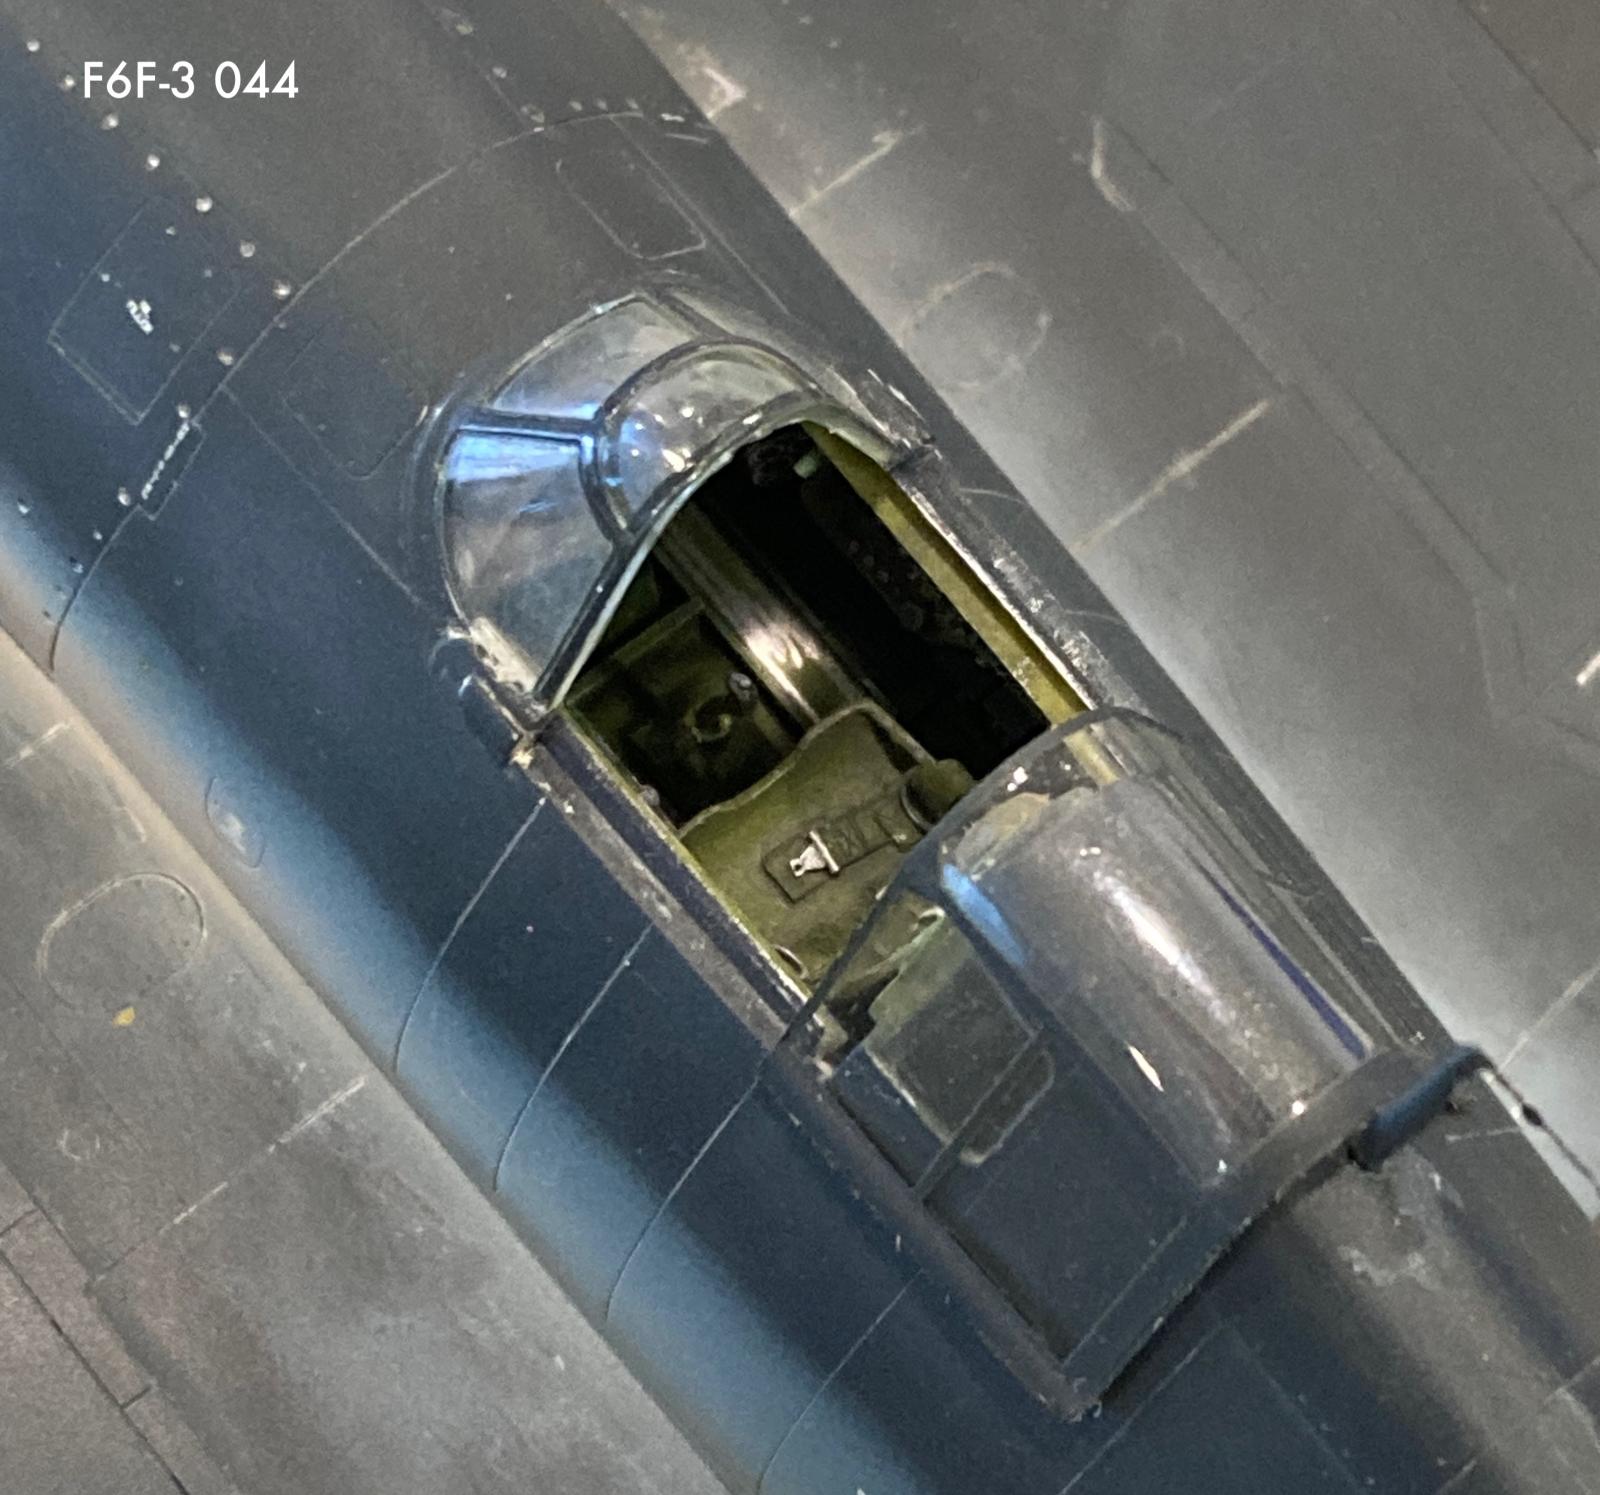
The down side is the canopy. While it is very clear, it's also thick. The sliding portion will not fit realistically when slid back over the spine, much like the canopy in the Tamiya F4F Wildcat. Fortunately, both Falcon and Rob Taurus make replacement vacform canopies.
Hasegawa did correctly tool both the early -3 Canopy with its separate internal armoured glass, as well as the later windshield with the integral armoured glass center panel, seen on the F6F-3N and F6F-5s.
Design and integration of the ubiquitous centerline fuel tank is a bit simplified compared to the Eduard kit and leads to some compromises in scale fidelity. For a more realistic result it will require some modification to the support struts and replacement of the bridle straps, but the Eduard installation is a lot more fiddly and complicated.
The most involved aspect to the model that may call for serious treatment are the wheel wells. In classic Hasegawa fashion, they are molded into the lower wing plank and are noticeably shallow. I don't have a fetish for wheel well detail. Having said that, the F6F had one of the most intricate and complicated wheels wells in its peer group (the Curtiss SB2C is a close rival) and if you are one of those types that like to park your model on a mirror, in this case some kind of rework is probably a must.
The landing gear struts are accurate in appearance and for the most part not oversimplified. Fit in the wing sockets is accurate and positive. The kit provided wheels however, are okay in diameter but noticeably thin in cross section. Fortunately, there are excellent resin replacements, providing modelers with a wide range of wheel design and tread patterns to choose from. Hasegawa provides the standard carrier-suitable solid "Grizzly" hard rubber tyre. The tail wheel well is again typical Hasegawa, but the opening is so small as to not be significant. In line with their engineering ethos, the basics are there leaving the modeler to determine how far they want to stretch their detailing skills to add "zing" to their model.
With that said, i will describe the build process, highlighting the positive aspects of the model along the way.

Not so fast, Wing Commander. I prefer to start my models off at the blunt end, thank you very much.
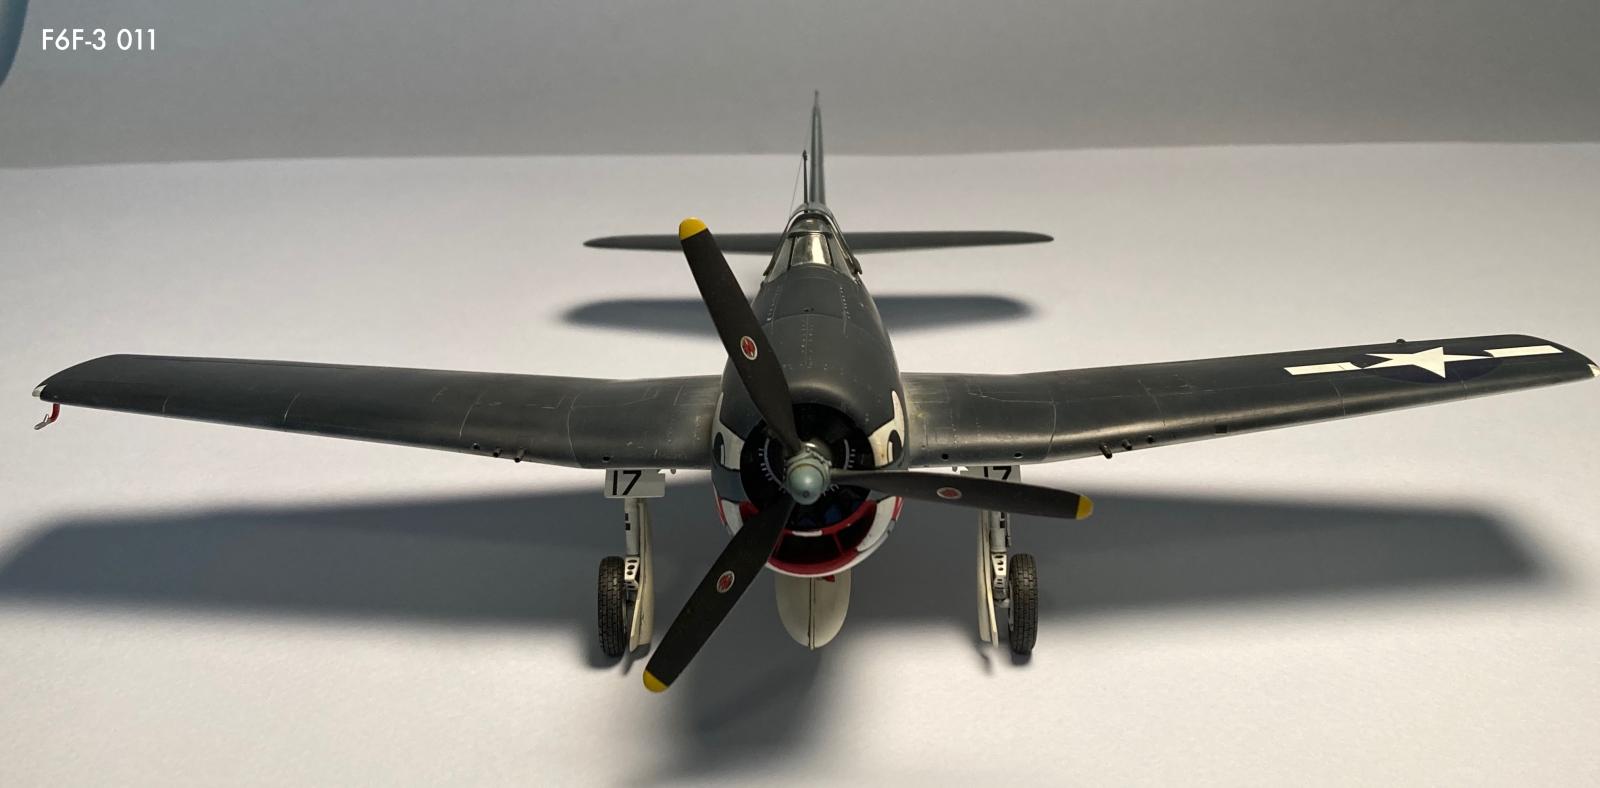
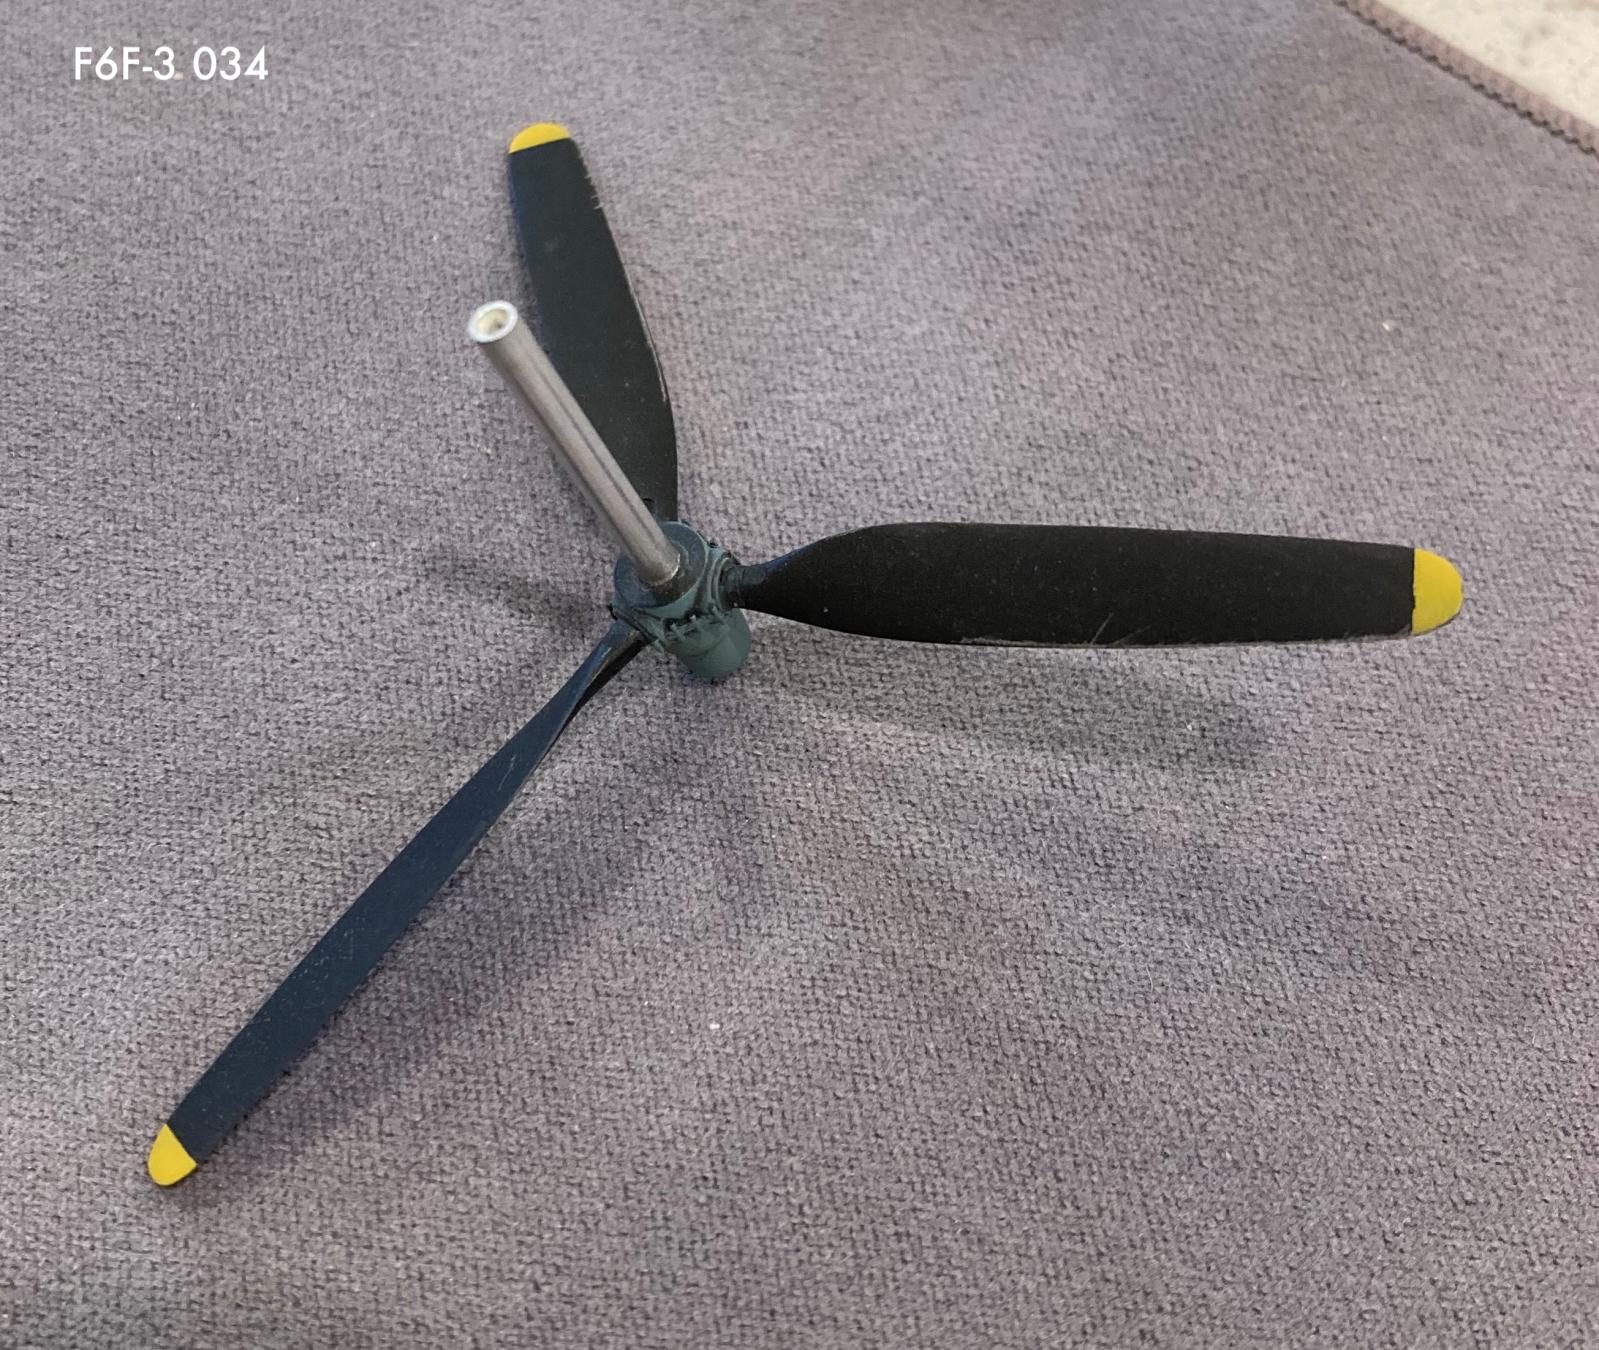
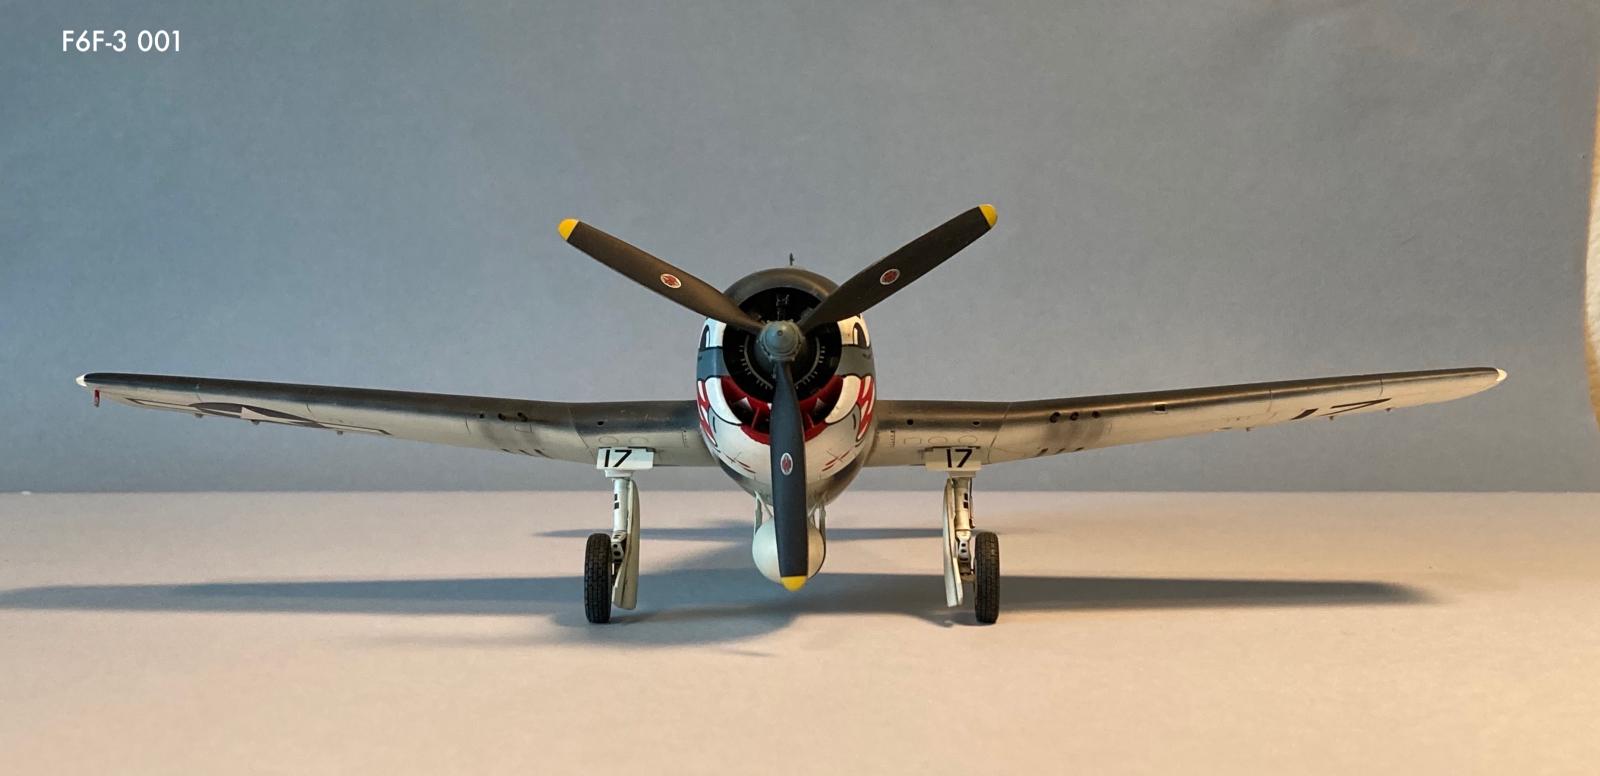
The Hasegawa Propeller is markedly superior to the Eduard one. The propeller hub is a little bit better than the Eduard one but the characteristic "Paddle Blade" of the 13'-1" propeller is better rendered in planform that Eduard's interpretation.
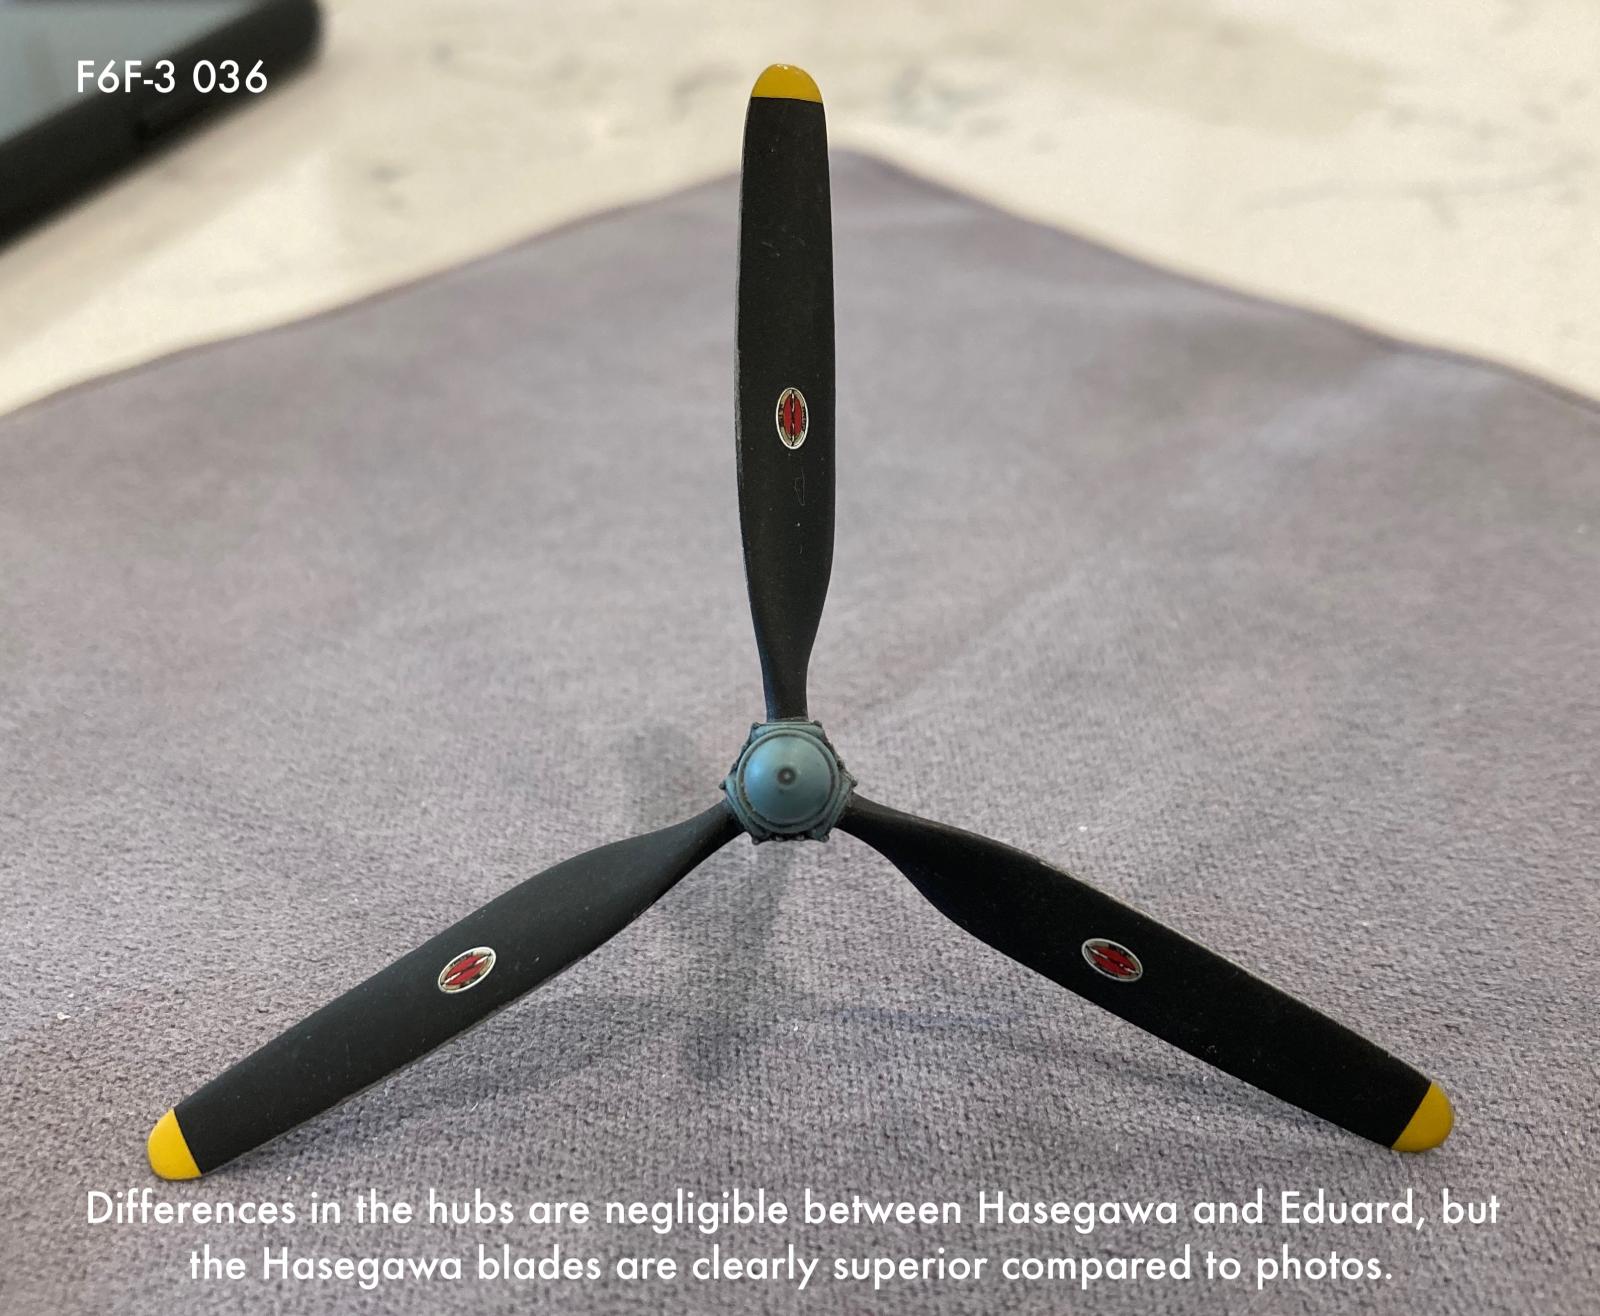
On my model, i created a sleeve bearing of two telescoping sections of aluminium tubing in order to facilitate installation very late in the game (Props to Robert Steinbrunn for this idea (no pun intended)).
The Hasegawa R-2800 is actually quite nice and can form the basis for a much more detailed powerplant, without the need for outright replacement. There is not a great deal that can be seen aside from things like ignition leads and prop governor stuff, so going nuts with detailing the rear cylinder bank is largely a waste of time. If you choose to open the cowling flaps however, this changes the situation somewhat.
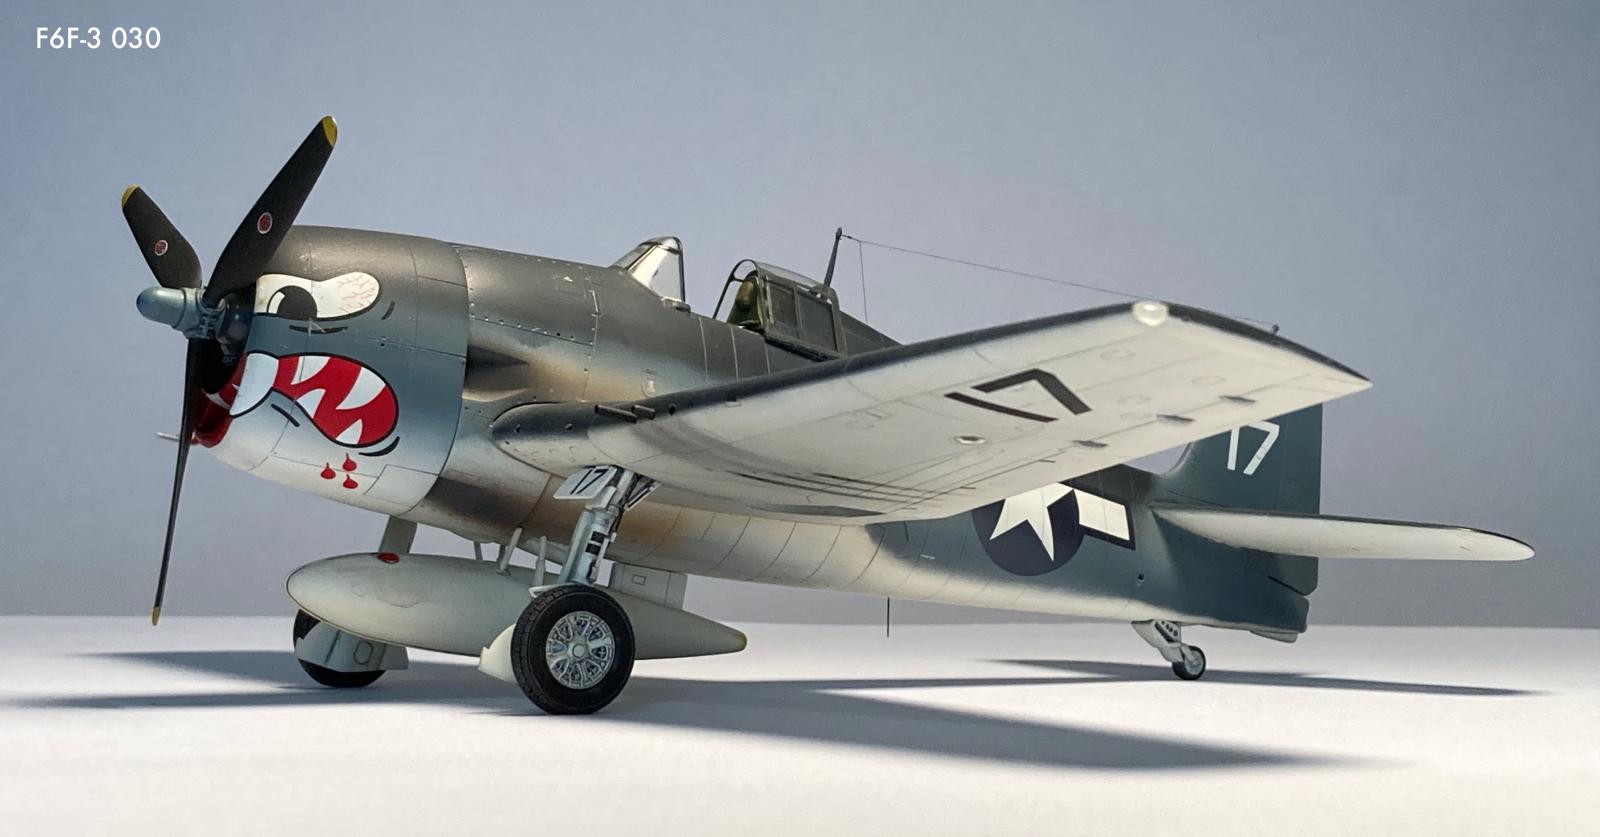
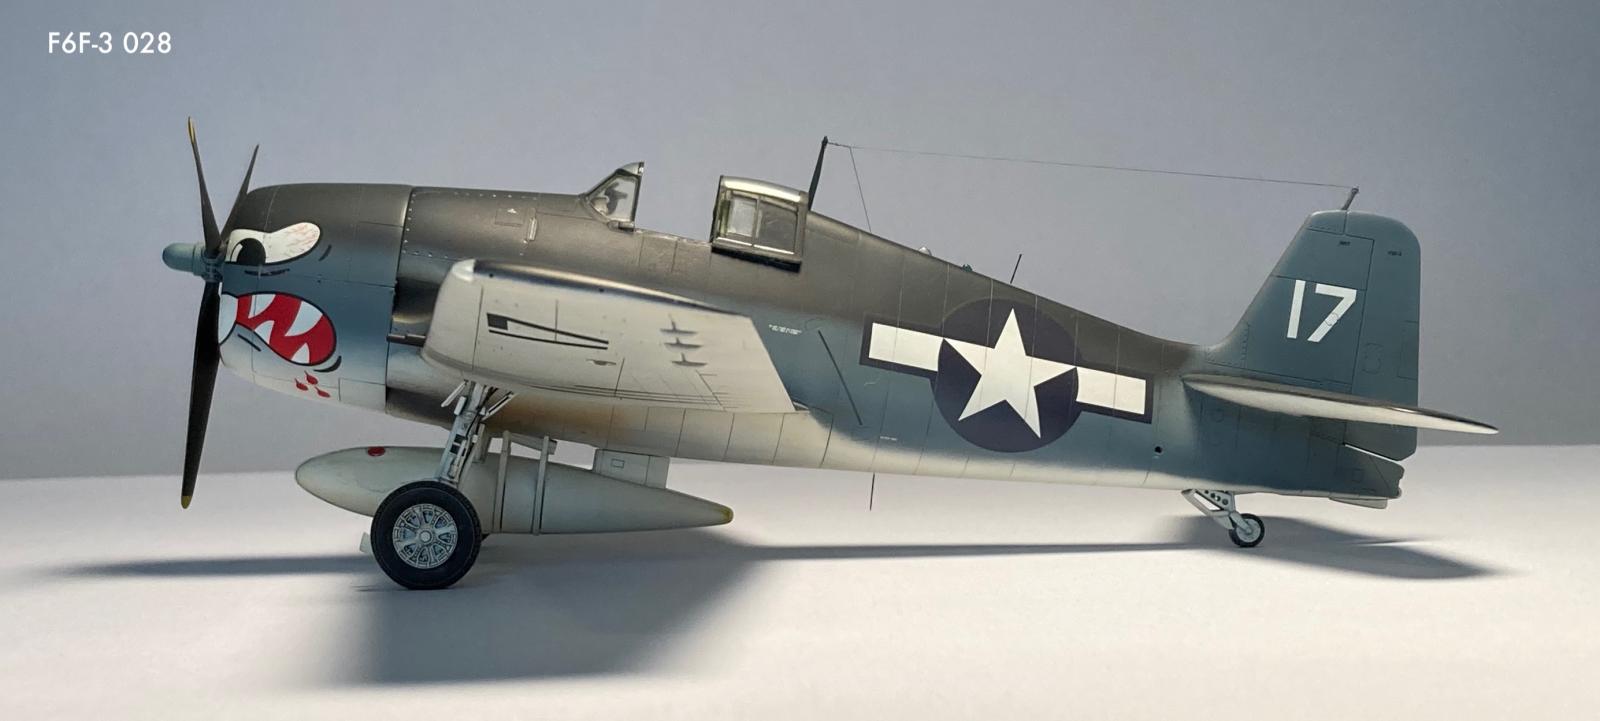
On my cowling, i sawed off the front end along the kit panel lines and grafted on the nose bowl from an Otaki F6F kit (already a separate part). There was some mismatch in diameter and this was fixed with some sheet styrene, over which i applied Zap A Gap CA that was then filed and sanded to shape. At the same time, i attacked the upper cowling with a file and coarse sandpaper and eliminated the pronounced "curve" of the upper profile. While most of the surface detail on top and at the front was obliterated, the cowling was still sufficiently thick and i was able to restore the missing detail without too much trouble.
One thing i tried that didn't work out as hoped was, i drilled out the Dzus fastener holes on the cowling and forward fuselage accessory section and replaced them with lengths of Plastruct rod. These were trimmed down and sanded to be mostly flush. Unfortunately, in the painting stage my panel line washes didn't "catch" around the fasteners so they really didn't pop out as much as hoped. Live and learn. Won't do that again.
I used a Jaguar resin cockpit in my build, partly because i was curious as to how it would work out and partly because it was available. Comparing it to the kit cockpit parts, they're an improvement but not on the same "game-changing" level that the new 3D-printed Quinta cockpit parts are. If aftermarket was unavailable, you can still build up a brilliant cockpit starting with the kit parts...Maybe an Ultracast or Barracuda resin seat but that's about all.
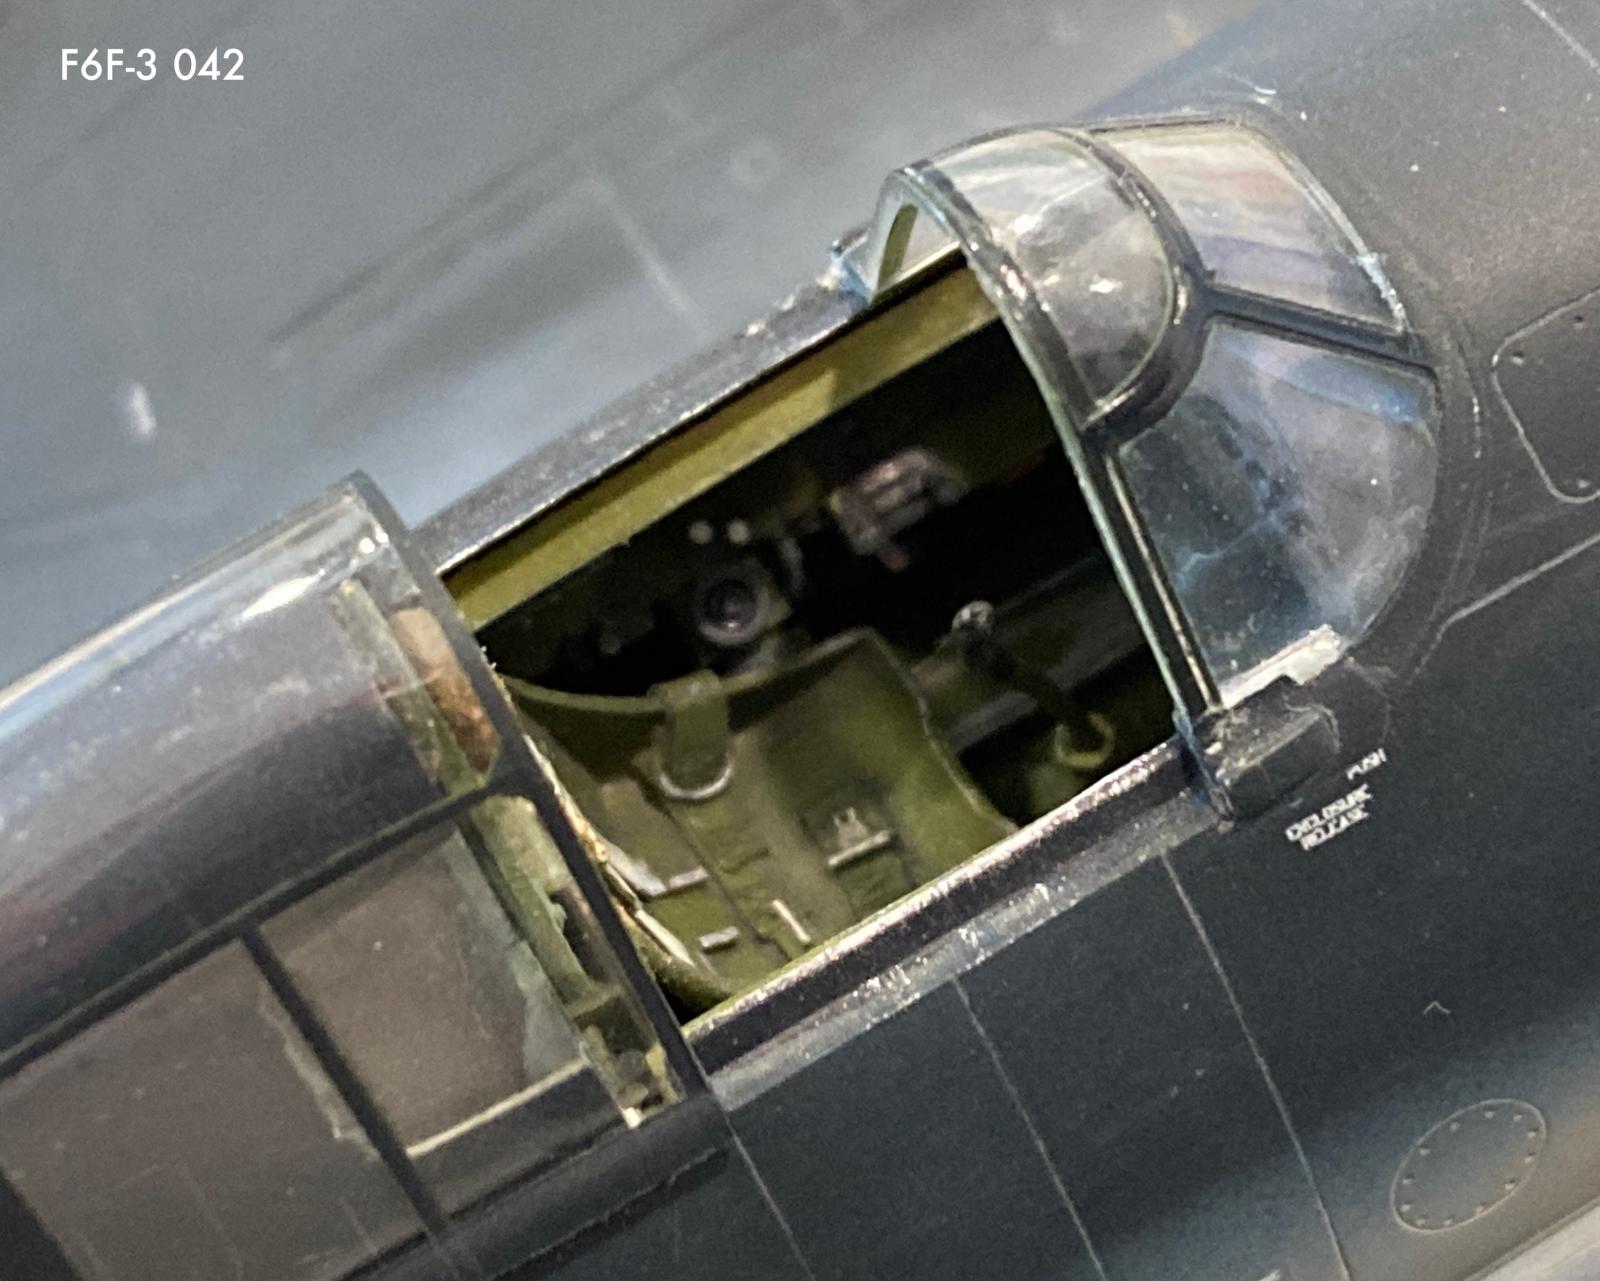

The windows behind the canopy are flashed over on the fuselage halves and need to be opened up to receive the kit provided windows, but nothing we haven't really seen before. The fuselage halves went together with no problems.
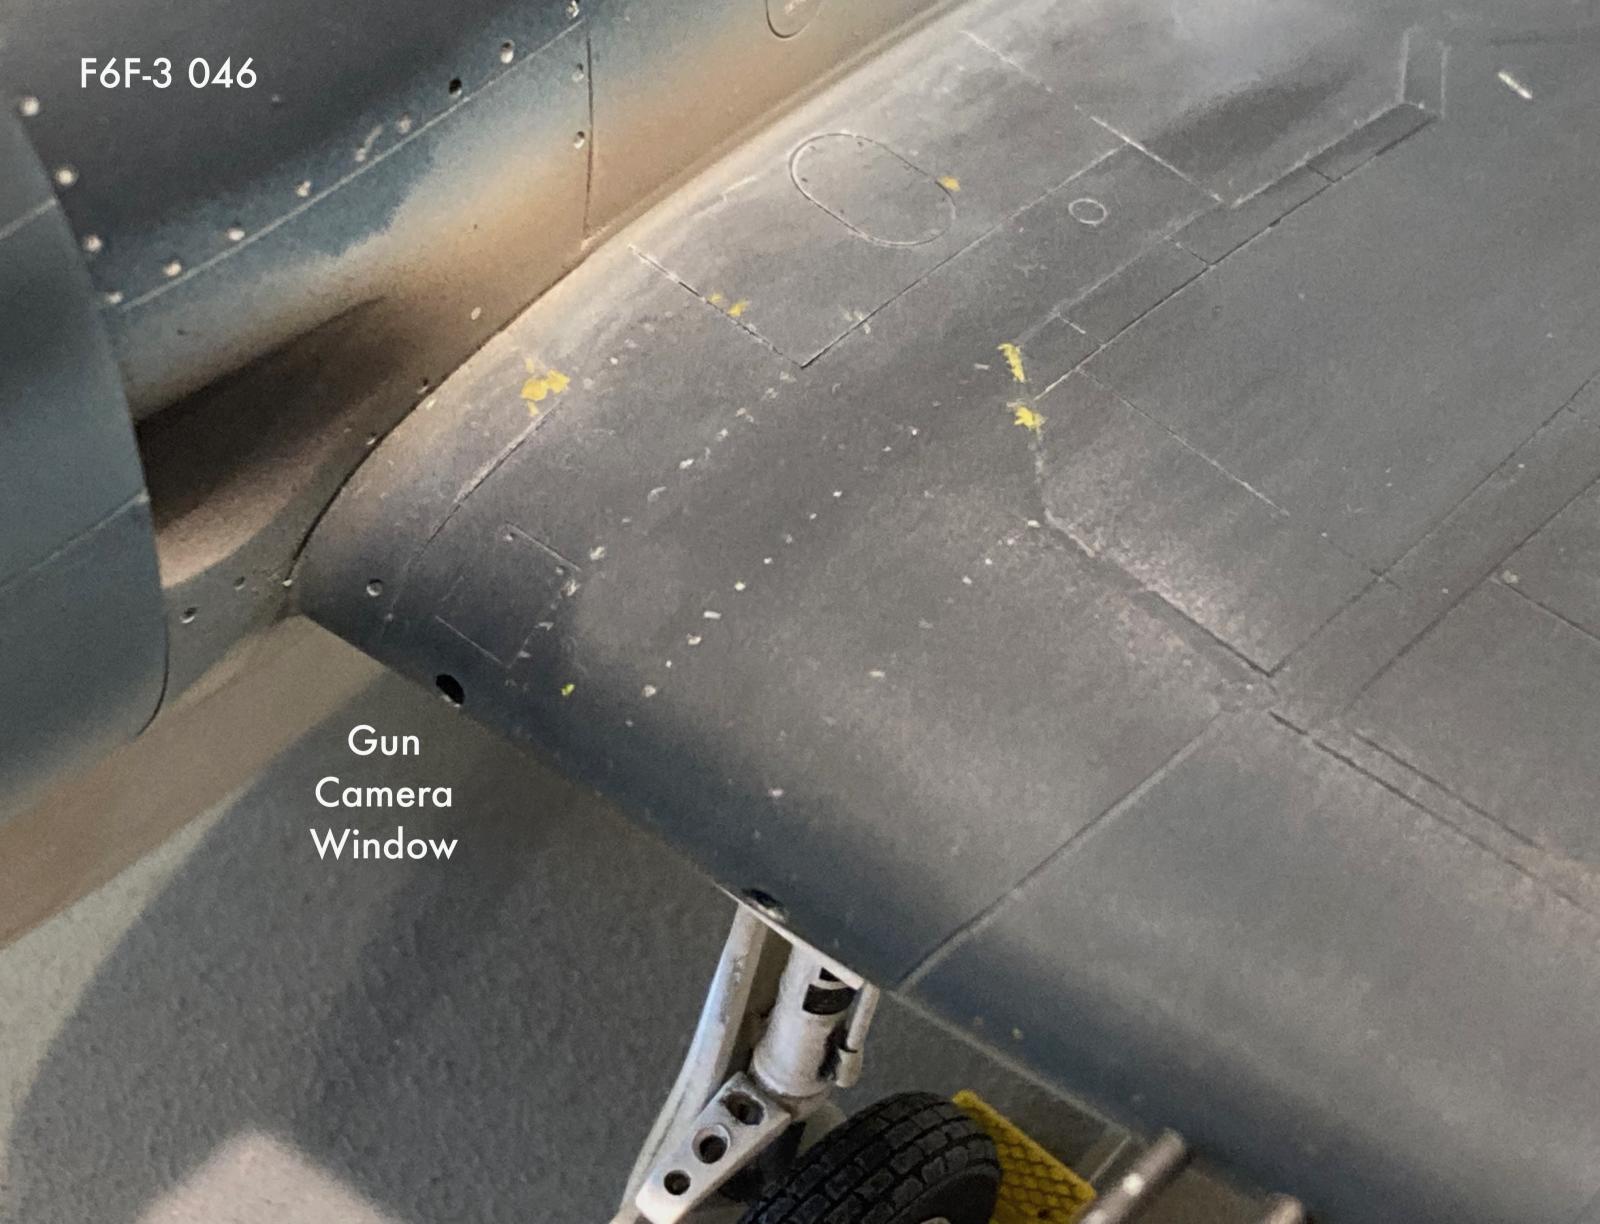
Hasegawa has accurately depicted the characteristic "lap Joints" of the belly and aft fuselage, though it doesn't have the petite rivet detail of the Eduard kit. It does however, stand up to sanding better than the Eduard kit does. small groups of exhaust stacks are provided that are easily drilled out to provide just a touch more realism if one desires.
Worth pointing out here, Hasegawa has catered for the early and late Hellcat sheet metal configurations on the belly with the semicircular intercooler "gill" depicted. On the later F6F-5, this "gill" was reduced in size by adding some sheet metal fairings to the flanks and Hasegawa provides separate pieces to address this detail difference (The redesigned gill and the glossy sea blue paint job were introduced by Grumman to improve the top end speed of the Hellcat). Not only that, The oil cooler flap is provided as a separate piece (D2) which avoids the awkward cleanup joint issues of the Eduard fuselage, which is split lengthwise firewall-to-tail like a gutted fish.
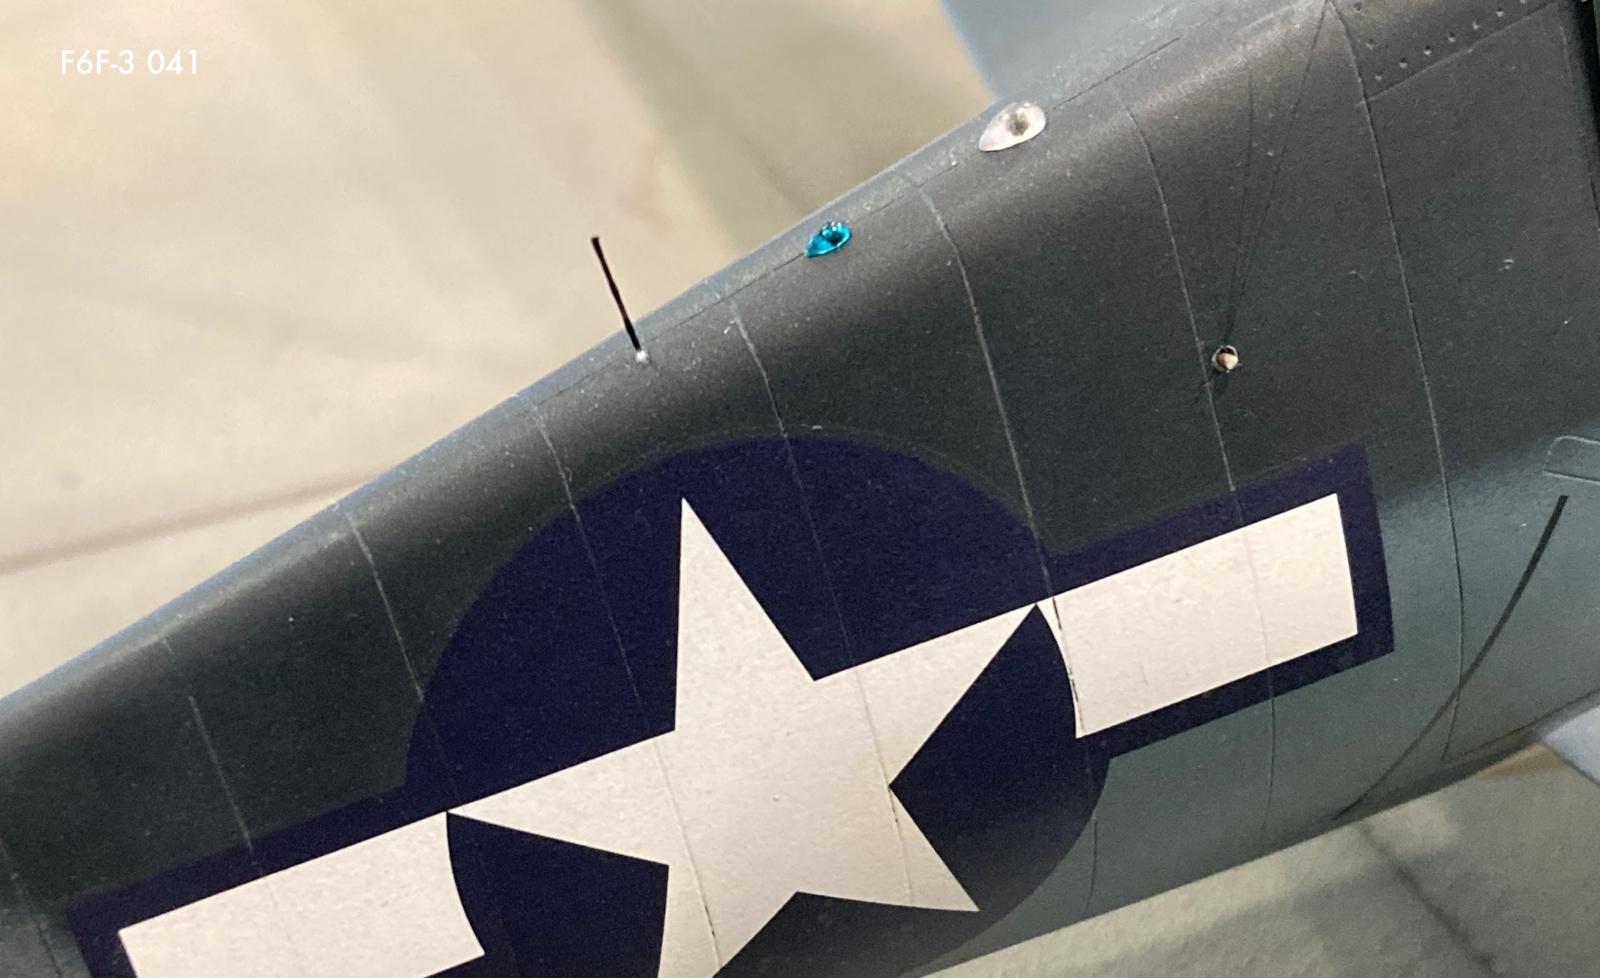
Once the wings were glued together, i borrowed a technique i learned from Geoff Coughlin and bored out the holes in the wing leading edge for the machine guns oversize, and inserted lengths of Evergreen tubing, which was carefully aligned, cemented in place then cut off and sanded flush with the leading edge. These tubes serve as sleeves to correctly mount and align the .50 caliber machine gun barrels at the end of construction.
Borrowing a different technique from Paul Budzik, i bored out the location of the LSO line-up light and inserted a piece of round clear acrylic or clear sprue (i can't remember). The back side is sanded and polished smooth, a hole is drilled in the center and filled with some white paint to depict the bulb. This rod is also sanded flush with the wing leading edge and then carefully masked off with a tiny bit of rectangular tape and then painted over. The actual light window is flat, but in this small scale the difference is negligible.

Lastly, i sawed out the opaque, molded in wingtip lights and replaced these with chunks of clear acrylic filed to shape. When i installed these i thought the covers were coloured and the bulbs inside were generic. Turns out i was wrong; the bulbs are coloured and the protective cover is clear. Same goes for the Corsair. Again, a mistake not to be repeated.
The wing was then mated with the fuselage. There was a little bit of mismatch just in front of the leading edge of the wing but it was fixed without trouble. Just remember to allow for the transition in the lap jointing between the back end of the wing and the adjacent lower fuselage where they meet up.
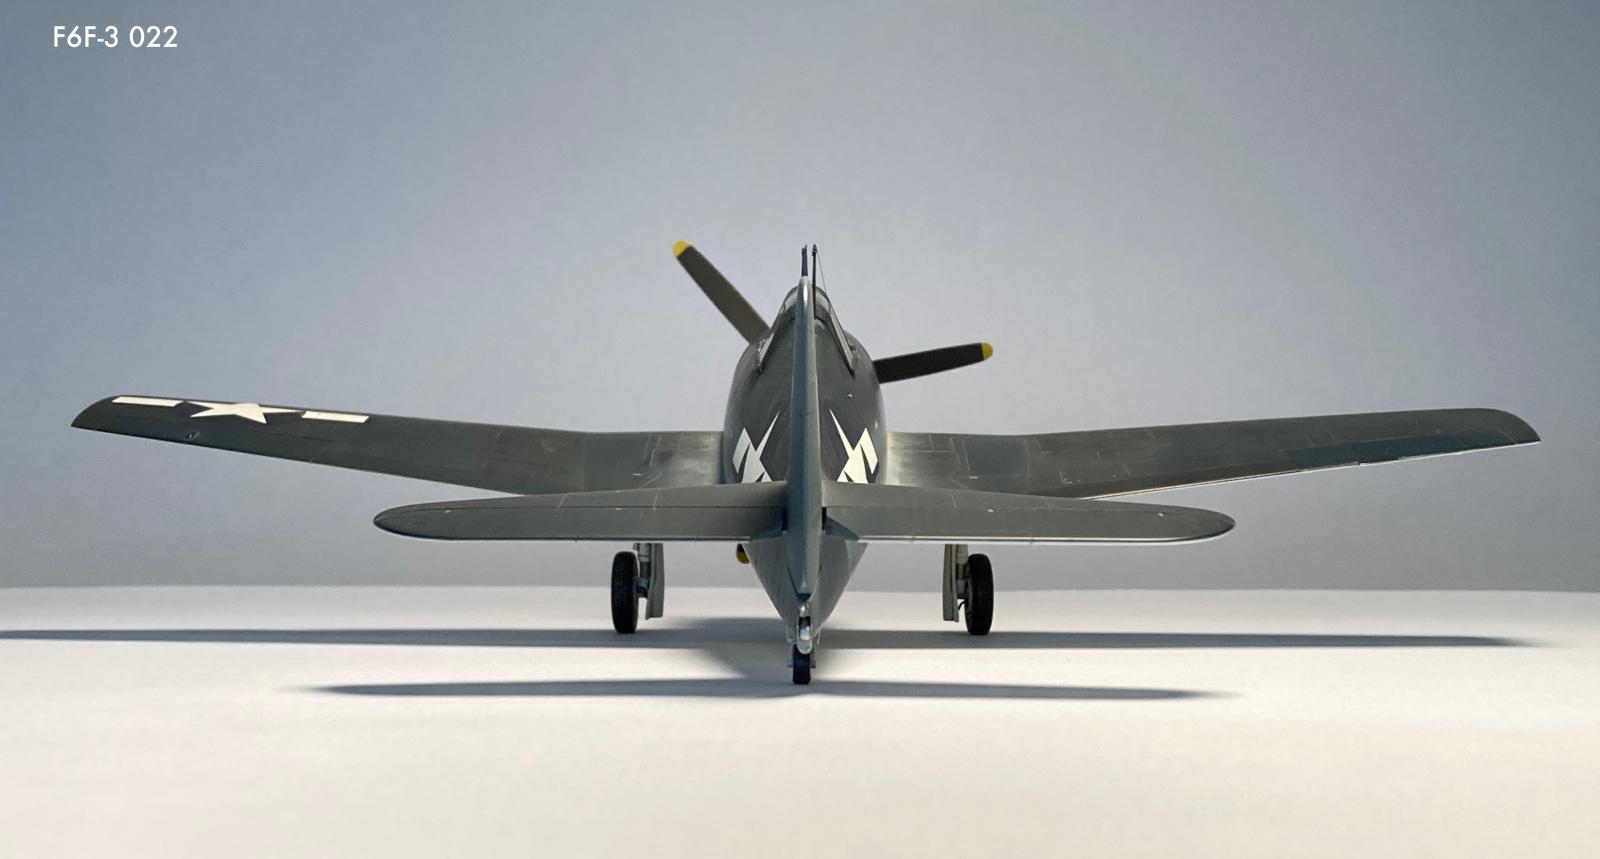
The horizontal stabilizers are simple two piece affairs and plug into an appropriately sized rebate joint in the sides of the aft fuselage, just like the real aircraft, eliminating the "stump" seen on earlier F6F kits which require some tricky surgery and re engineering. Unlike the F4U Corsair, elevators on the Hellcat don't noticeably "droop" in their static, non-flying state.
With the basic airframe completed, it was time for priming and troubleshooting.
I primed the model overall with ModelMaster Interior Green, FS 34151. Problem areas were identified, methodically re filled and sanded, and then the model was taken back down to bare plastic over a couple of evenings with some 1500 grit wet or dry and a bowl of water and a big used bath towel.
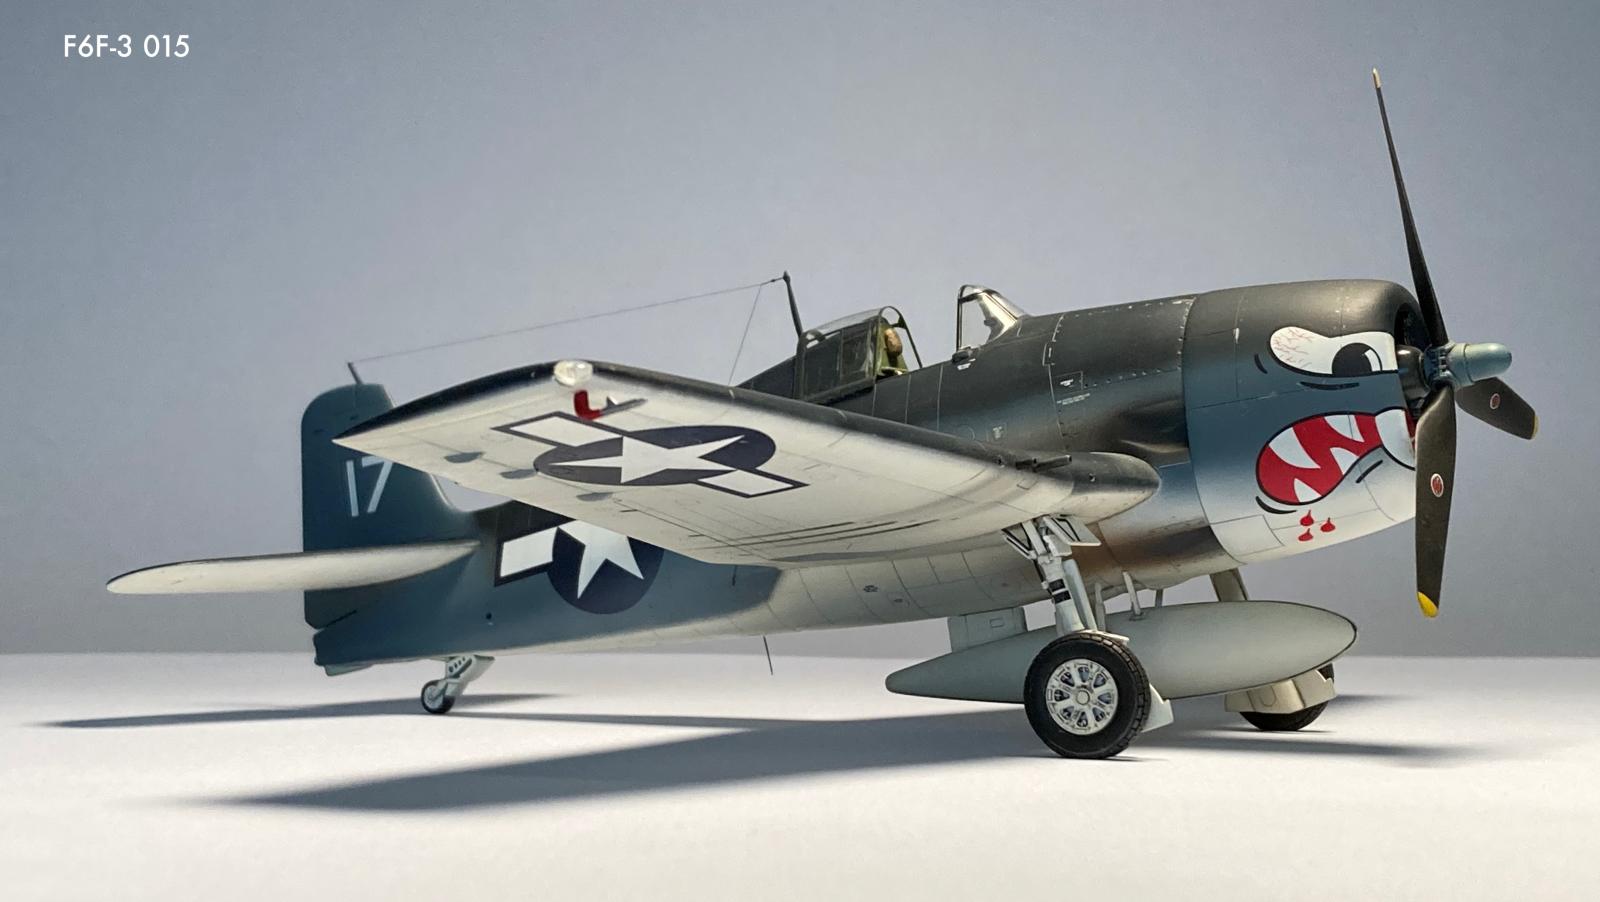
I painted up the cowling first as it was intended to serve as a testbed for the Model Master enamels and make any requisite adjustments to the colour... and there were some. i lightened up the Intermediate Blue with white slightly, and i lightened the Non Spec Sea Blue by adding Intermediate blue. Once satisfied with my colours i began with the white. I knew early on this would be the most challenging colour to apply.
The undersides were painted with Model Master flat Insignia White and it went on rather grainy. When dry i went back over the model carefully with wet hand-held 2000 grit 3M sandpaper which definitely smoothed things out but affected the opacity of the paint allowing the grey plastic to just begin to show through. I then masked off various panels of the wing lower surfaces, re sprayed those with flat white and sanded them back again to smooth everything out, leading to a very subtle two-tone effect... completely lost after the decaling and weathering was done.
The Intermediate Blue came next. I actually created a paint mask using a piece of paper or tape, that had a piece of thread strategically positioned a couple millimeters away from the edge, allowing for a relatively tight but still "feathered" edge between the white and the Intermediate blue, aft of the wing. Forward of the wing, on the cowling it was done in a much more free-handed manner, as it seems the Intermediate blue went on first, followed by the insignia white... and then more intermediate blue was applied in a hazy fashion over the white.
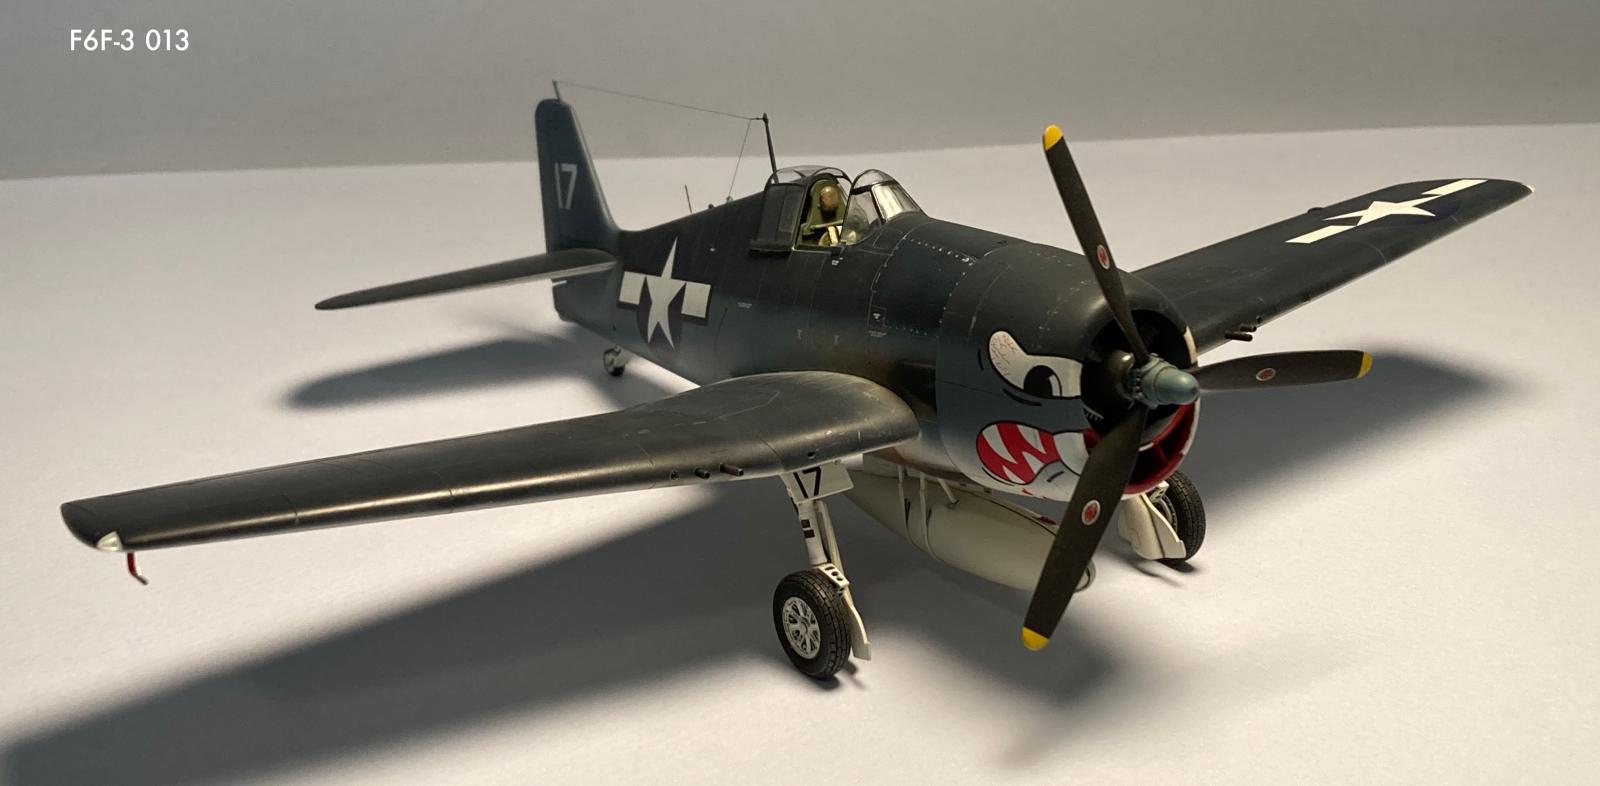
Lastly came the Non Spec Sea Blue, which required a couple of iterations to look right. It is sprayed freehand in a somewhat fuzzy pattern, but getting the correct height of the "waterline" took some work , it couldn't be too high, or too low... and it had to match on both sides.
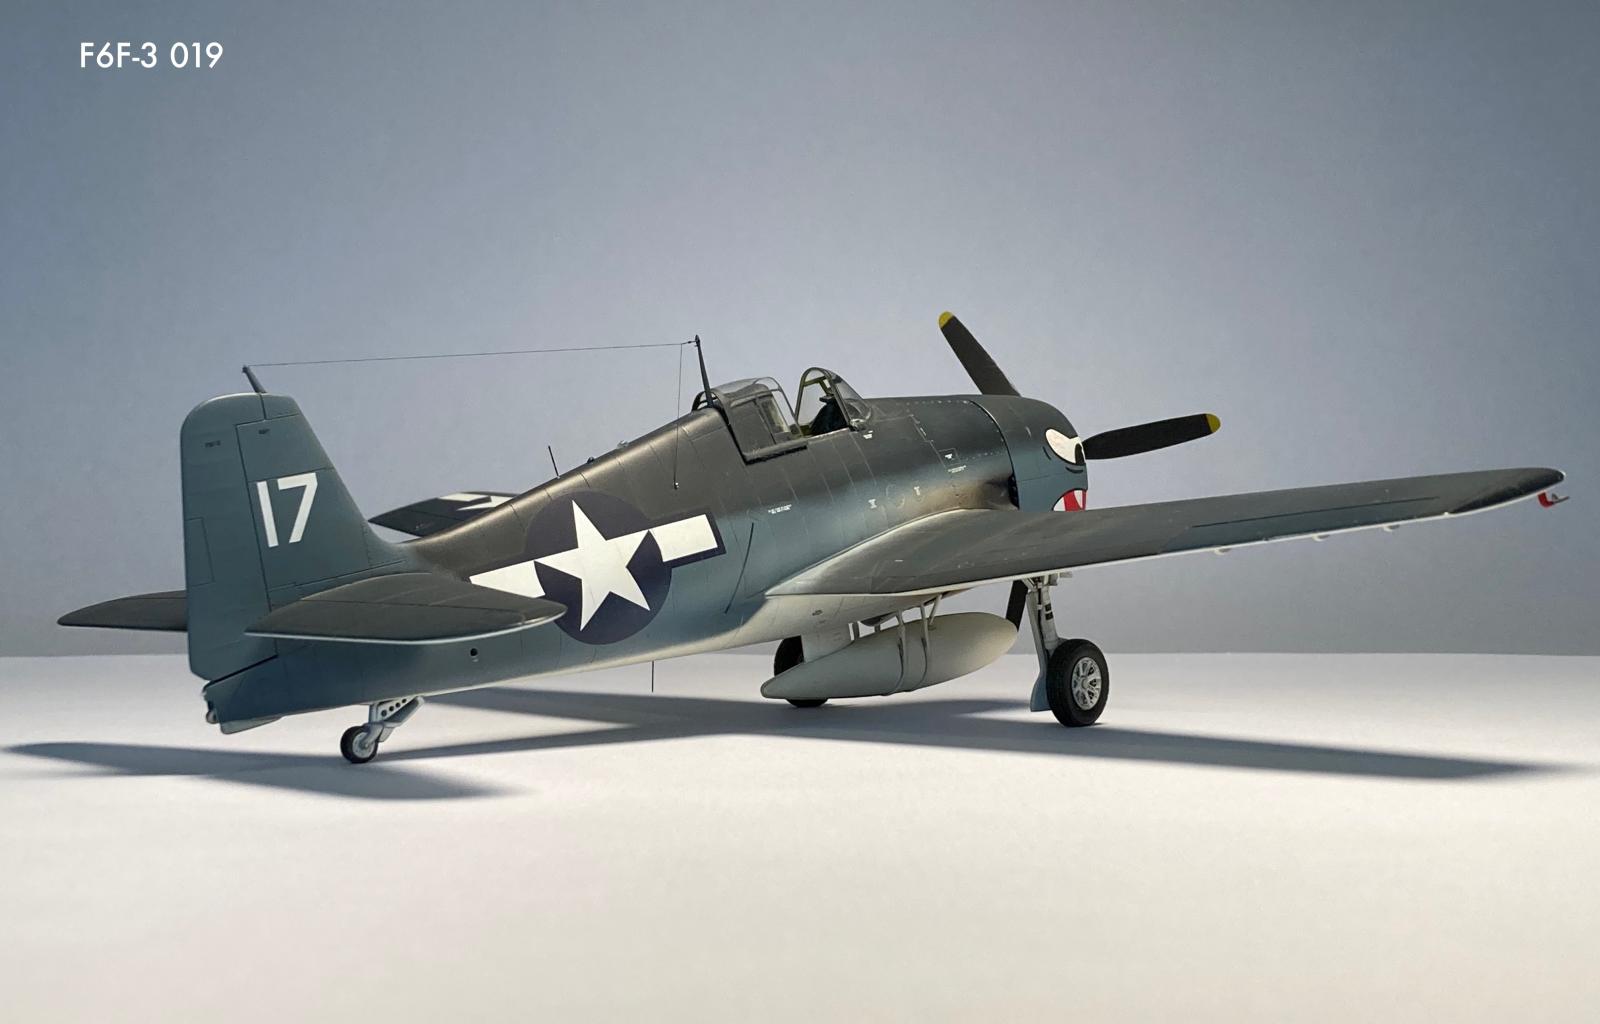
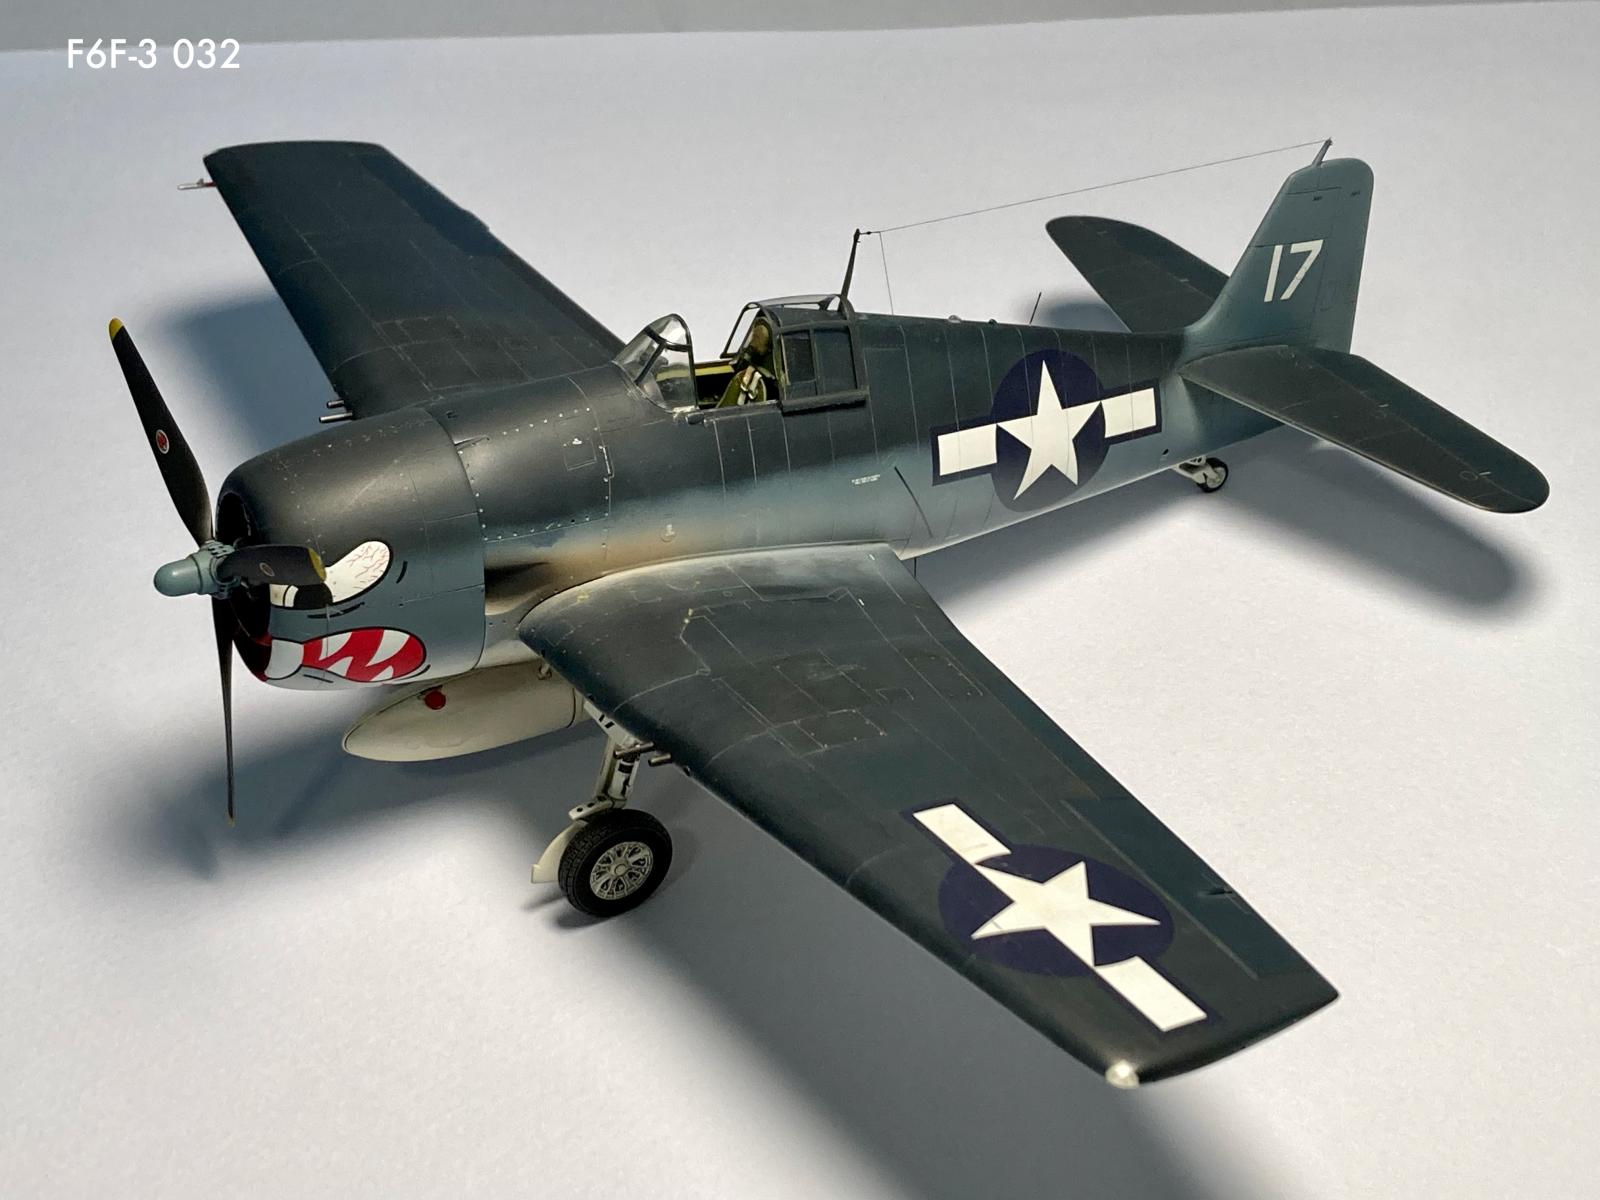
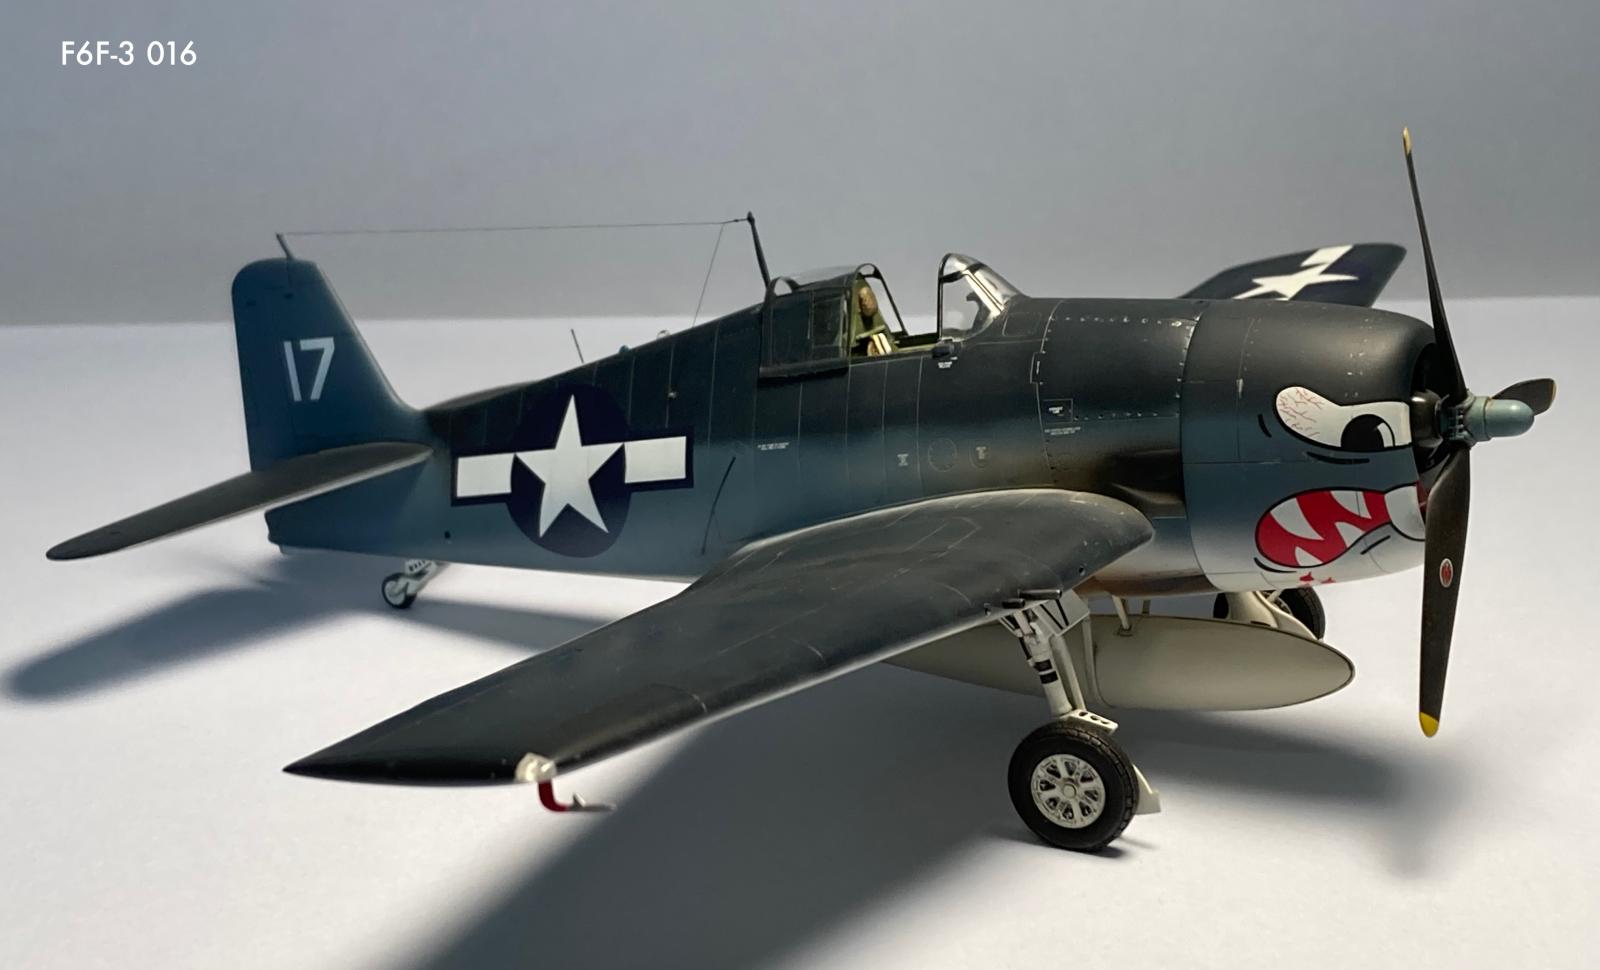
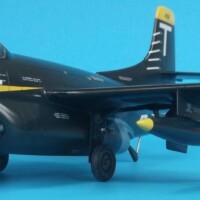
Then i needed to paint the Non Spec Sea Blue on the wing upper surfaces, allowing a very slight overspray to go onto the lower sides of the fuselage sheet metal where it meets the wing upper surfaces. The Hellcat is a very blunt, square, generic-looking aeroplane shape; much like the Douglas Skyraider. The plane doesn't really come alive until the big insignias go on the fuselage sides.
With the three tone scheme in place, i masked and painted the non skid walkways and then it was time for decals.
At this point, i should take a moment to note that i painted this model before i became aware of the often overlooked nuances of Navy aircraft paint schemes of the day. The painting spec actually called for four camouflage colours, not three. The wing leading edges, going back to approximately 25% chord are actually painted in a Semigloss Sea Blue, and it looks noticeably different from the Non Spec Sea Blue we all know and love. I originally attributed this anomaly in photos to sun bleaching and weathering, but i was wrong on this, the more i researched the subject.
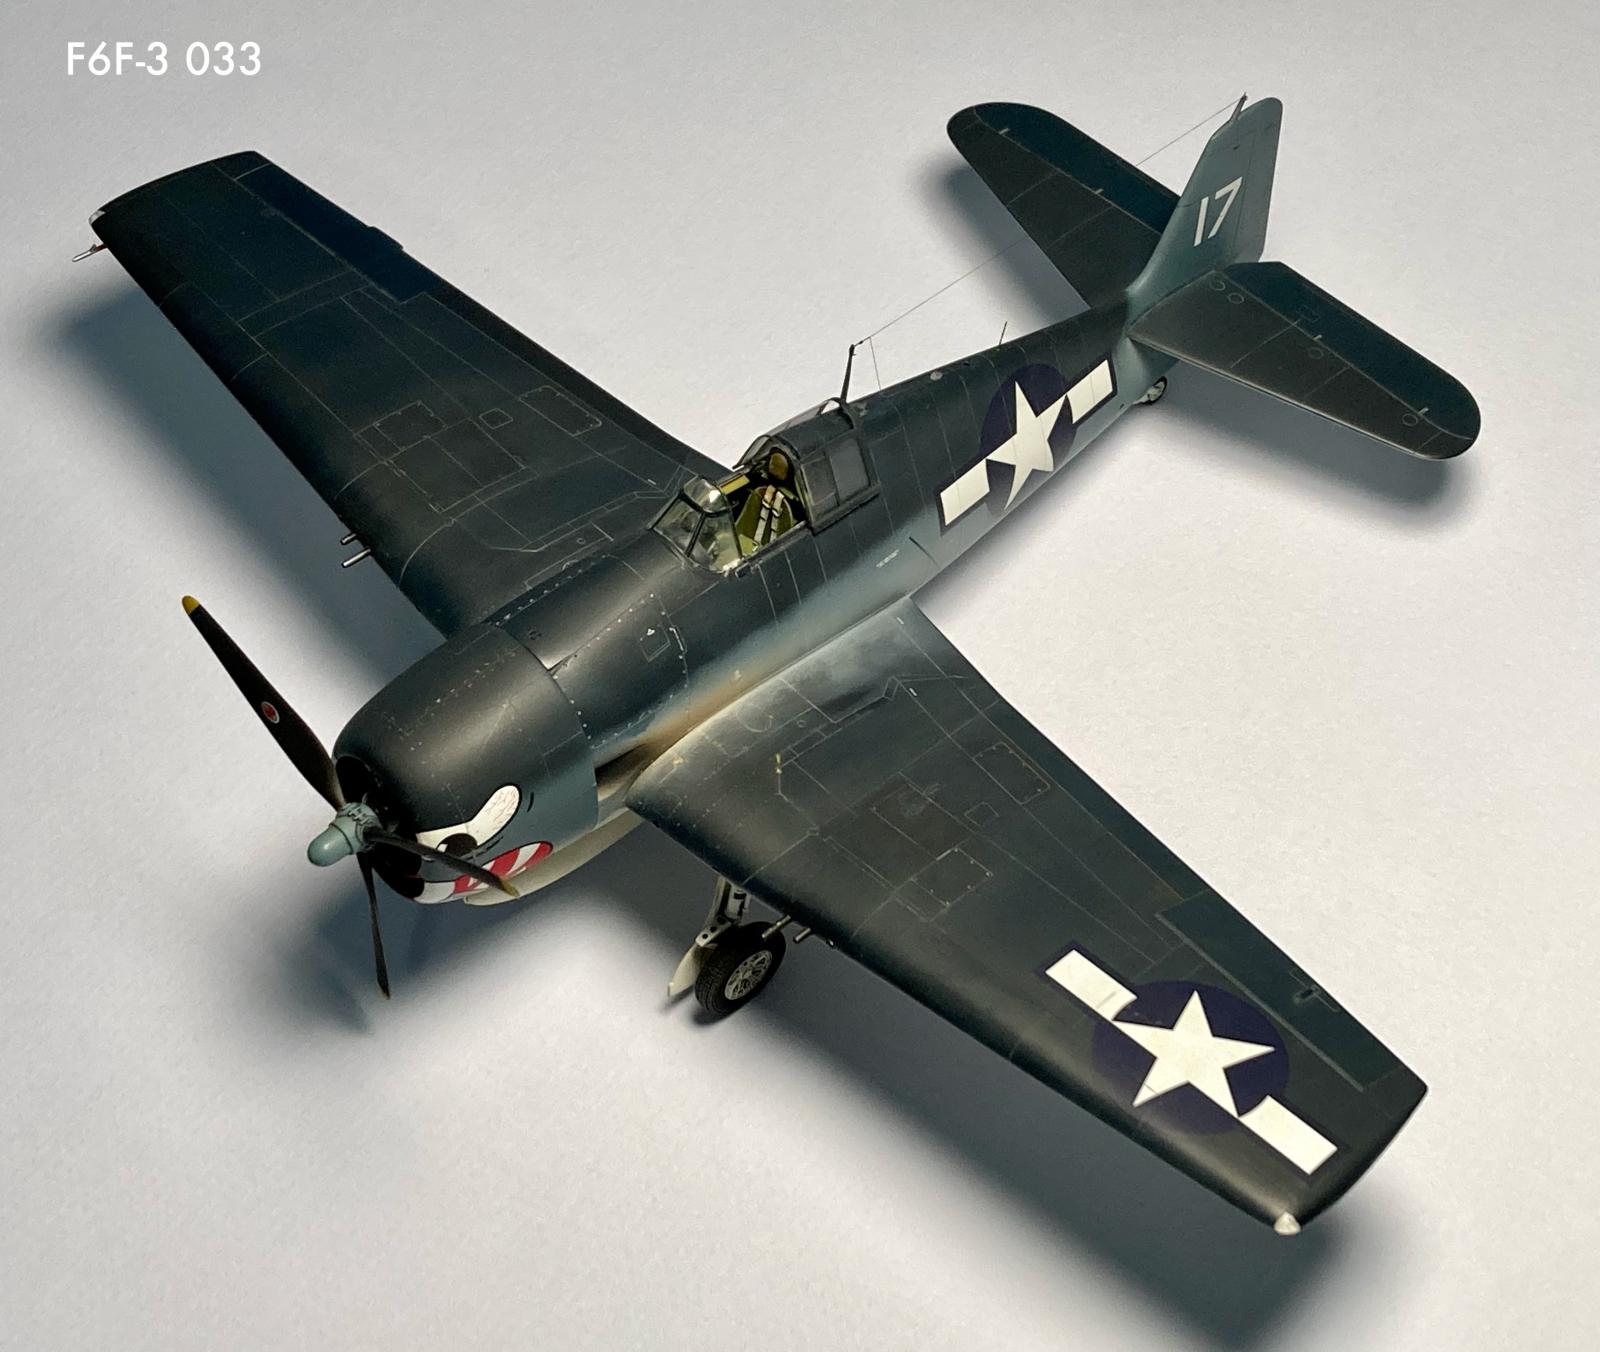

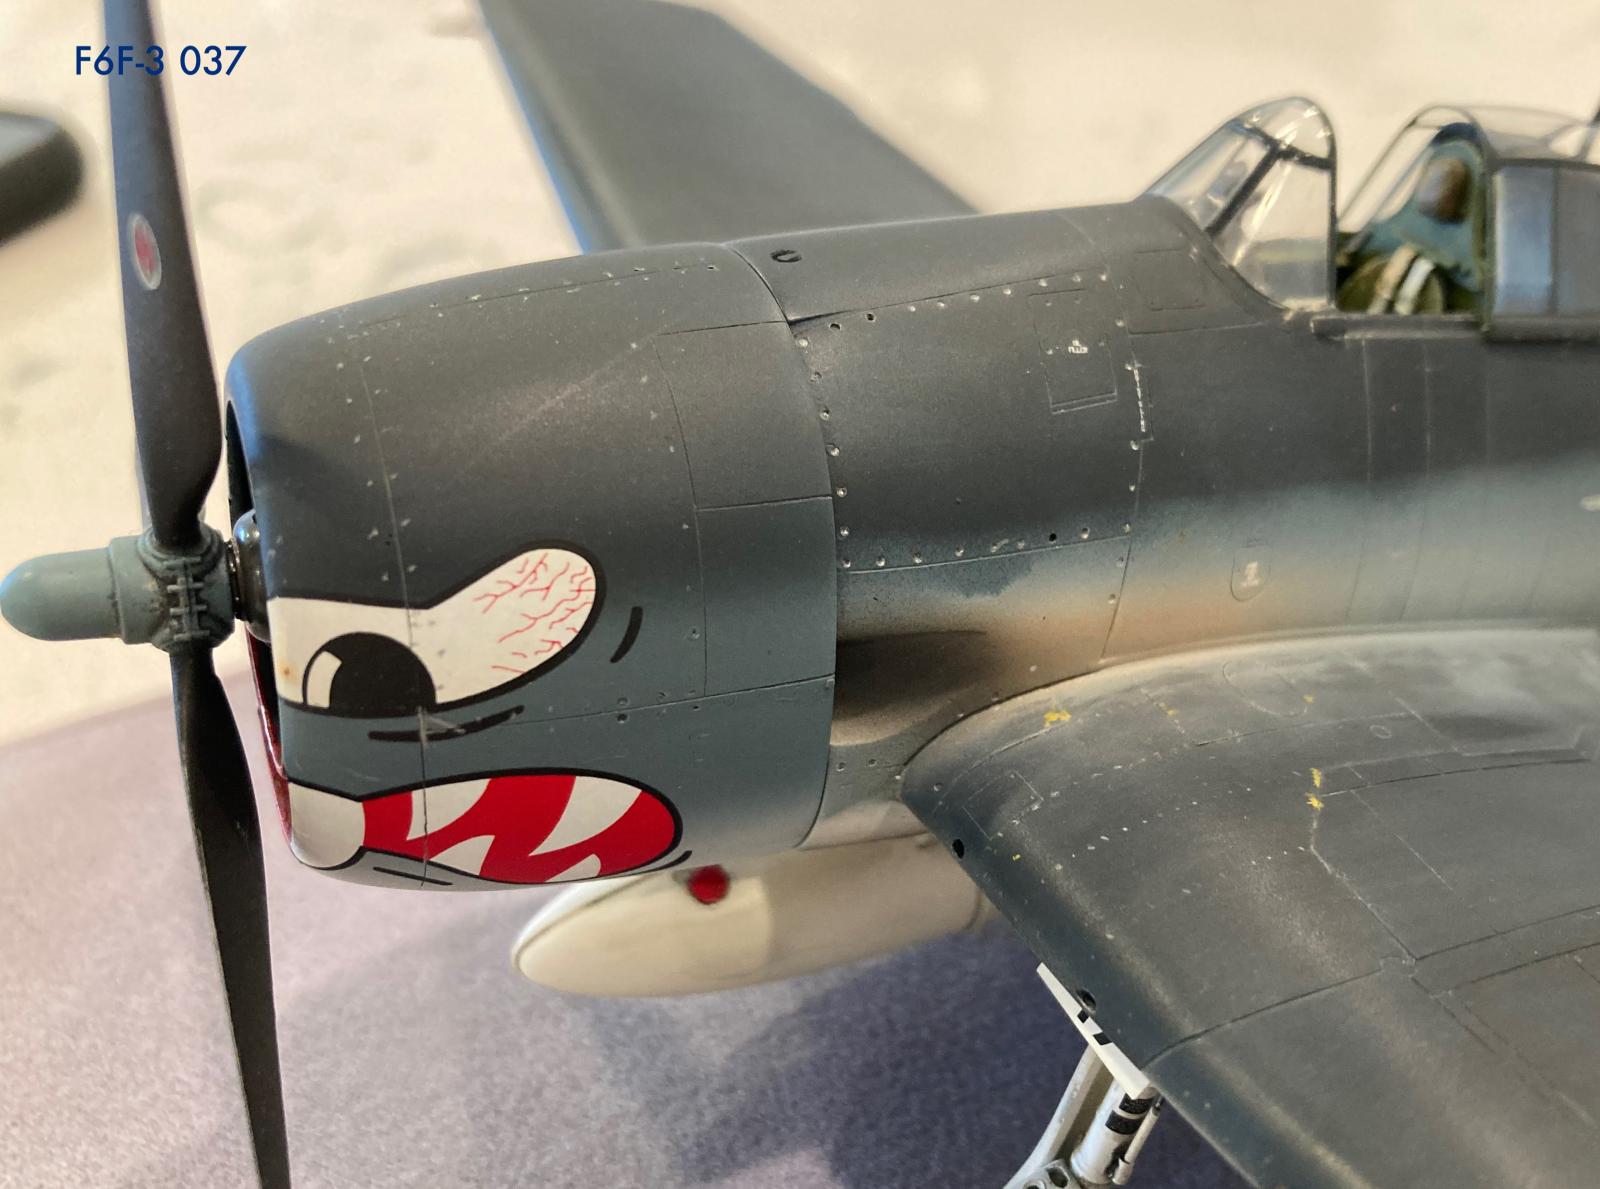
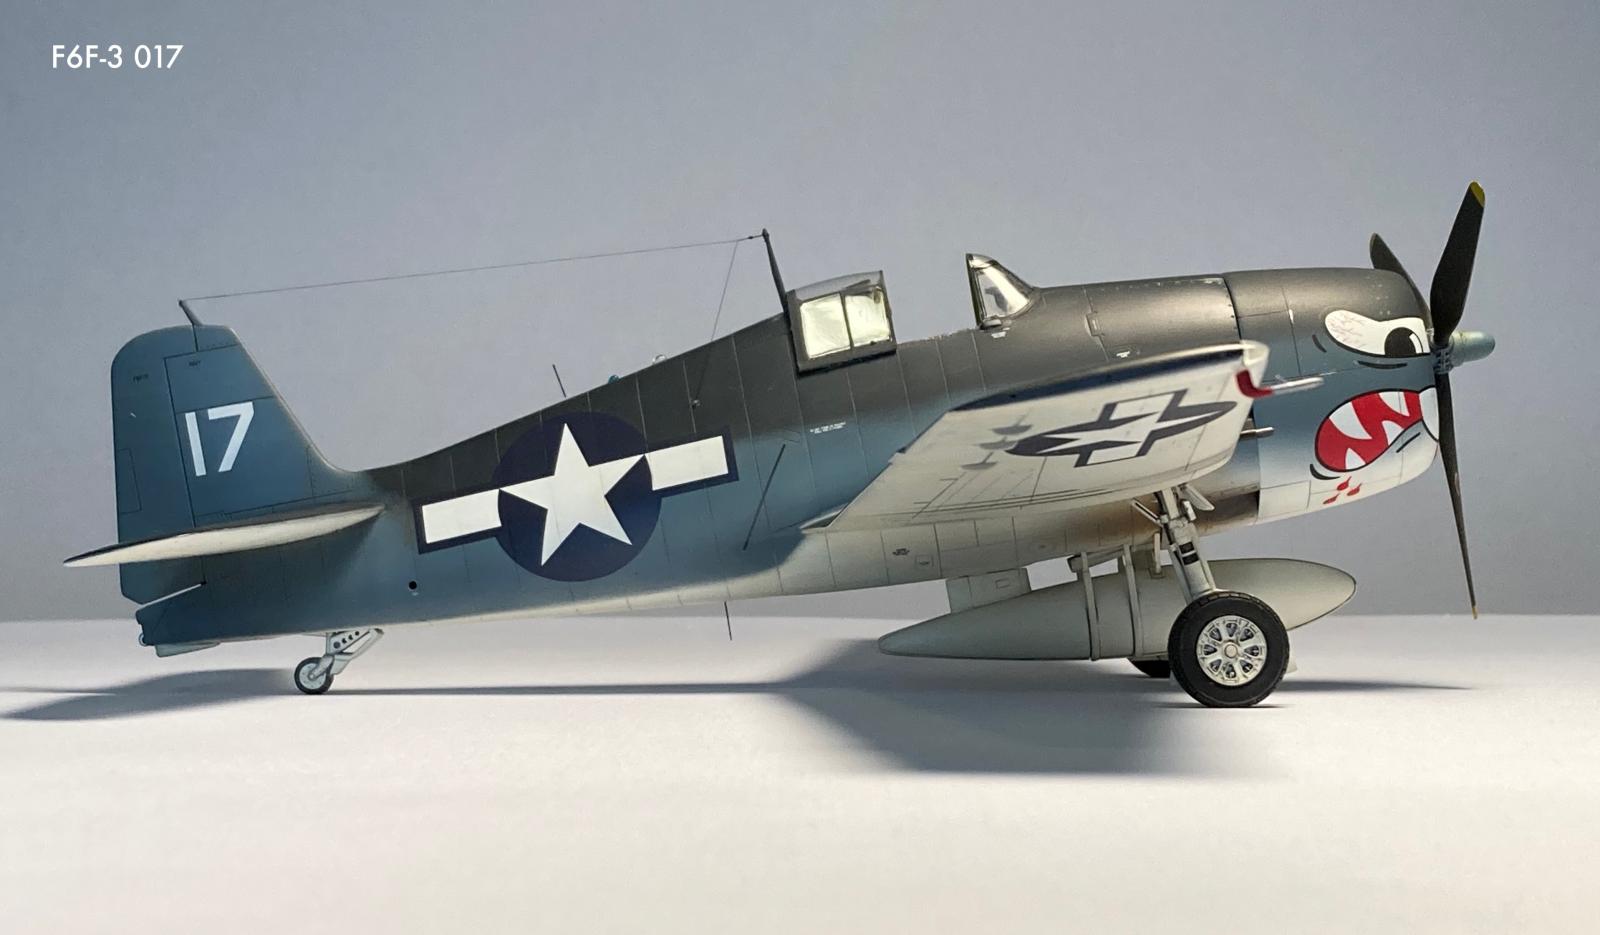
Having built this model back in 2006-2007, i don't remember exactly whose decals i used. I think they were AeroMaster, but there's a chance that i used the Techmod decals provided in the Kagero book i bought on the Hellcat. What i do remember is, i had difficulty positioning the cat mouth on the front of the cowling. I sliced the front edge in places to better accommodate the compound curvatures, and there was some brush painting with enamels after the flat coat went on to address the teeth in the inlet as well as the lower cowling lip.
With the decals clear coated with a second coat of Future applied, i went over the model with a wash made from ModelMaster FS16081, Engine Grey. Now, on the upper surfaces it looks great, but on the lower surfaces it's way too overpowering. In retrospect, a good starting point would have been light gull grey and then progressively darkening it from there by adding darker greys. The performance metric is, the grey should be visible up close, but largely invisible from 4 feet way.
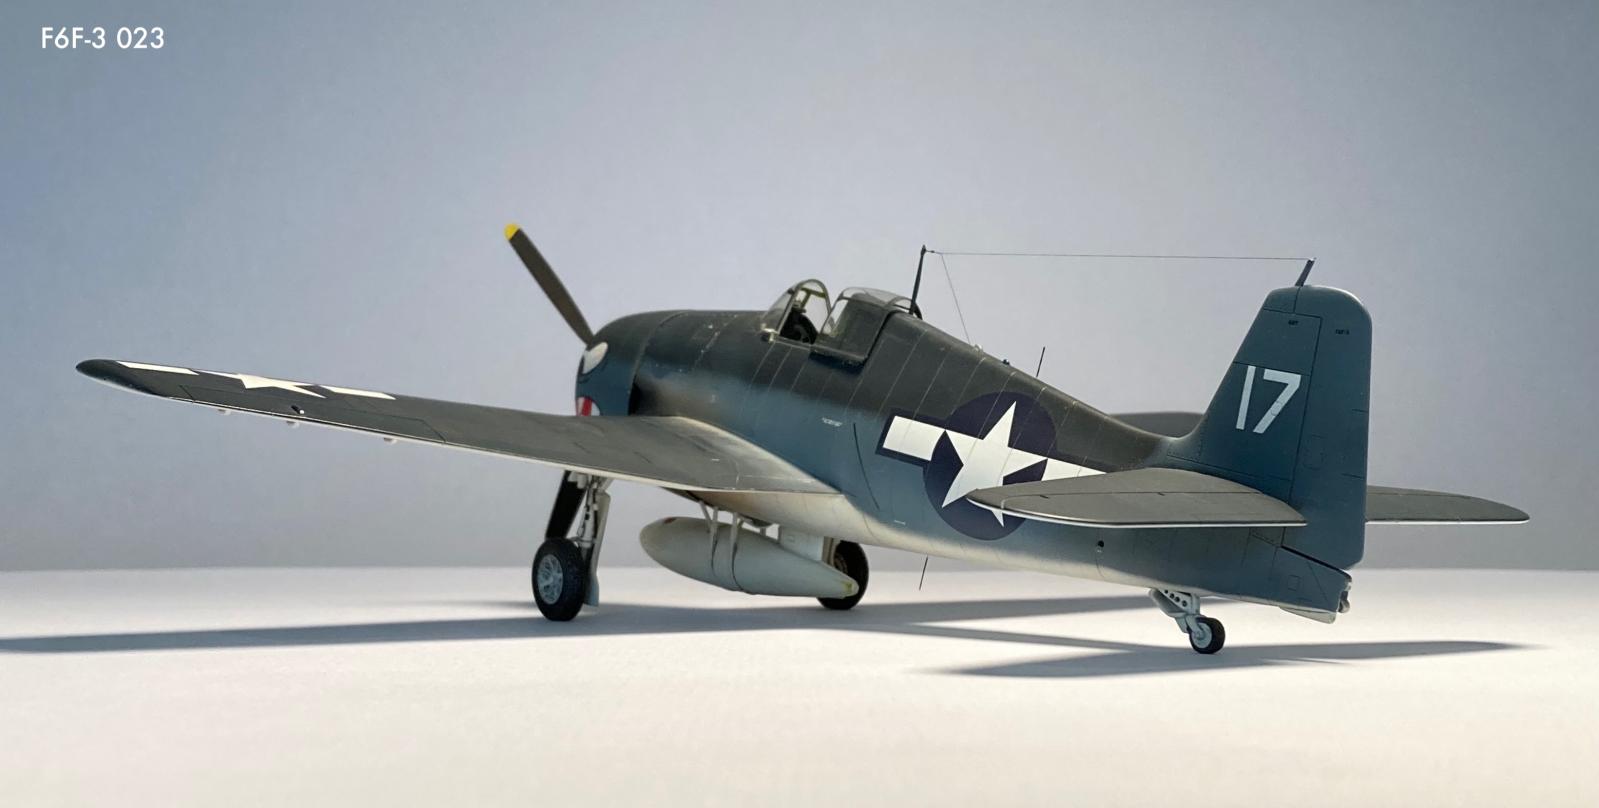
For the characteristic exhaust streak on the Hellcat fuselage, i used three basic colours: A very dark charcoal grey, emanating from the stack openings to represent carbon buildup; a rusty, brown colour (i'm not sure what this actually is but it's in the pictures), and then a very light grey, to depict the residue from the tetraethyl lead mixed with the fuel and evident when the engine is run in auto-lean settings. All of these colours were heavily thinned, and i may have had to remove and re apply some of them. Fortunately they came off easily with a Q-Tip and mineral spirits and the Future protected the enamel paint underneath.
The last weathering steps were handprints and boot traffic simulated with dark grey artists pastels, and i faked the worn, raised rivets using a very sharp Prismacolour silver artists pencil. If you go overboard with the pencil, it comes off easily with windex and a Q-Tip.

The kit windscreen was glued onto the fuselage and blended in prior to painting the exterior, but it was masked off and painted separately after the rest of the airframe had been painted. I added D-Shaped aerodynamic bumps to the lower aft ends of the windscreen arch with evergreen bar stock sanded to shape. The sliding portion of the canopy was sourced from a Falcon canopy and was installed using something called Micro LiquiTape, which is a lot like white glue but it dries up tacky. This allowed for adjustment and avoided potential disasters with more caustic glues or cements getting on the clear parts.
On the landing gear struts, i carefully marked and drilled out holes in the torque links.
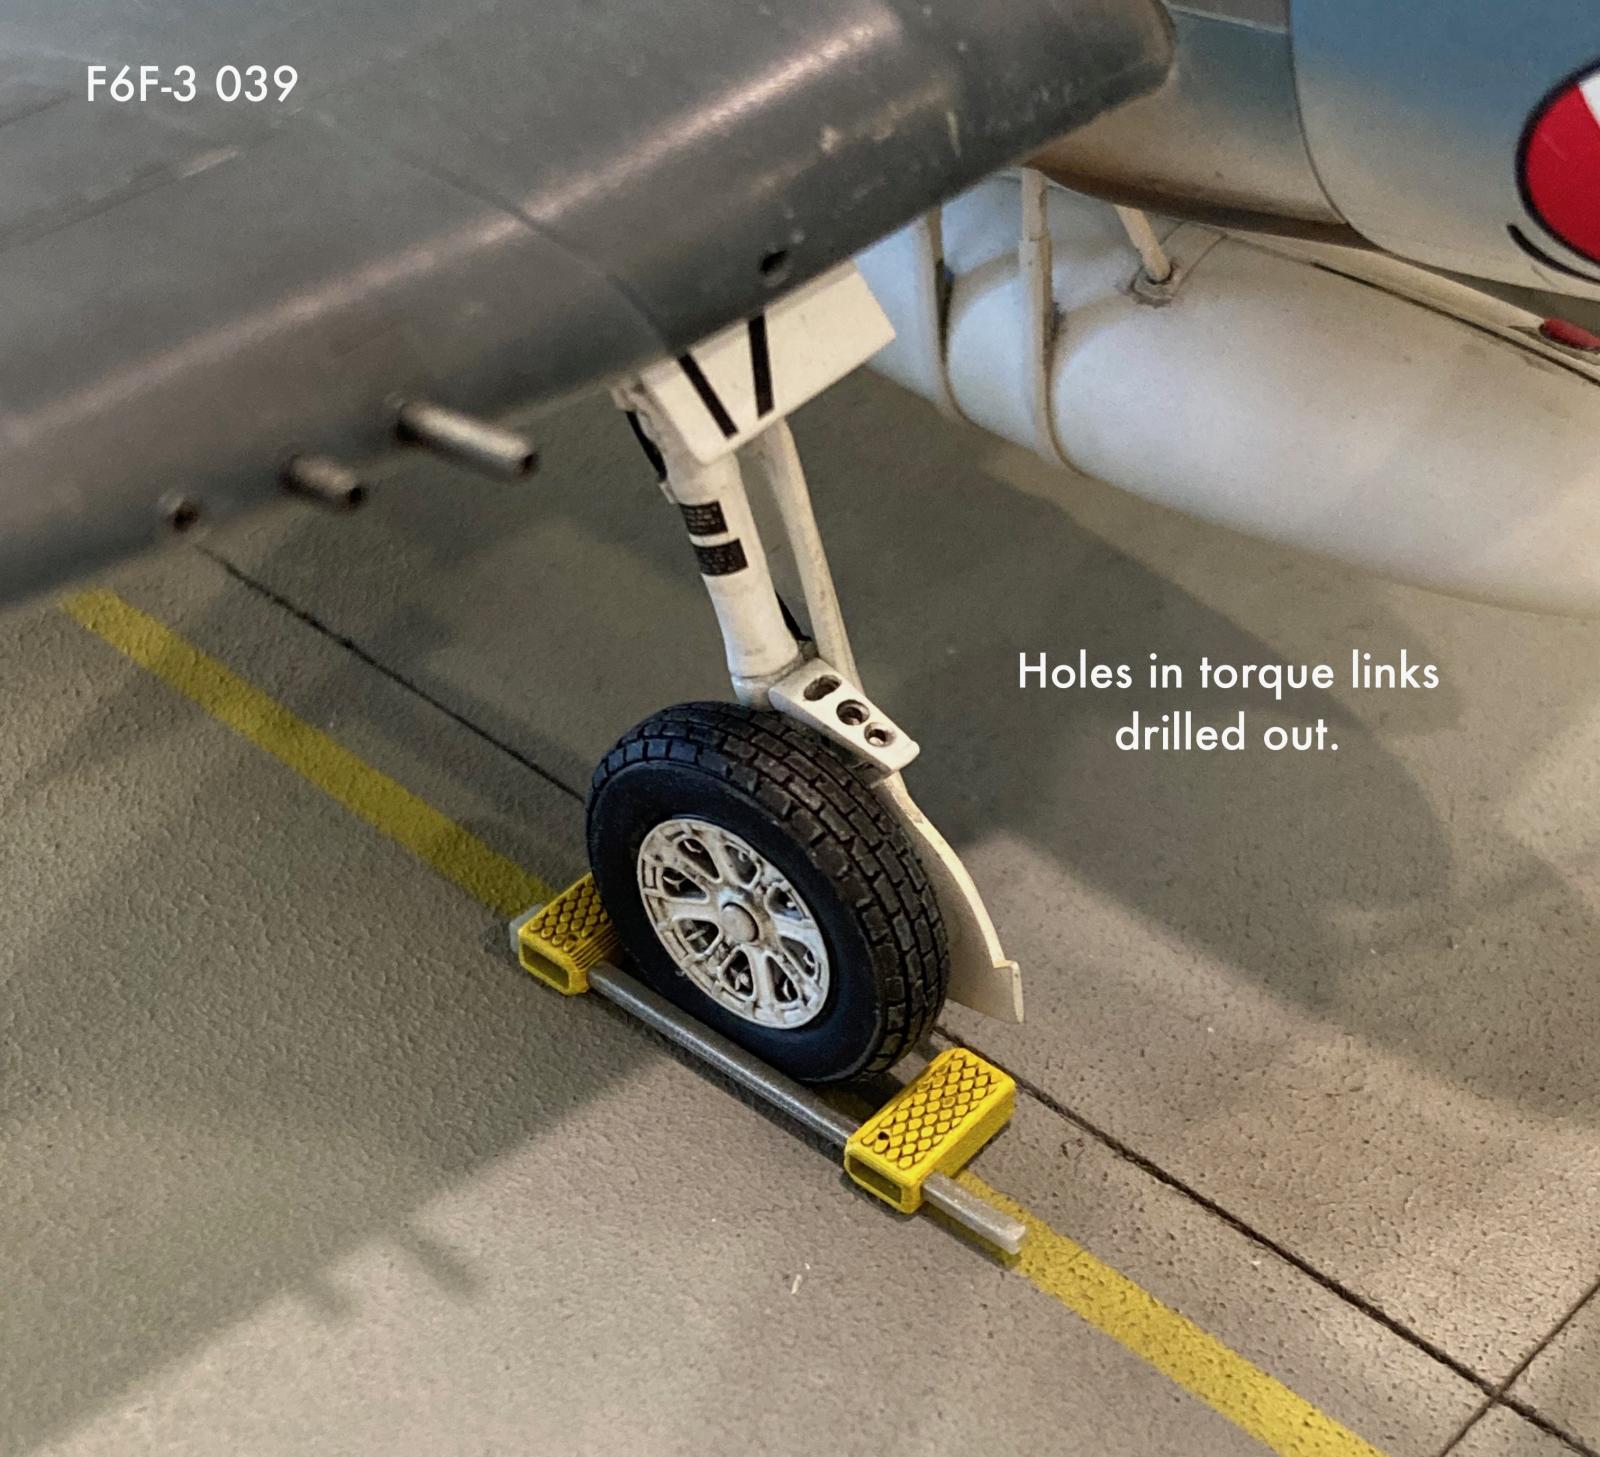
I then carefully carved away the mounting "pips" on the inboard sides of the struts and drilled small lateral holes into the struts where the pips were carved away.
Next, i drilled clear through the corresponding mounting holes on the landing gear doors. I then glued short lengths of plastruct rod into the holes i drilled in the gear doors. The outer protruding rod was filled around and sanded flush. The other side was trimmed slightly to length and test fit to provide more robust and positive location and assembly to the adjacent landing gear strut, with little if any glue.
I had to fashion collars located on the gear struts to take brake lines that were made from very small diameter lead wire. The collars were made (i think) from small pieces of stainless hypo needle tubing. Cutting these pieces to appropriate length and mounting them in position is a story in itself, saved for another time.
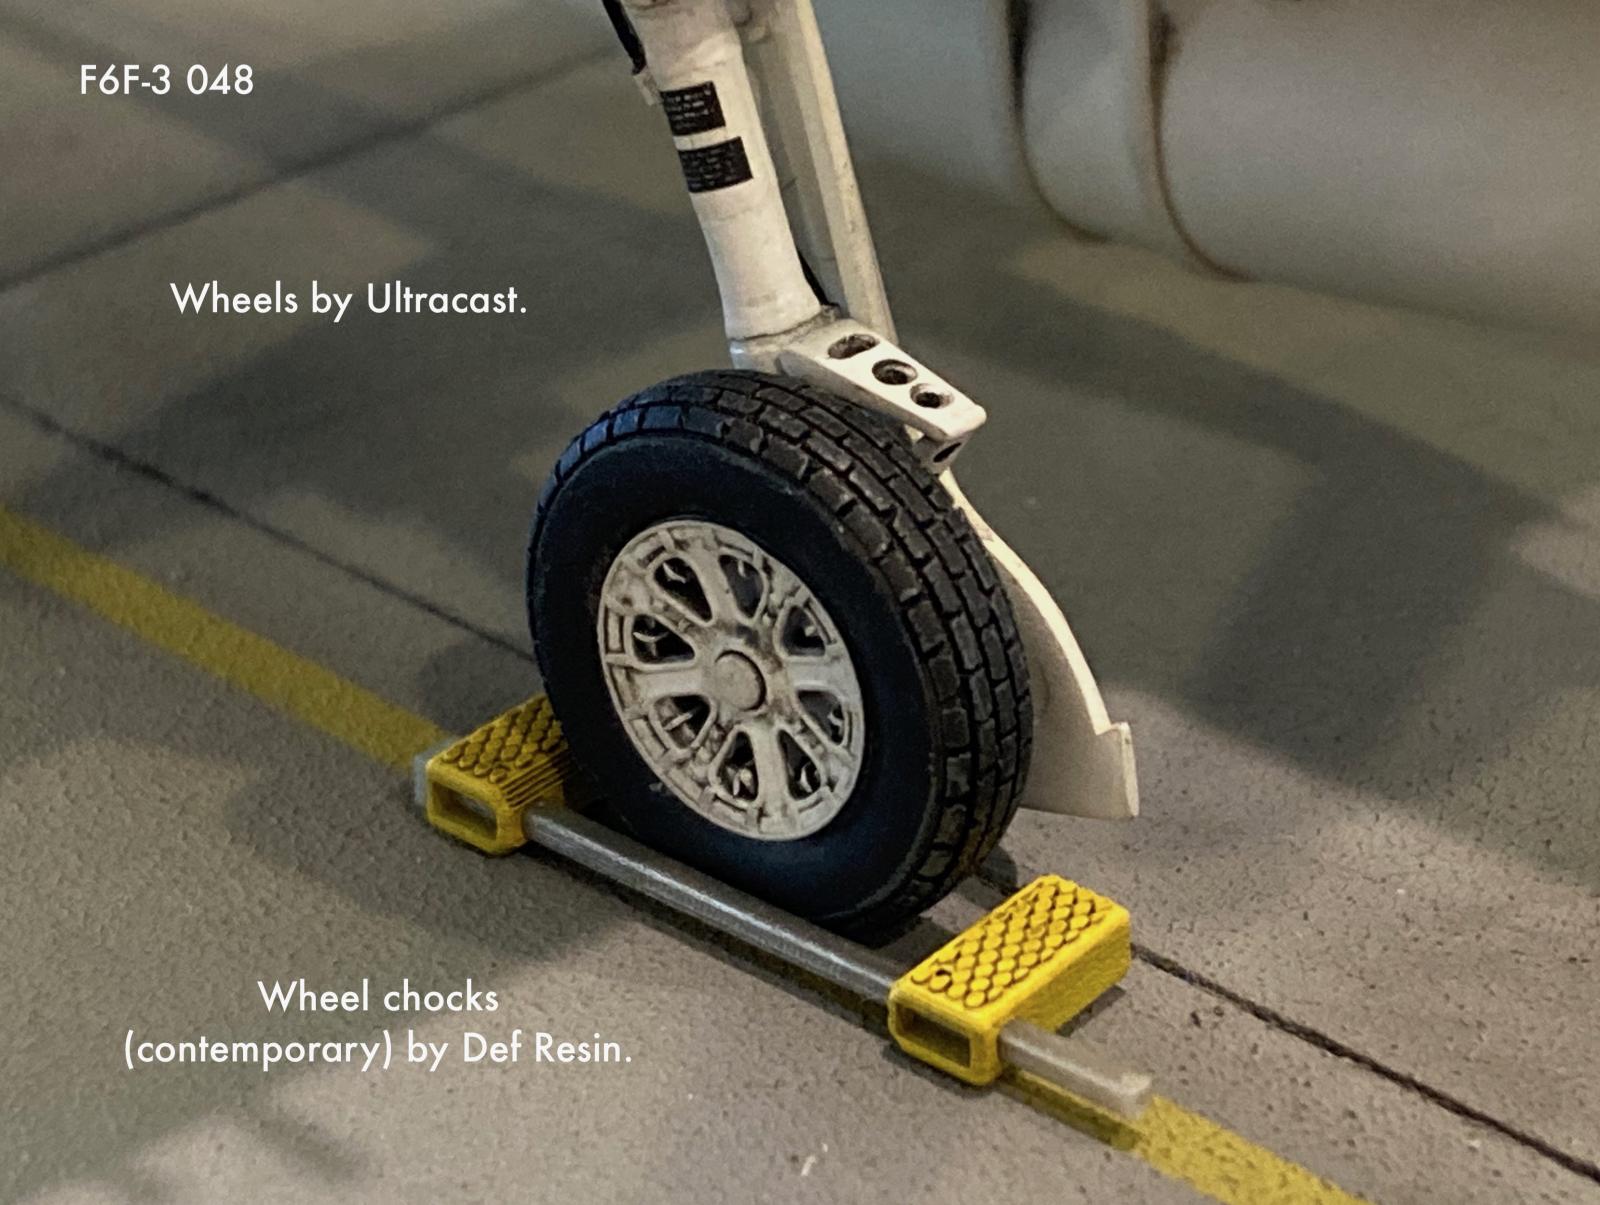
Looking at photos, i noticed many Hellcats sported what i call a "Brick" or "Block" type tread pattern. I sourced appropriate resin aftermarket wheels from Ultracast and the worked quite well.

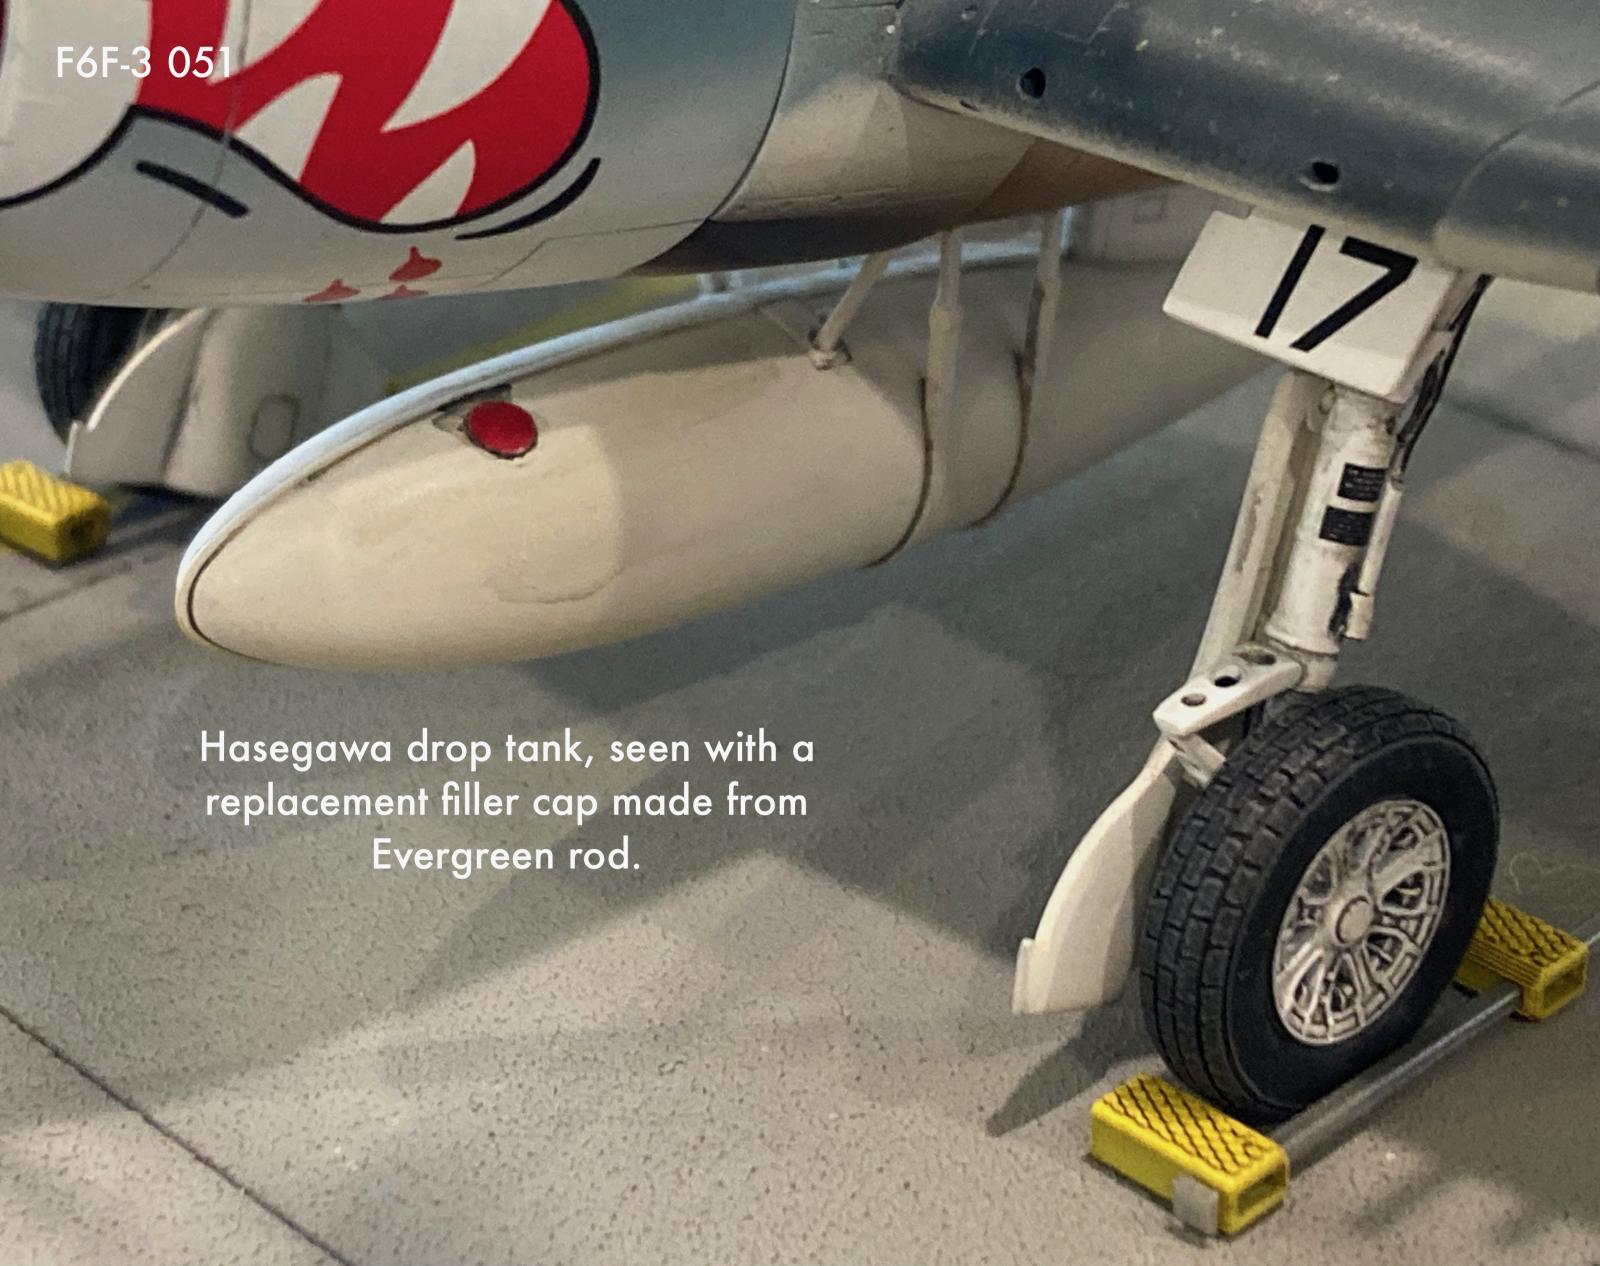
The straps depicted on the kit provided drop tank are extremely simplified and overdone. In the interests of getting the model finished, i relented and went with the kit provided parts as is. Looking at the model now, if you wanted to go with the kit parts, the bridle straps would benefit significantly from some thinning down on the inner and outer surfaces. Having said that, i argue it is still a much more user friendly integration than the Eduard kit.
When i built this kit, i went ahead and used the kit provided antenna posts. I would not do this again, since the thin styrene is brittle (especially over time) and its attachment point to the fuselage spine is weak. Most preferred antenna materials work best when slightly stretched and a stronger antenna mast if definitely preferable to a weaker one. I would replace the kit antenna masts with metal parts were i to do this over again, like on my 72nd scale F6F-5N (which came several years later).
The antenna material was black lycra pantyhose thread, which was carefully sliced away, and unwoven from the matrix. I carefully CA glued a small piece of Plastruct rod to each end. The antenna was first CA glued to the tip of the post on the vertical fin. When dry, the plastic CA post "handle"was pulled taut and the excess antenna wire on the back end was chopped off with an x-acto blade. Next, the "front" end was pulled forward and looped around the top of the forward antenna post behind the canopy and CA glued again. When dry, the remainder was pulled aft again, wrapped several times around the antenna wire behind the forward mast, then pulled down and aft and the "front" rod was pressed into a mounting hole drilled in the fuselage side just above the forward bar of the right hand national insignia.
Lights on the spine were sourced from ELF, the tail position light was (again) a small piece of Evergreen rod, and the whip antennae were fashioned from toothbrush bristles.
The pitot tube was hand painted appropriately in steel and red, and it inserted into the lower wingtip with no problems.

And with that, my Hellcat was done.
CONCLUSIONS
Here we are in 2023. Other Iconic WWII fighters have been re-visited with the latest and greatest mold making technology... to include the FM-2 Wildcat, a subject that had been sorely neglected.
Now, while it's old, i would not consider the Eduard F6F series a "Bad" kit. However, the Hasegwa kit hit the market in 1995. Eduard's Hellcat debuted in 2008.
As Tom Cleaver said so eloquently, we have not yet reached F6F Hellcat nirvana. Will we see an all new, all-singing, all-dancing 48th scale F6F Hellcat?
My answer is i honestly don't know.
The most recent Hellcat kit done by Hobbyboss was an unmitigated disaster; filled with all manner of unforced errors. The design drawings and technical support materials are very much in existence, though they are the domain of the Northrop-Grumman Corporation. In the 21st Century, aircraft manufacturers don't have the sense of pride or the nostalgia for their past accomplishments and contributions.
The 48th scale Hellcats to choose from are certainly acceptable. However, like the Hawker Hurricane the F6F Hellcat does not ooze charisma like the F4U Corsair does. It took a long time for the Hurricane to finally be done "right" by Arma and we may have a similar wait before the Hellcat is finally given the ultimate treatment by the likes of Arma or Tamiya.
In the meanwhile, we have two very good starting places and my vote is for the Hasegawa kit.
Thanks for shopping, and as always... FLY NAVY.


Excellent article and restoration Dave. Good to see you're still in the game.
Thanks Carl! Very much still in the game.
I agree! Excellent article, full with in-depth, first hand details on how to get the best out of this kit, one I have for two decades in the stash… guess 2024 could be a good year to get it done
Thanks, Pedro.
From an ease of Construction standpoint, there is no contest. The Hasegawa kit by far is more build friendly. Eduard tried to offer different ailerons, wings and fuselages to cater to the -3 and -5 versions, but many of the wing parts don't come together easily; overall its a little too clever by half.
In terms of build complexity, i rank the Hasegawa Hellcat somewhat easier than the Tamiya F4F-4 Wildcat (mainly because of the landing gear) and the F4U-1 Corsair versions (because of the optional position wings).
Great build!
THAT is a handsome build! Well done!
Great article on raising the bar for dialing in the Hasegawa Hellcat. I think the Otaki cowling is one of key parts in making your kit standout David. I get a big kick out of using this old chest nut from the Hellcat model lineage. For such an old kit they too got somethings right. Some strong work on teaching a modeler how to fish.
Otaki did a remarkably good job with their F6F-3, considering when it came out. They got some details better than Hasegawa did with their larger 32nd scale effort. For its time, it was clearly superior to the much older Monogram kit; you can still build a great model from it though some work is required to bring it up to contemporary standards.
A beautifully finished aircraft.
What an awesome restoration and ditto result, David! What a superb article in correcting and detaling the Hasegawa Hellcat!
Excellent outcome of this build, David @david-hansen
It was a pleasure to read this article.
Superb! And really helpful article.
Grazie
Well done all around!
That may be the finest article I've read on iModeler, David, and that's sayin' something! 🏆
@david-hansen, So well done and informative, and it showcases some superb scale modeling too! 😃
Nice work, David.
Spectacular work, a great result and a fine build article.
Thanks, David...besides an awesome model, your write-up was a phenomenal read!
A lovely Hellcat in its most iconic scheme! Well done.
First, your build is nothing short of spectacular.
Second, thanks for such a well-written and comprehensive build review. Your photographs are equally well done, too.
A few years ago, I did a side-by-side comparison build review of the 1/48 Eduard and Hasegawa Hellcat kits (posted on my blog here at iModeler), and reached the same conclusion as you: the Hasegawa kit is the better choice. I've always felt that the Hellcat is the Rodney Dangerfield of WWII fighters - it gets no respect. It's a little baffling, because the F6F produced more aces that any other aircraft in WWII. Let's hope that some manufacturer (Tamiya?) finally gives us the definitive kit worthy of this important and historic aircraft.
Thanks, Drew.
If you go back to the 1975 IPMS-USA Quarterly, there's a very good article that ranks the available F6F Hellcat kits of the time. One thing they pointed out then, that still holds true today is this: It seems everybody has had issues getting the shape of the F6F Hellcat right. This comes as a little bit of a surprise, considering it was such a ubiquitous plane. It's shapes are not terribly complex, and Grumman has done a good job at preserving its history. As Junpei Temma has pointed out, even the Hasegawa Hellcat has significant shape issues, but you have to really look for them, and in any event they're hard to correct. With the exception of the cowling i think the Hasegawa kit captures the shape of the F6F "Well Enough" for the time being.
i agree we could use a better Hellcat kit. Before Hasegawa wandered off the reservation, i was hoping they would do an all-new, 32nd scale F6F to accompany the rather nice A6M they did a couple years back. I'd love to see Tamiya do one but i think it would be in 48th scale.