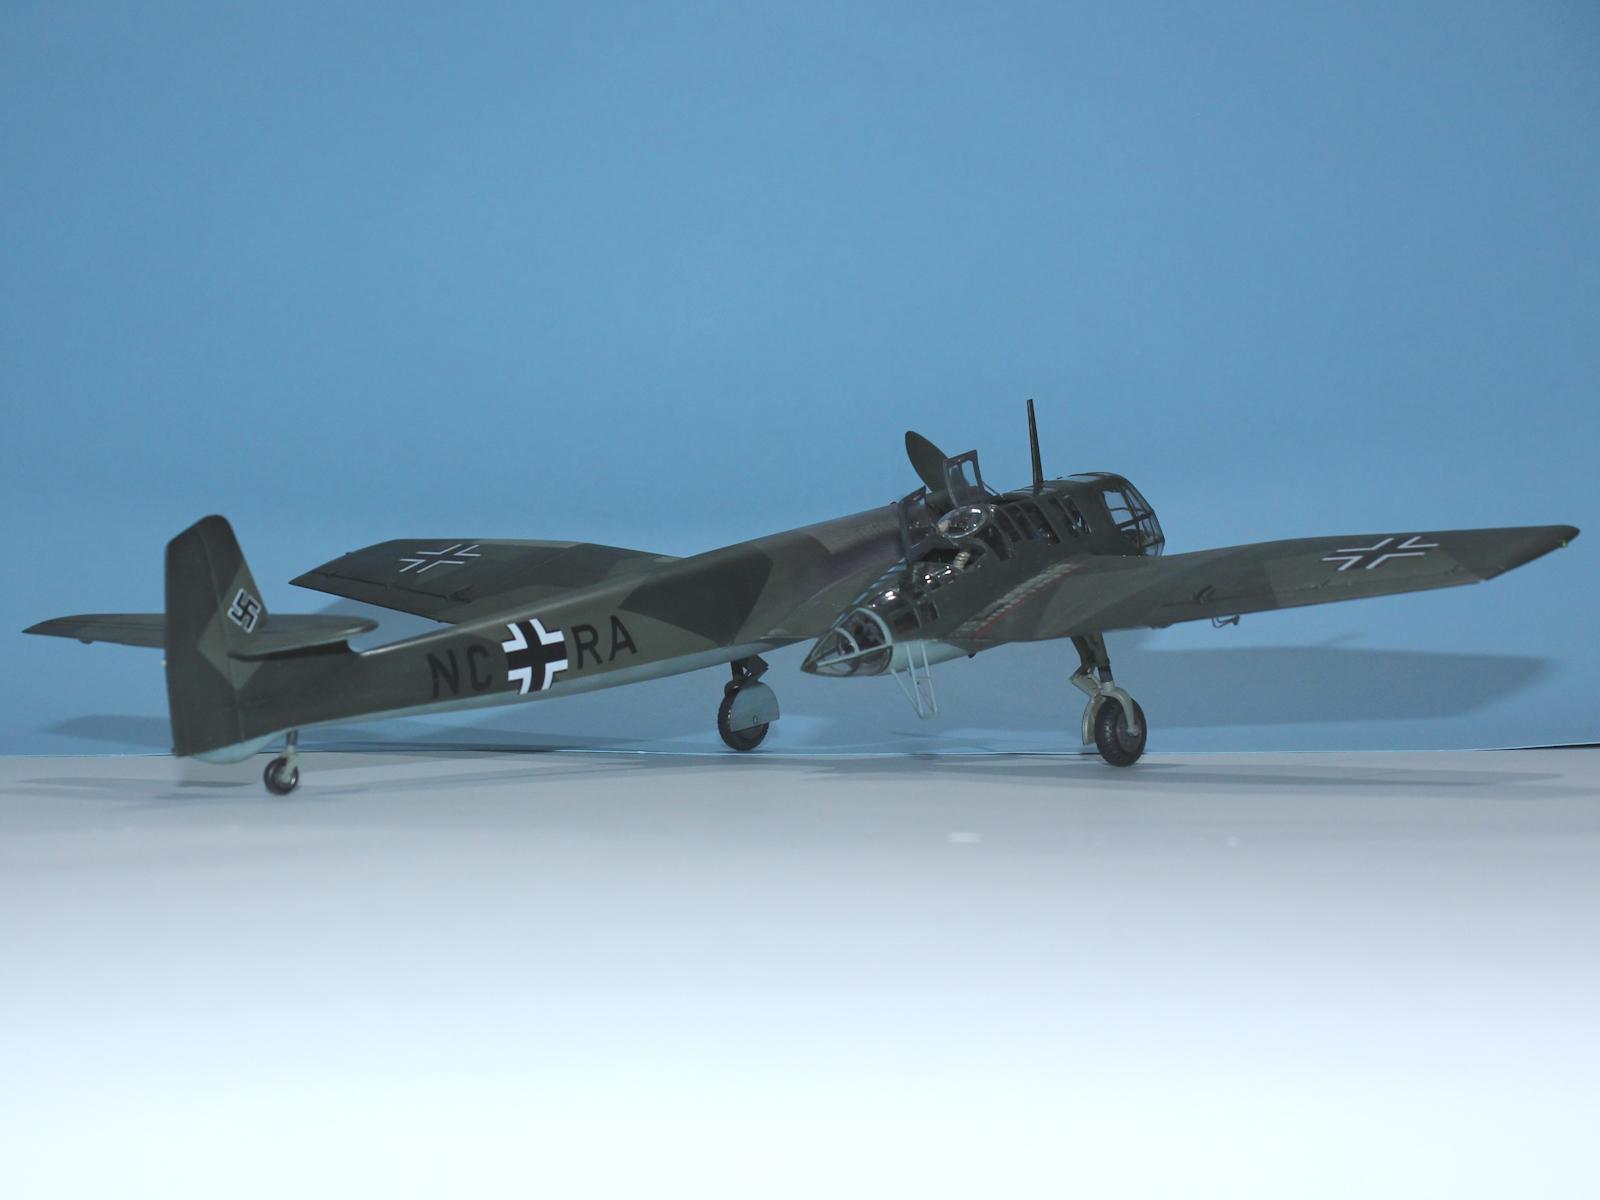
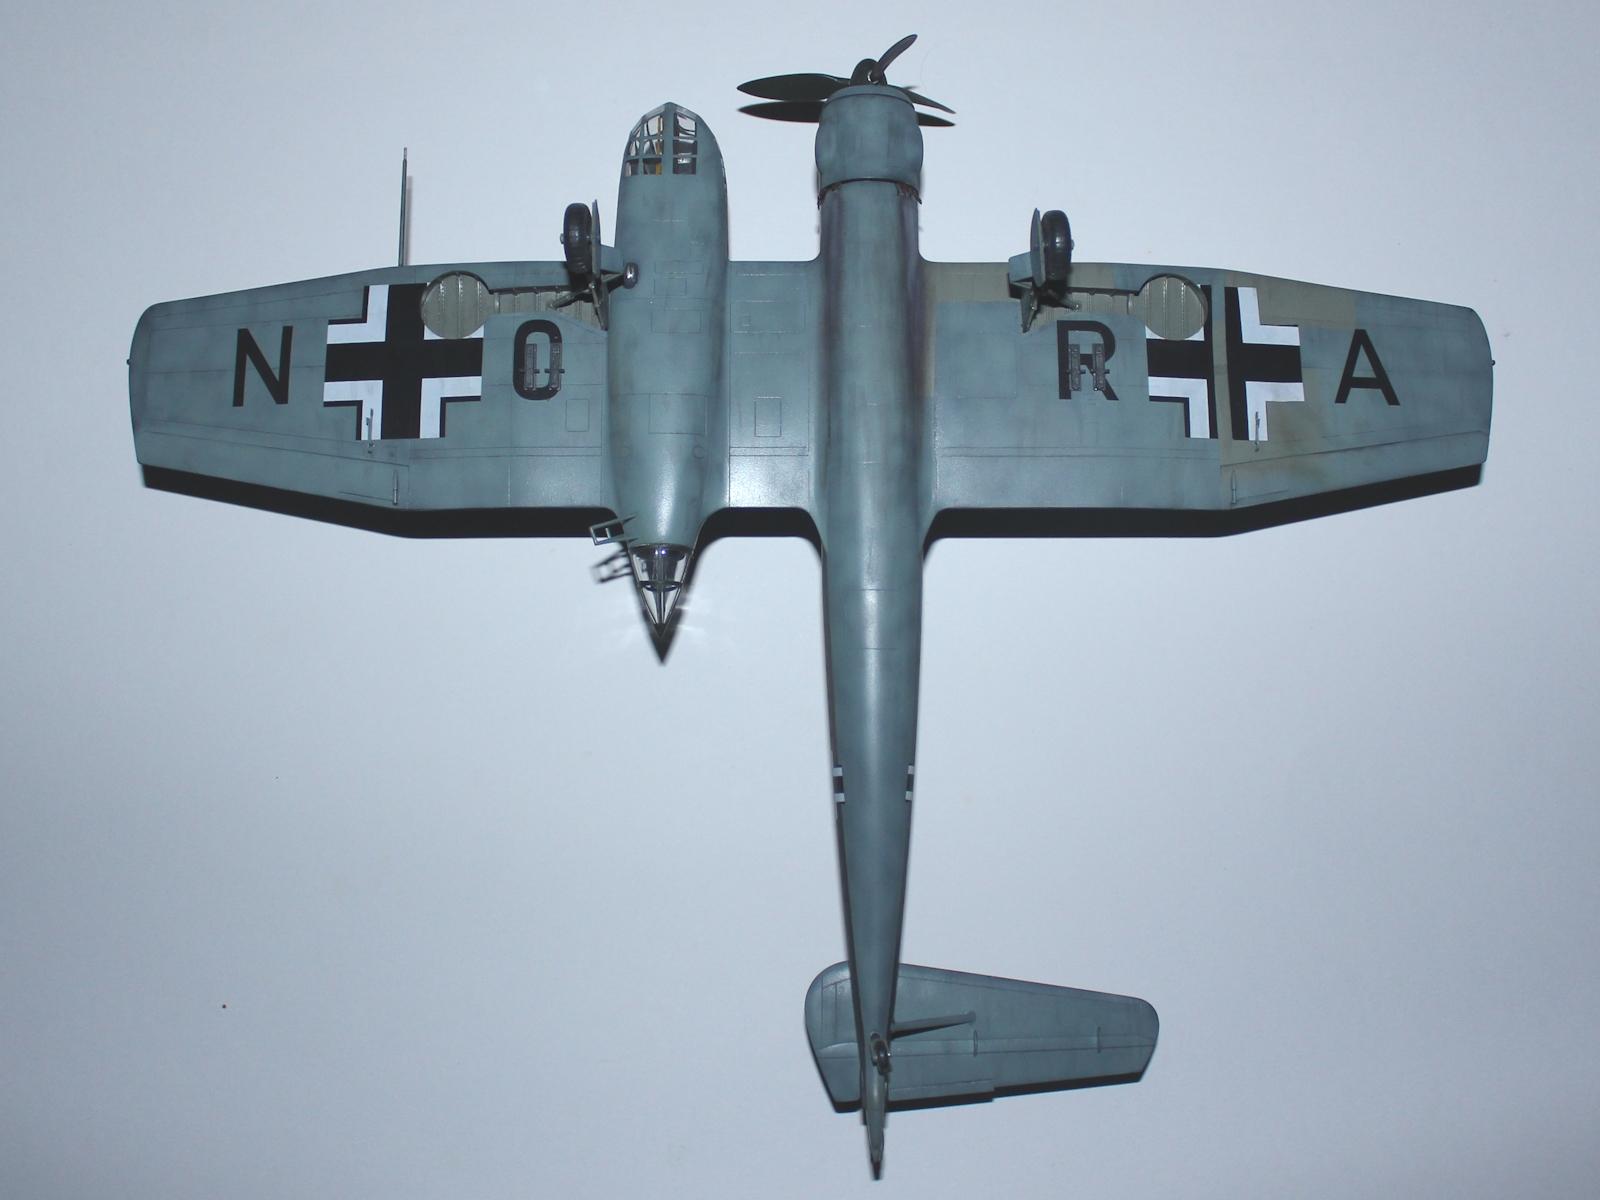
Blohm und Voss BV 141B-02, NC+RA
Subject
This model represents the 10th prototype (V10) and second pre-production BV 141B. As such it was officially known as the BV 141B-02 (WNr 0210002) and was assigned the Stammkennzeichen NC+RA.
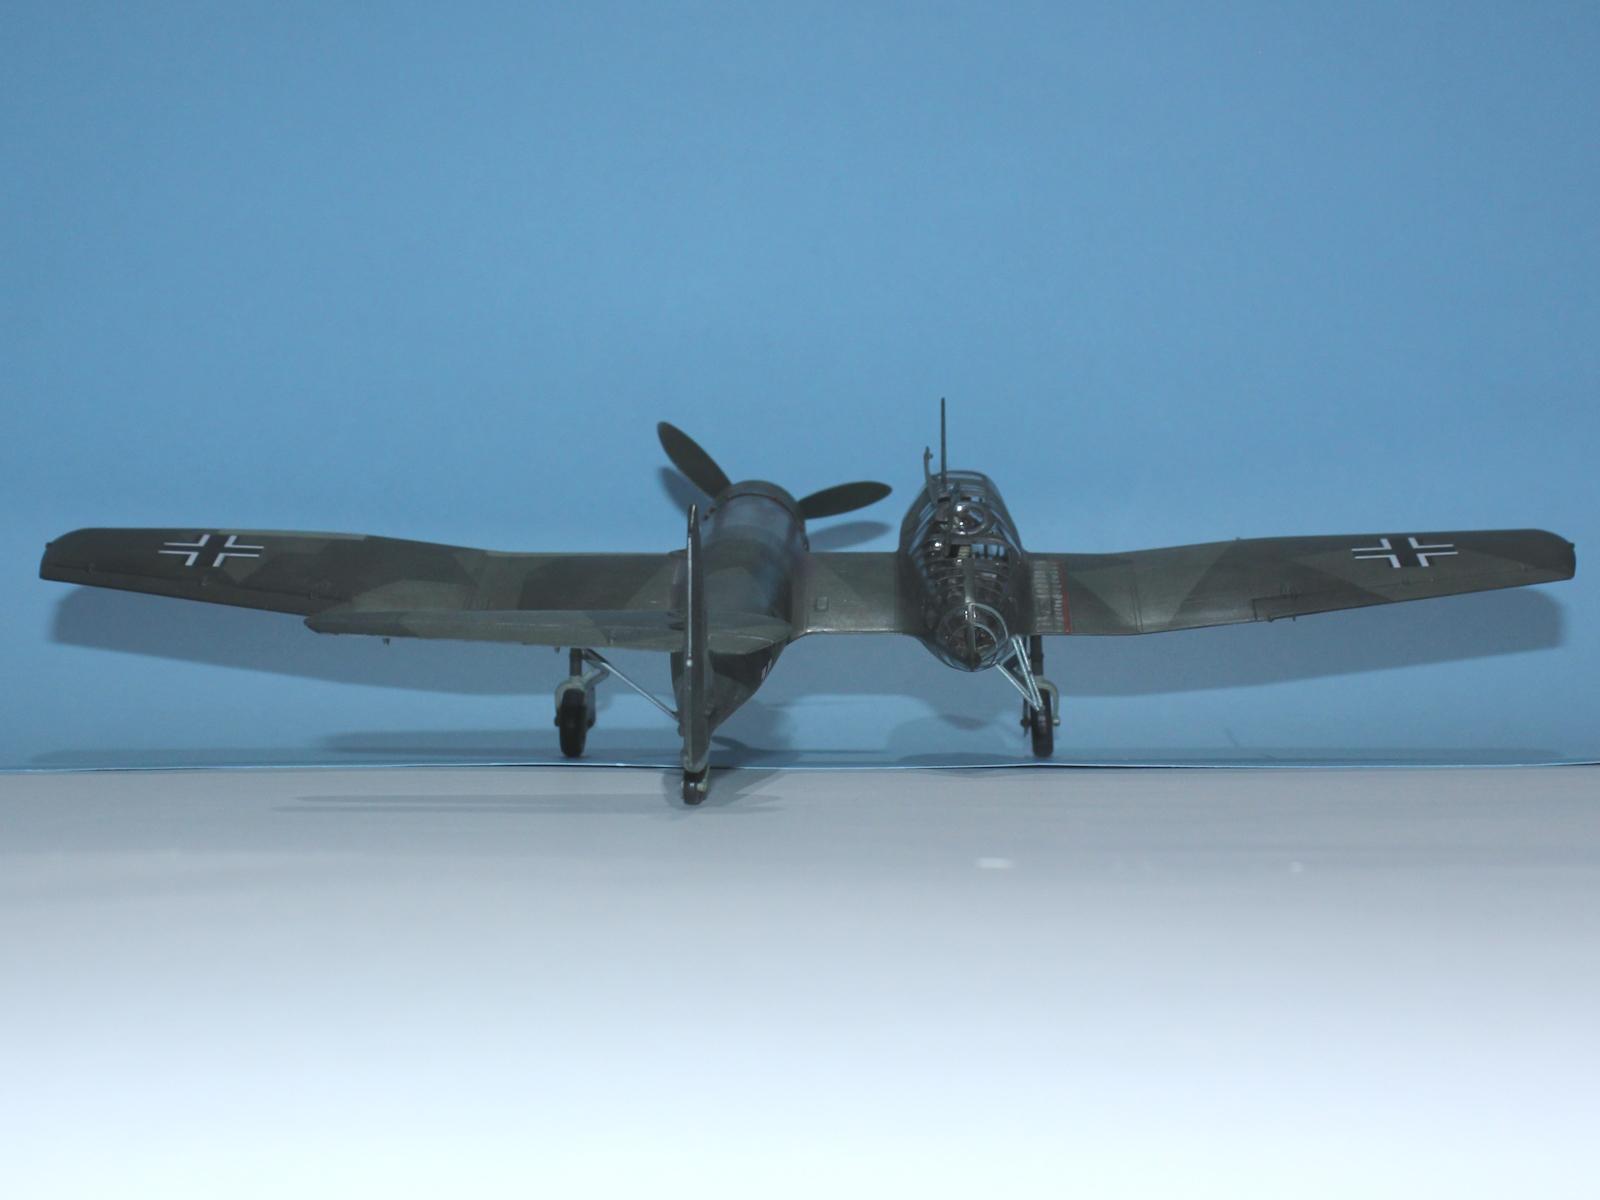
Designed to meet an RLM requirement for a single engine aircraft with a crew of three to fill the tactical reconnaissance role. Three prototypes, the V1 to V3, and five pre-series aircraft, BV 141A-01 to BV 141A-05 were built. These early aircraft had symmetrical horizontal tail planes and were powered by the BMW 132N. The aircraft proved to be underpowered and the subsequent redesigned B series had the tailplane offset to port, in order to provide a greater field of fire to the rear gunner, and was powered by the BMW 801.
By the time the eleven pre-production B-0s and ten B-1 series aircraft (the last two being rebuilt from the V1 and V4) had been built, the competing Fw 189 had been selected.
The closest the type came to active service was when BV 141B-02 underwent service trials with Auflarungsschule 1 (Reconnaissance School 1) at Grossenhain in Saxony in the autumn of 1941.
Construction
This was intended to be a quick build but, as is often the case, after a bit of research I decided there were a few enhancements and modifications that I wanted to make. While generally accurate in outline and detail there are a few of corrections I had to deal with.
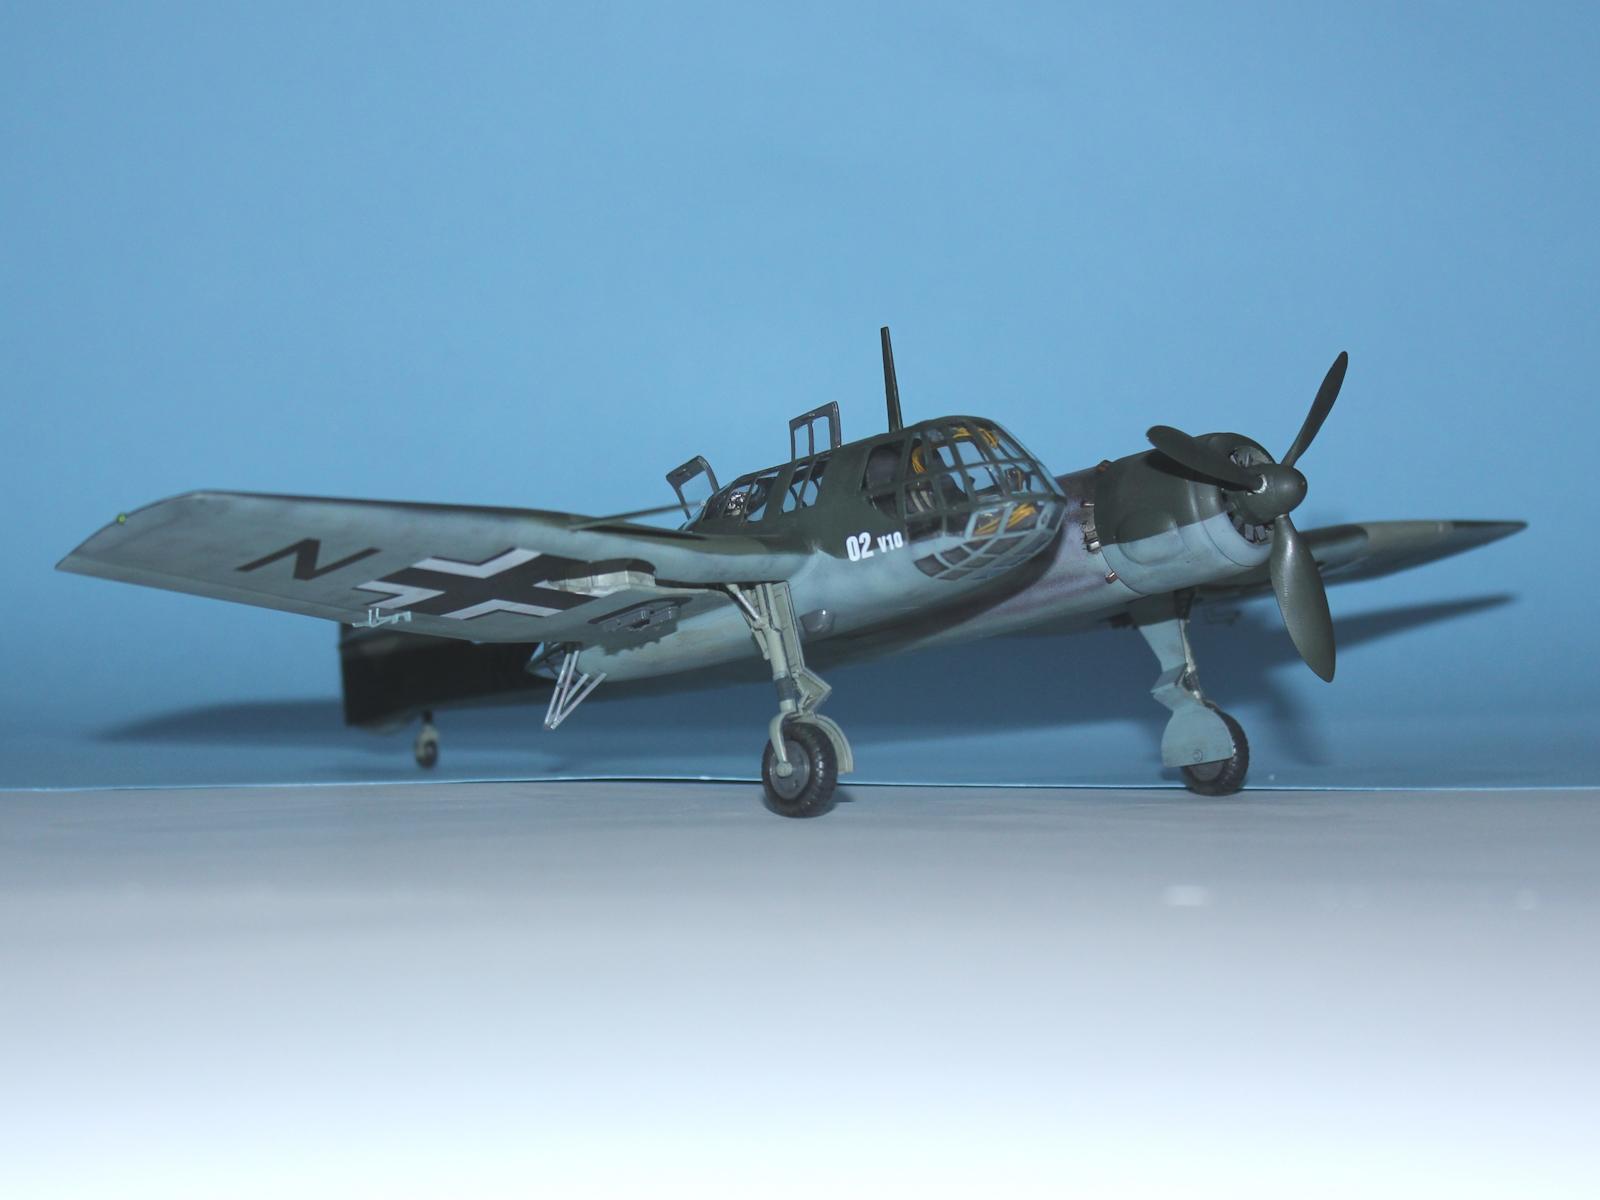
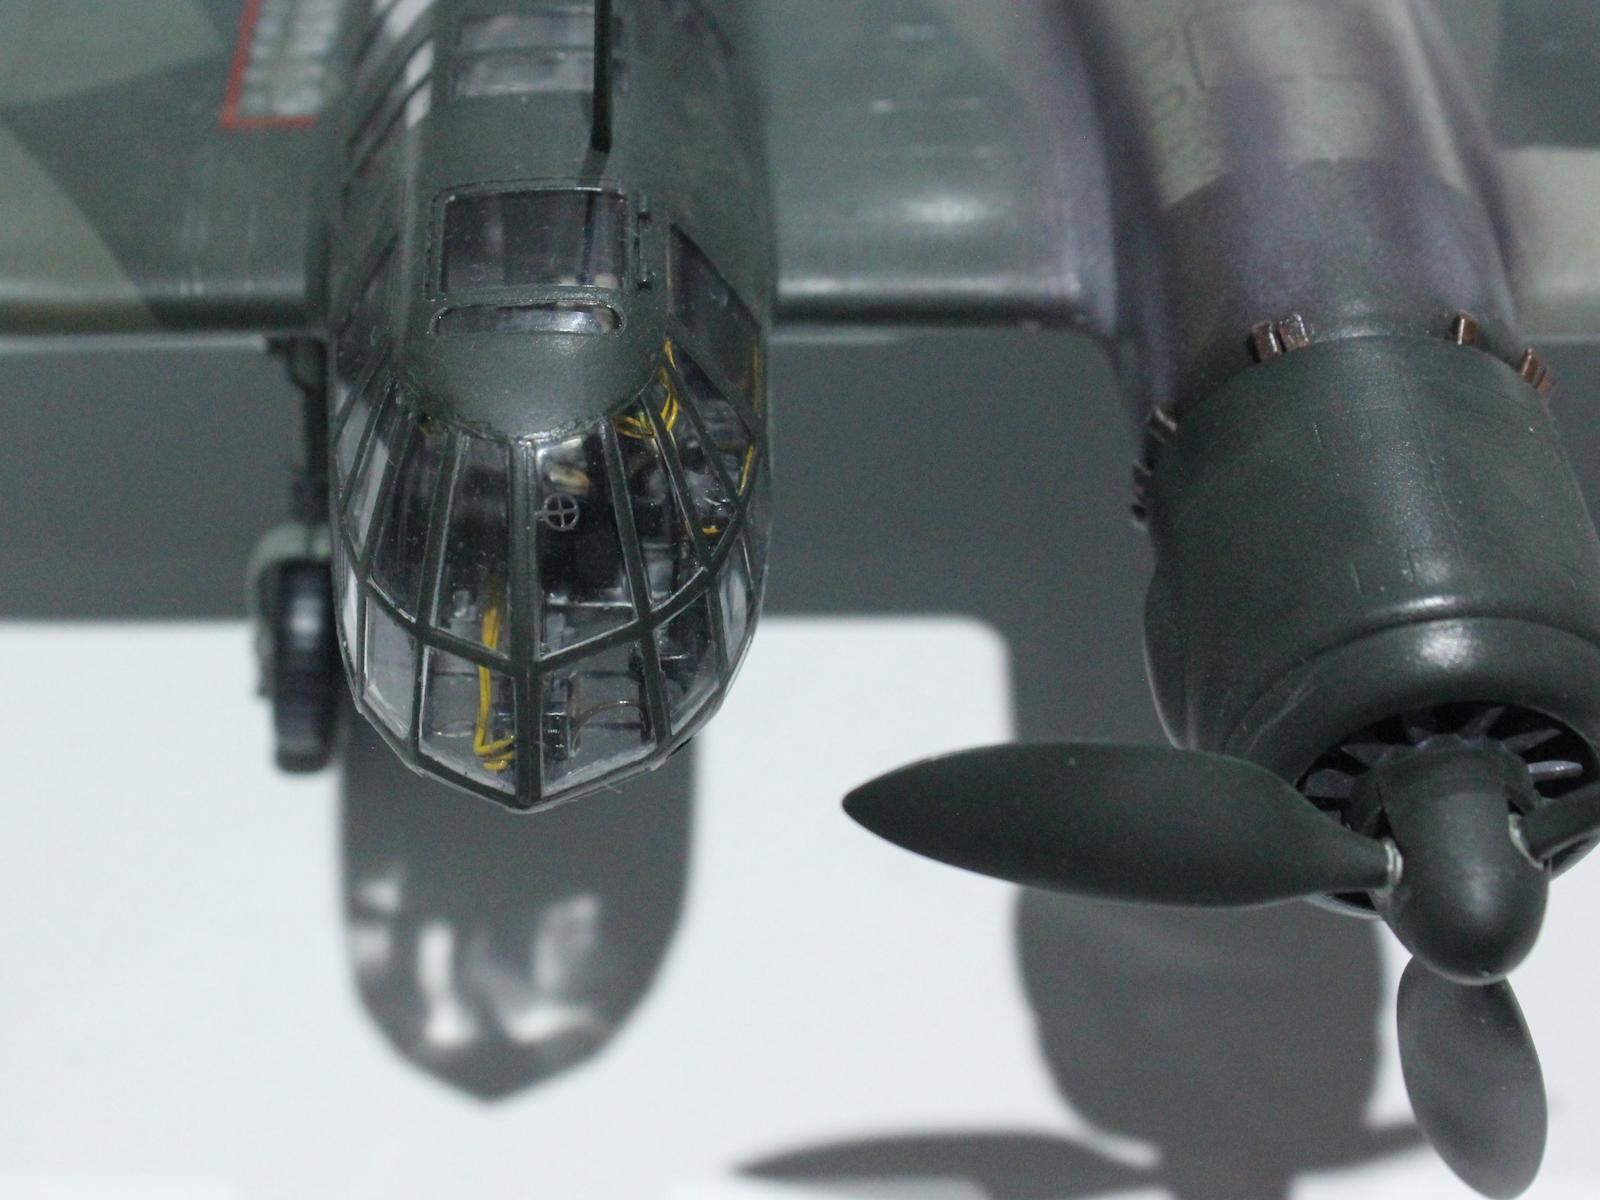
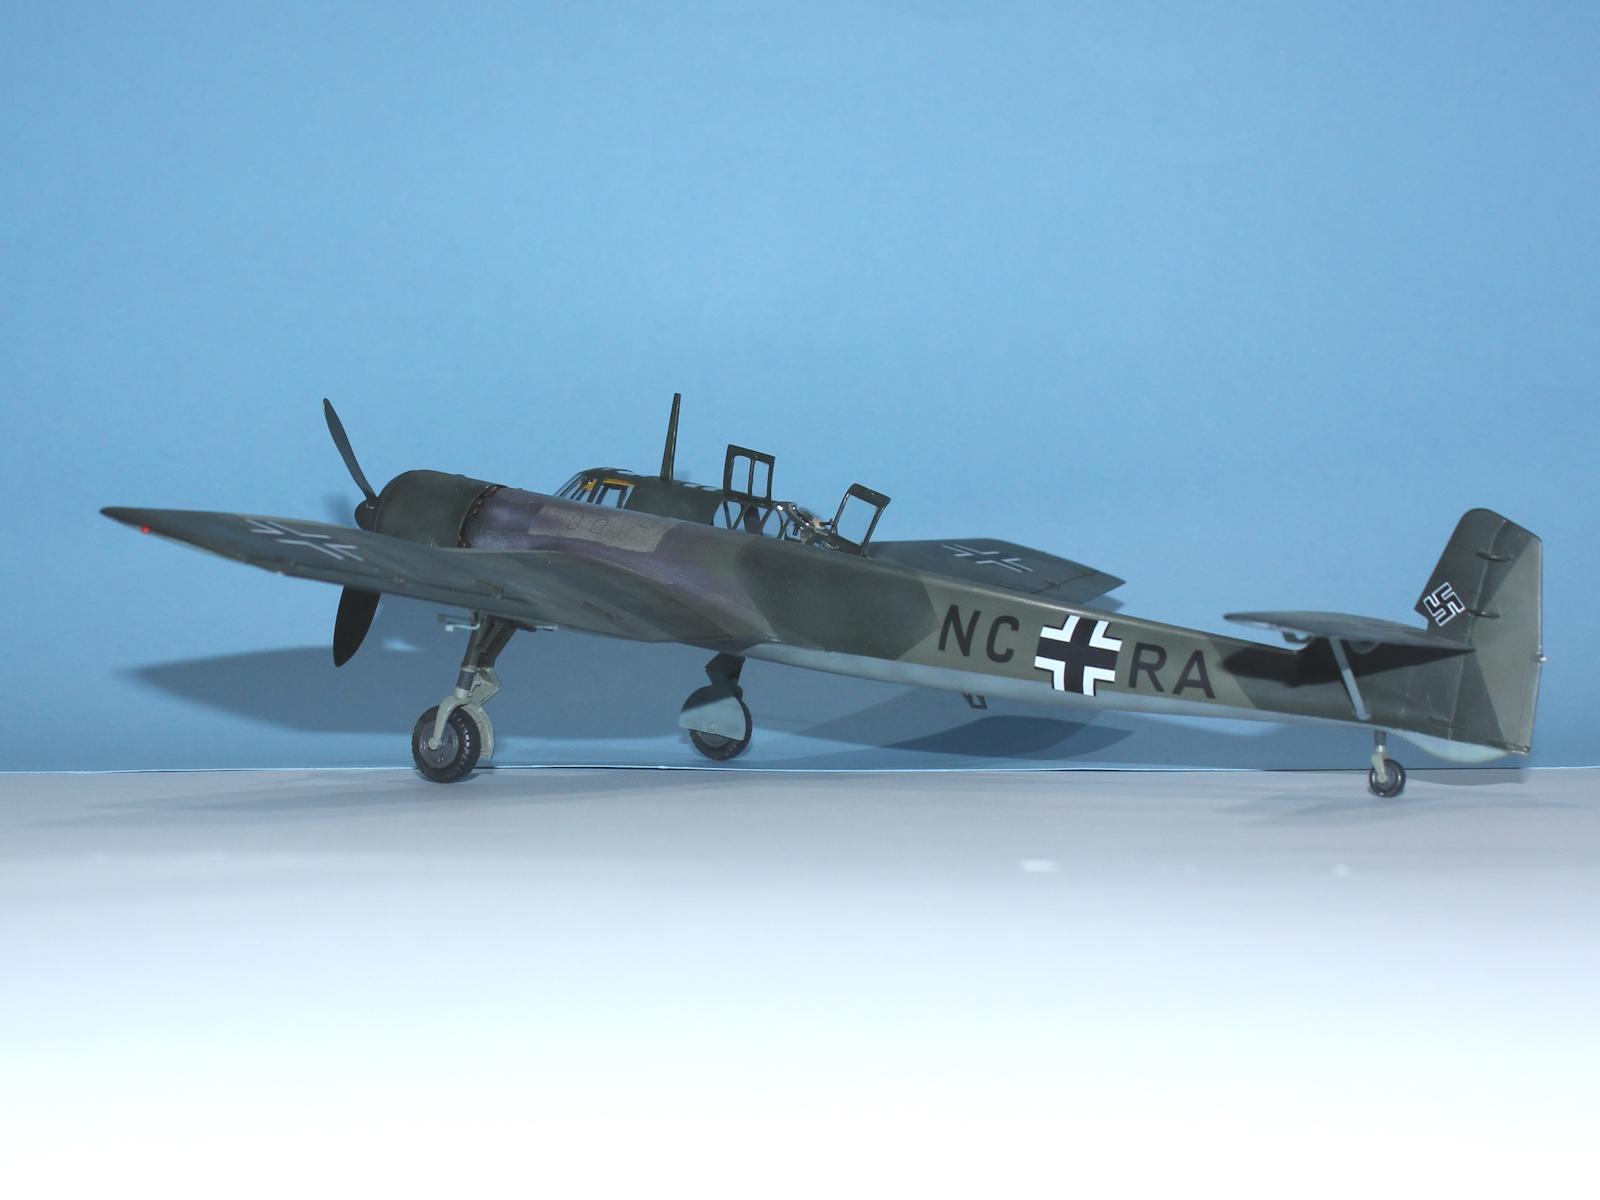
The first is the propeller, which Hobby Boss moulded as anti-clockwise (looking forward) whereas the BMW 801 rotated in the opposite direction. Fortunately, I had a spare propellor from an Eduard Fw 190A that I could use with a little bit of adaption. I understand that Hobby Boss corrected the propeller in later boxings.
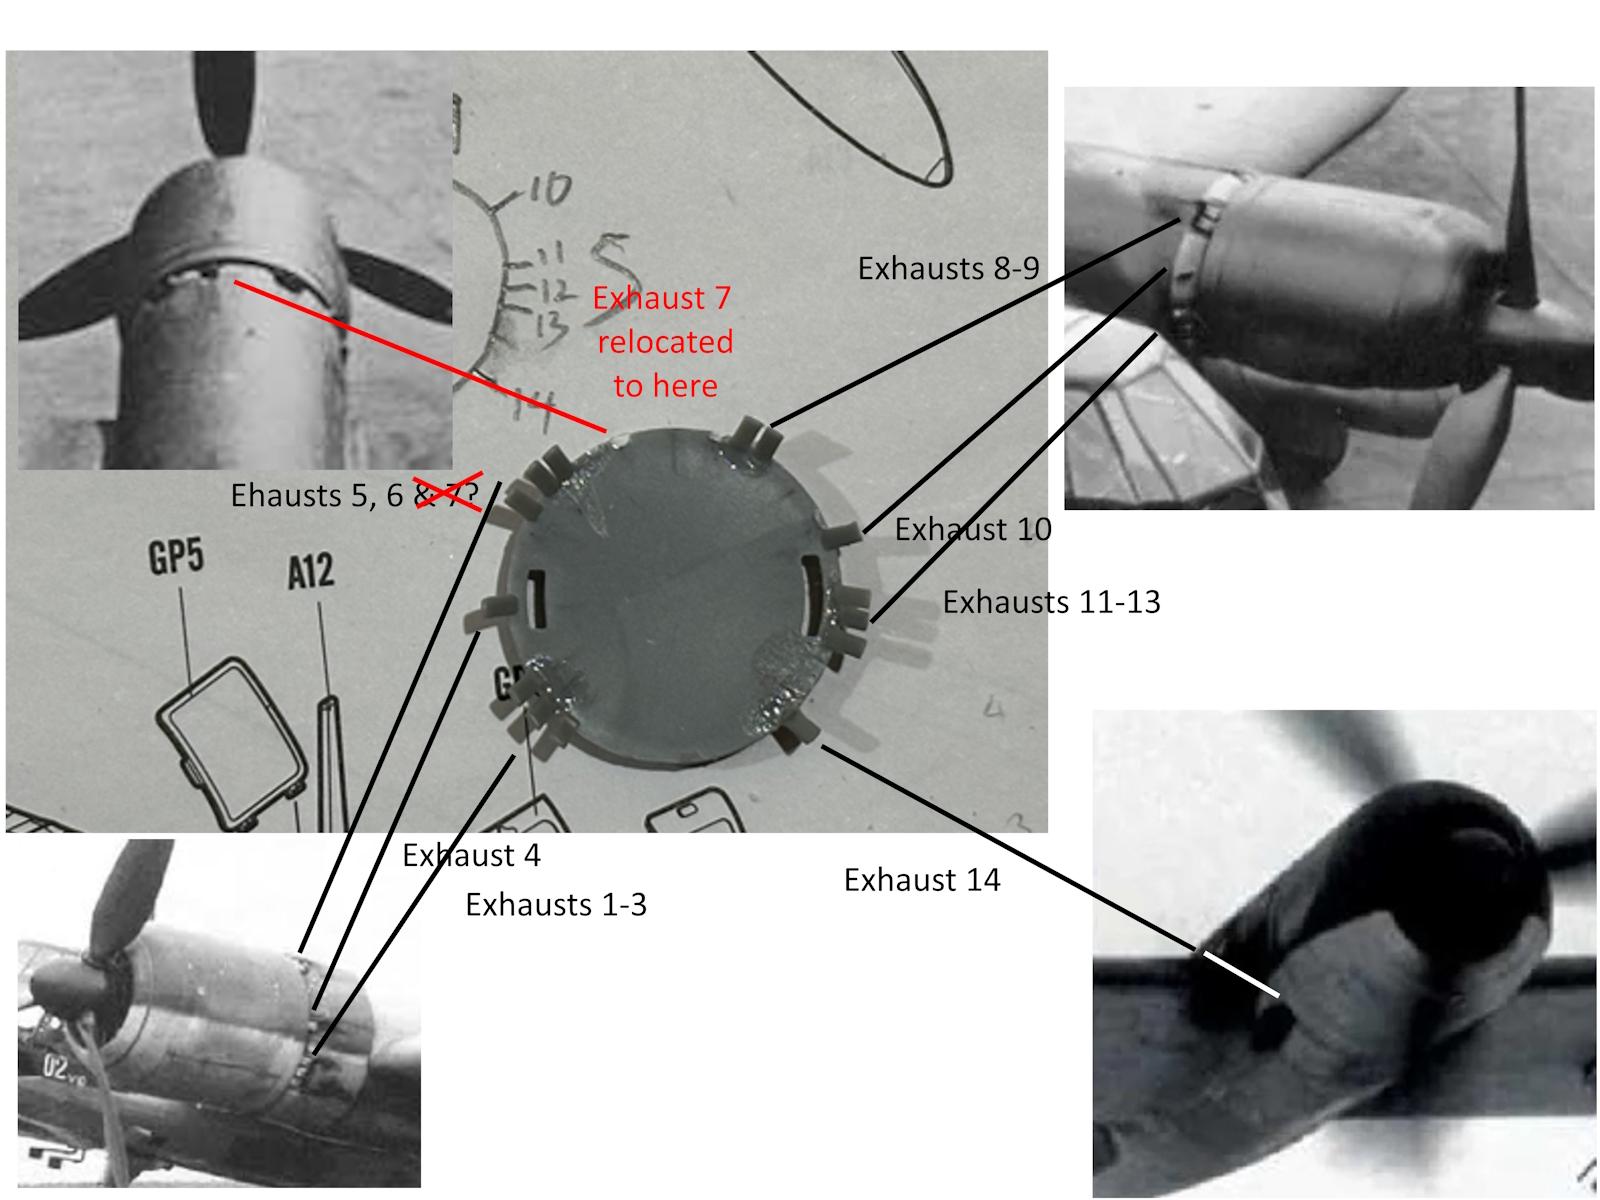
The second is the part with the exhaust stacks. The BMW 801 is a fourteen-cylinder engine which therefore requires fourteen separate exhaust pipes. However, Hobby Boss have moulded sixteen exhausts. After some research of the available photos, I decided that the arrangement was, starting lower left and moving clockwise looking forward, 3, 1, 2, 1, 2, 1, 3, 1 for a total of 14. (I originally had exhausts 5, 6 and 7 together but discovered a photo that showed exhausts 5 and 6 paired together and exhaust 7 on its own.)
The third problem is the landing light on the outer port wing leading edge. Hobby Boss provides a strange oval shaped landing light but a picture of the V10 (BV 141B-02) I have in a book shows it to be round. As it happens, the diameter of the sprue runners is the same as the wing leading edge, so I cut out the oval landing light, glued a half section of sprue and sanded it all smooth. Next, I drilled a 3 mm hole in the leading edge, which matched the diameter of the clear sprue runners. Then I cut a section of clear sprue, and rounded one end by placing it in a electric drill and shaped it while spinning using a file. I drilled a hole in the end to represent a globe and painted it silver. This end I glued into the hole and, when dry, cut and sanded it smooth to create a new light.
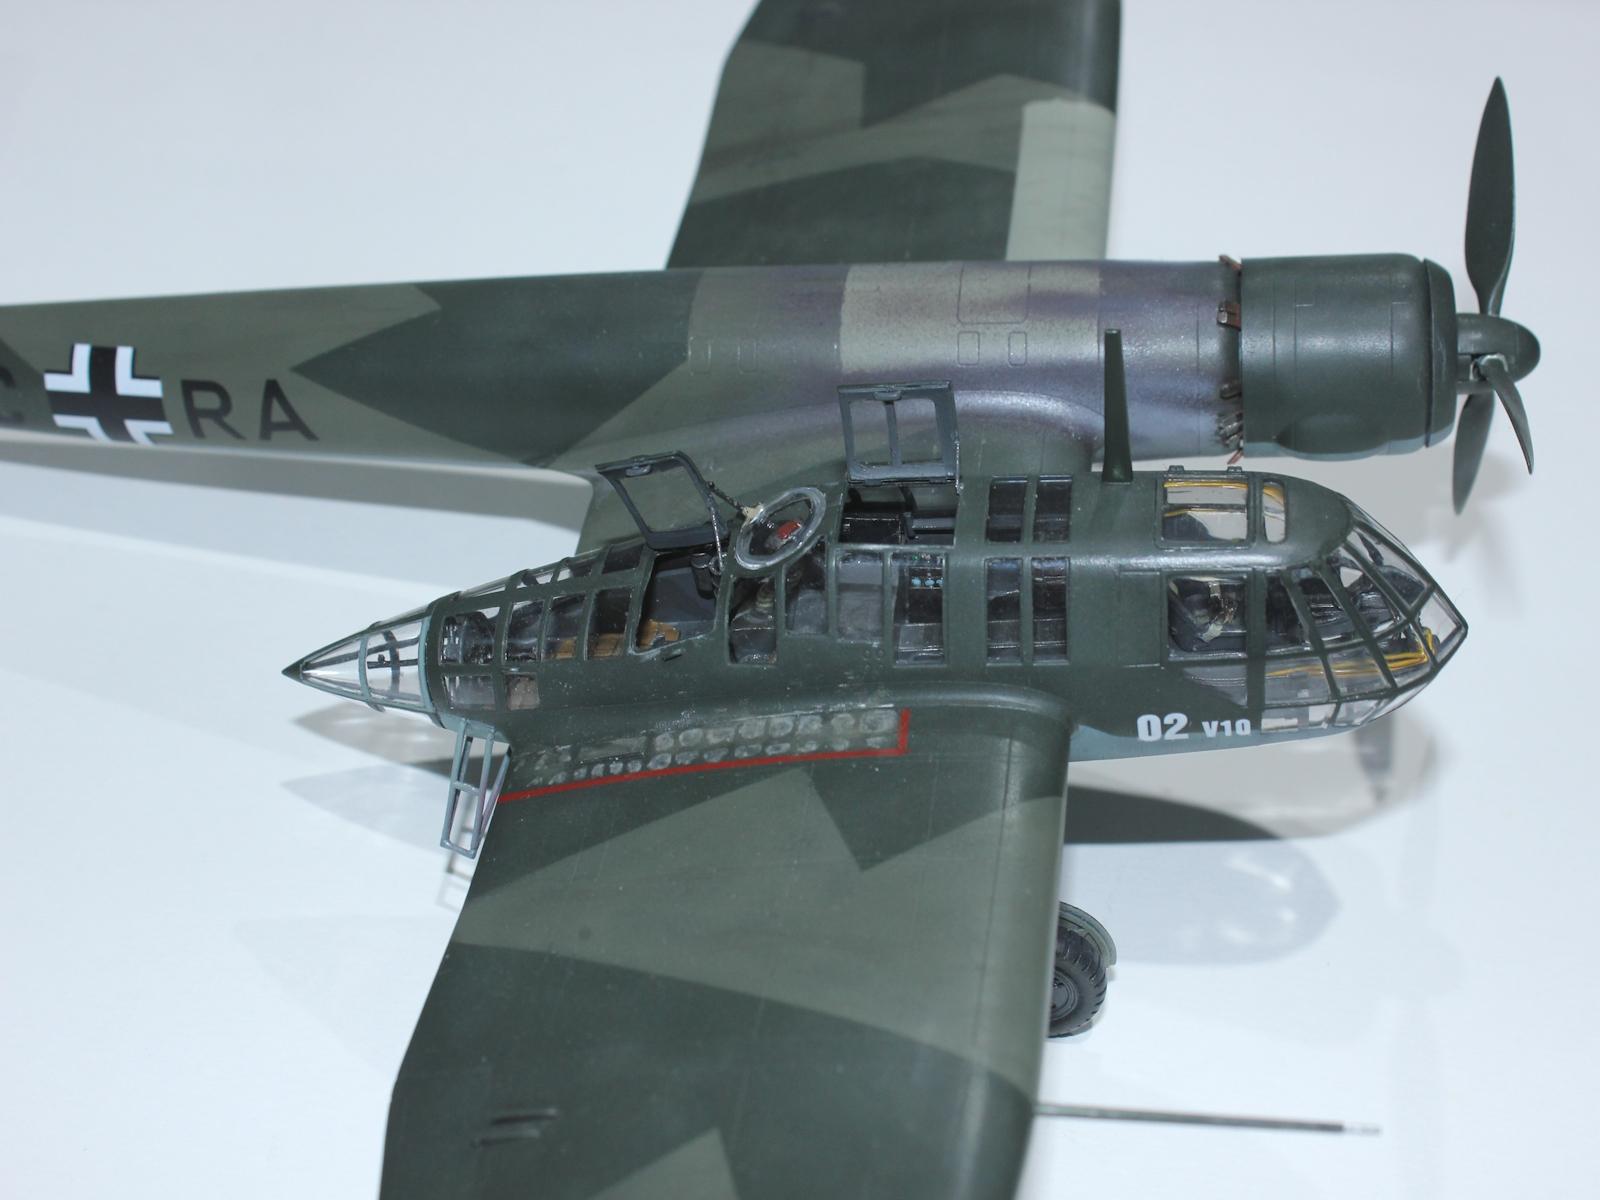
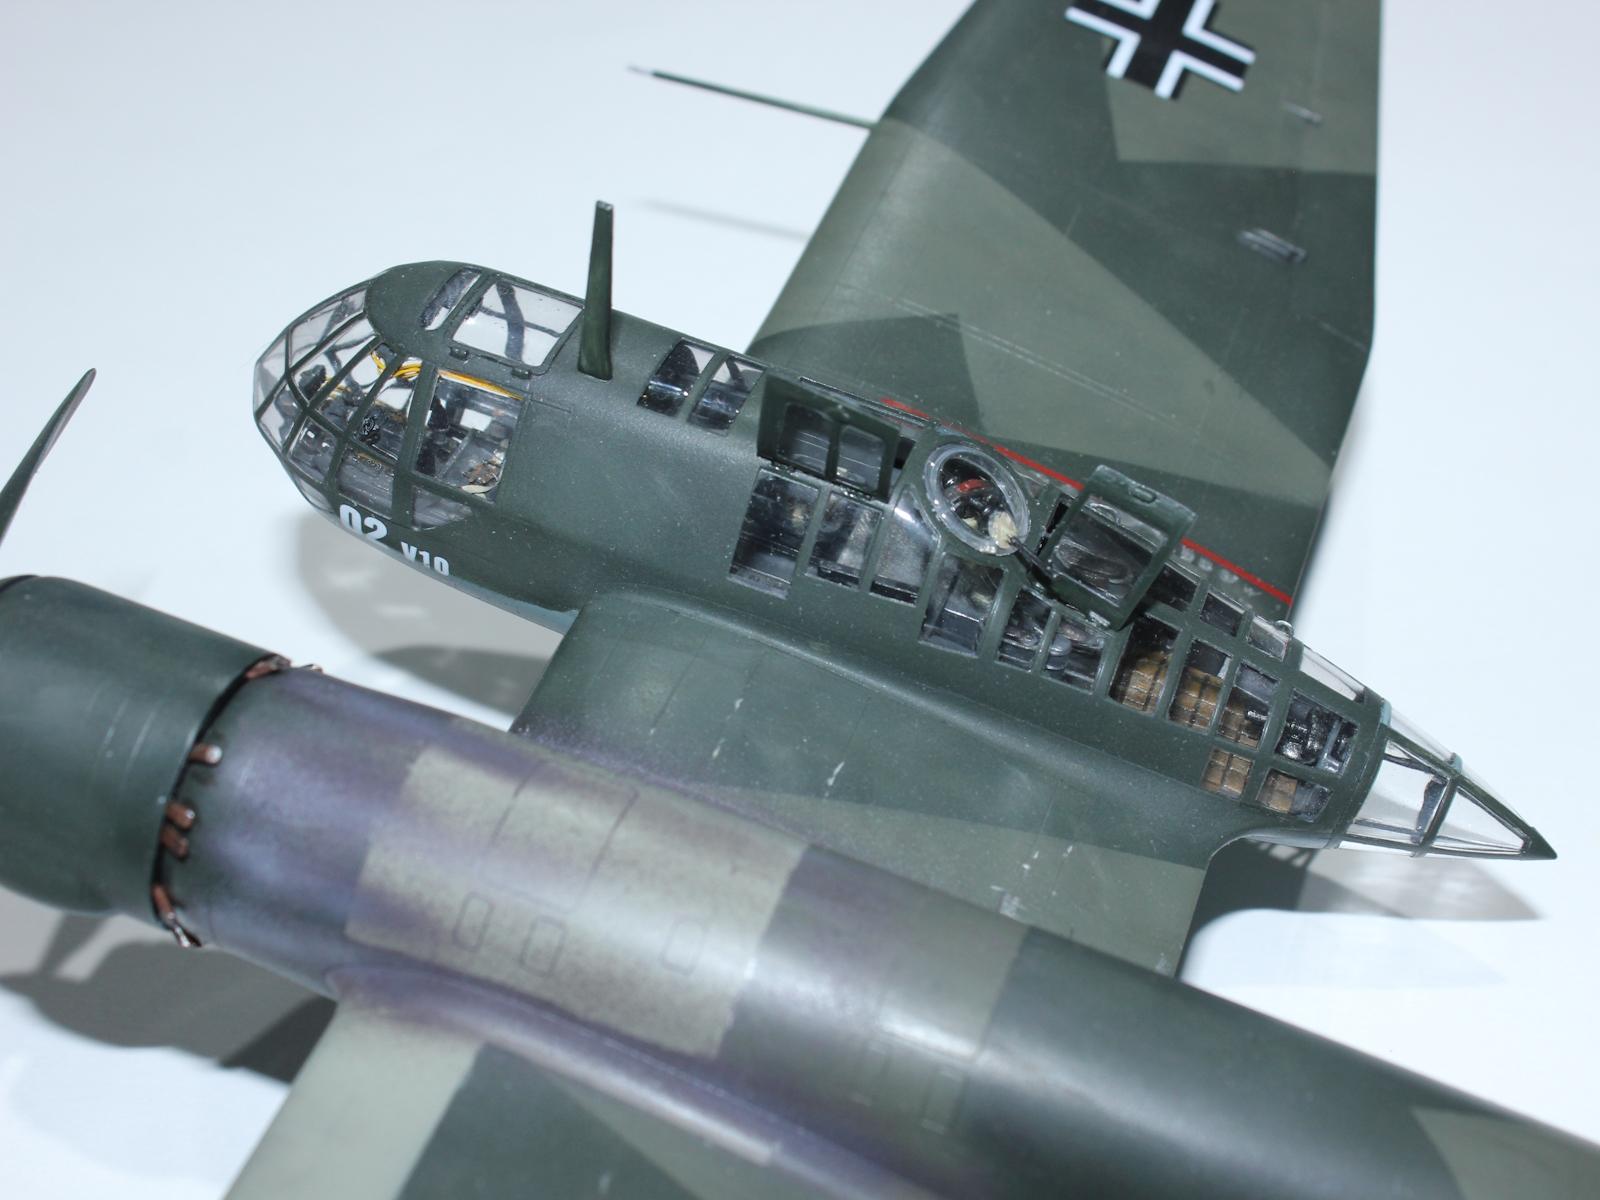
The cockpit is good, but given the visibility afforded by the extensive glazing I decided to add some wiring and details. This included copper wire for the hydraulic lines for the foot pedals (brown), which I also added from an etched brass set, and more copper wire for the instrument clusters (yellow) which I routed as best I could.
While the cockpit and observer/upper gunner position are nicely detailed out of the box, the rear gunner compartment is a little inaccurate. There is a box where casings from the upper gun are collected that is centred in the middle of the fuselage whereas it should be offset to the port side. This is probably because the rack for the spare ammunition canisters for the rear gun that sits to the port side of the box is too far forward. I didn't try and fix either of these issues. However, the rear gunner should have a seat starboard of the casing collection box and that is not provided. So, I made a seat pan from a U-shaped piece of 1mm brass wire and a square of plastic card.
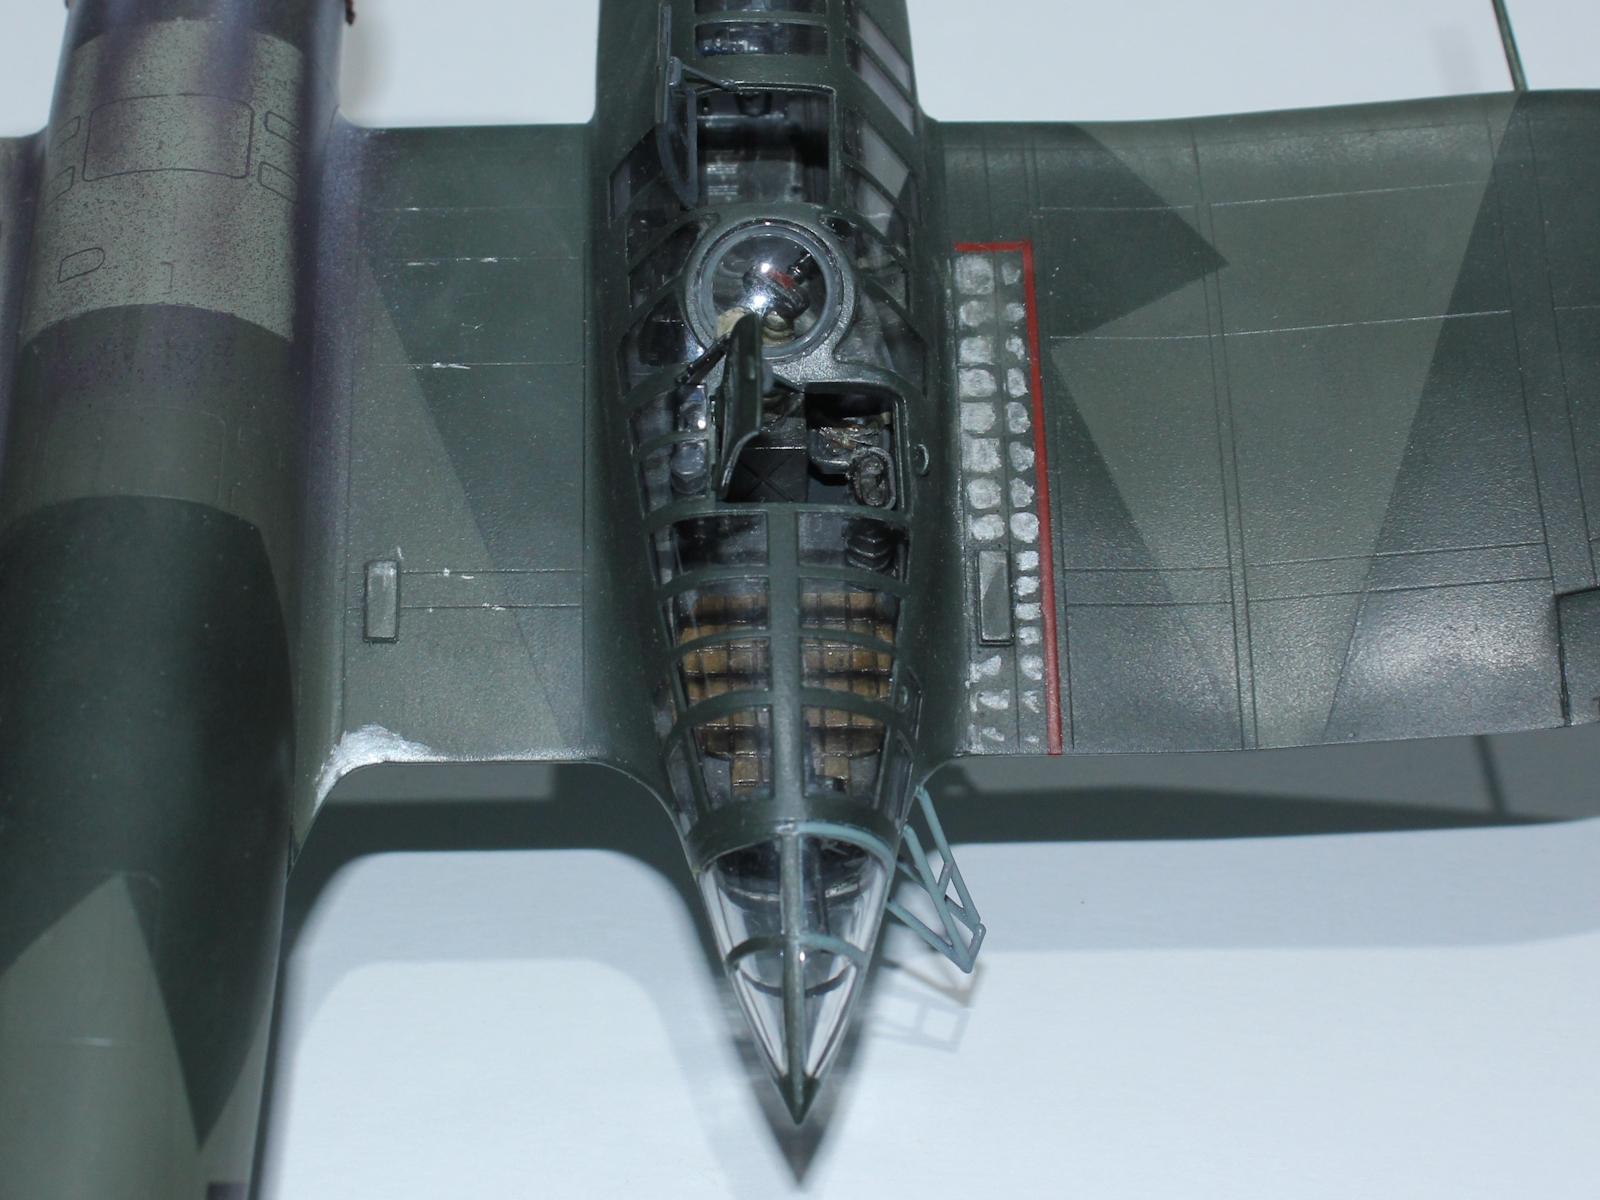
Of course, I added the obligatory seat belts to the three seats from an aftermarket Luftwaffe set.
Staying with the crew compartment, the rear gunner position was enclosed by a Perspex cone. One of the panels was able to be slid open to provide an opening for the gunner to fire his gun. This whole unit was also able to rotate 360° to allow him to fire in any direction, which required it to be a circular-based cone. Hobby Boss, however moulded this juncture as a flattened ring that meant that it could only be positioned one way. That might have been fine if they had aligned the gun mount structure with the centre of one of the four panels, but instead, they aligned it with one of the frames. So, with a bit of bending, sanding and swearing, I managed to mount the ring that included the gun mount in a way that aligned the gun with one of the panels.
Incidentally, it is difficult to be certain, but I am pretty sure that the cone was made up of three sections, not four as provided by Hobby Boss. I decided it was too much effort to try and correct that.
The elevator and ailerons had an exaggerated fabric effect with huge hills and valleys that annoyed me enough that I had to sand them smooth. Curiously, the rudder was moulded smooth, but this had a superfluous second control rod above the elevator, which would also have fouled the elevator, that I removed. I also shaped the rectangular block on the trailing edge of the rudder into a rounded navigation light.
The final modification was to add the pairs of underwing vanes that are just ahead of the ailerons using fine copper wire and Tamiya tape.

Colours and Markings
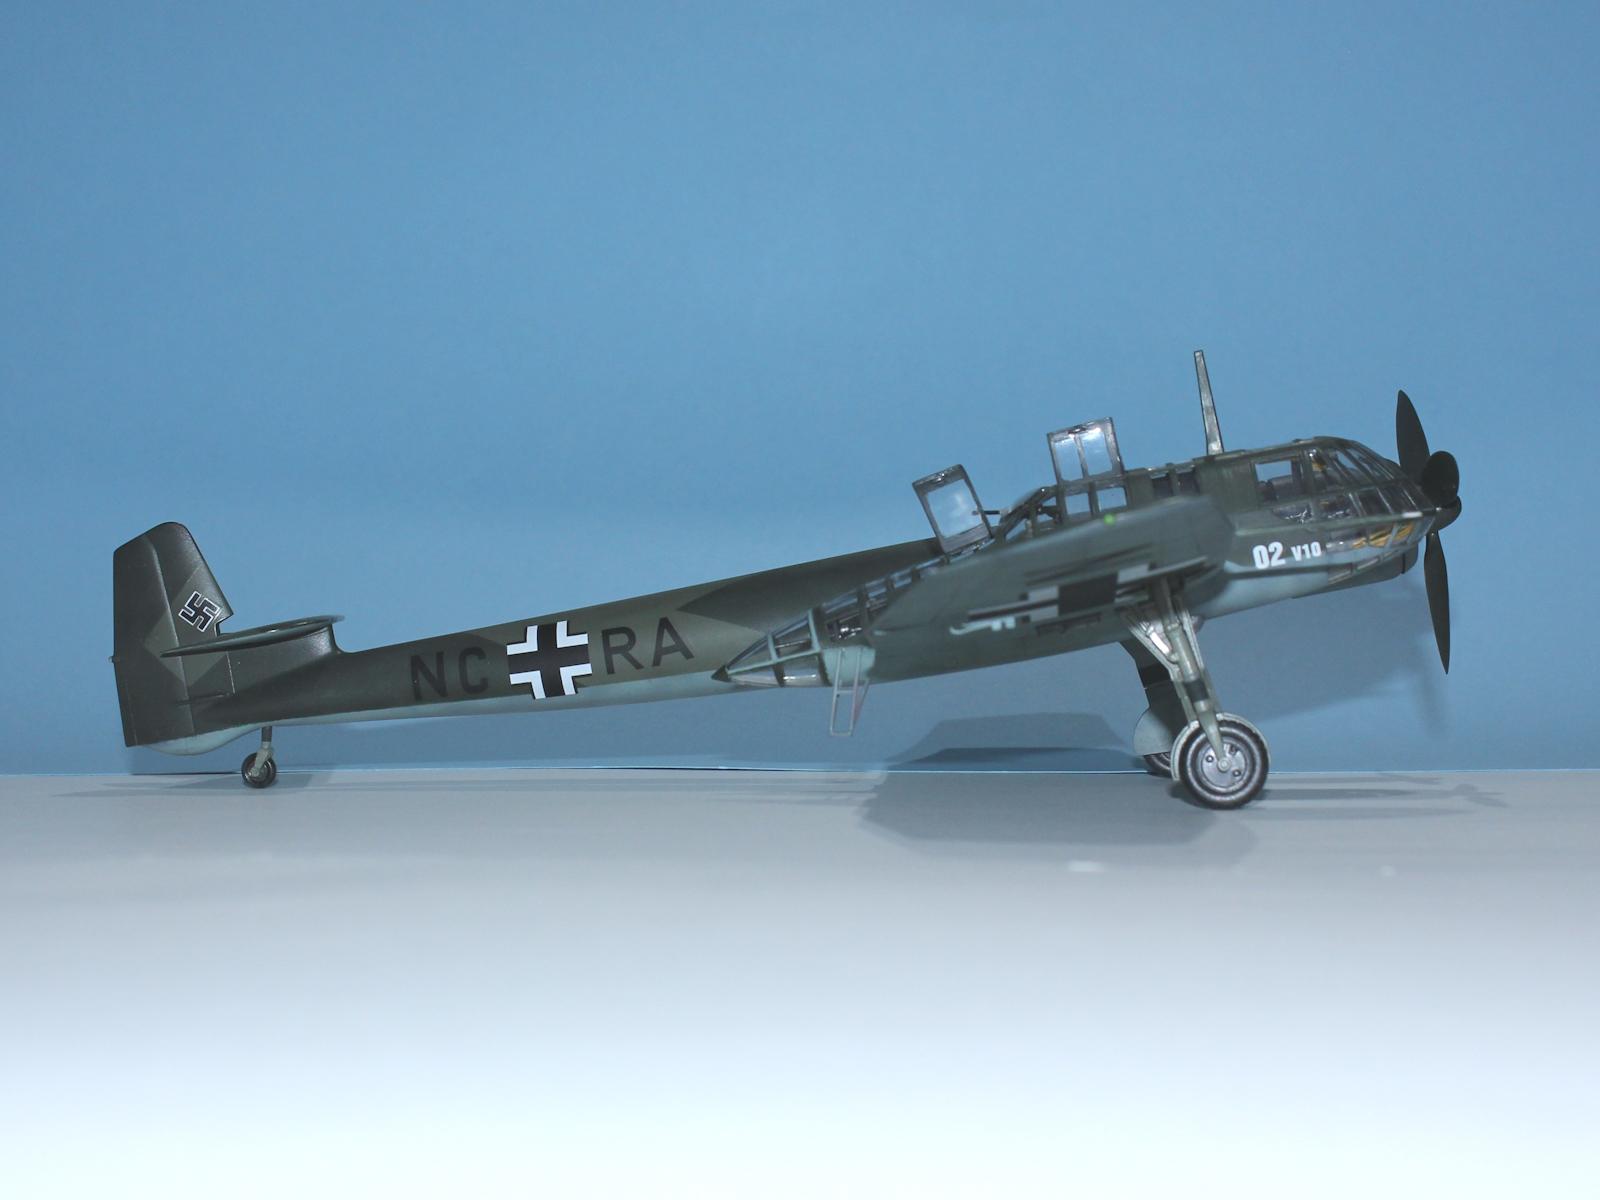
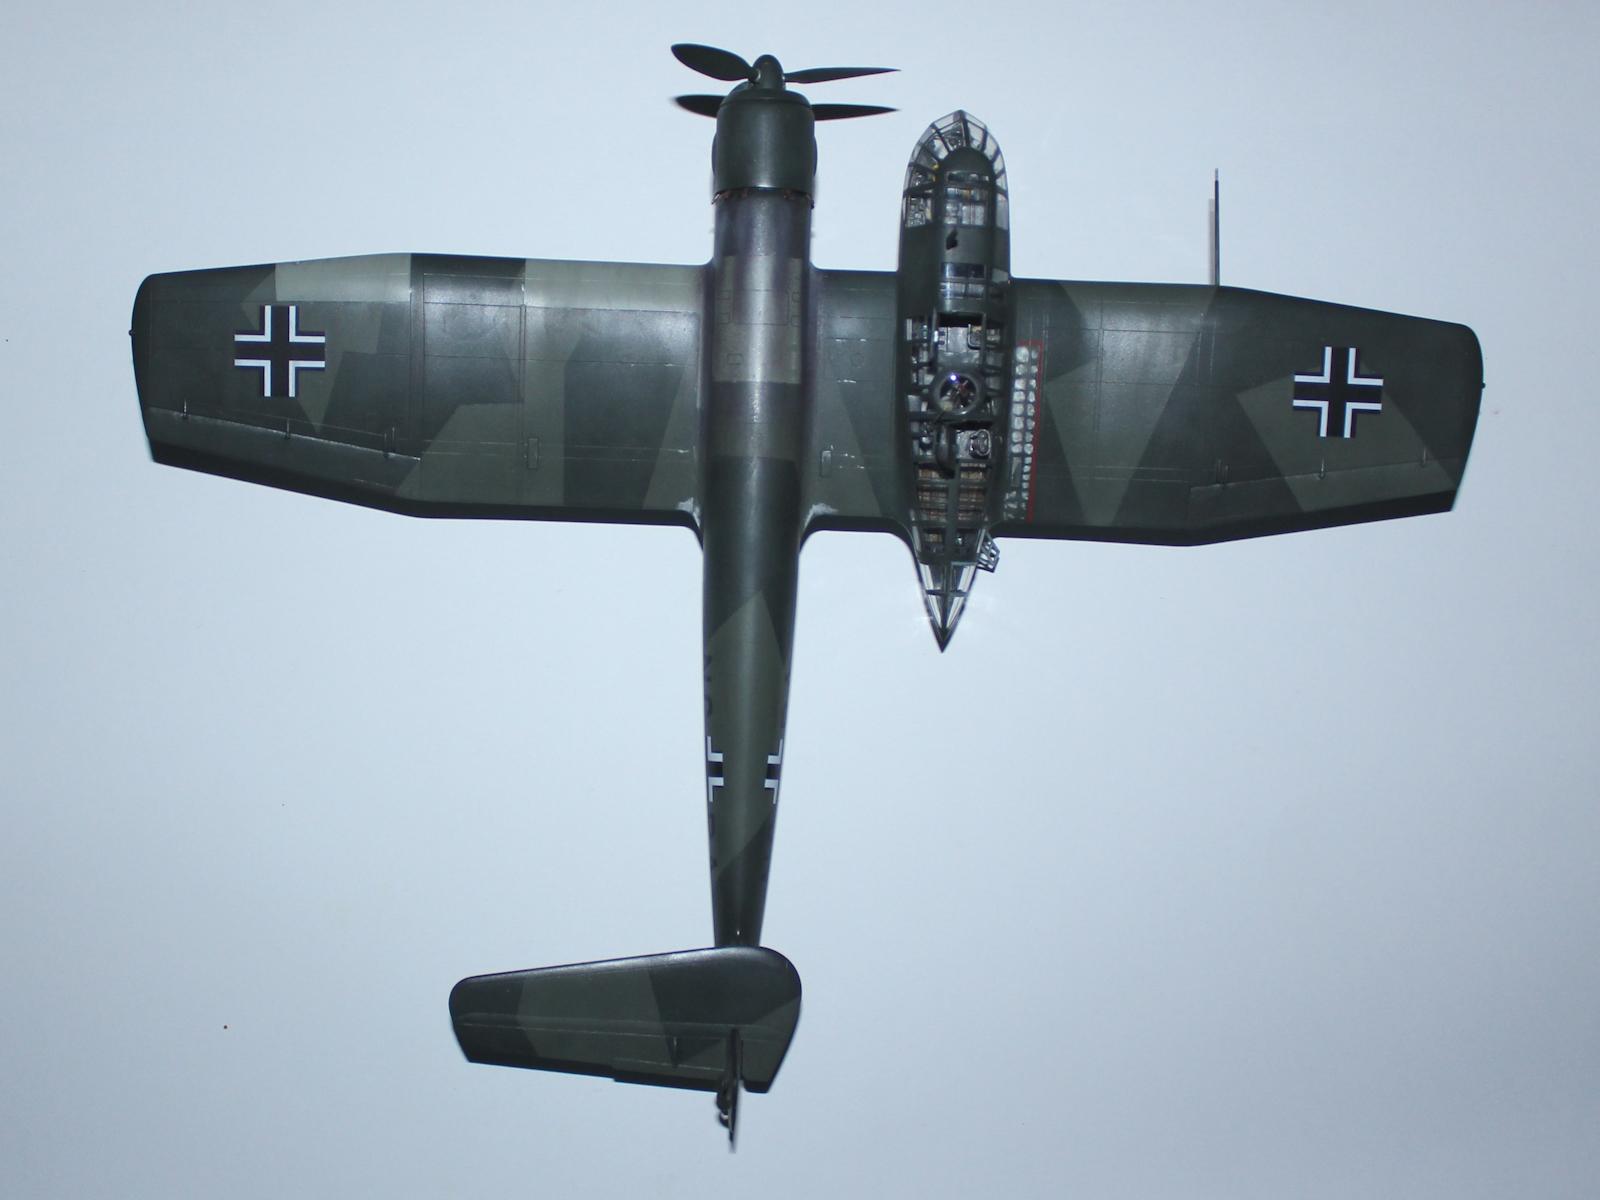
With so few aircraft built, there are not many options for schemes with the majority of aircraft painted the standard RLM 70 Black Green and RLM 71 Dark Green over RLM 65 Light Blue.
One of the, perhaps, two known photos of the V10 shows the aircraft taken from the lower forward port quarter. There is some evident patchy paint under the port wing with the Balkenkreuz split in two by a pale band and the outer black borders mostly missing, presumably overpainted.

I suspect that the aircraft suffered from a port undercarriage collapse that damaged the wing with the leading edge of the wing outboard of the Balkenkreuz and at the wing root, as well as the skin of the upper fuselage in line with the wing, likely to have been replaced and painted RLM 02 Grey.
From photos, it was also usual for the underwing Balkenkreuz to be continued on the undercarriage covers, but this is not evident on the starboard undercarriage cover for the V10. My theory is that these covers were probably also damaged in the accident and replaced.
I decided to replicate this to add some interest to an otherwise uniform scheme.
Photos show that the crew access path on the starboard wing root was outlined in a (presumably) red no-walk guideline, so I masked and painted this after applying the camouflage. The photos also show this path to be very worn, but in a series of squares between the underlying structural stiffeners, so I masked a grid pattern and used a cotton bud to rub silver paint in this area. It perhaps looks a little over done, but I think it is close to the photos.
I otherwise weathered the aircraft lightly and tried to get a dusty effect with Tamiya weathering set on the top surface.
Some of the aircraft photos show some reasonably heavy exhaust staining but I tried to not go too hard with this.
The last thing I painted was the bump under the cockpit which is actually a clear dome covering some longitudinal metallic strips as part of a direction-finding apparatus. So, painted this RLM 66 and hand painted three silver strips before giving it a gloss clear coat.
Conclusion
I remember building the old 1/72 Airfix kit in my youth and, when a friend said he didn't want this kit, I jumped at the chance to buy it off him and build it. The kit isn't perfect, but then references are scarce and photos limited. With a few modifications and additions, you end up with an unusual and, in my opinion, good looking aircraft.
You can see my build log here.

Nice work on an ugly and strange plane.
I would not call it ugly - just strange. I love this plane (once built the old Airfix Bv 141 about 50 years ago).
G’day John (@j-healy) and Hans (@wimfi),
Strange - Yes
Ugly - No
There is a certain elegance to the subtle reverse gull wing and crew compartment.
And science has shown that asymmetrical faces are more attractive than symmetrical ones 😊
Nice job, Michael. Yeah...gotta love those "quick" builds...lol
G’day Gary (@gwskat),
I knew about the prop and had the solution in mind and you (nearly) always need to add seatbelts, but the other details, in an otherwise excellent kit, were disappointing.
An example of the quality of the moulding is the wheel wells, which are beautifully detailed and with the plastic on the top surface almost transparently thin. Then, in contrast, you have the rectangular blob on the rudder trailing edge and the overdone fabric effect.
Strange.
Excellent result, Michael! Excellent build thread, too!
G’day Spiros (@fiveten),
Thanks, mate.
Great build of a rather demanding kit. Enhancements special.
G’day Bob (@bails),
Thanks for your kind comments.
Great job! You nicely highlighted the areas that needs help on an otherwise good kit . My kit luckily had the correct propeller so I didn't have to raid one of my Fw 190 kits. The longitudinal stability augmentation vanes on the ailerons are a very good touch that most folks miss...or don't even know about.
My only comment is about the landing light...and at this stage, it doesn't really matter. Like you, during my build, I questioned the shape and wing placement of the light. I had heard that the kit was wrong. That said, I got a copy of "The Blohm & Voss Bv 141, a Technical Guide" by Richard A. Franks. On page 36, he has a photo showing the area in question and states that the landing light on the "B" model was moved to the left wing and had an oval glazing.
Once again, a very beautiful build!
G’day Tom (@trod348),
I have also read that the light was oval, but the photo says otherwise.
I think that the confusion is that a round light on a curved surface results in an oval surface. So the light could be said to be oval in the vertical plane.
It is definitely not what Hobby Boss provide.
Crew compartment is excellent.
G’day John (@atjoe),
Thanks, I think it was well worth the effort.
This is such a wonderful result, Michael @michaelt
All the detailing and modifications you did are superbly done.
Thanks for sharing your progress in the build thread.
G’day John (@johnb),
Thanks, mate.
Well done! I built this one when it first came out (my first Hobby Boss build) and experienced some of the same things you mentioned. I also used a Fw 190A prop and scratched some vanes.
1 attached image. Click to enlarge.
G’day Chas (@chasbunch),
The vanes are an unusual feature - I’m not quite sure how they work and why there are two each side, but they must influence the ailerons in some way - perhaps via the trim tabs.
Other builds on this site helped me decide how they were placed and their dimensions.
Michael, Great looking build and I really appreciate your insights into this 1/48th Blohm und Voss BV 141B-02 kit - Cheers
G’day FPR (@flypastrush),
Thanks for your kind comments.
I’ve enjoyed looking at your recent posts and exploring your website.
Thanks Michael (@michaelt), I am relatively new here and am just enjoying catching up on some of the members kit builds here, as I find the time. Will definitely check out more of your collection as you focus on the same scale as I do - Cheers
Nice build! I'm a fan of the 141 - just finished the old Airfix kit. So happy to have one in my cabinets.
G’day Greg (@gkittinger),
Yes, I saw your build and am very impressed with the quality of your build of a very old style Airfix kit.
@miehaelt - this is really nice. I did pone of these and had the same issues you did. You have an excellent result here.
G’day Tom (@tcinla),
Your build was part of my research (as your builds so often are), although I came to a different conclusion regarding the camouflage.
Thanjs for your kind comments.