1/72 Twin-Tail Beaufighter

Started by George R Blair Jr · 70 · 3 years ago · 1/72, Airfix, Alley Cat Models, Beaufighter TF.X, twin-tails
  • Profile Photo
    George R Blair Jr said 3 years, 6 months ago:

    After just finishing several kits that were a little more demanding than I wanted, I really wanted to build something fun. I like to build things that are a little unusual in some way, which led me to a 1/72 resin conversion from Alley Cat Models in Great Britain for a twin-tail Beaufighter.

    Here is the background:
    Putting more than one engine on a plane is a case of "good news" and "bad news". The good news is that you may get additional power, lift, airspeed, and so on. But the bad news is that an engine loss may lead to yaw and stability problems, especially if the engines are on the wings. When a twin-engine plane loses an engine, it immediately yaws into the dead engine. The directional control problems following an engine loss tend to be more severe the farther the engines are from the center-line. Uncorrected this yaw can lead to some rather severe problems, including loss of altitude, loss of aircraft control, death, destruction (you get the picture). The good news is that you can control this yaw and rolling tendency using the rudder and elevators. As any pilot of twin-engine aircraft will tell you, the worst time to lose an engine is when you are low and slow, such as during takeoff. At low airspeeds, the airflow over the rudder and elevators is very low, which significantly reduces their effectiveness. Because of this, engineers design the tails of twin-engine airplanes to provide sufficient control during an engine loss at low airspeeds.

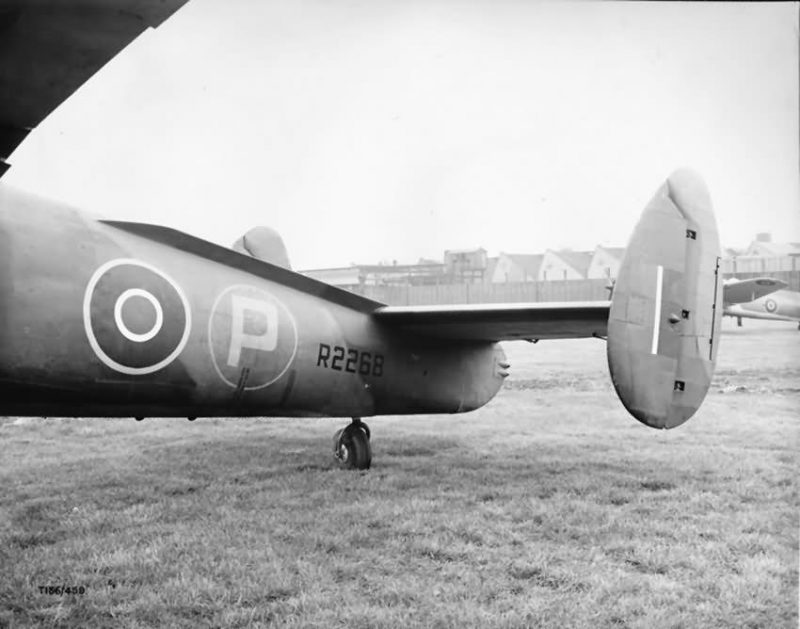
    Well, now our story shifts to the Beaufighter, which for some reason was already in production when it was discovered it had marginal longitudinal stability and poor handling characteristics following an engine loss at low airspeed. Engineers determined that a twin-tail configuration would fix the problem, so aircraft R2268 was taken off the assembly line and fitted with a twin-tail. Testing showed that this configuration would provide adequate control during a low speed engine loss, but retrofitting the existing airframes would be a difficult and extensive retrofit. Searching for a more cost-effective solution, engineers discovered that they could get the same result by increasing the area of the tailplane by 20% and adding 12 degrees of dihedral to the horizontal tail surfaces. This solution was a lot easier and more cost effective, so it was implemented on all previous and included on all newly-built aircraft.


    The Conversion:
    This conversion from Alley Cat Models is designed for the "new" Airfix 1/72 Beaufighter TF.X. It is advertised as requiring a "minimum" of cutting and fitting, and indeed, the only thing you need to cut is a small section on the aft end of the fuselage. Alley Cat thoughtfully designed the surgery to occur at a panel line, so it should be fairly simple to do. The rest of the parts are designed to be "plug and play" replacements for the kit parts. In addition to the horizontal stabilizers and the twin tails, the new parts include wheel hubs, main landing gear doors, engine exhaust collectors and exhausts, prop spinners, and a few other parts. Decals include the new registration numbers and the prototype "P" for the fuselage.
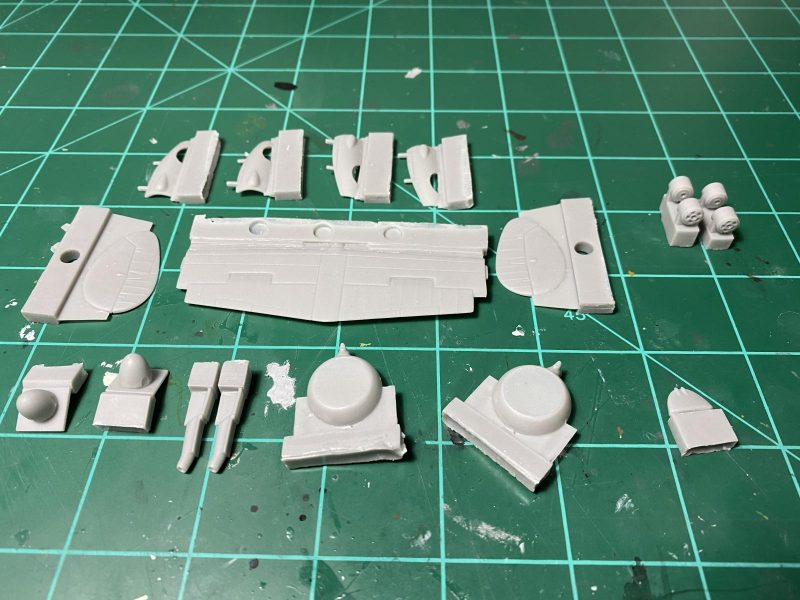
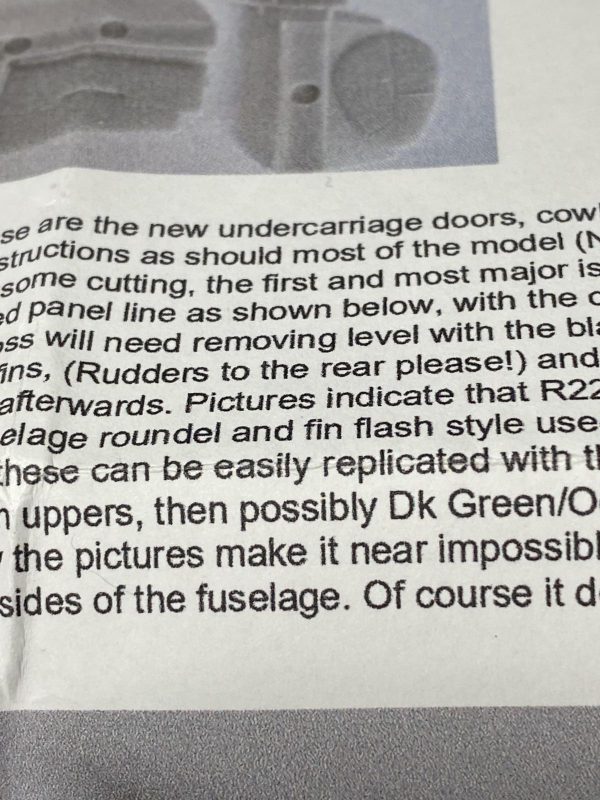
    The instructions gave me more than a giggle or two. At one point they admonish you to please assemble the tails with the rudders toward the rear. The painting instructions are also fun. They first say that the plane carried markings typical of the time period. Cool, whatever that means. They next tell you that all of the photos of the plane are in black and white, so the camouflage colors are guesswork. They say that the camouflage could be Dark Brown and Dark Green, but could be Dark Grey and Dark Green. They say it is also possible it is two-tone gray (I guess it could be a plane going to Coastal Command or Fleet Air Arm). For the belly of the plane, they say it could be gray, or it could be Sky, or it could be in yellow for testing. Basically, I think you can paint it almost any way you wish.

    I am looking forward to this build. I have heard that this Airfix Beaufighter is a straight-forward build that results in a good-looking model. I also think I have some Eduard masks and photoetch lurking somewhere that I can use for this kit. More to come.

    Everyone stay safe. Cheers.

  • Profile Photo
    Spiros Pendedekas said 3 years, 6 months ago:

    This is an extremely cool choice, George @gblair! I've never seen one built before!
    I have also heard that the Airfix kit is a nice one, so, just hoping the conversion set will present no issues!
    Eagerly waiting for your progress!

  • Profile Photo
    John vd Biggelaar said 3 years, 6 months ago:

    Great idea to build this twin tail, George.
    Also an unknown Beaufighter version to me.
    Looking forward to this build.

  • Profile Photo
    George R Blair Jr said 3 years, 6 months ago:

    Thanks, Spiros (@fiveten) and John (@JohnB). In my mind, this will be a really fun and easy build. But you know how that goes... :o)

  • Profile Photo
    Greg Kittinger said 3 years, 6 months ago:

    Oh, man-o-man - I HAVE to get me one of those conversion sets! I love the unusual stuff, and being 1/72, well, you just tempted me beyond by ability to say "no!" I'll watch you so I know what pitfalls to avoid...

  • Profile Photo
    George R Blair Jr said 3 years, 6 months ago:

    Thanks, Greg (@gkittinger). If you haven't visited Alley Cat, they have a bunch of conversions for some great kits.

  • Profile Photo
    George R Blair Jr said 3 years, 6 months ago:

    I got started on the build today. It was a little disconcerting to have three sets of instructions to work from: kit instructions, photoetch instructions, and the resin conversion instructions. The only real cutting required for this conversion is the removal of a small part of the aft fuselage, so I wanted to start with this first. Using a Tamiya scriber, the section removed quickly and cleanly along a panel line.

    Once this was done, I modified the cockpit parts for the upcoming addition of the Eduard photoetch. I also slimmed down the sides of the aft seat, which were noticeably thick.

    The last thing I wanted to take care of was the assembly of the two wing spars onto the section of plastic that forms the floor of the cockpits. The first thing I noticed about the spars was that they are both very curved, which seems sort of unusual for a wing spar. I assembled the two spars according to the instructions since I figured I could take care of the curves later. The next thing I noticed was that the two spars showed a slight twist once assembled. At this point, I'm not sure if this was due to a twist in the floor or something else.

    Well, my fun build is taking on some potential challenges, but that will be for another day.

    Cheers, and stay safe.

  • Profile Photo
    John vd Biggelaar said 3 years, 6 months ago:

    Good progress already, George.
    For sure you will fix this, just wondering how.

  • Profile Photo
    Erik Gjørup said 3 years, 6 months ago:

    Will this be the conversion where the resin parts behave better than the styrene? Airfix did have some quality issues, especially with the "Made in India" kits, but I do not recall wether that was still the case in 2015 when this kit was issued.

    Fingers crossed for a smooth sailing George!

  • Profile Photo
    Tom Cleaver said 3 years, 6 months ago:

    @gblair:

    There are two likely choices for camouflage painting: the night fighter scheme and the Coastal Command scheme.

    The night fighter scheme is overall Sea Grey Medium with a disruptive pattern of Dark Green on the upper surfaces. The Coastal Command scheme is the Temperate Sea Scheme, with Sky lower surfaces and a disruptive pattern of Extra Dark Sea Grey and Dark Slate Grey (likely what Alley Cat is talking about with "two greys").

    Interesting project. The Airfix kit is likely the best Beaufighter out there for accuracy and ease of assembly combined. (not a description you can use with the 1/48 Revell kit)

  • Profile Photo
    Spiros Pendedekas said 3 years, 6 months ago:

    Nice start, George @gblair!
    Let me risk to say that I believe you will have a smooth ride with this kit, mutatis mutandis the now multi media nature of it.
    Floor twisting and spars curvature might have to do with the softness of Airfix styrene and possible quality control issues upon molding. I hope they are not dead serious.
    Waiting for your progress upon this very nice project!

  • Profile Photo
    George R Blair Jr said 3 years, 5 months ago:

    Thanks, John (@JohnB), Erik (@airbum), Tom (@tcinla), and Spiros (@fiveten). The other "new" Airfix kits I have built didn't have any problems like this and went together very well. This is my first 1/72 kit from the new Airfix. I did notice that the plastic is very soft and these parts are very thin. The spars fit into slots in the wing, so I don't think the warp will be a problem. The twisted floor may be another matter, we'll see.

    I have been thinking about the camouflage. When you look at the photos, you can definitely see some camouflage. I think the most likely camouflage is probably either Dark Brown/Dark Green or Dark Green/Dark Gray. I would love to put a TSS on it, but I don't think that was likely. I may put a yellow bottom on it, in a nod to its prototype status.

    Everyone stay safe.

  • Profile Photo
    George R Blair Jr said 3 years, 5 months ago:

    It doesn't seem like I have much to show for 3 days of work, but most of it was spent putting the Eduard photoetch into the cockpit. It seemed like a lot of effort for just this one area, but I have to admit it looks pretty good once you close the fuselage up.


    Closing the fuselage took a little effort. The forward part of the fuselage in front of the cockpit was warped. So, basically I put some glue in the seam and then used some tape to pull everything together until the glue dried. So far, so good.

    The next item on the checklist was to add the fuselage floor and the wing spars to the bottom of the fuselage. Again, the floor was warped and had to be held in place after gluing with some tape to keep everything together. Thanks to the tight fit between the fuselage and the wing spars, a lot of the warp in the spars disappeared. There is still the issue of the wings spars having a twist in them, but I will worry about that tomorrow.


    I built the two wings, which were also warped. Thanks to the soft and flexible plastic in this kit, the warp was fixed with glue and tape.

    The last item on the hit parade today was to start removing the resin parts from their plugs. The new tail assembly was the first to receive some attention, and it fit into the hole cut in the fuselage perfectly. Yeah!

    More tomorrow, I hope.

    Cheers and stay safe.

  • Profile Photo
    John vd Biggelaar said 3 years, 5 months ago:

    The interior looks perfect, George.
    Luckily the plastic is soft enough to correct it simply, although I'm a bit surprised to see all this warping.
    The twin tail fit does indeed look pretty nice.

  • Profile Photo
    Erik Gjørup said 3 years, 5 months ago:

    Awesome cockpit!