1/72 Twin-Tail Beaufighter

Started by George R Blair Jr · 70 · 4 years ago · 1/72, Airfix, Alley Cat Models, Beaufighter TF.X, twin-tails
  • Profile Photo
    George R Blair Jr said 4 years ago:

    Thanks, John (@JohnB) and Erik (@airbum). I was also surprised by the warping in the kit. Luckily the plastic is soft, but on the downside the soft plastic gums up my sanding sticks fairly quickly. I can usually clean the plastic out of the sticks with water, but the soft plastic stays stuck.

  • Profile Photo
    George R Blair Jr said 4 years ago:

    Much to my surprise, the wings went on fine, despite the warped and twisted wing spars. I suspect the time I took to be sure the cockpit floor was clamped in place in the fuselage while the glue dried insured that the floor was flat, which, in-turn, pulled the twist out of the spars. The tight fit of the fuselage over and around the spars also reduced the warp in the spars to a usable level. Yeah!

    2 attached images. Click to enlarge.

  • Profile Photo
    Allan J Withers said 4 years ago:

    Looking good George, luckily I had no such problems with mine !

  • Profile Photo
    George R Blair Jr said 4 years ago:

    Thanks, Allan (@kalamazoo). I have built other kits from the newer Airfix molds, and they were fine. I think this one was pulled out of the mold too quickly, but it is going together well despite the warps.

  • Profile Photo
    John vd Biggelaar said 4 years ago:

    Good to see that this wrapping seems to cause no issue for the end result.
    Must indeed have something to do with production since other kits do not suffer from this.
    With the wings on the beauty of this planes starts to show.

  • Profile Photo
    Spiros Pendedekas said 4 years ago:

    Glad to hear all is well, George @gblair!
    Those warped parts kind of twist and bend and finally bed into place.
    Love the cockpit!
    Was it an India made kit?

  • Profile Photo
    George R Blair Jr said 4 years ago:

    Thanks, Spiros (@fiveten). I didn't find anything to indicate that this particular kit was made in India, so I think it is just that my karma was out of sync with the universe when I grabbed this box off the shelf.

  • Profile Photo
    Louis Gardner said 4 years ago:

    Hey George ! @gblair
    This is a great conversion, and I'm very impressed with the work you have done so far. I think you are on track with your color choices, especially the yellow lower color. Here is a color chip chart showing most of the RAF colors in use during this time.


    I found this online a while ago when I was building multiple Spitfires for the 100 Years of the RAF group build that our dear friend Paul Barber hosted. There's a small number on the bottom right hand corner that is supposed to be the closest FS color standards matching number. I have a FS color chip book, so if you want me to scan anything for you, please don't hesitate to ask.

    For me, doing the research and finding out the history behind the men and the aircraft they flew is just as much fun as the actual building process.

    I'll be watching, and I hope this color chart is of some help for you somewhere along the way. It's also nice to have it as a reference for future RAF builds too. Take care my friend and stay safe.

  • Profile Photo
    George R Blair Jr said 4 years ago:

    Thanks, Louis (@lgardner). I appreciate the handy color chips. Like you, I also have an FS color chip binder. I think you have to be a certain age to have the whole range of FS chips in printed form. I remember a few decades back when FS numbers first hit the model world, and it was the hot thing for a while. It seemed like a handy thing to get at the time. Back in the days before computers were everywhere, you got these kinds of references in printed form. Now everyone just hits the internet for info. Speaking of the internet, I found a good website that seems to have some pretty good color info: http://www.theworldwars.net/resources/resource.php?r=camo_rafww2

  • Profile Photo
    John vd Biggelaar said 4 years ago:

    Thanks for sharing this interesting website George @gblair
    Very helpful to have all those corresponding numbers of each brand combined in an overview.

  • Profile Photo
    Erik Gjørup said 4 years ago:

    George (@gblair), I did a half-hearted attempt to check online wether this particular kis is of the Indian production, but no luck. I have recently acquired a 1/48 Tiger Moth for a friend, and it says on the long side of the box, in very small lettering "Made in India". At least in europe you have to state where your product are made, and that also makes it a lot easier to determine what kit is used to rebox, like when Revell states that a MiG-29 is "Made in Russia" it will be a reboxed Zvezda. All that said, I do think Hornby Hobbies have made a great effort to mend the Indian production in later years and with great success. Your kit was made in 2015 I think, and if Indian-made that may be just around when they made the turnaround.

    And with that, I am enjoying the usual deep and thorough detective work to determine the historically correct colors by you and "the team".

  • Profile Photo
    George R Blair Jr said 4 years ago:

    Thanks, Erik (@airbum). I looked at the box and didn't find anything that would indicate where the model was manufactured. I am having all sorts of problems that can be traced back to some quality control issues.

    Thanks, John (@JohnB). I use this website fairly often. It seems to be well-organized and has the info that I use most.

  • Profile Photo
    Greg Kittinger said 4 years ago:

    Beautiful cockpit details, especially for 1/72! I generally shy away from spending so much time on PE that will be hard to see, but I gotta hand it to you for the patience and result you got from the effort!

  • Profile Photo
    George R Blair Jr said 4 years ago:

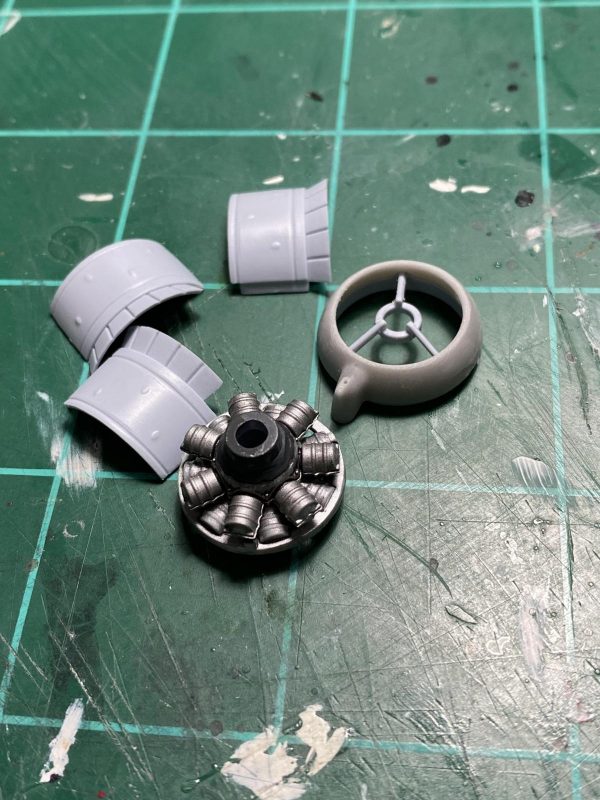
    Today was one of those semi-catastrophic days. Things were going well and it was time to assemble the engines and nacelles. The circumference of the nacelles is made up of three different parts, each being 1/3 of the nacelle. These, in turn, attach to the front of the nacelle. The kit nacelle front piece is replaced by a resin piece from the conversion set.

    The problem came up when I went to the sprue to gather the 6 pieces needed to form the two nacelles. Sadly, there were only five pieces on the sprue, and a big empty spot where the last part should be. I searched the box, and the plastic bag the parts were in, and the part was still MIA. I did a thorough search around my workbench and didn't find it. When I am working, the sprues are never anywhere except the box until I cut a part off, and then they go back to the box. It is possible that I mislaid the part, but I suspect that the part was never in the box. In any case, I went to the Airfix website to find a statement that do not have spare or replacement parts for any of their kits. Plan A down the drain. On to Plan B: see if I had another nacelle that I could use. In my stash I discovered a Mk X by Hasegawa, a Mk X by Revell, and another Mk X from Airfix. The simplest solution would be to rob the needed part from the Airfix kit, especially since the nacelles from the other kits would require some work to get them to fit the Airfix kit. I hesitate to pull the trigger here because the donor kit becomes a box of spare parts as soon as I steal something from it. Gonna need to think about this for a bit.

    Cheers, and everyone stay safe.

  • Profile Photo
    Louis Gardner said 4 years ago:

    George, @gblair
    Can you use the one from the other side as a master to make a mold from ? Then possibly you could cast a resin replacement ? Or could you possibly scratch build a new one ? Try the method I used by breaking it down to smaller parts. It seems to work.

    Please keep us posted. What a bummer... 🙁