One of the venerable Roden kits in 1/72. That's correct: 1/72, the 'gentleman's scale'.
I don't know of any other firm that would produce the complete range of these iconic WW1 bombers in this or any other scale, from the I to the V. This kit is 'mid-series', being the Gotha II/III. I'm modelling the III. I don't know why; it's a complete pain, and there are many, many more modelling choices available for the era. Every day I think I'll call it a day and do something more useful with my time, but it's like one of those dexterity tests that you're sure will get better if you only stick with it.
Hippo produced a reasonably nice Gotha in 1/48 (can't recall which one of the series), and AZ Models took the moulds and improved a few things, but these are hard to come by now. Not sure why. I never see any of them built or for sale, so presume they're languishing in stashes.
Of course there's always WnW Gotha IV if you want to drive the deluxe model out of the showroom, but even this is hard to find, BIG and dreadfully expensive. So, in view of these issues, I bought the Roden kit from Poland, and with it the PART etch set of the Gotha II/III (PART produce a set of each of the Roden series.). The two together were only £30.
Here's the PART set.
And some of the interior items. All very nice. Only a handful I won't use, as items that are out of sight or otherwise too inconsequential to register as an improvement to kit parts. I used the Eduard coloured etch belts as I had a set to hand.
The kit itself has a few items not in use for either the II or the III versions, including a set of wheels of marginally smaller diameter than used in the II or the III, and the PART set has wheel spokes, also not in use. I decided to make a dolly of the sort I'd seen in photos, that was in place to the rear of the aircraft to help shift it on the airfield. I cored the wheels and fitted the spoked centres, and made the rest from stock spares.
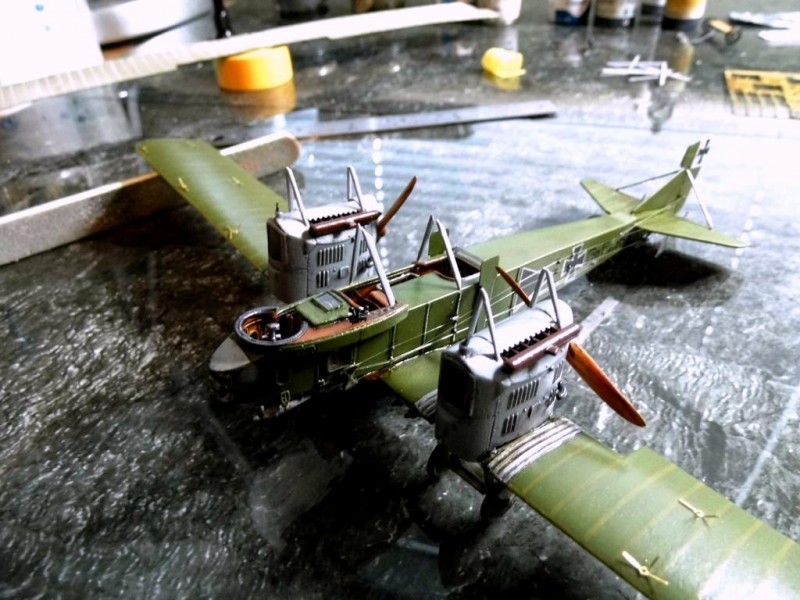
Pretty happy with the props. Laminations look acceptable in 1/72.
Even in 1/72 it's a big kit. Here's the top wing, and a little detail added to the gravity tank, for interest.
Looking down into the fuselage. The PART items really set it off. There's a central section attached beneath the fuselage to which the engines are attached with two tiny nubs. The outer sections of the lower wings then are attached to the other side in the same way. Stupidly fragile, and no real room to drill to set strengthening rods
And below stairs. Quite decorative, really. The bits along the edges, that's my blood, sweat and tears...
I should mention the decals. Roden is notorious for poor quality decals, and some modellers simply throw away the kit decals and order new aftermarket selections from the off. I brushed a thin coat of Future over the printed decal areas, let them dry thoroughly, then soaked them in warm soapy water for a minute or two and 99% behaved perfectly, but for the top wing crosses which split as soon as they touched the water, but were salvageable with care. I used three different sorts of softening solutions, and none of them touched the decals. It's odd, seeing how fragile they are, you'd think they'd melt into place. In the end I used malt vinegar.
I may post something again as WiP or just directly on to Headlines as completed project. That said, if you never hear anything further about this, you know why.
Well, back again.
A slightly better shot of the dolly, which shows the platform as wood. It is in fact a small piece of veneer used for WW2 era ships' decks.
I’ve set the various windows in place - two either side of the forward observer/gunner position and one in the cowling just before the pilot’s position. They’re acetate with PART frames.
I've now managed to complete the fuselage rigging, which leaves me free to install the props and get that out of the way. Because of the scale the rigging material will be left as-is, without being highlighted with paint.
The props now in place.
The undercarriage has the typical "X" of rigging to the front of each unit, now complete.
The PART set includes some nice turnbuckles. I had to have a closer look to confirm the apertures were large enough to accept the rigging line, as the buckles are very small items indeed, and they look OK to me. The next step is to get them all in place on the wings before the top wing is set. I won't paint them until the end. No matter how careful one is, there's always a tiny drop of paint that finds its way to the most inconvenient place and makes harder work of the rigging process.
The various struts have been removed from the sprues and prepped. Here are the 12 main struts primed and with a coat of grey enamel. Very small and very fragile!
I still have the two Parabellums to make up from the PART etch set. I have another set from Tom's Modelworks that are virtually the same, but I'll continue with the PART items while I'm waiting for the struts to dry.
You may be able to tell that I'm relentlessly picking off all the miscellaneous items, leaving finally the top wing to set and the rigging to complete.
The PE Parabellums here. Quite the intricate exercise, having spent the whole day with them. Bearing in mind they're 1/72 they've come up pretty well.
After pondering these turnbuckles a few days, I decided to make a start. The main buckles have an aperture that should match the holes for the main struts. Not entirely sure how user-friendly these will be in practice, but as can be seen here those for the underside of the top wing are in place. I'll set the rigging lines to them ready to fix the whole wing in place, and the buckles for the lower wing have been placed to mirror those of the top wing.
I've now placed the various cabane struts. The kit instructions for placement are a little vague, as well the angle of incline (or not) they're supposed to have. All I can do is measure the distance between strut anchor points on the underside of the top wing and set the struts accordingly. I have a Datafile on the Gotha, which has been useful at critical points of the build, but this particular area isn't well represented in archive photos.
The engine struts lean in to anchor at single points in the top wing, while the fuselage cabanes have a small gap between them in each pair. This means that instead of having 12 separate strut ends to set to the top wing, there are only eight in practical terms because of the lean factor.
-
And here with all struts in place. In the end I removed the engine struts and set the top wing with the main fuselage cabanes, as there was too much 'drift' in getting the wing squared. However, although I'd braced the top wing and it looked perfect, the next day, when time came to install the 12 main struts, the right side of the model was literally adrift by 3-5mm. This doesn't sound like much but it's hard to correct, and peculiarly by appearances at most angles it only affected the one side. I then reinstalled the engine struts, having now to make allowances for the right side issue. Actually, looking down on the model it looks fine; it's just at that dead-on front view the issue becomes more apparent. Still not quite sure what happened, but it's a big floppy model and I'm lucky that's all that's come up, I guess.
I managed to knock loose one or two of the etch buckles, but I had anticipated a degree of this sort of thing. I said I'd give an opinion about these, not having used them before. They in fact work pretty well. I haven't as yet strung the top lines through to the lower wing buckles etc., but at present they look OK. The only thing I can think of now is that in adjusting the angles of the buckles that the etch gives way at the bend of the buckle. Also, I'd suggest removing the kit protrusion at anchor holes first, as these imitation metal fittings protrude too much and prevent the etch from settled flat against the wing surface, which would lead to having to adjust the strut lengths.
This is probably the last WiP post. I have to complete the rigging and touch-up the paint, but hopefully a straight forward job.
Thanks for looking!