Lockheed T-33A

Started by Michael Turner · 55 · 6 months ago · 1/48. Testors, Hawk, Lockheed, T-33
  • Profile Photo
    Michael Turner said 10 months ago:

    My model club has an annual "Build a B@#$" competition and this is the kit that I drew out of the hat.

    It is the 1/48 Testors/Hawk Lockheed T-33A.

    The competition rules state that it is an out of the box build - lost panel lines can be re-scribed and aerial wires added, but no other modifications. Kit decals must be used unless they are beyond use, in which case an alternative can be sought for the same scheme.

    Fortunately, the kit decals look good, although I may mask and paint some parts instead.

    The side of the box shows a couple of novel features.

    Firstly, the canopy is able to be opened and closed.

    Secondly, the rear fuselage detaches and the jet engine can be removed and placed in a stand.

    You can also see that it is advertised as being 1/4" Scale - 1 inch = 4 feet.

    Looking at the inside of the starboard upper wing, the mould was originally produced by the Hawk Model Co in 1964, which makes it older than me by a couple of years.

    The instructions are very old school.

    Colour call-outs are generic and minimal with no overall colour being specified. It seems that it is intended that the silver plastic serve as the aircraft finish. I'll be painting this one Aluminium, though.

    I've already taken many of the parts off the sprue and test fitted and cleaned up some of them.

    Naturally, the panel lines are raised, but the control surface edges are nicely recessed.

    The fit of the parts is actually quite good, although there will be a centreline seam to deal with.

    The canopy is commendably clear and distortion free.

    Cockpit detail is minimal but instrument panel decals are provided, if a bit low resolution.

    Most of the cockpit will be filled with the pilot figures, anyway.

    There is even a ground crew figure.

    The wheel wells are open and the entire fuselage will be see through.

    Being out of box, I will have to live with that.

    There were some circular mouldings around the edges of the main landing gear opening that seemed to be there to allow for the doors to be closed, although not mentioned in the instructions. I removed these as I will be building it gear down.
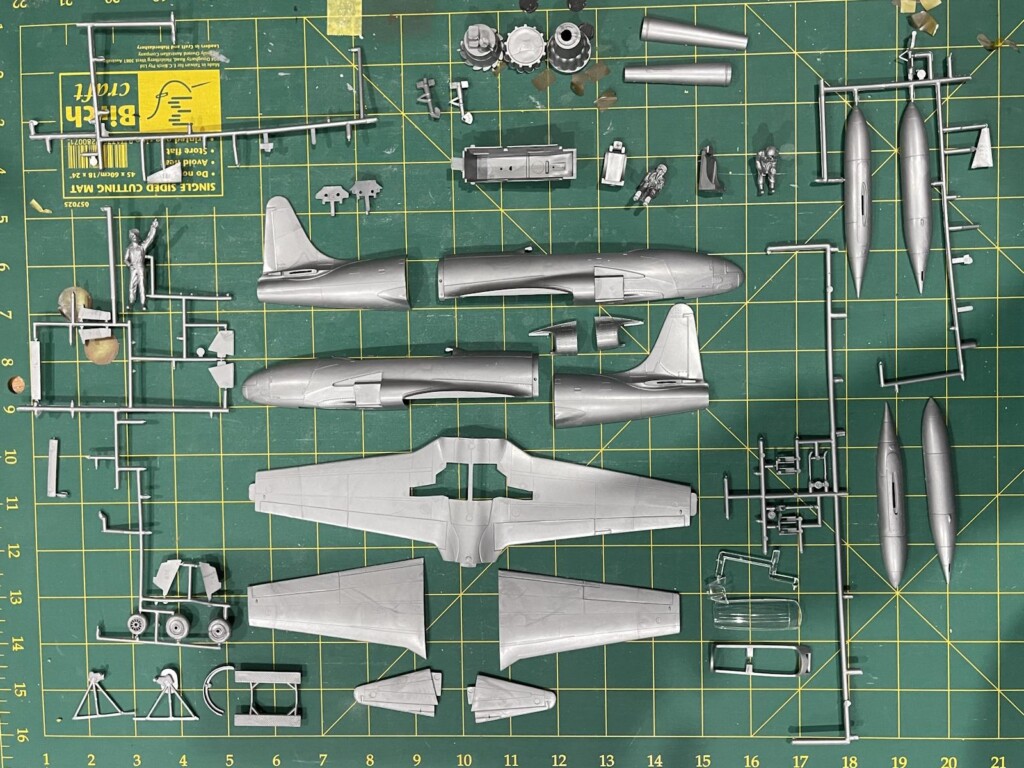
    You can see from the following pics that there are ejector pin marks galore on the outer surfaces of things like the lower wing and landing gear covers.
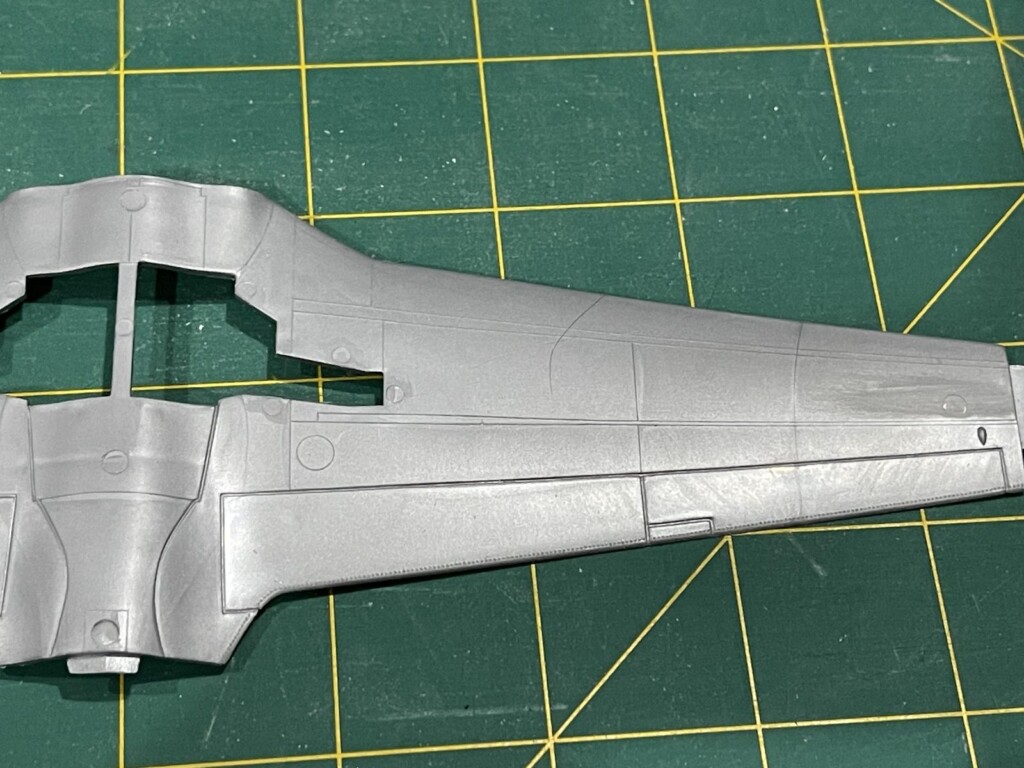
    There are also a few sink marks on the fuselage parts.

    I hope that I can build this without deleting too many of the raised panel lines or other detail.

    All in all, this will be an interesting build.

  • Profile Photo
    Jay Mitchell said 10 months ago:

    It’ll be interesting to see this one built, I have a chrome plated version on this kit. I’m undecided about building it or not.

  • Profile Photo
    Spiros Pendedekas said 10 months ago:

    Great entry, my friend @michaelt! Yes, the kit is old school and it shows, however building such kits can be a pleasant experience. Thanks for the detailed kit info. Looking forward to your progress!

  • Profile Photo
    John vd Biggelaar said 10 months ago:

    This is definitely an oldie, Michael @michaelt
    Quite a lot of corrections required but definitely doable.
    You will turn this into a beauty.

  • Profile Photo
    Michael Turner said 8 months, 3 weeks ago:

    So, I have been doing a bit of work on this over the last few weeks.

    First: The cockpit. It is very basic, as to be expected, and the instrument panels are flat with very low resolution decals. Fortunately, the lack of detail will be hidden by the aircrew.

    A lot of effort is still required to eliminate the seams.

    The plastic is hard and shiny, which means that putty does not stick to it and sanding can be a bit rough.

    I used sprue goo initially, which worked OK but left tiny air bubbles, hence the need for putty.

    It looks worse than it is, though.

    And the tail, including the ejector pin marks on the underside of the horizontal tail.

    I thought I'd done a good job eliminating the ejector pin marks under the wings until a coat of paint revealed how bad they were.

    The engine comes with a cradle.

    Finally the wing tip fuel tanks.

  • Profile Photo
    Spiros Pendedekas said 8 months, 3 weeks ago:

    Excellent job on this challenging kit, my friend @michaelt!

  • Profile Photo
    John vd Biggelaar said 8 months, 3 weeks ago:

    Very good progress, Michael @michaelt

  • Profile Photo
    John Healy said 8 months, 3 weeks ago:

    Nice work on this. Hawk made some cool kits back in the day. Their factory was in Harwood Heights, Illinois, close to where I grew up. Just a little east of O’Hare airport.

  • Profile Photo
    George R Blair Jr said 8 months, 3 weeks ago:

    Looks great, Michael (@michaelt). I suspect many of us have built this kit more than once during our modeling lives, and I still have at least two in my stash. With a little TLC it will build into a really nice model, especially if you do a little scratchbuilding here and there. Looking forward to watching your magic on this geriatric kit.

  • Profile Photo
    Michael Turner said 8 months, 3 weeks ago:

    G'day George (@gblair),
    The build is strictly OOB (depending upon your definition) as I said above.
    We had a clarification of the rules recently, but I can't remember if the arial wires are part of them.
    No scratch building/modifications allowed.
    Some magic might come in useful, though. 😊

  • Profile Photo
    George R Blair Jr said 8 months, 3 weeks ago:

    I think you can get a good model even OOB, Michael (@michaelt). The basics are there, but it looks like there is a lot of filling to do. As I recall, the worst area was the intakes. Hopefully you can use some newer decals. It's looking good.

  • Profile Photo
    Michael Turner said 8 months, 2 weeks ago:

    The wings are attached and all the seams and sink marks more or less delt with. It just needs a little more work in the wing roots. I'll live with the forward wing/fuselage join as it is.


    The rear fuselage/tail is good now, too.

  • Profile Photo
    Michael Turner said 8 months, 2 weeks ago:

    I added about 12g of lead sinkers in the nose so that it won't be a tail sitter. I've lost some of the raised panel lines with all the sanding of the seams but I have a plan to hide this by painting different shades of silver.

  • Profile Photo
    Michael Turner said 8 months, 2 weeks ago:

    You can probably see that I've already spayed the interior of both pieces silver.

  • Profile Photo
    Spiros Pendedekas said 8 months, 1 week ago:

    Great progress, my friend @michaelt!