ProModeler (Monogram) PBY-5A
I'm posting this old (2005) review from Modeling Madness as encouragement for the Midway Group Build.
With more than 4,000 of all versions produced over eight years, the Consolidated PBY Catalina easily qualifies as the world's most successful flying boat. Seventy years after its first flight, 20 Catalinas still fly as fire bombers in North America, and several others are now restored warbirds.
The Catalina was the result of a 1933 Navy specification for a long-range patrol bomber to succeed the Consolidated P2Y-1 and the Martin P3M-1 flying boats which had entered service in 1931. These two types suffered from being underpowered, while their range and payload were insufficient for the job of maritime patrol in the Pacific, where the Navy saw its most likely war happening.
Consolidated responded with the XP3Y-1, a development of the XPY-1, that had been unsuccessful against the Martin P3M, and the XP2Y-1, which had received a limited production contract. Douglas Aircraft responded to the specification with the XP3D-1, which lost out to the Consolidated design on the basis of cost, with the P3Y projected to cost only$90,000 per airplane.
Known as the Model 28 within the company, the XP3Y-1 was a revolutionary design compared to what had gone before. The parasol wing was an internally-braced cantilever structure that only required four bracing struts. The wingtip stabilizing floats were retracted in flight to become the wingtip, while the wing structure could carry gasoline sufficient to provide the long range required. Rather than use the two rudder design of the earlier Consolidated design, the P3Y had an internally-braced single rudder. With these aerodynamic clean-ups, the XP3Y-1 provided superior performance to any other flying boat the Navy had used.
The XP3Y-1 made its first flight on March 28, 1935. After manufacturer's trials were completed, it was transferred to the Navy for service trials, where it demonstrated significant performance improvement over the currently-operational aircraft. In October 1935, the prototype returned to Consolidated to be modified to meet the newer patrol-bomber requirements. With 900 h.p. engines replacing the 825 h.p. powerplants it originally flew with and redesigned vertical tail surfaces to increase directional stability, the protot6ype was redesignated XPBY-1 and made its first flight on May 19, 1936, during which it established a record non-stop distance flight of 3,443 miles.
VP-11F was the first patrol squadron to equip with the PBY-1 in October 1936. By 1940, PBYs equipped all patrol squadrons of both the Atlantic and Pacific fleets. That year, the definitive PBY-5 with 1,200 h.p. engines and increased defensive armament of two 50-caliber machine guns in bulbous blister housings entered service. the next year, the PBY-5 was further developed into the PBY-5A, which included a retractable tricycle landing gear so the flying boat could operate from both land and sea.
The PBY Catalina first gained fame when a Catalina II operated by RAF Coastal Command found the German battleship “Bismarck,” which had recently sunk the battle cruiser “Hood” and heavily damaged the battleship “Prince of Wales.” Finding and shadowing the “Bismarck” gave the Royal Navy the opportunity to bring together the ships that would eventually sink the German behemoth.
PBYs were ubiquitous in the Pacific following the attack on Pearl Harbor. By May 1942, Naval intelligence had determined that the Imperial Japanese Navy was going to attack the island of Midway in early June. Several patrol squadrons were dispatched from Hawaii to Midway, to increase the aerial search capability for the coming battle. One of these squadrons was VPB-44, which arrived at Midway the night of May 22-23. The next day they commenced exhausting 700-mile, all-day searches, which covered a semicircular area extending from due North through West, to the South of Midway. None of the squadron's Catalinas had the new air-search radar that had begun to equip other patrol squadrons.
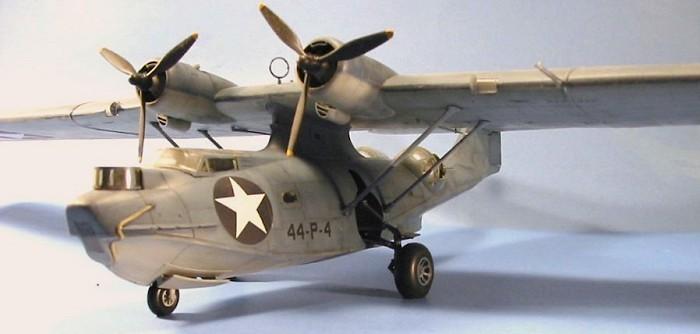
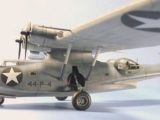
On June 3, 1942, Ensign Jack Reid was flying Catalina 44-P-4 on a west/southwestern search leg. Since arrival at Midway, other PBYs had run into Japanese “Mavis” patrol bombers from Wake Island. An aggressive pilot, Reid and his crew had "requisitioned" some armor-piercing 50-caliber bullets from the B-17s on the island, in hopes of shooting down any Mavis they came across. Coming to the end of the search leg, Reid and navigator Robert Swan decided to push the search a few miles further west. Suddenly, far out on the horizon, Reid spotted the wakes of ships in the pre-dawn greyness. He turned to co-pilot Gerald Hardeman and asked Do you see what I see?" Hardeman looked out and replied, "You're damn right I do."
Crew 4 had just found the Japanese invasion force, composed of transports, destroyers, and cruisers. While the fleet looked impressive to a PBY pilot, it was not the carrier striking force. Not knowing this, Reid promptly radioed Midway "Sighted Main Body. Bearing 262. Distance 700."
Midway responded: "Amplify." Reid dove low, assuming the Japanese would have air cover, and turned north for 15 minutes. He then turned west for 10 minutes, until he figured he was behind the enemy fleet. Taking advantage of thin cloud cover, Reid gained enough altitude to identify what he believed were two small carriers and other ships. Reid and his crew were unaware this was a separate task group from what they had first spotted. After sending this information to Midway, he was ordered to return, two hours after his initial contact report. Even though he hadn't sighted the main force, Reid had made the first sighting of Japanese ships sent to attack Midway. The B-17s at Midway were sent to bomb the invasion force, and the most important battle of the Pacific War began.
The kit
When Monogram released their PBY-5 Catalina in 1994, it was in response to expressed desires by modelers in many annual surveys of “most-wanted kits” in Fine Scale Modeler and other magazines for an accurate 1/48 scale PBY. As with almost every other kit manufacturers are dumb enough to release in response to such surveys, the kit promptly became a shelf-sitter. “Too big,” said many. “Not enough detail,” said others. “The tail's wrong,” cried others.
The truth is, the Monogram Catalina does have the rear fuselage wrong, for those who worry about such things, but most modelers weren't aware of the problem until it was brought up by those who enjoy going to model shows and saying “Eeewww, you built one of those?” (It's also interesting to note how many of these types never seem to get around to actually ever building a model of anything - let alone what they're criticizing -themselves.)
Two years later, Pro-Modeler released the PBY-5A amphibian version, priced a few dollars more than the original flying boat kit. It too sat on store shelves and gathered dust.
Right around that same time, Mike Belcher, responding to the complaints about the tail, released a resin correction set that got the “pinched-in” look of the rear fuselage right. Not only that, he released sets that would allow a modeler to create the early PBY-1 through PBY-4 flying boats with their different-shaped rudders and lack of bubble gun blisters, and also the ultimate PBY, the PBY-6 with its taller tail and different horizontal stabilizers. Additionally, Eduard released a photoetch detail set for the cockpit and gun positions, while Pro-Modeler released a decal for a wartime USAAF OA-10A and a postwar USAF OA-10A in the attractive postwar rescue scheme. Additionally, Yellowhammer Decals did a sheet that included Jack Reid's famous Midway PBY.
And still this kit sits there. I think in the past decade that they've been out, I have seen maybe three of them built and displayed at shows. Which goes to show what happens when model companies listen to modelers - one can cite both the Ju-52/3m that Monogram released shortly after the PBY and the RA-5C released by Trumpeter earlier this year. “Give the people what they want” and they'll blame you for it.
Having found the ProModeler PBY-5A at a shop where the owner was happy to cut the price to get rid of it, I was also able to pick up Mike Belcher's corrected tail set at a show. When a friend was willing to swap me the Yellowhammer sheet with Reid's airplane, it was time to consider taking my own advice about building the kit.
One thing that all modelers have complained about with the amphibious PBY is that with so much model aft of the main gear, getting enough weight into the forward fuselage to insure nose sitting without breaking the scale-size plastic landing gear is a major undertaking. This is even more true for anyone who uses the Belcher Bits tail, since it is heavier than the relevant section of the plastic kit, even if a modeler takes the time to dremel the parts thinner to save weight. In my model, the only place inside the fuselage that is not filled with weights is the pilot's cockpit. The navigator's position in the nose and the forward cabin are filled to the brim with fish weights. And even with all that, if I tilt it back on its tail it will sit there, and it will tilt all on its own on any surface that isn't absolutely flat. However, with the model having been in existence now since 2001, I can report that the gear is fully capable of supporting all that weight, though the model has spent most of that time hanging on a wall, which does not put as much strain on the gear. (Nowadays - 2017 - you can get white metal gear from Scale Aircraft Conversions that will help with supporting the weight - I can report the model still sits OK on its plastic gear)
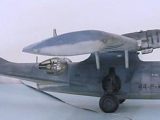
Other than cutting off the tail and attaching the Belcher Bits conversion - which looks much more like the rest of the kit if you take the time to use a pounce wheel to scribe in the rivet detail the rest of the fuselage has - there is no difficulty in assembling the kit. I assembled the fuselage and tail as one sub-assembly, and the wing as another, to be joined together after the model was painted. The only thing I had to do to create Reid's airplane was leave off the ASB yagi antennas and fill in the mounting holes on the lower wing surface. I also glued a cut-up metal coat hanger to the inner surface of the upper wing to prevent sag over time, since the wing is assembled in several parts.
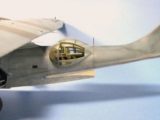
Having managed to sacrifice one of the mounts for the Eduard gun shields to the carpet monster, I was left with the decision to use the kit-supplied part, which is not so detailed but is OK.
Painting:
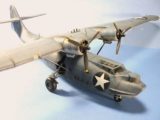
The model was painted in the early war Blue-Grey and Light Grey scheme, using Gunze-Sangyo “Blue Grey” for the upper color and Gunze “Light Gull Grey” for the lower color. I did extensive pre-shading and post-shading to both colors, because the last thing one wants with a model this size is the monochromatic look of acres of one color only. Having been around flying boats during my own naval career, I know the damage salt water does to even the most well-maintained airframe, so weathering it out with sun-fading and salt water residue on the lower surfaces gave it an accurate look. The job was time consuming mostly because of the acreage of surface to cover.
The Yellowhammer decal sheet came with the oversized national insignia, the squadron markings, and the various bits of stenciling, and went down without problems with liberal applications of Micro-Sol.
After washing off dried decal setting solution, I gave the model a coat of Future, then began applying several coats of thinned Dullcote to get the kind of flat finish an airplane operating under a tropic sun in a saltwater environment ends up with. When this was done, I applied heavy exhaust residue with Tamiya “Smoke.” I then attached the landing gear. I decided to attach the wing to the support pylon with slow-curing cyanoacrylate glue. The struts were attached with Pro-Weld.
The Catalina was big, slow and ungainly, but big, slow and ungainly is as big, slow and ungainly does. The airplane had a significant combat record second to none in all theaters of the war in the roles of fleet reconnaissance, search and rescue, anti-submarine warfare, and night attack of surface ships.
I have a personal connection to the Catalina, inasmuch as I grew up with my father alive and at home after the war, due to the fact he was rescued by a Catalina after three days adrift following the sinking of his radar picket destroyer by the kamikazes north of Okinawa in 1945.
Absolutely STUNNING. Well done Tom. Always very informative as well.
This is outstanding Tom. Very realistic. It actually supplies answers to some of the weathering questions on the Midway thread too!
Great job on the big Catalina, Tom. Thanks for showing the way on this model, so others may be inspired to give-it-a-go.
Tom, great work, at my local club I've seen one built since it came out.
What is that rope hanging off the bow? Something to do with morring? Hey, I was Army, we're not the technical branch.
Love the comments about if you make it, they will buy it. Or nit pick it to pieces. I also agree the loudest critics rarely, if ever, build anything. It takes all kinds, I suppose. We had a resident "expert" in my IPMS chapter that we told not to come back. For us, that was pretty extreme.
Also, I have always wondered about interior colors. Best I can figure, darker green in the areas exposed to sunlight, ZCG elsewhere in the hull.
Am I close?
For the PBY, like the B-24, the interior is a Bronze Green, closer to a "Medium Green."
Yeah, the rope is for mooring.
Thanks Tom...Now I gotta pull out my PBY-5 and start that...
Seriously, excellent job and she looks awesome! Another quality result from "Tom Cleaver Productions"
It's worth getting the resin tail, the result looks very different. I really don't know how Monogram - which was traditionally very good at getting shapes right - missed that.
I've got a Catalina hanging from the ceiling (don't recall if it's the ProModeler version). So tell me...just how much of the tail section was removed and replaced with a 'corrected' one? Nice job, by the way.
From just ahead of the vertical fin
Very nicely done Tom.
Nice job Tom
You must have been reading my mind Tom... Thanks for sharing this with us. I was doing some online research yesterday about the Cat's at Midway, and ran across this article at Modelling Madness.
You pretty much answered all of my questions. Thanks again.
So I took the bait... Check out the Midway Group Build.
Very nice Tom. i was more than happy to build the Revell/Monogram 1/48 PBY-5A Catalina. Made it an RCAF aircraft festooned with antennae and representented the aircraft P/9754, 162(BR)SQN. flown by RCAF pilot Flt.Lt David Hornell V.C.(Posthumously) against U-1225. To solve the weights problem, she's a wheels up dangler and like you say, I can live with the tail though I did give a serious look at the replacement
Nice Job Tom
Your article convinced me to built my PBY-5A bought long time ago)
And I have just ordered Belcher s tail correction set from Ultracast.
Thanks
I STRONGLY URGE that you dremel out the tail and remove about half of the (very thick) resin - it will be well worth all the time you took to do it.
Nice build - looks nicely weathered. I've got several cats in the stash (smaller scale), but this little poke may make be pull one out and add it to the 2017 build list.
Outstanding work, Tom. The weathering and finish are superb.
Hello Tom,
Nice job on the Cat. Interesting story and lots of info concerning the tail-bit. You did put a lot of time in it, but I appreciated the completeness of it all.
Regards, Dirk / The Netherlands.