Zoukei-Mura H0-229 Completed
This article is part of a series:
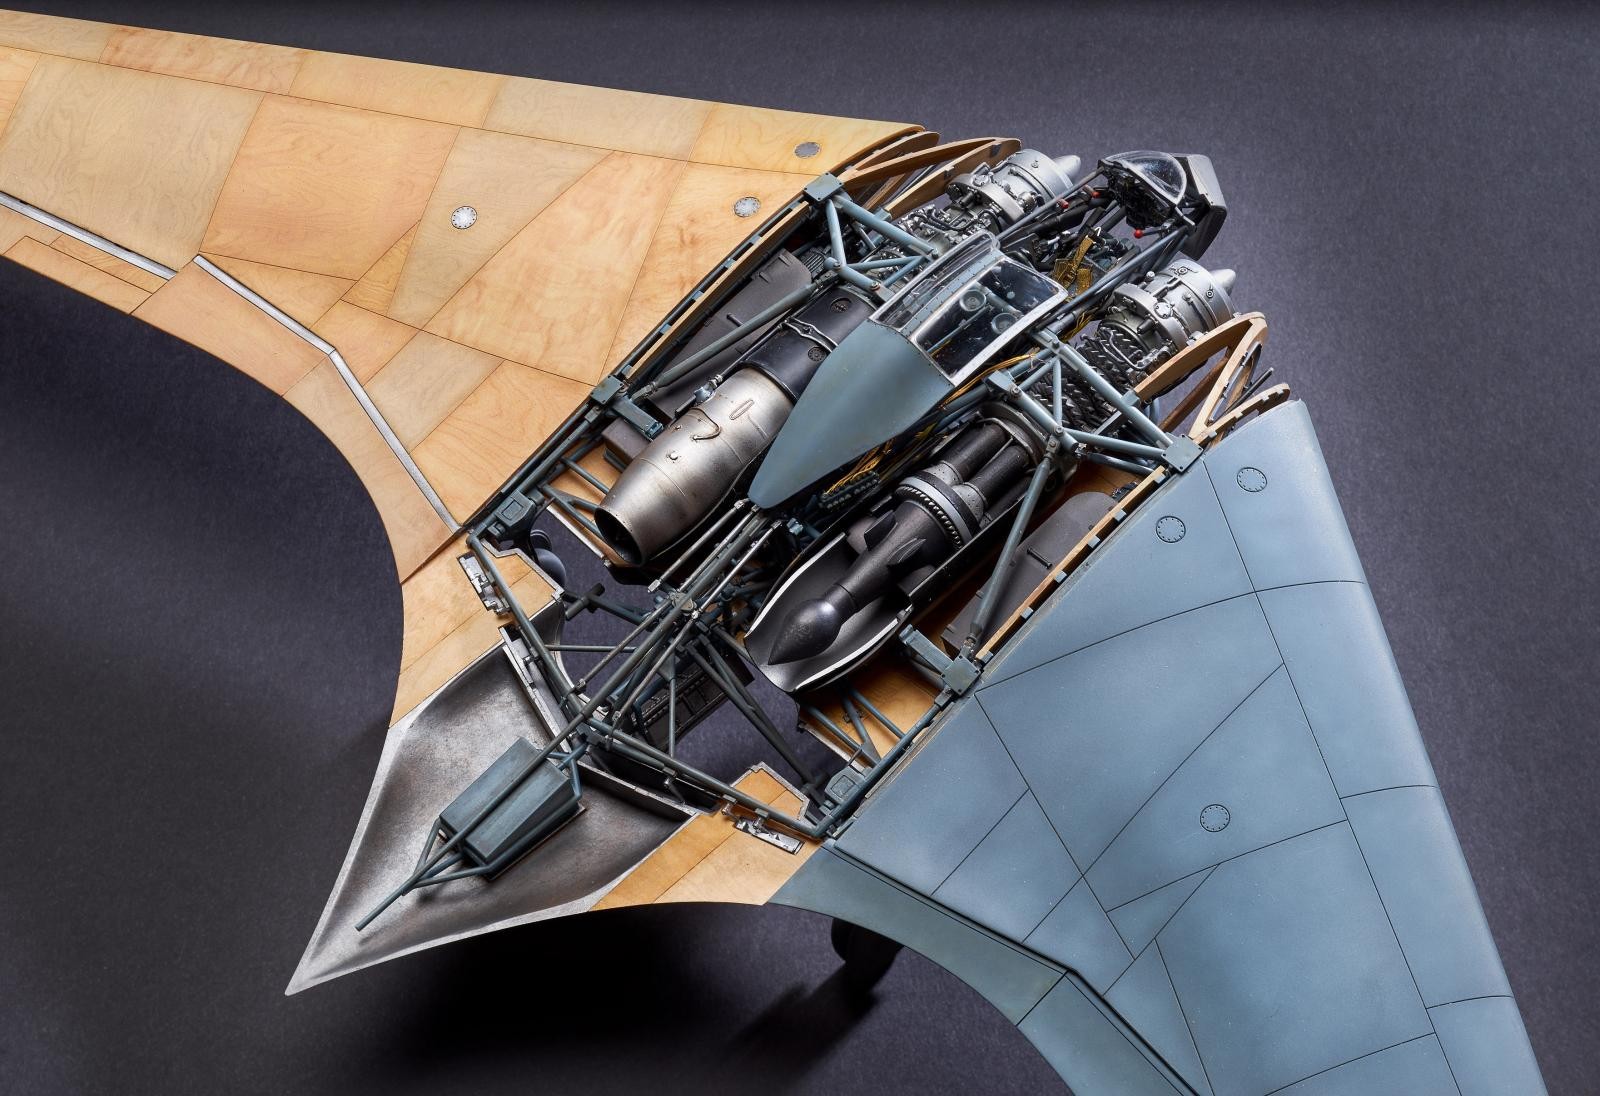
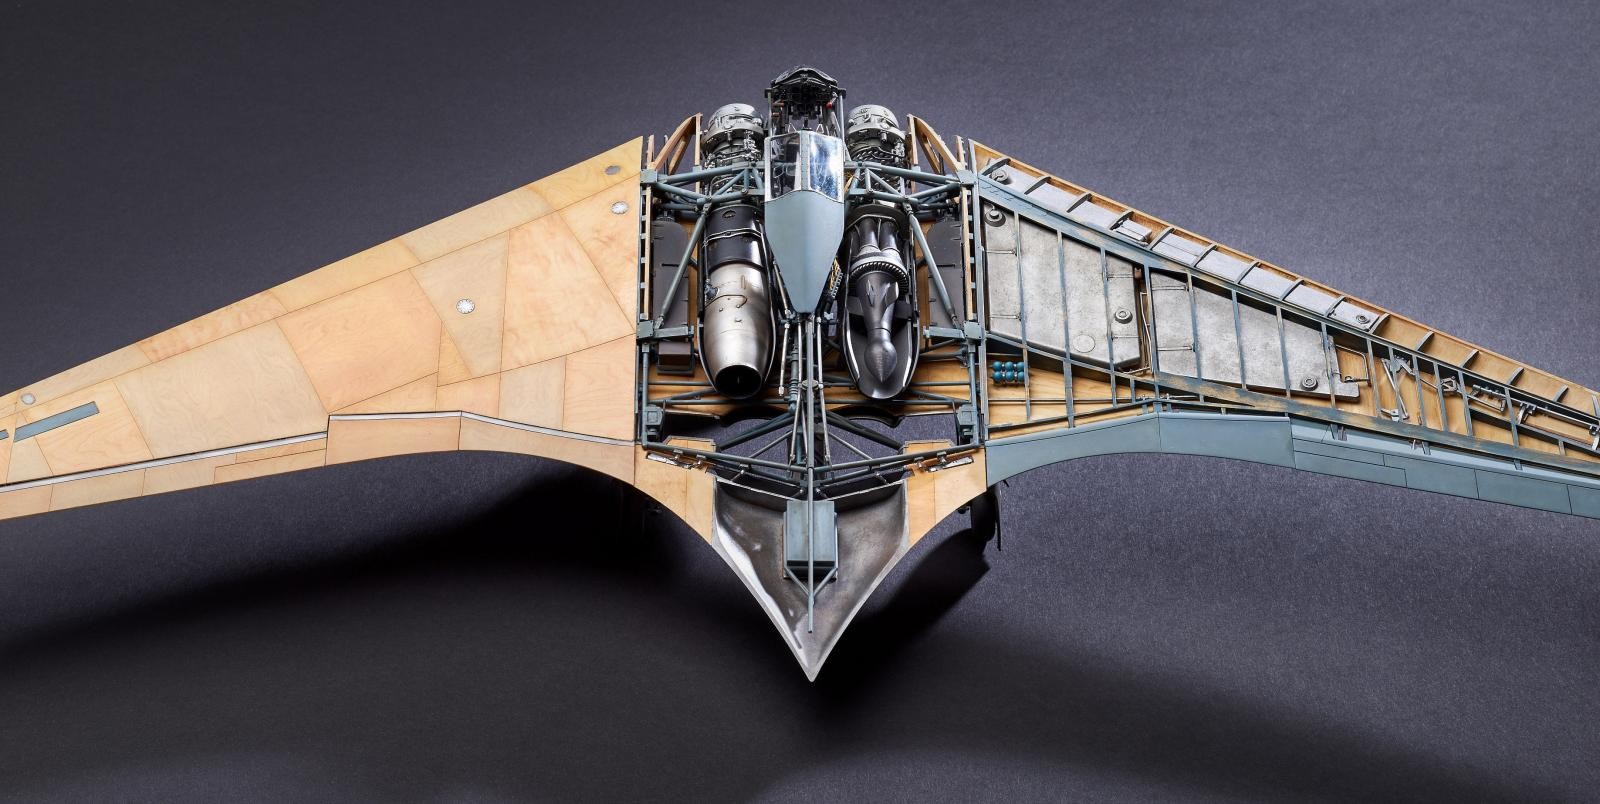
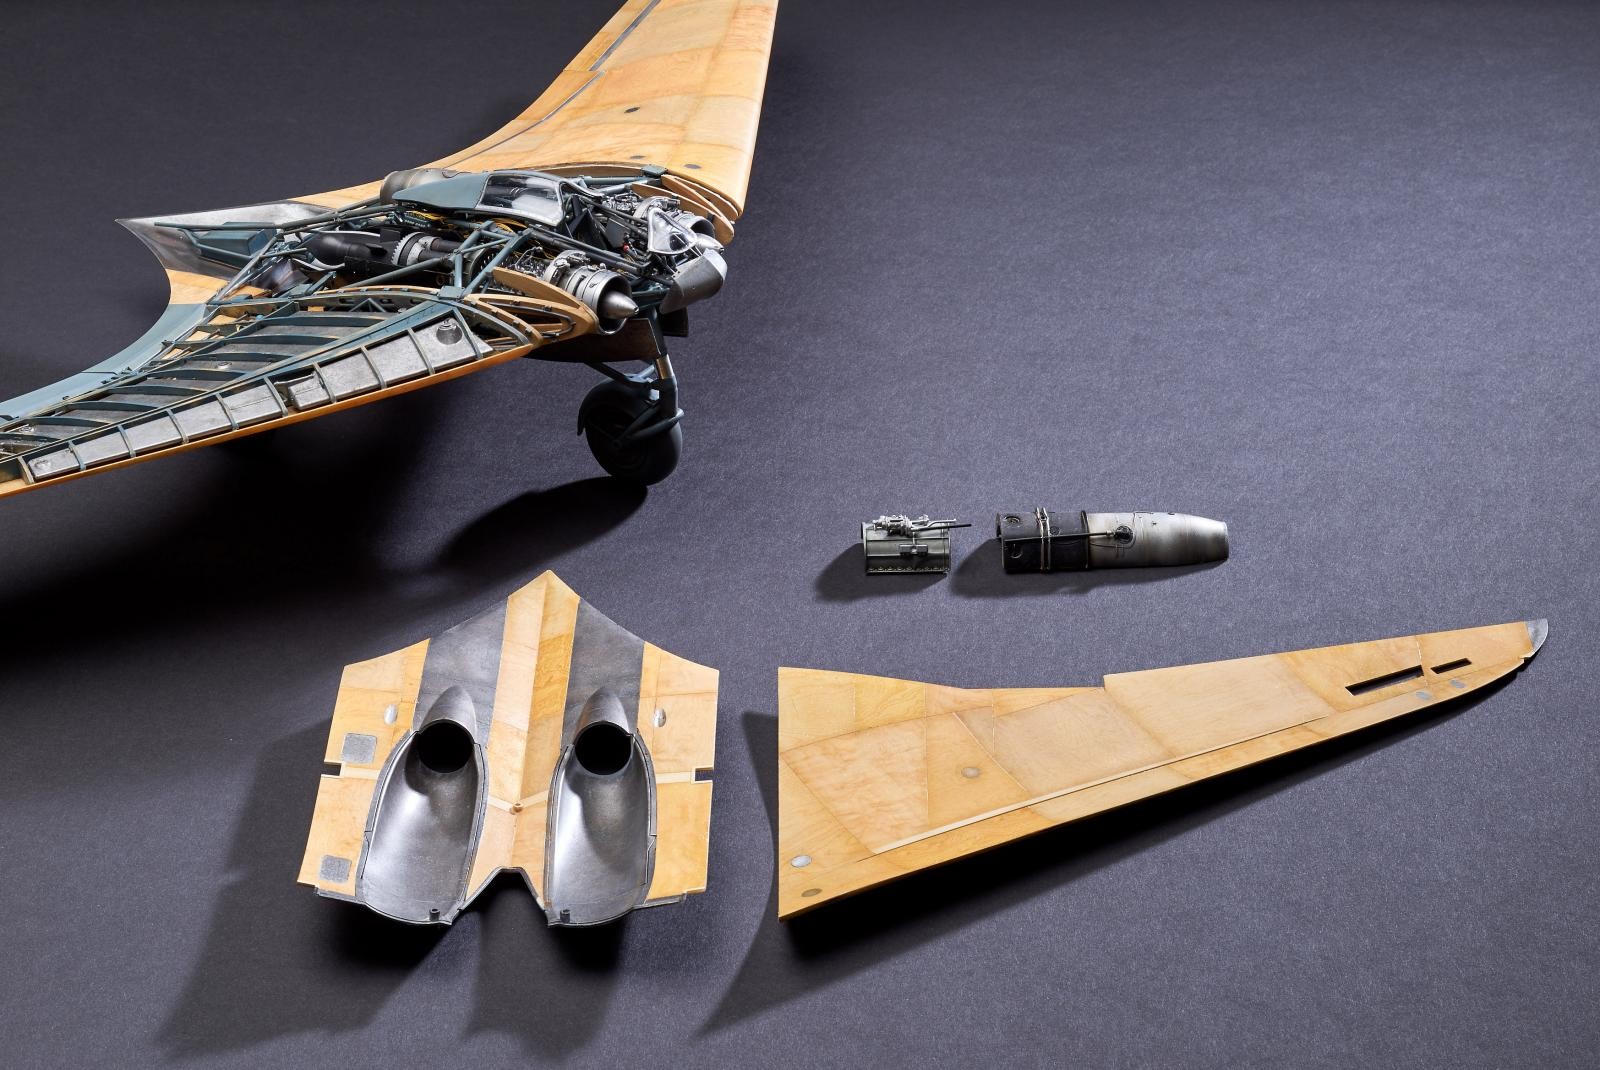
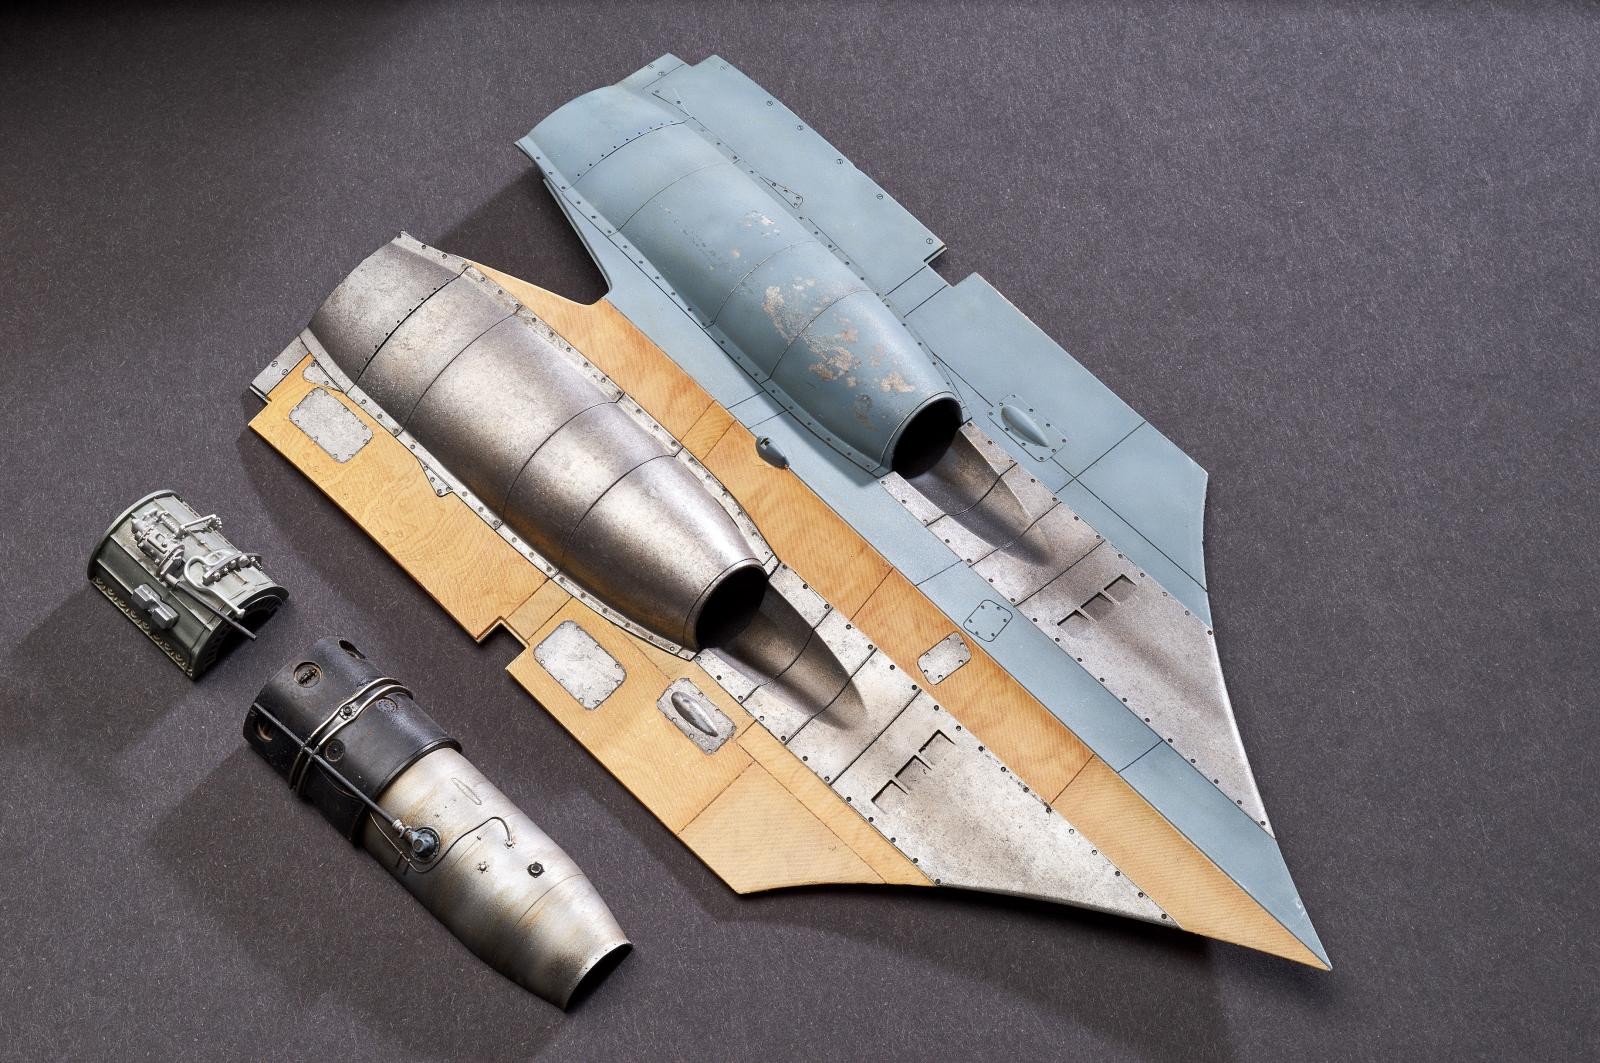
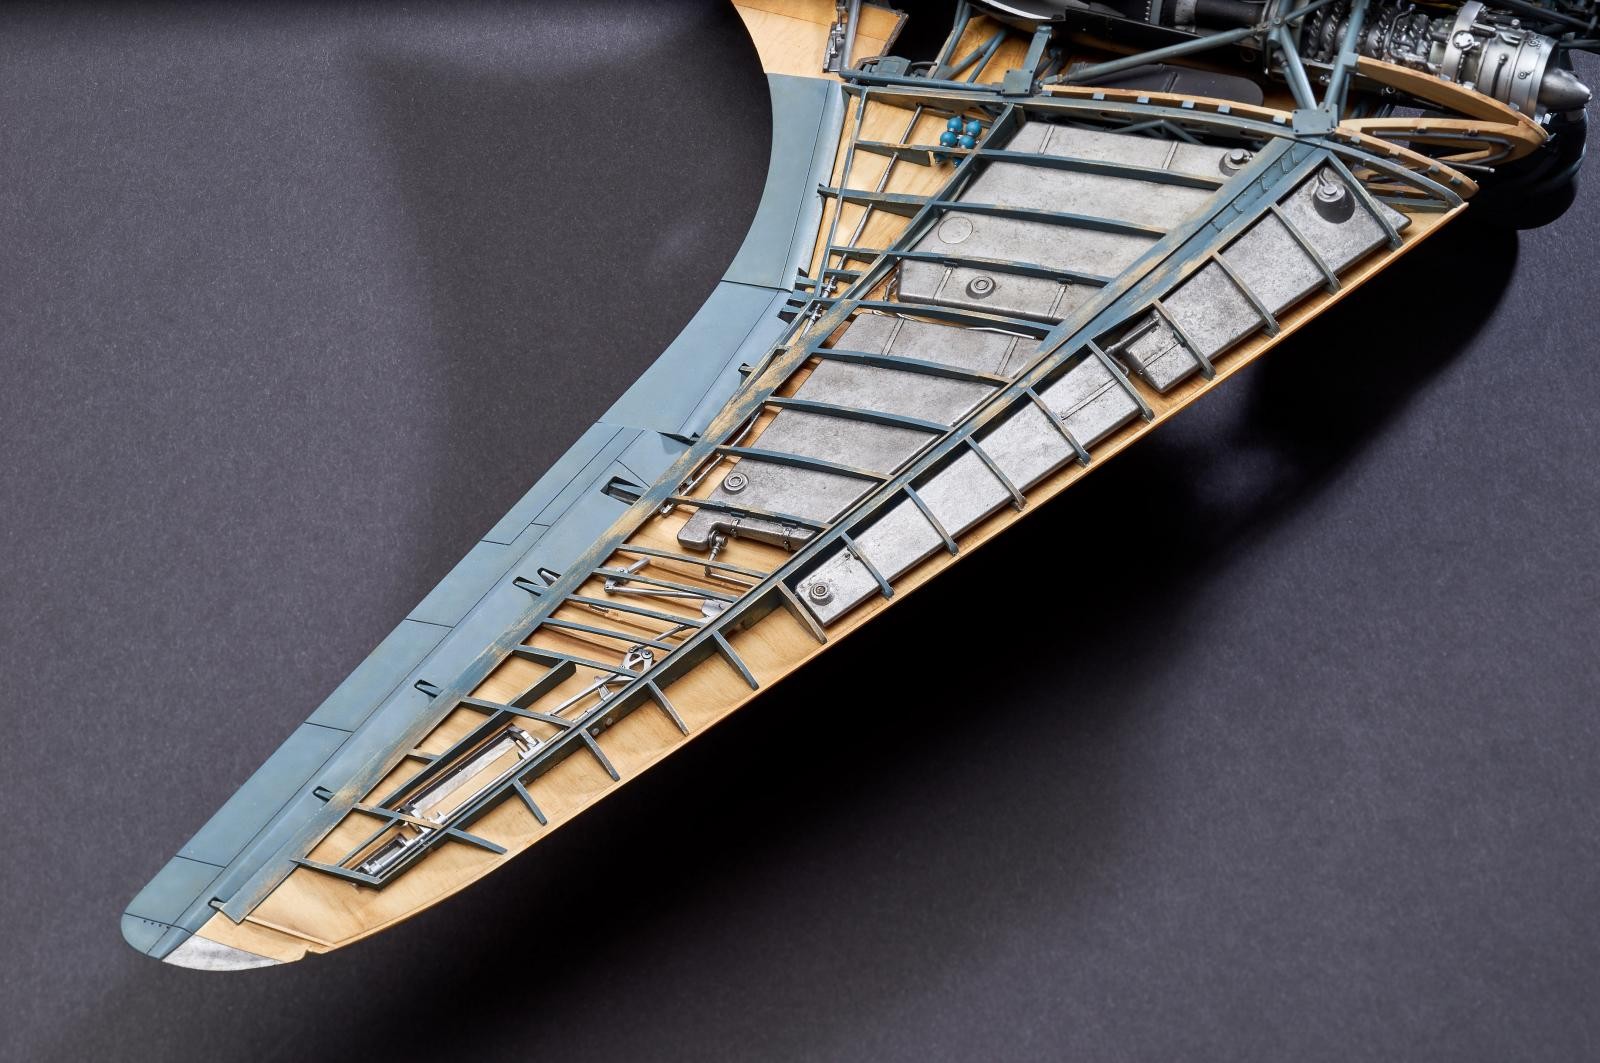
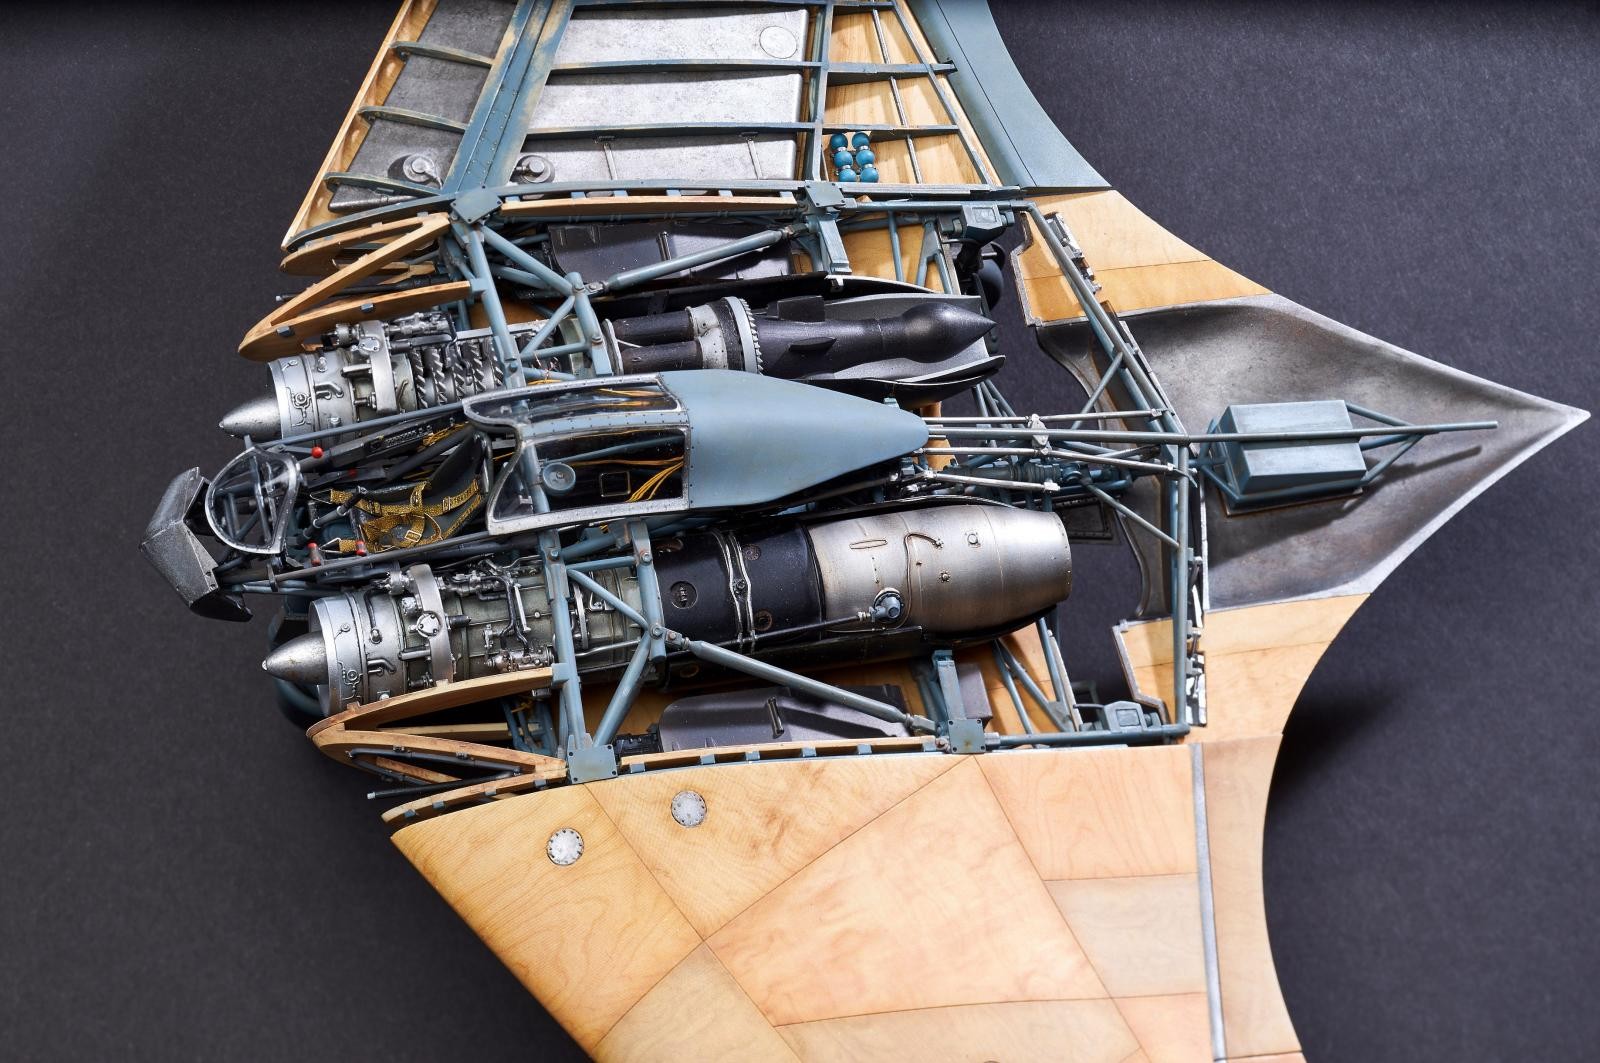
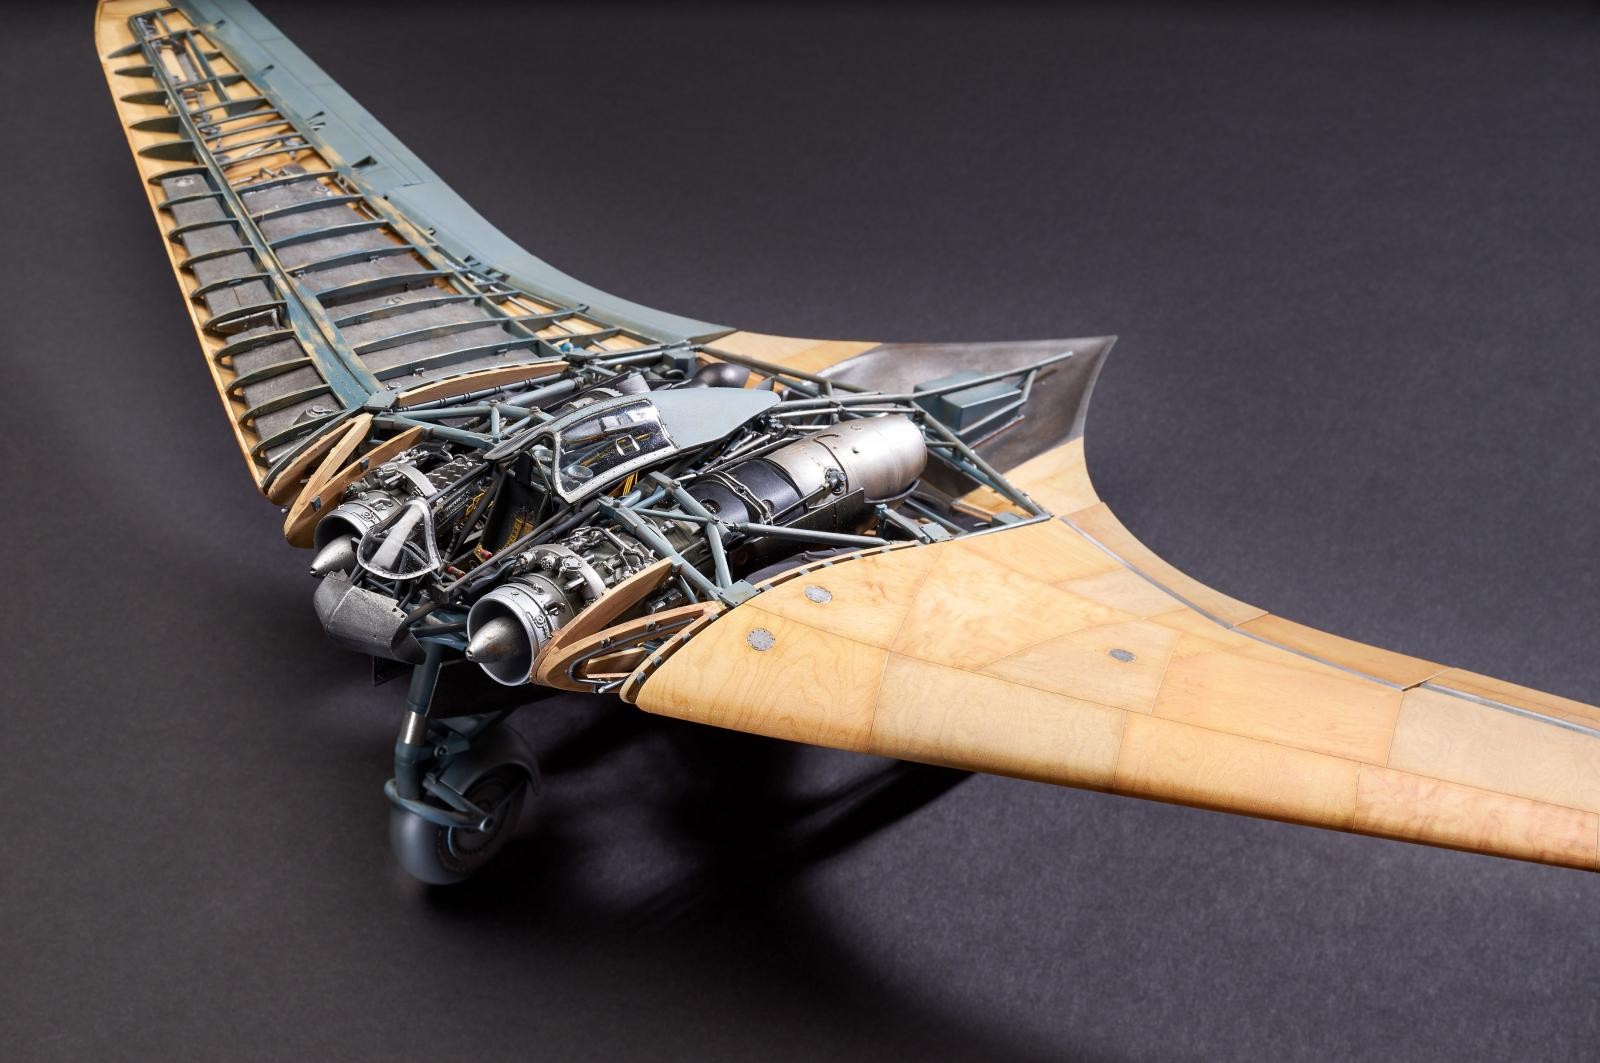
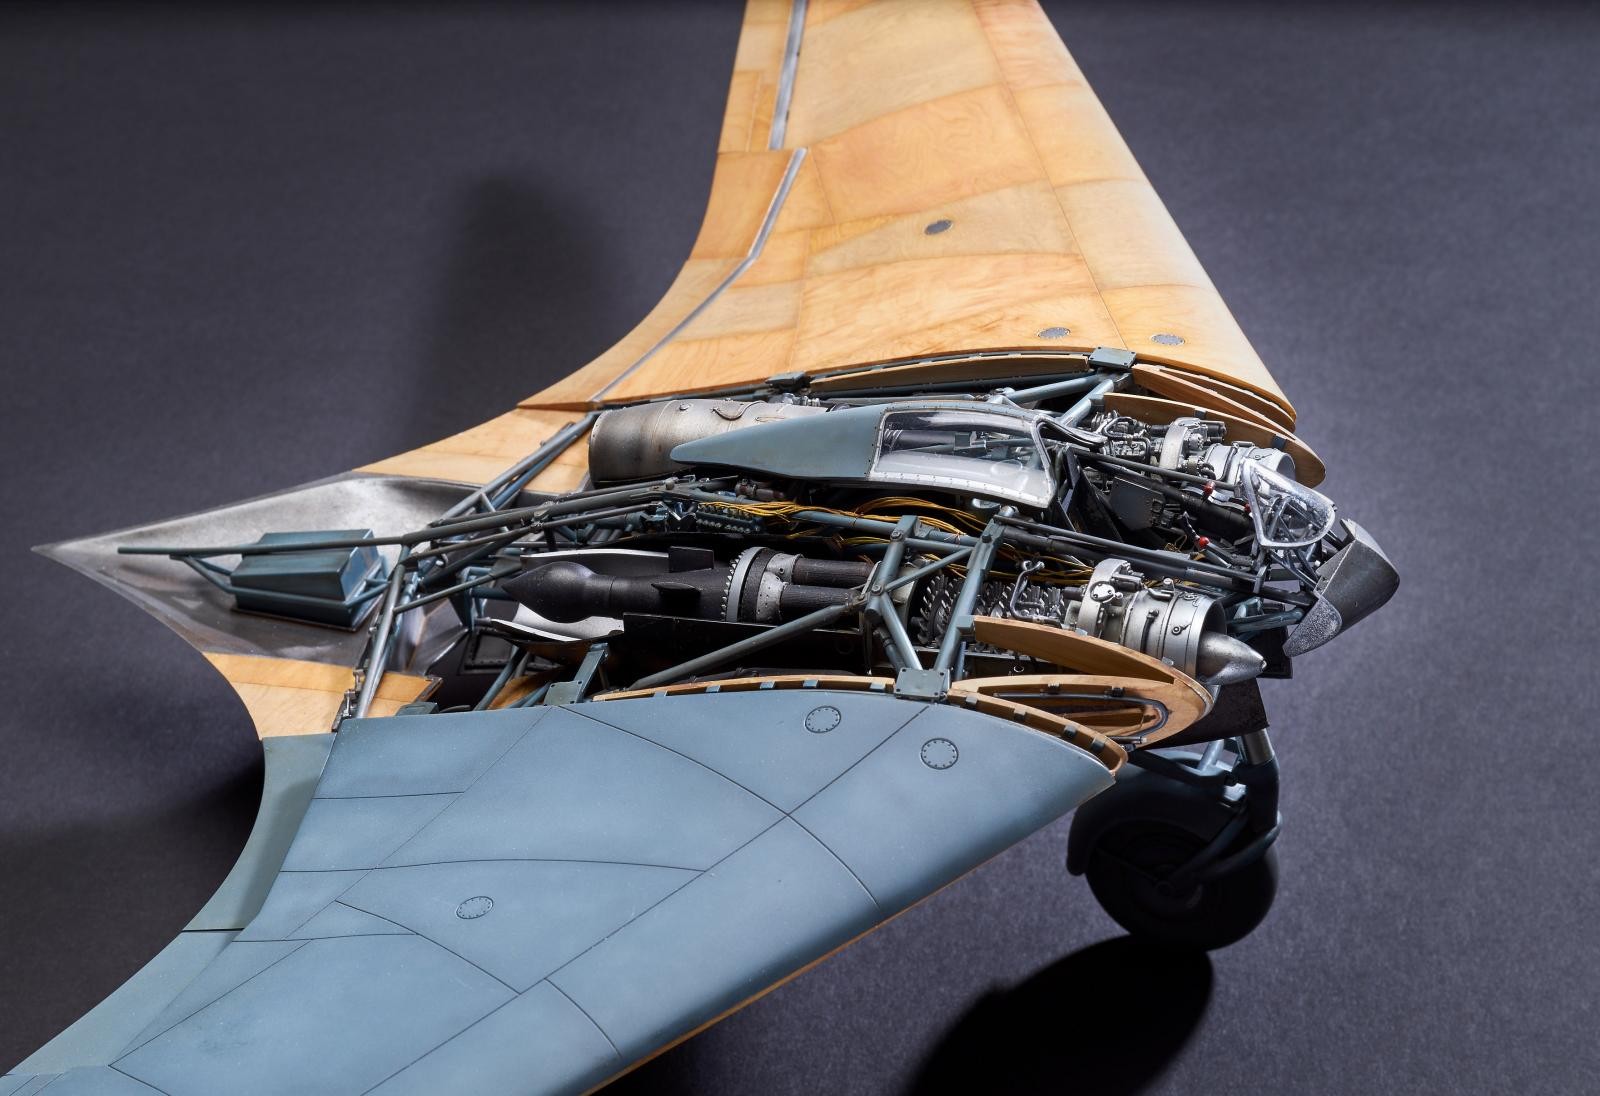
Zoukei-Mura SWS 1/32 Ho-229. Well, I finally finished this thing. It took me exactly 4 months to the day to build it. I must say that I'm very happy with the results. This, with the exception of the resin combustion chamber, Uschi van der Rosten decals, and HGW seatbelts, is out-of-the-box. I used Mr Paint for the wing, Mr Color for the pre-plywood application, AK Extreme Metals, Alclad Metals, and lots and lots of scalpel blades. The project took close to 360 hours total. Finishing it feels like saying goodbye to an old friend. It really was fun to build. My only complaints are that the resin combustion chambers were originally 3-D printed because you can see definite lines in them. These should have been molded as part of the kit. And, the frosted clear parts are really horrible to paint. These all had to be sanded starting with 600 grit and ending in 2000. The pebble-like finish really pops when you paint it. It also makes decal application difficult. I wish they would mold these parts in gray. You can see more on my blog at georgesmodels.com


Wonderful. Marvellous. Superb. Magnificent. There. That covers it. Oh, and a bit sublime.
Way to go, George. What you going to do with the rest of your life?
Thank you, David. That is a good question. I feel lost now.
Excellent! Just excellent! Dusting off my Dragon 48th scale one!
Thanks, Bowman. I hear the Dragon is pretty nice. Have fun with it.
I'm at a loss for accolades.
Glad you like it, Craig. Thanks!
George, I have been through the photos about a hundred times - I still can't manage the right words - I honestly understand the previous comments. It is one of the best builds I have seen. I'm struggling to think of better. I love the 'lightness' - the pale wood, metal and blue-grey just work together. The sharpness of the wooden panels, and the realism in the engines and their chambers is simply to wonder at. But this goes way beyond technique - to the level of art. Thanks for the WIP thread - it has just been a treat to see how you have worked - inspirational!
Hi Paul- Thanks for the very kind words. I thought long and hard about how I wanted to present this. I looked at many excellent builds on the web, but they seemed to show the wood varnished as in a WWI Albatross. I got the idea to do unfinished plywood as I was sitting in my workshop- I had covered the walls in plain old plywood and it had about 5 years of aging on them. The solution had been staring me in the face the whole time.
And what museum can we see this at? A masterful job!
Thanks, Robert. I offered it to the Smithsonian Air and Space Museum to complement the new restored Ho on display there. Doubt that I'll hear back from as they probably get a 1,000 offers a day.
George, I bet the aviation museum at Balboa Park in San Diego would take it for display. At any rate, your model is simply beautifully done! BTW, I'd be happy to have on display in my model cabinet.?
Great job, George, it really looks the business. ?
Thanks, Rob.
This is a WINNER in every sense of the word. You did a marvelous job on this kit! Well done!
Thanks, Morne.
I followed this one throughout. It's one of the best combined model and build-report I've ever seen. I sure learned from your plywood science class! I hope the restored 1-1 Scale for the Smithsonian will look exactly like 32x this one... Enough said, splendid job George!
Thanks Michel. The model was fun to build, but the plywood decals proved to be a challenge, but worth the extra effort. I learned that you don't apply adjacent panels one after the other. You should apply them to different parts of the model. This prevents the second panel from tearing or pulling on the first.
Great build George, a winner for sure.
Thanks, Marc. I'm entering it in the IPMS Nationals in Phoenix in August.
Every single square mm of this is just excellent beyond words! If you can't find a museum to take it, I've got a display cabinet in my office...!
Thanks, Greg. You may have to take a number.
Nice job on this.
Stunning mate, that is on another level!
I have been commenting with all your builds always being very impressed, but now that is is finally finished I am speechless! Your should be very proud of this build. You took an impressive challenging kit and really did it justice. Your finishing skills and attention to detail are breath-taking. Your finally presentation and how you show it is awesome. It is one of the best cut-always I have come across and this is surely an award winner! Cant wait to see your next masterpiece.
Thank you so much Paul. Your appreciation means a lot to me as I have been an admirer of your work as well. I had no idea when I started this thing how it would turn out. I researched it on the web and found many beautiful examples of the finished model, and only hoped that it would turn out half as nicely as those.
What a treat. Definitely a "kick up the bar really high" piece of work. Amazing detail. I really really like this!
Thanks, Tom. I decided that I would build Tamiya's 1/32 F4U-1A next. Stay tuned...
I would hate to think of what would have happened if this kit didn't make "Model of the Month". I learned something from following your posts George and some of the Smithsonian photos where of interest . Many of the photo's prior to your article showed the cockpit section and not the wings or the rear of the aircraft which has a Swastika. I wasn't aware of that. Your article prompted more reading. When the Smithsonian example was brought back to the states the military wouldn't touch the aircraft for flight trials. I am sure that given the history of the quality of German glues used on wooden aircraft causing them to crash... they didn't bother and Northrop's experience in flying wings relegated the Horton to museum status.
There is a movement to make a flying replica along the lines of the Collins Foundations Me-262. All that group needs is money. Congratulations George.