Ki-84 Hayate – Tamiya 1/48 (Original 1972 export boxing)
Last summer I was rearranging a stash shelf to make room for another kit I won't live long enough to build when I found and opened a box of the 1972 Tamiya Ki-84 Hayate. It had been started so long ago I have no idea exactly when, saw a fair amount of progress, and was then put aside for reasons unremembered. What caught my eye was that I did a lot better job of filling seams and finishing the surface then than my age and skills permit now.
This kit, frankly, deserved to be finished.
The only thing that had gone missing was the landing light cover. The only things I couldn't live with were the 20mm wing cannons, and I had a Master set for those (12.5mm in 1/32 coming close enough to 20mm in 1/48 for my standards). Work on the kit resumed.
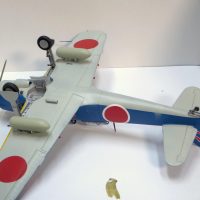
What was already done: Wings and fuselage were finished, including the cockpit and pilot. There is talk about the Tamiya kit being 1/50 instead of 1/48, and that might be right, but the biggest problem I saw back then was that the fin and rudder were too small, so I had made a thin insert by tracing around an Otaki Ki-84 tail, sanded it thinner, and used that and putty to expand Tamiya's original effort. That took care of any obvious shortness in the fuselage length.
I also compared the wingtips to photos of the one surviving Ki-84 and saw where (IMHO) Tamiya had misinterpreted the curve and washout there, leading to what some see as too great a wingspan. Hasegawa missed the curve, too, but in the opposite way. Otaki got it right - IMHO. The work to fix that was something I hadn't tried to do all those years ago and is beyond what I can do to my satisfaction today, so the wing's maybe a few mms too long in span, but a word of caution, as the survivor's wingtips have been repaired over the years.
The wings and fuselage were primed with Aero-something aluminum dope for a nearly impervious metal base coat suitable for a typically distressed Japanese late-war paint scheme. This was the pre-build I started with.
Unfortunately, all those years ago was when we thought all Japanese interiors were aotaki-colored, so the cockpit interior's aotaki was very carefully repainted a non-metallic dark green where it could be seen and got to and the wheel wells repainted aluminum. The pilot survived, but I did paint his goggles' lenses different colors as seen in many war-time photos.
Adobe Illustrator (you could buy the version I have, which says much about how old it and the laptop it's on are) made a “frame” image and printed it on acetate for the missing landing light cover as near to the actual Hayate's as I could make it. Brake lines were added from some of that rubber tubing stuff that wiggles all over the place while you try to glue it down. I tried various ways of doing the cockpit framing, including “silver” decals, but ended up using Humbrol Maskol. I found on eBay an Eduard mask set, too late for this build but good for the next one. The Tamiya canopy has three parts to be posed open, but the center section is a bit too thick and doesn't look quite right when closed, in contrast to most kits, so open it is, all the better to see the pilot and instrument panel which I don't remember how was done, so let's suppose I once could paint that well.
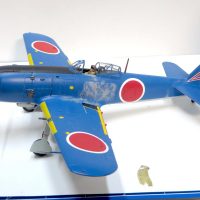
The kit decals didn't provide markings for a scheme I liked or felt confident enough to airbrush. A scheme provided by the Otaki decals looked doable, but they were too old to use, as those that would come off the backing paper wouldn't stay together. Back in the day I had built a Ki-51 with the blue over-the-ocean scheme, so when I found a similar scheme for a 102 Sentai Ki-84 on a Lifelike decal set, that seemed like a good choice.
Unfortunately, I had the one set that Microscale had neglected to put the final coat of sealer on (I emailed Lifelike and they said no one else had reported the problem and offered their most sincere apologies), so applying each decals was a delicate when not frustrating challenge, and It was lucky that Vallejo makes lots of reds to find one that sort of almost matched the red dye Microscale used for the Lifelike set. I made up the tail number from some extra Hasegawa decals that also sort of matched.
The blue is a Vallejo mix to approximate the color Lifelike suggests and my old Ki-51. I distressed the blue with a fiberglass soldering brush according to photos of typical Ki-84s, but lightly, as I don't like excessive effects. Photos of Ki-84s under construction at war's end show a rather light underside color, so I cut Vallejo light olive with some white - maybe should have used more white - but left the auxiliary fuel tanks in the original. Control joints and panel lines are washed with a home-brew gray/brown. Badger Minitaire flat coat seals everything. I don't do aerials anymore.
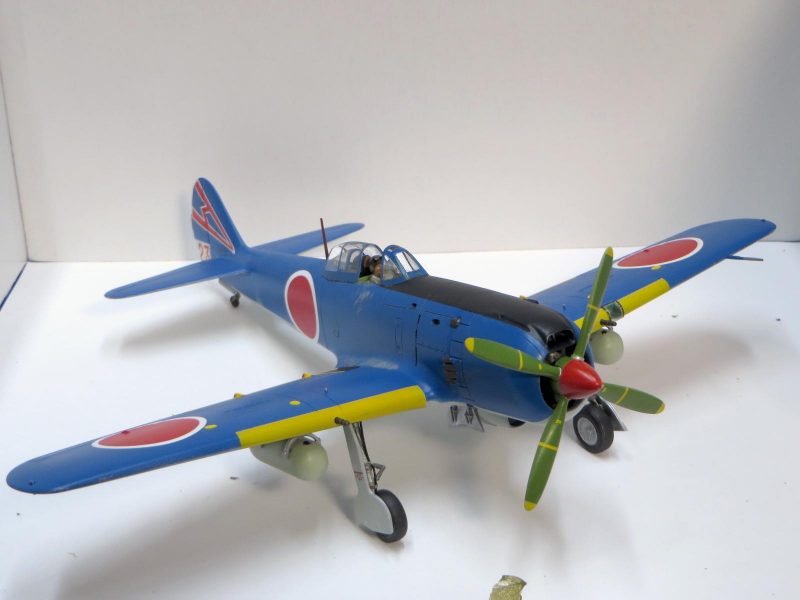
Nice model with a really unusual paint scheme, Christopher (@brummbaer). It's nice to see something besides dark green or gray. Well done.
Thanks, George.
Hi Christopher @brummbaer !
Just love to see "old" and especially already started kits brought to life.
You've done a really great job on this, improvements and corrections definitely included!
The blue scheme stands out!
Congratulations and welcome aboard!
Thanks, Spiros. I'm working on a Hobbycraft Hawk 75/M, but right beside it I have the Esci snap-tight kit of the P-36, which I hope is buildable with some aftermarket horizontal stabilizers.
Eye catching build.
Glad it caught your eye, Haslam. Thanks for commenting.
Very unusual scheme but very nicely applied, Christopher.
Beautiful Hayate.
Thanks you, John. My work isn't up there with many posters, here, but its not bad for an old fart.
Very cool scheme
Yeah, George, I like this one for its simplicity while still being different. Thanks for taking time to look and comment.
Very nice build, and great scheme choices! Well done.
Thanks, Greg. Each build now gets harder (or more frustrating) instead of easier, but I'll keep plugging away as long as I can. This is a good red-white-blue scheme, even if it didn't fly for the good old USA.
That is a really nice plane. That color looks odd to me for a japan fighter. But really looks great.
Thanks, Enrique.
This is my interpretation of the color printed on the decal instruction sheet. There are a few other Japanese aircraft that were supposedly painted similarly, including a Ki-51 (Sonia) and - IIRC - A Ki-43 Hayabusa. This unusual blue was supposedly used by IJAAF units that flew over-ocean flights, like convoy and kamikaze escort duties. I did the Sonia (Nichimo kit) a couple of decades ago and used a similar color for this one - the colors are only similar because I have no memory of what paints or mix ratio I used on the Sonia!
1 attached image. Click to enlarge.