1/144 Hobbycraft B-58A Hustler
INTRODUCTION
The B-58 Hustler was the USAF's first and only delta wing supersonic strategic bomber from the late 50s till 1970. It was designed to fly high and fast which would also end up being the reason for its demise.
Original specs of Mach 2 supersonic bomber were drawn up in the late 40s by the USAF. It was originally thought to be unfeasible due to limitations of material science and aerodynamics. However with the advances in metallurgy, jet engines and the area rule made the B-58 possible. In 1953, Convair won the contract to develop a supersonic bomber which eventually became the Hustler.
It became operational in 1960 with only two USAF bomb wings. Pilots found that the Hustler was a notoriously unforgiving airplane to fly as it had some fatal handling issues if the pilot was not paying attention. It was also apparent to some members of the USAF (Curtis Lemay among them) that the Hustler was a costly and limited in capability airplane as it was strictly designed for nuclear warfare and had no real conventional bombing role. The SA-2 Guideline (S-75 Dvina) shoot down of a CIA U-2 in 1960 forced the USAF to change its mission profile from high speed/high altitude penetration to moderate speed/low altitude penetration which crippled its speed and already limited range which meant even more airborne tanker support.
After a review, Secretary of Defense Robert S. McNamara ordered the retirement of the B-58 in 1965 to be done by 1970. The Hustlers were all retired by January 1970 and most of them scrapped in 1977 aside from museum pieces.
The B-58 role of supersonic strategic bomber was replaced by the somewhat more capable but much shorter ranged FB-111A.
Of note: Hustler pilots were among the few who had experience flying long distance supersonic flights and were among the first crews selected for flying the SR-71. Also singer John Denver's dad flew Hustlers and attained three speed records while doing so.
THE KIT
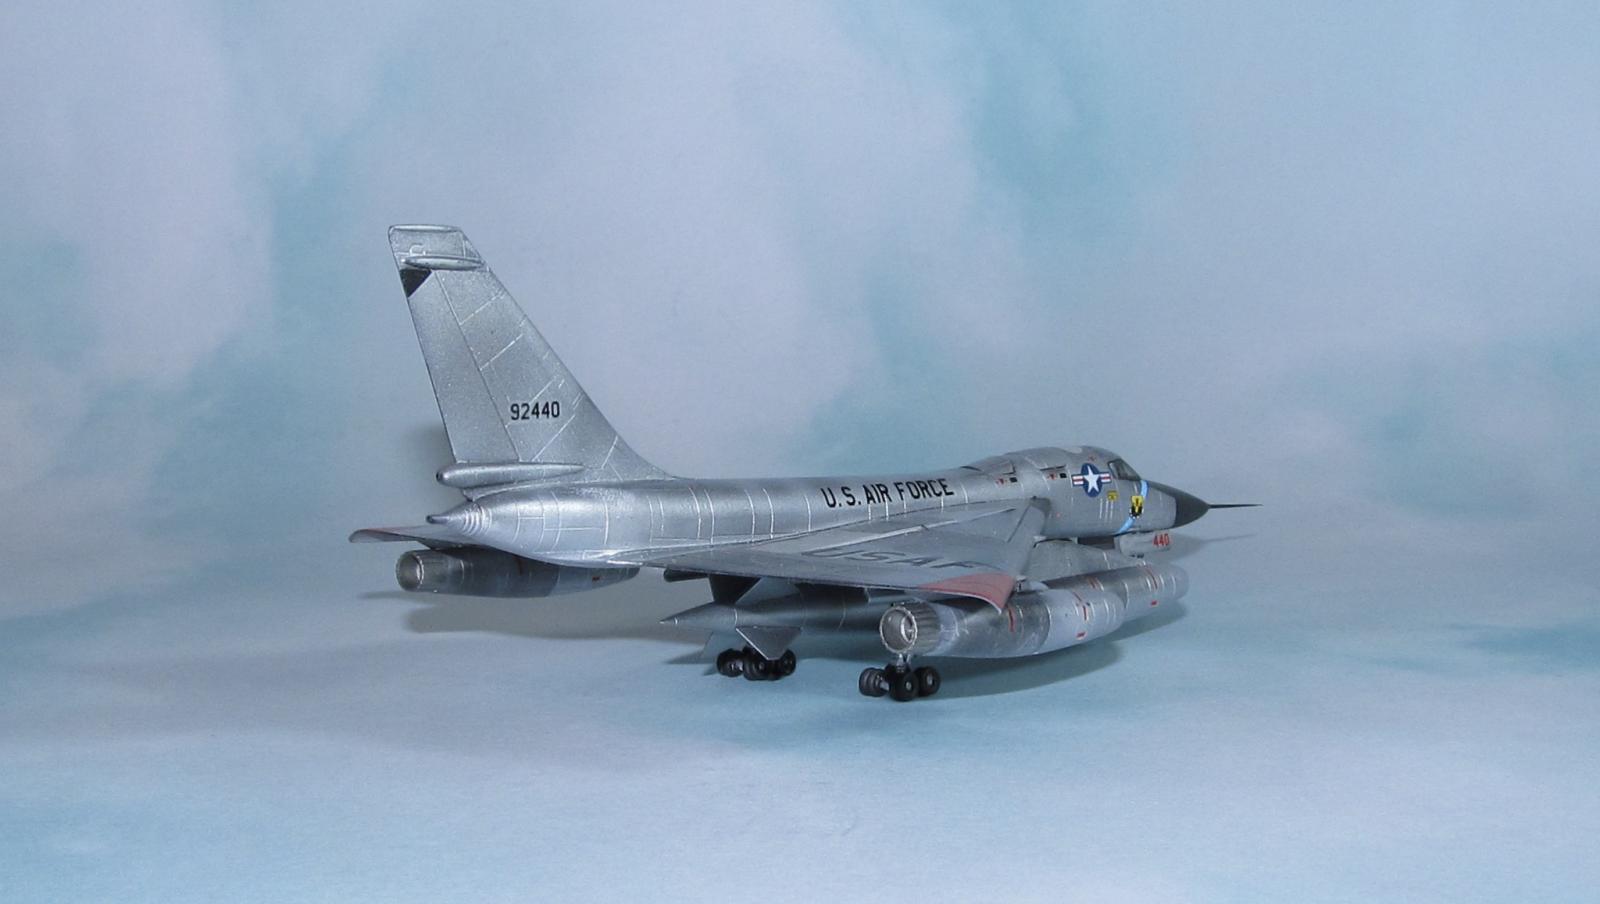
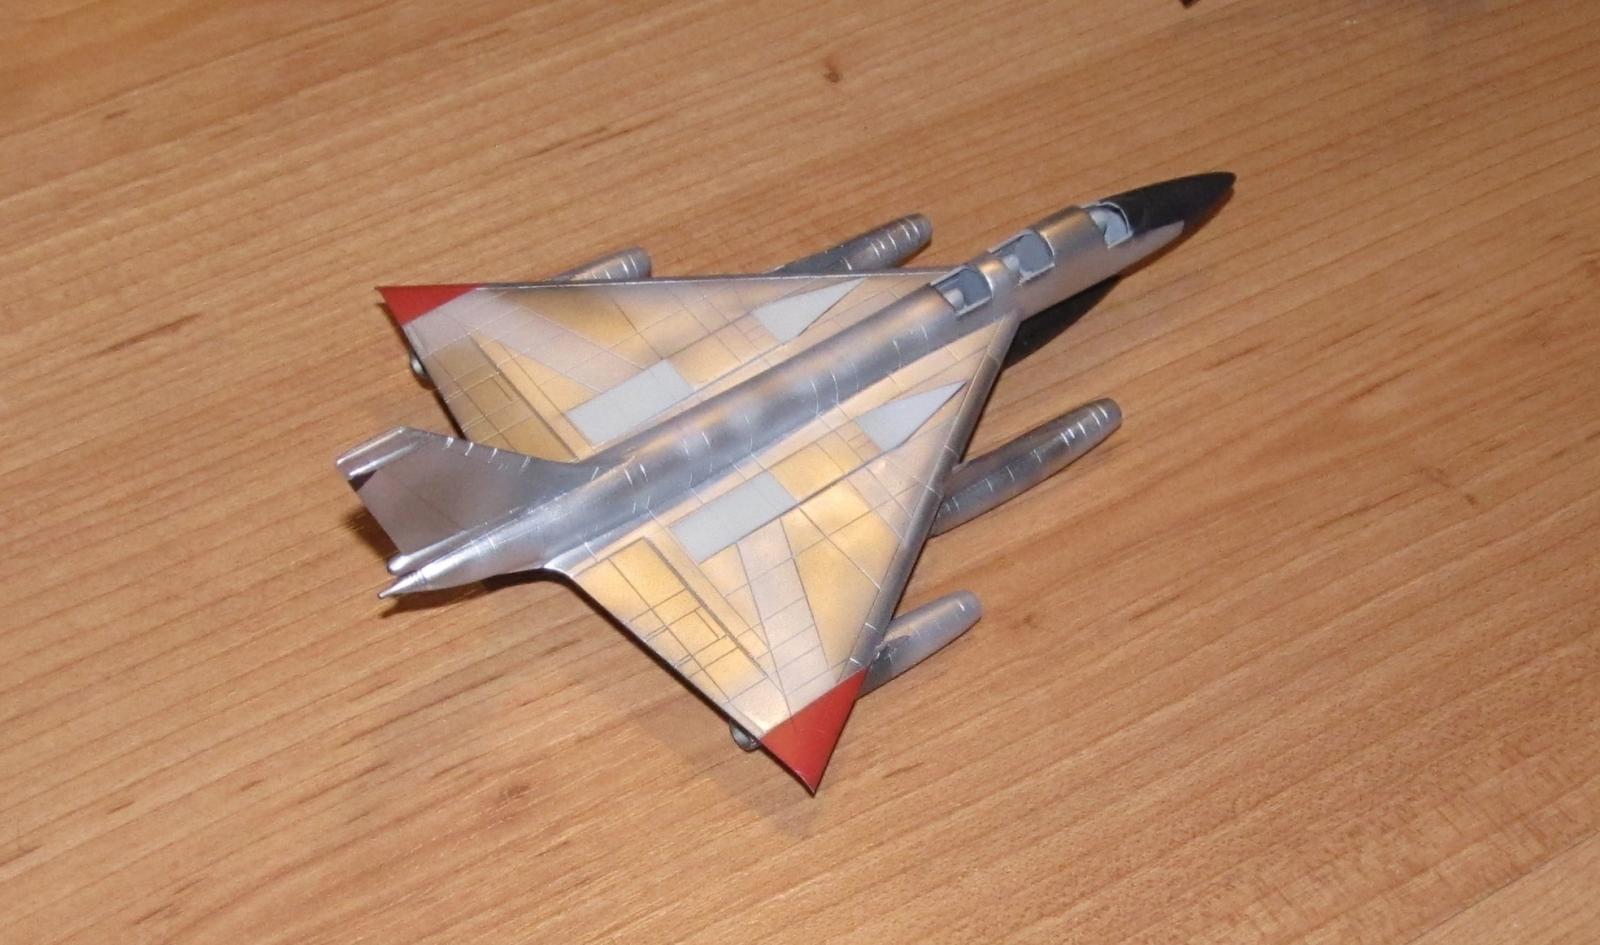
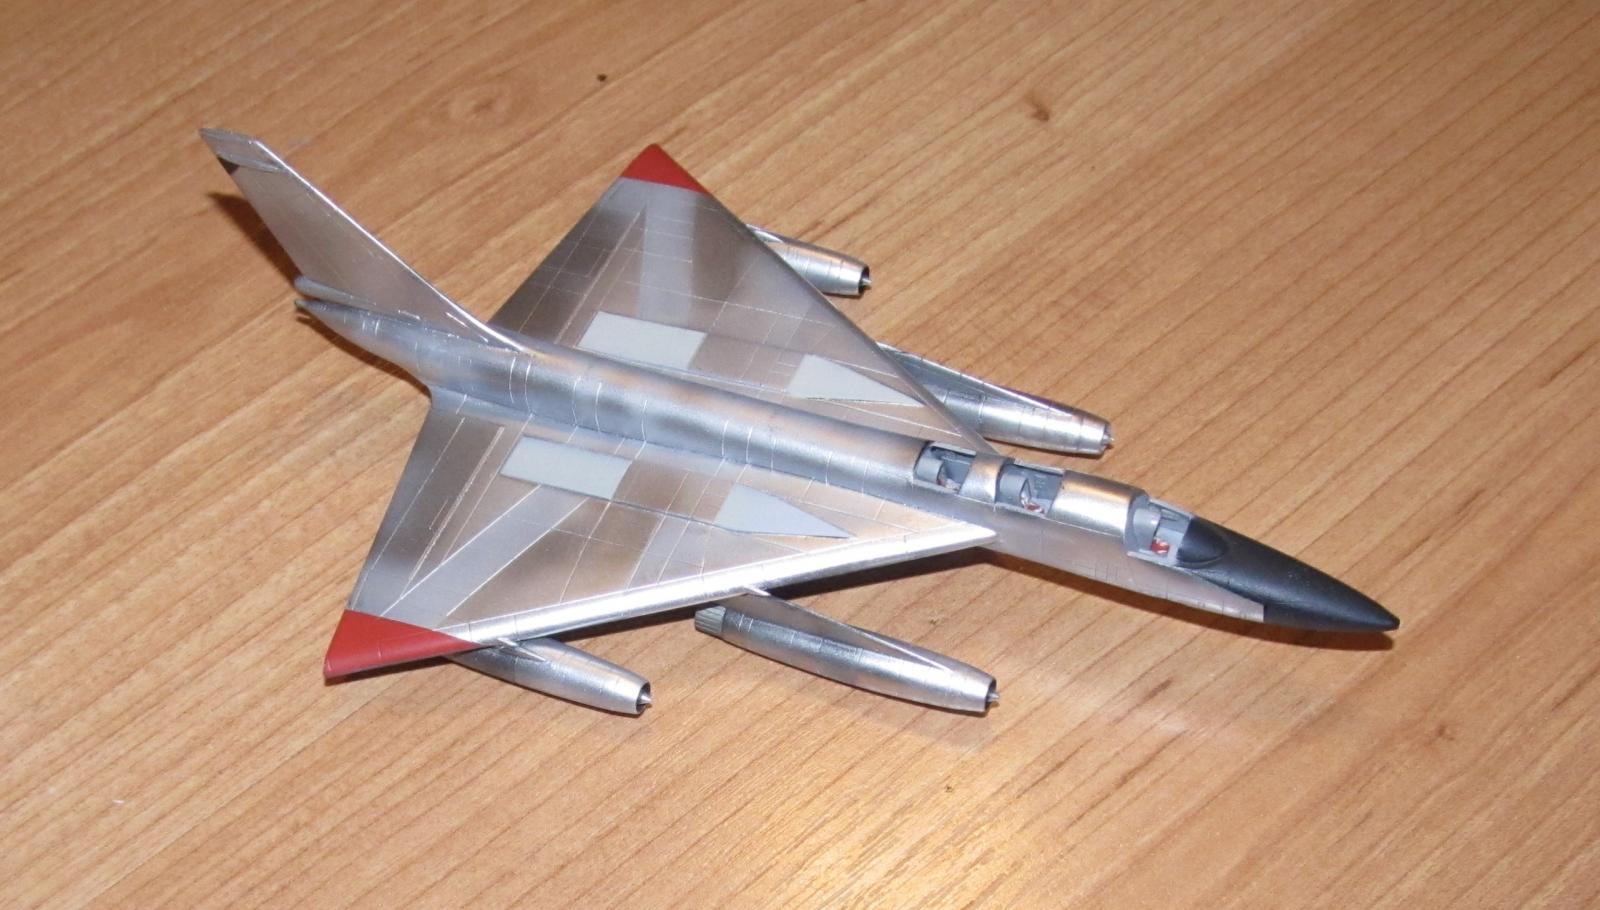
The Hobbycraft B-58A comes with three plastic sprue trees consisting of two larger sprues of grey plastic and one small sprue for the clear parts. It has somewhere in the neighborhood of 80 parts in total.
The first sprue contains parts for the fuselage halves, a small external fuel tank, the interior bulkheads, the outer engine pods and some of the main landing gear. The second tree contains the one piece wing, the larger operational bomb/fuel pod, interior engine pod and the remaining landing gear parts. The third clear tree contains the windscreen and the hatches.
The engraved detail on the plastic is overscale (anything in 1/144 is) but it looks the part. The plastic is free of flash and my copy didn't contain any noticeable sink marks. The decals were decent as the model kit came in the Hobbycraft black box. The instruction sheet is only four pages with everything needed. The one thing that wasn't clear was the paint scheme as it depended on a quite useless grey scale diagram. I ended up just using available internet photos to paint the Hustler instead.
CONSTRUCTION
The Hobbycraft B-58 kit is a simple kit to assemble. The first thing I did was glue together the interior parts with the fuselage halves using super glue for the visible seams and Tamiya extra thin glue for the seams along a panel line or hidden. Next I assembled each of the four engine pod bodies and fuel tank/bomb pod the same way. I left off the engine nozzles for painting reasons.
Each sub component component's visible seams was sanded smooth using 400 and 600 grit sandpaper then polished with 1800, 3200 and 4000 grit polishing cloths in preparation for the NMF.
The reason for the separate components was to make it easy to paint instead of masking off areas and dealing with overspray.
COLORS AND MARKINGS
Painting
I primed each sub-assembly with two separate coats of Badger Stynylrez black primer. This was polished using various grades of polishing cloths from 1800 grit to 8000 grit. It sounds easy, but it wasn't and quite tedious.
I normally would prime the model with a 3rd coat of Tamiya Gloss black as with previous NMF models using Vallejo Metal Colors. However, I found that gloss black isn't as easy to polish as the basic Stynylrez and decided to see how the NMF would look with just Stynylrez.
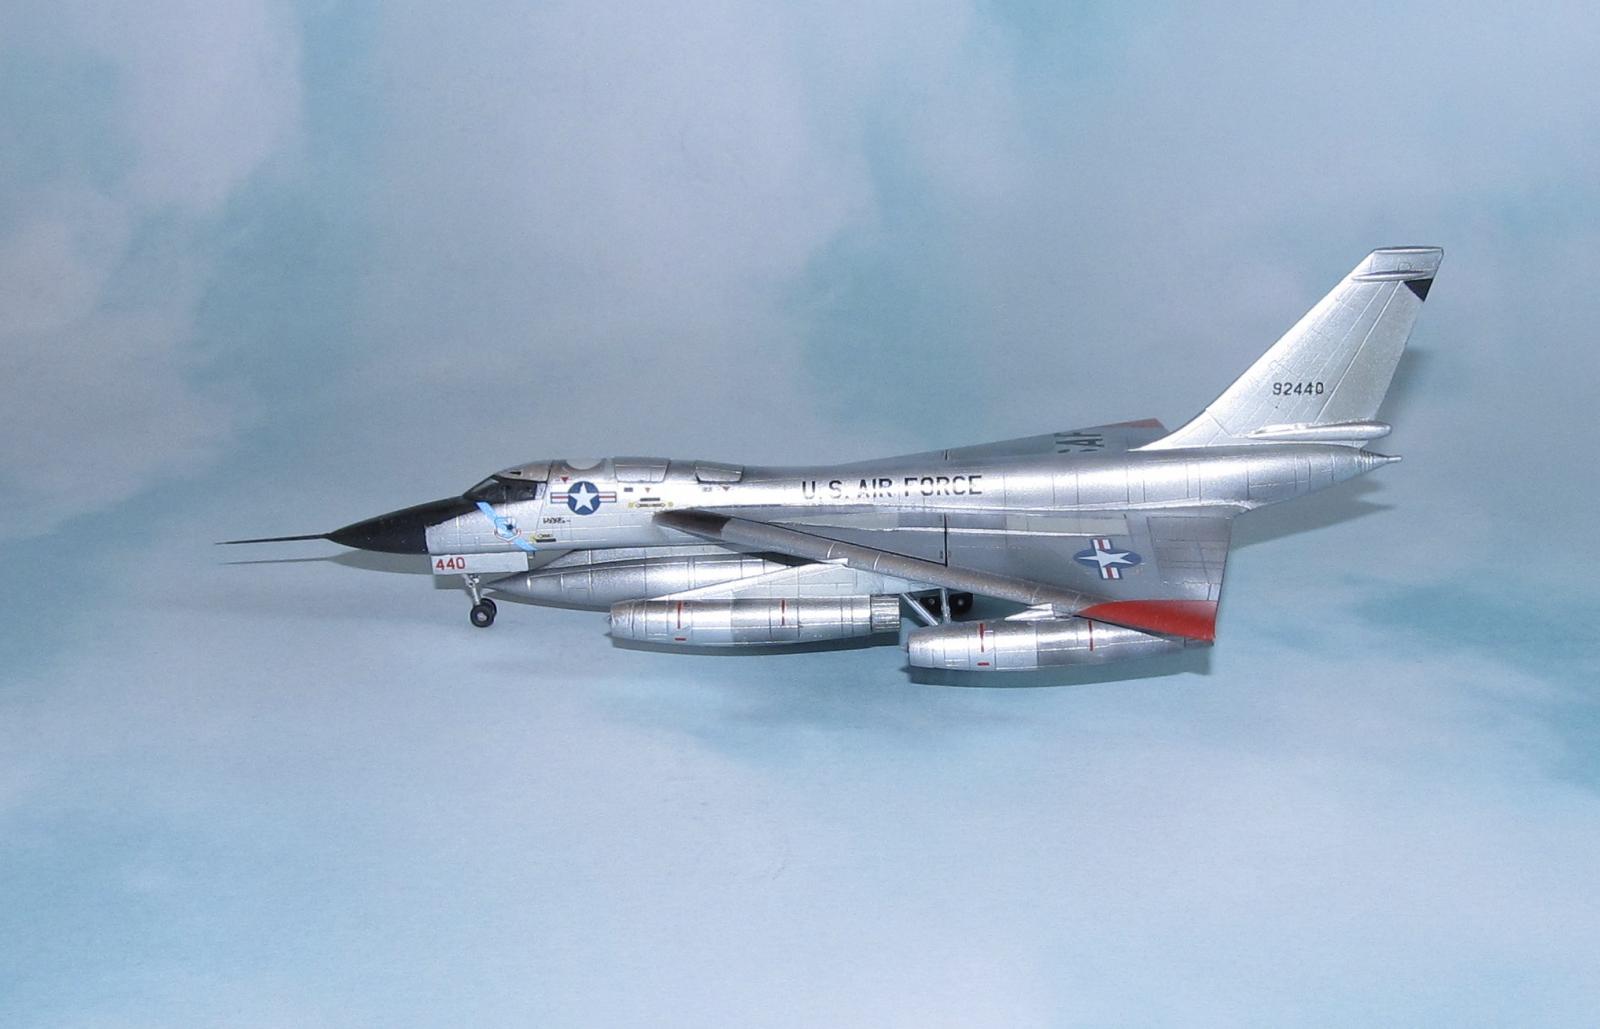
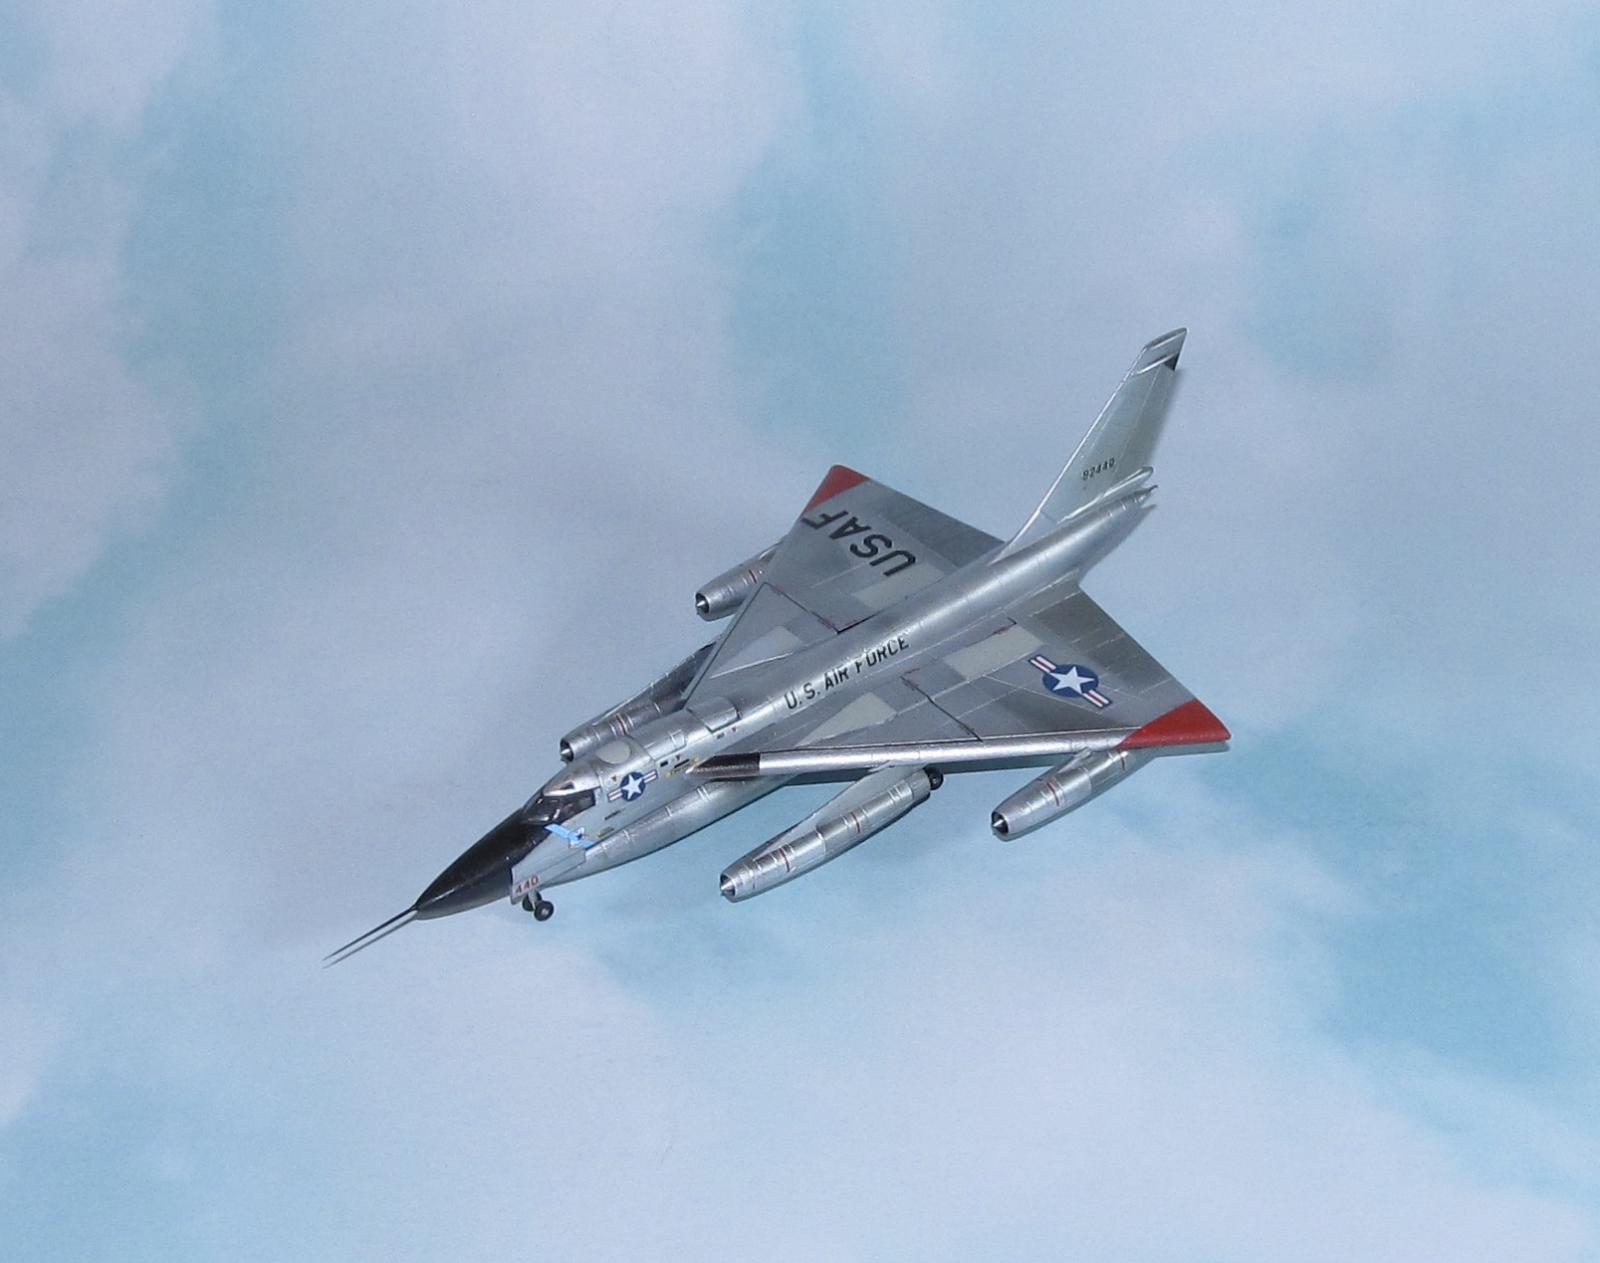
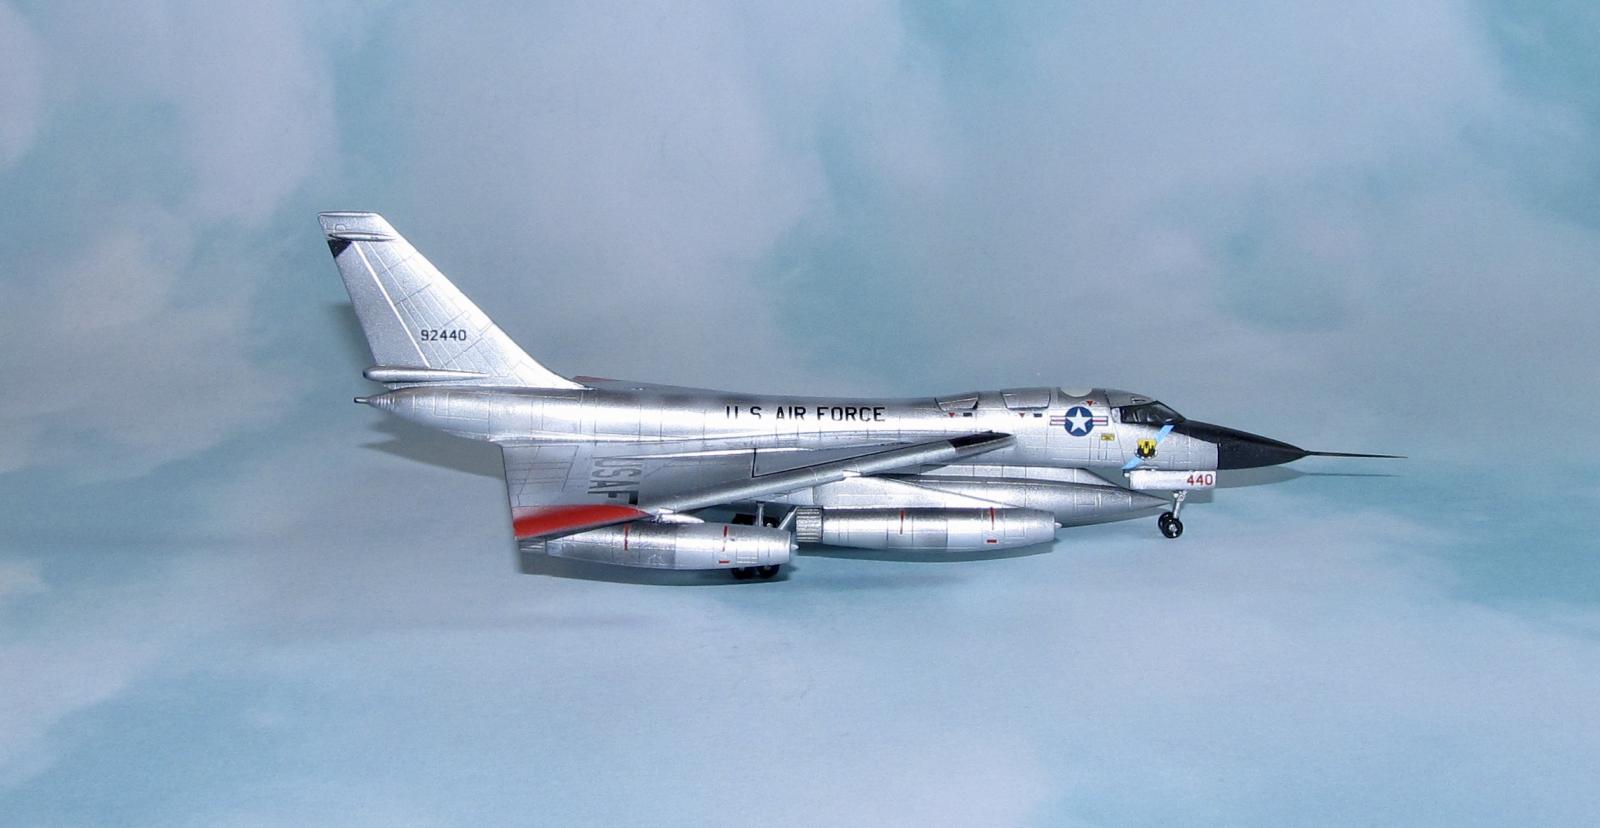
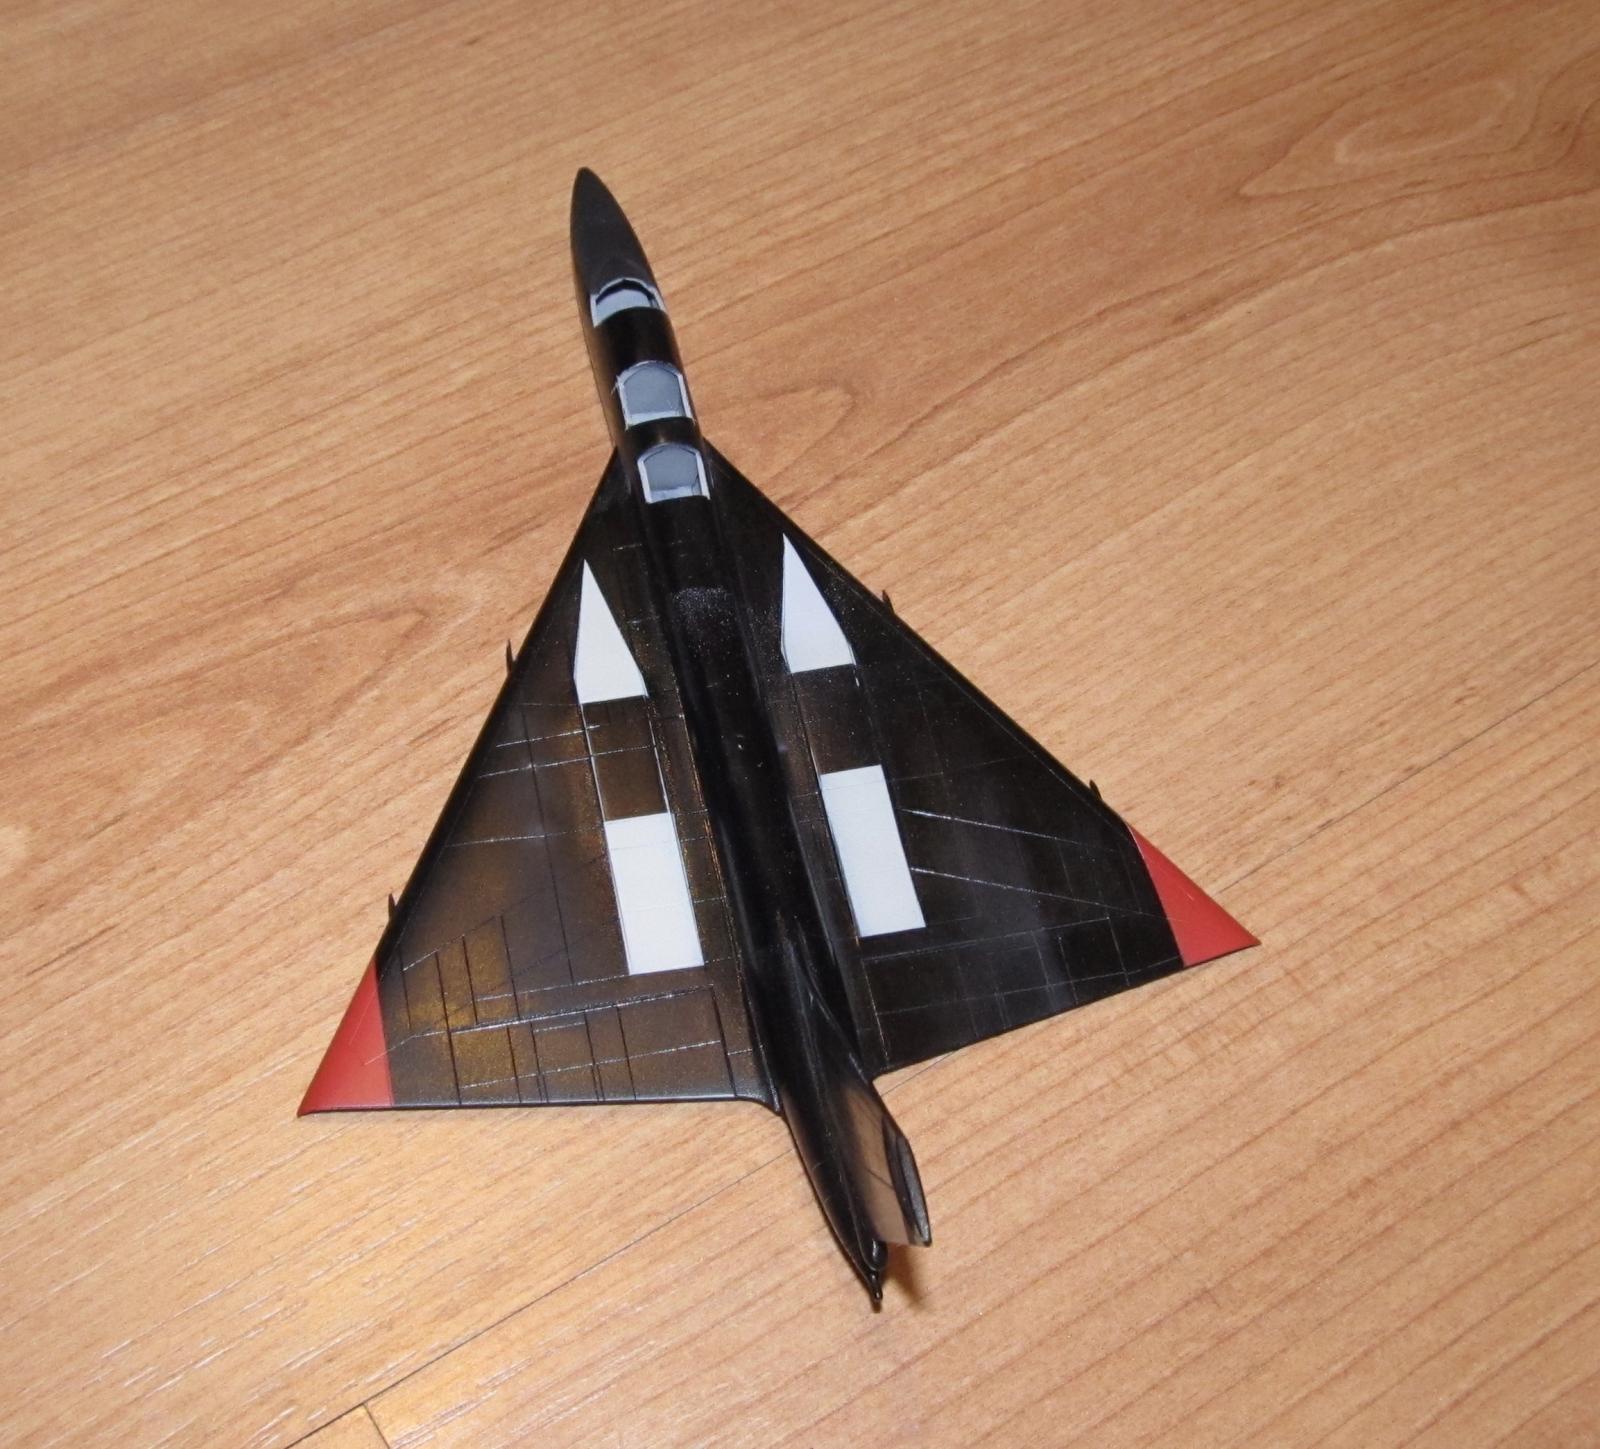
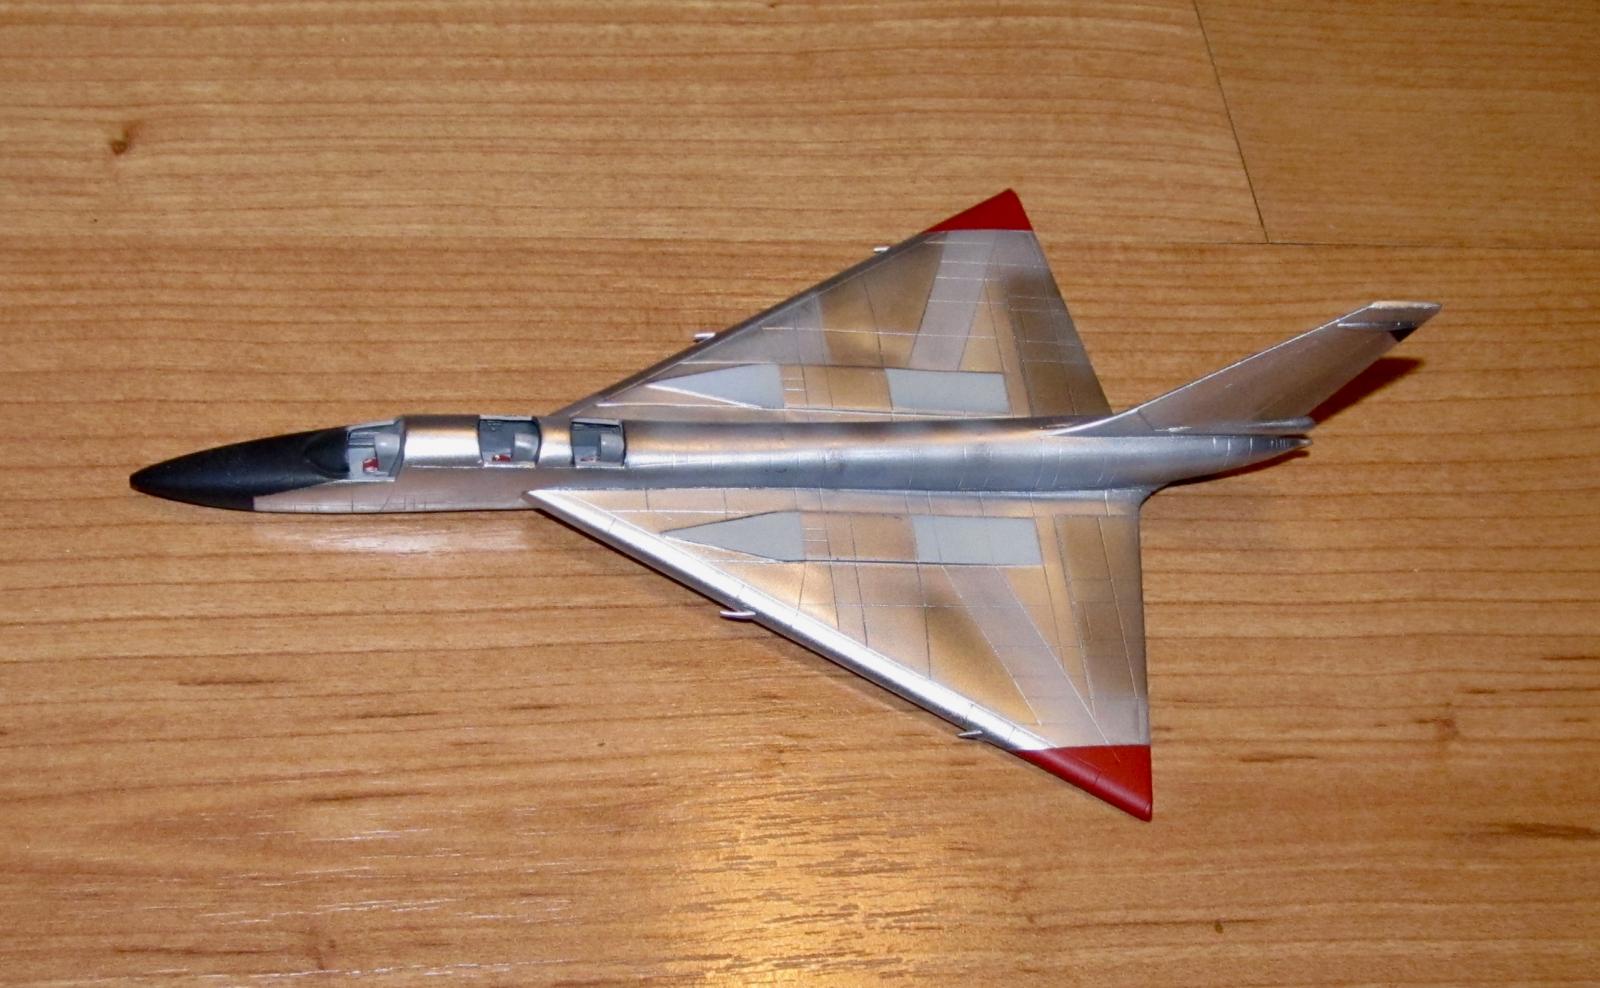
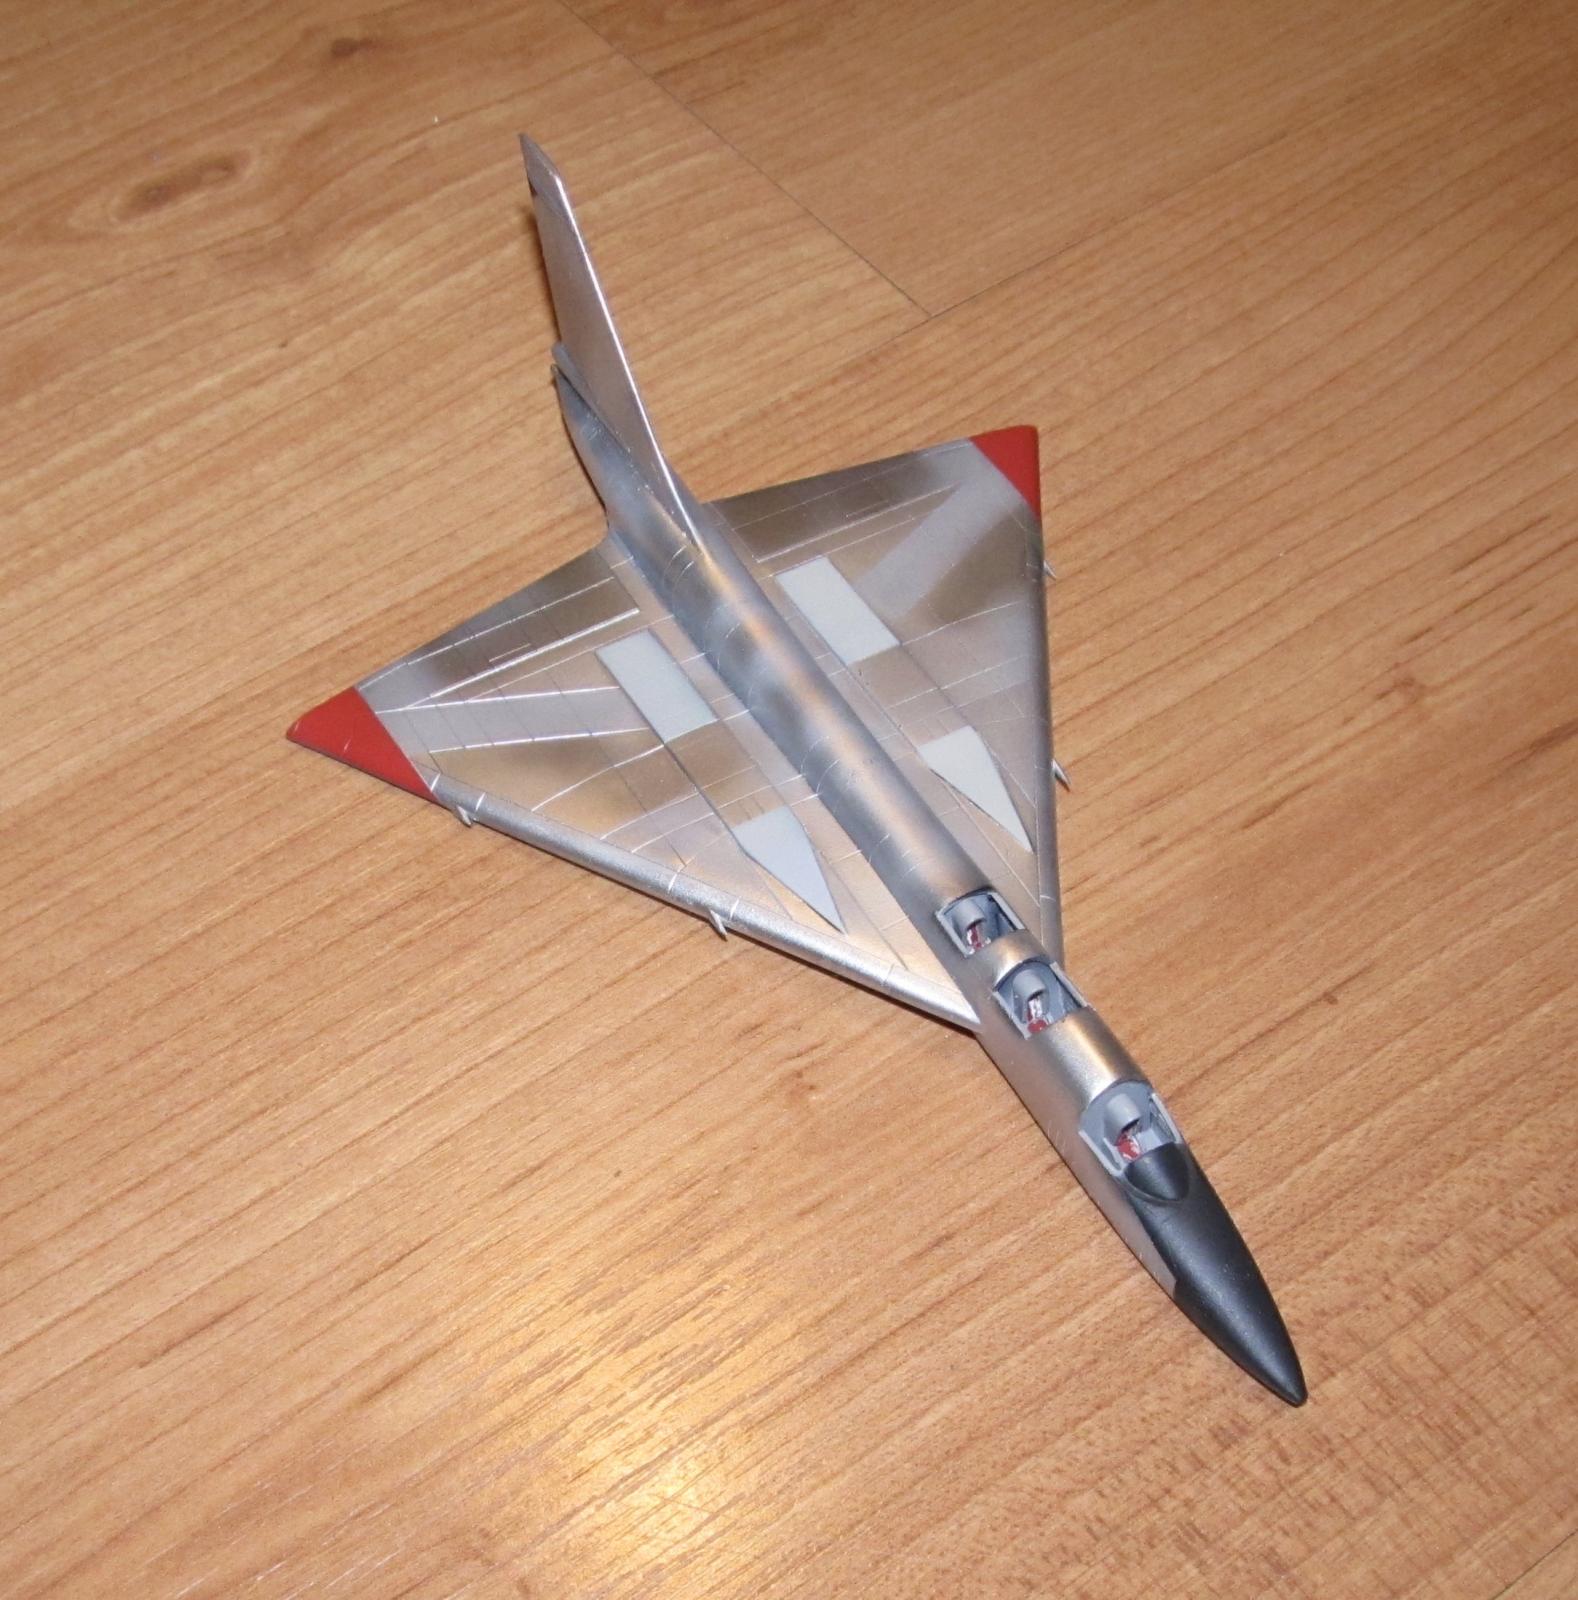
Each sub component was wiped clean of acrylic primer dust before being painted. The back half of the engine pods were painted alternating subtle bands of Vallejo Metal Color Dark Aluminum and Pale Burnt Metal The front half of each pod were painted Vallejo Metal Color Chrome as well as the leading edge of the inside engine pylons. The two pylons were masked off and painted Aluminum. The separate exhausts were painted a combination of Tamiya XF-56 metallic grey and Vallejo Metal Color Jet Exhaust.
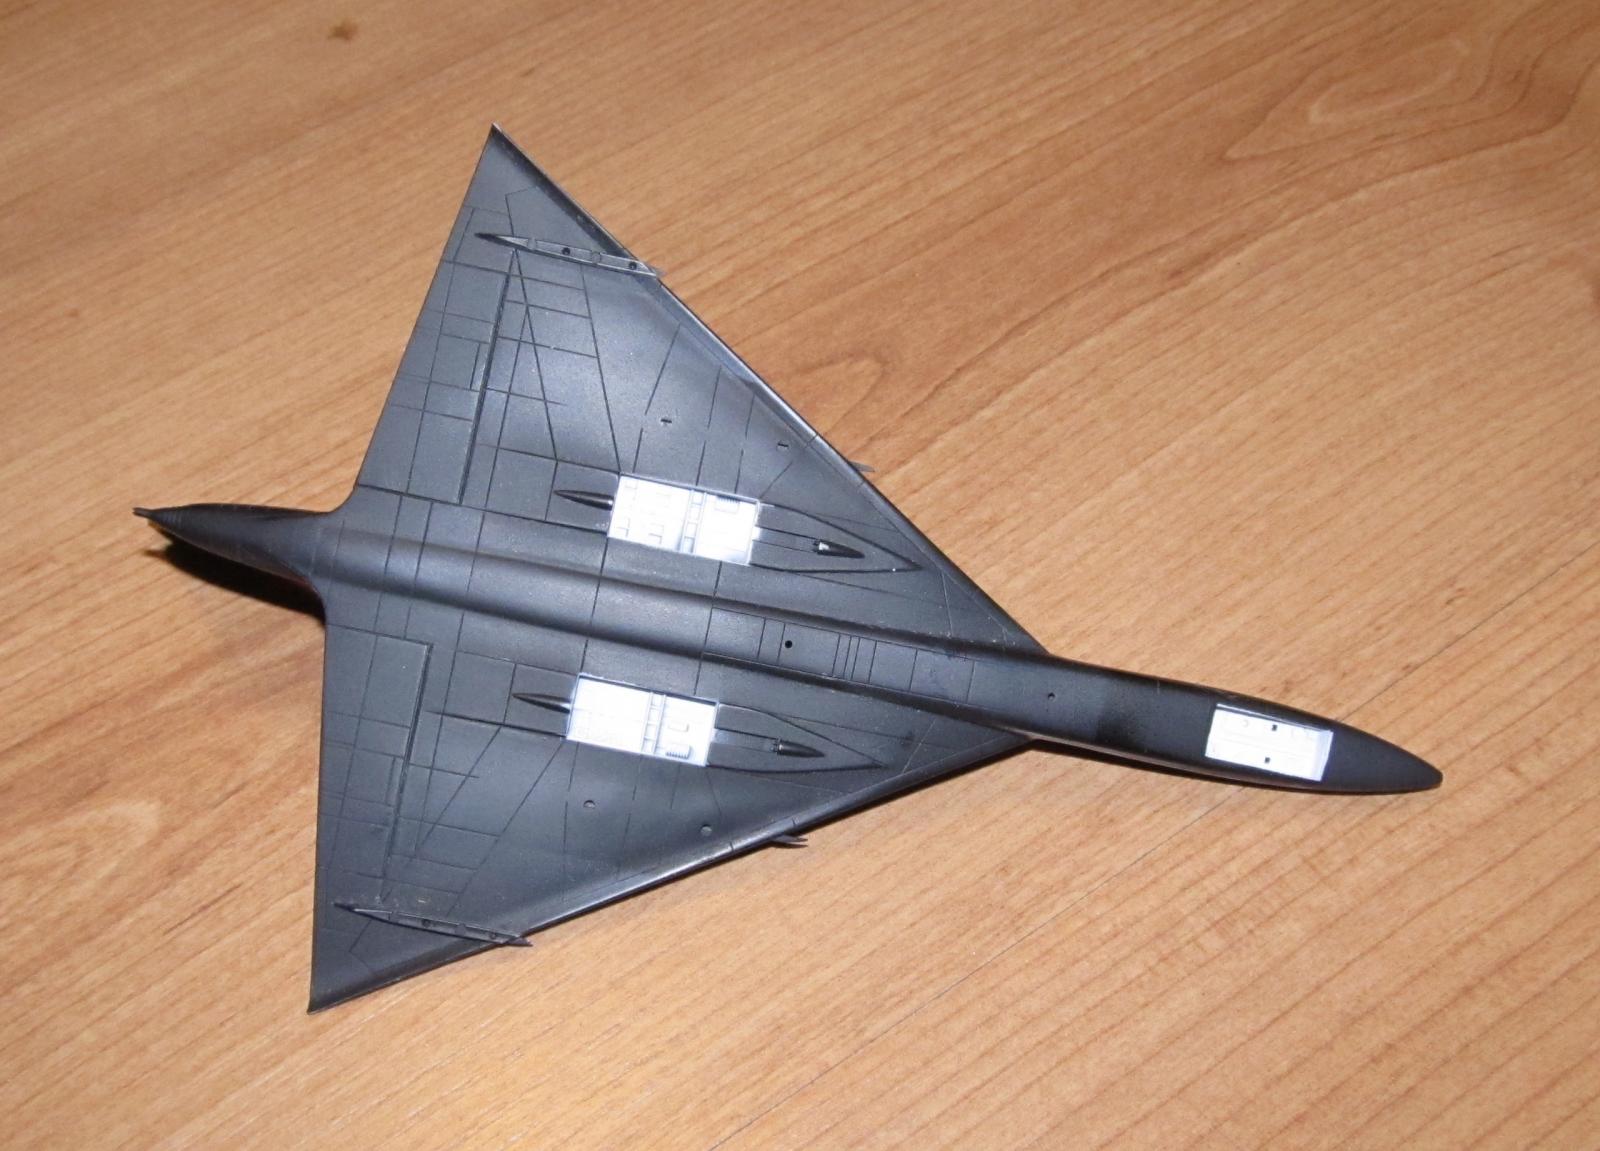
Next sections of the wings and interior were masked off and painted with light gull grey to represent the anodized sections while the wing tips were painted flat white then insignia red to as per the plane markings I was going to use. The nose cone was masked off and left in black primer to represent the black nose painted nose. Once it was dry, these areas were masked off and the plane was painted with various colors from the Vallejo Metal Color Range. I started off free handing the colors, but that didn't look as good as I hoped especially on the wings. I broke out the crappy Chinese knock off Kabuki tape and masked off each section on the wings and painted again. This sharpened the demarcation lines between each metallic color. I left the fuzzy edges on the fuselage as those looked okay.
I ended up going over the this plane several times as I corrected mistakes or did not like the look.
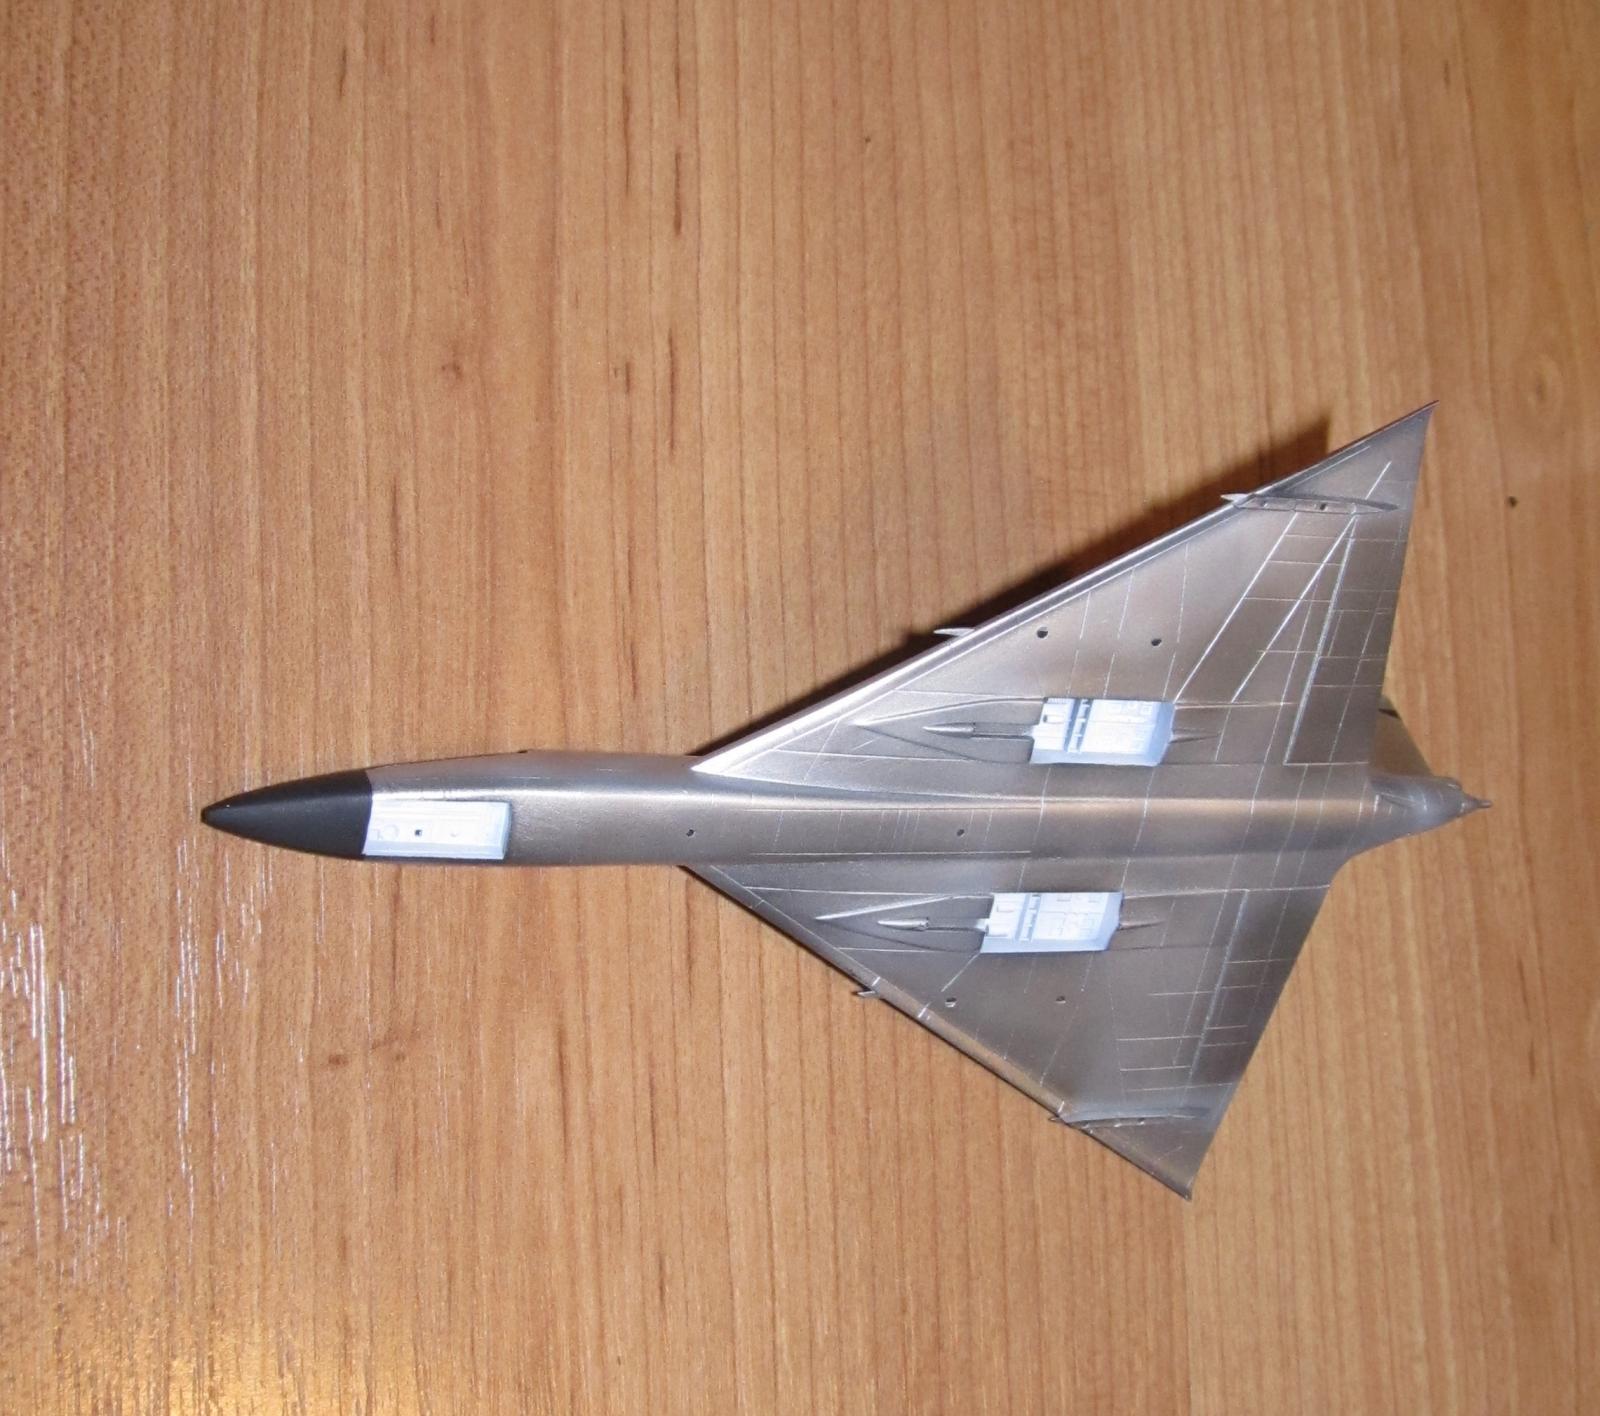
Also, I used an unused wheel mask from a Eduard Spitfire masking set of the appropriate size to provide the perfect circle for the UHF command radio antenna that is located on top between the forward cockpit and the 1st rear cockpit. It took a while to place the Kabuki tape in the proper position. More tape was put down to protect from overspray and I sprayed on Xtracrylix Light Gull Grey. It worked out the first shot (for a change.)
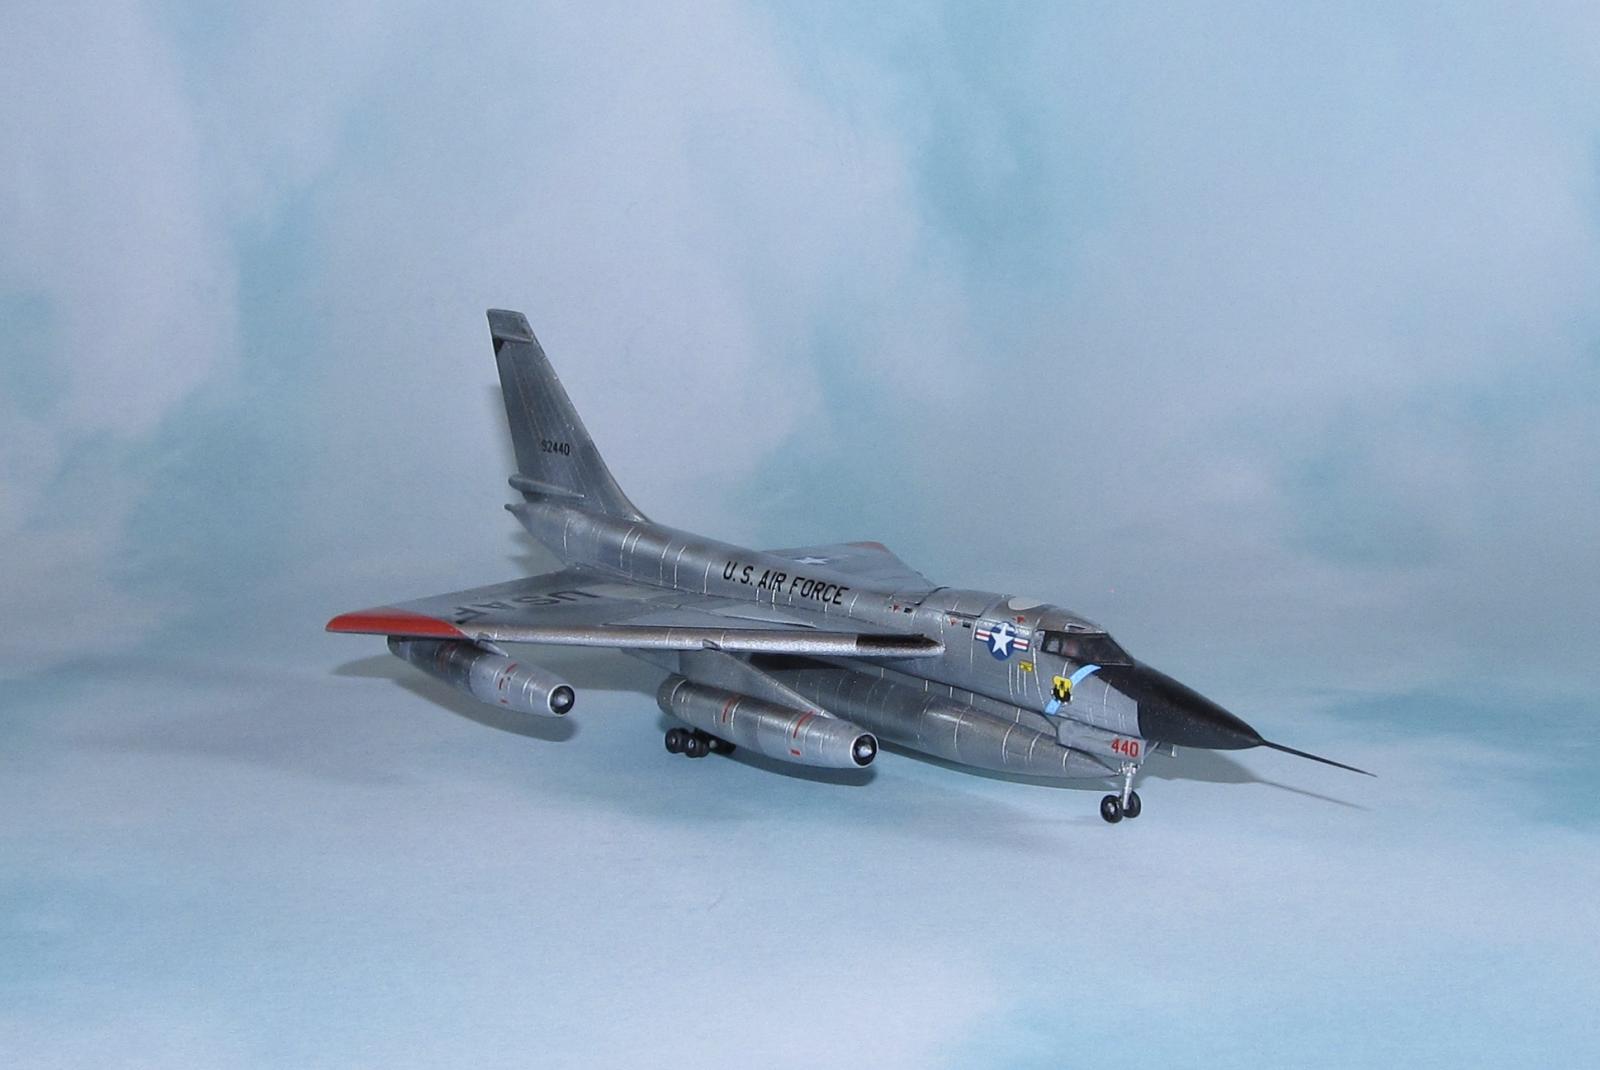
I wasn't sure what the landing gear well color(s) was(were.) A quick google search of B-58 wheel well pics showed off the wheel wells of a lot of models but very few of the real thing. Some folks who used silver/baremetal or zinc chrome yellow, but I ended up going with flat white which was borrowed from the only actual B-58 wheel well photo I could find.
The entire model sans landing gear was sprayed down with Vallejo Metal Color Gloss Metal Varnish which is quite good, but it takes a few days to dry (quite sticky to the touch.)
Markings
As the model had the Hobbycraft black box which generally means that the decals were okay to use. Each of the markings went on well with some Microset.
However, I screwed up the portside serial numbers on the tail because the decal moved as it was drying and I didn't notice till it was too late. I gently scratched it off without removing the paint and used some small numbers from a 1/48 scale Caracal USAF number sheet which was the same size.
I opted not to weather the plane due to the small scale and every picture I've seen of a B-58A Hustler gave the illusion that it was kept in pristine condition.
FINAL CONSTRUCTION AND GOOF CORRECTIONS
I drilled out the hole in the nose cone and added a pre painted brass Master pitot tube instead of the clunky and fragile plastic kit tube.
The engine pods were glued in place using small dabs of CA glue on the mounting pegs and Tamiya extra thin glue elsewhere.
Next I worked on the landing gear. The B-58 Hustler in real life has a very complicated landing gear. It is quite ugly to assemble in 1/48, but simplified in 1/144 scale. It doesn't mean that it was easy as the parts are delicate and require some knife work or the use of a saw blade to remove them off the sprue trees. These parts were cleaned up with a sharp knife, primed and painted Vallejo Metal Color Silver. There are 18 tires on the landing gear. Each tire was cleaned up and painted. The metal hubs were painted with a fine tip brush silver. The wheels and/or wheel mounts were glued on each of the landing gear and left to cure. Finally the landing gear was glued on and aligned. However, the wheels did not line up as well as I hoped.
The original plan was to make an open cockpit so each of the tiny windows was masked off in the various clear parts and painted flat black and duraluminum. I then painted the interior of the hatches flat white to approximate the actual color used. There is a reason why models of this plane are closed up and I found out why as I positioned the hatches open and then realized how bad it looked. Instead I glued down the hatches which fit decently except the 3rd cockpit hatch. I had to sand both front and rear edges down to make it fit...sort of. Not happy about it, but not much I can do unless I want to repaint the fuselage all over again and I don't.
Lastly, the various doors were painted and decals added to the landing gear doors. They were glued on using CA Glue.
It was at this point when I realized that I forgot to paint the black walkway (?) markings at the leading edge where the delta wings meet the fuselage. Using the extremely low tack Chinese tape, I masked off those areas based on the instructions and sprayed them flat black. Fortunately, the tape did not lift any of the decals and I did not need to fix any overspray.
The final coat of Metal Color Glossy Metallic Varnish was sprayed on.
CONCLUSION
The Hobbycraft/Academy B-58A Hustler is a mostly straight forward kit to build of the supersonic nuclear bomber. It is not a common kit in its Hobbycraft boxing, but can be found from time to time in its Academy boxing on various auction sites. It currently isn't in production.
It was a fun build and provide useful practice for NMF finishes. Not recommended for beginning modelers due to the complicated NMF unless you're looking for a challenge painting wise. I am glad I finally had a B-58A Hustler on the shelf.
Great tiny model. NMF finish and decal application are super! I actually love 1/144 though have built only two in that scale as I found the eyestrain exhausting. However- I would love to have my 50+ 1/48th collection able to fit in one, moderately sized display case. Can't imagine how the 1/32 folks cope... So has any one built a 1/32 (or larger?) He-111Z or Do-X?... Love to see where it lives. 😉
1/144 generally hurts my eyes too (now as I'm deep into middle age.) It's good for large scale projects that I'll probably never build like a 1/48 Hustler. The 1/48 Hustler is pretty huge and would require it's own shelf (assuming it can fit on a cabinet shelf.) My 1/48 Hustler will probably sit on the shelf never to be built. Also as Tom pointed out, it isn't the easiest kit in the world to build (combined with NMF makes it downright difficult.)
Nice work, @dbdlee - doing this airplane isn't easy in larger scales, let alone this scale, and you got a great result.
Thanks Tom. It was a lot of work even for 1/144.
Amazing model, my friend @dbdlee! Super NMF!
I love 1/144 scale! Has such interesting subjects to offer, such as this one, a joy to see them excellently built.
Thanks Sprios. I enjoyed building it. As I mentioned earlier, I probably won't build its 1/48 cousin because of all the NMF and issues with said kit.
Very nice build, Dan.
Lots of compliments to achieve this result on such a tiny scale.
Thank you! 1/144 isn't bad for larger planes. I plan on doing more larger planes in this scale.
Sharp metalwork!
Thanks. Not to be an unpaid spokesman for Vallejo, but I am going to be... their Metal Colors make NMF a lot easier these days.
Nice work. Like you I build mainly in 1/48, and dabble in 1/72. Upon finishing a Hasegawa original-tool 1/72 F-104 I remember thinking I could've just as easily had a "real" 1/48 one done by now. Of course the parts count, glue and paint are less but the amount of modeling energy expended is the same. The decals still have to go on just as straight, etc., maybe even straighter.
I still love it, it's right near me now to see and make me happy, so it wasn't a waste by any means but it taught me a good lesson. I guess what I mean is you've done this so the 1/48 kit isn't beyond you. Again, great work.
That's the point. I really enjoyed building it. I know from folks who built the 1/48 Monogram version is that they didn't enjoy it quite as much. Outside of masking the paint, this kit was an easy build.
It's mostly a matter of shelf space (or lack there of.) Still tempting to tackle it though.
Beautiful build of a beautiful aircraft!
Thank you!
Looks great! Well done.
Thanks very much Gregg!
Great model of a great airplane! Thanks for sharing also the WIP photos, that adds value for all who want to go the same or similar path!