Oorah!
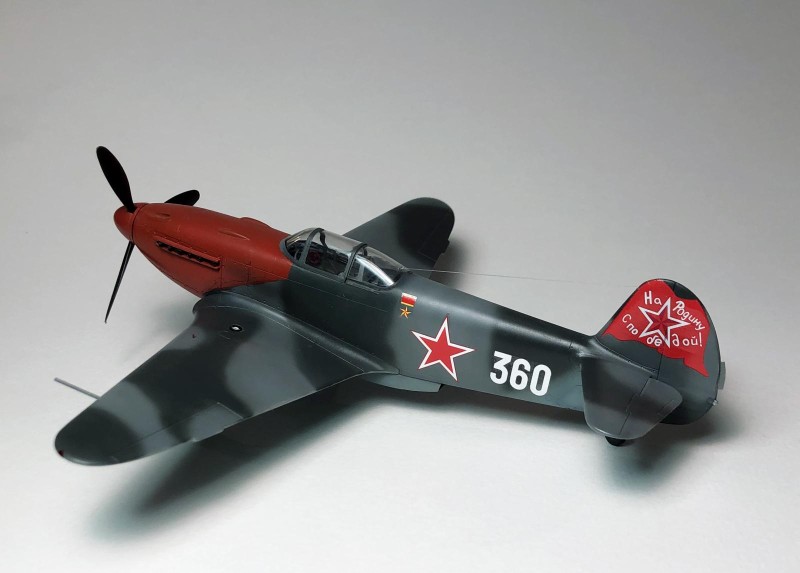
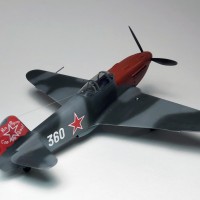
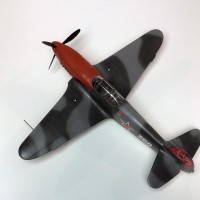
Today I'd like to share my 1/48th scale Eduard Yak 3 with the group. The kit is one of that company's older efforts, first appearing in 1998, but it's a well-done if occasionally inaccurate effort that does a credible job of representing Yakovlev's ultimate lightweight fighter. This one was built almost entirely from the contents of the box, to include those in-your-face decals.
Over the years a number of modelers and historians have commented upon the Eduard Yak 3's inaccuracies, the primary one being it's overall "softness" of line, for want of a better term. People who know far more about Yak fighters than I do have commented that its outline and overall shape don't adequately depict the pugnacious little fighter's lines, and I'm ready to concede to that statement, but it does look the part once built and, in this instance, was completed prior to the release of Zvezda's more accurate effort.
The model is essentially box stock with a couple of small additions. The Yak 3 featured what I'm going to call splitter plates within the wing-root ducts and the Eduard kit doesn't have them, but they're easy enough to make from sheet styrene and definitely add to the appearance of the model. I've never been a fan of the pitot tubes as represented in Eduard's older offerings, so the one in the kit was replaced with an appropriately sized blunt hypodermic needle ("blunt" meaning it's not meant for injection purposes and therefore has a squared off tip rather than a sharpened one), while the tiny "tell-tales" that stick up from the wing's surface to let the pilot know whether the landing gear is extended were duplicated with thin brass wire. The antenna wire was duplicated with monofilament line (2-pound, I think) intended for fly fishing and accomplished by drilling a #80 hole through the aft canopy over the radio gear, with a corresponding one in the leading edge of the fin---that allows the antenna to properly connect to the airplane's primitive com gear and provides a nice detail. The monofilament was attached with slow-drying cyanoacrylate, which allowed me to pull it taught with tweezers for the several seconds required for it to cure. Oddly enough that antenna was the one thing on the model that I was apprehensive about but it turned out to be among the easier tasks to accomplish.
There's a modest amount of photo-etch used on the model, primarily because it was a Profi-Pack offering and came with the kit. I could've used resin aftermarket exhausts but chose not to because they're so darned tiny and shrouded to boot; you can barely see the ends of them once they're in place. There is a small amount of aftermarket resin should you choose that route for your own model, of course; besides QuickBoost's exhausts, Barracuda makes a dandy seat and a set of wheels, for example, but you can get a reasonably attractive model using only what's provided in the box. Paint was courtesy mixtures of my current stand-by Mr Color, mostly because my late-War Akan paint had yet to arrive. It was on order while the model was being completed but was delivered the week after the completed effort was placed on the display shelf. As an aside, Akan is now my go-to VVS paint and it's what I'll use on any future builds but I didn't have it when this one was built. Such is life...
The markings shown were included with the kit and represent a late-War or immediate post-War fighter from the 150th GIAP as stationed in Czechoslovakia in 1945 and may or may not be entirely accurate when compared to the most recent research regarding that unit's aircraft---keep in mind that this particular kit was released as one of Eduard's Limited Edition series of models (kit #1119, produced in 2006). It's an older effort on their part, which means the markings included are based on research done 15 or more years ago.
The model was a simple one to build and detail, and was a lot of fun to build. It's been superseded in accuracy by the far more recent Zvezda offering and its markings may well be a bit inaccurate as well, but the completed model makes a striking addition to anyone's collection of VVS fighters from The Great Patriotic War. My next Yak 3 will be from the Zvezda kit, but this one won't be scrapped out or removed from the collection anytime soon.
phil
I think it looks great, Phillip (@phillipfriddell). The colors are striking. You have certainly brought out the best in this elderly kit.
Congratulations, Philip!
You brought out the best of the now elderly Eduard Yak.
Amazing mini additions and improvements, together with excellent modeling skills, a striking scheme beautifully rendered, what is not to like?
Thanks for the detailed article, as well!
Very nice finish, Phillip @phillipfriddell
The scheme of your Yak looks perfect.
Red accents always do look great to my opinion.
Nice work, Phillip. Looks like you matched the Akan shades pretty closely. I for one was surprised how dark these colors really were when modern research came to light.
Thanks very much for your comments, guys!
John, I was surprised how dark those colors are as well. Attached is an example of Akan on an old Accurate Miniatures Yak-1B that I built right after finishing the Yak-3. The kit isn't particularly accurate, or so it seems, but I had the Exito "Yak Attack" decals and had to try out that snake scheme! The model still requires weathering and radio antennae but is close enough to complete to make the point regarding Akan's color interpretations.
On a more practical note, I absolutely LOVE Acan's lacquers. The paint is just super, or at least it is when reduced with Mr Color Leveling Thinner. Good stuff and highly recommended!
phil
1 attached image. Click to enlarge.
G'day Phil (@phillipfriddell),
This is a great build.
As you can see below, I built the same aircraft back in 2008.
Like you, I added the splitter plates to the intake ducts.
Both my closed canopies had the same flaw in them, so I used the open canopy pieces (I think this would have been one of Eduard's first Dual Combo boxings).
I wasn't happy with the colours that Eduard specifies in the instructions, so I mixed/sourced may own. 13 years ago it was hard to find any information on Russian colours and, with considerable hindsight, the light grey is far too light.
Your colours are much better.
A few years ago I bought a set of Vellajo Soviet VVS colours, but haven't had a chance to use them. When I build the second kit, or one of the other Russian kits in the stash, I'll give them a go.
Liked!
1 attached image. Click to enlarge.
Nice job Phil @phillipfriddell - I am building the Eduard weekend version of this at the moment. Great work with the splitter plates they are very distinctive and it helps give the great result that you have achieved here.
It's one of Eduard earlier offerings but still a nice little kit and mine will be going to paint soon.
It will be my first foray into VVS grey pattern camo - so we will see how that goes - I may just go for AK real colours for the AMT11 and AMT 12 and see how I get on.
Congrats on a great scheme well executed!
Hi Michael, and thank you!
Eduard's instructions, coupled with Pilawskii's once seminal book, led a great many of us down the path to incorrectly-painted VVS models way back when and I've got another Yak-3 and a Gavia La-7 sitting on the shelf, both in lighter greys than they should be wearing, to prove it! The canopies were ok on both of mine, gratefully, and the builds were extremely easy, but the colors are wrong---guess it's time to strip and repaint them!
That said, I like your treatment of the kit a lot. There's absolutely no mistaking what the airplane is or who operates it and the model is well-done indeed---kudos, and thanks for sharing it!
phil
Hi, David, and thanks! It's a neat little kit for sure and still well worth building, perhaps even more so since the explosion of good VVS references began appearing in the West several years ago. Please post photos of your model when it's done!
phil
Very nice build, and some fun markings! Looks great.
🙂 ... Greetings ... 🙂 :
A very much appealing and attractive work accomplished in this model Phillip.
The camouflage is so well done that it is quite a joy to see over and over again.