Revell/Italeri 1:72 HO4S-1 Chickasaw
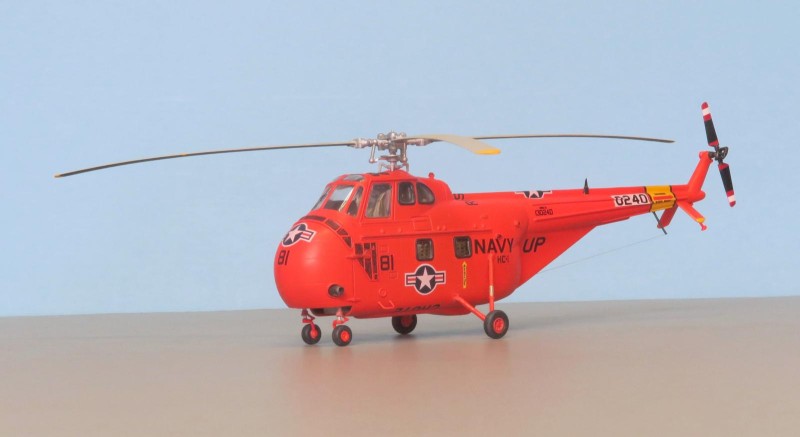
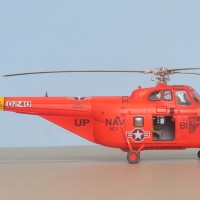
This is the second of the 1:72 helicopters I built for my club's 2021 theme build of Rescue and Recovery. It's mostly the Revell H-19A kit, but I also purchased a copy of the Italeri H-19B kit and used some of its parts interchangeably. I wanted to do something really eye-catching, so I went with one of the options on a Print Scale sheet: a Navy HO4S-1 of HC-1 stationed at NAAS Ream Field outside of San Diego around 1965.
It was a reasonably straightforward build, although I had trouble getting it to sit evenly on all four wheels and had to pull one of the nose wheels out and insert a piece of guitar string which allowed me to adjust its height to match the others. I fashioned the ventral tail antenna mast out of stretched sprue and the dorsal blade antenna out of .010" sheet styrene. The dorsal antenna should be further forward, just behind the national insignia, but I didn't notice the mislocation of the molded fairing until the model was all painted, so I took the easy way out.
For paint, I used a bottle of Model Master enamel ANA 634 Fluorescent Red FS 28915 that I happened to find on the clearance table of a local hobby shop. The color OOB appeared a little too red, so I mixed in some Model Master International orange 1-to-4 to more closely match my FS595 chip. In doing so I was unwittingly a victim of Print Scale's shoddy (read lack of) research. They stated 1959 as the date depicted, during which ANA 634 was in use. However, I later discovered (after the model was completed), that HC-1 (originally HU-1) wasn't so designated until 1965, by which time the color in use was ANA 633, FS 28913, for which the Model Master color is a pretty good match being somewhat redder. Oh well; apparently Fluorescent Red drifted toward orange as it weathered, so I'm still in the ballpark. Neither Print Scale nor the kits provided the yellow/black tail warning area, so I masked and painted it. To simulate the open grills at the nose I used liberal amounts of Tamiya black panel line accent color.
The markings were another adventure. The NAVY designator has to fit between the top of the rear main gear strut and the nav light fairing, but the kit was engineered with the strut joint a bit too high, so the marking wouldn't fit. Further, Print Scale designed all the markings using 45-degree block letters, but available photos clearly show the postwar 60-degree letters at least for the aircraft data block and unit designator. Therefore I designed replacements using the USN Longbeach font as well as slightly reduced NAVY markings, and laser printed them.
Cheers, Pip



That is one bright bird! Looks great.
Thanks very much Greg!
That is one lovely piece of work, you're an inspiration sir!
Thanks Ian, much appreciated!
Nicely done Pip, it looks great!
Thank you Bob!
An awesome result, especially for the scale, Pip!
Congratulations!
Thanks very much Spiros! It's actually quite a nice little kit. I opted not to do much inside the cabin, but one could add a ceiling and other details.
This Chickasaw looks amazing, Pip @seawinder
Hard to believe it is 1/72
Thanks very much John!
It has been on my wishlist for a long time, but I don´t really have place for helicopters anymore. Really nice build!
Thank you Csaba. Yes, they do take up a lot of space. That's why I only build them in 1/72 while 1/48 is my scale of choice.
Shades of Antarctica Pip. Great build and finish. Good work...
Thank you Clark!
After I put on my sunglasses, I could see that is a really excellent model.
Thank you Tom, much appreciated!
Great job, Pip.
didn't even consider that four wheels may need additional attention. Uneven tables always drive me crazy.
Thank you George. The problem with the four wheels is that there's a lot of play and nothing to indicate the proper angle in the fitting of the main struts. I made the conceptual mistake of installing the nose wheels first and then adjusting the main struts. Wrong: should have done it the other way around.
Looks great, love that scheme!
Many thanks, Robert!
Nice work, Pip. How did the paint spray? Fluorescent and day glo colors are always tricky.
Thanks very much John. The paint was actually quite easy to use including a fair amount of touching up with the brush. It seems to be somewhat more fragile than ordinary Model Master enamels, thus a lot of the touching up. It also has a weird, nasty odor, unlike any other paint I've sniffed.
Good looking chopper and colorful as well. I like it.
Thanks, Tom, glad you like it. I'm rediscovering that helicopters can make fun and interesting projects.
Very Nice Pip!
Congrats on a super build.
Thank you very much David!
Very nice Pip - and you succeeded in making it eye catching - not only because of the colour but because its a fantastic build - well done.
Thank you very much, Anthony!
The colour looks great, makes for a very attractive model, we call them Whirlwinds where I come from.
Thank you George. East of the Pond, eh? I think the next helicopter project on the docket will be a Westland Wessex in the cool yellow/blue-grey ASW scheme.