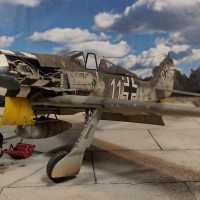
Eduard 1/48 A6M3 Model 32 Zero
The Airplane:
The A6M2 Model 21 Zero revealed it was slightly underpowered when it entered combat in 1941. Mitsubishi answered this problem with the A6M3, powered by an uprated Sakae 21 engine, which used a two-speed supercharger for better altitude performance, and increased power to 1,130 hp. A prototype with the new engine was first flown on July 15, 1941. The new engine was slightly heavier and somewhat longer due to the larger supercharger, which moved the center of gravity too far forward on the existing airframe. To correct for this, the engine mountings were cut back by 7.3 inches, which reduced the size of the main fuselage fuel tank located between the engine and the cockpit from 137 gallons to 120 US gallons. The cowling was redesigned to enlarge the cowl flaps, revise the oil cooler air intake, and move the carburetor air intake above the engine in the upper half of the cowling.
The Model 32 featured a redesigned wing with the folding tips removed, which squared off the wingtips. The inboard edge of the aileron was moved outboard by one rib, and the wing fuel tanks were enlarged to 110 gallons. The 20 mm cannons were upgraded from the Type 99 Mark l to the Type 99 Mark II, while ammuntion capacity was increased to 100 rpg.
The changes increased maximum speed by only 6.8 mph compared to the Model 21, but reduced maximum range by approximately 620 miles. The shorter wing span led to better roll, while reduced drag allowed diving speed to be increased to 420 mph. Maneuverability suffered due to smaller ailerons and decreased lift, while range suffered due to greater fuel consumption. Nevertheless, the navy accepted the new type and it entered production in April 1942. Mitsubishi produced only 343 before it was replaced by the A6M3 Model 22, which restored the Model 21 wing and the maneuverability and better range than the A6M2.
The reduced range proved a significant limitation during the Solomons Campaign, where Zeros based at Rabaul had to fly nearly to their maximum range to reach Guadalcanal and return. Thus, the Model 32 initially entered combat over New Guinea, where it replaced the Model 21s of the Tainan Air Group based at Lae and Salamaua. The lack of range spurred the Japanese to construct airfields on Bougainville, the northernmost island of the Solomons chain, which allowed the Model 32 to be widely used during the Central Solomons campaign that commenced after the U.S. took control of Guadalcanal. The new type equipped the carrier air groups of the ships at Truk, and saw combat at both the Battle of the Eastern Solomons and the Battle of Santa Cruz. They were pressed into service at Rabaul and saw extensive combat during the Rabaul campaign between September 1943 and February 1944.
The initial appearance of the redesigned A6M3 Model 32, which was initially thought to be a completely new type, prompted the USAAF to assign it a new code name, "Hap". The name was short-lived, as a protest from USAAF Commanding General Henry "Hap" Arnold forced a change to "Hamp". Soon after, it was realized it was simply a new model of the "Zeke" and was termed "Zeke 32".
The Yamamoto Mission"
On April 14, 1943, Private Harold Fudenna, who belonged to a unit of the U.S. Army's Military Intelligence Service composed of Nisei (second-generation Japanese Americans) that specialized in translation of materials ranging from standard textbooks to captured documents, was given message NTF131755, which had been sent in the Japanese diplomatic code known as “Purple” by the Japanese Foreign Ministry to diplomatic personnel in the South Pacific, alerting them to a planned visit by Admiral Yamamoto to inspect all Imperial forces at Rabaul and Bougainville involved in Operation I-Go, the final Japanese attempt to wrest back control of Guadalcanal which had begun on April 7. The message outlined the Admiral's itinerary and schedule of arrivals and departures. When Private Fudenna translated the message, it was at first met with disbelief that the Japanese would be so careless. However, other MIS linguists at stations in Alaska and Hawaii also intercepted it and confirmed the accuracy of Fudenna's translation.
Events moved quickly. Some sources have claimed the order to “get Yamamoto” came directly from President Roosevelt to Navy Secretary Frank Knox, though no official record of such an order has ever been discovered. Secretary Knox was not a man who needed someone else to tell him what to do with the information once he saw it. He let Pacific Fleet commander Admiral Nimitz make the decision after consulting Admiral Halsey, Jr., Commander, South Pacific. When Halsey read the message, he immediately saw the potential to decapitate the top command of the Imperial Navy. He made no bones about his attitude, naming the mission “Operation Vengeance.” It was coincidental that April 18, 1943, was the one-year anniversary of the Doolittle Raid which had provoked Yamamoto to attempt the invasion of Midway, which turned into the battle that reversed the course of the Pacific War.
The Americans did not know that Japanese officers at Rabaul had tried to convince Yamamoto to cancel the Bougainville visit out of fear of ambush being that close to the Americans. The admiral determined to go regardless, believing the men on Bougainville in the front line units of the I-go operation and the Army troops on the island needed the morale boost. His one concession to the potential danger was that he discarded his white dress uniform in favor of a khaki uniform.
Major John A. Mitchell, commander of the 339th squadron, was assigned to lead the mission, which would be composed of 18 P-38s. One flight of four was designated the "killer" flight, while the rest - including two spares for the first flight -, would fly cover at 18,000 feet to deal with the expected reaction by enemy fighters based at Kahili.
The 18 P-38s lifted off from Fighter One at 0725 hours. Two P-38s assigned to the killer flight dropped out early on. One experienced a flat tire during takeoff, while the second aborted when its drop tanks failed to feed. Mitchell and his flight of four led the formation. The “killer flight” was now composed of first element Captain Tom Lanphier in number 122 “Phoebe,” and 1st Lieutenant Rex Barber in number 147 “Miss Virginia, a P-38 normally flown by Captain Robert Petit, and second element spares 1st Lieutenants Besby F. Holmes in number 100, the oldest P-38 in the unit, and Raymond K. Hine in number 102. Mitchell, flying number 110 “Squinch” since his regular aircraft was down for maintenance, managed to navigate entirely by dead reckoning on the longest interception mission of the war. His navigation was so skillful that the P-38s arrived at the intercept point at 0934 hours, one minute early. A moment later, Yamamoto's bombers and their six escorts descended into view in a light haze.
Mitchell radioed Lanphier and Barber to engage. The nearest Zeros spotted the enemy fighters and dived toward the pair of P-38s. The two Bettys increased their dives, the pilots hoping to throw off the approaching Americans by flying low over the jungle. Lanphier immediately turned head-on towards the approaching Zeros while Barber went after the bombers. He banked steep and turned in behind the bombers, momentarily losing sight of them in the sun. When Barber regained visual contact, he found himself immediately behind one, He opened fire, hitting it in its right engine, rear fuselage, and tail. He aimed a second burst at the left engine which immediately trailed heavy black smoke. The Betty rolled violently to the left and Barber narrowly avoided a mid-air collision. He turned to the right, looked back over his shoulder, and saw a column of thick black smoke rising from the jungle 200 feet below.
Barber then attacked the crippled bomber. His fire blew off debris that damaged his P-38 as the Betty crash-landed in the water. Ugaki and two others survived and were later rescued. Barber, Holmes and Hine were then attacked by the nine Zero escorts. When he got back to Guadalcanal, Barber's P-38 was had 104 hits. Holmes and Barber each claimed a Zero shot down, though the Japanese records record no losses.
At this point, the story took an additional twist that would not be finally settled for 50-odd years: who shot down Yamamoto?
Tom Lanphier's actions during the battle after he turned toward the approaching Zeros were unclear and his account was later disputed by the other participants, including the Japanese fighter pilot who was interviewed after the war. The formation had broken after the attack and Lanphier was one of those who returned alone. As he approached Henderson Field, Lanphier radioed "That son of a b***h will not be dictating any peace terms in the White House," which was a serious breach of security. Immediately on landing, Lanphier claimed he shot down Yamamoto. He wrote the only report of the mission, in which he stated that after he turned to engage the escorting fighters he shot the wing off one, then rolled inverted as he circled back towards the two bombers. He spotted the lead bomber circling below him, pulled out of his turn and fired, blowing off the right wing after which the Betty crashed into the jungle. He also stated that he witnessed Barber shoot down the second bomber, which also crashed in the jungle.
From Lanphier's report, intelligence officers believed three Bettys had been shot down, since Besby Holmes claimed a Betty that crashed into the sea. Since there were no formal post-mission interrogation procedures in use at the time, none of the other pilots were debriefed and Lanphier was officially credited with being the pilot who “got Yamamoto.” However, many of the other pilots soon expressed skepticism about the official story.
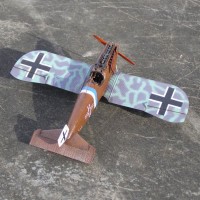
After the war, Imperial Navy pilot Kenji Yanagiya, who had been one of the escort pilots, told Mitchell he might have shot down Hine, since he had attacked and heavily damaged a P-38 escorting another P-38 that still had its fuel tanks. None of the escorting pilots made a claim for a P-38 that day and Hine is still listed as Missing In Action. Yanagiya also stated that none of the escorting fighters were shot down and that only one was damaged sufficiently to require a day of repair at Buin, which was a direct contradiction of Lanphier's claim.
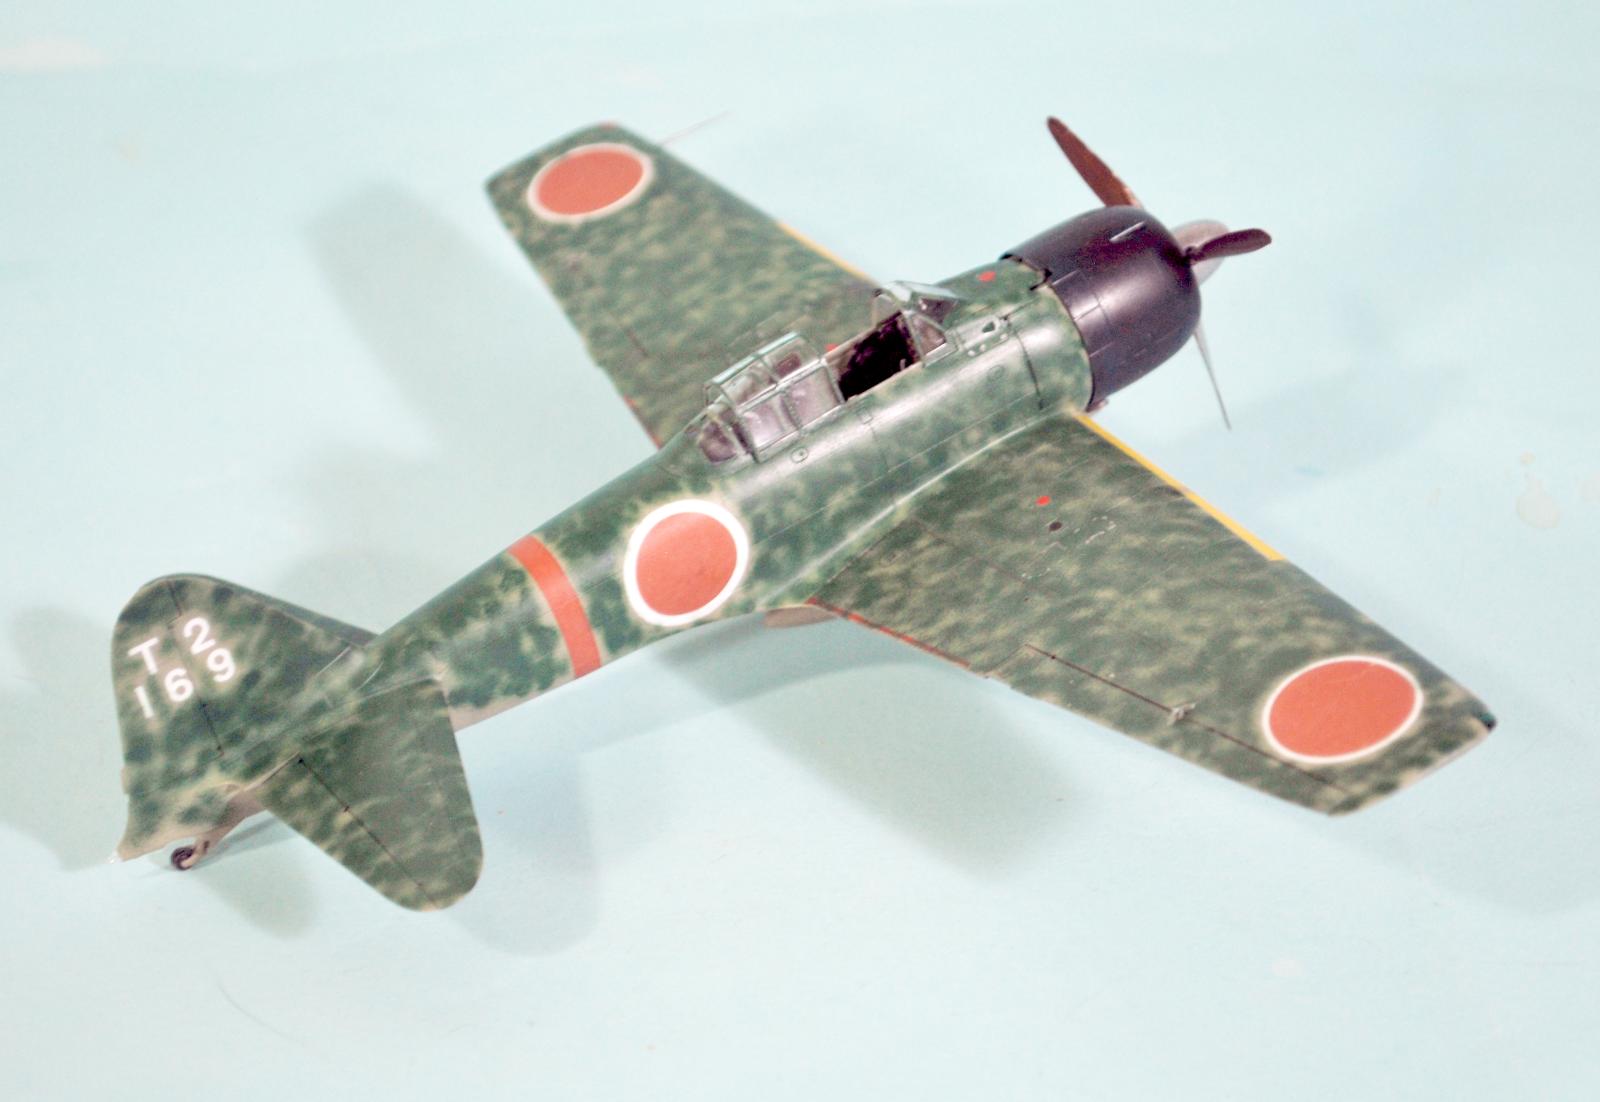
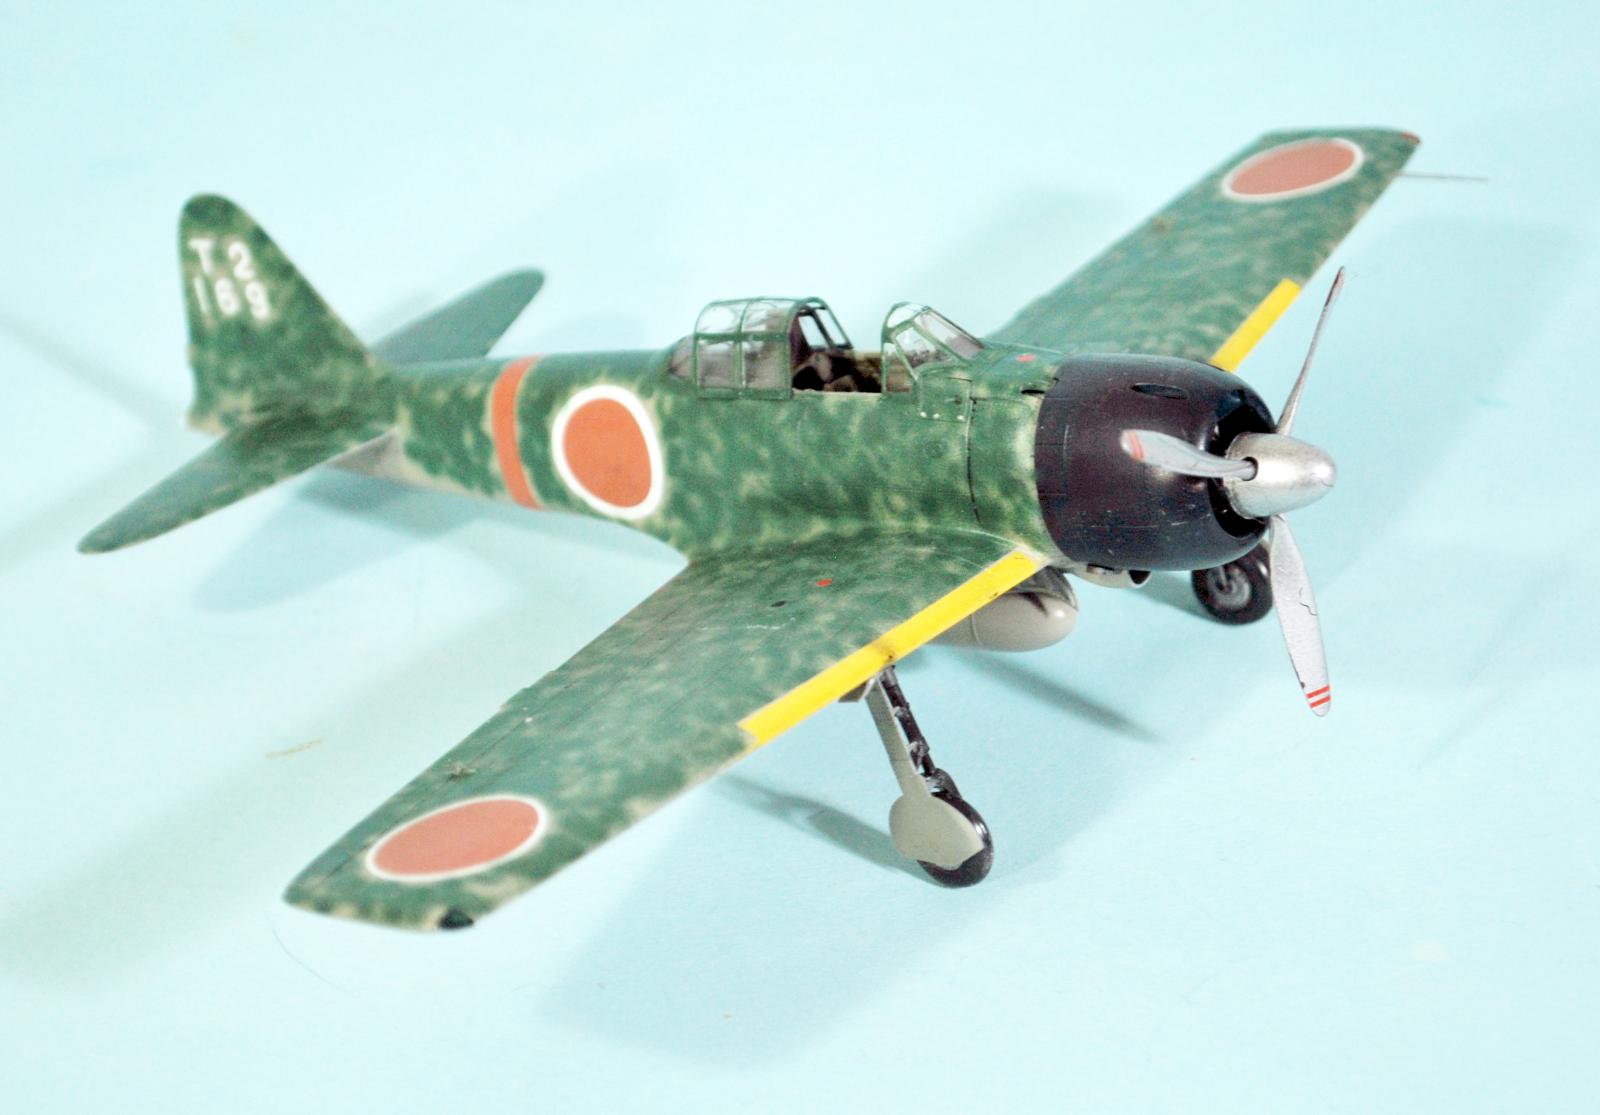
Leading Seaman Kenji Yanagiya was the only one of the six Zero pilots escorting Admiral Yamamoto's G4M1 on his inspection tour of the South Pacific on April 18, 1943, to survive the war.
Eventually, the Air Force split the difference and officially awarded Lanphier and Barber a half credit each for the bomber that crashed in the jungle, with Barber and Holmes each receiving half credit for the second bomber that crashed at sea. A post-war inspection of the Yamamoto crash site validated Barber's account because "all visible gunfire and shrapnel damage was caused by bullets entering from immediately behind the bomber" not from the right. Despite the evidence, Lanphier maintained his claim for killing Yamamoto until his death in 1987, with the credit making it into nearly all the published obituaries. The fight for credit continued even after Lanphier's death, as Barber petitioned the Air Force Board for Correction of Military Records to have his half credit shared with Lanphier changed to a whole credit. The Air Force History Office advised the board in September 1991 that "enough uncertainty" existed in both Lanphier's and Barber's claims for both to be accepted, and Air Force Secretary Donald B. Rice ruled to retain the shared credit. Barber appealed to have the ruling overturned by the U.S. 9th Circuit Court of Appeals, but the justices refused to intervene. Barber contested Lanphier's claim, primarily in military publications, until his death in 2001.
Following Barber's death, the argument remained quiescent until May 2006, when Air Force Magazine published a letter from one of the Operation Vengeance pilots, Doug Canning, who had escorted Holmes back to the Russell Islands. Canning, who had been friends with both Lanphier and Barber, stated that Lanphier had written the official report, the medal citations, and several magazine articles about the mission, and that until he gave Barber an unpublished article claiming he alone had shot down Yamamoto, Barber had been willing to share the half credit for the shoot-down. Canning further stated Barber had a strong case for his claim from the testimony of Kenji Yanagiya, who had stated he saw Yamamoto's plane crash 20 to 30 seconds after being hit from behind by a P-38. Furthermore, Canning stated categorically that the P-38Gs flown that day did not have aileron boost (which was not put on the fighter until the final P-38L model), making it physically impossible for Lanphier to have made the 180-degree turn he claimed he made to shoot down Yamamoto's plane. With this, the Air Force disqualified Lanphier's claim and his air-to-air victories were dropped from five to four. Today, Rex Barber is generally recognized as the man who killed the admiral who planned the Pearl Harbor attack.
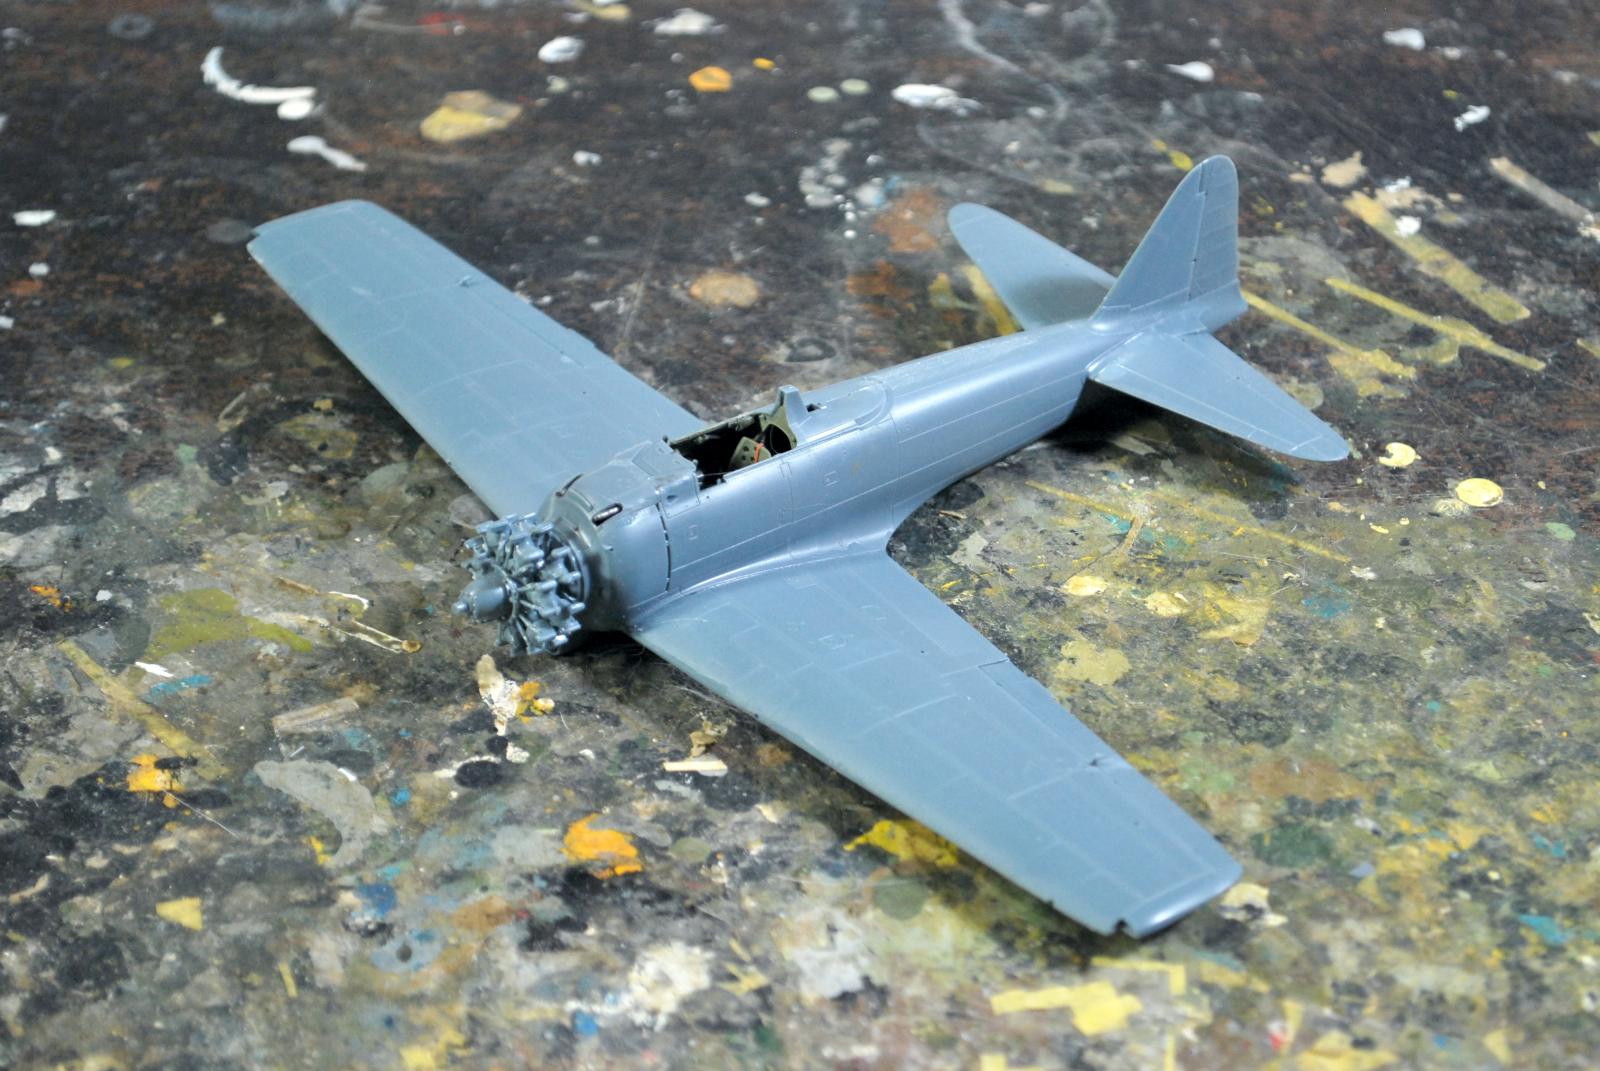
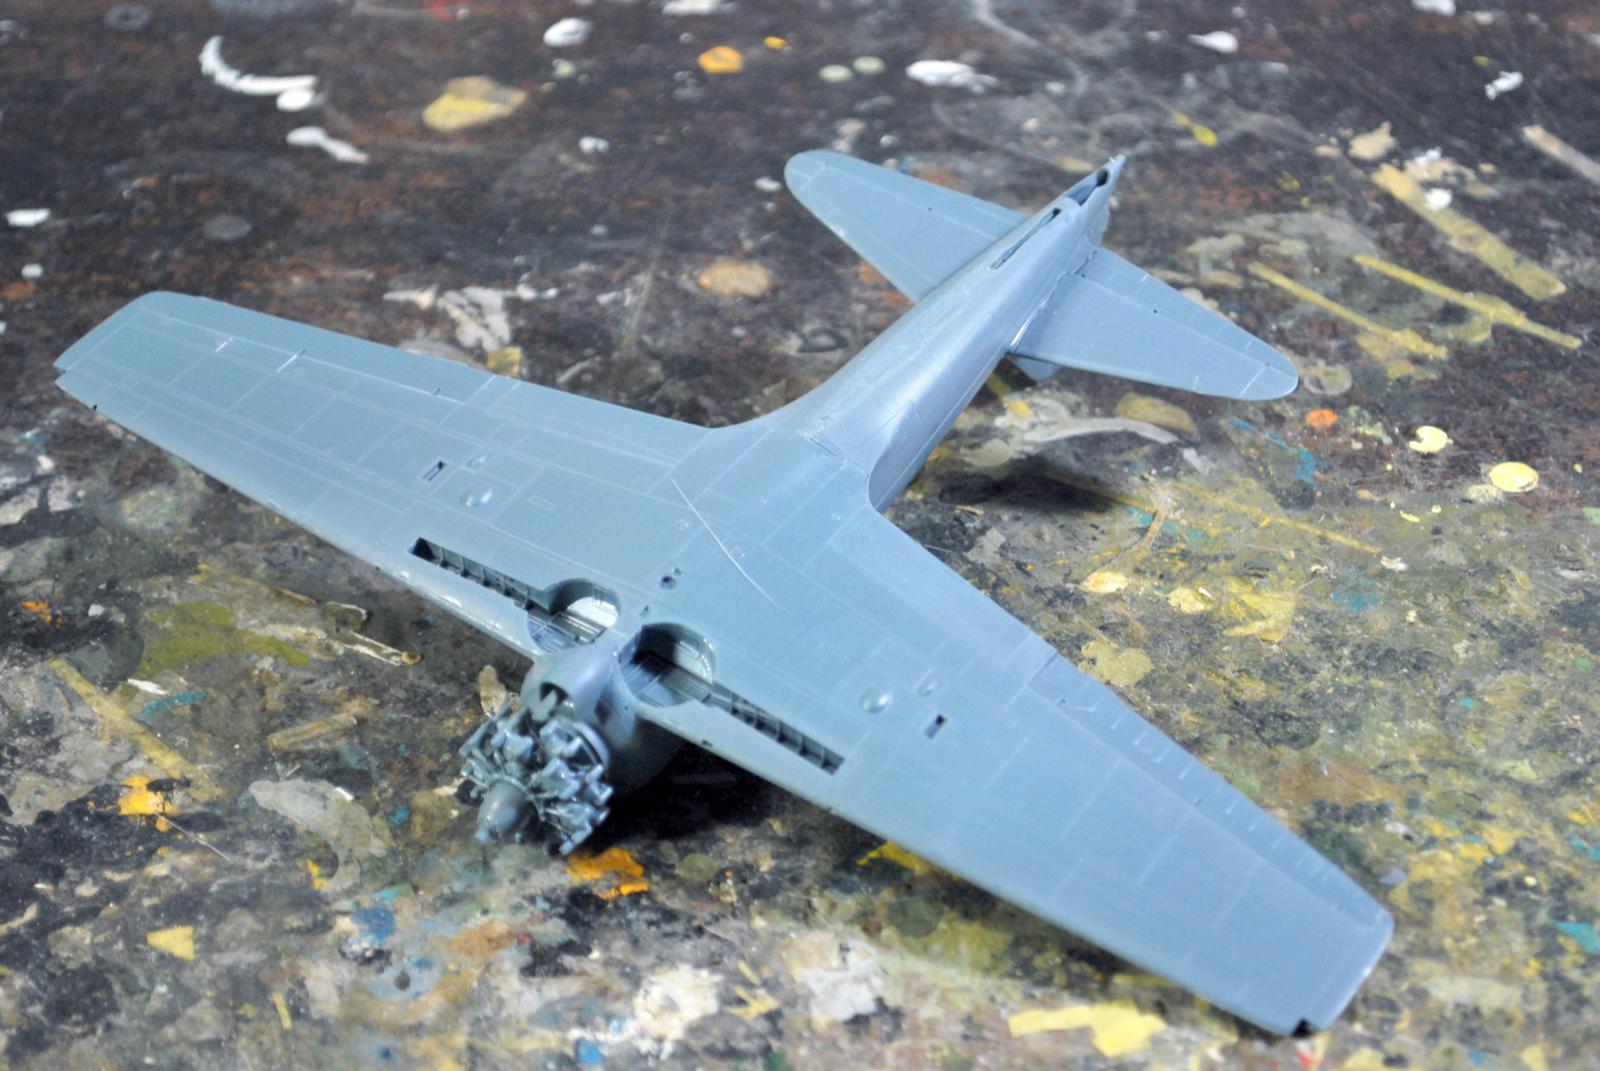
The Kit:
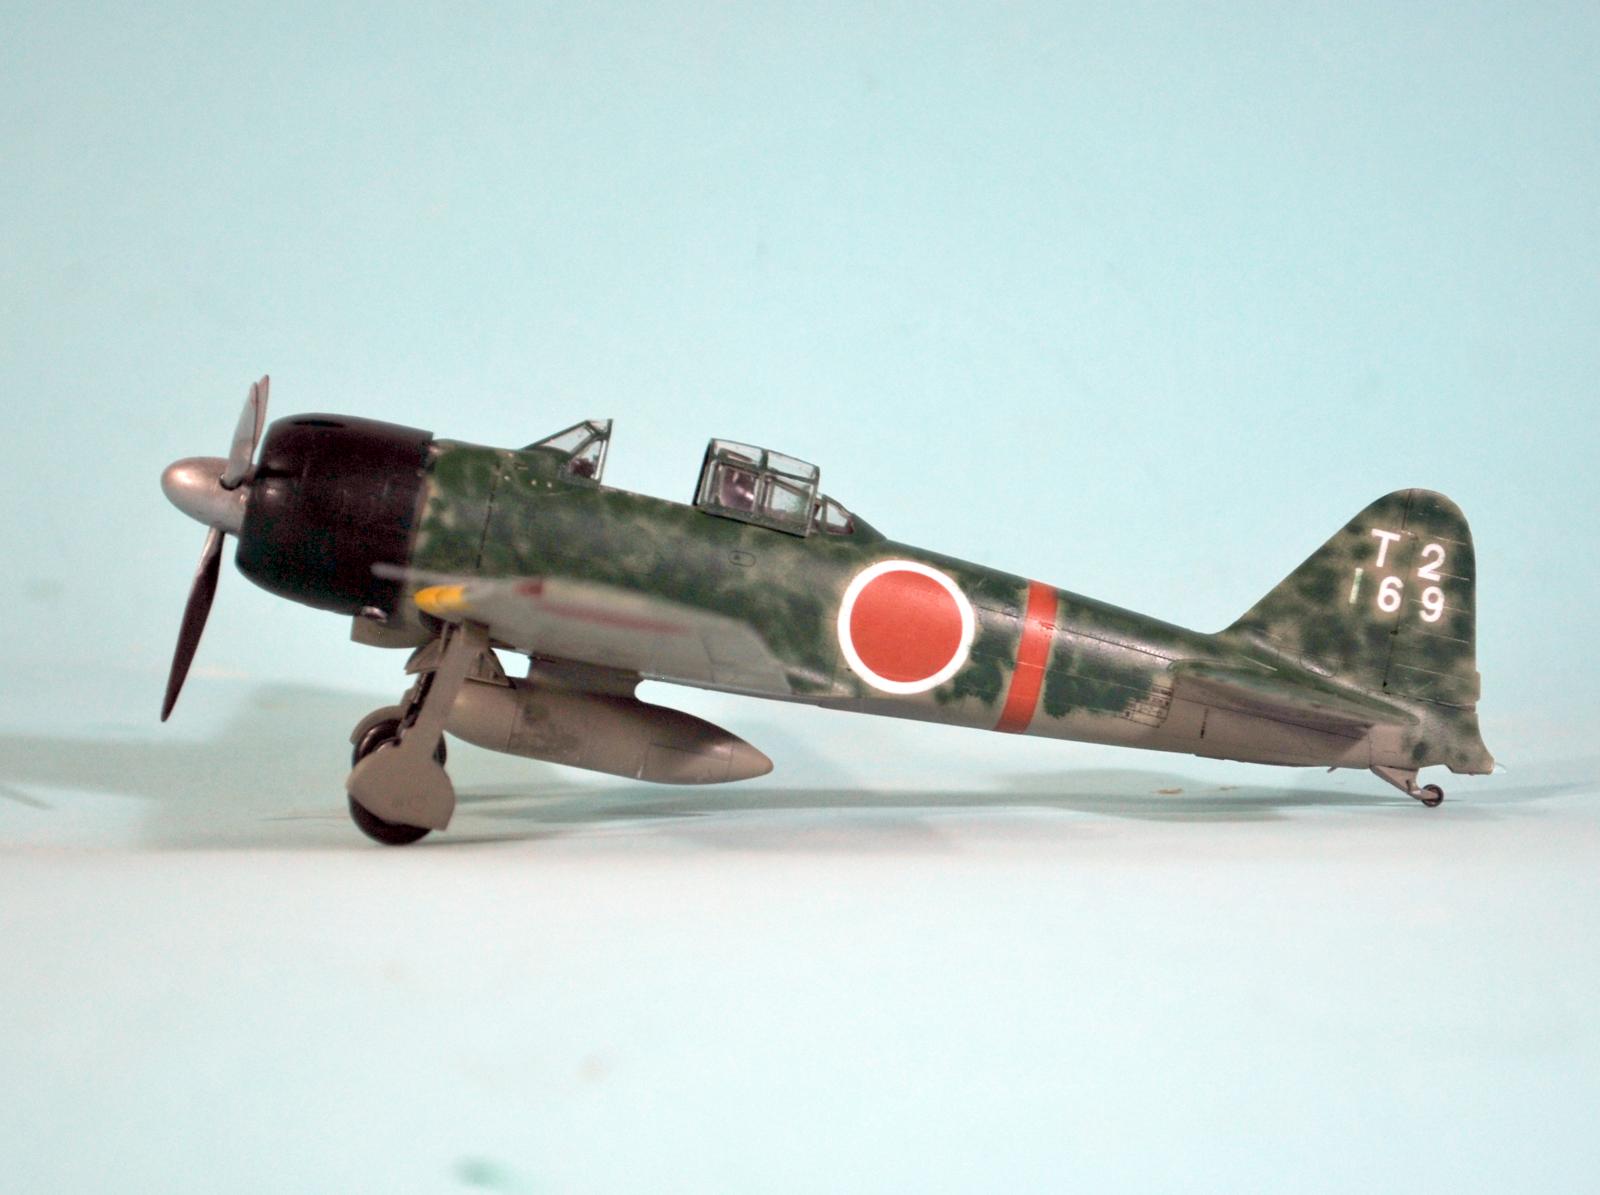
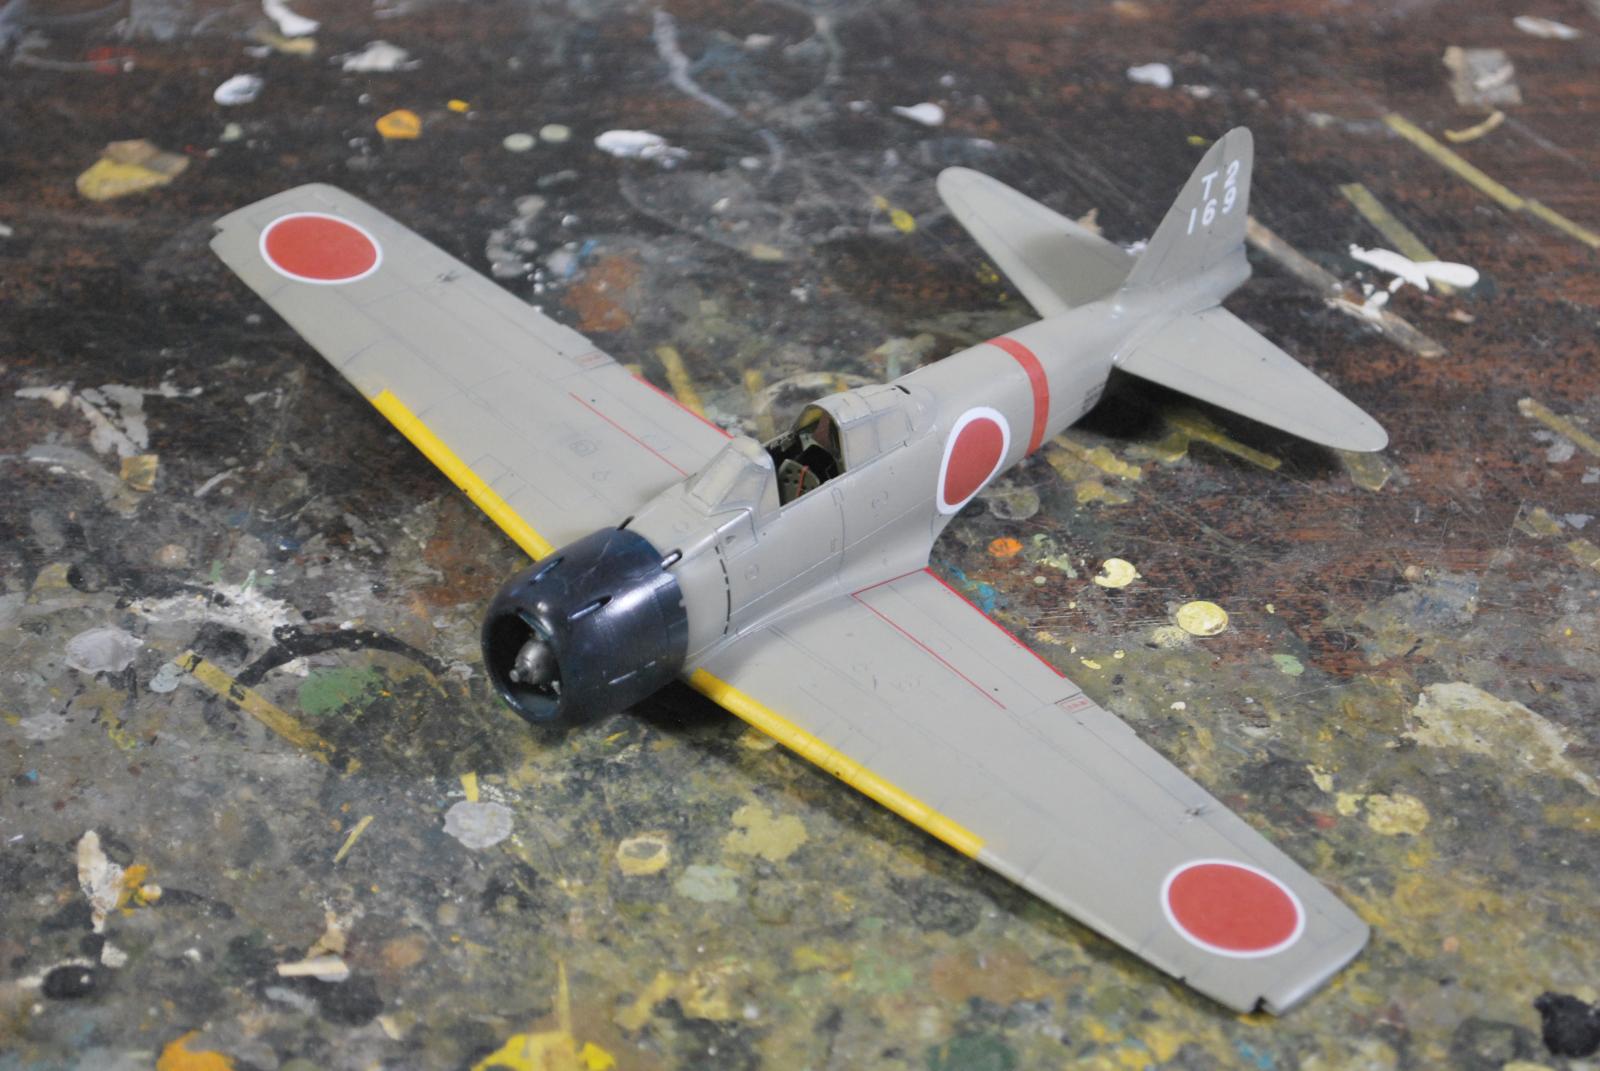
This is the second Zero sub-type released by Eduard. The kit has a separate Spru V that has the type-specific parts, which include a different rudder, engine and cowling. The wing sprue is also new. Surface detail is petite and highly detailed, as one is now accustomed to seeing on Eduard kits. The decal sheet includes markings for five aircraft, including the Zero flown by Kenji Yanagiya at the Yamamoto Interception; an airplane from the Tainan Air Group at Buna, Mew Guinea; an airplane from the 3rd Kokutai at Timor; an airplane from the Zuikaku Fighter Squadron at the Battle of Santa Cruz; and an airplane flown by Takeo Tanimizu on Taiwan in September 1944.
Construction:
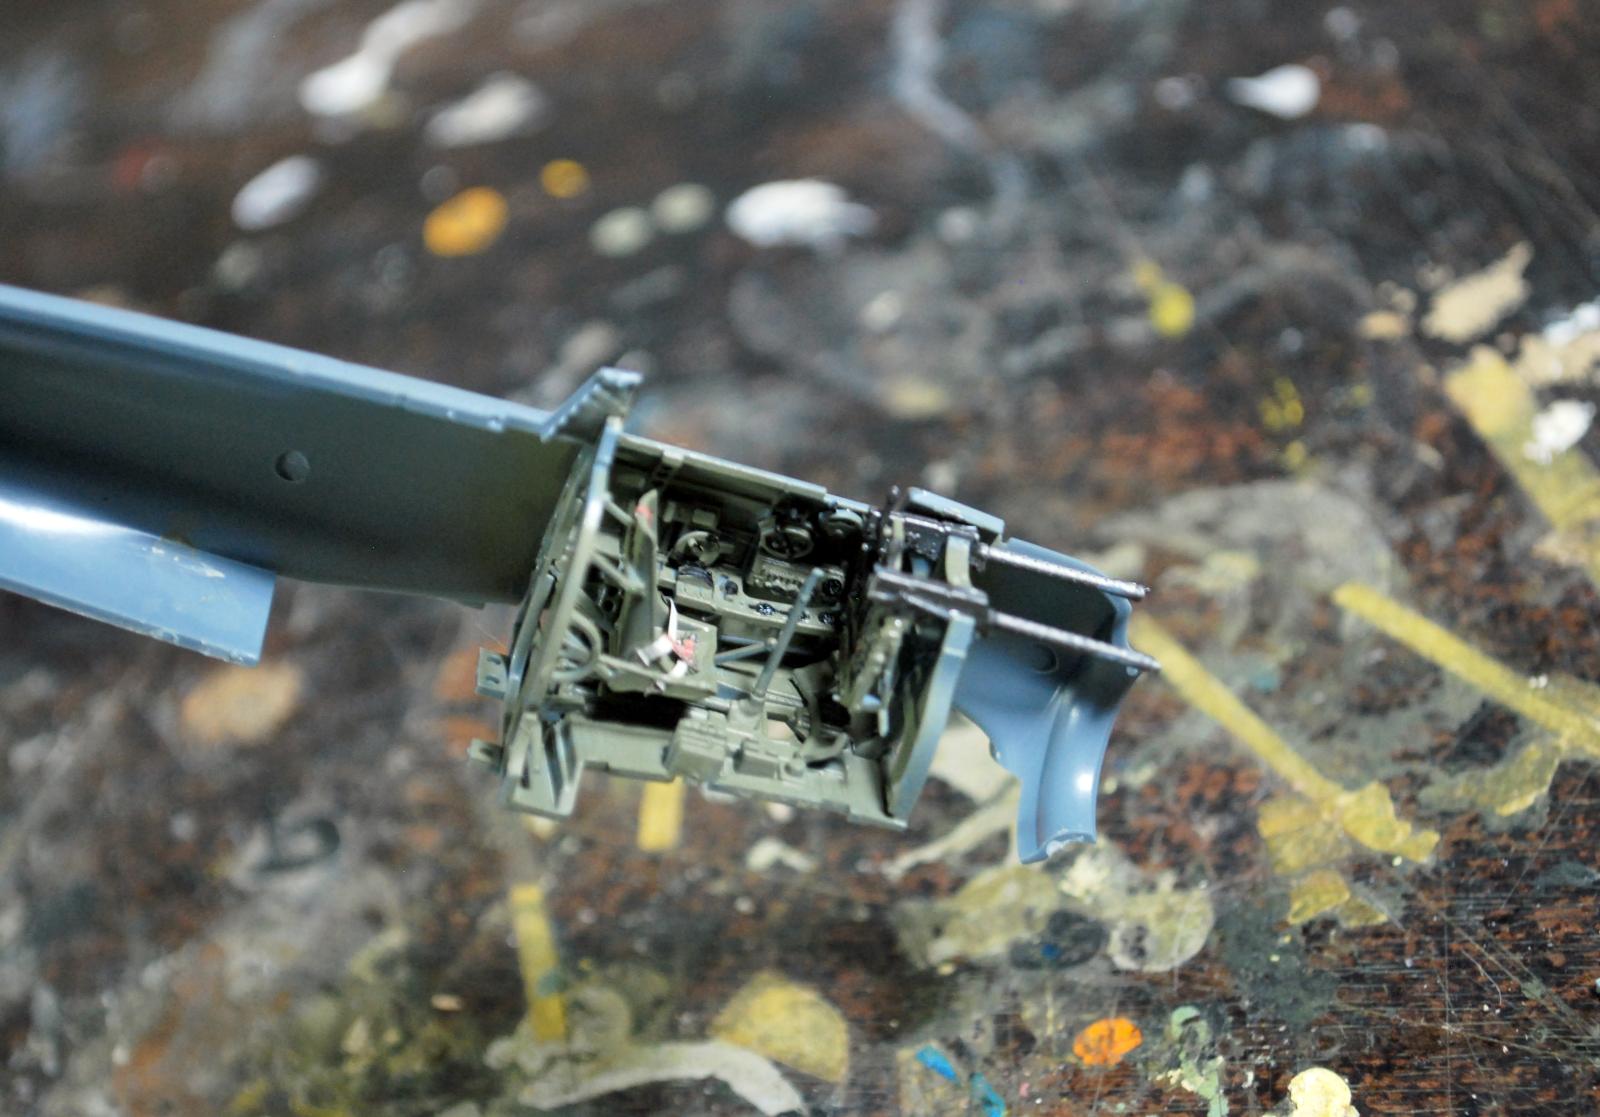
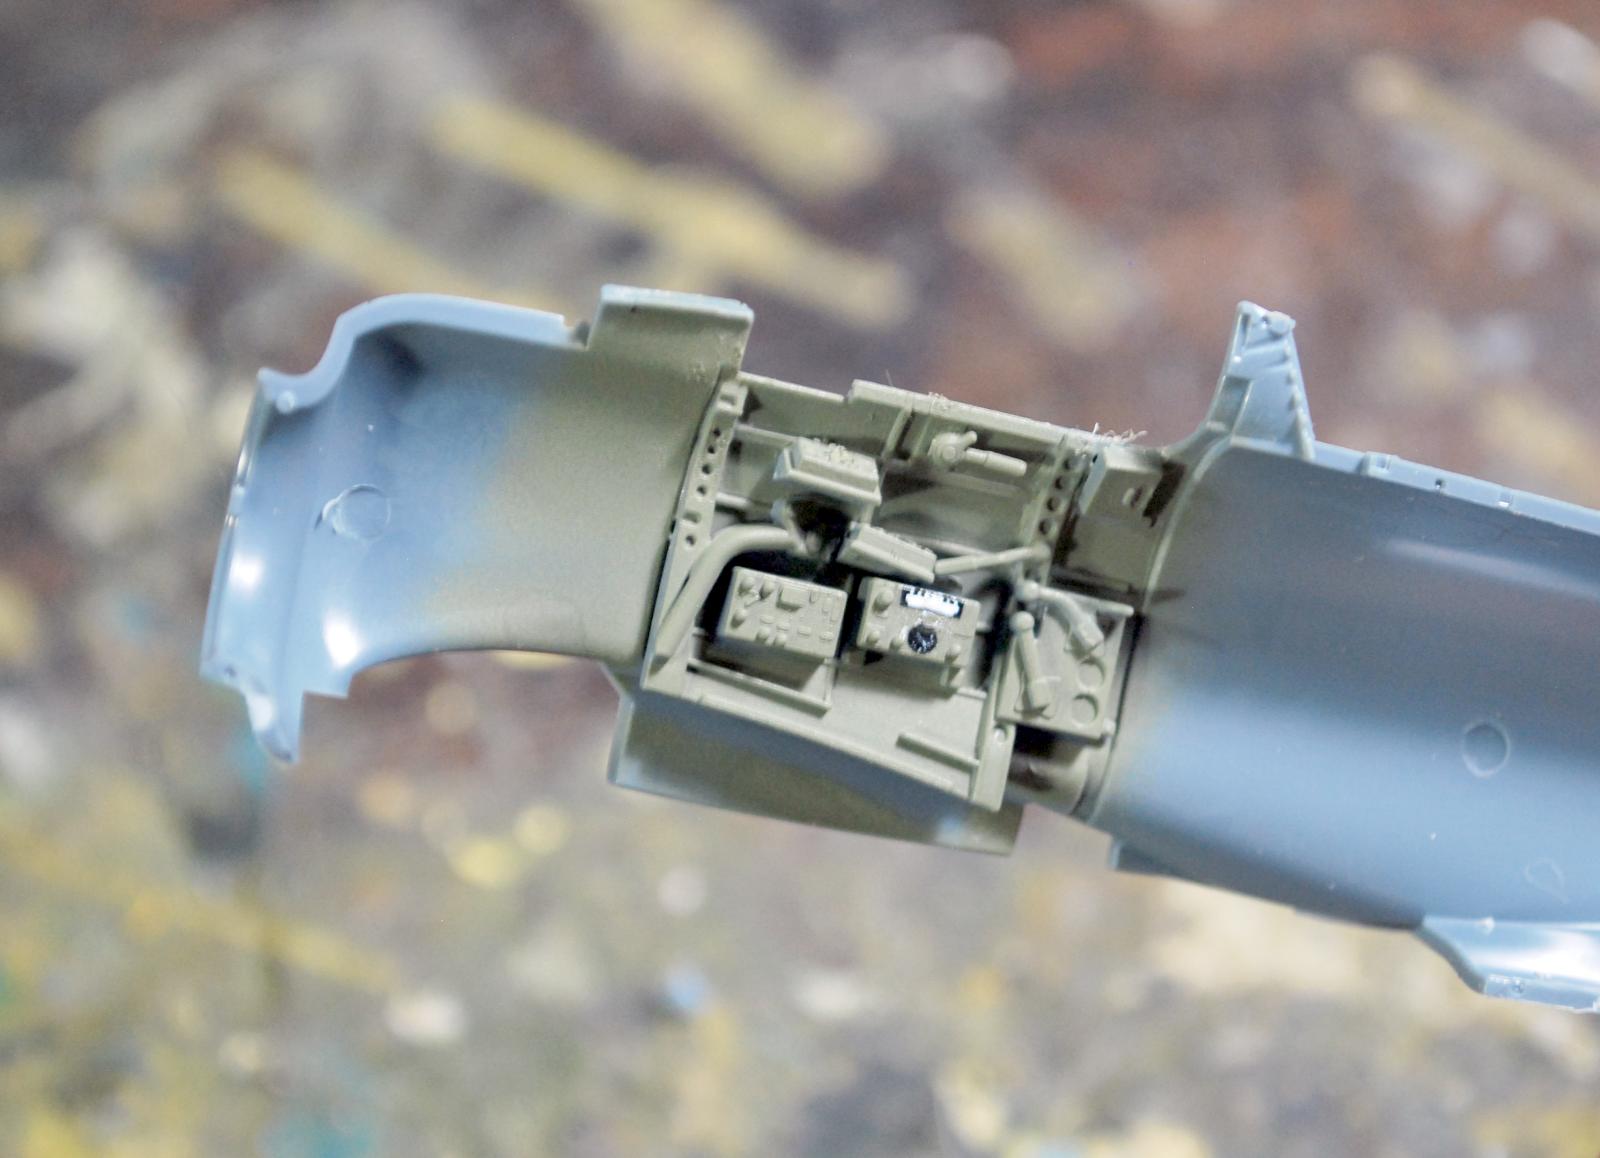
Eduard's Zeros are less “fiddly” than some of the other kits. I have found that any remaining “fiddliness” can be dispensed with if one assembles the cockpit as follows: glue the side frames to each fuselage half rather than to the cockpit floor; this allows all the small detail parts to be positioned more easily. Assemble the main cockpit - the forward firewall, floor, rear bulkhead, controls and seat as per the kit instructions, then glue that full assembly to one or the other fuselage side and get it positioned properly. Follow the kit instructions for assembly and placement of the ammo magazines and guns, and the instrument panel.
Past that, follow the kit instructions for assembly of the airframe and you cannot go wrong. Be careful in assembly and you will not use any filler anywhere.
Painting and Decals:
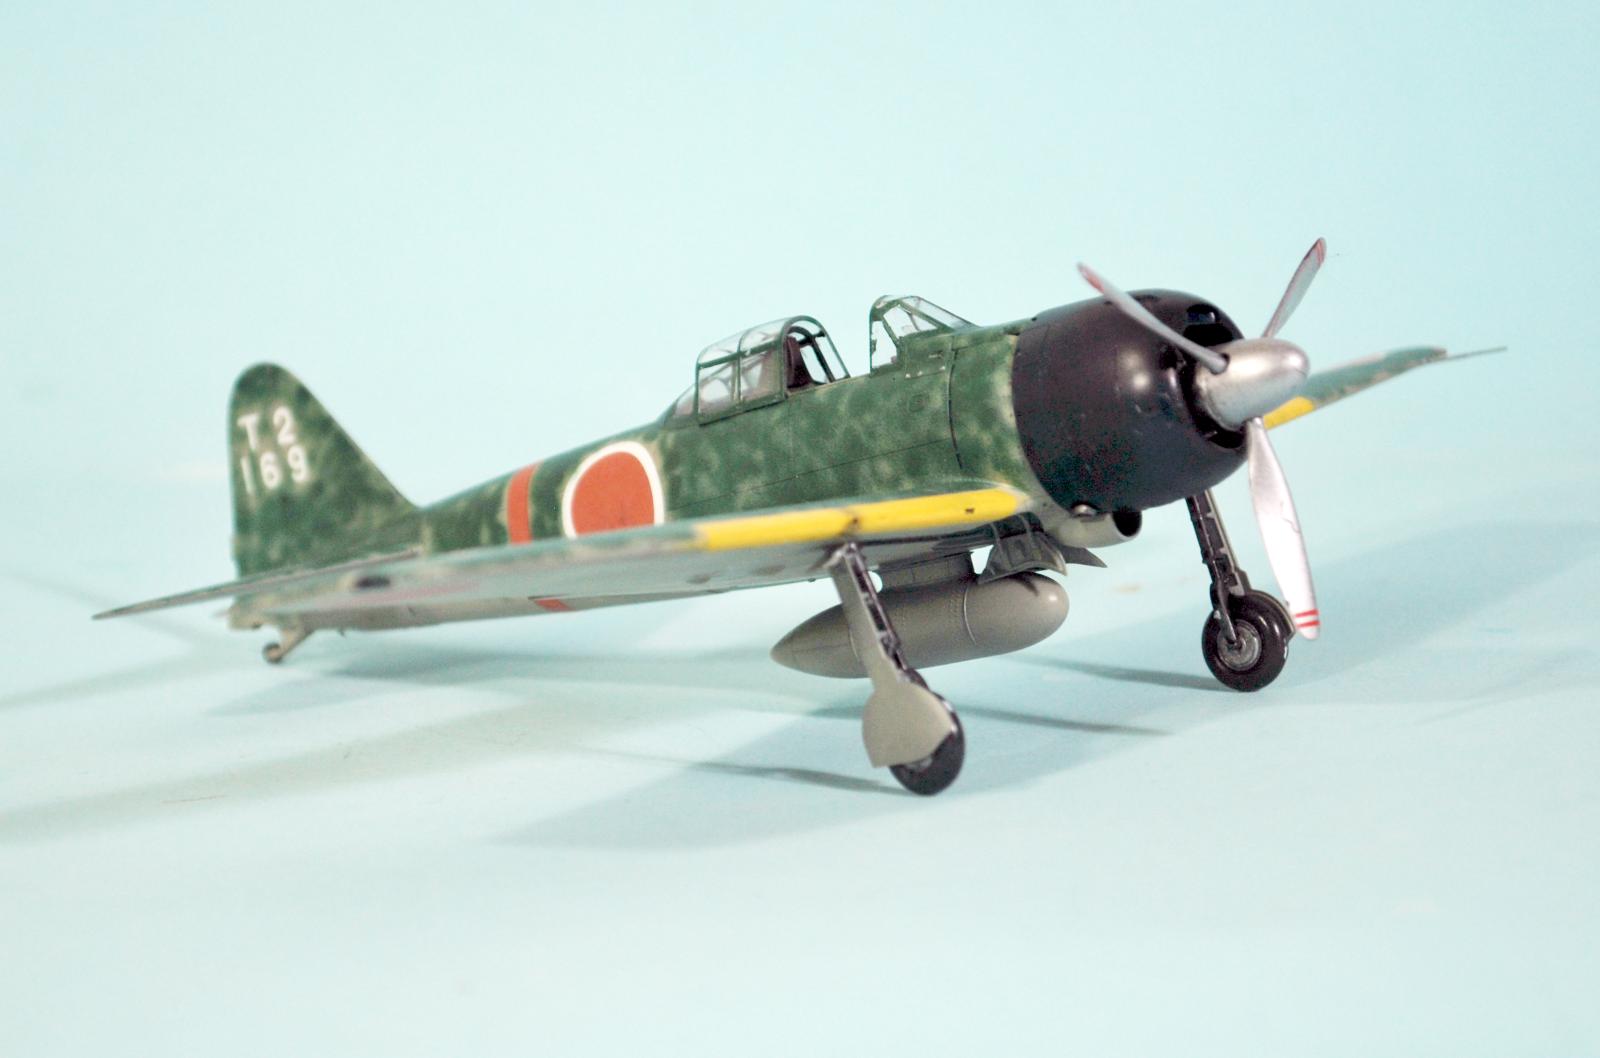
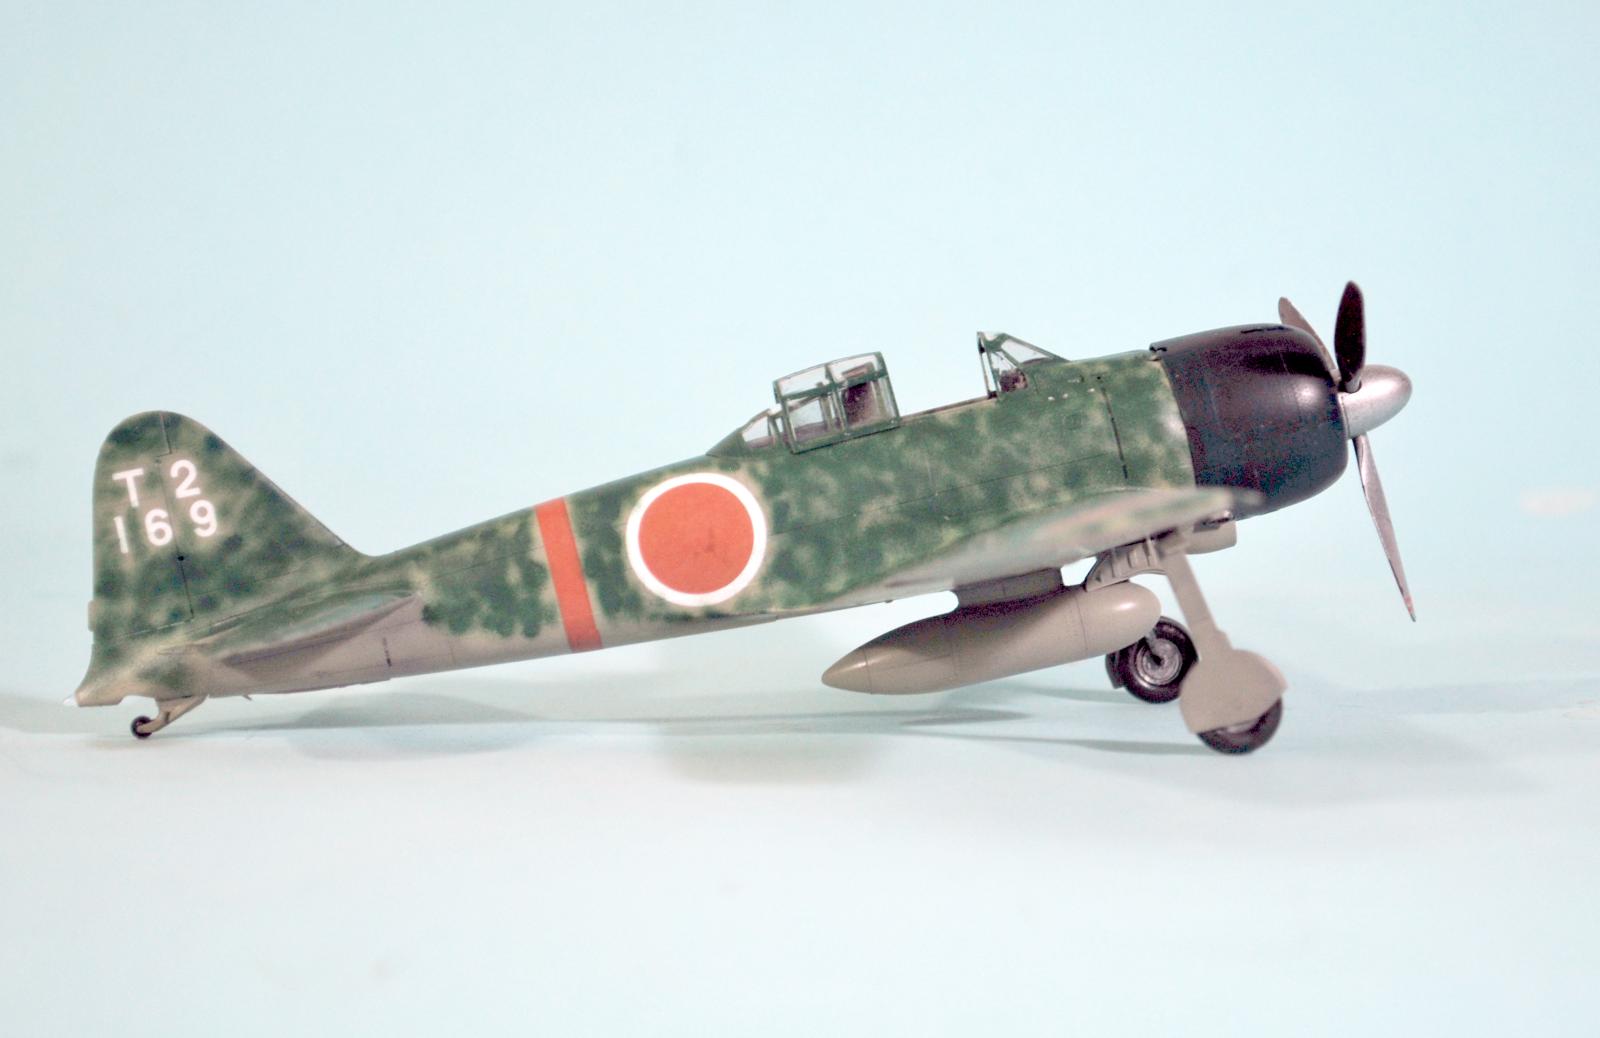
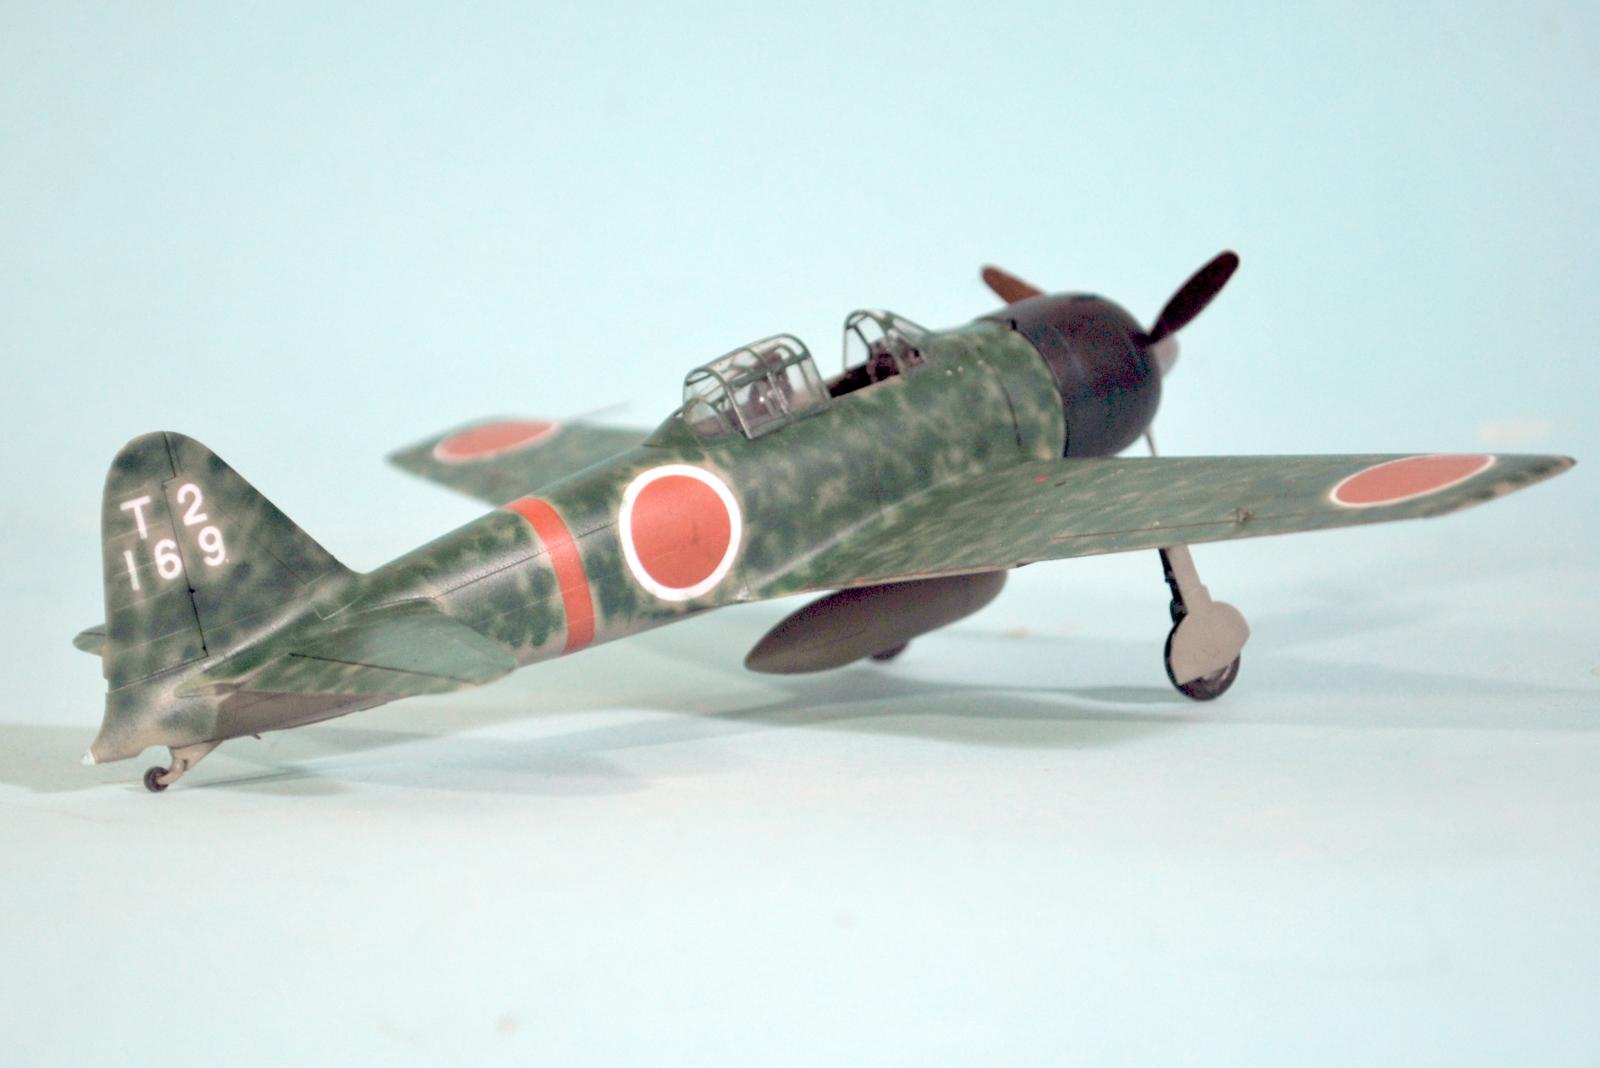
Yanagiya's Zero had an overpainted upper camouflage of a dark green “scribble.” To get this, I first painted the model in Mitsubishi Ameiro tan, applied clear gloss, then applied the decals. When they were set, I applied another coat of clear gloss, then airbrushed the upper camo freehand around the markings, using Tamiya XF-70 IJN Dark Green 2 (aka “Mitsubishi Dark Green. I thinned the paint 50-50 which allowed me to tighten down the airbrush so that I got a thin line. I then “scribbled” over the upper surfaces until I had an effect that looked like the boxart. I got a slight bit of overspray, which was intended.
Final Assembly and Finish:
After giving some slight “dings” to the model and airbrushing exhaust staining and gunfire stains, I assembled the landing gear and attached it, unmasked the canopy and attached the sliding section in the open position. I atached the prop and called things done.
Overall:
Eduard's Zeros are the best in 1/48, as are their 109s, 109s, P-51Ds, and Spitfires. If you take your time, follow the instructions, and are careful in assembly, you will not need filler anywhere and you will be rewarded with a very nice result.
Recommended for modelers with experience assembling precisely-designed kits.


Kit, build and article, all are supreme, Tom!
Well done!
Great looking Zero . The camo work on this came out really well.
Great write up @tcinla. I recently stumbled across a short documentary on YouTube about the A6M and found it interesting. The build turned out great!
Great looking Zero, Tom @tcinla
Especially the camouflage scheme is perfectly applied.
The detailed cockpit looks amazing as well
Thanks for the great story and informing us about the best approach for assembling the cockpit.
Looks great, Tom!
Another good looking Zero and article, Tom @tclina.
I love that paint job! Great article!
Good thing I don't do 1/48 anymore, nobody around here seems to get anything Eduard.
Nice squiggle job.
Very nice work @tcinla. 👍
Great job. I love the cammo job. Your discussion about who shot down Yamamoto is very good. I have been following that situation for quite a few years and, to me at least, Lanphier became more and more of a prick as the truth came out. I lost all respect for him.
Look great Tom!
This one is a real eye catcher, Tom. Excellent history too!
I’m impressed! Great painting!
Looks great, Tom (@tcinla). Camo worked out really well. Interesting story on the Yamamoto shoot-down controversy.
Tom Cleaver (@tcinla)
This one looks really goo Tom. I can remember watching an interview of Lamphier on a TV show in the 1970's. I think it was on the series called "World at War". My Dad and I used to watch it regularly when I was a kid.
An expedition was made to the Yamamoto crash site, and they were able to forensically claim the Betty was indeed downed from incoming MG / cannon fire that was received from a direction rear of the aircraft. There was also reportedly a post mortem autopsy done on the admiral by the Japanese before his remains were cremated and returned to Japan.
This is what is said on Wikipedia about this.
The retrieval party noted Yamamoto had been thrown clear of the plane's wreckage, his white-gloved hand grasping the hilt of his katana, his body still upright in his seat under a tree. Hamasuna said Yamamoto was instantly recognizable, his head tilted down as if deep in thought. A post-mortem of Yamamoto indicated two bullet wounds, one to the back of his left shoulder, and a separate wound to his left lower jaw that appeared to exit above his right eye. The Japanese navy doctor examining Yamamoto's body determined the head wound killed Yamamoto. These more violent details of Yamamoto's death were hidden from the Japanese public, and the medical report whitewashed, this secrecy "on orders from above" according to biographer Hiroyuki Agawa.
This information clearly shows (at least to me), that Barber is indeed the one who shot down the Admiral.
I definitely clicked on the "like" button.
Excellent article and great model.
Great build Tom, plus excellent read on who shot down Yamamoto.
Great looking Zero - I really like that scheme. Not sure I can pull it off in 1/72... (but I think I will try!).