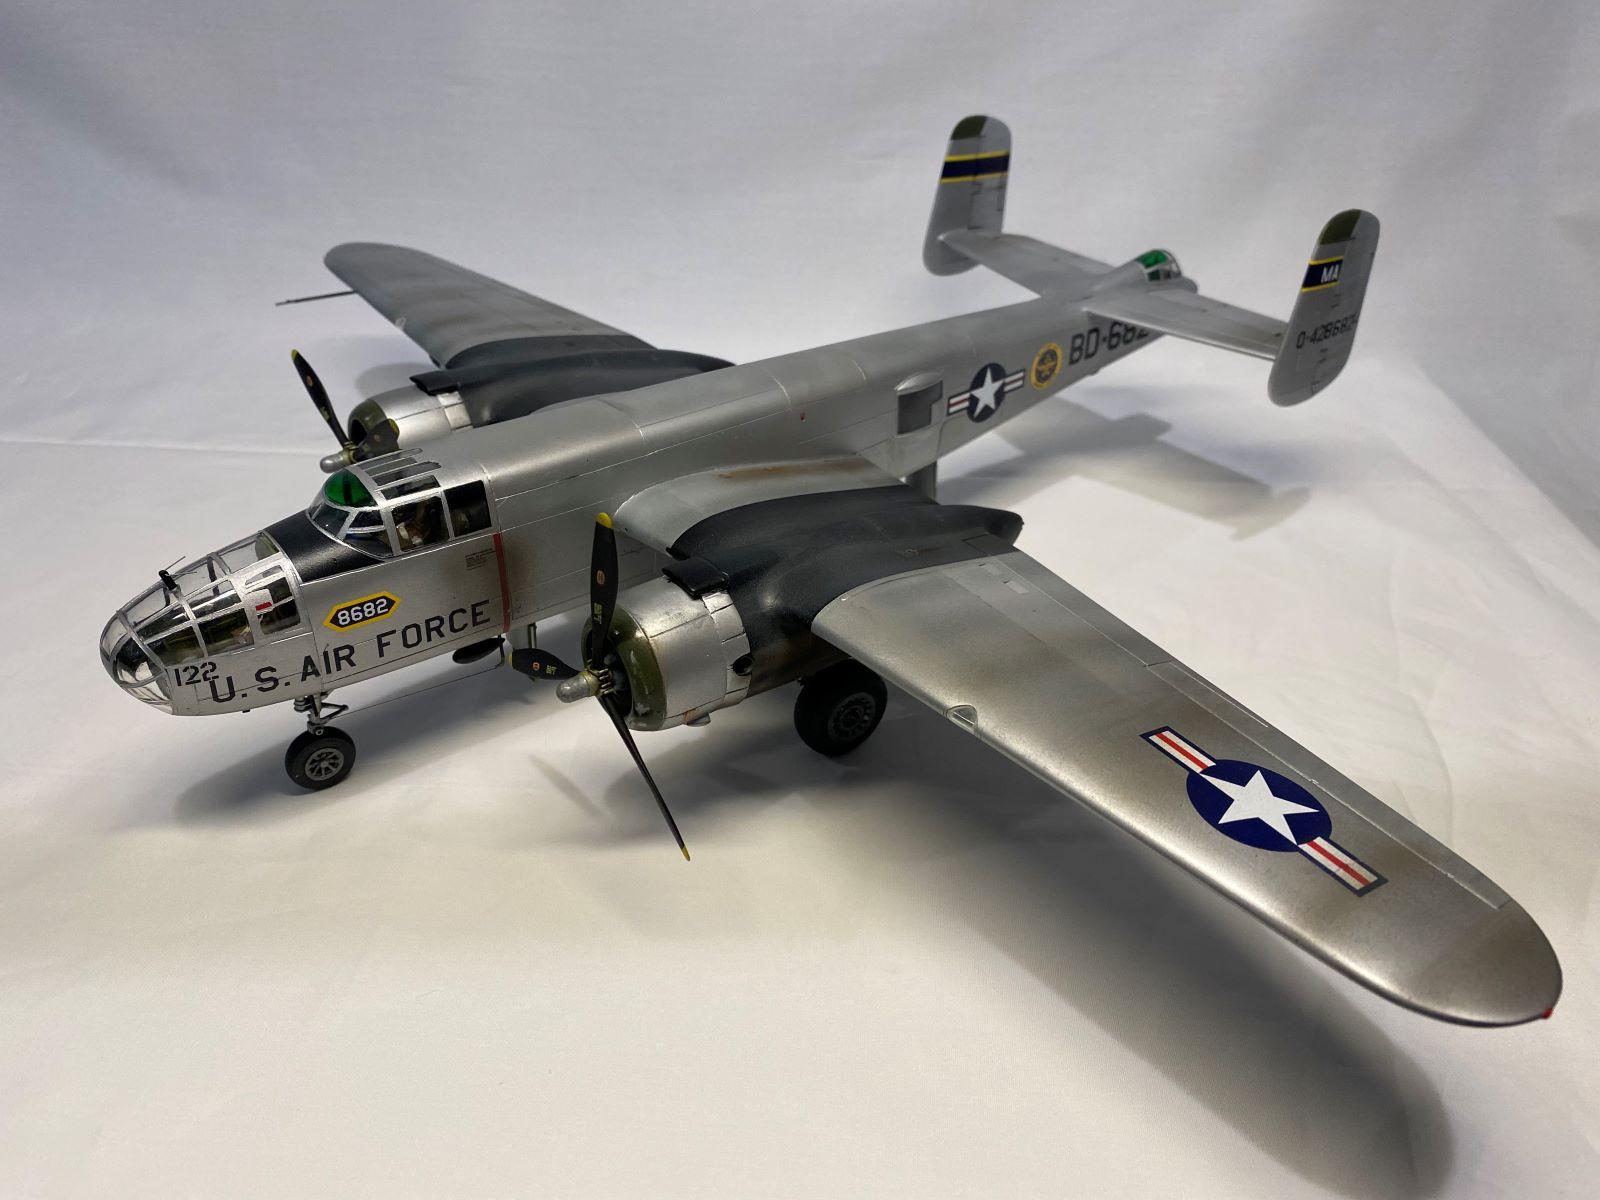
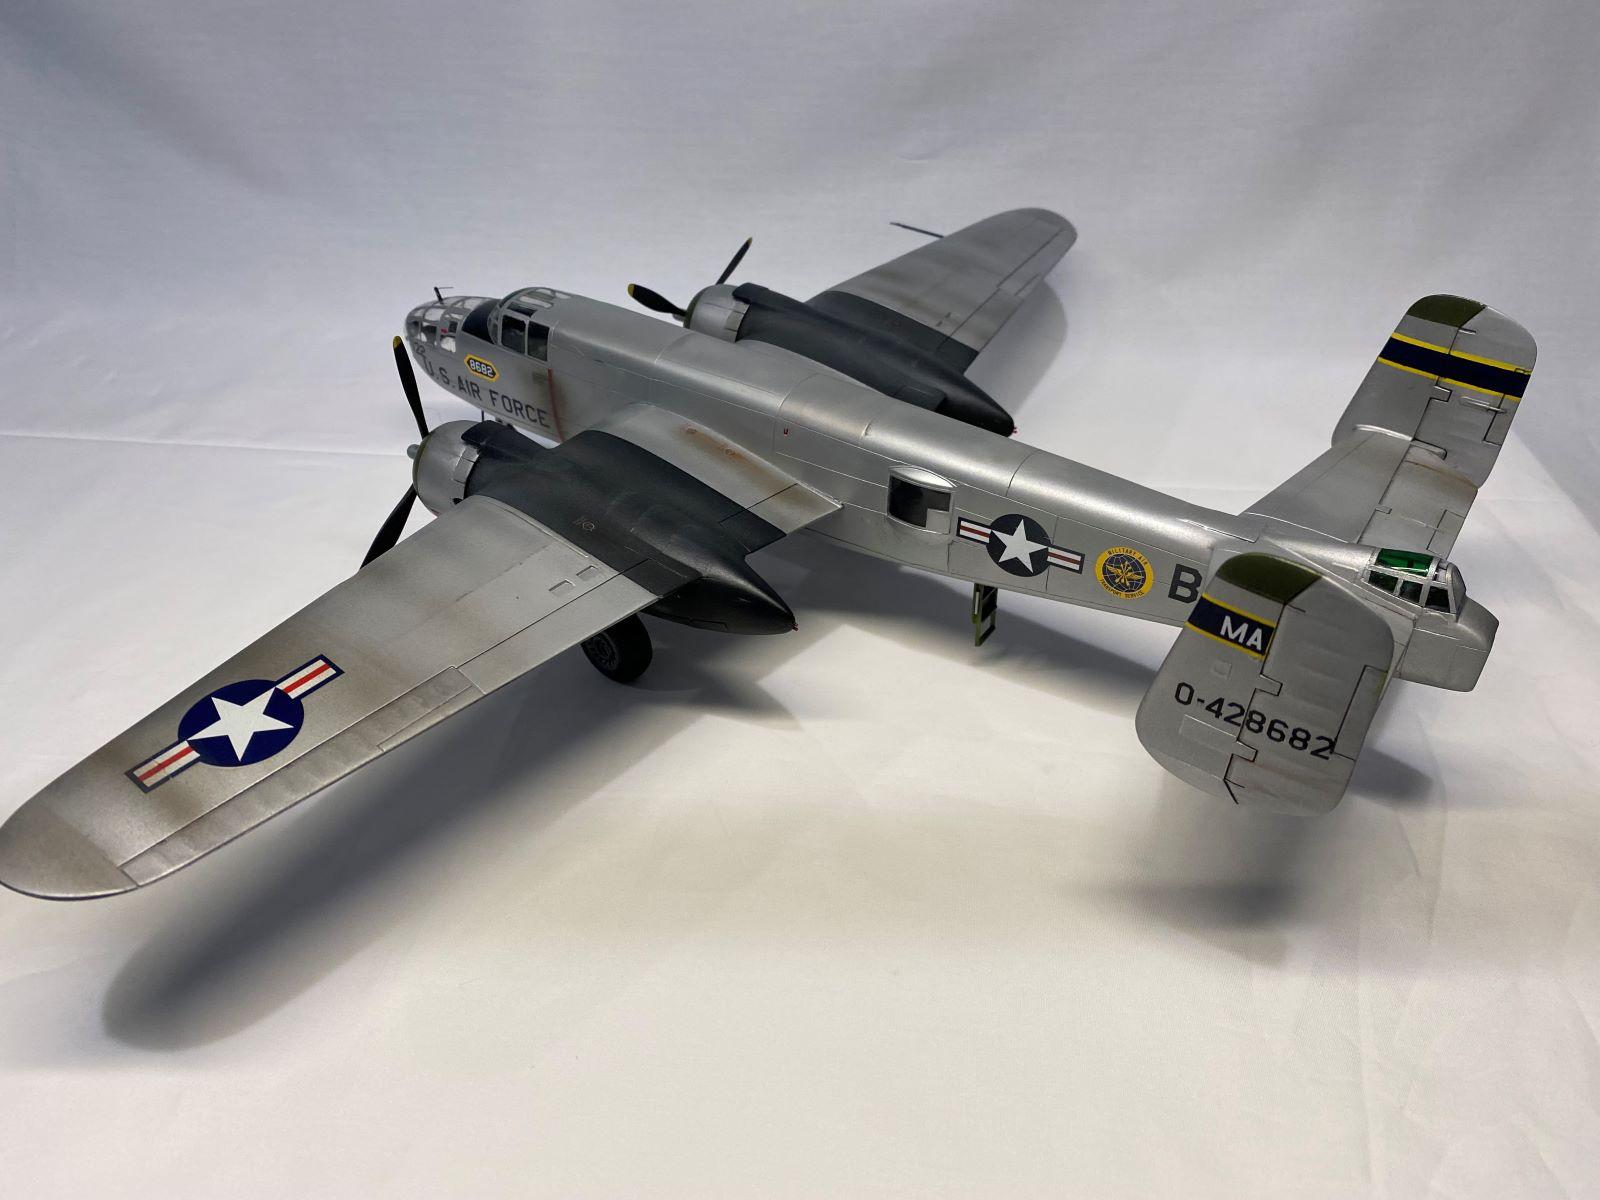
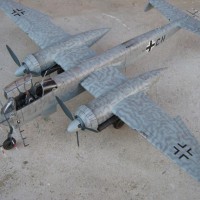
CB-25J Mitchell (Revell 1/48 B-25J)
First, a little background:
Following WW2, the Air Force had a lot of warplanes left over from the war. Many of these planes quickly became obsolete as warplanes, so new missions were sought for these planes. The B-25J Mitchell was soon performing a number of new missions:
TB-25J Trainer version of the B-25J
TB-25L Advanced multi-engine trainer of the B-25J
TB-25K/M Fire control trainer for radar systems going into the early jets
TB-24N Navigator trainer
RB-25J VIP transport
CB-25J Utility cargo version
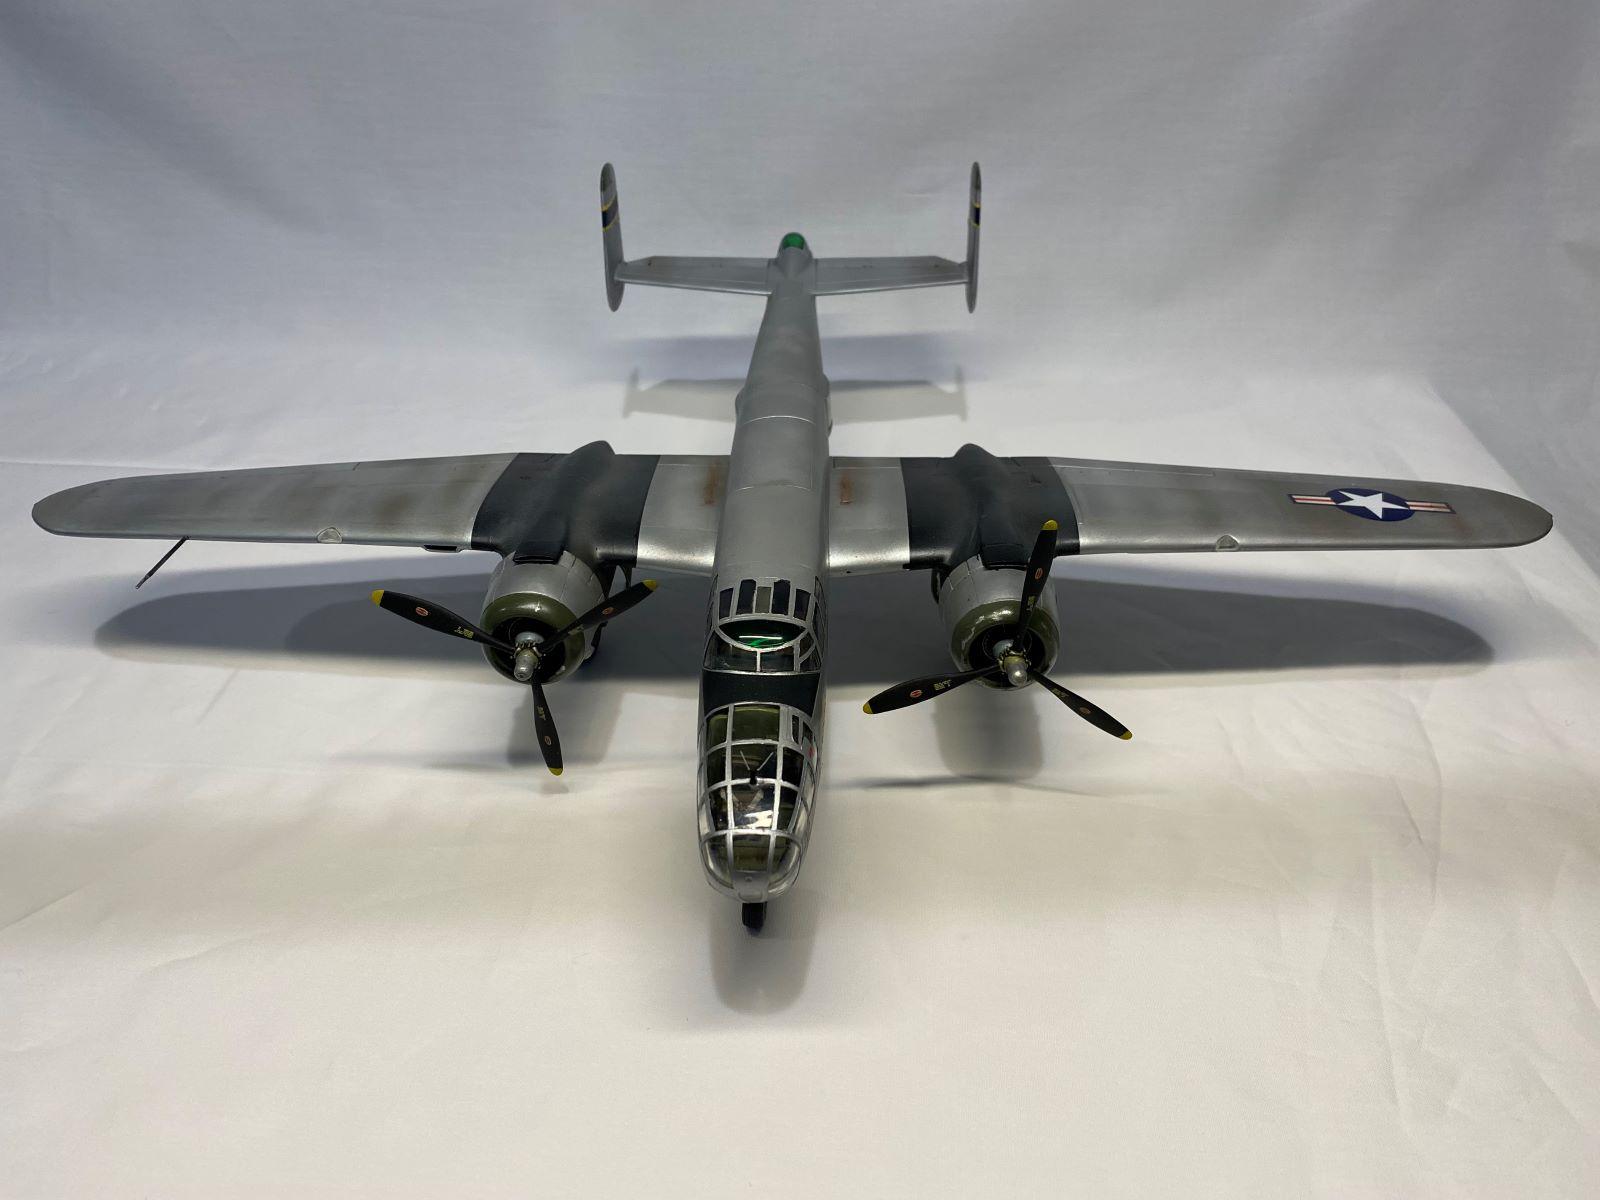
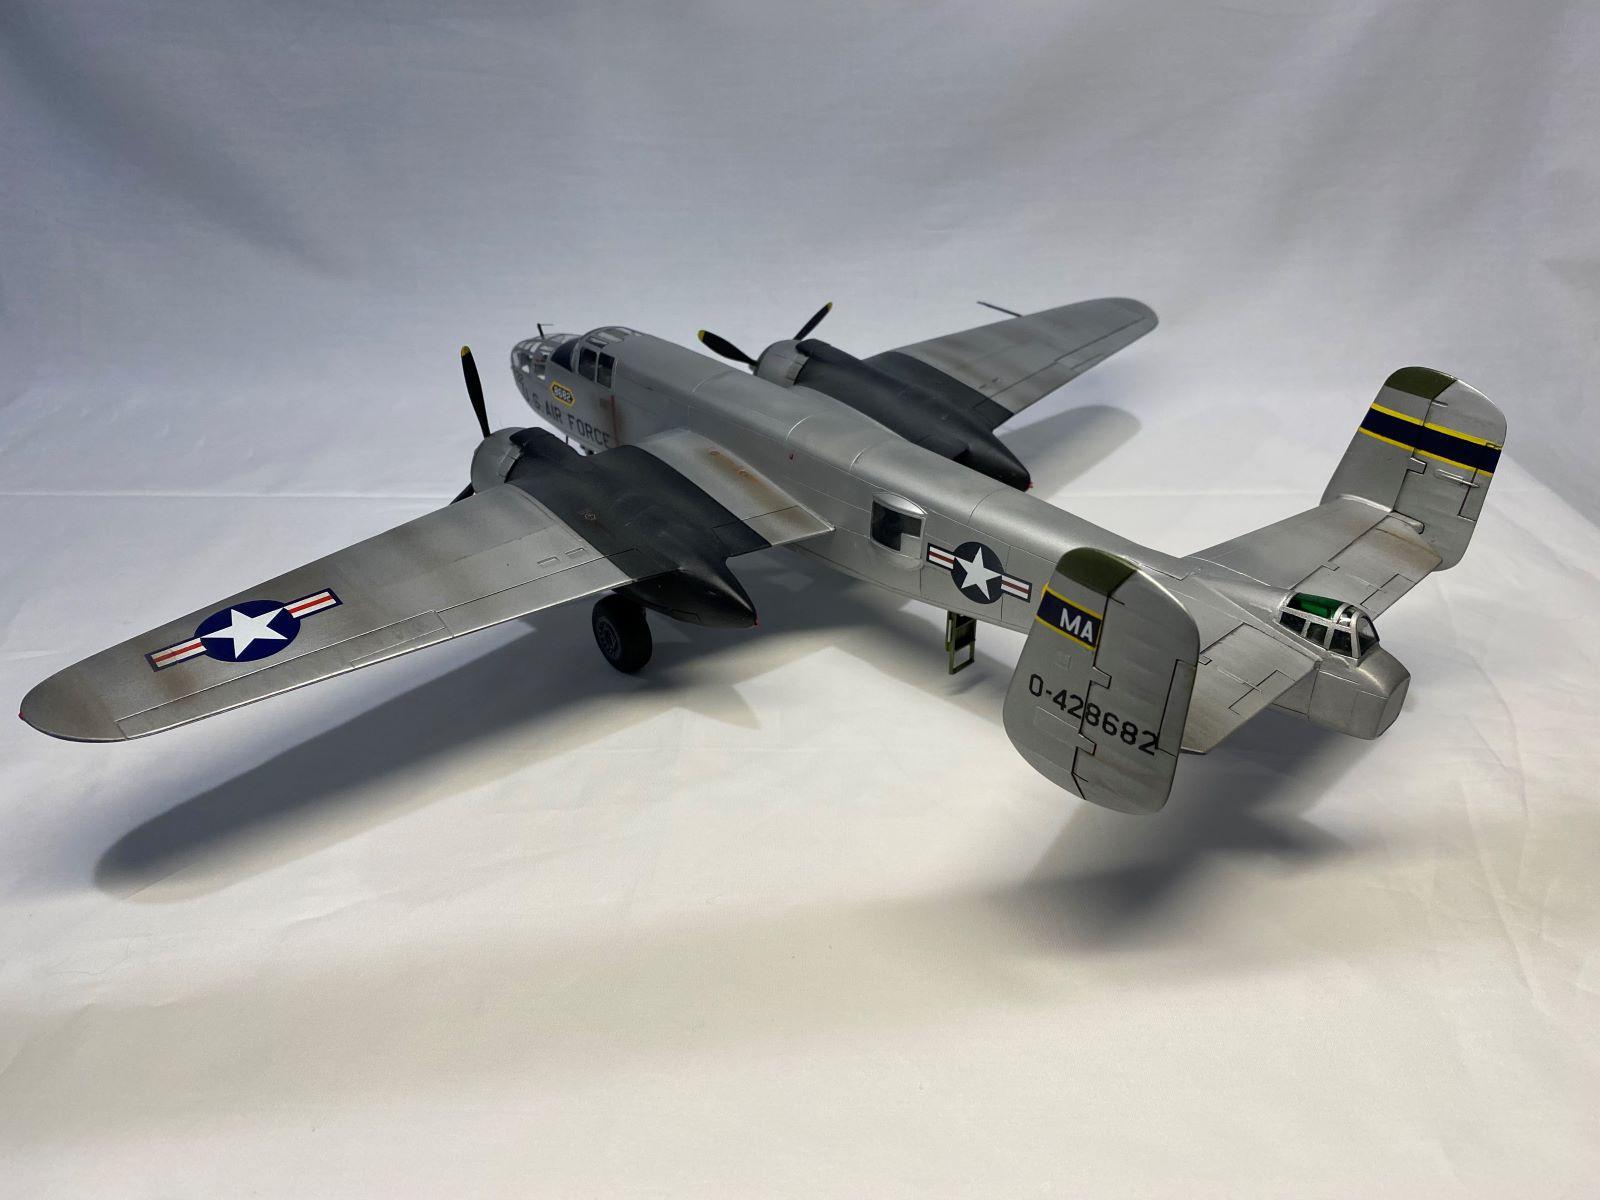
I have wanted to build two or three of these post-war planes for a long time. The conversions seemed fairly simple. Over the years, I have purchased 6 1/48 Revell B-25Js so that I could one day build several of these former warplanes. Having been a C-141 pilot for 20 years, it seemed natural to build the cargo version first. There isn't much information online about the cargo version. I suspect this was because the B-25J wasn't very successful as a cargo hauler and only lasted for a few years. Apparently the bomb bay was bolted closed, and any cargo that the plane carried had to fit through the crew hatches in the belly of the plane.

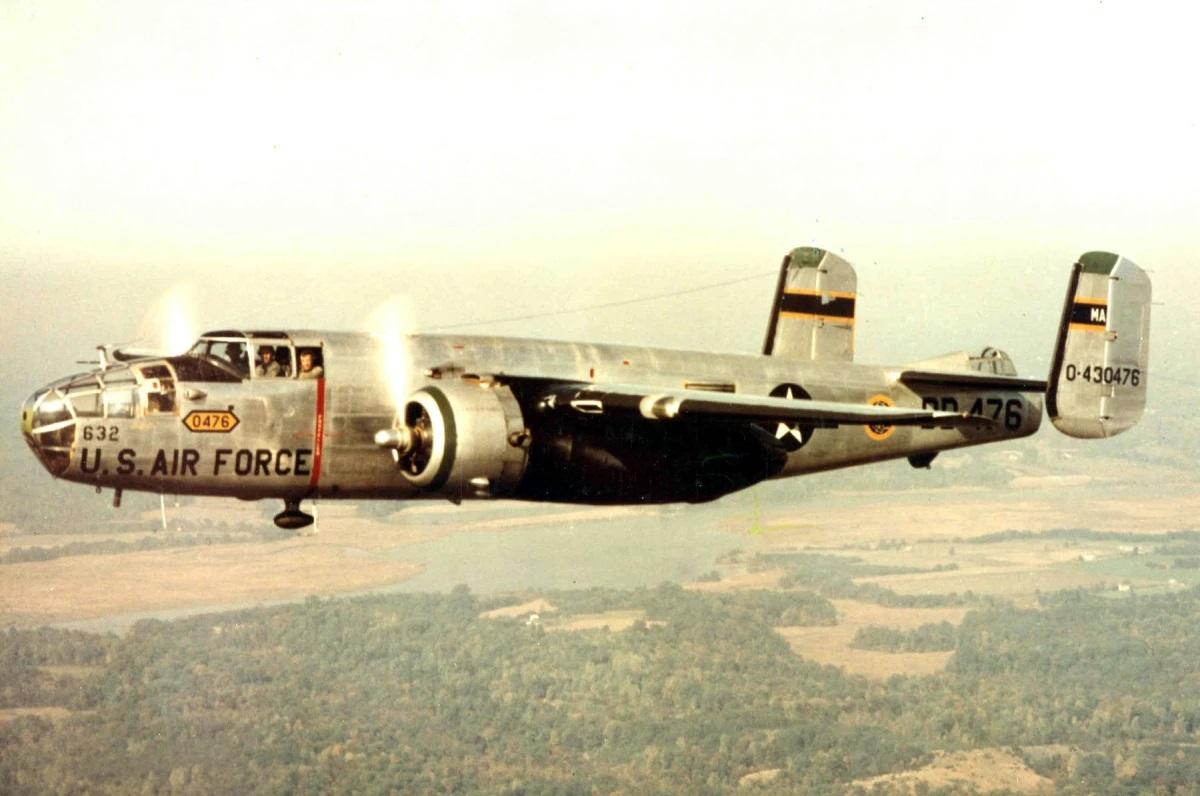
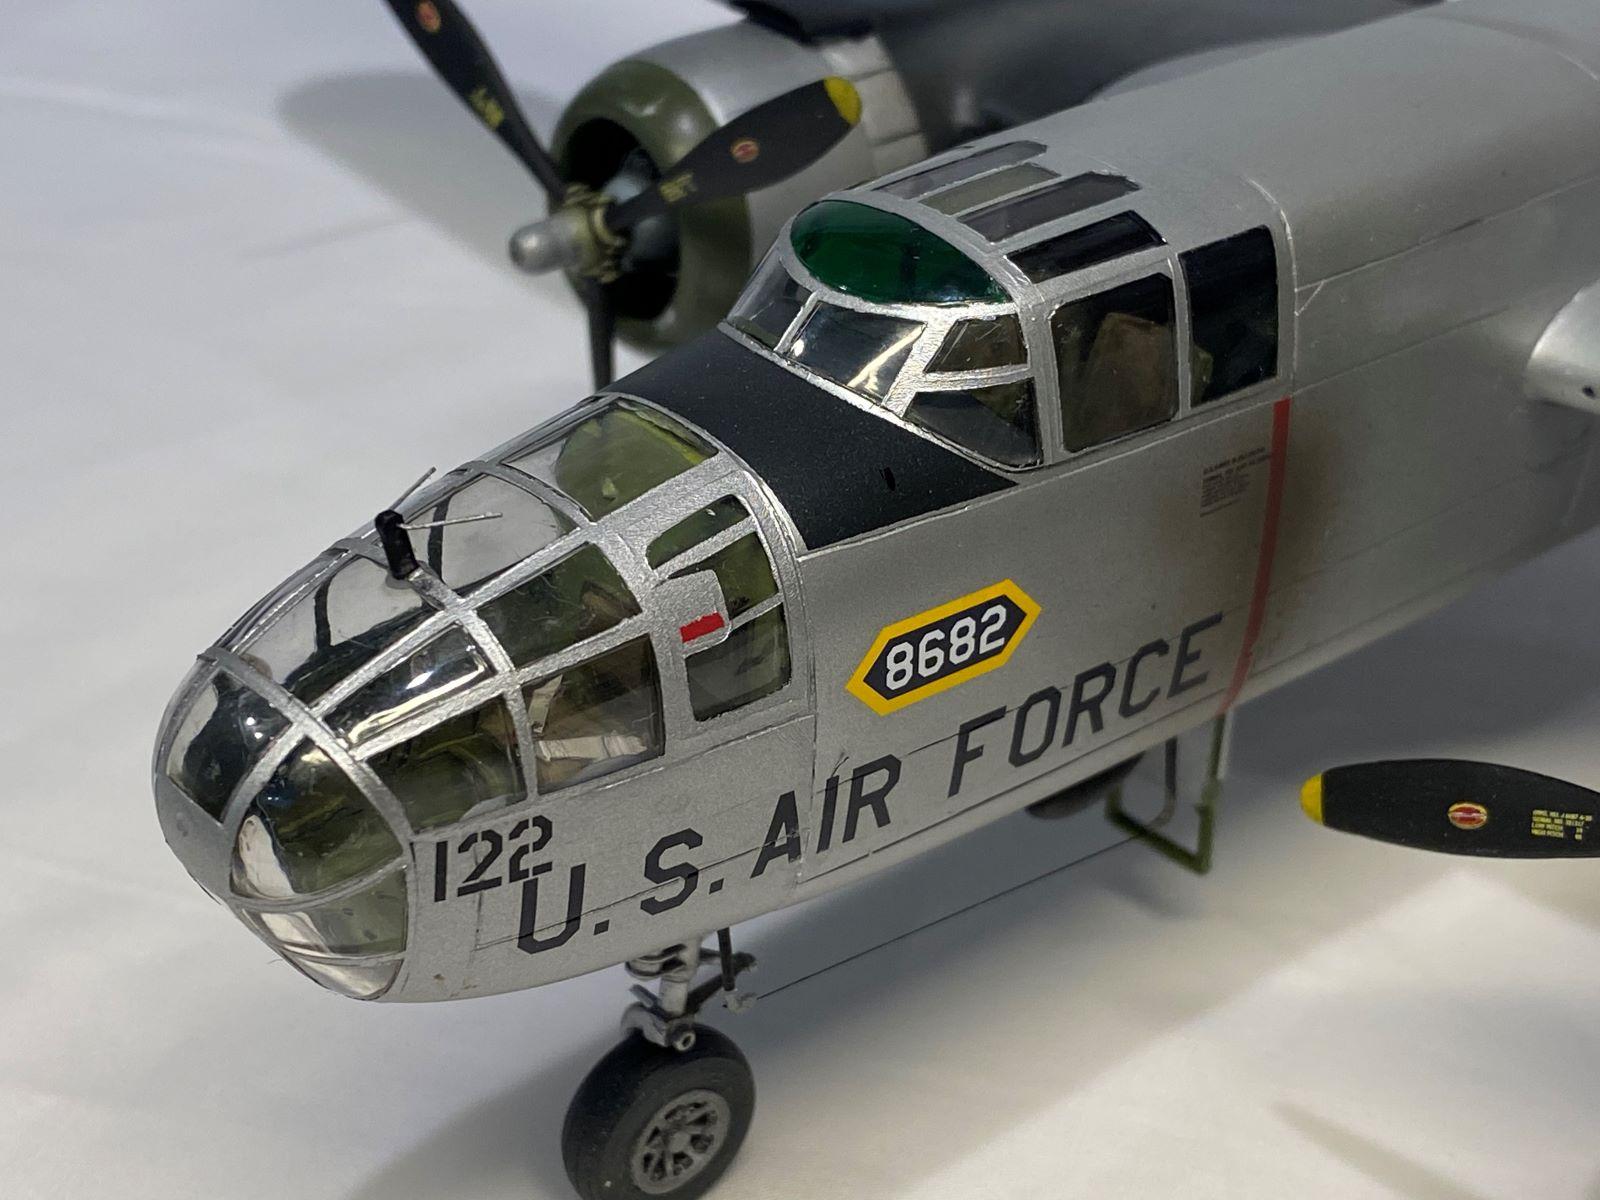
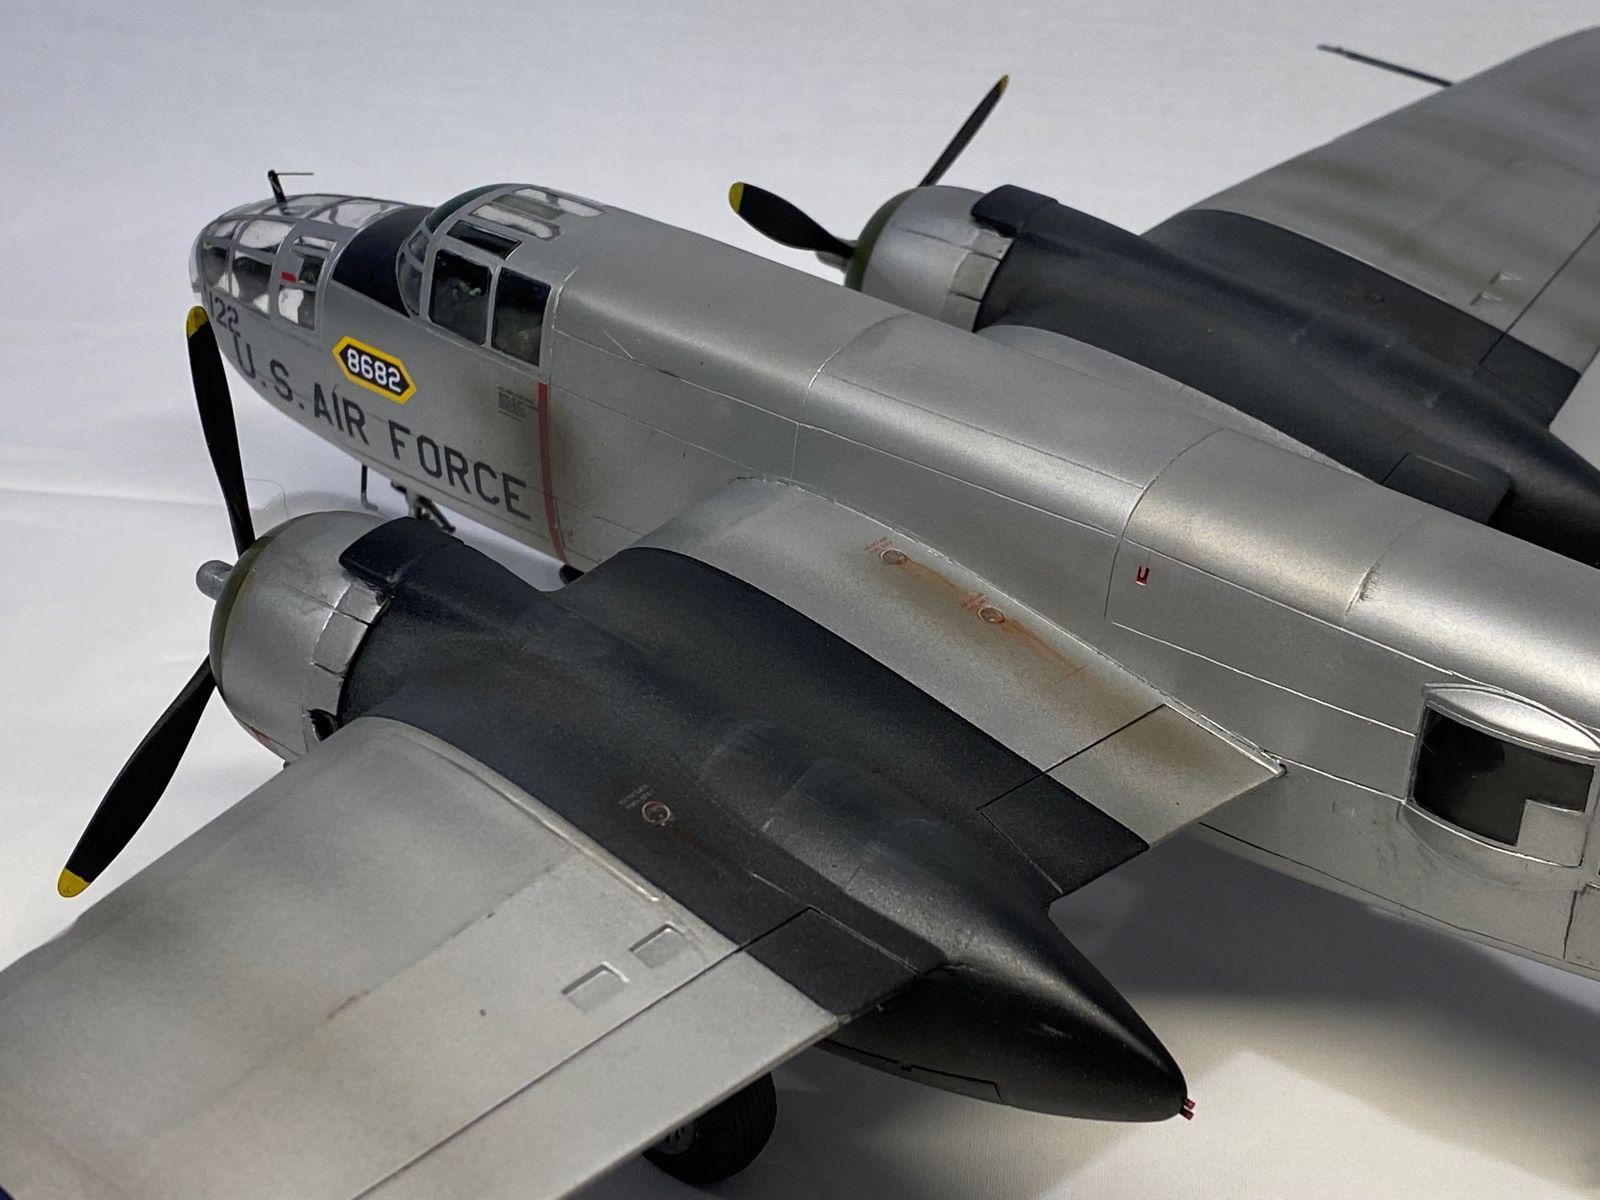
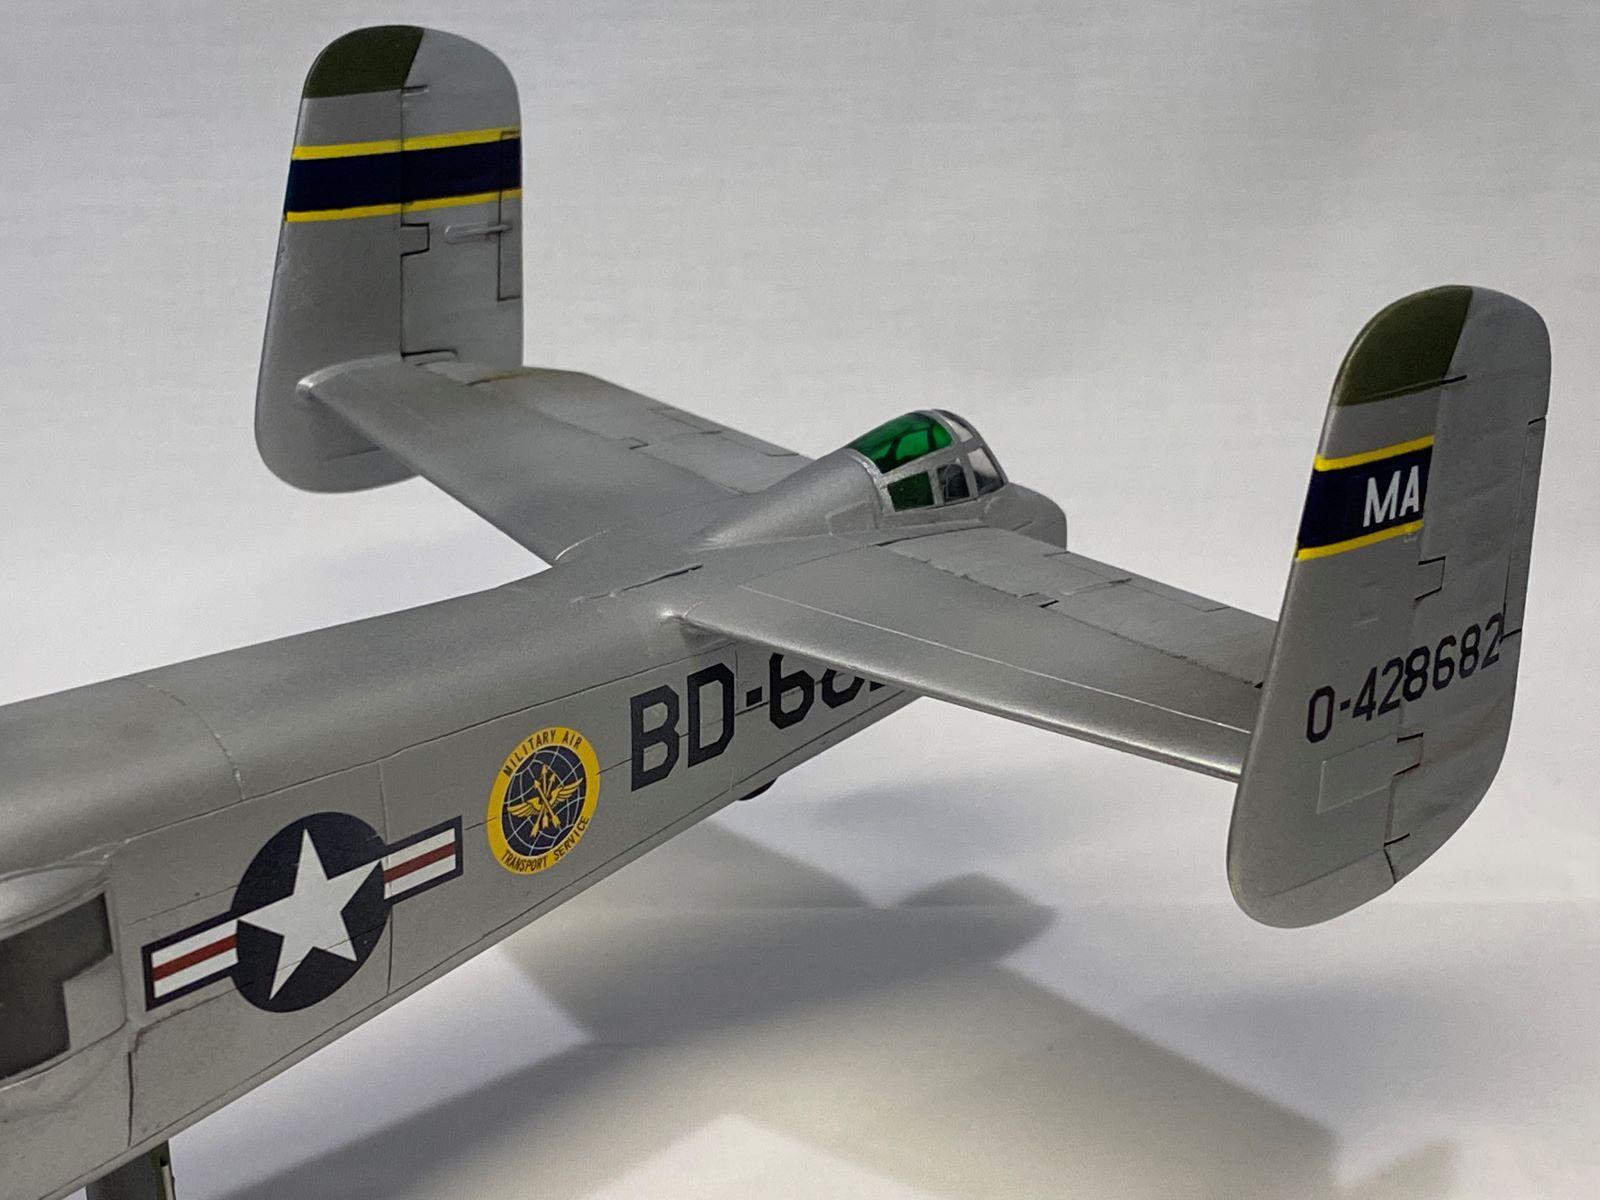
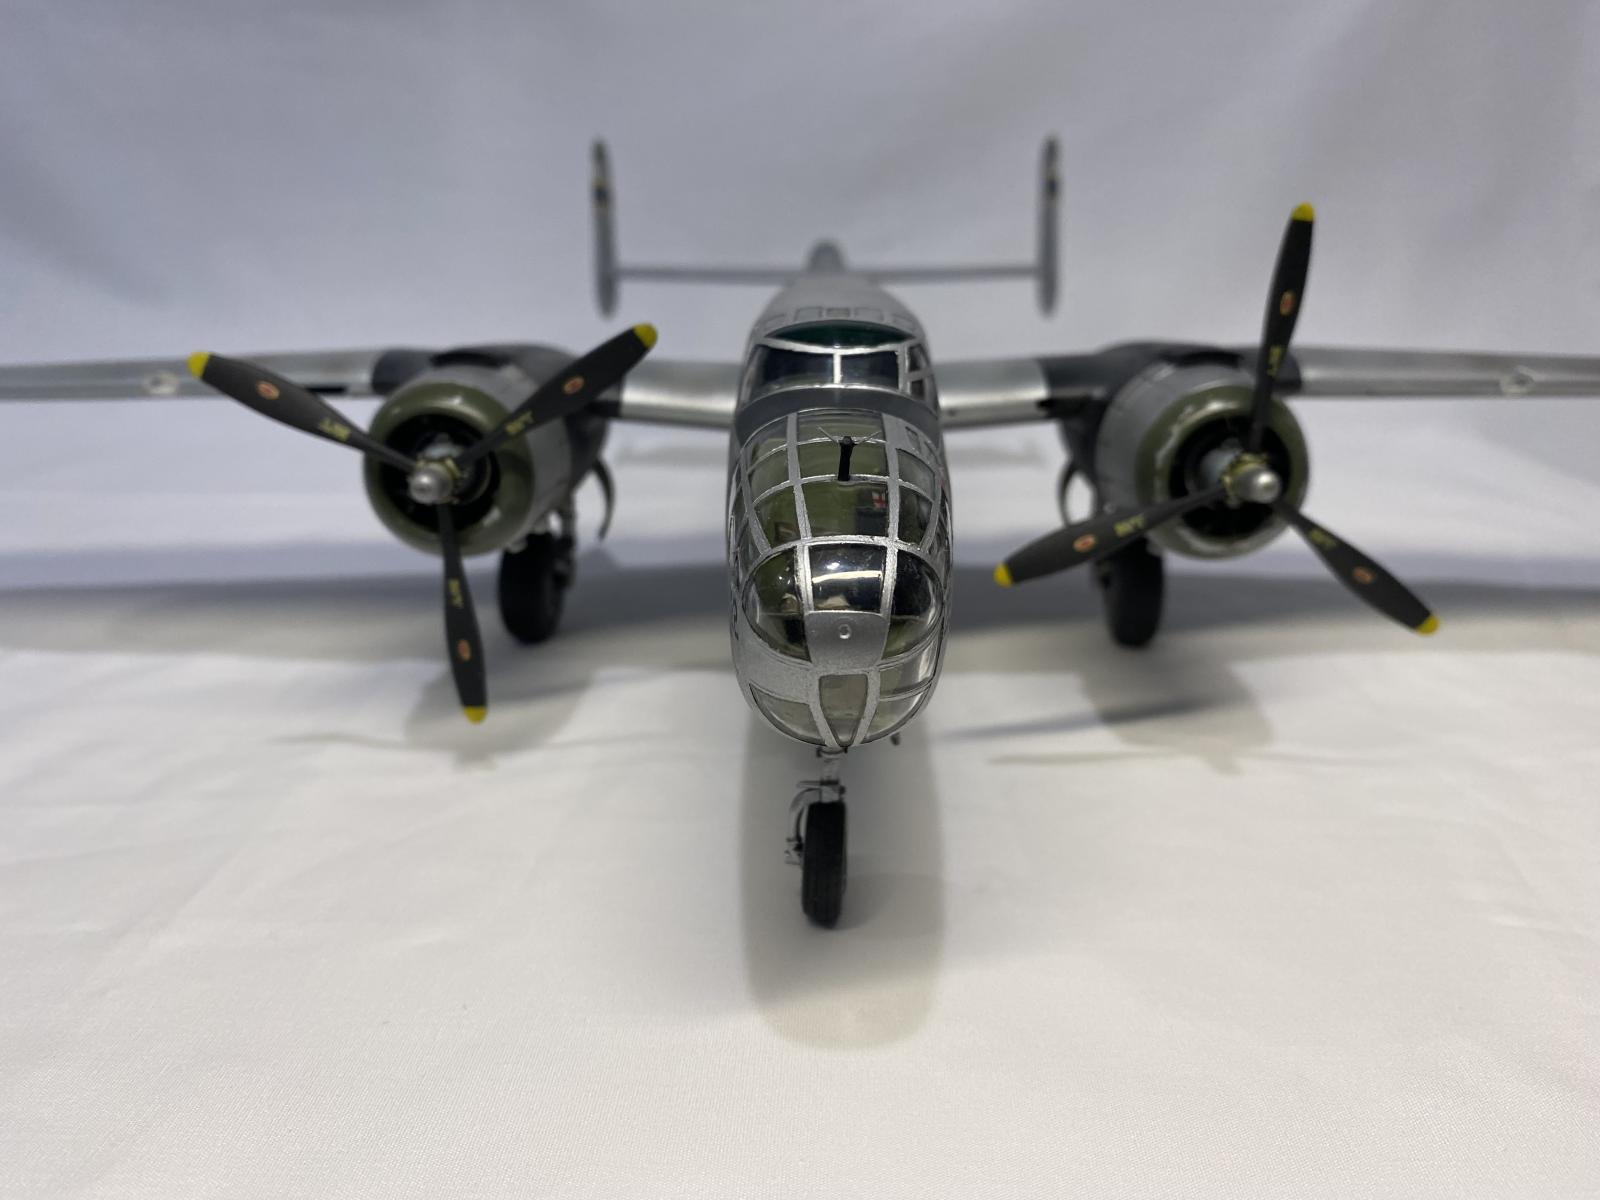
Although all of these planes were former B-25Js, they had a wide variety of equipment. All post-war B-25Js received a redesigned exhaust system. In the original system, each cylinder had a separate exhaust, resulting in a number of exhaust ports all around the engine nacelle. In the modified exhaust system, the exhaust from all of the upper cylinders was collected and exhausted through one large pipe on the outboard side of each engine. All of the lower cylinders retained their individual exhaust ports. The modified systems were installed when a plane went for depot maintenance, so, at any given time, some planes had the modified exhaust and some didn't. There were also two different carburetor systems which resulted in different inlets on the top of each engine. Some planes retained their wire radio antennas from the tail to the fuselage, while others received more modern equipment that didn't require the wire antenna. In all of my online searches, I have been able to find only 2 photos of the CB-25J.
-
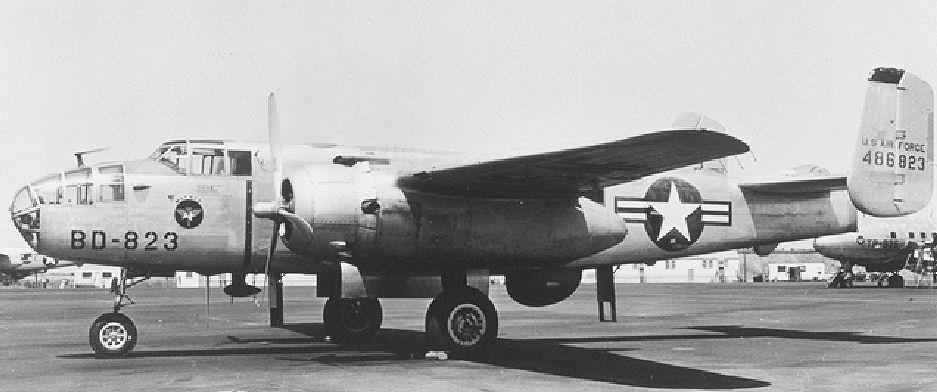
- 1. Modified exhausts on this TB-25J.
This simple conversion was a lot more involved than I thought. Here are the things that were converted for this build:
-Armor protecting the cockpit sides removed
-Upper turret deleted and hole plugged
-Rear gunner equipment removed
-Alternate exhausts installed
-New postwar antennas installed
-All weapons removed
-Bomb sight removed
-Bomb bay closed
-Three-color identification lights removed
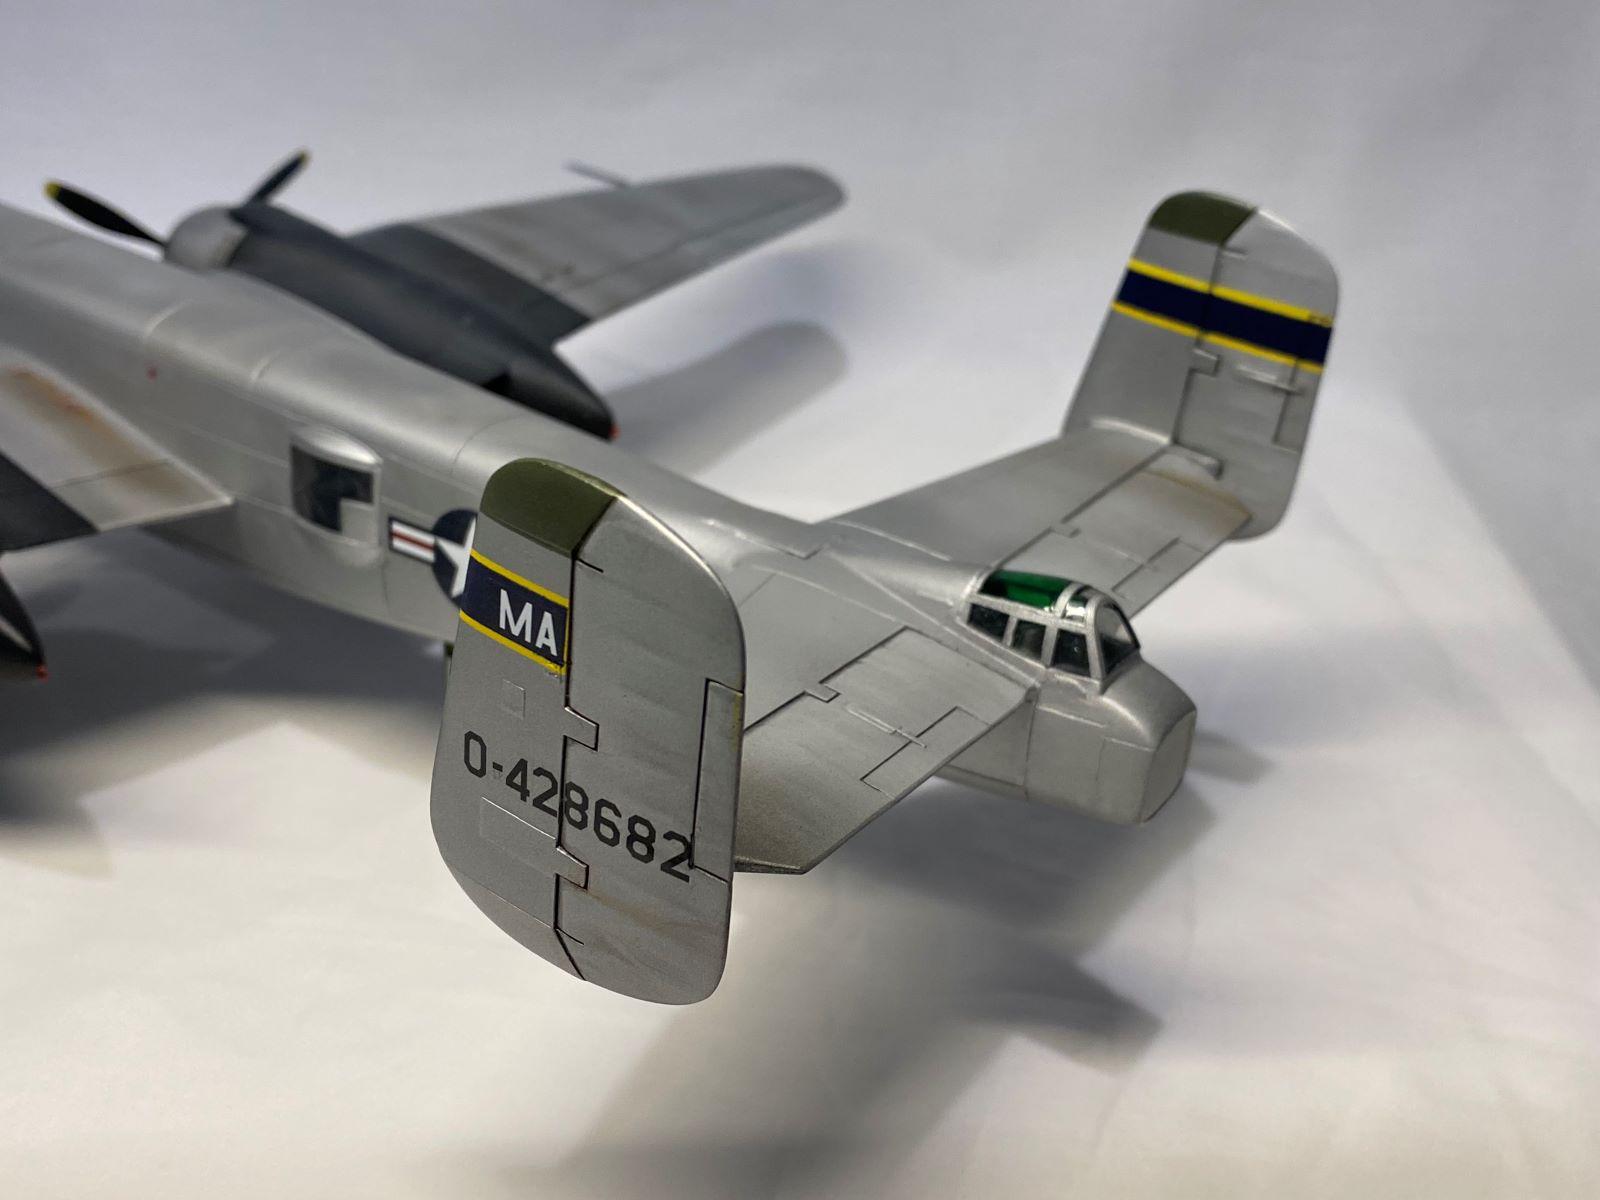
-Green-tinted glass added above the pilots and the tail position
There were several "firsts" on this plane for me:
-Although I have replaced small portions of panel lines removed during sanding, this required that all of the panel lines be replaced. I made lots of mistakes with the panel lines, but I tried to repair all of the mistakes. If you look closely at the photos you will see one or two mistakes that I missed.
-I created a resin plug on my 3D printer to fill the hole for the upper turret.
-My experience with NMF in the past has been limited to small areas on my models, so this was the first model that required a NMF over the entire plane.
This was a fun build, even if it did take a lot longer than I thought it would. I had several near catastrophes, all of my own making. I also assumed that all of the Revell/Monogram B-25J kits had the same parts in them. It turns out they don't. Some of the kits were released as a standard bomber, while others were released with the glass gunship nose that had 5 machine guns sticking out of it. You really want the standard bomber version for these conversions, since they have fewer holes in the nose glass. I still want to do a radar trainer, as well as a TB-25D trainer, but I think I will take a break from conversions for a while.

George @gblair - This is really a wonderful modification of the well-known kit. I remember as a kid my dad driving us past Lowry AFB in Denver, and there was row on row of B-25 trainers. So this brings back a lot of memories.
As to the exhausts - the post-war exhausts were a return to the early exhausts. They went with the individual exhausts because the single exhaust during the war was so obvious that B-25s on night ops in the Middle East were targeted by the Germans sighting on the single exhausts.
Beautiful work. Definitely a "Wow!"
Thanks for the kind words, Tom (@tcinla). One of the books I have on the B-25 mentioned the problem with the night ops. Apparently the removal of the individual exhausts actually cut the drag enough to see a small increase in speed. Thankfully, only half of the individual exhausts were molded on the cowling, so I could remove all of them, add the panel lines to the cowling, and then replace the ones I needed from those provided by the kit to glue on the cowling.
Fantastic modification
Thanks, George (@blackadder57). I have a couple more that I want to do.
Amazing job, George! All your extra effort paid off, the final result being really unique! Great build thread and accompanying article too.
Congratulations!
Thanks, Spiros (@fiveten). I appreciate your support while I muddled through this build.
The conversion of this Mitchell turned out perfect, George @gblair
All the extra time you put into this build was definitely worth it.
Thanks for the learningful build thread.
Thanks, John (@johnb). Thanks for following along during the build.
Very nice Mitchell George! Great work.
Thanks, Martin (@matra). Despite the problems I had, it was a fun build.
Well done, George.
Your firsts all look good "Nothing ventured, Nothing gained"
Thanks, gary (@gwskat). I have avoided NMFs for a long time, but there was no alternate paint scheme for this one, so I was forced to try the NMF. I still need a lot more practice on both NMF and panel lines.
Neat conversion, George, the accuracy of the details reflects your research and your modelling skills, along with your enthusiasm for the subject.
Thanks, George @chinesegeorge). I appreciate your comments.
Fine build & finish. Re-scribe issues not obvious at all.
T Cleaver will correct me if I'm wrong...recall years ago TC said that once painted, UN-rescribed raised panel lines not obvious from a foot away. My experience...he's right.
Thanks, Bob (@bails). Re-scribing seems like it would be really easy, but I found it amazingly difficult to keep the scriber going in the right direction. I probably wouldn't have attempted it if I hadn't removed most of the raised lines by the time I finished removing the pilot's side armor (molded on), puttied and sanded the plug for the upper turret, and then did a lot of fill and sand on the fuselage seams. Using the same thought process as Tom, I left the raised detail in-place on the wings. I don't think it is too noticeable.
George R Blair Jr (@gblair)
Hello George,
I'll bet you are happy to get this one done and in the headlines section. It was a joy to read along with your build journal. The model turned out great ! Having a photo of the original plane also helps. The Port side rudder without the markings applied yet is one of those things that set this particular aircraft apart from the rest.
B-25's are SO cool... and so is your model. Well done buddy. Each one of your models seems to be better than the last. You are really "upping your game" with things like the 3D printer and the cutting tool.
I'm looking forward to your next project(s). I'm sure you will knock them out of the park, just as you have done with this one.
Thanks, Louis (@lgardner). I appreciate your kind words and the thoughtful inputs during the build. I also appreciate the historic information that you share. I should be posting in your new group soon.
Well done George,and I see you solved the weight situation. When it comes to larger models I shelve the air brush and go right to Tamiya rattle cans if they have the correct color. Covers large areas fast and dries quickly. Works for me. BTW just had a B-25 fly over the house, nothing like hearing those radials humming along. Really nice job on your conversion,George, I like it a lot.
Thanks, Tom (@tom-bebout). I had to add almost 4 ounces to get the plane to sit on all three wheels. The glass nose on this model made it impossible to add weight in the nose where it would do the most good. The farther away from the nose you get, the less effective the weight is. I added a bunch just behind the cockpit, and some in the engine nacelles. Finally getting the wheels on helped it balance, also. I used Humbrol Polished Aluminum from a spray can for the first layer over the black primer. It is very controllable and goes on thin. I used some Vallejo Metals and some Alclad II for some of the panels. I like the Vallejo, but the Alclad is still a little finicky for me. We moved to a smallish town, but it has a really nice airport not too far from us. It is home to several warbirds, and, like you mentioned, you can always tell the difference between a warbird and a Cessna 172.
@gblair - Fantastic build George! Very cool that you're going to end up building several more. The variations will look great together.
Thanks, Brian (@brithebuilder). I had a real sense of accomplishment creating the plug for the upper turret using my 3D printer. It was really simple using Tinkercad, but it filled the hole quite nicely. I do plan to build some other B-25s, but I need to be sure I have the real estate in my display cases to hold more 1/48 bombers.
Very nice conversion and interesting story about those post-war careers of the Mitchells.
Thanks for sharing.
Thanks, Alfred (@alfred). Thanks for stopping in.
Extremely well done- I really enjoyed watching the progress as this shaped up over the last few weeks. You've definitely set the standard as far as Revell/Monogram B-25's are concerned- seeing what you've done will make anyone think twice before they shell out almost $100 for the new HK kit. Looking forward to your next builds on this subject as well. Very impressive work!
Thanks, David (@dbutlr). I think this one was fun because I am interested in the postwar versions, especially the cargo and trainer. I learned a lot, and also managed to recover from several self-induced catastrophes.
Beautiful modification and rendition of a rarely-seen version of the Mitchell! Love it.
Thanks, Greg (@gkittinger). I like doing things that are a little bit off the beaten track.
A great job indeed! Nicely done.
Thanks for the kind words, Robert (@roofrat). After two 1/72 scale models, it was nice to build something a little larger.
Cramps the fingers it does.
I build 1/72 more by feel than sight. It is nice building something I can see. :o)
I was away from the site for a few days and missed this George, @gblair. I really enjoyed following along with your build and in the end you really put together a good looking build. Everything seemed to work out in the end and produce a slightly off the beaten path B-25. Good job and congrats.
Thanks for following the build, Walt (@luftwaffe-birdman). I want to do some more of the postwar B-25s, but I want to take a break and build some other models before I dive into another B-25.
Gorgeous results George @gblair, simply fantastic work in making something more of this kit. I love the chosen scheme, and really, the NMF looks great. Thanks for sharing the build and your wonderful results.
Thanks, Andrew (@pb_legend). I appreciate your kind words. I still don't really like to do NMF, but I suppose it is just a matter of getting more practice.