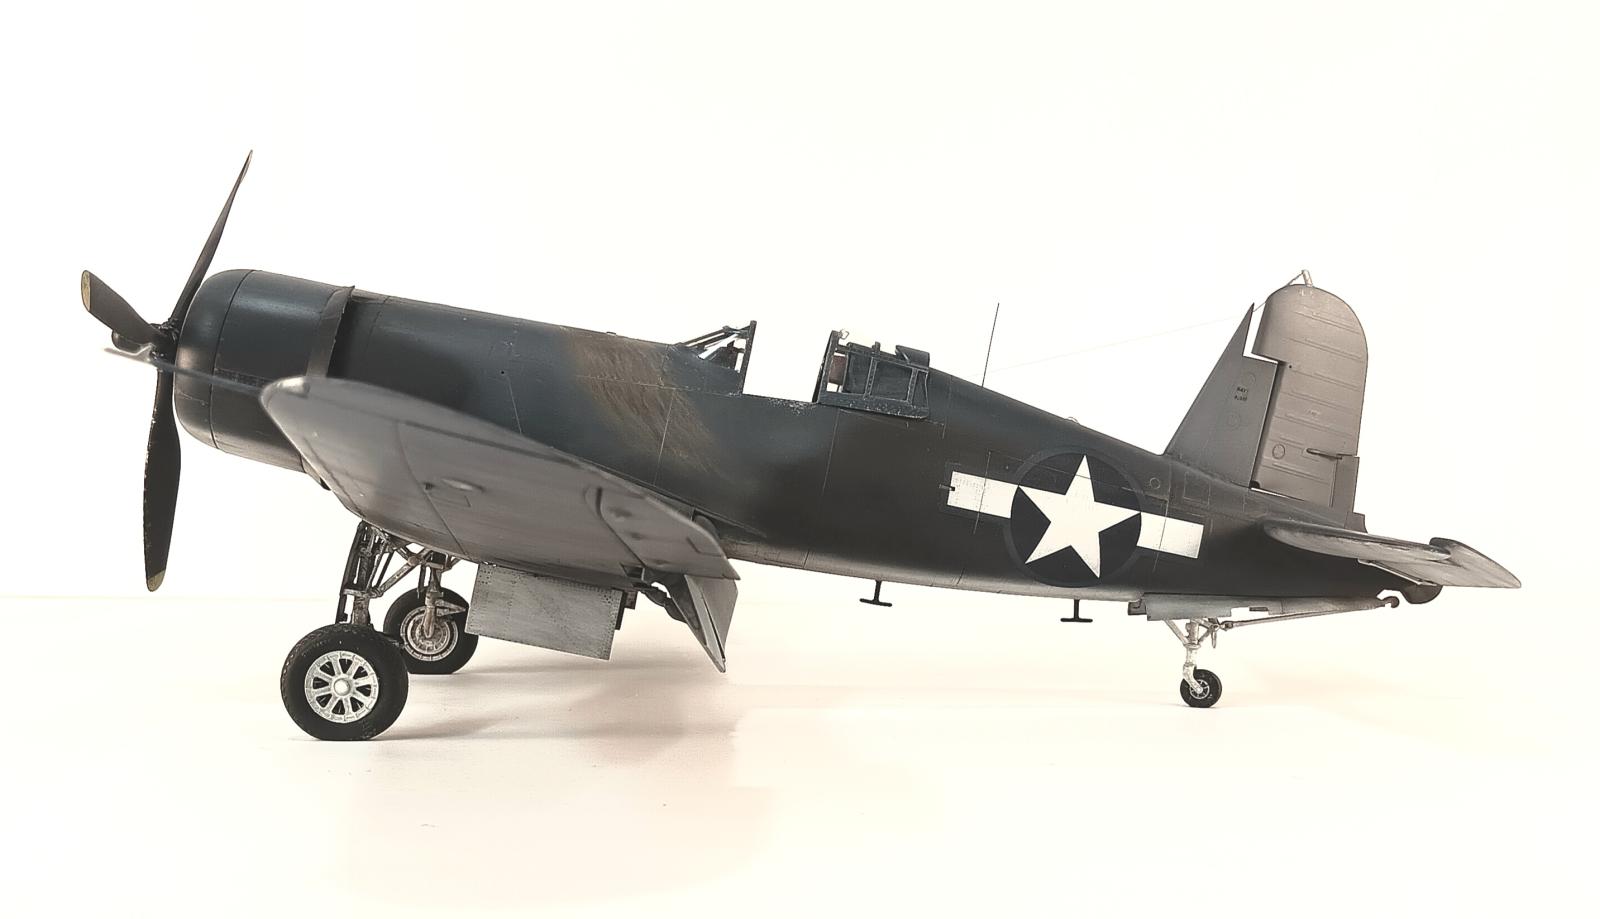
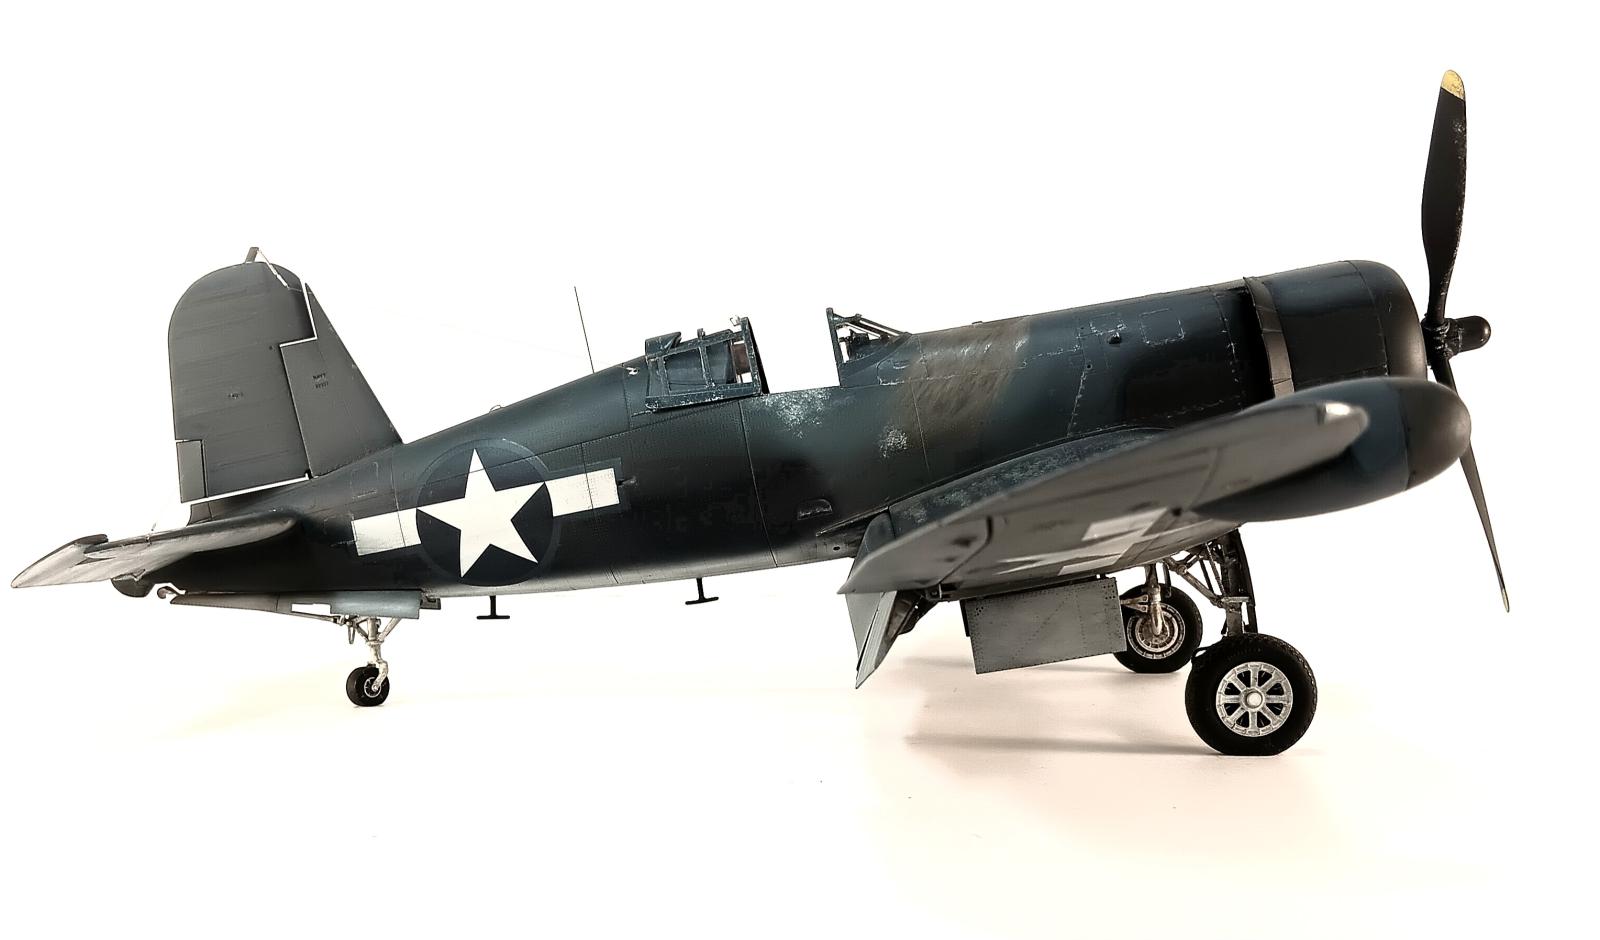
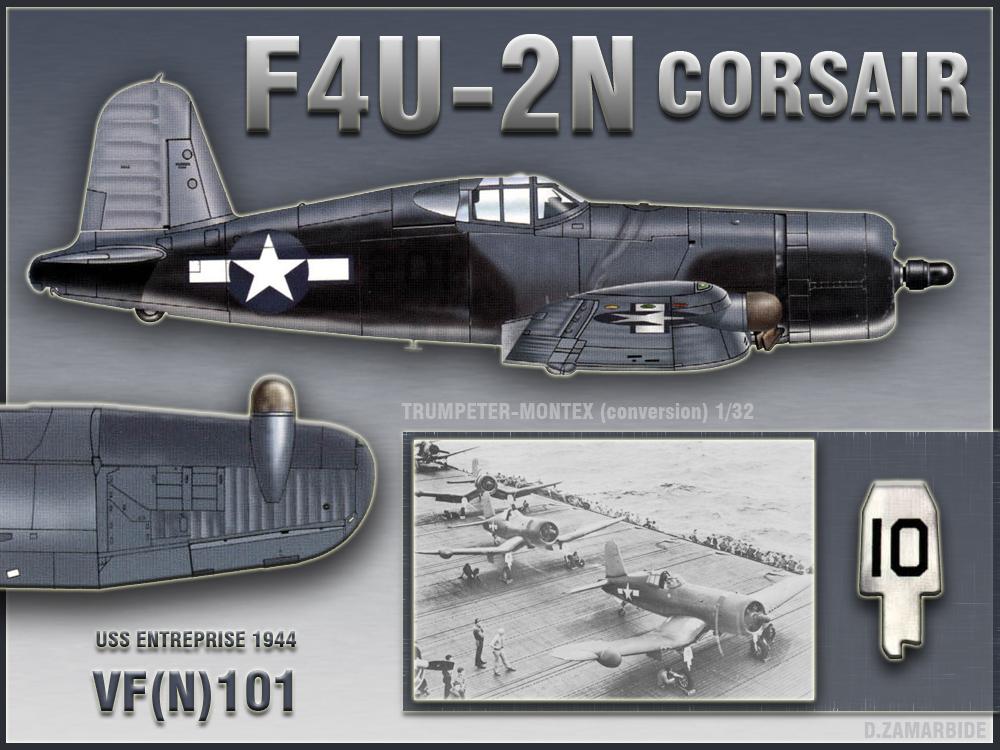
The F4U-2 Night Fighter Corsair
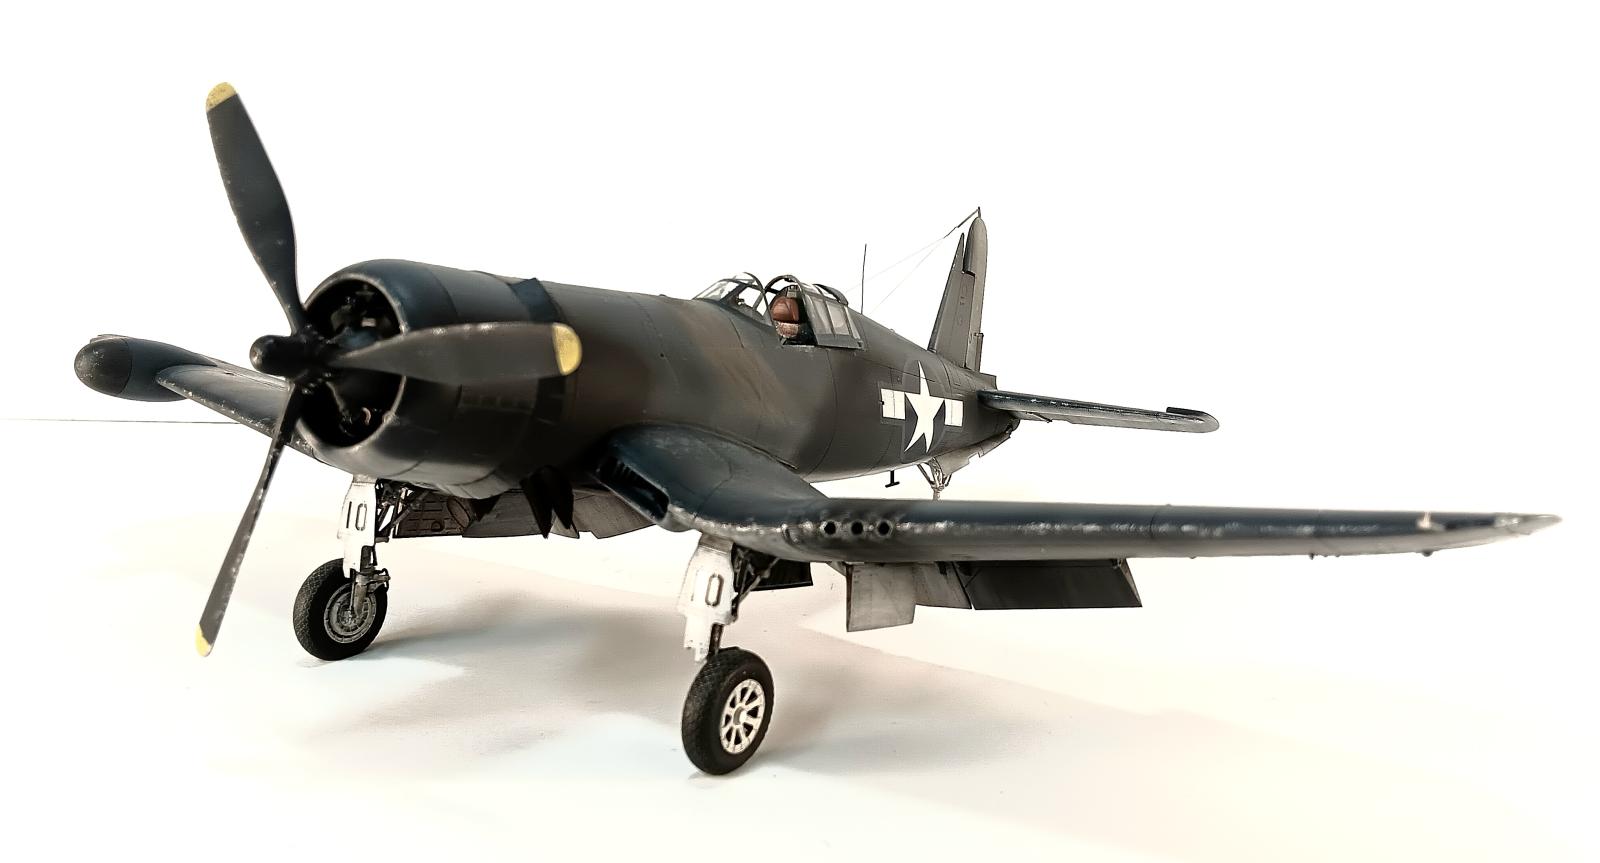
This is my conversion of the beautiful Tamiya 1/32nd scale F4U-1 "Biracage" Corsair.
Here's a little background on the dash 2, (for a better, more comprehensive history, check out Tom Cleaver's @tcinla articles here on iModeler and on Modeling Madness.
There were 34 F4U-1 Corsairs converted to the -2 specifications. 32 at the factory and two in the field. This conversation essentialy made the -2 Corsair the Navy's first night capable flete defense fighter, paving the way for F6F Hellcat night fighters that followed.
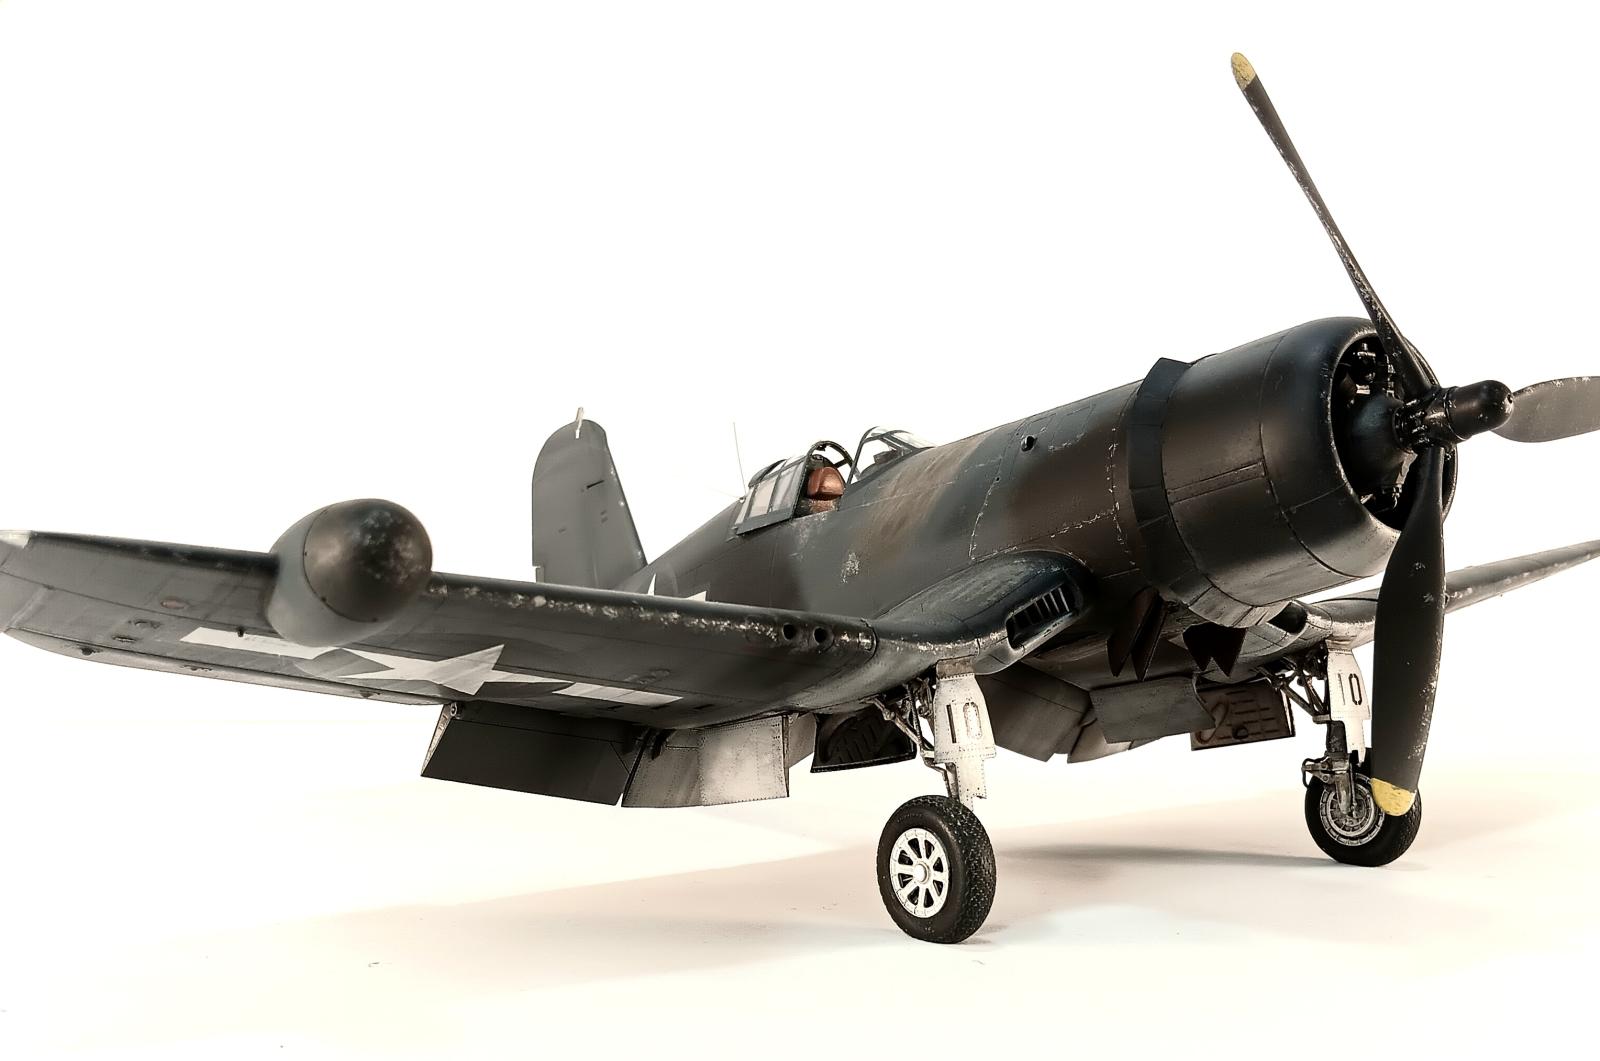
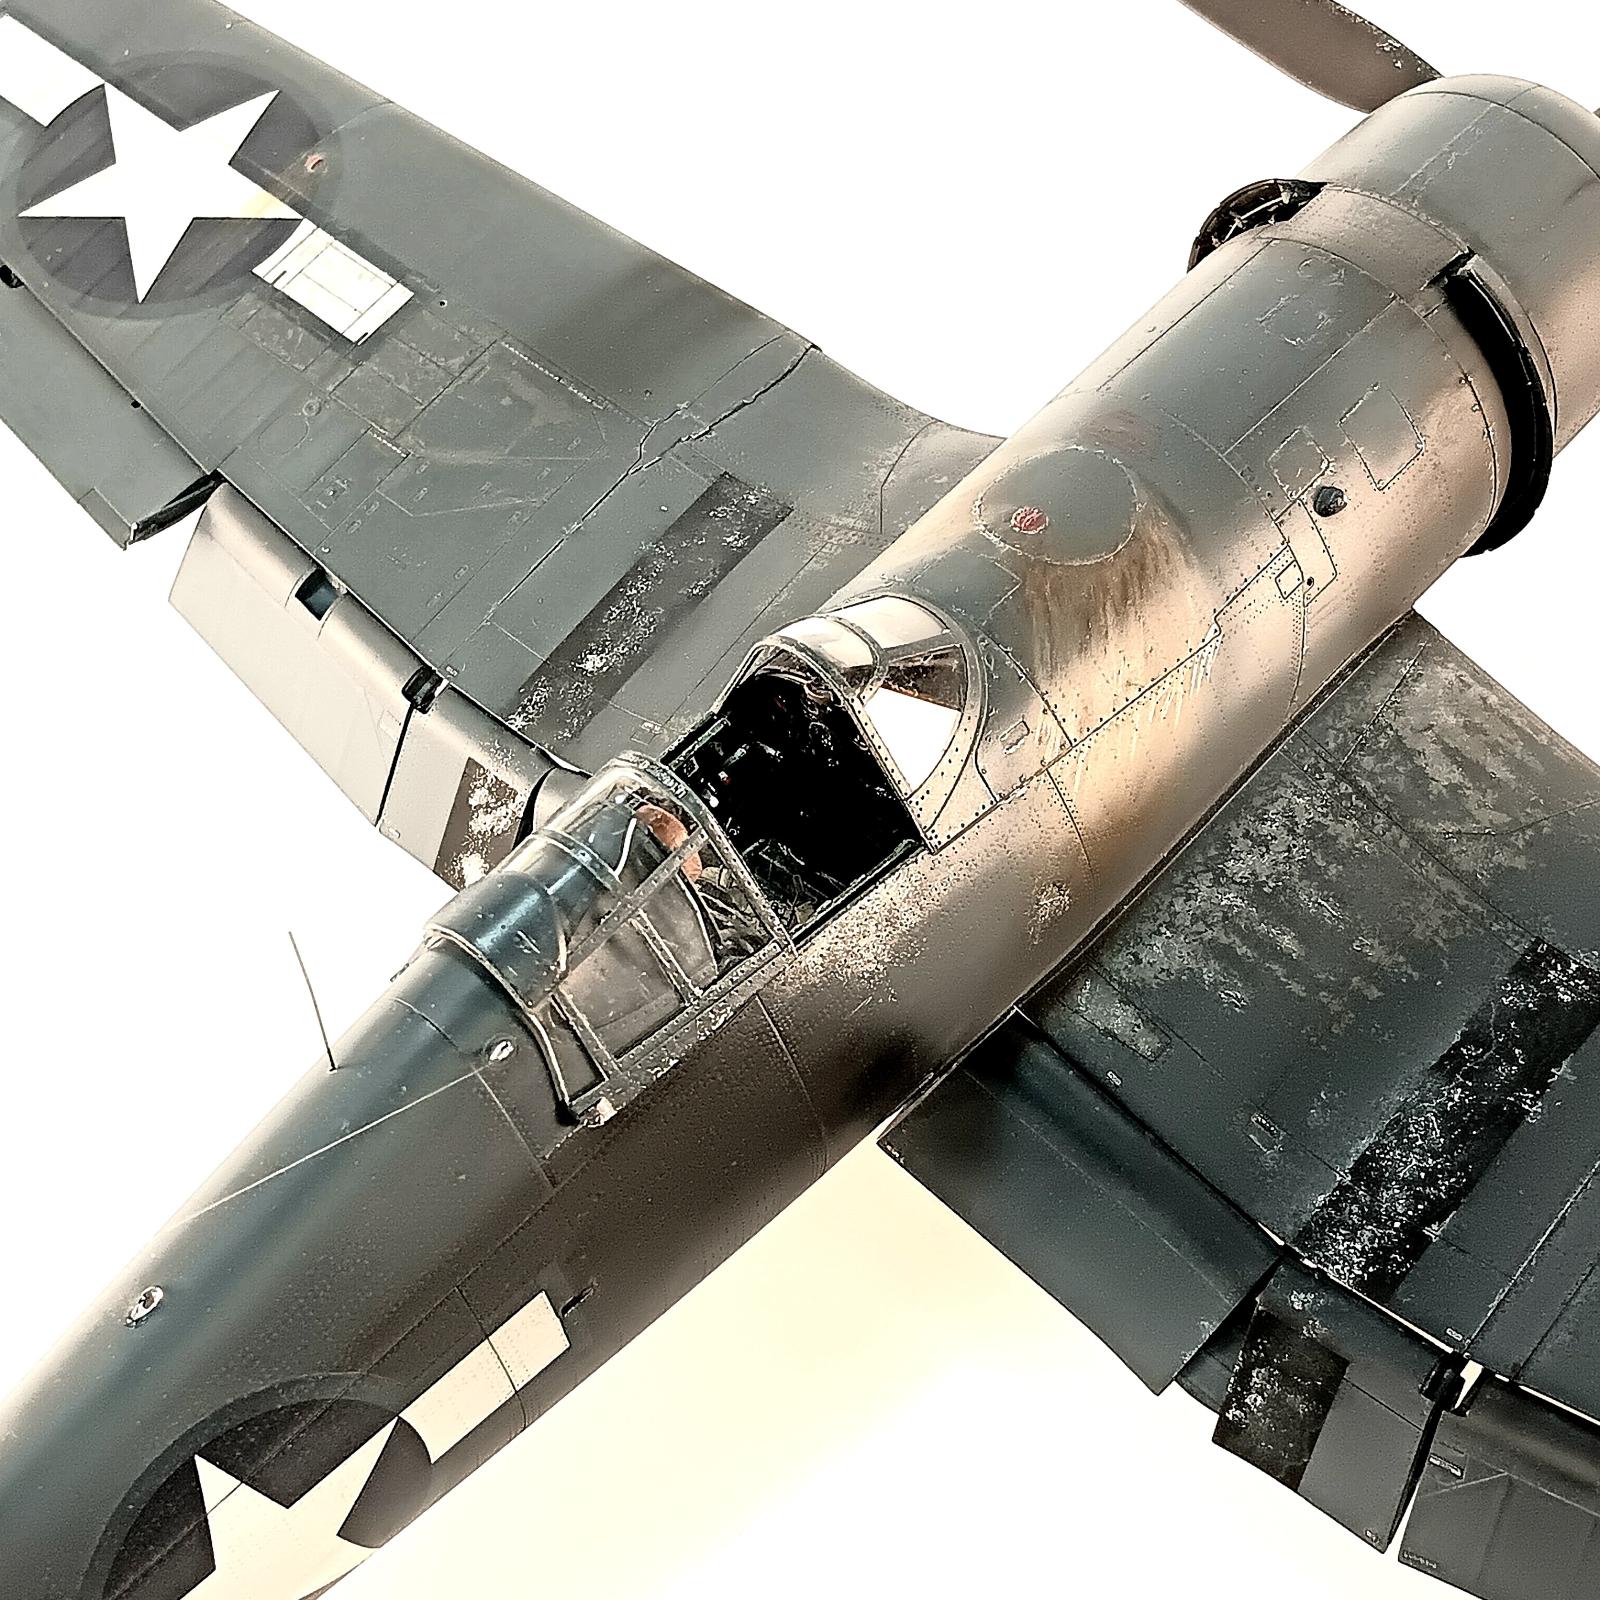
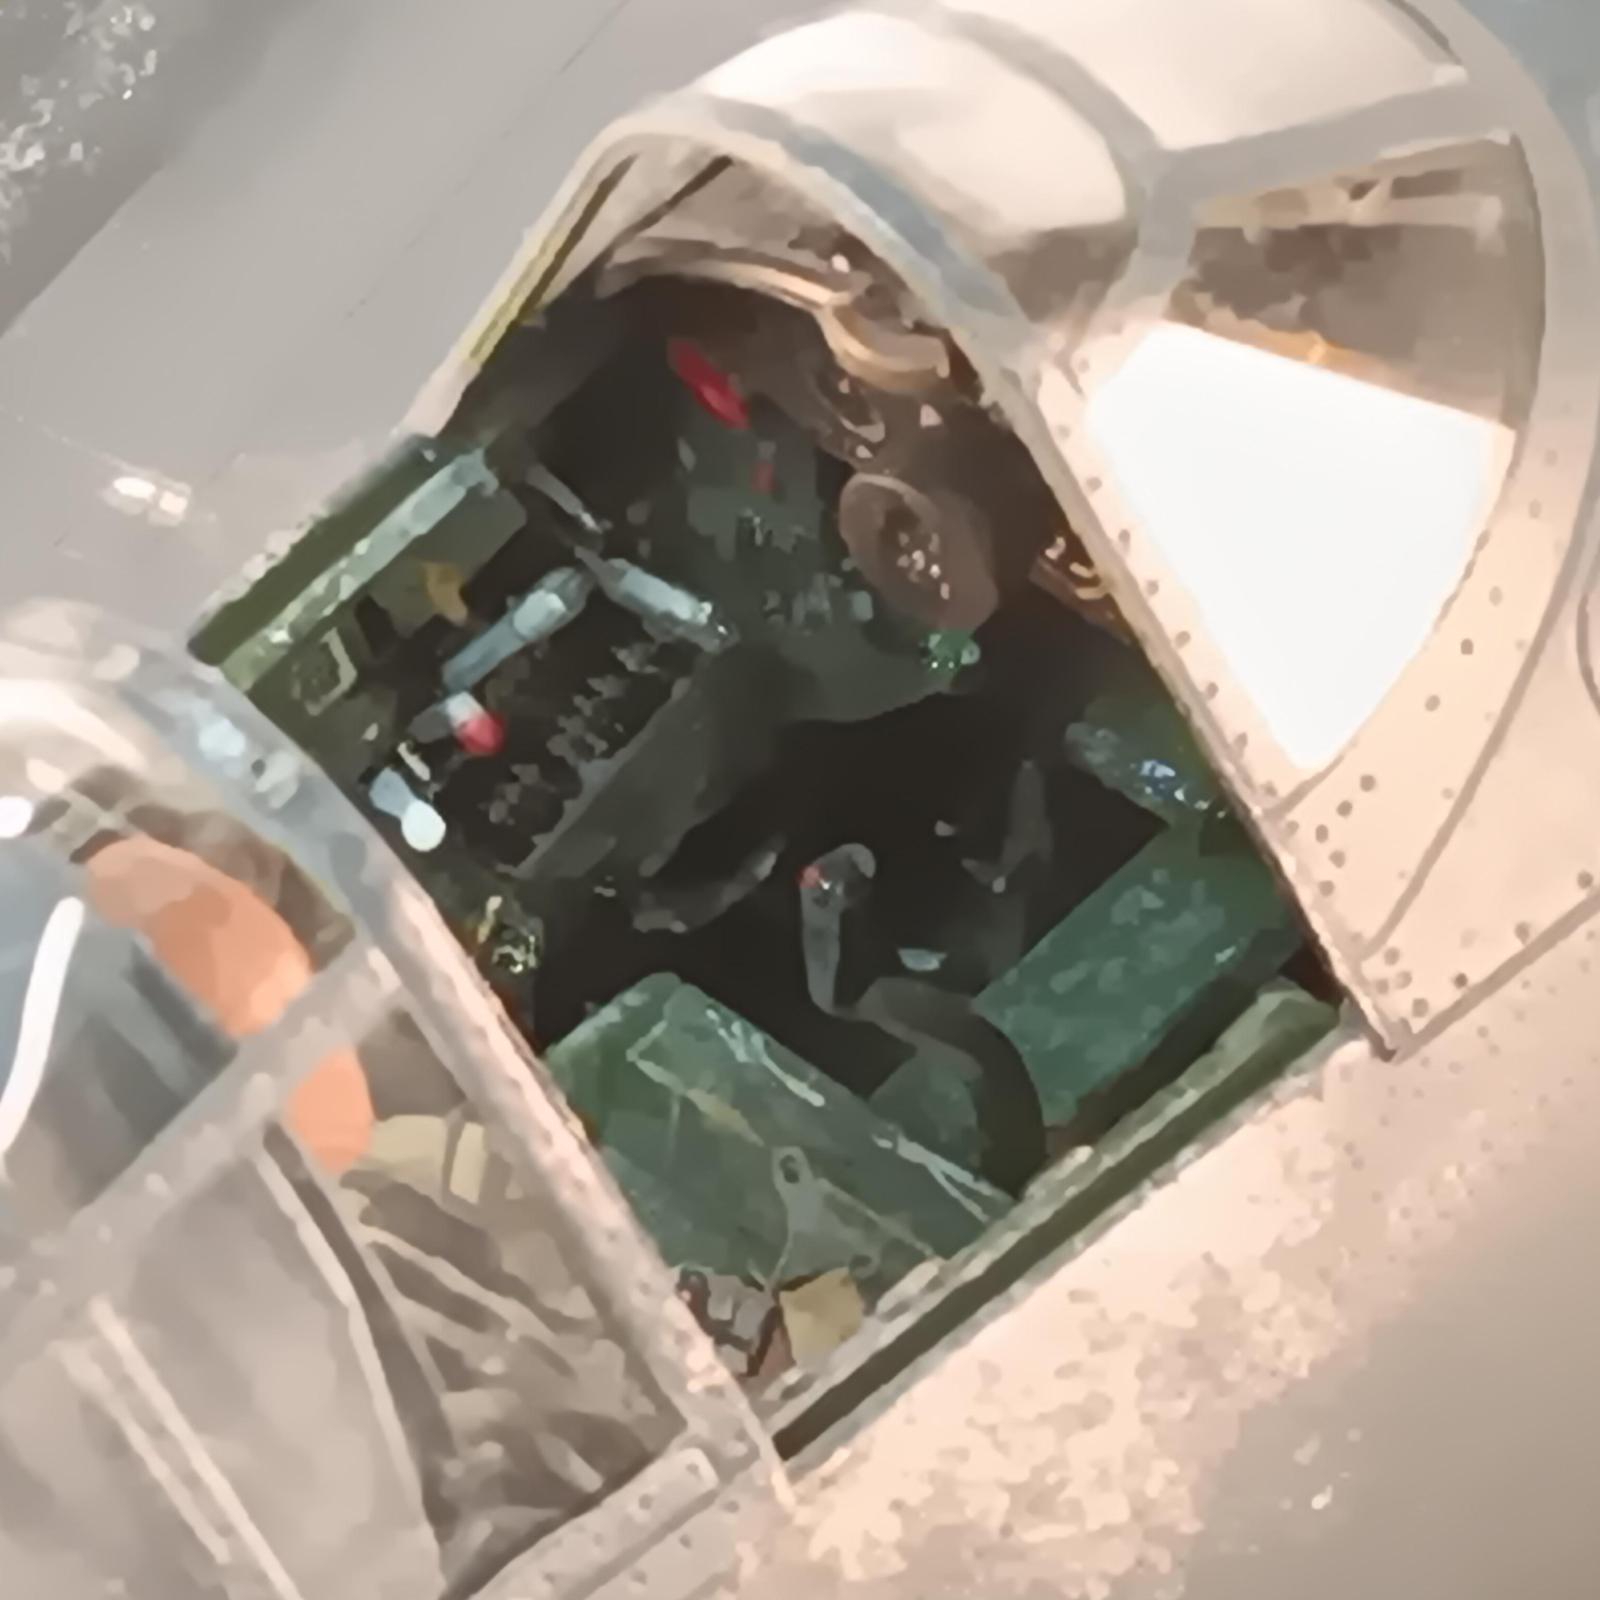
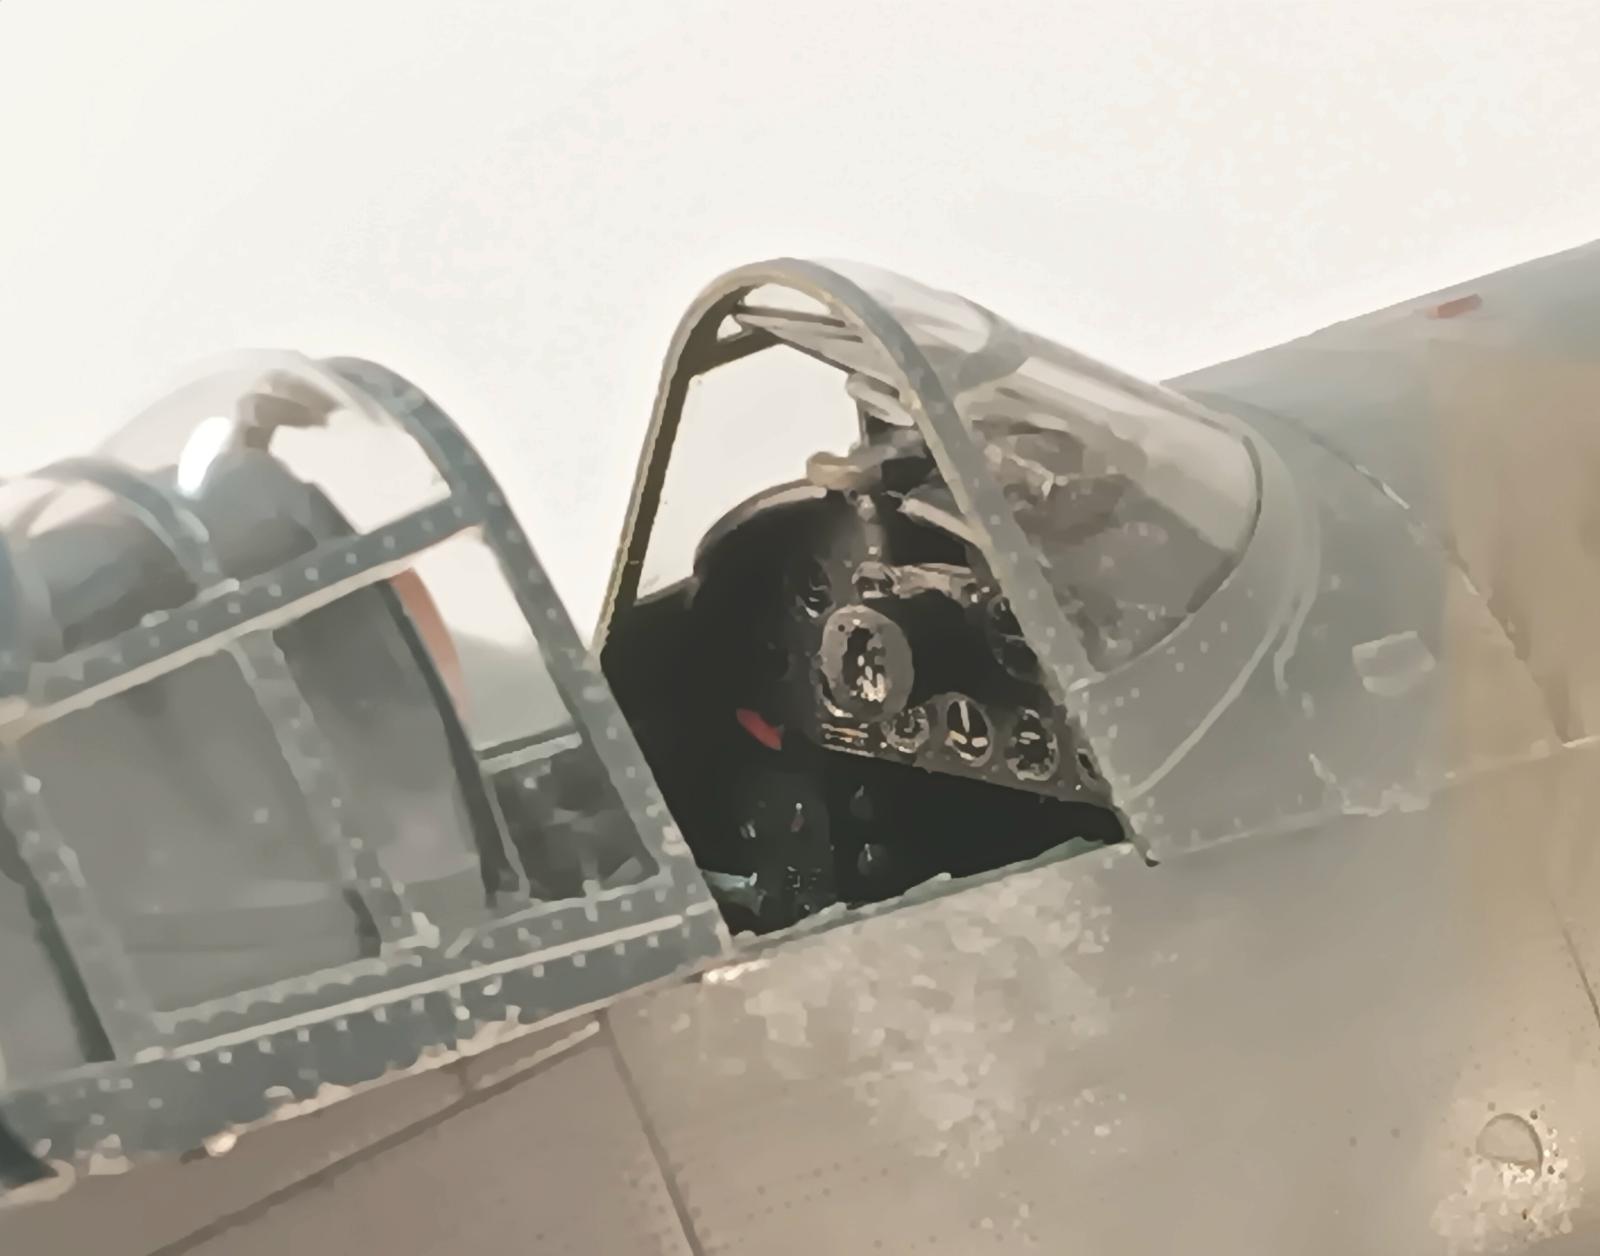
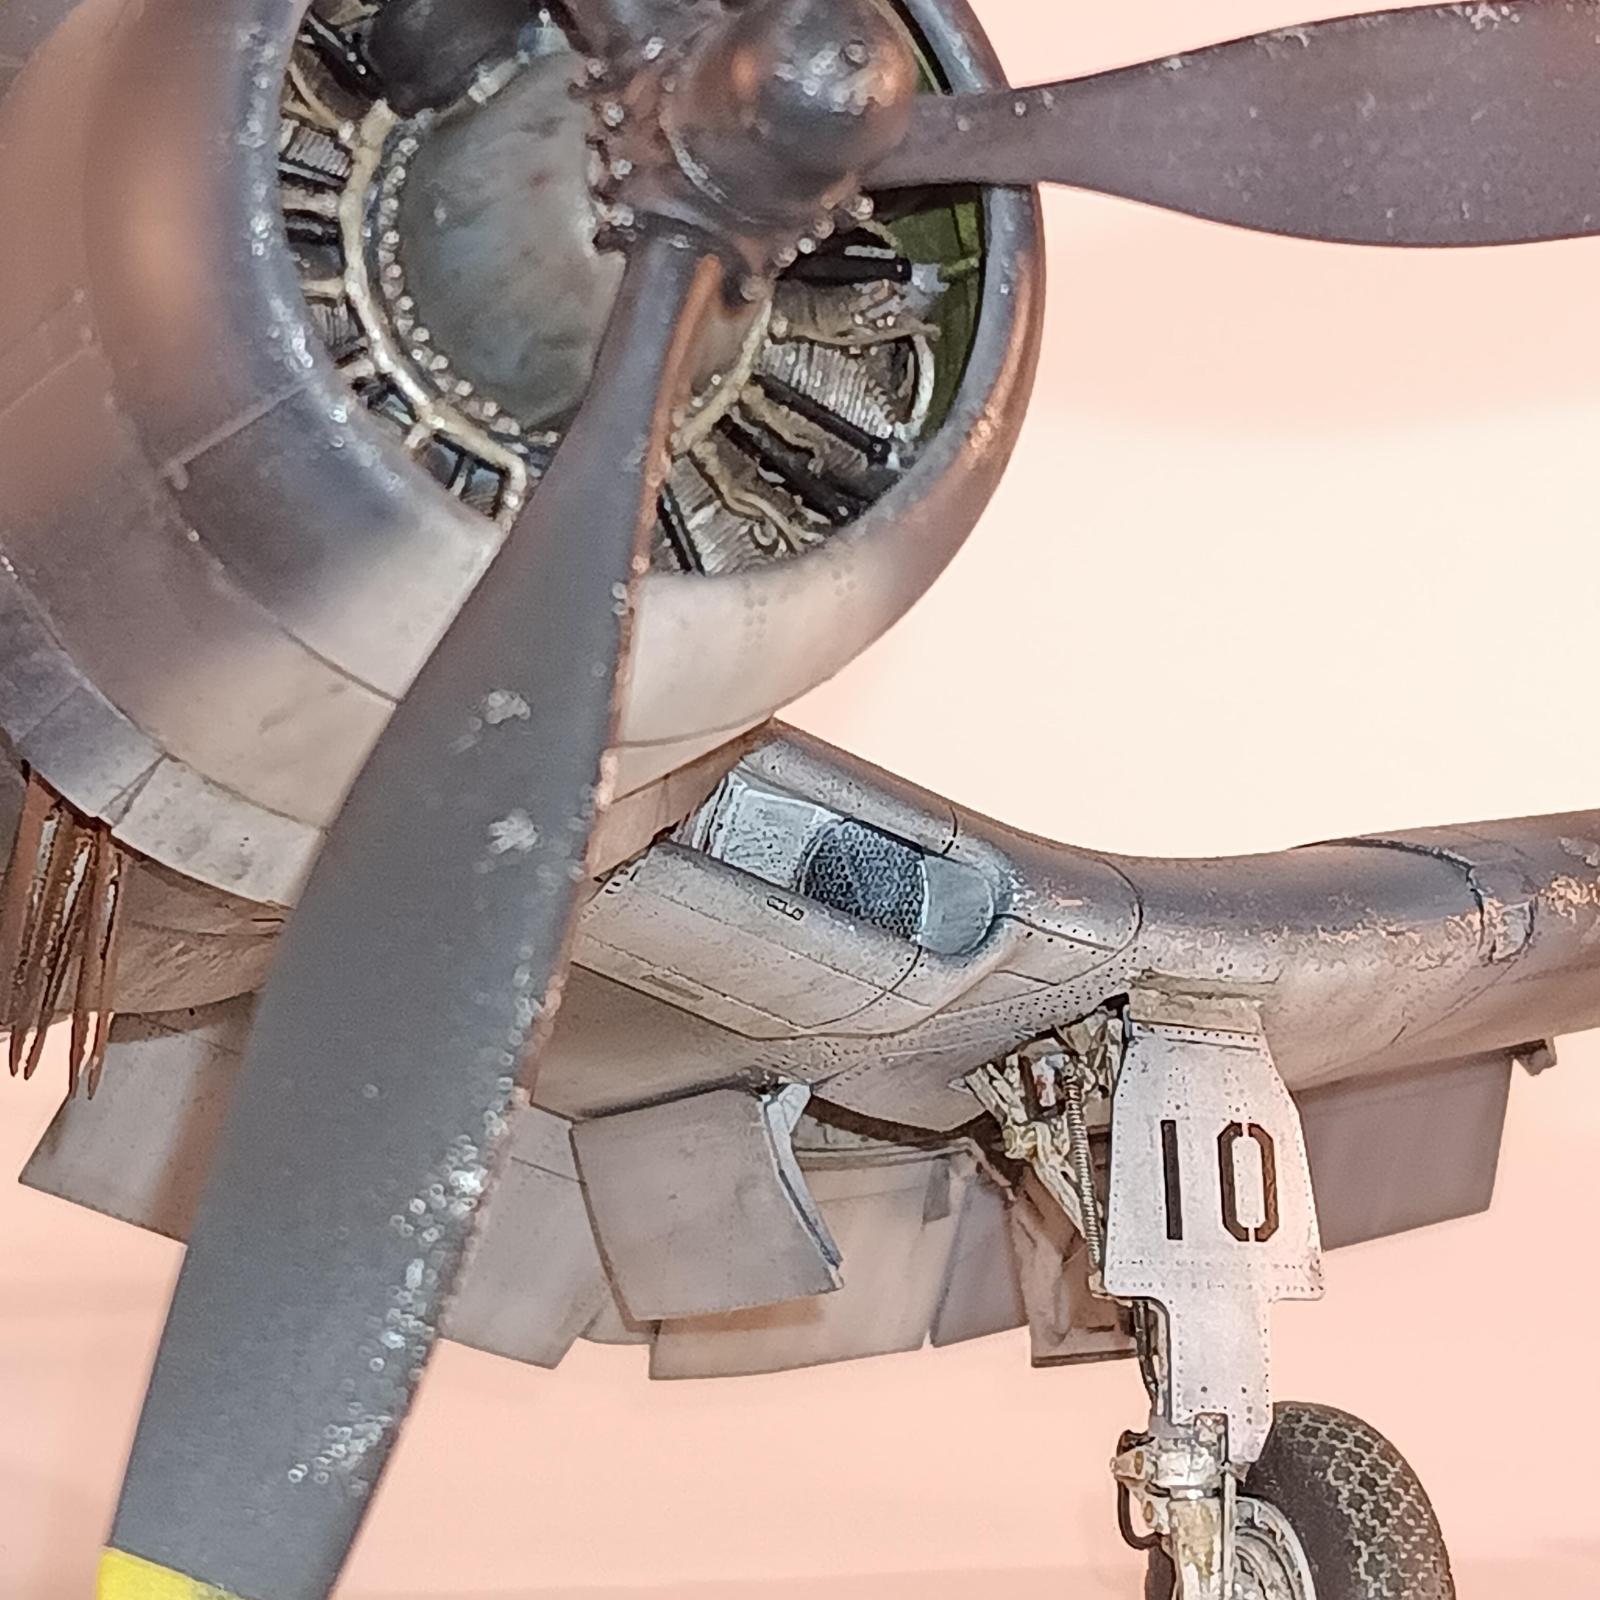
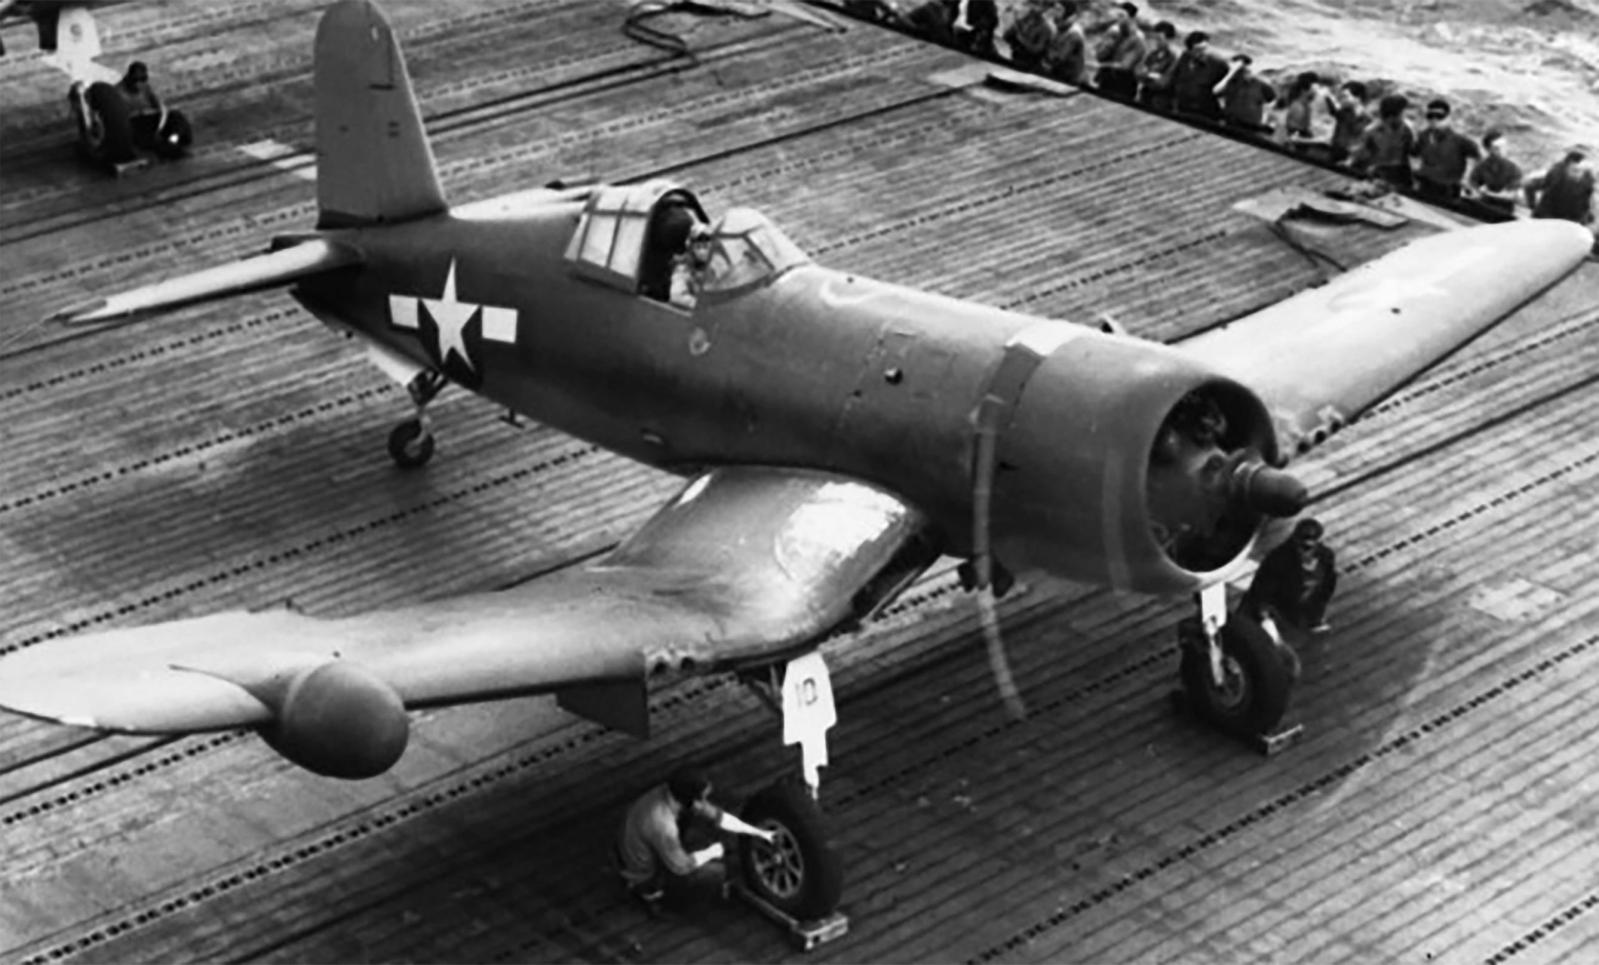
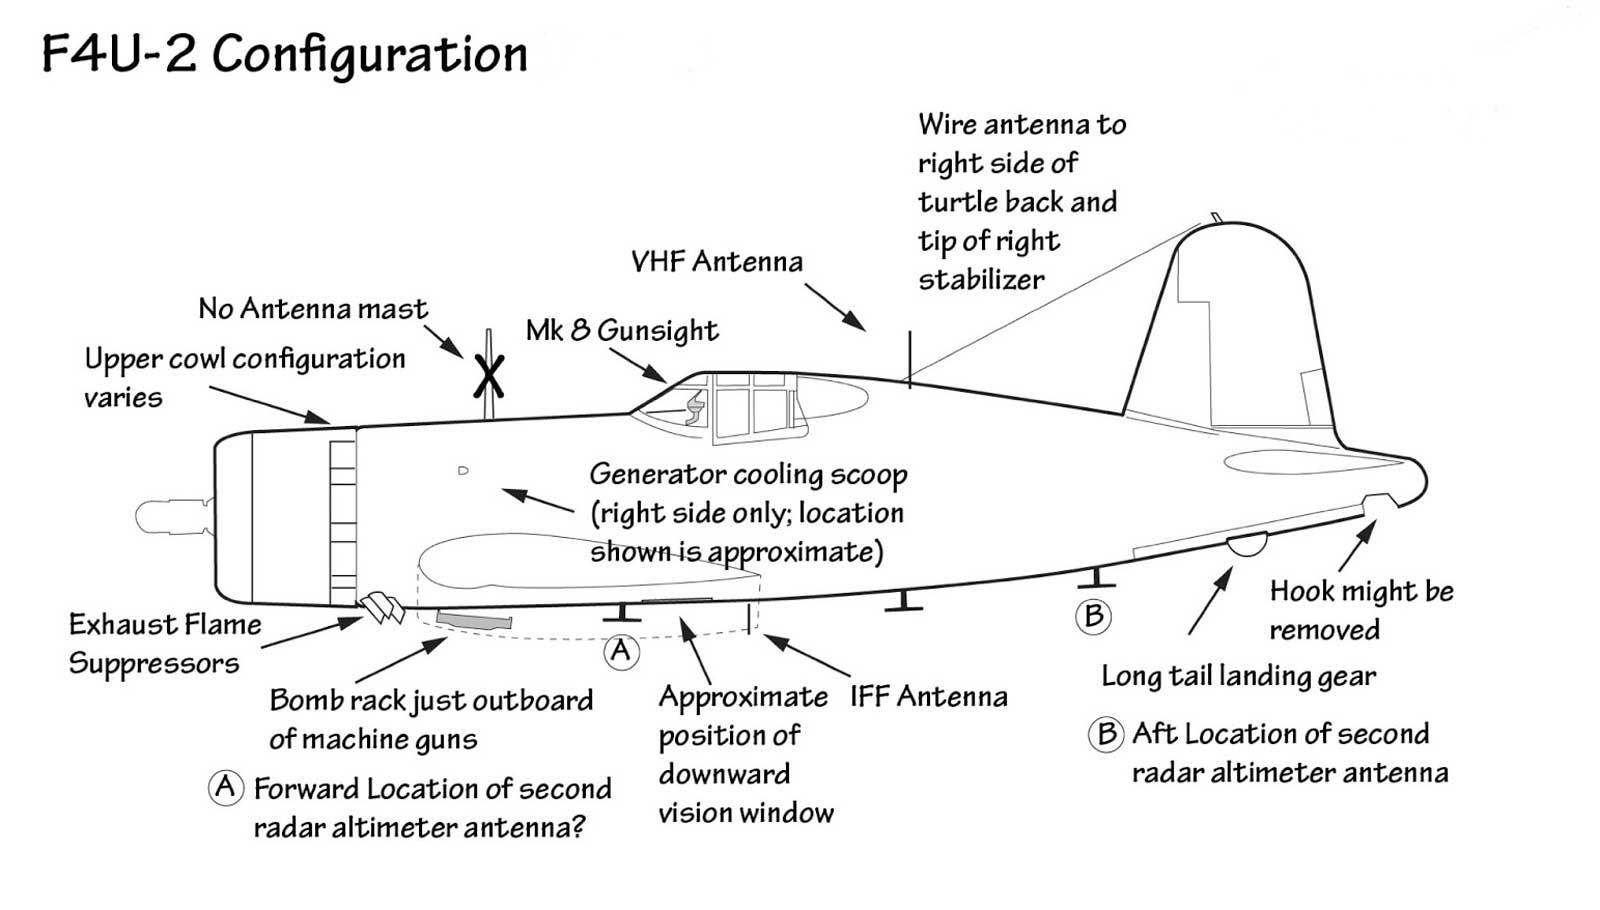
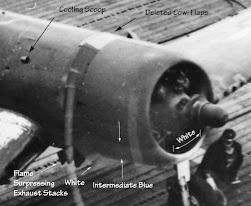
The dash 2 consisted of the installation of a APS-4, 18" parabolic "radio dection and ranging" (RADAR) antenna unit, housed in a dome faired into the leading edge of the starboard wing, along with a 6" radar scope mounted in the center of the insterment panel, and a few other radar antennas under the fuselage.
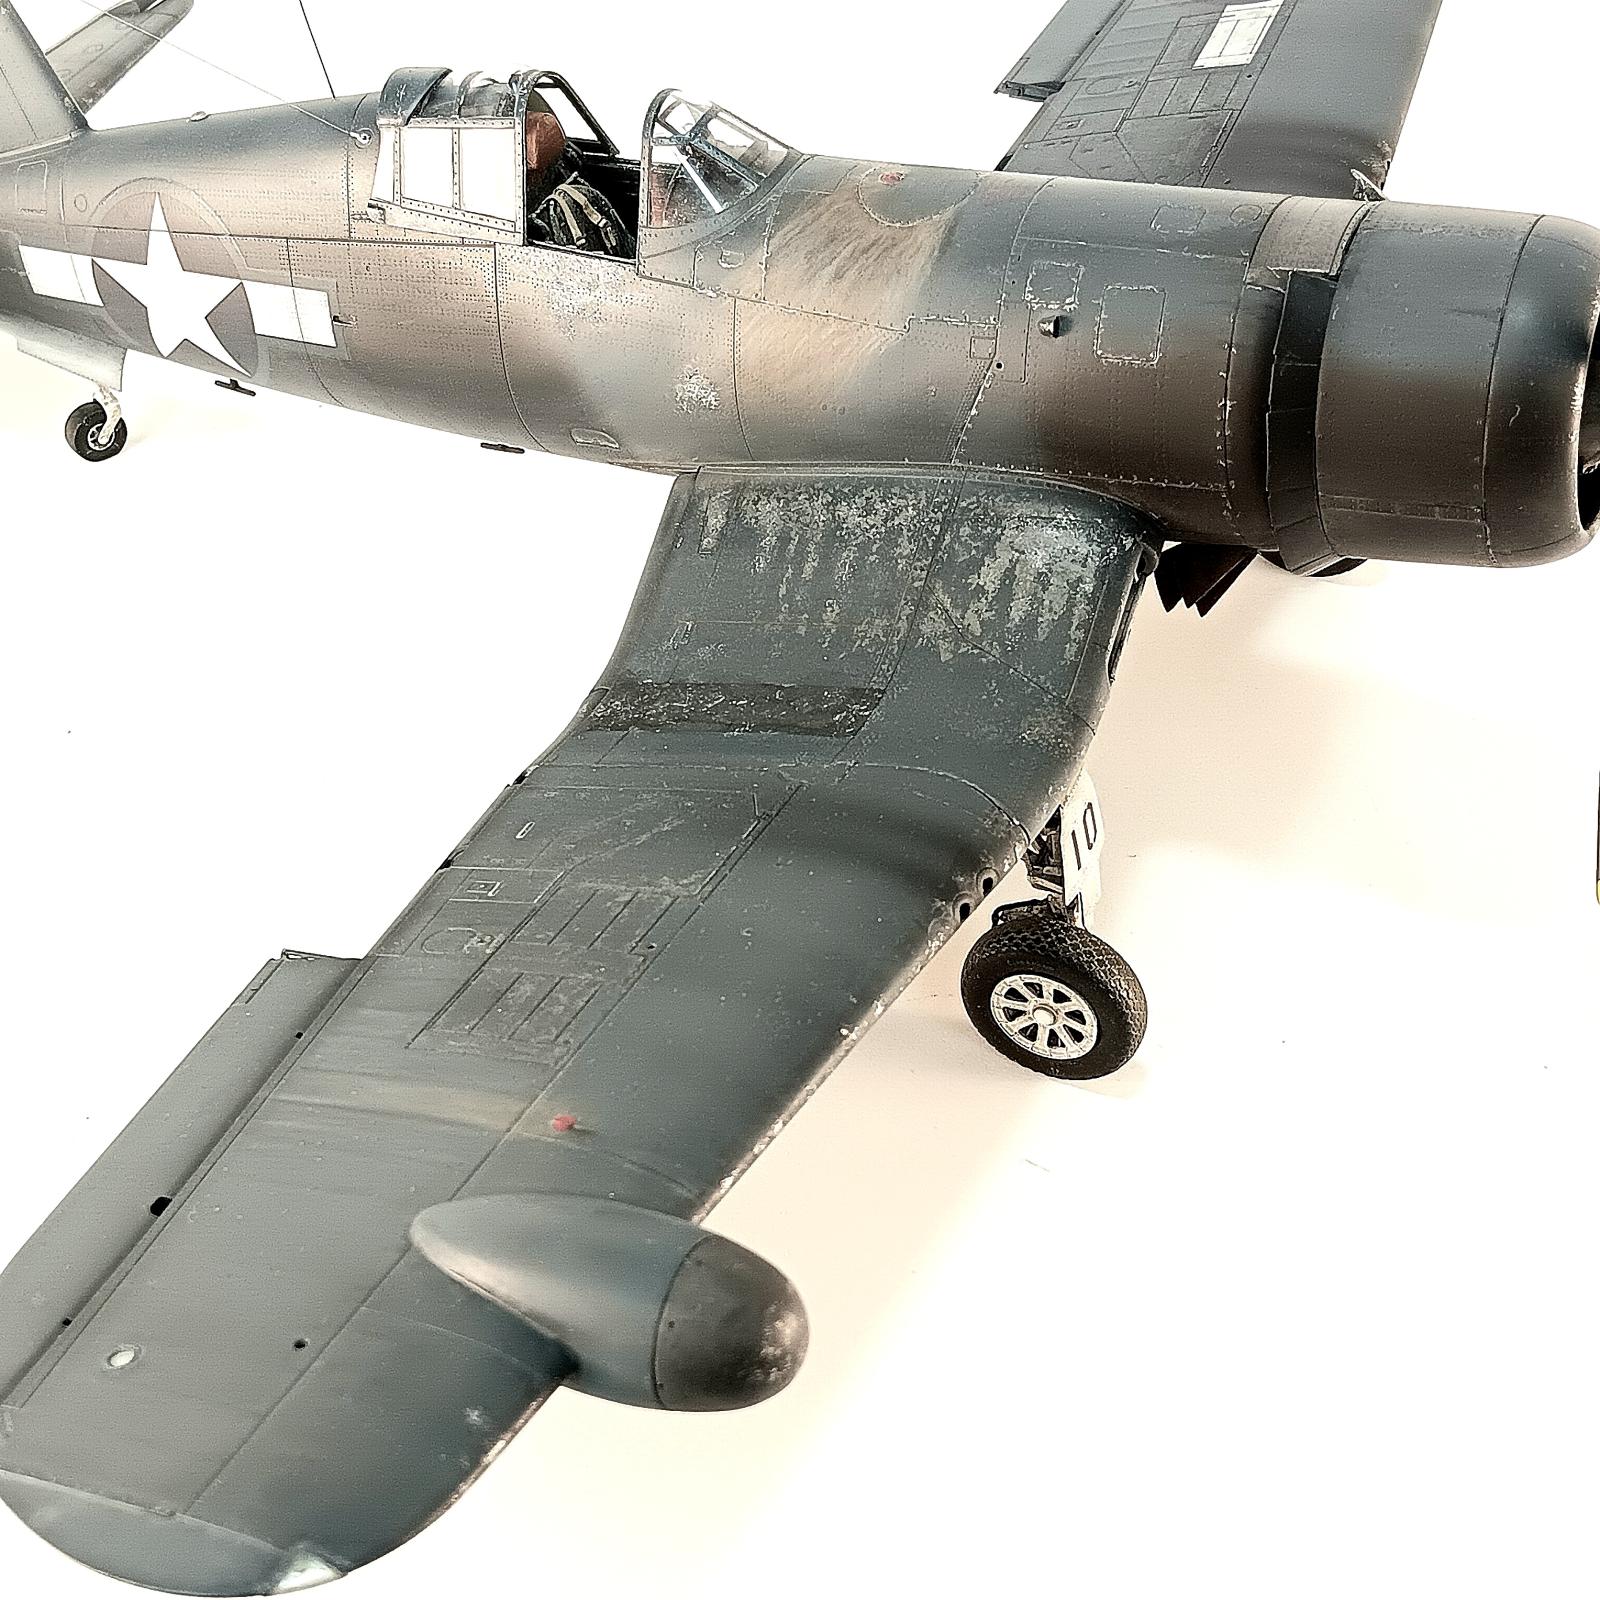
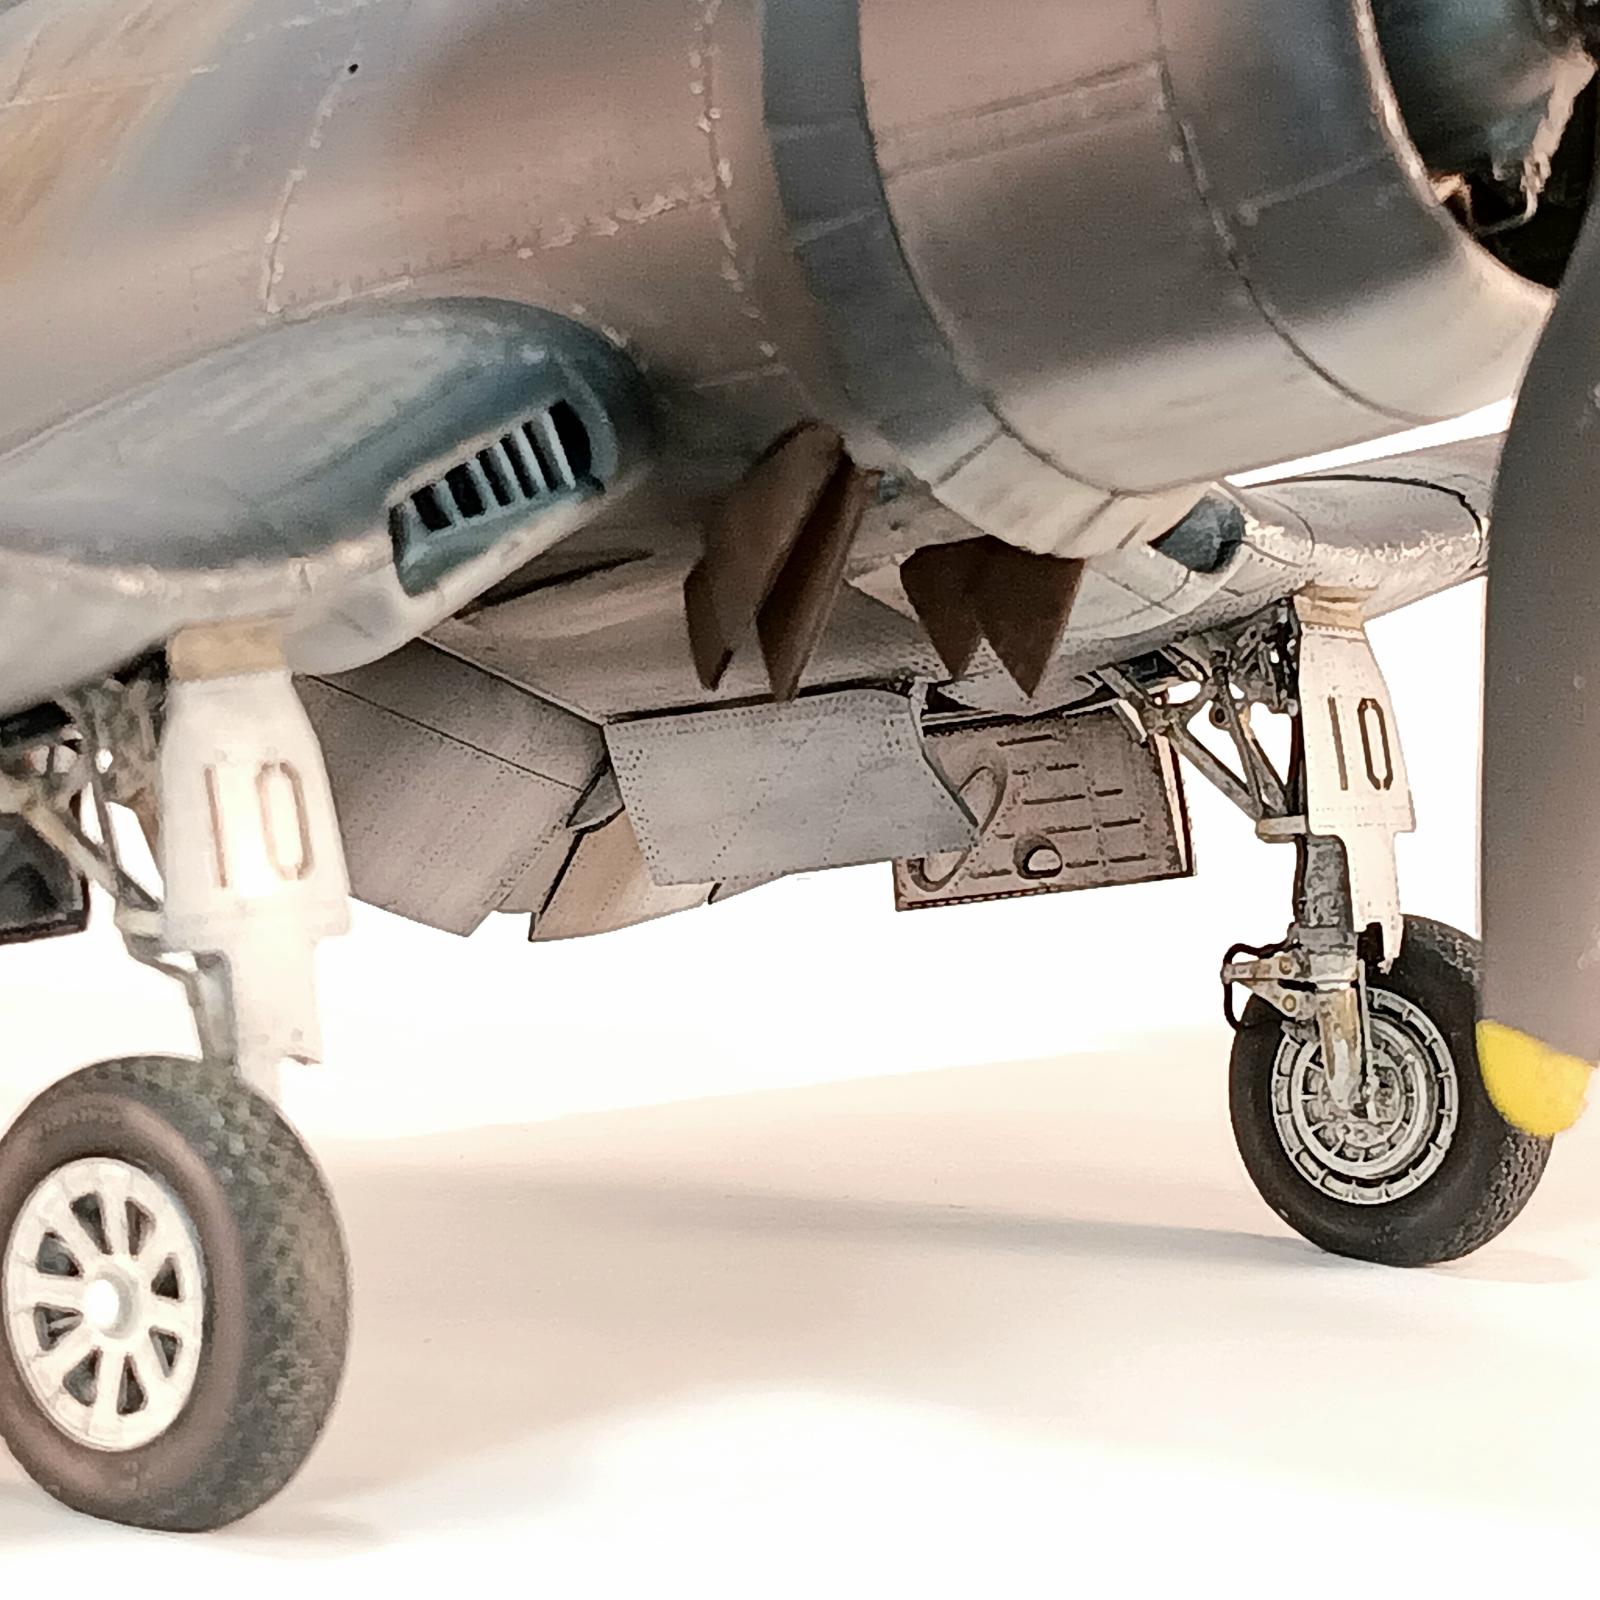
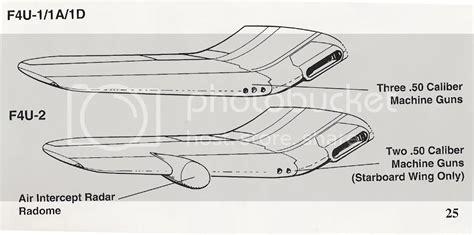
Along with the radar system, all -2 Corsairs had there outboard .50cal machine gun removed on the starboard wing to compensate for the weight of the radar pod installation, leaving the -2 variant with 5 .50cal. guns total. Another missing item on the starboard wing is the stall strip.
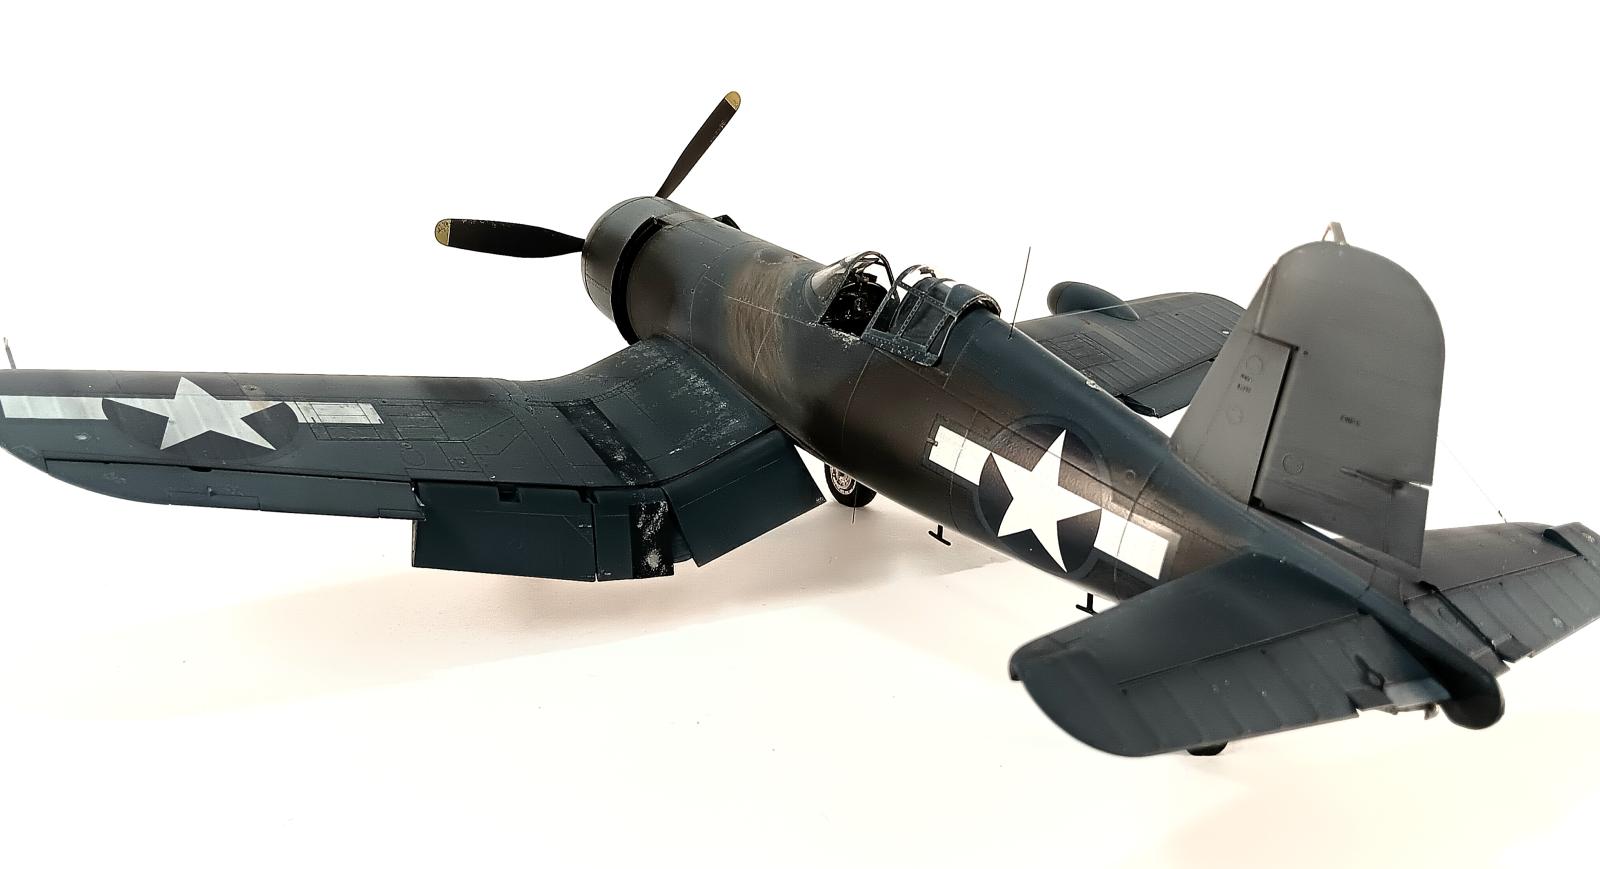
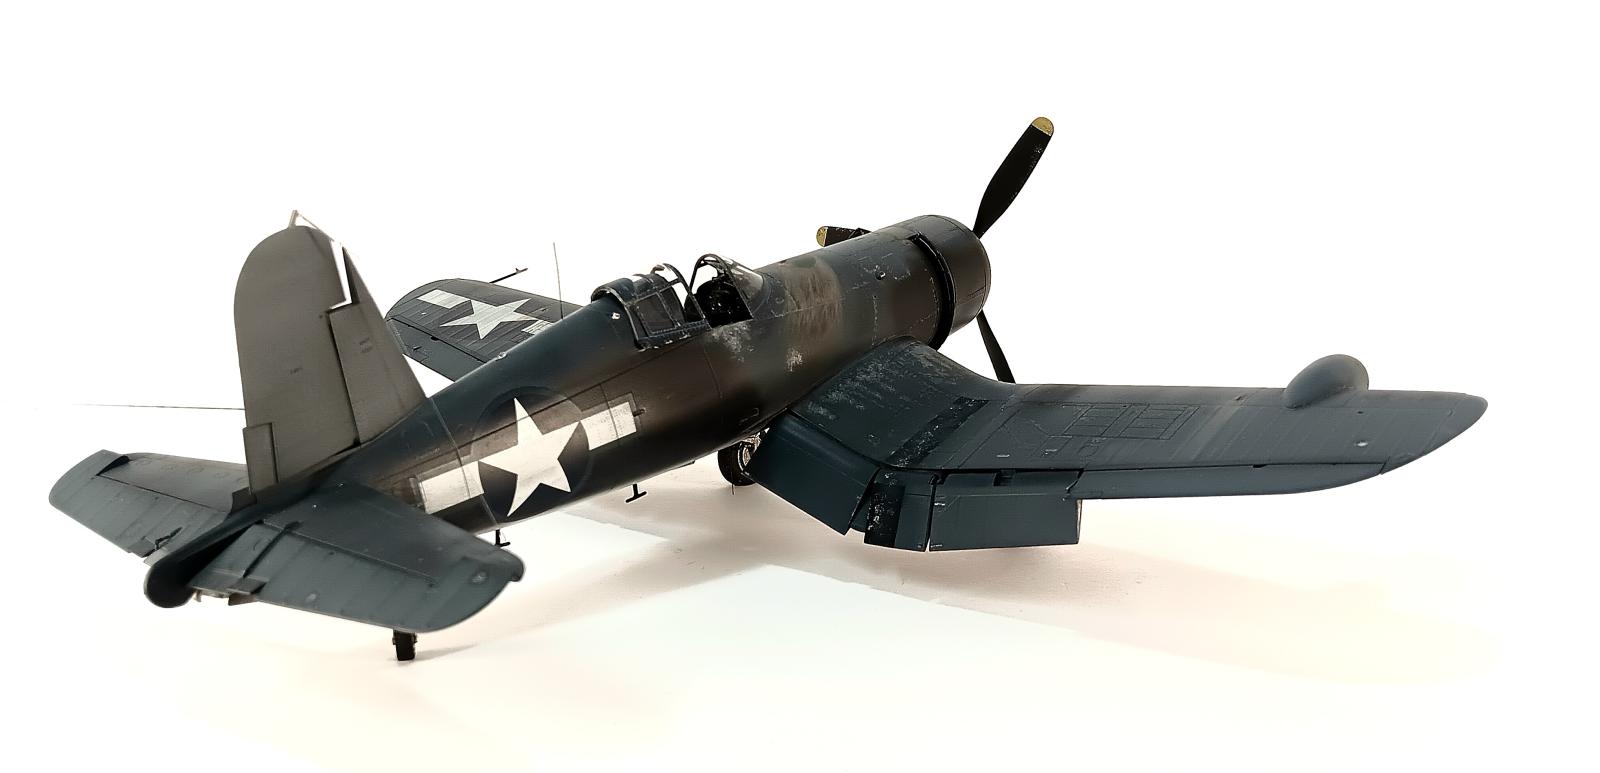
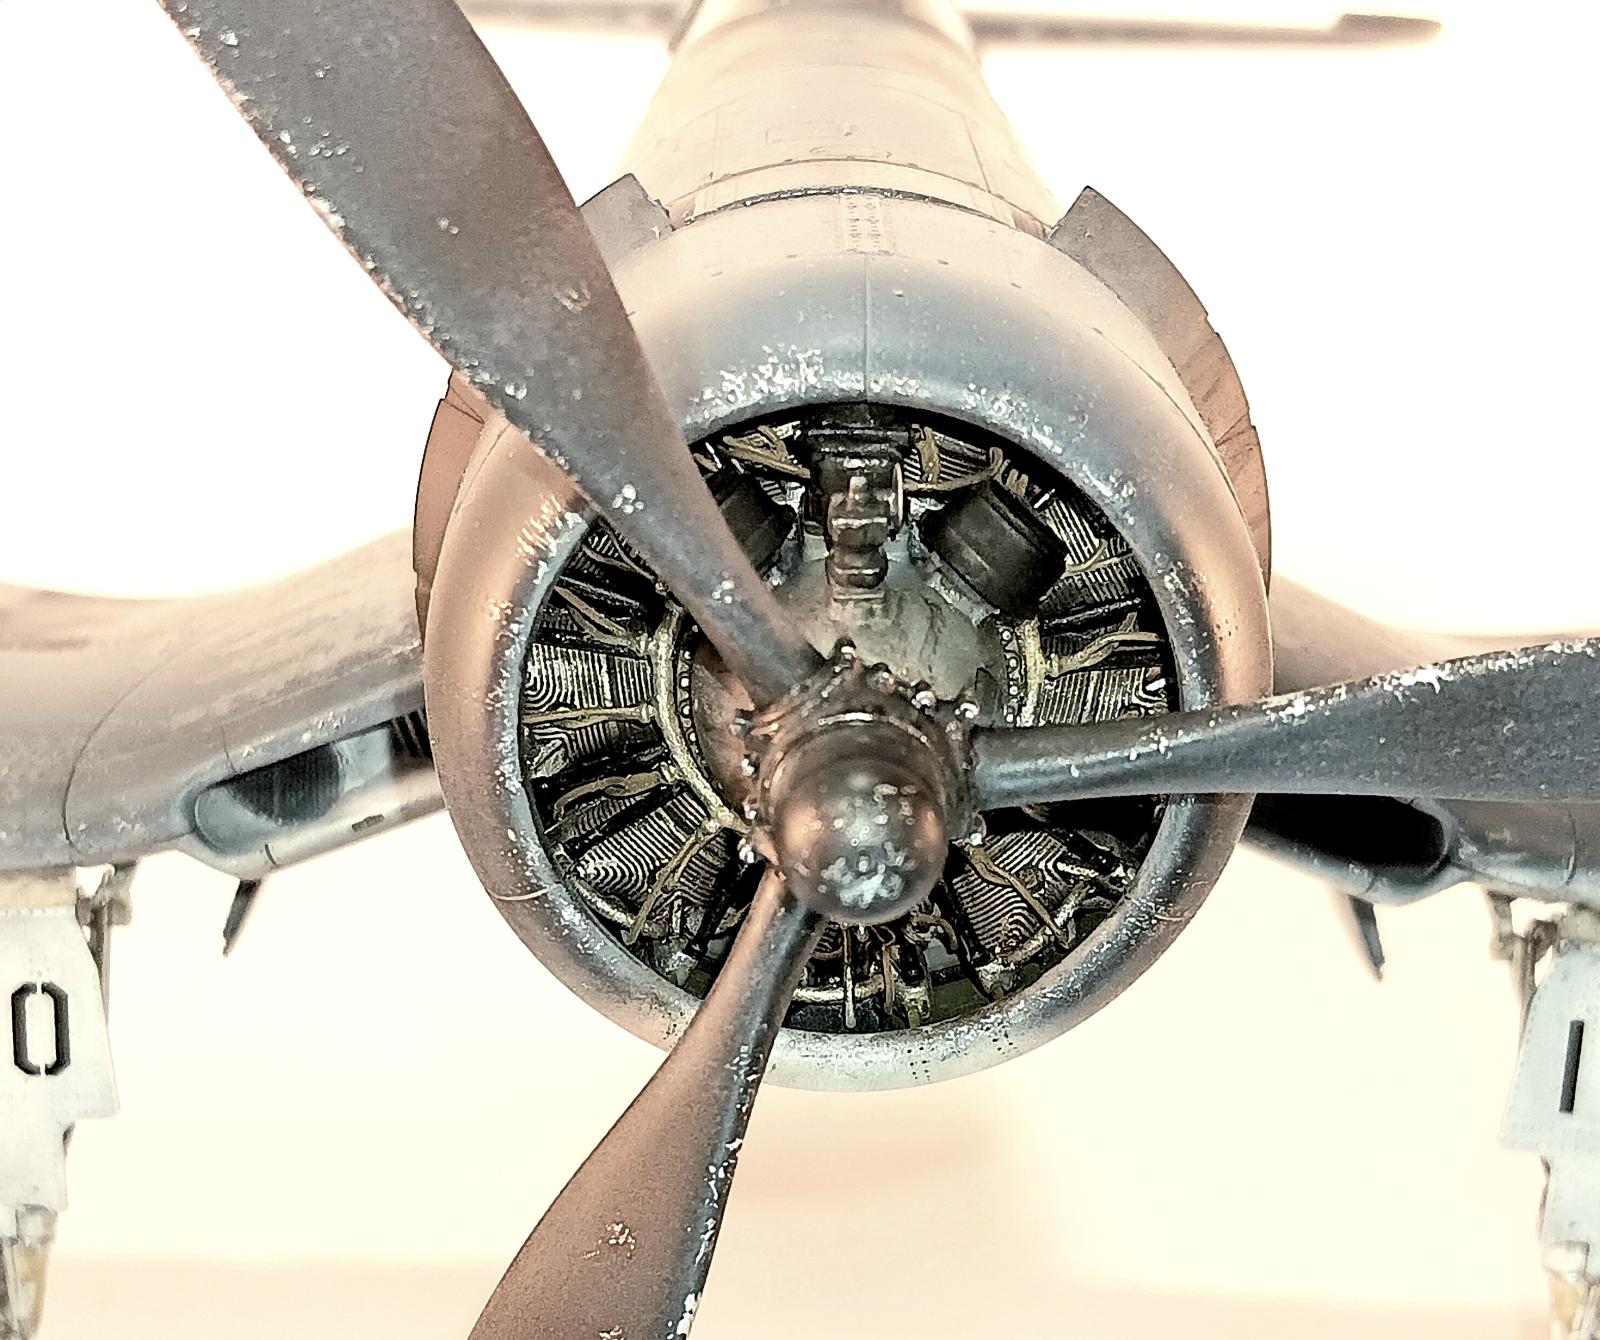
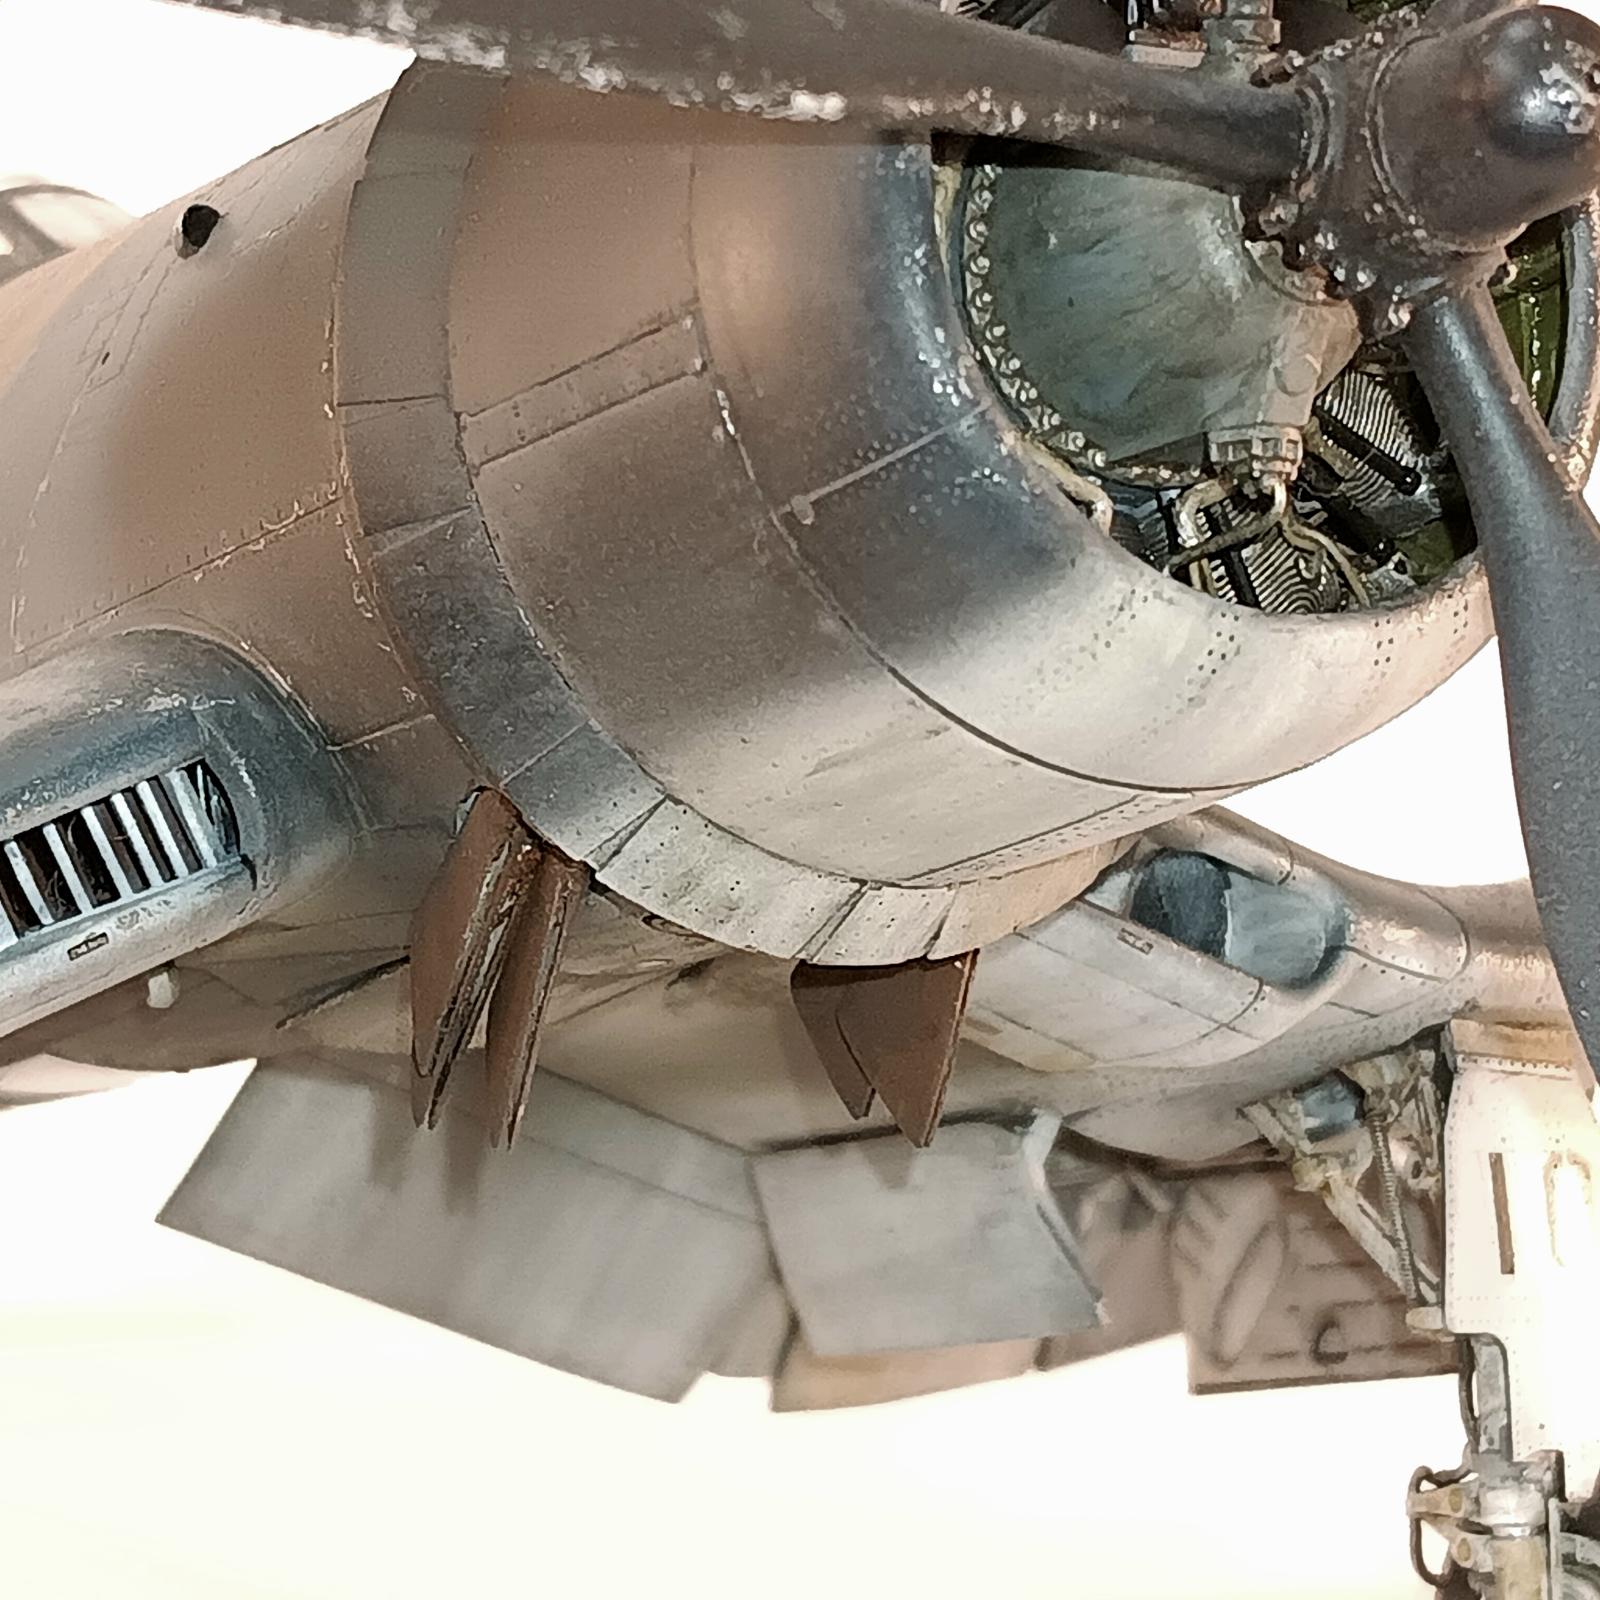
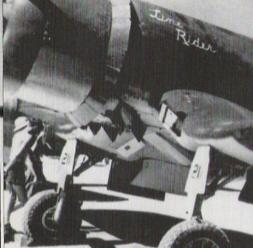
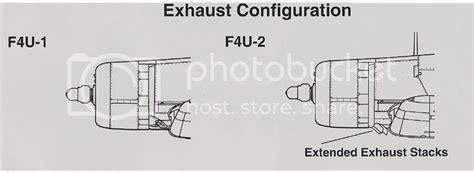
One of my favorite pieces of the -2's equipment are the exhaust flame dampeners. Now, there isn't a lot of detail photos of -2s, only a few of VF/N 101 on the deck of the USS Intrepid getting ready take off on a sortie, (later the squadron was assigned to the USS Enterprise). There are also a few ground shots of -2s from a different squadron. I found some great info on http://www.tailhooktopicksblogspost.com. I've included some pictures I found there below, along with a couple from photo bucket.
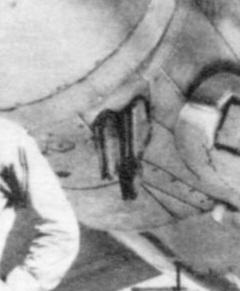
I made the exhaust flame dampeners from aluminum roof flashing to the best of my abilitys, according to the photos I was able blow up. I used Lone Star Models conversion set for the -2, and it comes with the flame dampeners but there're badly misshapen and lacking in detail, (at least mine were). I did use the radar pod and the radar scope for the cockpit along with the small air scoop for the generator, located on the starboard side of the fuselage near where the front antenna mast was usually located on F4U'1and -1As. Only dash 2 Corsairs used this intake scoop for the larger generator.
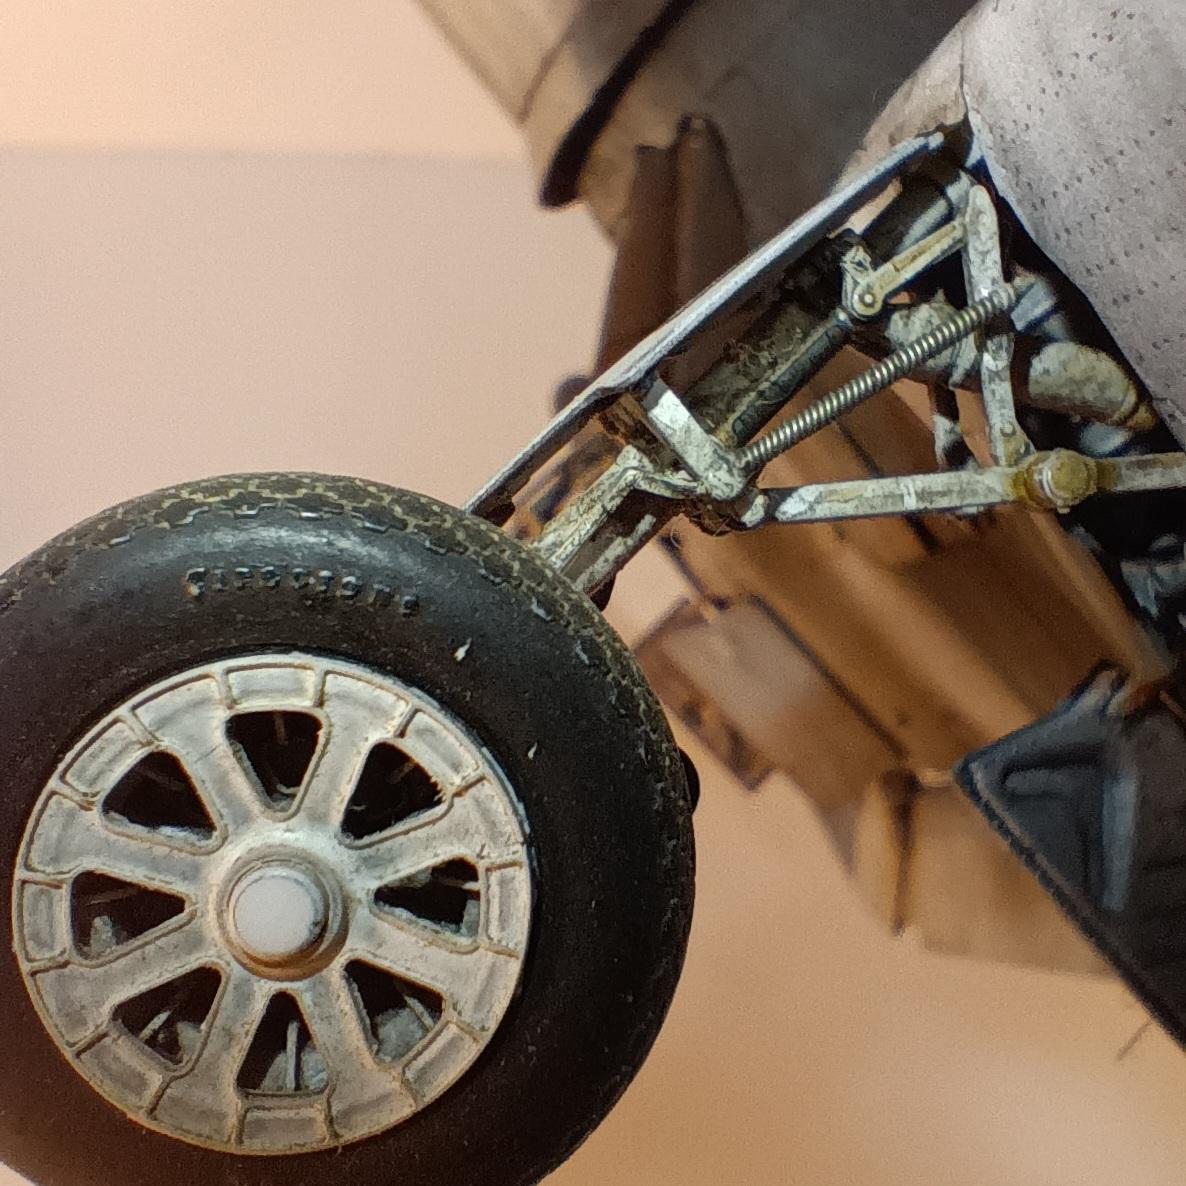
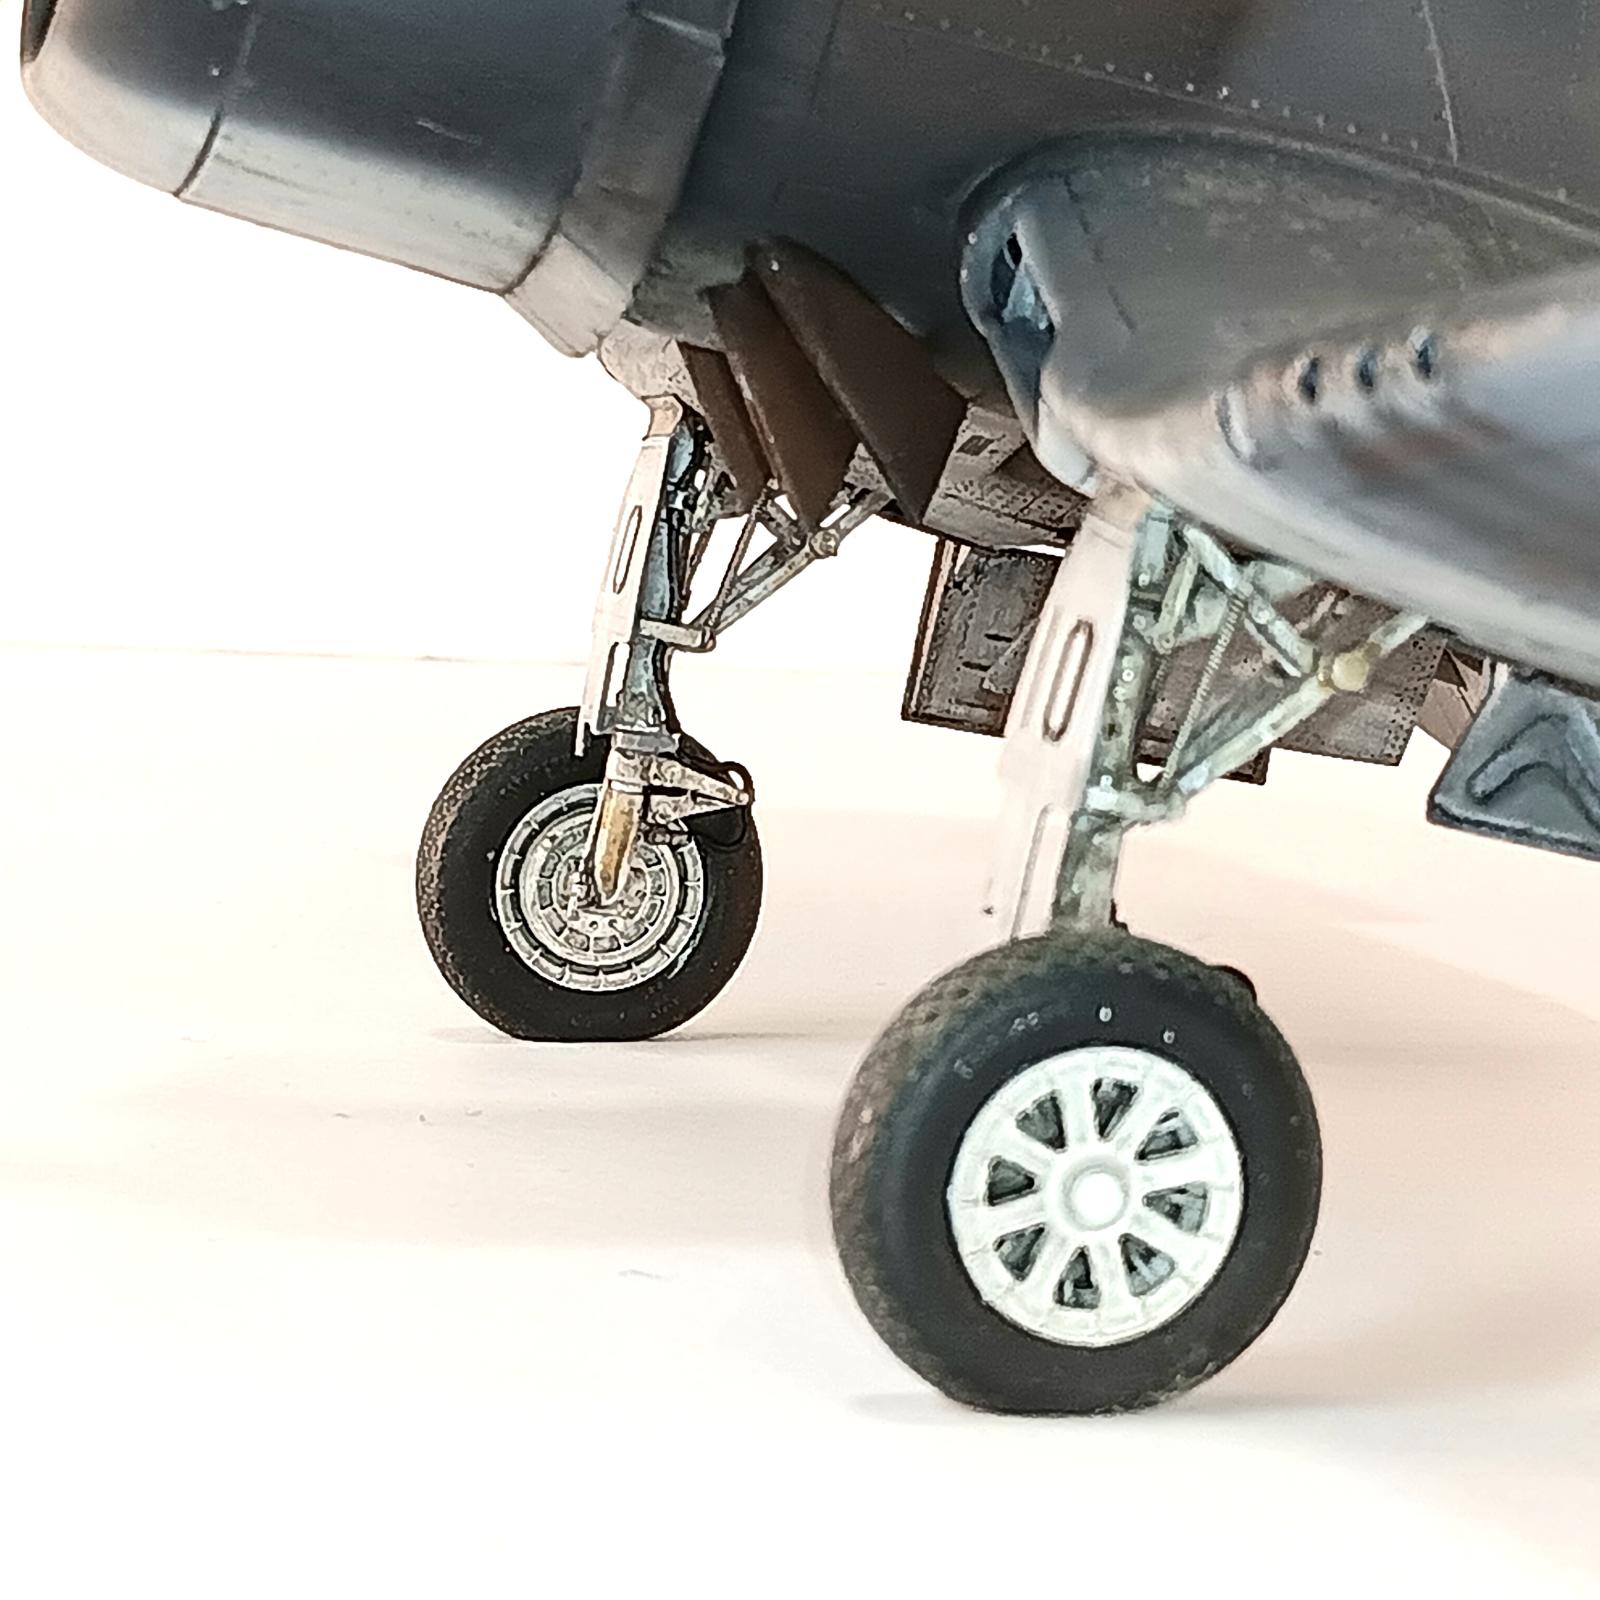
As far as other after market goes, I also used Barracuda Cast's P&W R-2800 backdate set for the ignition harness and coils. Tamiya molded the later style ignition harness housing, wich is incorrect for the early P&W R-2800 used in F4U-1/2 Corsairs. I also used one of there beautiful F4U wheel and tire sets.
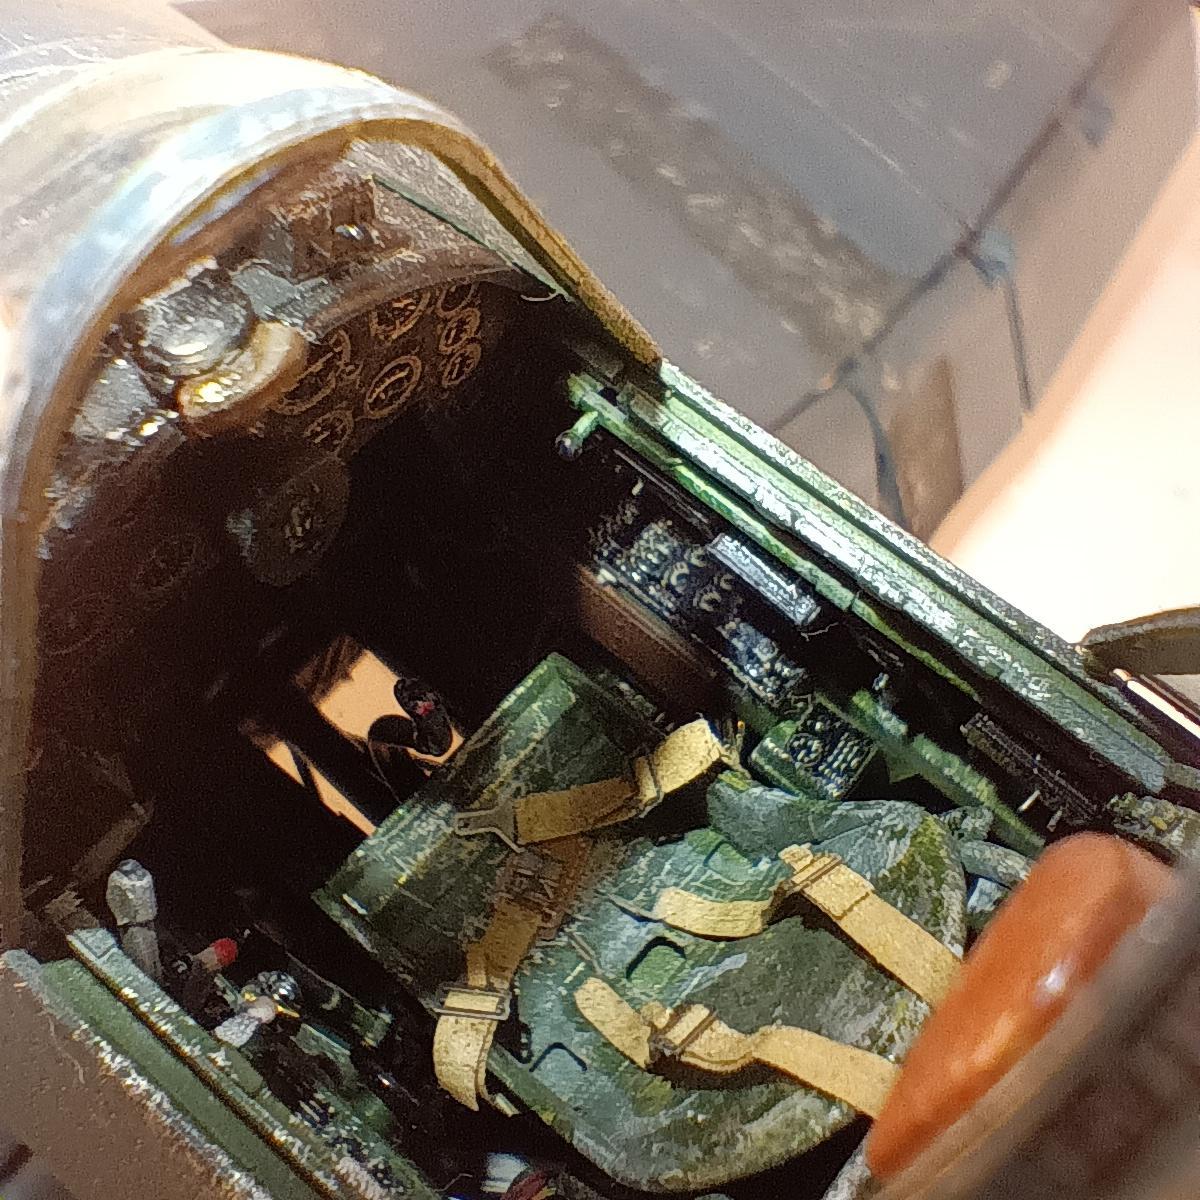
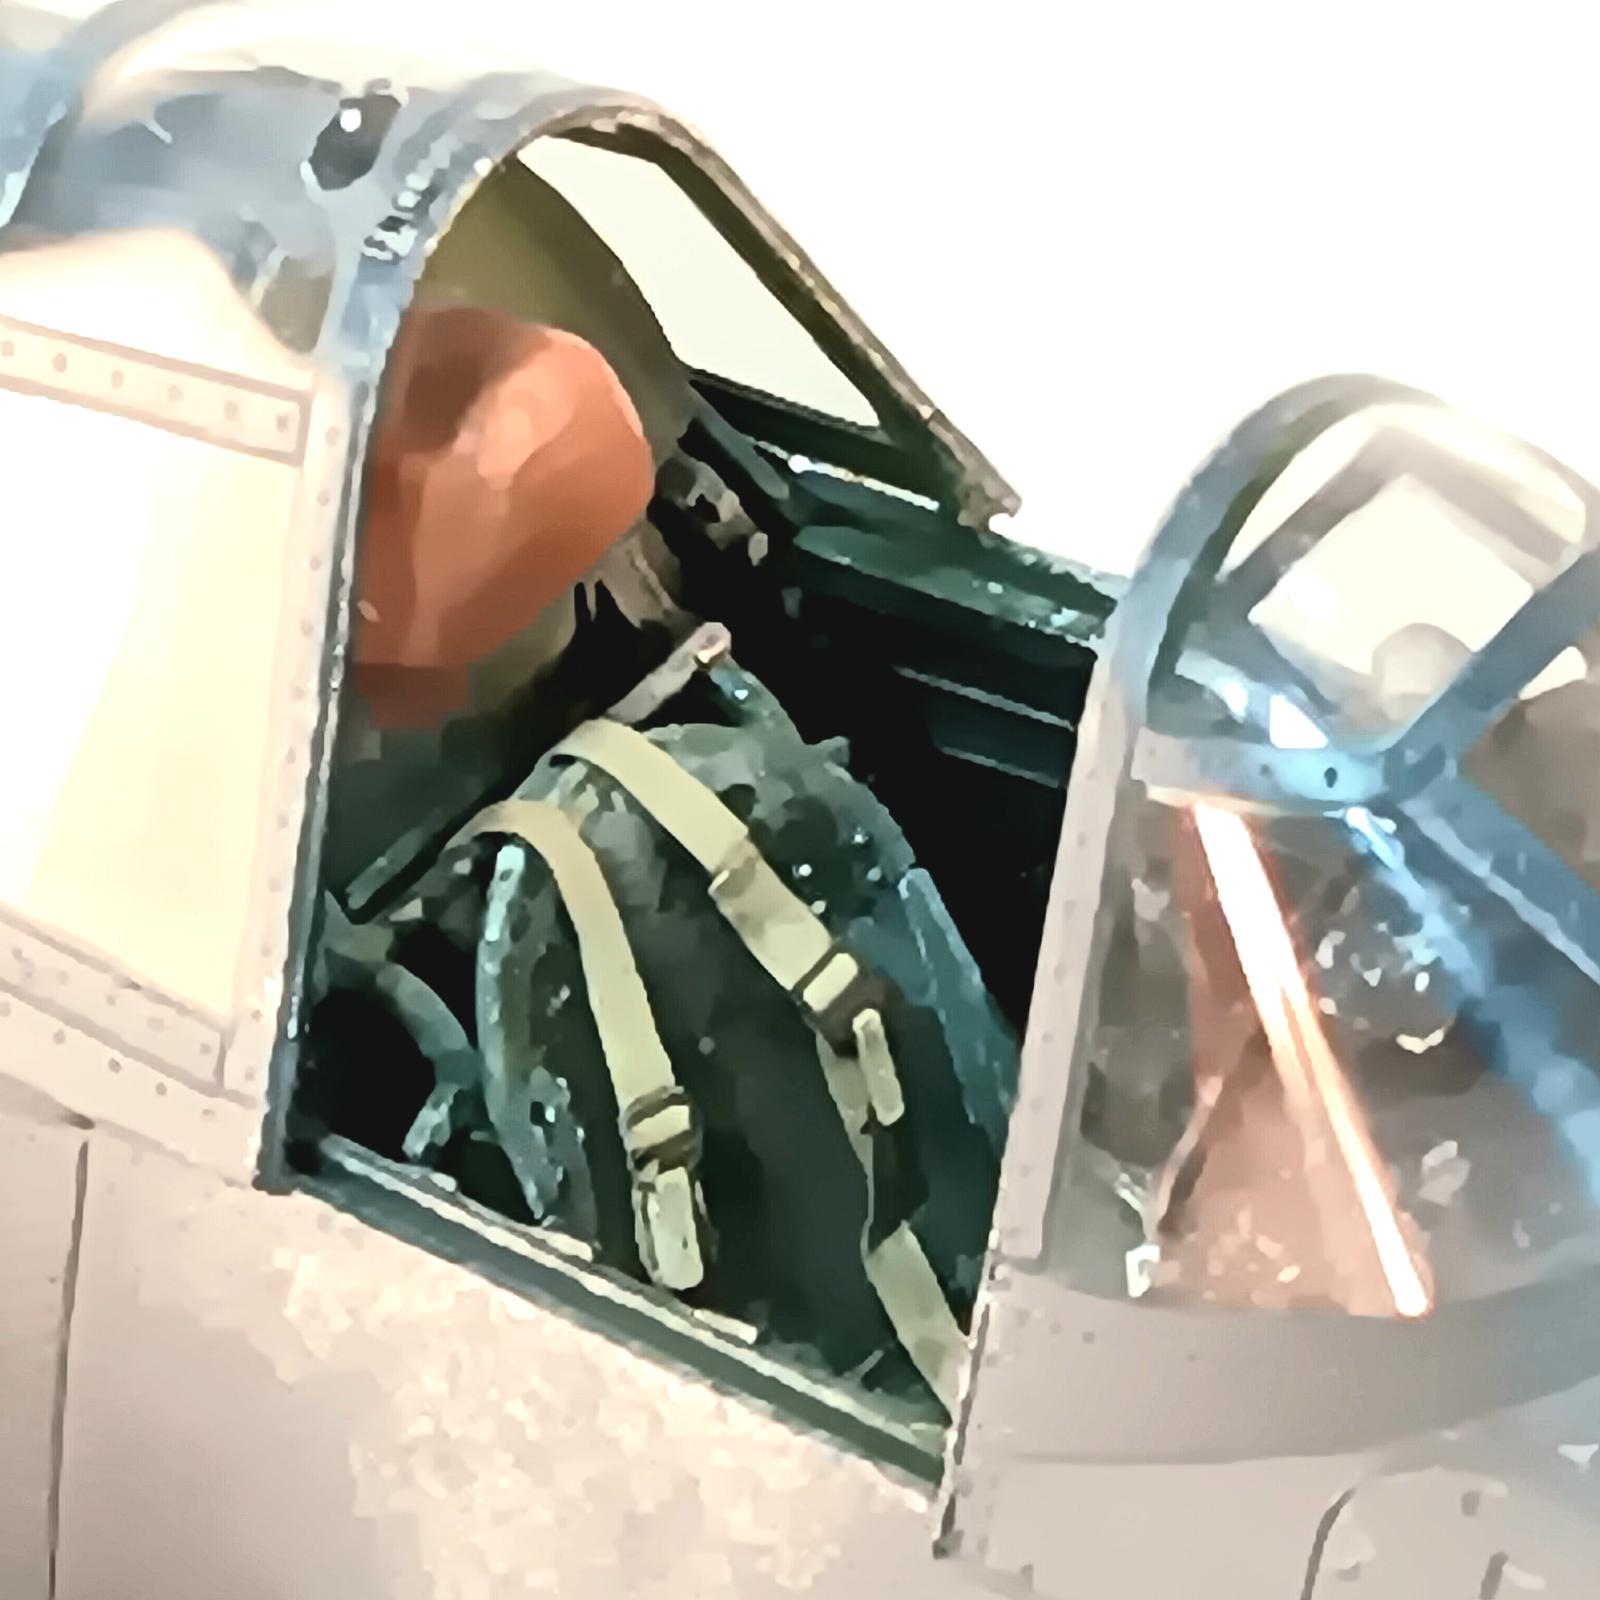
In the cockpit, I used an Eduard photo etch set in addition to the radar scope listed above. I also added lead wire to simulate wiring harness and various plumbing components, (that no one will ever see, but I know it's all there). I added all the missing hydraulic lines in the wheelbays as well. For some reason, with all the beautiful details Tamiya engineered into this kit, they failed to include machine gun muzzles to place behind the gun ports in the wings leading edges, so I fabricated some of those too.
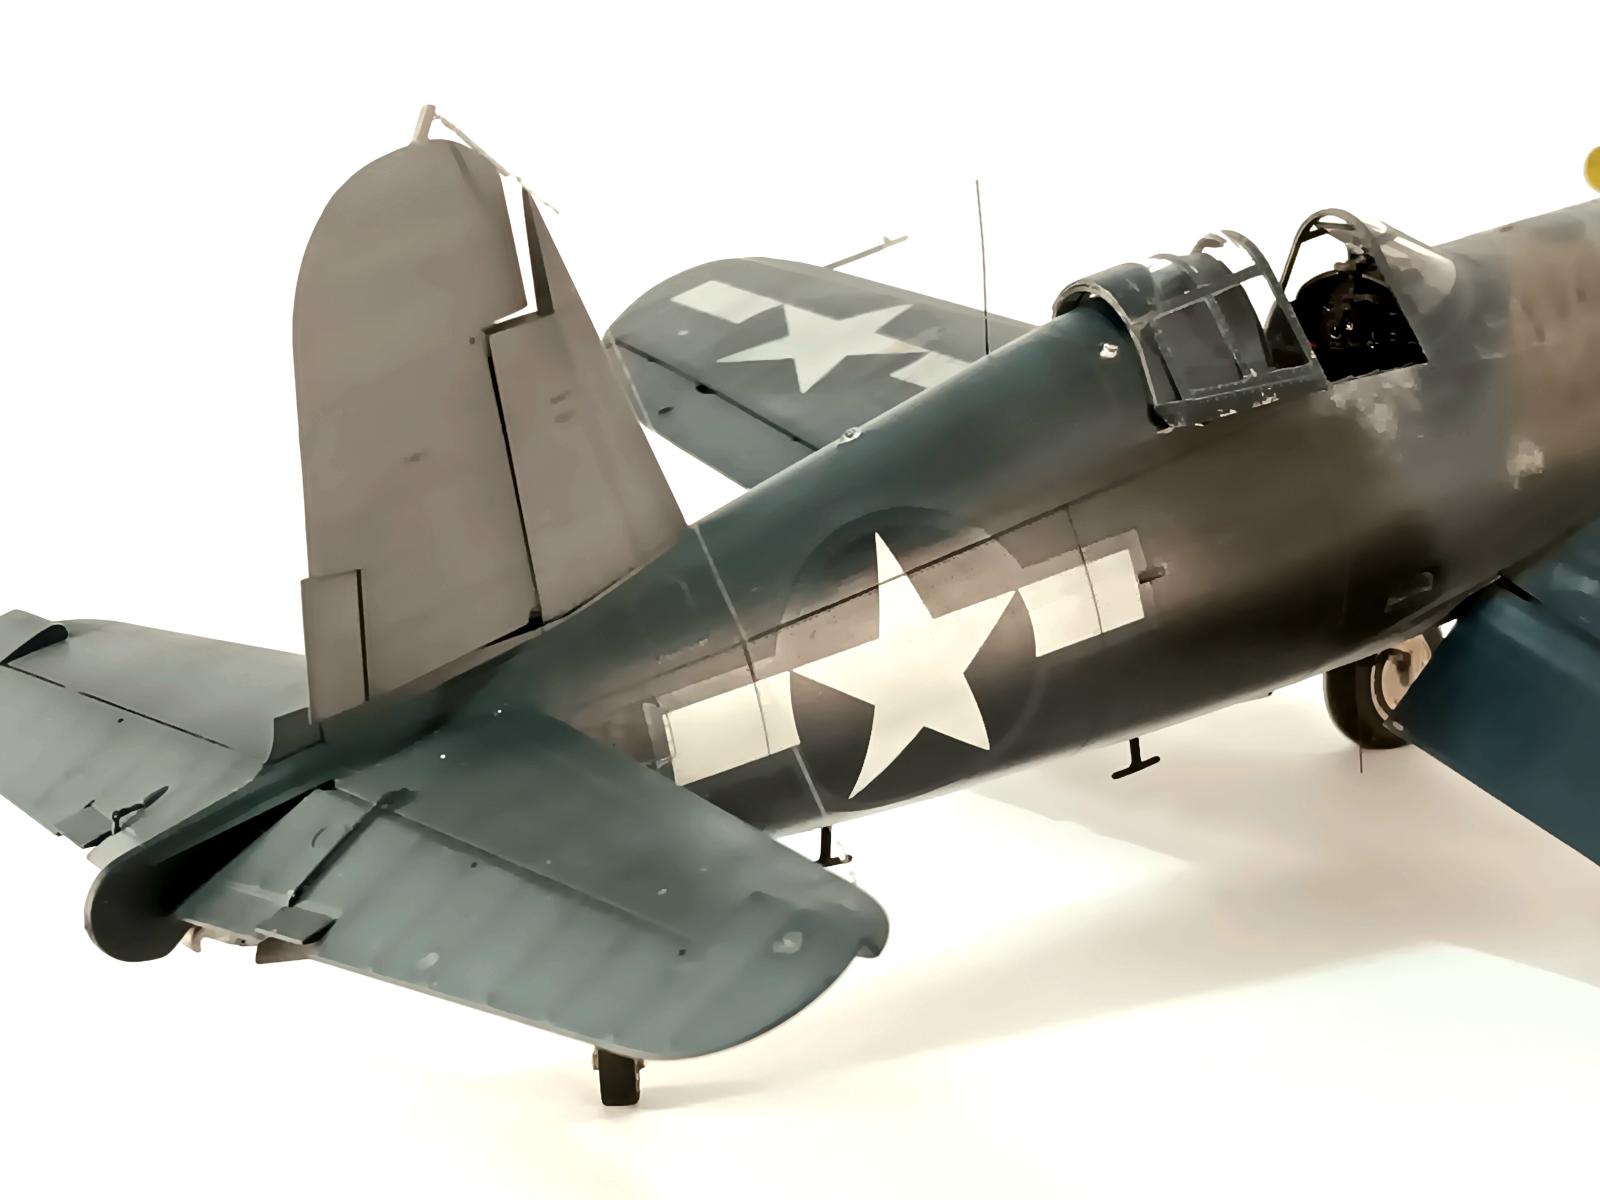
NOW, as for the color, I know there was/is debate over VF/N 101s paint scheme. Some say there flanks were painted black, others say they were painted with a fresh coat of sea blue making it look black it the pitchers. I don't know who, or what, is correct but I like the black scheme, I just think it looks cool, plus it's not "just another blue Corsair"
I used Mission Models paints for the bulk of the paint work on this build. I used Tamiya for the interior work and Vallejo for the detail bits.
My only disappointment with this build is my fuel staining. It's definitely not subtle, I may go back and try to redo it, then again I might just leave it too, I'm not sure yet.
Lastly I used my trusty smoke colored "invisible" mending thread for the radio aerial wire.
I've included some of the references photos I found to help others who want to build a dash 2 Corsair night fighter.
Hope everyone enjoys taking a look.


Very nice conversion, Clint.
Thanks Rafi, I really love this kit. I really need to work on me fuel stains. It's one of those Corsair specific details that I love looking at on them. I havehave a couple more of these kits to practice on. I'll definitely have to study the photos of your builds, there really beautiful.
Excellent article, photos and model. Clint I've been struggling with Mission Models paints and have found them to be easily scratched , are fragile and when applying a clear gloss seal they tend to bleed. Some folks have been adding Future Floor wax or a like minded product or you can buy from Mission Models their poly additive to add to the paint to help make it more durable . Your painting looks impressive and the black paint under the wings and on the fuselage is well done. How did you apply the paint?
Thank you ery much for the praise. I definitely know what you mean with the Mission Models paints. I have definitely had my share of problems with MMPs but on this occasion they worked beautifully. I did use the poly additive, and there thinner/reducer. I've never tried adding Future to MMPs like I have with Tamiya paints and such. MMP doesn't recommend anything but there products for thinning, which doesn't surprise me, they gotta make the money. I have thinned it with Mr. Color leveling thinner with success though. I still use MMP paints here and there, but there not my go too.
As for the weathering I used thinned oils applied with brushes, the airbrush to apply some of the smoke and hot exhaust gas stains, and the machine gun blast stains. Then there's some chalk pastel powder here and there for good measure.
Man, that's a great Corsair, Clint @curtisshawk! 👍 I love the paintwork and your conversion changes. Beautiful scale modeling, sir! 🤩
Thank you very much Gary. There is a couple little things going I'd do differently, but overall I'm really happy with it. It really is a great kit.
I am indeed clever, Clint, but I'm also sharp as a Cleaver. 🙂
Really nice work on this and superb result.
And my hat's off to anyone who can use MMP for a project all the way through without throwing the paint and the model that it wrecked against the wall.
First, my apologies for the error in the spelling of your last name. I am truly embarrassed. I went back and fixed that mistake in the article. I wrote this article at 4 am, and this was the second go at it. I accidentally deleted the whole thing the first time rite at the end by accident.
Secondly, compliments. I genuinely appreciate them. Your articles were a great inspiration when I ran across them wher I was researching this build.
Lastly, I know what you mean about the Mission Models paints. I have had hit and miss success with them, but on this particular project, I had no problems at all, and they worked great.
Again thank you for the kind words and my apologies for my flub up.
I did enjoy the exquisite detail on this beautiful Corsair, Clint!
Thanks Robert. It a great kit and was a fun build.
Excellent result on that conversion, a real beauty!
Thank you, Chas. I appreciate it very much.
Beautiful work on this conversion, Clint @curtisshawk
Well done.
Thanks John. The Tamiya kit is a great one to start with, it made the conversion easy.
🙂 ... Greetings ... 🙂 :
This is a true achievement and accomplishment of a well thought out conversion.
Great detail work on the cockpit and a superb overall paint work followed by a well applied
subtle weathering, great work Clint.
Thank you for sharing these photos.
Thank you for the kind words DE4EVER. Overall I'm really pleased with the outcome. If I was doing this build again I'd go more subdued on the fuel stains. Other that that I'm happy with it.
Yeah, the paint is a PITA.
It definitely can be!
Clint, you did an excellent job in replicating this Corsair. @curtisshawk
Thanks John. There isn't a lot of information, of photos of the dash 2 Corsair. It's not surprising to me, being there were only 32 factory examples built, and 2 field modified F4U-1s. I spent a lot of time trying to enlarge photos to see detailed. Tom Cleaver's @tcinla articles being a huge help.
Wonderful result, Clint! Excellent conversion!
Congratulations!
Thanks a lot, Spiros. That Tamiya.kit makes it easier for sure.
Great work and great back knowledge bomb on the -2! Very cool! You have given me ideas to attempt when I around to working on mine...look fantastic..
Thanks, and your welcome. 🙏 there really isn't a lot of info out there on the dash 2. Mostly the same pitchers over and over, and no detail shot that I could find. I hope what I could find helps.
You’ve certainly done a great job on this kit with your conversion and painting skills, Clint.
Thanks George. I appreciate it very much. I think I got lucky with the Mission Models paints. It seems like a lot of people have trouble with them. I just need to refine my Corsair fuel stains! 😉
Beautifully realistic. I really like your work. Keep it up, it's a pleasure to look at your models.
Thank you very much Milan, I'll keep plugging away!
That is a great-looking Corsair - the extra work for the night-fighter version was worth the effort!
Thanks George. I really like the research aspect of our hobby, there really wasn't a lot out there to research on the dash 2, but it was fun.
Hi Clint... I commented on this beautiful pirate by replying to your comment in my post.
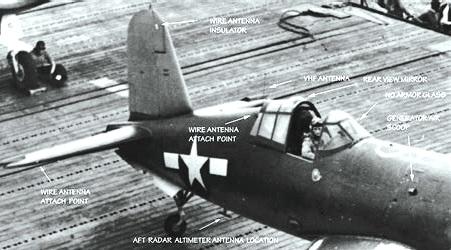
Here I add that I really like your "generator cooling vane" and the "VHF Antenna".
And I noticed there's another suggestion about the stop hook being removed... I was unaware of that.
Davide @dapo68, Thank you for your kind words. I think we're all our own hardest critics. The generator cooling vane was part of the resin conversion set (I just hollowed it out) along with the raydome, the radar scope for the interment panel, and the exhaust flame dampiners, that didn't use, I scratch built those. I used really small monofilament fly fishing line for the antenna, and the eyelits are easy, check out http://www.ww1aircraftmodels.com for that.
They have a lot of great how too articles that can be applied to any airplane model. It's a great site. The tail hook thing was for when they were land based for a little bit, but for carrier operations they must have had them reinstalled, thoes short stops are really be a killer! It's hard to find much info on -2 Corsairs, there's definitely a limited number of pitchers, the ones we've all seen.😉
Hi Clint @curtisshawk ,
Thank you for your suggestions and really kind words. I'll try to see if I can recover and redo the antenna wire attachments on my "10" or if I will use these methods in the next (5 in 1/48 and 1 in 1/32 !) F4U... I also used a very thin fishing line...
You are very kind and I hope to discuss with you again for the next works... now I am taking a "break" from Corsair and I am dedicating myself to a resin kit of the Macchi M.39 winner of the 1926' Schneider Cup. We will write to each other soon.