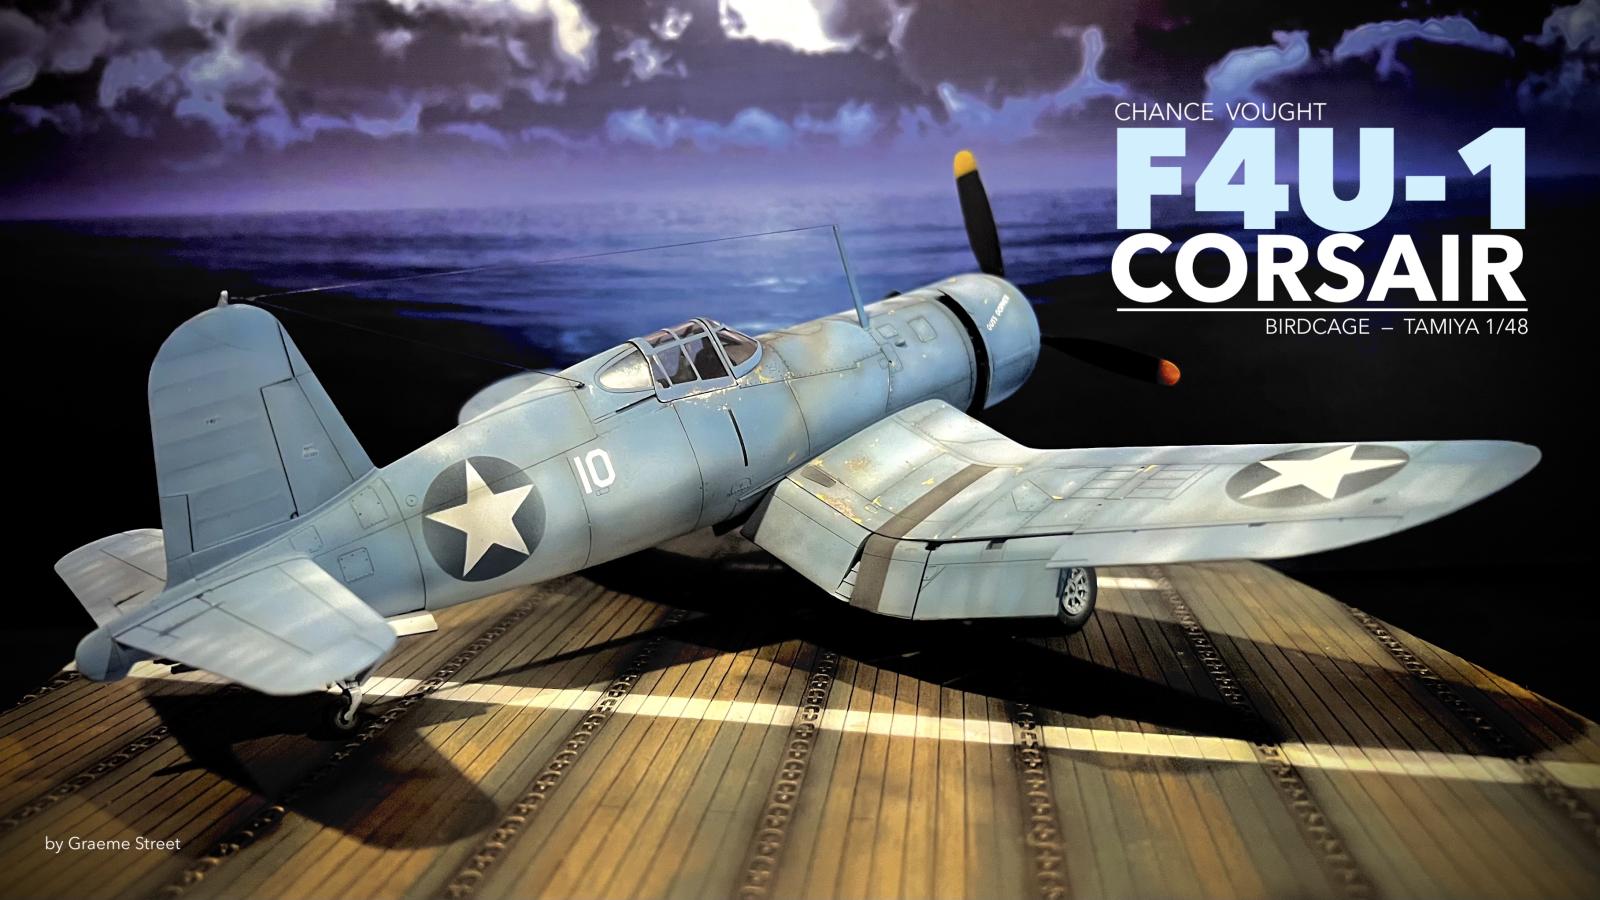
"50 Shades of Blue" -- F4U-1 Birdcage Corsair -- Tamiya 1/48 Redfox Cockpit
Hello my friends and Corsair Junkies.
As I promised from my first aircraft posting, [Why I Hate Building Airplanes!] (https://imodeler.com/2024/03/why-i-hate-building-airplanes-tamiya-focke-wulf-190a8-1-48/), I have taken on the challenge of completing my first Corsair. A subject and aircraft that I know many of you love and respect both as a modeler and history buff. I am no corsair expert. Not even close, other than loving the sleek and unique lines of the plane and the incredible pedigree of the plane in the time period. It really is an impressive machine and now having built it, I have come to love it even more. Of course, I assume many of you feel the same.
That being said, I have completed this great Tamiya F4U-1 Birdcage Corsair to the best of my ability and have tried to offer the Corsair the respect it deserves. I'll let you be the judge if I have at least come close.
The Build
There really isn't much to say, it's Tamiya. I know so many of you have built this exact kit or another of the many Tamiya permutations of the Corsair over the years. In general, it goes together well. The wings are a little tricky, but workable. I had some tips from many of modelers, so thank you. I still have lots to learn on building aircraft, in particular the seam lines. Yah, I got them out, kinda, but there is a lot of room to improve. I will try the super glue and filler technique next round I think.
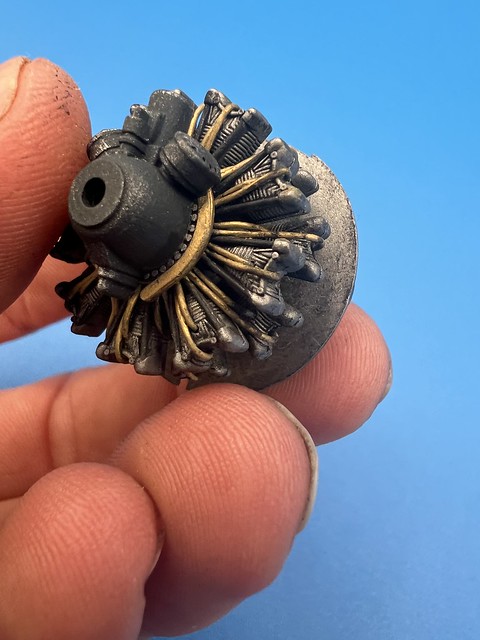
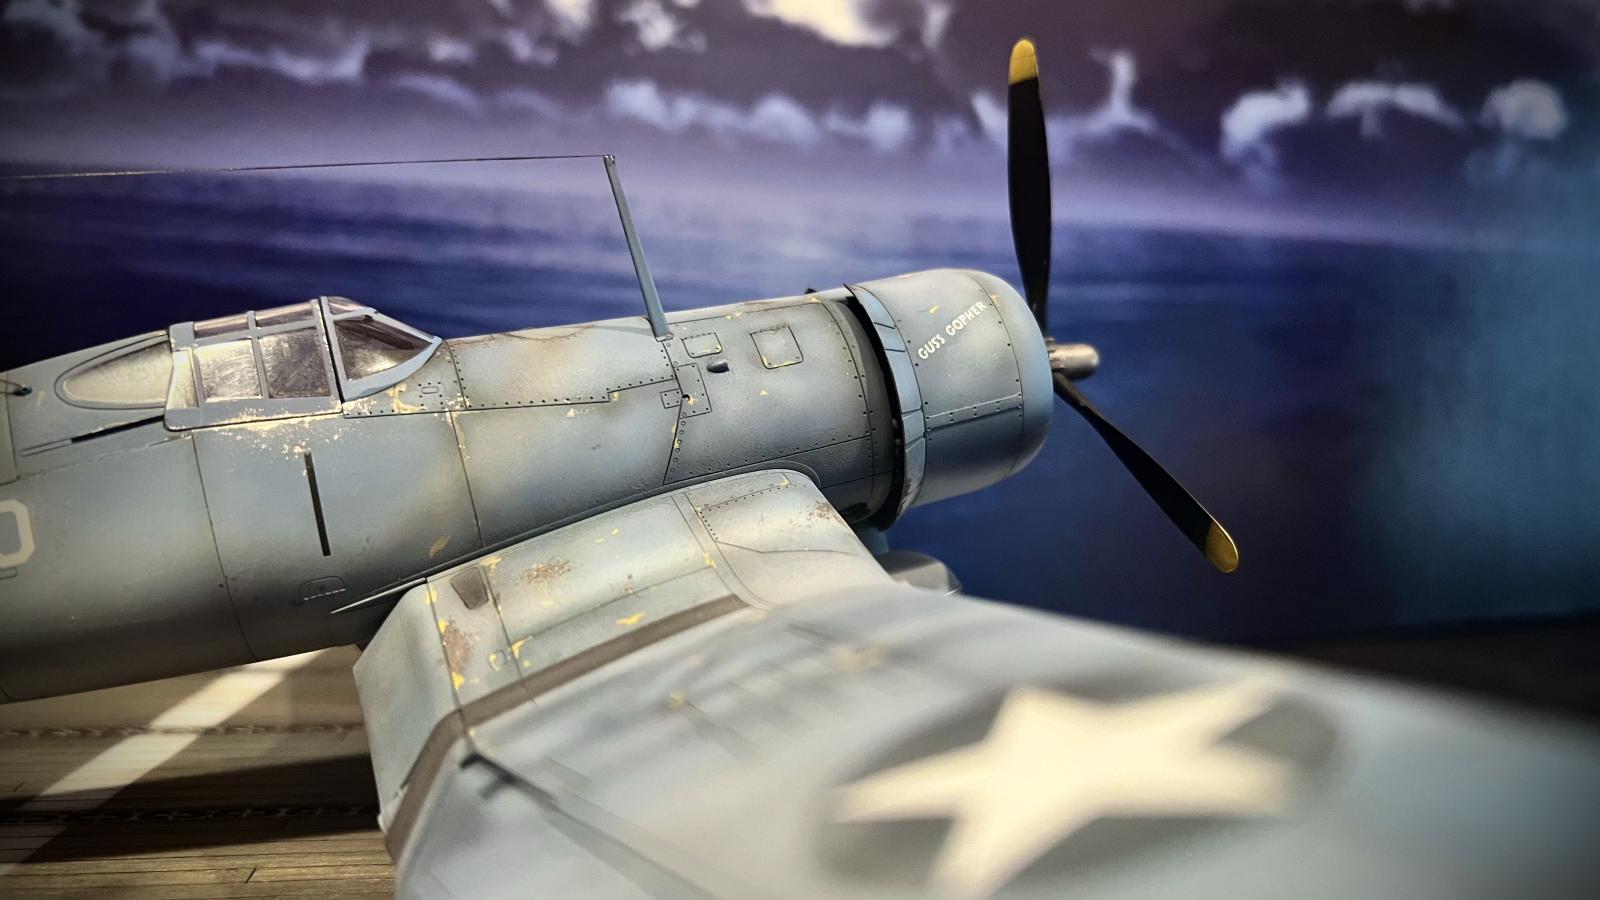
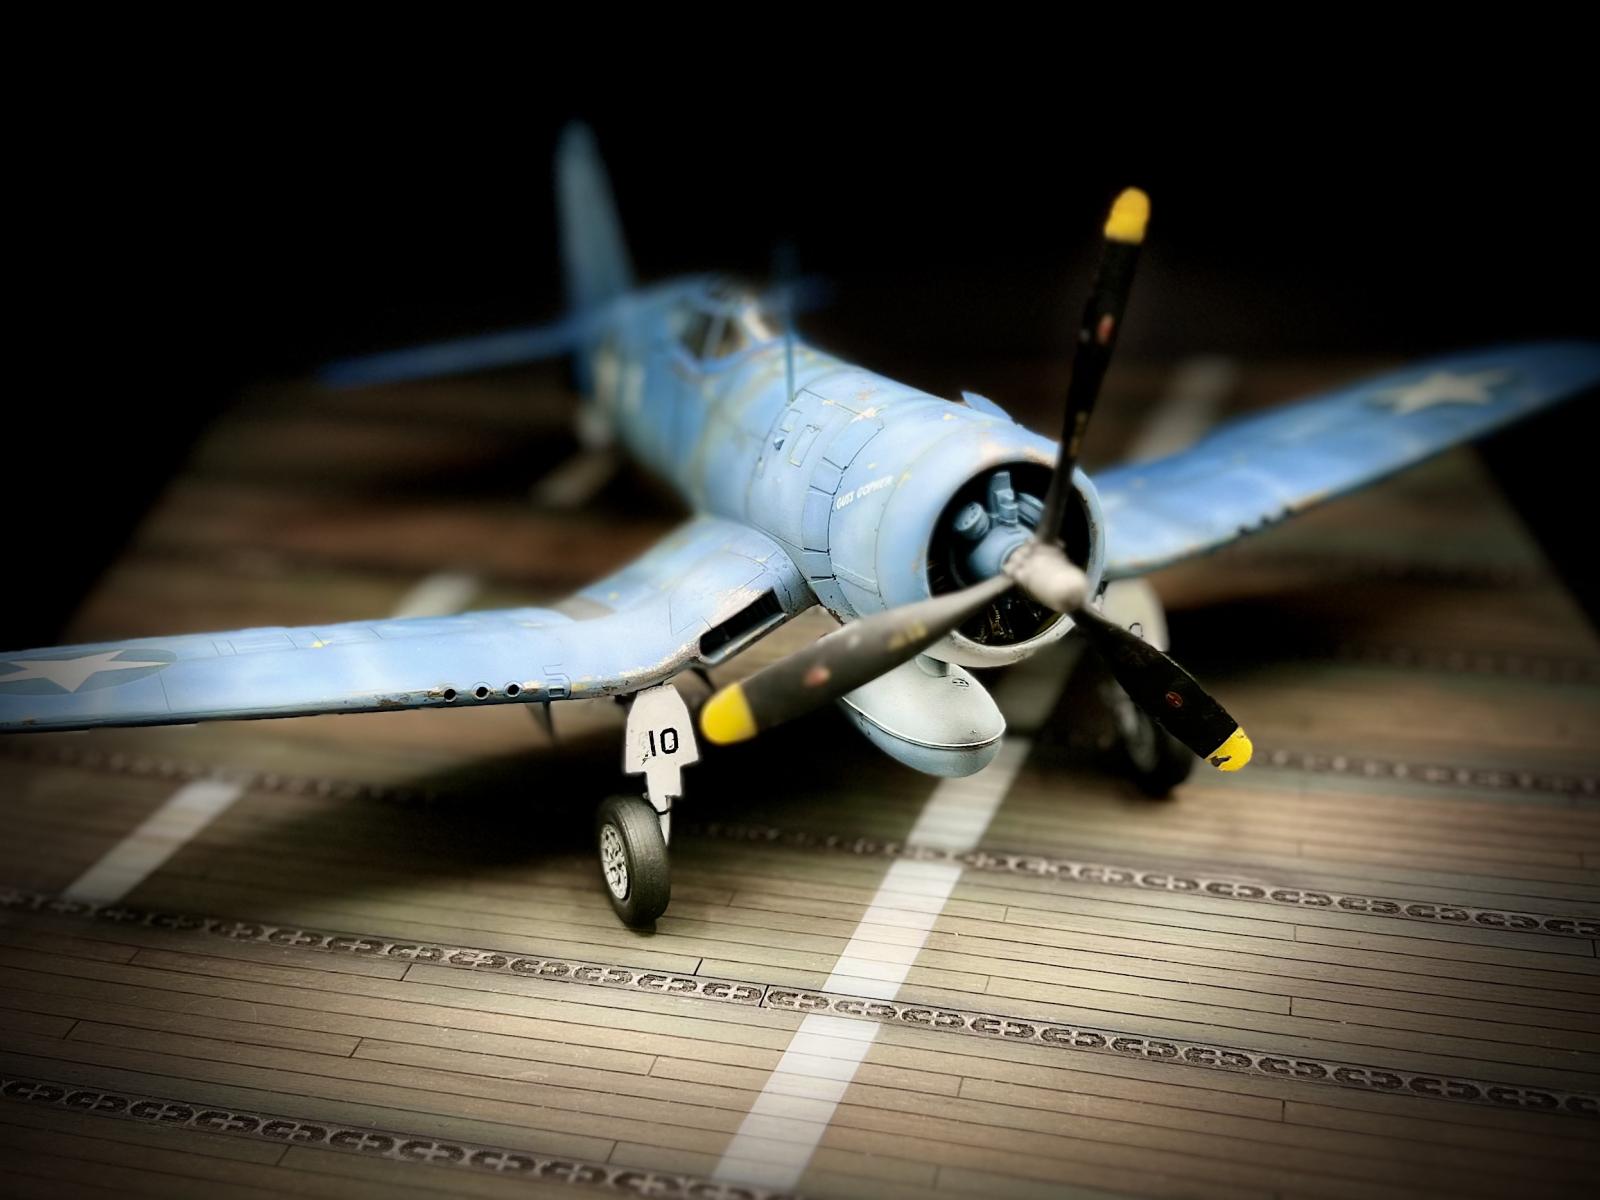
I decided to spice up the engine with ignition lines ( at least I think that's what they are). I did the best I could with what I had. The lines are a little thick, but workable. They can be seen from the front of the aircraft, so that's cool.
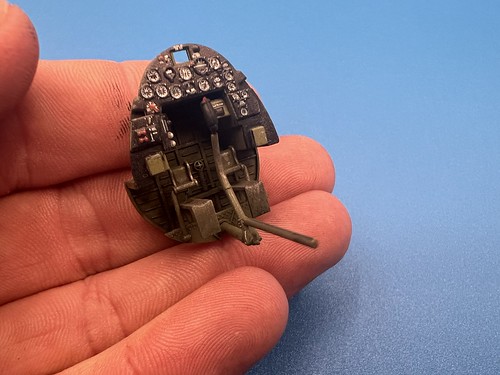
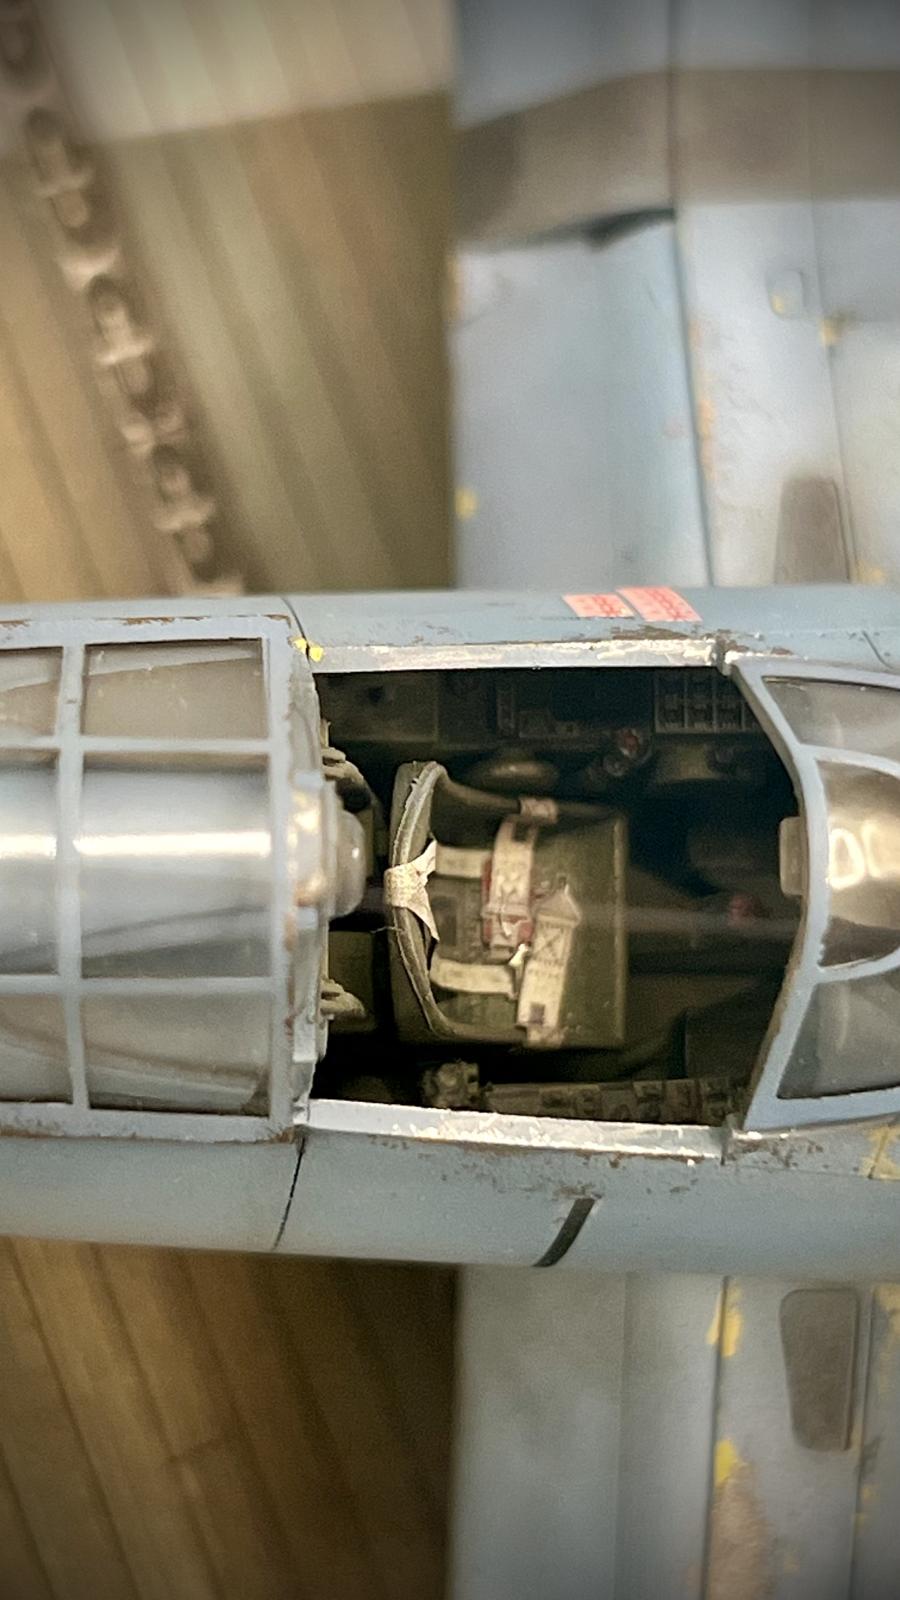
I also splurged and decided to detail the cockpit with Red Fox. I guess they're considered, what? 3D parts? I don't know. But, they were fantastic. Easy to get on there after shaving down the kit parts. They look great and well detailed.

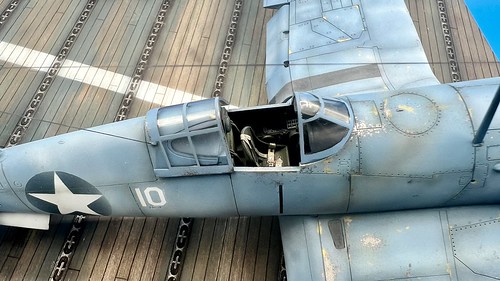
Again, they are kinda visible in the finished product with the canopy open, so that's nice.
The Painting
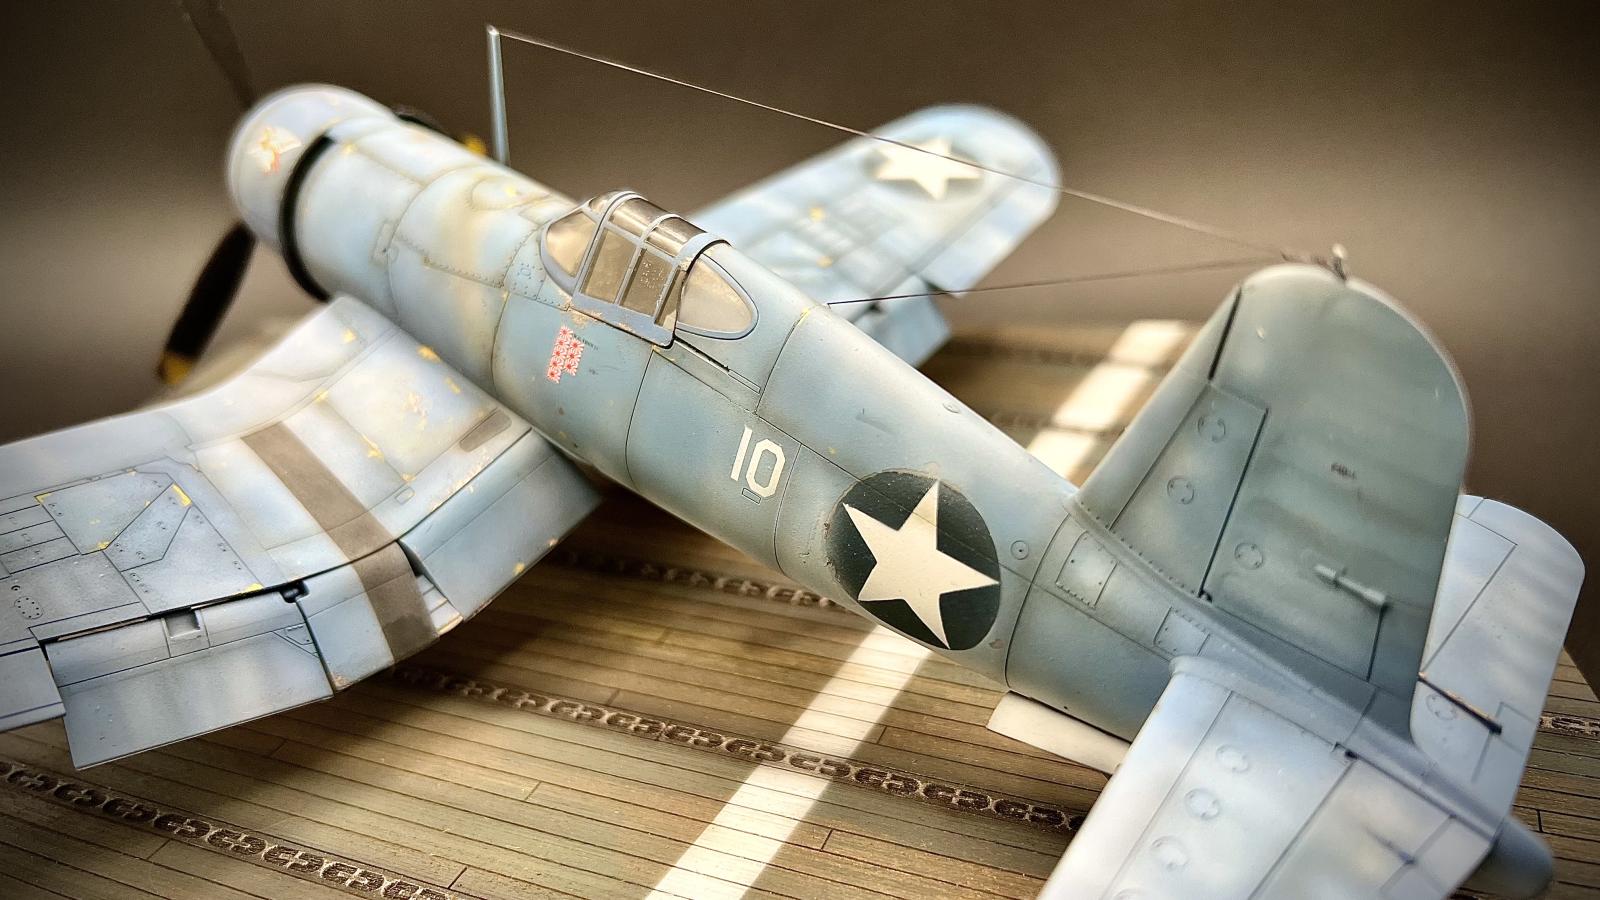
If you haven't figured it out yet, I really like the painting part of the modeler process the most. Although I can build and even scratch from time to time, my real passion is painting. I love tones, hues, saturation, shading, highlighting. In particular the airbrush. So everyone knows from now on, I use a $35 Master Airbrush for all my work. Yep, that's it. Always have. Anyway, this is where, to me, the model comes to life--the painting process. Even though the weathering process is most modelers favorite part, for me the painting makes the weathering effects possible. Even weathering can't overcome a bad paint job.
I usually always paint with Tamiya. Solid. Easy to mix. Great to spray. This model, after I "mottled my work" as I usually do in B&W (after an Alclad black primer)...
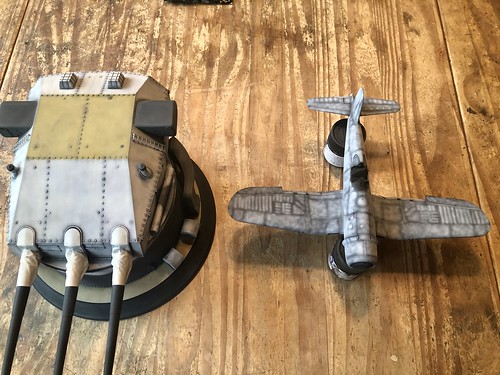
Yah, that's a Scharnhorst turret I'll finish here soon. Also "mottled". Anyway...
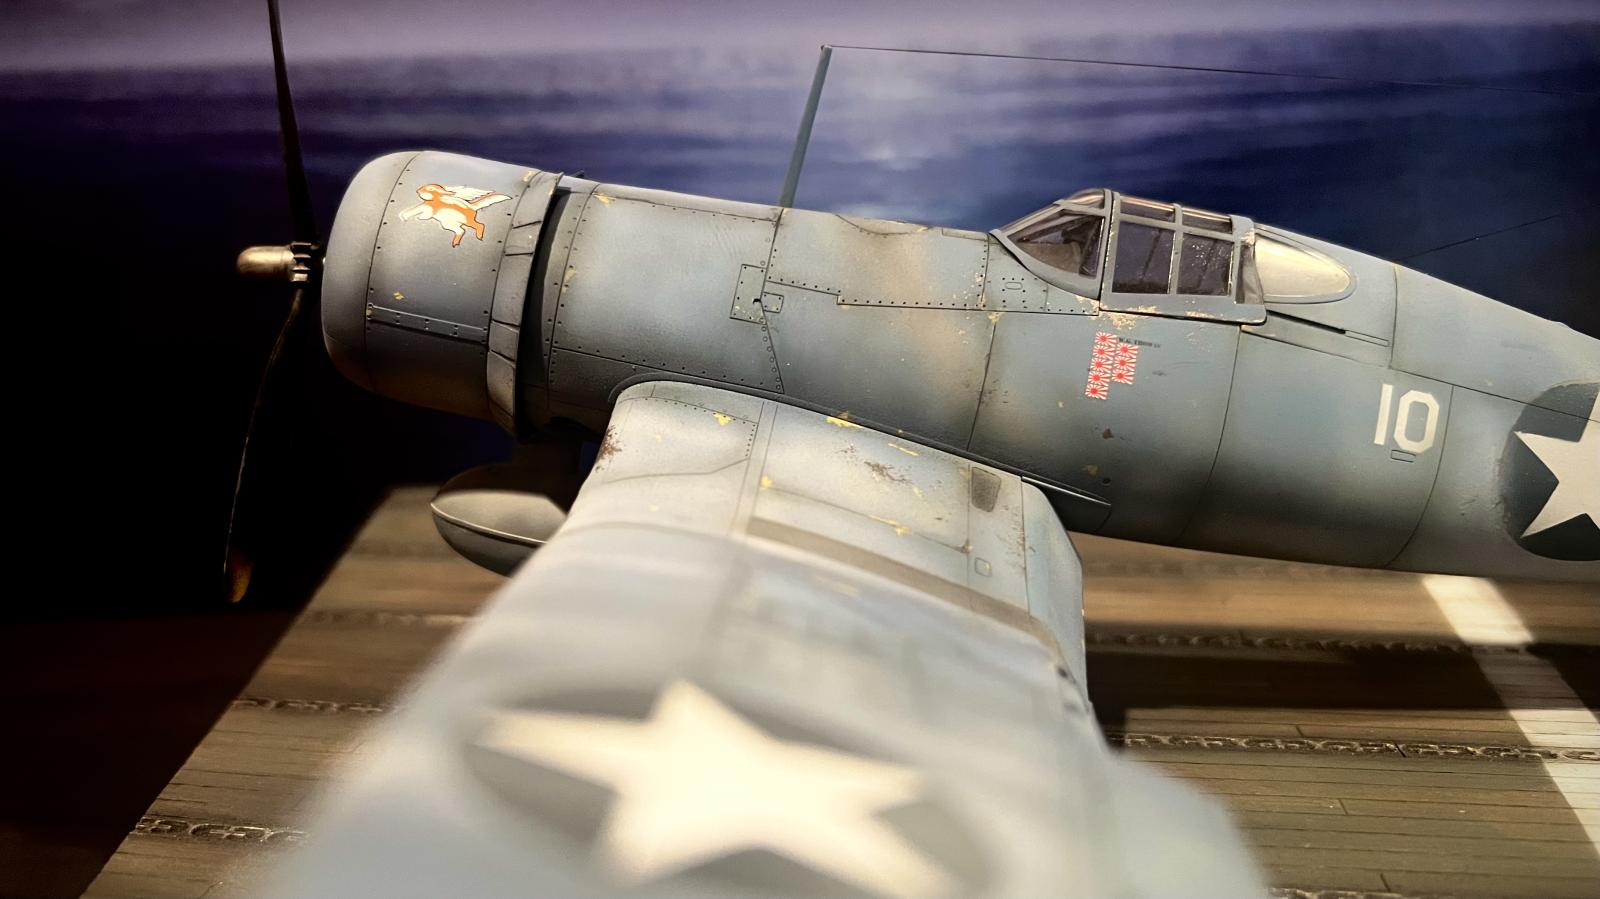
I decide to take a risk and try new paint on this bird. I decided to try MRP paints, in particular, the Intermediate and Navy blue. When I got them I could not believe how thin they were. Like water color. I thought there would be no way they would get good coverage. I was wrong. Not only do they get great coverage out of the bottle, they mix well with Tamiya paints, which was great as I had nothing else really to use. This allowed me to both darken and lighten the tones. I used the navy color as a very thin pin wash for the panel lines. I did this with my airbrush, at low psi and lots of lacquer thinner. Check it out...
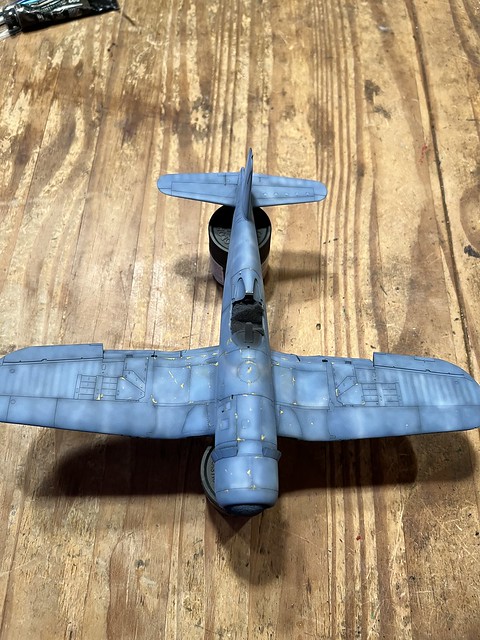
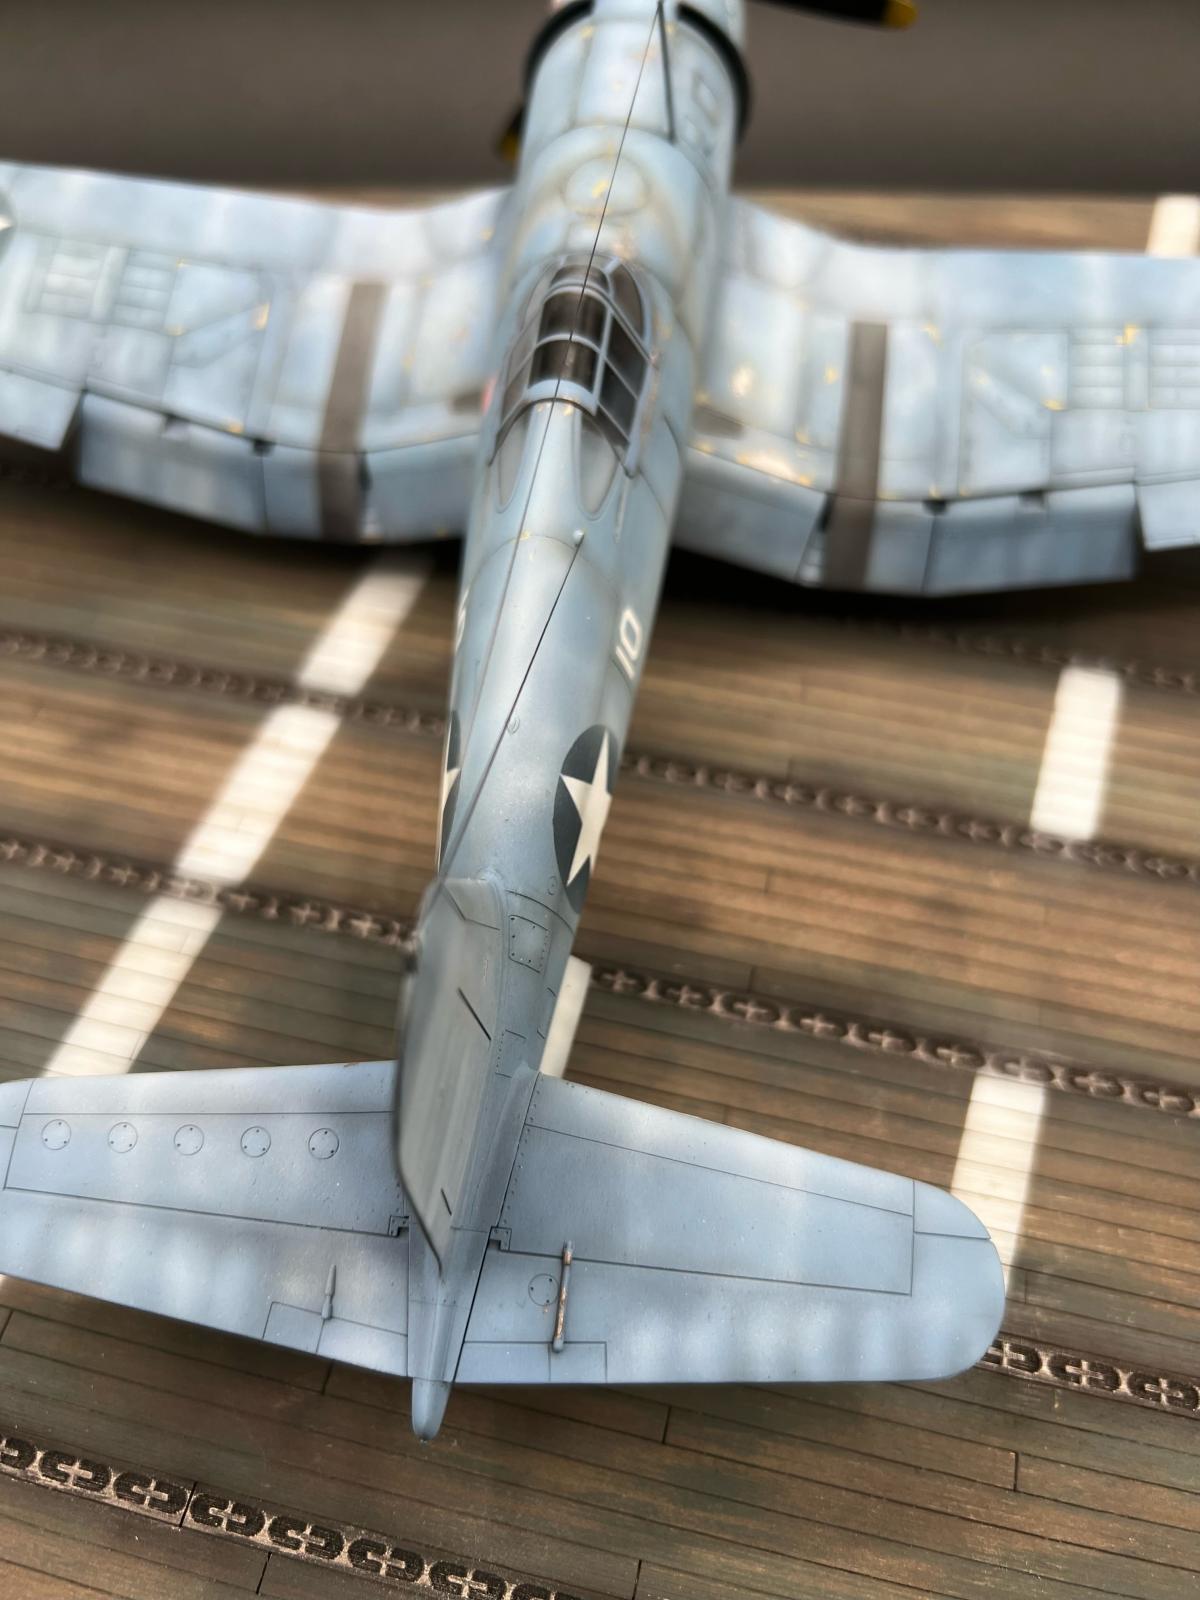
You can see in this shot, overall it's a little dark. I later came in and began lightening the tones and leaving much of the shadows where appropriate. I also began the chipping effects of the zinc chromate yellow. Look, I doubt I did this correctly and did the best I could. I did NOT want to hairspray chip this as I would usually do with the effects I wanted. The reasoning is because of the new MRP paint. With it spraying as a lacquer, I had no idea how it would react with hairspray chipping. I did not want to risk it, so went with post color chipping. Yah, it could be better. This is where my shortcomings as an aircraft builder come out. I'll work on it.
The MRP paints did great. HOWEVER, I found out later that they are SUPER DELICATE. At least how I used them. I found this out when I went to go and airbrush the markings. Yah, I bought aftermarket decals (NO TAMIYA DECALS!), but they got delayed and I didn't want to wait, so I figured, make the stencil yourself and paint them. At least you won't have to worry about Tamiya decal issues again. Yah, it was a good call, except for the paint getting peeled up all over the place. I used Tamiya tape, as I usually do, and even "detacked" it further. No go. It peeled up huge panels of paint. I was shocked. Fixing was NOT going to be easy. Mostly because I had already toned, modulated, highlighted, shadowed, mixed, and went all freehand. Yah, reduplicating that on bare plastic was NOT easy. I'll be honest, I think it was not just the MRP paints, but mostly the Alclad primer. A new primer for me as well. It's great, super black, thin. BUT, it does seem fragile. Maybe more curing time was needed?
Anyway, I got the markings and paint fixed.
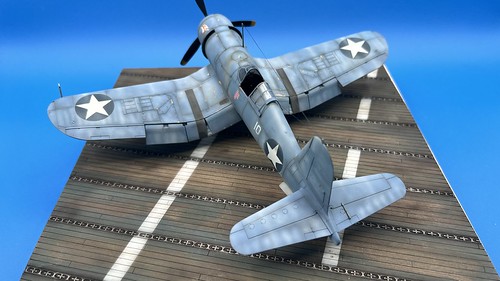
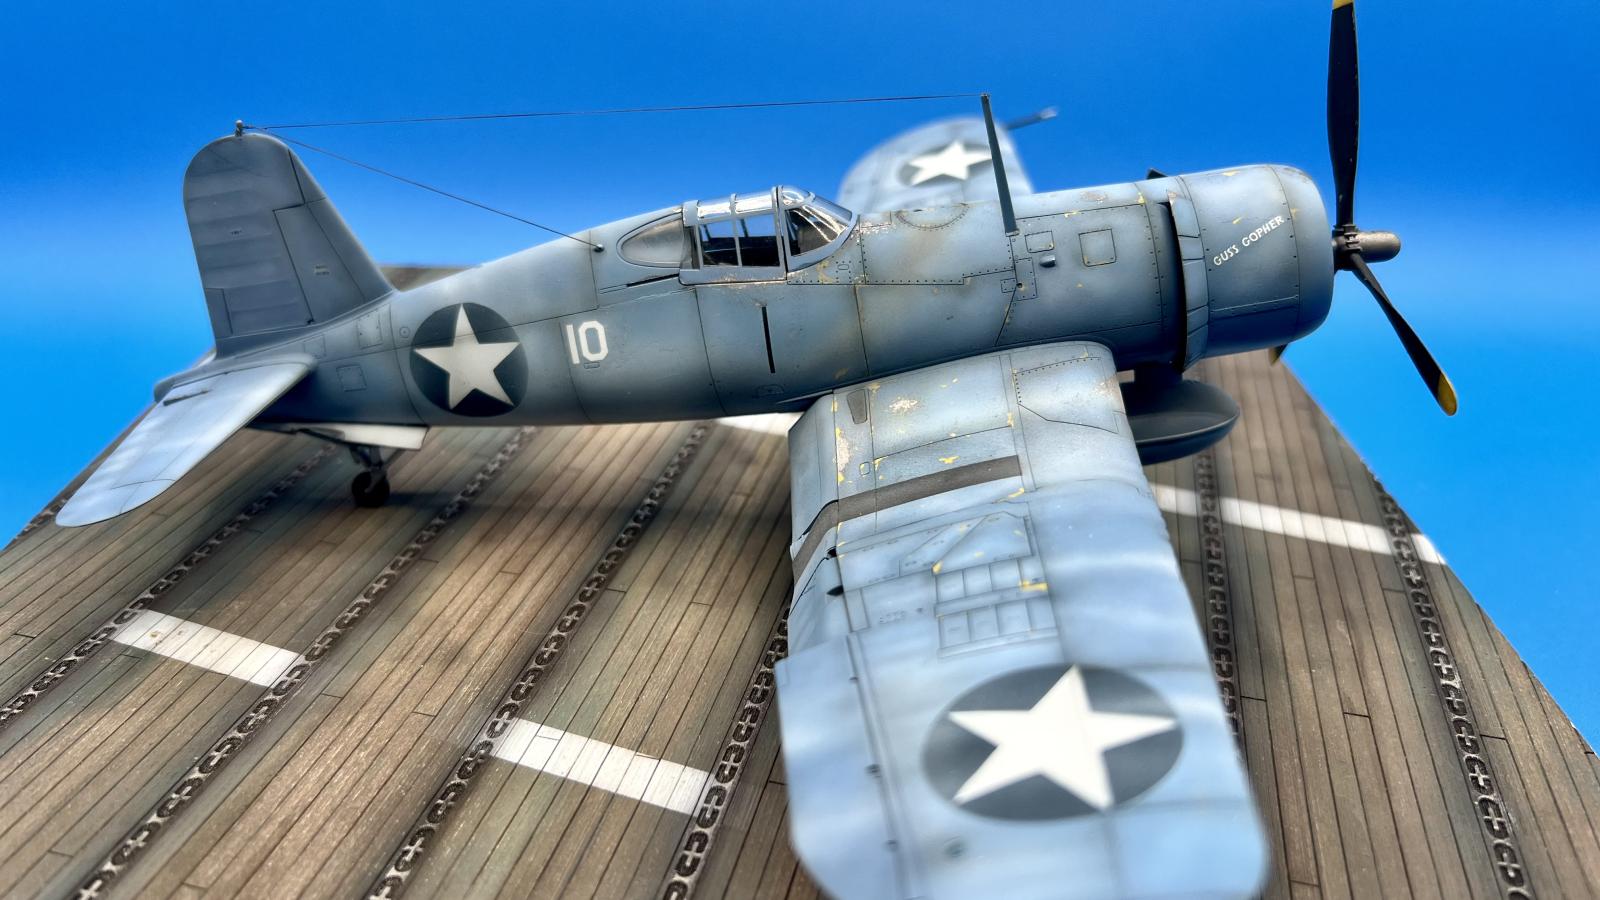
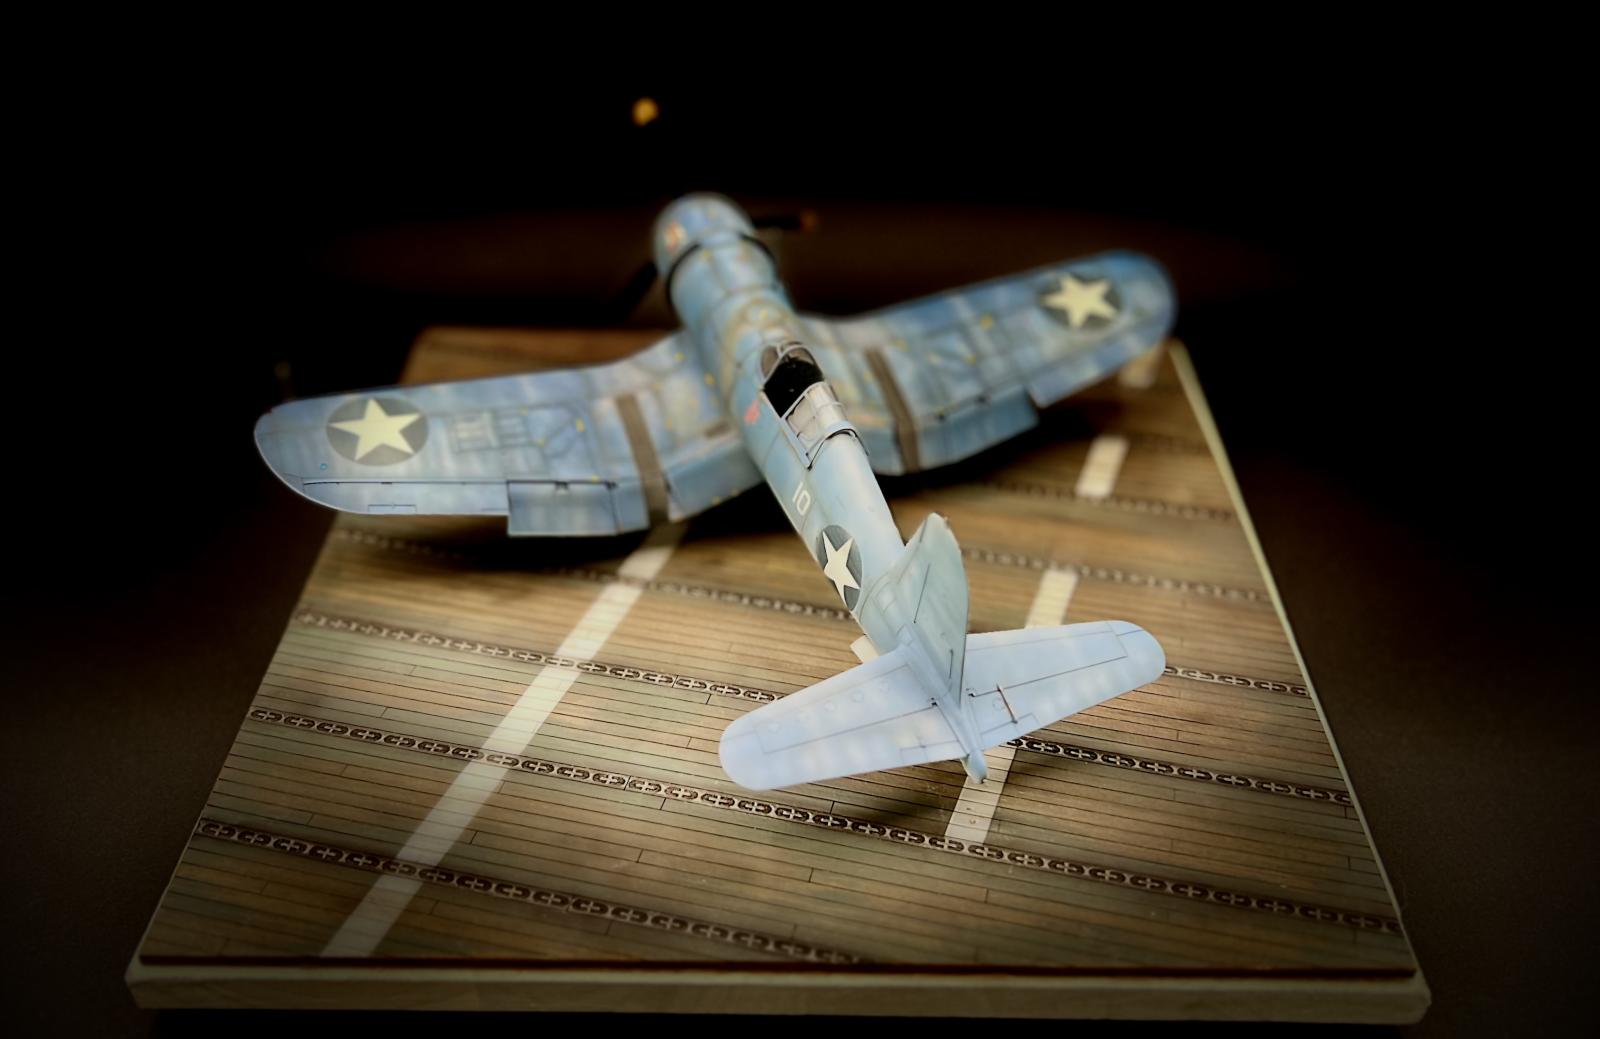
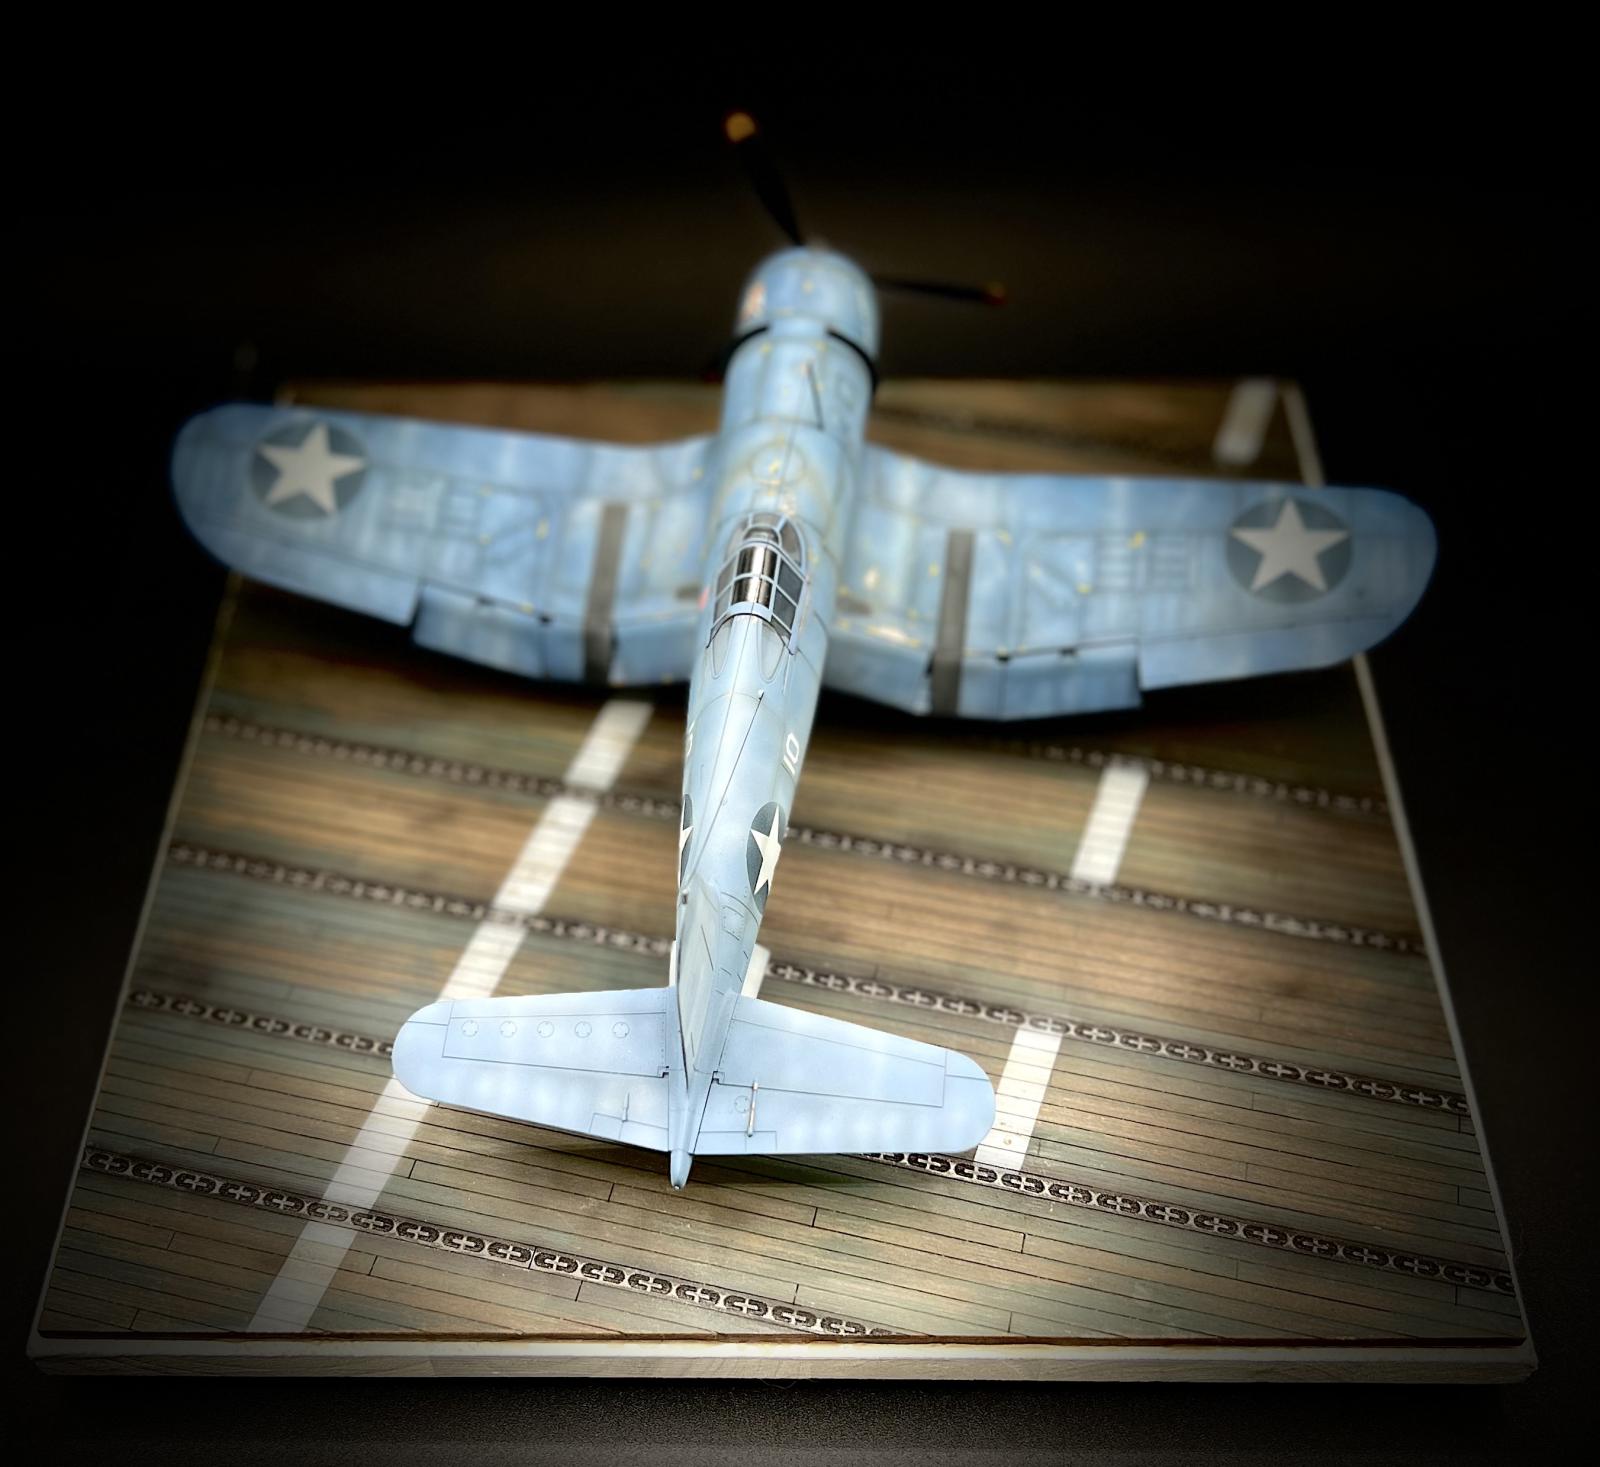
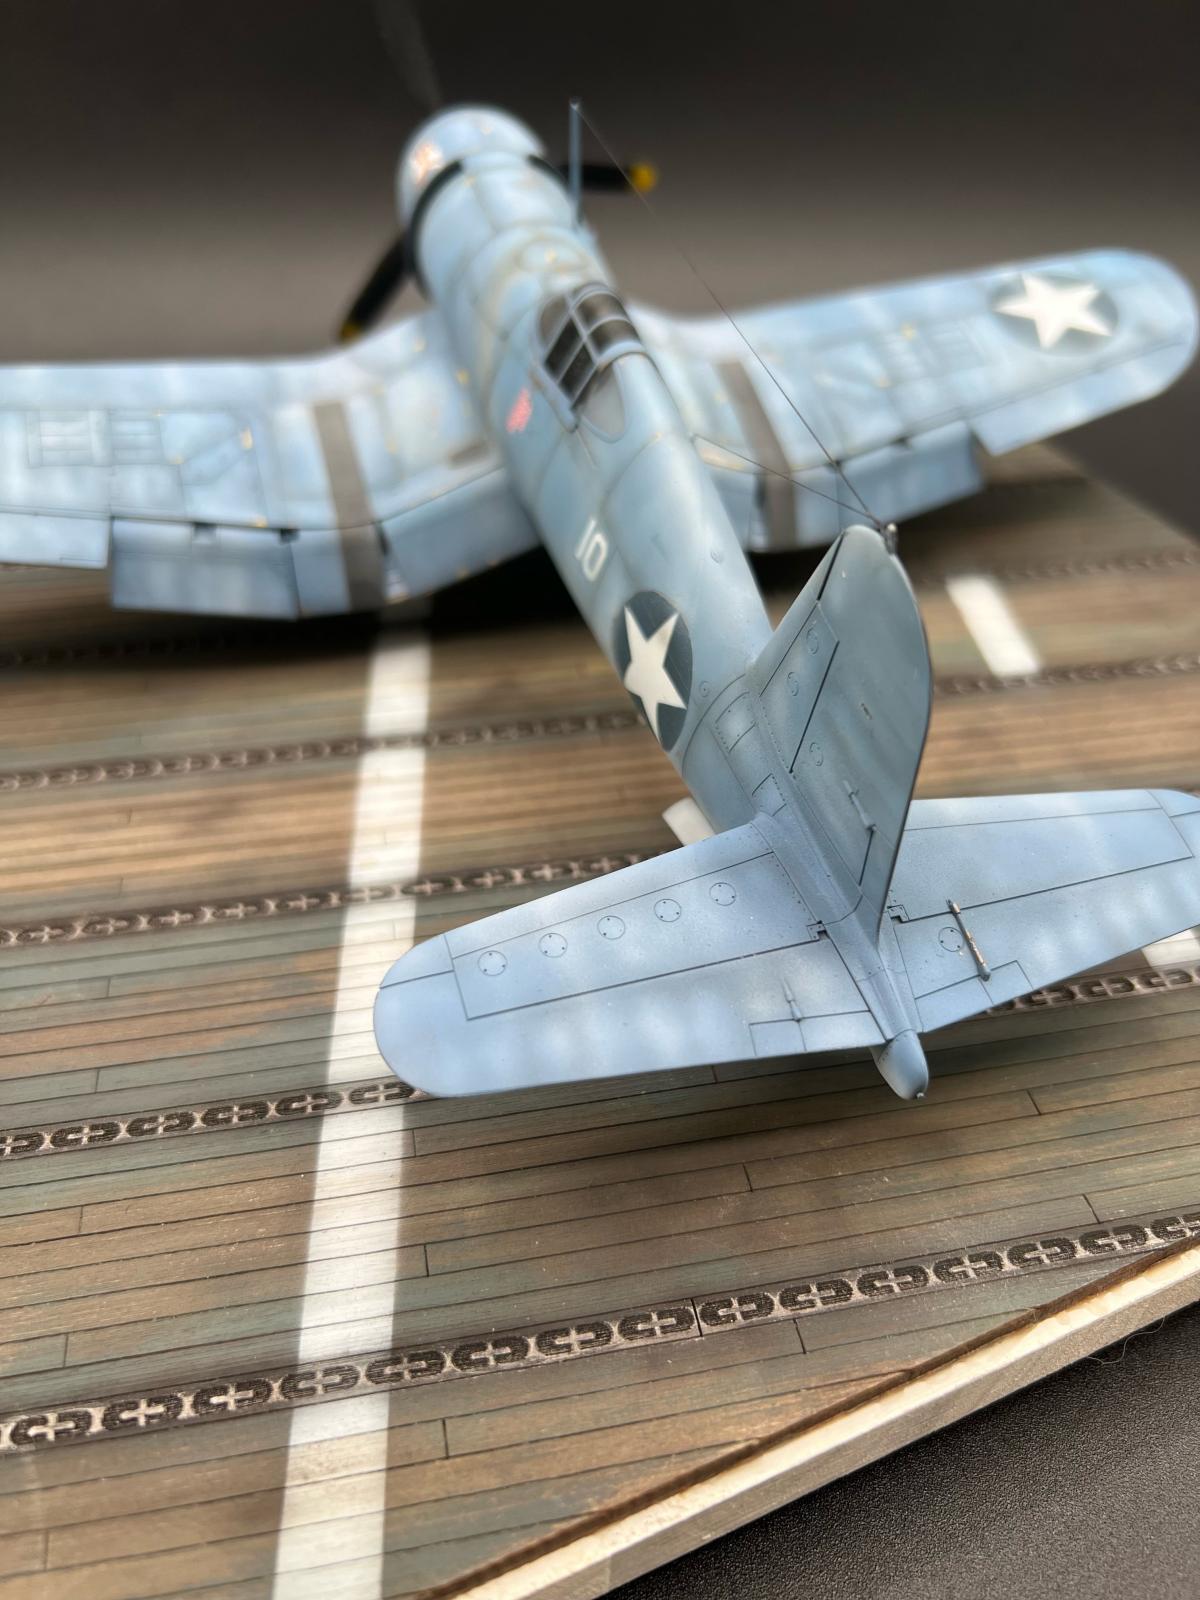
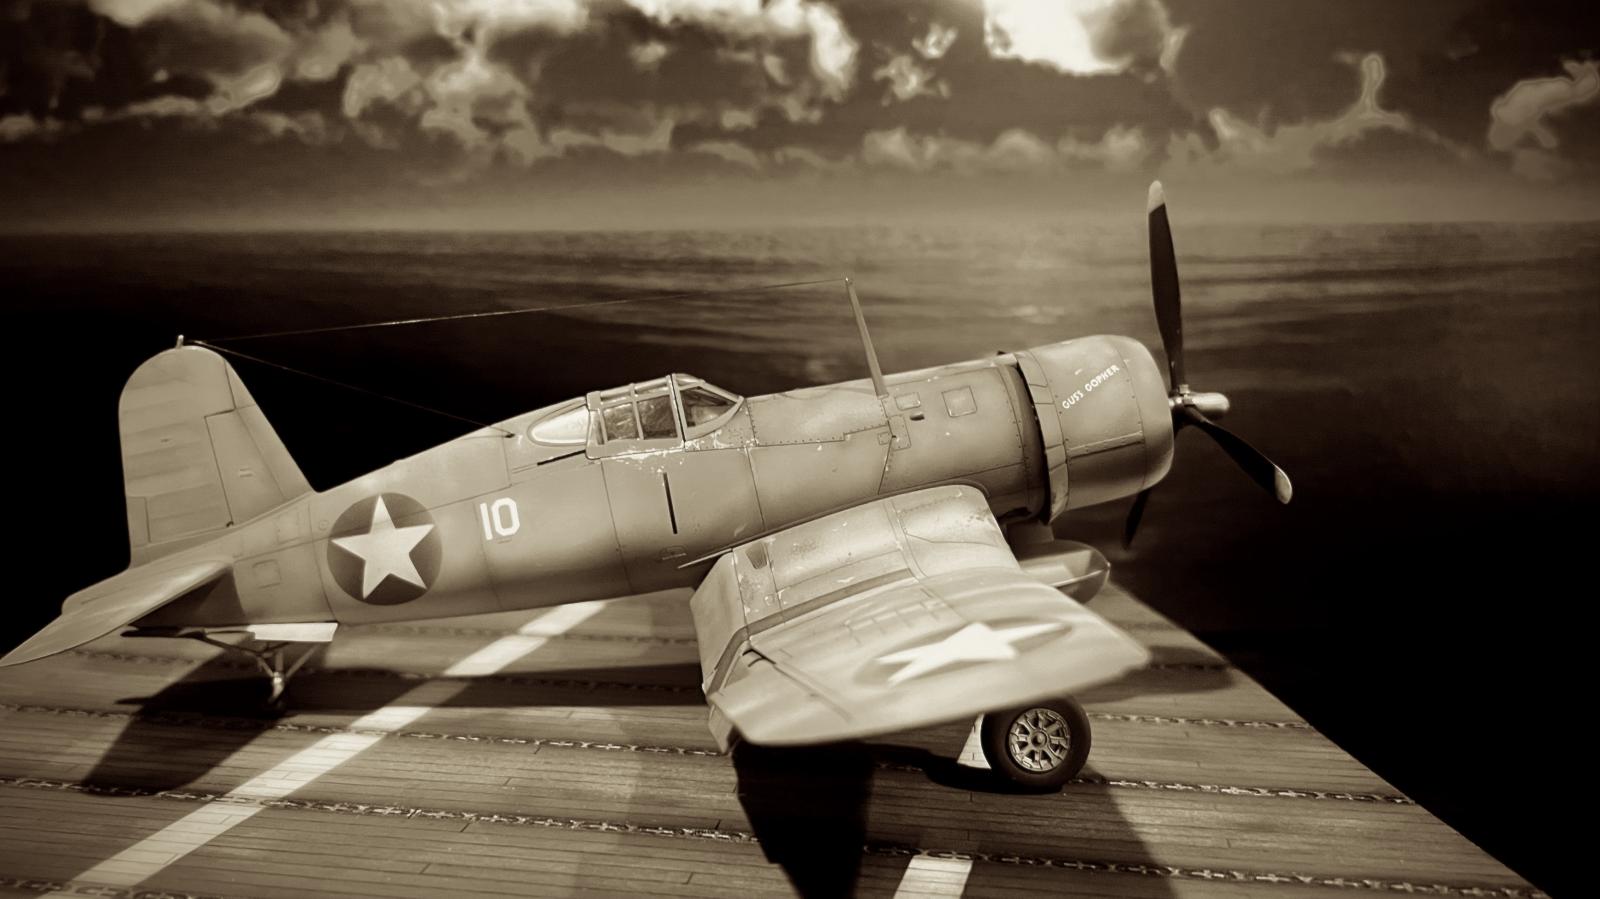
NOTE: I am aware (now) that there are some "mistakes" per se in the depiction of this F4U-1 on a carrier deck as well as "Gus's Gopher" which was a Marine plane, that would fly off off Atolls and islands. I had bought the carrier deck for display and the decals at different times and didn't know these little gems of knowledge. I was NOT going to not use the decals nor the carrier deck, so...there it is. Wrong and all, but it still looks really cool, so grab your beer, take a sip and enjoy.
The Weathering
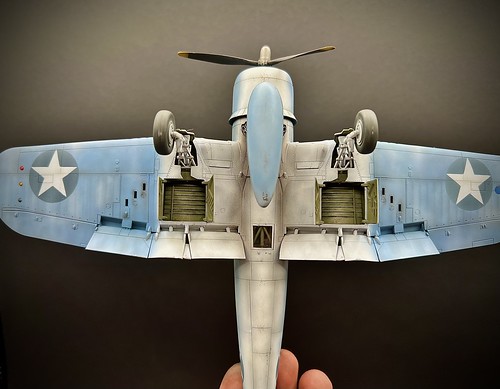
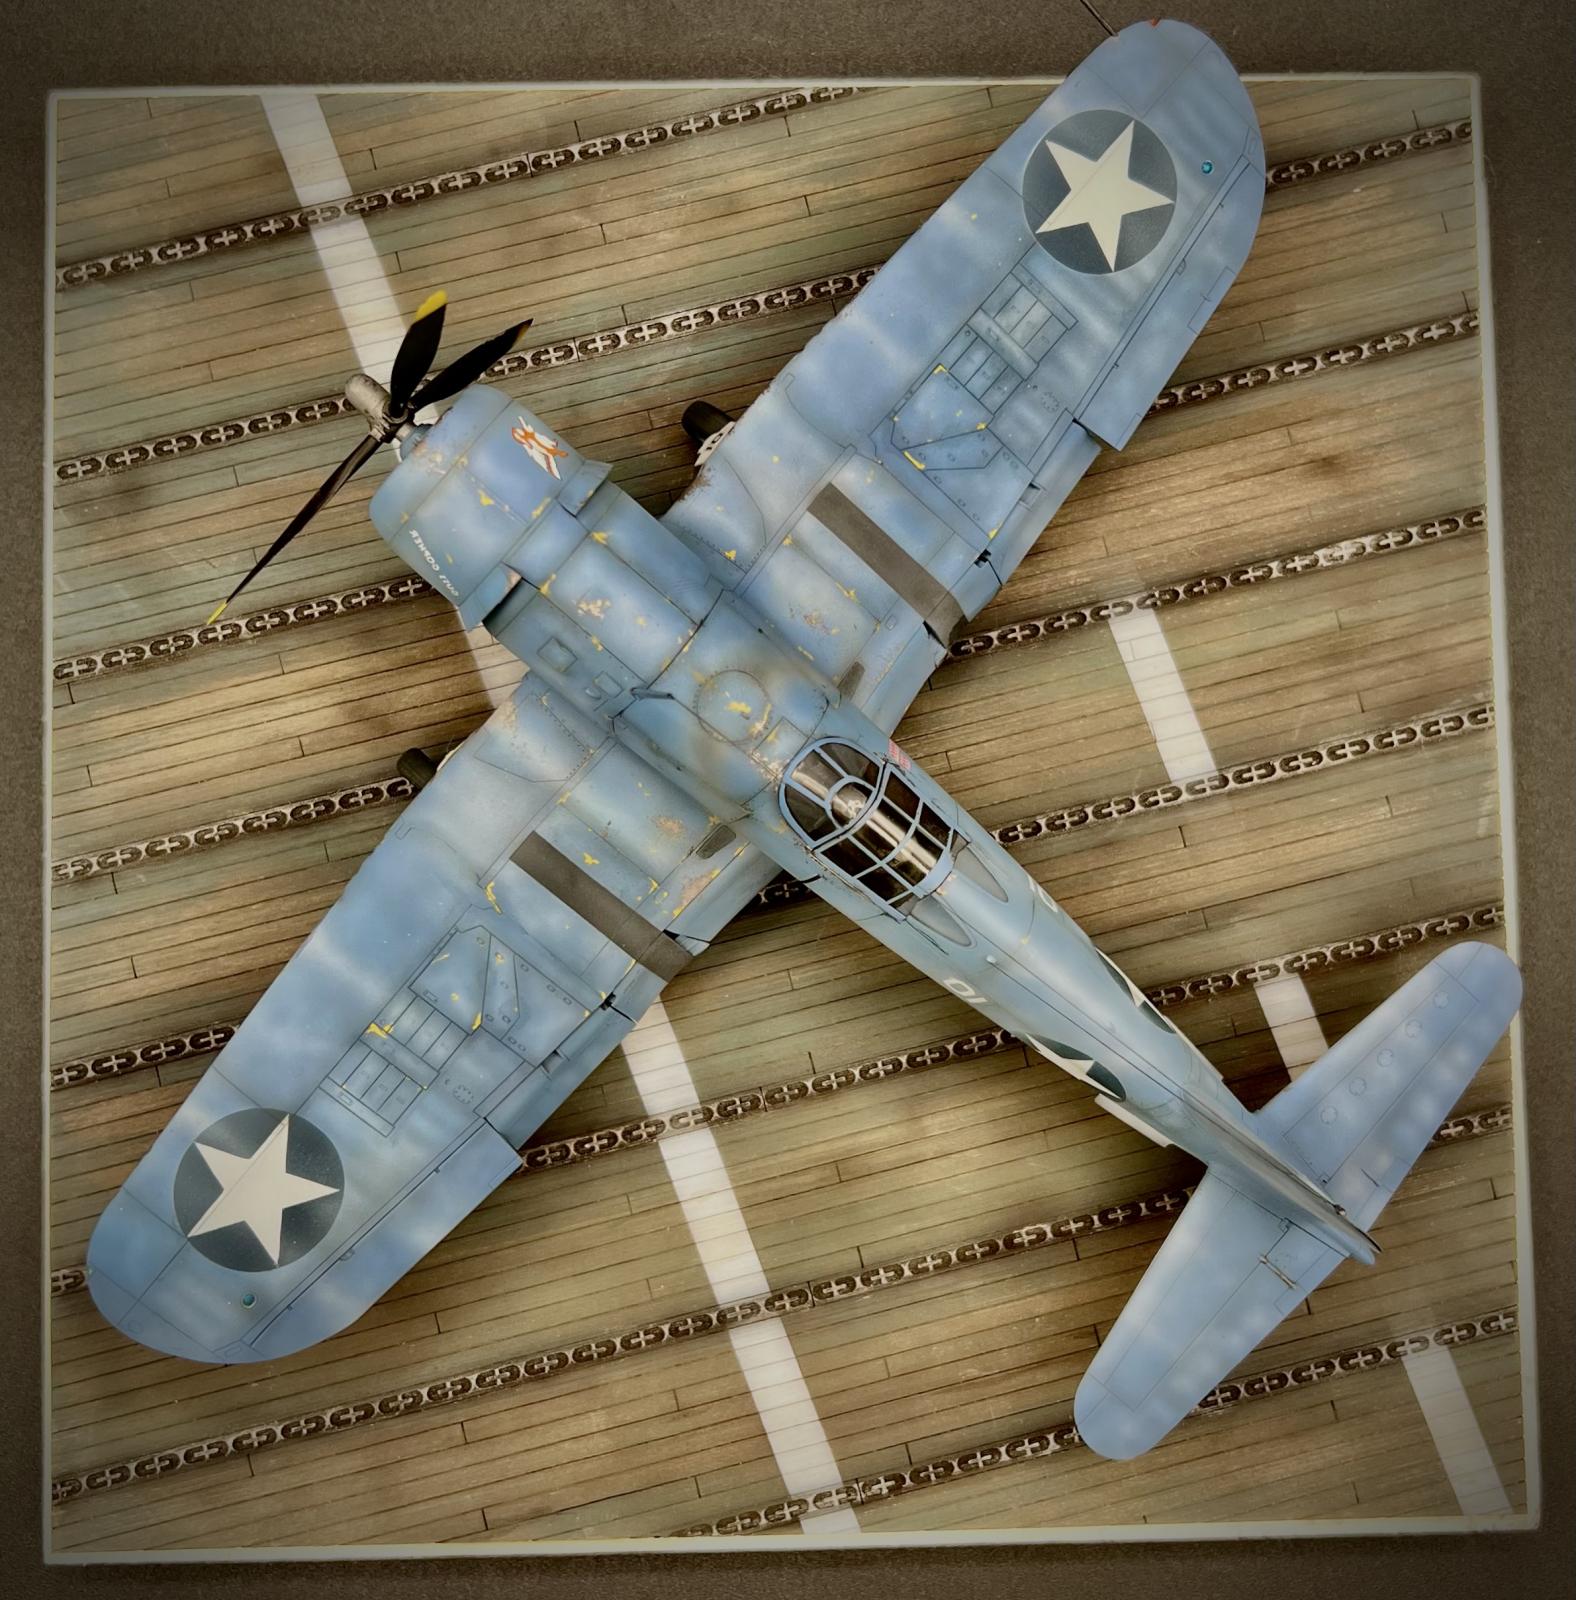
I did most of my weathering with the airbrush. Some white here. Some dark there. Nothing over the top. Mostly because I'm out of my depth here. I've seen them really beat to heck and gone. I've seen some pristine and museum like. It did the maximum I felt comfortable with and the minimum to keep it from being overdone. Zinc primer. Aluminum chipping and wear here and there. I'm sure many of you know how to do this much better than I do. I'll get better as I learn. Again, I did a pin wash with the airbrush with the navy blue, heavily thinned. Like really heavy. I did NOT use any enamel or oil washes on this. I was going to. But after all the pre and post shading, the airbrush pin wash...it was done to me. Sometimes, more is not better, it's just more and I did not want to risk more paint issues with adding different things like oils, enamels and such.
I could have done more on the undercarriage, but again tried to stay in my realm and kept it pretty basic and clean...
Not much more to say really. I LOVED building and painting this model. The corsair is just beautiful and I hope, given my lack of knowledge, that it at least entertained you and made you look. I appreciate any feedback, insight, and thoughts you may have.
Cheers,
Graeme
P.S. I wanted to do a shoutout to both the creators of imodeler as well as the community. This is a really well done website and so many of you are really great modelers on all fronts. I'm glad I found you.

Ciao Graeme!
I don't have much time to finish my Corsair (S), I have one too in 1/32 scale from Tamiya and I can't wait to do it... your work is really nice and I hope you will show us other planes like this...
In the meantime, I'll post here some results of the progress of my first of the 4 (1/48 Magic Factory) I have in WIP!
See you soon
2 attached images. Click to enlarge.
Thanks @dapo68. Your F2 looks fantastic at this stage. Looks like you've done a Corsair or a few planes before. Excellent work on the engine. I look forward to seeing the finished model (s). That's a lot of Corsair work. I've never done two of the same or similar models at once. I know a lot of people do. May try that someday.
I hope to see many of your planes... see you at the next update!
Very well weathered plane. The painting part is my favorite part of the build too. Throw in some weathering as well.
Much thanks @dbdlee. Glad you like it. G
Looks great, Graeme! Those Pacific theater Corsairs just lend themselves to some great weathering, and you did well with this. Just for future reference, the MRP can be chipped about as easily as Tamiya. It sticks a tad more than Tamiya paint, but once you get it started it chips fine. I've realized that at 1/72, I can get almost as realistic a "chipping" effort without having to actually use the hairspray or chipping fluid technique, and it sure saves a few steps and some time! And, you know, more time, more models!
Thanks @gkittinger. Good to know on the MRP paint. I really enjoyed it and will go back for more colors. Also good to know that it can be chipped without chipping fluid with minimal effects, which is good in many scales, not just 1/72.
I used hairspray for "chipping fluid." Wasn't sure if I was clear on that! I'm really enjoying MRP paints - no thinning required for the most part. And WAY more colors than Tamiya...
"I have completed this great Tamiya F4U-1 Birdcage Corsair to the best of my ability and have tried to offer the Corsair the respect it deserves."
You win, Graeme.
Your painting and weathering skills, which are first-rate, are first-rate-plus with this model. You have captured the essence of a well-used Solomons Campaign Corsair. Congratulations! I do know a bit about Corsairs, certainly enough to grade this one A+.
Wow, thank you @tcinla. I really enjoyed the challenge on this. Especially being able to paint BLUE! I paint in so many yellows, browns, and greens that this was a fantastic chance to do something different. Glad you like it. G
Beautiful paintwork on this Corsair, Graeme!
Especially like the tone variations you applied to the aircraft. It really shows the harsh conditions the plane had to endure during its service in the tropics.
Much appreciated @alfred. I had a lot of fun with the airbrush on this one. I always like monotone subjects. It allows so much tonal variation in the paintwork that many times is hard to do with a harsh camo pattern. Glad you like it. G
Paint disasters?
I see no paint disasters. I do see a beautiful build. Well done.
Thanks David @kahu. If you can believe it, it was both side panels on both sides. Luckily I was able to glaze paint it back into shape and since I used so much white I was able to make it work. It’s my fault. It was just a poor primer coat and laziness with proper cleaning. Won’t make that mistake again. Thanks for commenting. Glad you like it. G
That is one well worn Marine bent wing bird Graeme. Two thumbs up.
This is amazing, Graeme @graemestreet
Your skills on aircraft building are superlative.
I wish my recently finished Corsair would look like yours.
Thanks @tom-bebout.
G’day Graeme (@graemestreet),
This is s great effort for a second aircraft.
I have just purchased the Magic Factory Corsairs and, like you, I am new to monotone blues, although not new to aircraft. (My latest build is an Avenger, my first USN scheme).
I’m also finding my feet with more than mild weathering. I can tell that you have applied some of your armour weathering techniques, which are harsher than I am normally comfortable with.
I want to build a weathered Corsair, so your build gives me some food for thought.
That makes me so happy @michaelt. I was able to use some armor skills here for the Corsair. I’m looking forward to seeing your finish. The magic factory looks like a great kit. I almost went that route but wanted to keep it simple for this one. More complex coming up soon. Nice to meet you. G
Great job Graeme! You nailed the heavily weathered condition of a South pacific Corsair. Beautiful paint.work and nice weathering. You did an outstanding job, I can't wait to see more of your work.
You did a fantastic job, Graeme! This is a wonderfully built, painted and weathered birdcage Corsair!
and I just got the article title’s reference. Your paint work is a real inspiration. And I love that kit. I am not the sharpest knife in the drawer by any means, but the wing assembly challenged me too. With the prevailing wisdom being that you can’t mess up these kits, I think I was on the verge of doing just that. I have a F4U1-A ready painting, and will try to emulate some of the effects you have achieved.
Excellent result, Graeme. Hard to believe that kit is almost 30 years old.
Well done sir! I hope to achieve similar results with my birdcage Corsair. Just wouldn't look like a South Pacific airplane without that worn and weather beaten look. BRAVO!
Wonderful Corsair build, not sure you can continue to call yourself an “armor guy”! You have a great eye (and hand!) for shading and weathering!