Work in Progress: The German Air Ministry 1941
This article is part of a series:
Hello all,
My next project took more shape today. After finishing David T's GB entry, I target my energy now on a diorama involving a particular building in Berlin: The former Air Ministry of the 3rd Reich.
Some history:
The building was designed by the architect Ernst Sagebiel and built in record time in the second half of the 1930-ies. It housed Reichsmarshall Görings infamous air ministry. It was here that the Battle of Britain was planned and earlier than that, the Junkers company bailed out on its patents on the JU52 transport plane.
After the war, the building - only slightly damaged - served housing ministries of the SED, the East German DDR government. After the fall of the Berlin wall, the German finance ministry moved in from Bonn and from there, all nationalized DDR companies were privatized or dismantled by the Treuhandanstalt. The building is now called the Detlev Rohwedder Haus in honor of the Treuhandchief assasinated by the Terrorist group RAF (Rote Armee Fraktion) in 1991. More on the Wiki link below
https://en.wikipedia.org/wiki/Detlev-Rohwedder-Haus
The setup:
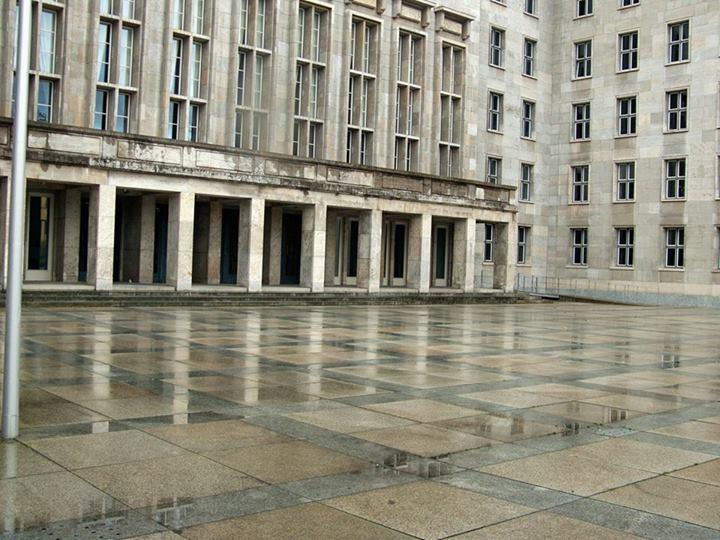
I want to try new techniques to present the building in the 1941 setting. The building used to be the largest office building when it was first commissioned (up until General Groves' Pentagon took shape). I therefore chose to model the central square (Ehrenplatz) only in 1:35 scale.
I found the original plans for the building via the library of the Technical University of Berlin and started calculating scale dimensions. The one facade I intend to build is already about 90 cm wide in 1:35 so no way I can build all of the building in my workshop 🙁
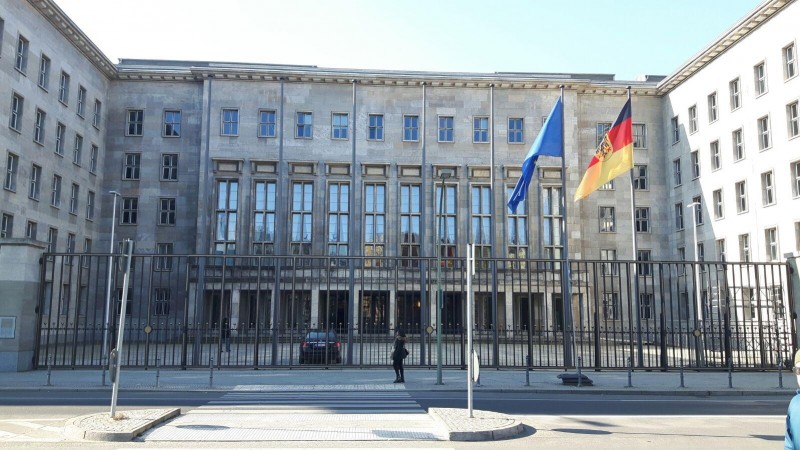
I plan to integrate two ICM kits in the dio: One of a staff car and then some figures. I just hope that the end result gives the kind of majestic impression you still get when you pass by the front of the Ehrenplatz on the Wilhelmstrasse in Berlin today.
Status:
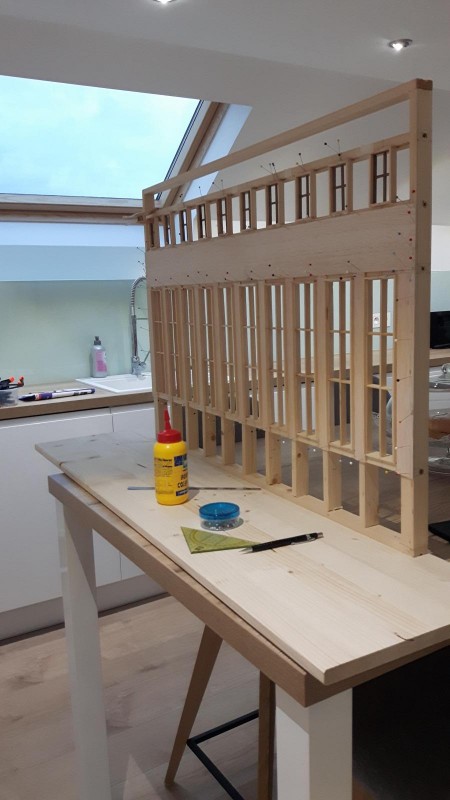
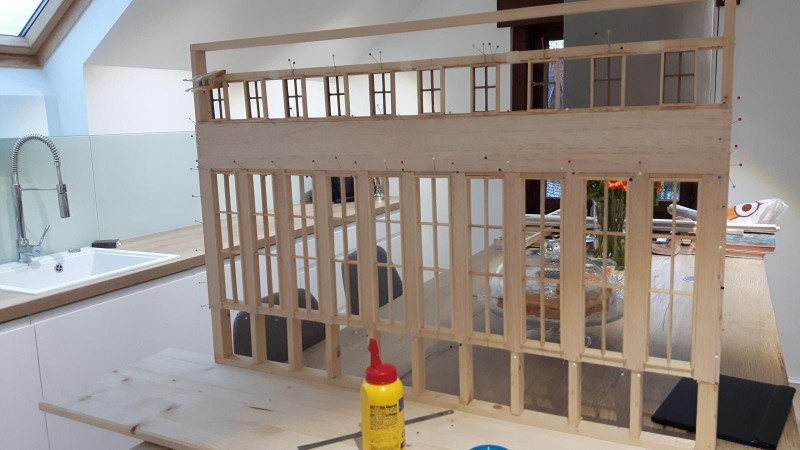
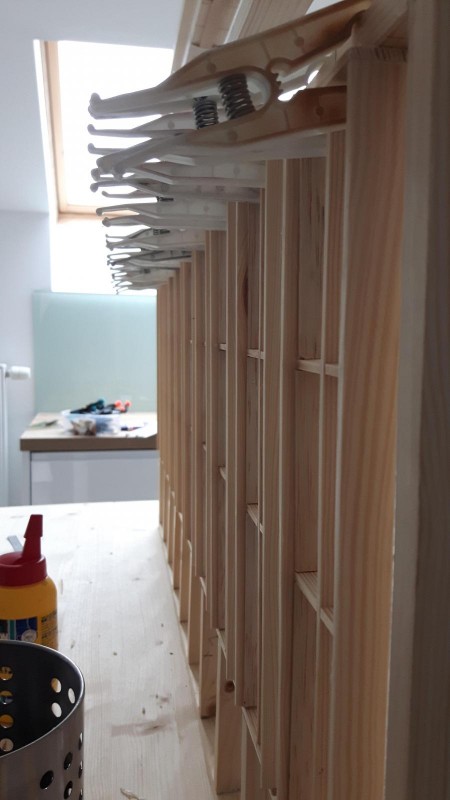
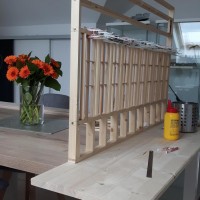
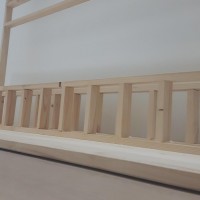
Built the facade around a hardwood frame. All windows (2x10) were constructed from hardwood strips using a jig so they are dimensionally equivalent. I now mounted the windows on the frame, lined them out and started covering the frame with balsawood.
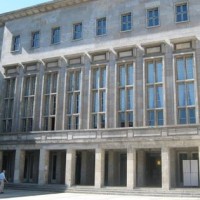
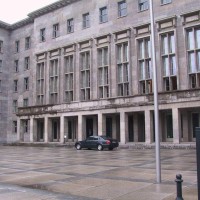
The main challenge will be replicating the color and texture of the natural stone lining the steel frame of the original building:
I hope some of you will follow upon this Work in Progress, all is scratchbuilt on the building so wish me good luck!
Happy Easter and pleasant modeling!

You have a daunting task in front of you, sir...but one that I'm quite sure will have a favorable outcome. Can't wait to see how it turns out.
Holy mother of God. Michel, I think you need to acquaint yourself with the term 'diorama'. This is not a diorama, as most of us regular people know it; my friend, this is the Sistine Chapel of dioramas. That framework is an amazing piece of work. Michelangelo himself split opinion in his day; people divided between lunatic and genius.
This, I am sure, will redefine 'diorama' - I'm looking forward already to the next instalment.
Certainly, excellent engineering and architectural modelling skills on view here.
My own view of dioramas is that they must contain an element of drama, that is, human interaction, in-extremis moments or moments that halt us in our tracks in the realisation of the consequences of these interactions.
Unlike David I don’t think we’re yet at a moment that would “redefine” diorama, rather, the point of the process that defines it as diorama, for me, has yet to be established. The presentation of the staff car would seem to offer only an element of human scale, which is of course different to that of human drama.
That said, it’s an impressive project and I look forward to it’s further stages. Please don’t take my comments as negative; I’m simply curious, and view these things circumspectly.
Simply amazing, and shows a dedication to history and detail I do not possess.
Very impressive Michel. Might I suggest...http://www.pegasomodels.com/productdetails_en.asp?id=194#
1 attached image. Click to enlarge.
Thanks all for your feedback my friends. Of course this is just the start! In fact, I've been building the windows and frame over the last month, as an intermezzo to the Kasserine build and whenever I found the time in between busy work. I reckon this will take me many months and I'll be glad to build the plastic vehicles and figures OOB in between!
Most of my models have figures featured, this setup will be no different. The vehicles here will be soft-skinned and there will be few weapons and no rubble whatsoever. Nevertheless, I intend to try and deliver something more than just a facade with a car in the front. If I need to turn to sculpting again, I will do it of course!
I have some ideas already but suggestions welcome!
Happy Easter!
Good luck again on this ambitious project, Michel.
Hello Michel,
Very impressed with the task ahead. The German history in WW2 still keeps many interested people occupied. Including me.
Regards, Dirk / The Netherlands.
Status update:
Building front now fully covered in 2mm balsa, still need to cover the sides.
Next step is the balcony, which still needs some study.
To give you an idea of the source files, I attached two exempts from the original plans I used (courtesy of TU Berlin - Museum of Architecture).
Happy Easter!
Great project!
Keep it up.
Beautiful craftsmanship, Michel. Incredible vision and precision.
Fitted the base for the balcony preliminary with some screws to allow later access for painting and finishing. This required quite some measurement as the design requires an alignment with the slab size for the square covering to be added later.
Next is the staircase and the flooring & roof of the entrance hall, after which the balcony will be fitted.
Keep you posted.
Happy modeling!
2 attached images. Click to enlarge.
Wow - cool project!
This is VERY interesting, Michel. I'm in awe of your many-faceted talents. I believe this is the 2nd report of this project, right? I look forward to more!
Hi Jeff,
I hinted this project in the Kasserine thread as I had started mass-producing the windows in between the Tiger works. So maybe from there you remembered some pictures.
Main job will be the building, but I'm confident I have most technical issues solved now, so I just need time to continue building. Lately I manage 1-2 hours a day in the eve.
The building will not be exactly scale but it is close within my target of accuracy. One point where I will differ from the original is the headstones above the main windows:
There are ten windows, five of them have the German Cross (Eisenen Kreuz) and Five have the Swastika alternating. In both cases these ornaments are featured of Oak Leaves. I will use my 3D printer to make them but I plan to keep all ten ornaments at German Cross. Truth is I personally do not feel comfortable with the Swastika and what it stands for. You guys may have thought of this since most German planes WWII had a Swastika on the tail but how you deal with that? What is more important: Historical accuracy or deliberate avoidance of Nazi symbols?
Thanks for your reply and I'll keep you posted!
Did not have much time today, finished front part of the staircase. Left is the sides, working out the entrance and then the balcony on top. Will stop now and let rest for a day.
Happy modeling!
1 attached image. Click to enlarge.
Michel, stunning! Museum work!
Thanks Bernard!
I could not resist so continued a bit...
There are ornaments to the building as you can tell from the picture below, taken during Nazi times...
Above the large windows of the grand hall, there are ten ornaments, five iron crosses and five swastikas in alternating fashion, each time with oak leaves left and right. As I explained, I do not plan to feature the building of the swastikas but I will fit ten iron crosses instead.
I programmed the iron crosses to print in my 3D printer (Prusa i3), see:
https://www.prusaprinters.org/prusa-i3/
I once wrote an article here on the interplay between scale modeling and 3D printing:
http://imodeler.com/groups/scratch-building-models/forum/topic/on-the-interplay-between-scratchbuilding-and-3d-printing/
Here is a short summary...
You first define the 3D shape you want to print using a design tool. I use Openscad, which is basically a programming language for 3D objects. I devised a way to define the wings Iron cross out of a combination of intersects between squares and cylinders, rotated one version 90 degrees and then subtracted another iron cross to give it an inner depth:
Then you transfer the basic 3D printing file format (.stl) to another piece of software that converts it into a format that can be read by the 3D printer. This file is of .gcode type and basically converts the 3D shape into one stretched and bent sausage of 0.4 mm wide molten plastic.
This is the only thing the 3D printer does: Moving a heated extruder according to what is in the .gcode file, layer by layer in z-direction. In my case I printed into ABS plastic, the same as for LEGO blocks and soluble in acetone for after treatment. Here you can see a preview of the printed shape once it is converted to .gcode.
My little printer is now at work, will take maybe another hour for the first three trials:
Hope you learned something about 3D printing now, there is really no magic to it!
Happy modeling!
Michel, fascinating, the way you make your own details! I like that Christmas scene, myself. Much more recent. The building itself, fine example of swords into ploughshares, always a good idea. That and bureaucracy goes on forever.
I first viewed this on 1st April and thought it was an April Fools' trick, now I know better, it's an incredible project, I'll be following your progress with great interest.
Looking good, now the next batch of 3 is on its way...
Stay tuned...
1 attached image. Click to enlarge.
Finalized staircase and entrance gallery. Here are some shots including the preliminary positioning of one of the ten iron crosses. I'm doing the last batch on them so should all be ready printed by this evening!
The next couple of days I will focus on the balcony and the ceiling of the entrance hall!
Stay tuned!
Looking great, Michel. Really enjoying this build , not entirely sure what to expect!
Surprise, surprise...
An update:
Nearing the end of the main construction phase.
The balcony is now being finalized, the sheeting with Balsa is next.
It starts to look like the real deal, don't you think?
After this, some focus on the roof will be required.
All ornaments have also been printed now, took about 3 days for 20 oak leaves and 10 iron crosses plus spares.
Cheers, Michel.
2 attached images. Click to enlarge.
I did not have much time over the weekend, but I continued tonight with the sheeting of the front of the entrance hall. Tomorrow I should be able to add some texture, so this part of the build can come to a close.
I hope you enjoy it!
Michel.
2 attached images. Click to enlarge.
Lovely work, Michel. Tell me, will Herr Goring be making an appearance, or do we have to wait and see?
Hi David, I searched for a 1:35 scale Göring figure but could not find any. I will give it a try to sculpt one but the face poses of course a challenge... In any event, Göring was purportedly a flamboyant type of person who liked to throw the better Hennessy Party so I planned a lot of that for sure!
So here it is, the balcony and entrance alley almost ready! Just need the back side sheeting but that is a detail. Next is the finishing of the main building front. After the woodwork is finished, I will apply a couple of layers of wood varnish.
I started experimenting a bit for the paintjob. There are two options: Covering the walls with individual "sandstone" slabs made from photo paper. Of course that does not help us on the window frames.
To exactly match the color combination between photo paper and painted texture would be a challenge too difficult, so choices need to be made.
I took a spare piece of plastic and sprayed a light grey primer on top. After that, I applied several acrylic colors with a natural sponge. You can see the result below. This method is quick, once the underground has been prepared using wood varnish, filler and primer.
Top is the printed real sandstone texture on photo paper, below is the "synthetic" texture using acrylics. Still too much yellow but it is clear what has to happen now! Compared to an evening picture of the real thing:
This "sponge" technique gives a nice texture in my view, now I just need to get the color combination right...
Terrific building skills. Nice texturing and colouring also. 'Oddball' Henderson has already pointed this out but here's a fat 1/35 (54cm) little man...
Ah I thought it was 1:32... 54mm would fit yes!
Let the construction rest for a day and continued working one of the vehicles in the planned dio. This is an ICM kit of a 1930-ies Opel Admiral Saloon.
I had finished the engine already last week so today I turned to the chassis.
This is a very crisp kit offering probably the best 1:35 representation of this - then - high powered saloon car. It had the same engine as the Opel Blitz. Many of them were requisitioned from their original owners as war broke out and so it fitted the setting of the Air Ministry here.
It's one of these things Louis mentioned in his review of ICM airplane kits: Detail is very crisp with few ejection marks. I only noticed the plastic to be sometimes brittle but was able to repair some tiny parts that broke when I was removing them from the frame.
The chassis is ready now, hope you are enjoying this thread, comments welcome.
Michel.
Michel, that's a nice looking car! Great progress on the building and the ornamentation! As an aside, were the swastikas removed postwar? When I was a youngster, the local movie Saturday newsreel had this sequence of this large swastika in a laurel wreath on top of an edifice blowing up. I think it was at the Nuremberg stadium. Made an impression on me!
Hi Bernard, yes they were removed. I believe they were cast-iron and had an anchor attached to the rear. This anchor was either cemented in the natural covering stone of the building front or to the steel beam skeleton of it. I modeled the iron crosses and printed 3D so there will be 10 IC's instead of 5 IC's and 5 Swastikas. Yes Nüremberg was blown-up after the war, was even w/o the Swastika a huuge stadium at the time where Leni Riefenstahl taped her propaganda movie "Triumph des Willens" in the 1930-es.
How to deal with Nazis? 10 pounds of Composition B does the job! Enjoy the big boom!
Today's status: Finished sheeting on the main part of the building. Started to fill the widest gaps. This thing is almost ready for the paintjob now. Keep you guys posted.
Happy modeling!
1 attached image. Click to enlarge.
For such a complex and detailed build you are making amazing progress, Michel. That last photo is stunning. Before taking up psychology I studied architecture and this is better than the models we used to make as professionals.
Thanks David, yes my first models were also buildings to place next to my H0 train set. I always liked architecture, it's actually a miracle I became a physicist instead... In physics you also build models - albeit mathematical - to describe nature so maybe there is some consistency... In plastic modeling, I use physics of hydrodynamics to determine the distribution of track grease and mud on my tanks 😛
Goodnight!
Today I found time to do some sanding on yesterday's putty job.
I then focused on the roof covering and fitted the small square ornaments underneath the overhang. There are 37 in total and lining them out was a bit of work. The result looks good!
I also fitted the last steps on the staircase, which needed some care because it required leveling out some of the construction underneath. Now I need to focus on the door frames to the entrance hall. I hope to find some time over the weekend to do that.
Hope you like the progress, comments are welcome!
Happy modeling!
Hello all,
Today I cleaned and sanded the ornaments to fit above the main windows.
I dropped some email varnish into the inner cusp of the iron crosses. Left to do is the door openings and the casings for the ornaments. I will construct a jig to make the latter.
Stay tuned!
Michel.
Great progress here, Michel. Terrific engineering and a lot of patience, a winning combination.
The question over the 'Hakenkreuz' is an interesting one. I've written a little of my thoughts elsewhere and I can completely understand why people won't use them. I think these hate symbols are exactly that; the emblem of a failed fascist ideology of intolerance, anger, and violence. The important word being 'failed'.
Looking forward to see the direction you take this audacious build.
Michel, better and better! Just incredible workmanship!
Thanks Bernard and David,
I finished the main construction steps with the detail on the entrance. It's a detail for you but it is closely intertwined with the doors, which I will print 3D.
Here is a picture of the current status:
Only the ornaments need to be fitted now so I made a jig for that. Over the next days I'll start to produce them "in series" 🙂 as I need ten of them...
I experimented with the paint steps. Right now I think the best course of action will be:
(in order of application)
This should do the job. Most critical will be the sanding and "texturing". I am trying some methods to enhance the appearance of individual slabs of sand stone covering using pre-shading technique.
Stay tuned my friends!
Hi all,
Made the jig for the ornament covers above the main windows and started to "mass produce" them.
Here is a picture.
Left you can see the arranged 3D printed parts with one of the finished covers. The jig assures dimensional equivalence of parts that are to be produced in multiples. It takes a bit of work to assemble the jig but it pays off in terms of speed of assembly later. As you know, most mass produced aircraft and vehicles are constructed this way.
Hope you like it, won't be long now before I can start the paintjob. Looking fwd to that!
Happy modeling!
Hi all,
Today I found some time to apply the first layer of wood finish.
After this is set, an extensive sanding job must follow. I do this outside (thanks to the nice weather) for the smell and dust is not preferred in my workspace...
Application of wood finish makes Balsa rock hard. The fact is that this type of wood is highly hygroscopic (it sucks water and other fluids almost like a sponge). So upon application of finish, the cavities in the Balsa fill up with the liquid which then sets to make the structure almost as hard as glass. There is a secondary advantage in the form of static electricity which erects the little chunks of wood on the surface. After the finish sets, you can sand the wood as smooth as baby skin. Wood finish prepares for the later paintjob with acrylics.
Most of the main parts of the building are now finished, except the doors I still need to print.
I hope the weather will stay as it is in the forthcoming days so I can make this one move forward further!
Happy modeling!
Hello all,
I applied only one layer of wood finish as the result was already good after one pass. Now I proceeded covering with thinned MDF filler. You can see the weather is still fine so I did that outside 🙂
Another extensive sanding job is next!
Enjoy the weekend! Michel.
Michel, they say there is a fine line between gifted and crazy. I'd say that there's a craziness in taking a project like this on, but you are one of the few gifted enough to carry it through. Even so, I'm a little nervous watching, like those people who watched the construction of the Eiffel Tower, not quite believing what they were seeing.
Fantastic work, Michel.
Hi everyone!
I continued a bit on the plastic, the weather was so nice I went for some outdoor activity. Lest we forget this site is also about plastic modeling, so I continued to work on the ICM Opel Admiral Saloon as one of the vehicles that will come with the dio on the air ministry.
This kit really goes together like a charm and is well engineered. As with most passenger cars of the 1930-ies there is a lot of chrome parts but - in this kit - they almost all come as separate parts, simplifying the paintjob. Status of the vehicle is that I assembled most of the bodywork apart from the roof. I will add the latter permanently after the painting of the interior is done. None of the clear or chromium parts have been assembled yet.
I always had in mind that this dio should impress the viewer by means of the - in my humble view - overwhelming size and design of the building. The straight lines, with emphasis on the vertical buildup, give it an impressive look, at least to me. How about you?
Mind the relative size of the car and the building! Yes, they are same scale 1:35!
Hope you start to get the idea of this project!
Happy modeling.
@David: thanks for your comments, maybe I just shed some more light. Some friend of me read your comment and let me know he expects me to build the Eiffel tower now in 1:35th scale 😀
The perspective shots are stunning and I can only imagine the impact it will have on completion. I have to admit for me, there's something of the book depository in Dallas, '63 in this project (maybe a future diorama with a 1/35 Lee Harvey Oswald - perhaps after the Eiffel Tower build?)
Huge respect for this, Michel. Huge.
Michel, marvelous work! That is a fine looking car. I've always had a yen for late Thirties vehicles. In this country, the airflo look, streamlined, art deco and chromed grilles. I'd have hated to write an estimate on a front end collision, but real good looking! Official buildings, seems to me, try for intimidation and power projection.
Thanks for your reply my friends! I try and continue over the weekend, sanding on the building and maybe applying some primer. I haven't totally figured out the painting steps on the car yet (interior & exterior have different color) but at least that gives me something to think about when not at the bench...
Happy modeling!
@David: With every completed build comes the question where to put it. In this case I think I will attach it to a wall instead of the Picasso that is there now (it's not a real one FYI). The Eiffel tower would pose serious problems as almost 9 meters high... I have no space for that...
Hi everyone,
I expect to work on the building later this week. It still needs a bit of prepping and sanding before the final paintjob.
Meanwhile, I continued the work on the car a bit. I assembled the body and restored a nasty seam between the windscreen and the roof. It worked out ok, I just use car bodywork putty and grade 200 sandpaper.
After that, I applied some more layers of primer and have now given it the first layer of laquer. It probably will take two more. In any event I wanted to share the progress here already. All other parts have been painted and the chassis and engine have been married, hurrah!
I keep you posted!
Happy modeling!
This baby just had its second layer of white dull primer. Now I wait till that has set and I can start the main paint job involving the texturing. So far I'm happy about this project: The lines and dimensions are within my tolerance thanks to intensive measuring throughout the build.
The sanding job was certainly the most demanding one as some areas were not easy to reach. It took me about a year (scaled in 1:35) and now it starts to converge
On the plastic front: All parts of the Opel are done, I also started to assemble the figurines. However, since I used some rattle-can chrome I need to wait until that's set. It appears to me that this kind of paint needs weeks to dry. You better be patient on this one...
I hope you are learning something from this thread!
Happy modeling!
Looking better every post. That chrome paint job is mighty impressive, Michel. Wonderful, patient, and precise work. Kudos to you. Looks as though this could be perfect mounted on a (nice, big) wall - was that your intention from the start?
Yes. I'm still negotiating which wall but that is the idea!
More and more impressive!
Very impressive work Michel! Having spent several years building models in Architecture school, I appreciate the attention to details. I'm sure the final product will bring you great satisfaction.
Thanks James! Appreciated and... I keep you posted!
Hi all,
Today, I continued with another vehicle for this dio. It is MasterBox' #35113 Mercedes 170 military car. This kit is highly detailed, the engine to it is a highly detailed kit on its own. I finished all steps for the engine and chassis and started the bodywork now.
Comparing this kit with the ICM Opel leaves me with some remarks. There is some flash here and there (with ICM kit there is none) and ejection marks are sometimes located there where later construction steps require you to remove them in order to ensure a correct fit. Masterbox also has the habit of packing all sprues (three in grey styrene plus the main body parts and one in clear plastic) into one single plastic bag. With small, intricate parts and stiff styrene, this practice is a recipe for trouble. Add to that that this box is not as sturdy, you get the idea.
In my case the main body part was slightly warped even. I believe however I've been able to bend it in shape again, fingers x-ed. Some of the parts are so fragile you need to take utmost care not to break them when removing them from the sprue. I used the 'hot knife' trick multiple times...
Again, ICM soft skin vehicles are renown for their detail and accuracy, so if you use these kits as a benchmark, most others manufacturers fall behind so let's not be too negative: The kit is one of the better cracks at this popular 1930-ies personell car. I will add some PE (Part) to detail it some more, I have everything there!
Here are some pictures. Tomorrow is May-day so - not being a die-hard socialist - I think I will try and paint the building for a change after I finished the main construction on the 170.
Hope you enjoy the progress! Comments welcome!
Happy modeling!
Michel.
Today I applied the first layer of acrylic paint using the sponge technique. I chose gold-yellow to give it this natural sandstone glitter effect. Mind this is only the first layer. Tomorrow I try and advance some more. I'm happy to see this one converging somehow 🙂
Happy modeling!
Closing in on the endgame!
Last few days I inscribed the cover stones with a fine permanent marker. This was done on the gold undercoat because my 50 cents were that the acrylic "texture paint" would be translucent and show off the lining well...
It worked!
I mixed a color resembling the actual Detlev-Rohwedder Haus from white, sand, black and brown acrylic paint from the tube. With the sponge technique this nicely blended even into some slight 3D texture. So I'm happy. I now let dry and go out enjoy the fab weather we had in the last couple of days. I think I go for a little stroll in my electric T (of course it has "109" in the license plate in honor of my favorite German plane!)
Next are some finishing steps, the stairs, final sanding, covering the square with photopaper, dullcote and weathering. Plenty of interesting stuff I would say. Stay tuned, won't be long now!
Happy modeling!
Michel.
PS: Every imodeler friend who visits me in Belgium can get a free ride on this one! Wizzzz...
Great progress, Michel, and a fantastic finish on the Admiral. Beautiful work.
Michel, it really is looking more and more real! Nice looking ride you have there!
Thanks guys!
I thought about my plane-loving friends here and took thie picture in the afternoon. It's an early Hawker Hunter of the Belgian Air Force on display on a pivot near Chièvres in the Walloon area (South) of Belgium. Dunno whether there is an A/M decal set but... Enjoy!
Today I fixed the ornaments.
They were 3D printed and then primered, painted black (all from the rattle can) and subsequently dry brushed with dark steel. I lined them out and attached them to the building with CA glue.
I'm quite pleased where this is going... Almost done. Looks almost like the real thing...
Next is the stairs, the tiles on the square and balcony finish.
Hope you enjoy it.
Happy modeling!
Outstanding work. Great modeling. I could go on (I've been known to...) with adjectives but the work speaks for itself, Michel. Wonderfully realised.