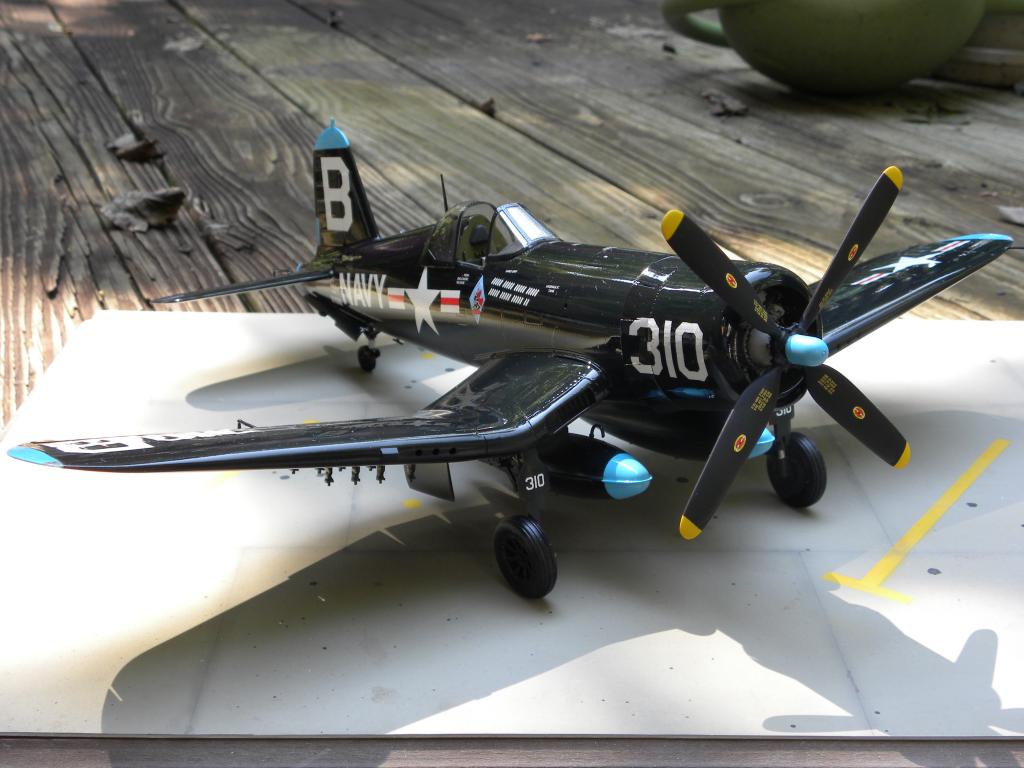
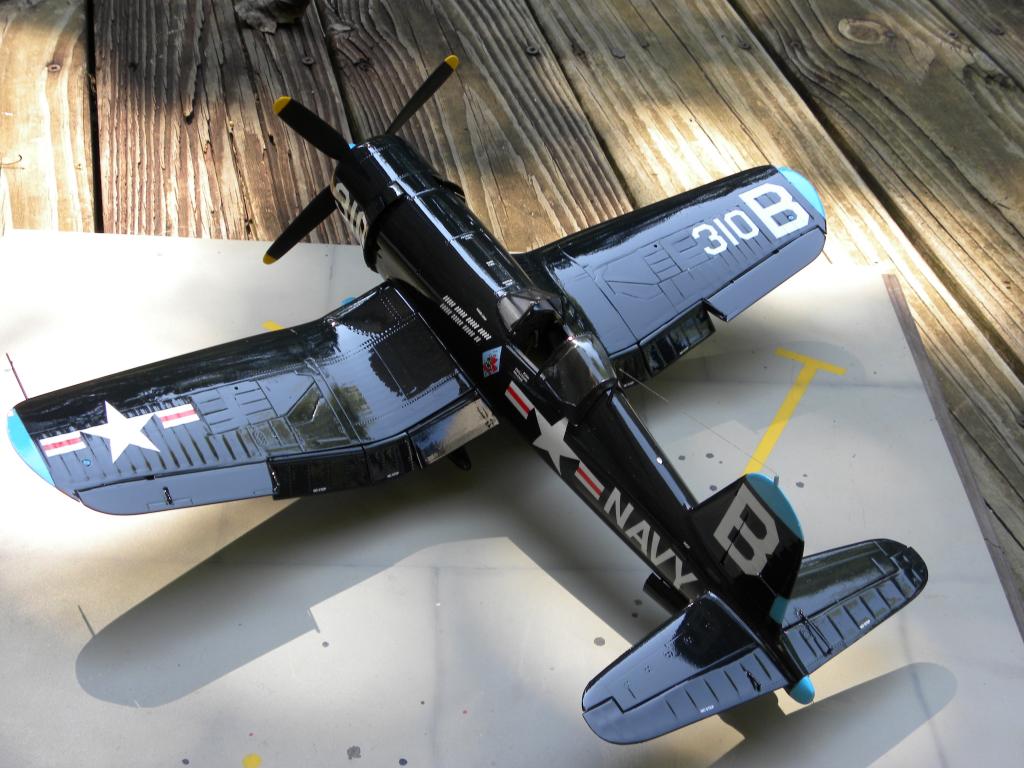
1/32 F4u4

The kit was built out of the box. The decals are Superscale.It took 2 sheets to do the aircraft properly as one sheet only gives you enough markings for one side of the aircraft, not to mention some sizing issues, but the with 2 sheets you can make it happen.
The build was straight forward. Not folding the wings made for a bit more work and the flap metal parts blow.I recommend not using the metal parts and setting the flaps up with glue and plastic. The paint was Tamiya and the gloss was Mr. color gloss out of the rattle can.
Thanks,
Rob


Very presentable. And wow, that's a LOT of gloss! I'll be adding that product to my shopping list. Did you use just one coat, or several?
I did it in several coats...prior to decal and post decal...the mr. gloss stuff sprays really well and is dry in about a half hour. I choose to wait over night on drying time though. One thing...this stuff is really hot...if the paint is not dry or you go to heavy this stuff will crack it. If you go to heavy over decals I have seen this stuff krinkle or eat the decals. Practice up before you use on the "show stopper". Once you get it down, this stuff is great.
Now that I've taken of my sunglasses...:) , I've got a question. A decal sheet that provided only enough decals for ONE SIDE ?! I've never heard of such a thing. That "factory-fresh" paint job is killer! Nice work.
On the decal...perhaps Superscale's research was off.
A breakdown of the Decal issues;
The sheet only gives you the art and and mission markings for one side. I found a color photo on sale on ebay of all places of this exact bird to go with a black and white of the other side and the color markings/mission marks were clearly on both sides
1.Extra art an misson marks second sheet
The "B" on the tail is pretty good, however the "B" on the wing is way to small.Again I found a pick of these birds, wings folded,with the larger style "B" on the wing
The "310" on the outer wing...was also painted under the wing just behind guns on the leading edge . I assume this is so you could find a particular bird in a sea of folded wing aircraft on the deck. Once again from pics of these birds with the wings folded.
3.I need a total on 3 "310s" and the sheet only provided 2
Last but not least from the same folded wing pics. The bird had navy under the wing not "B310"
All in all your are going to need two sheets to get it right...or at least close.
The USN never had planes that looked like that. They came off the assembly line with chipped paint, worn and faded wings and insignia and exhaust stains even in the wheel wells. Don't tell me different because I had a relative that worked at Vought aircraft and his job was to make the completed aircraft look like it had a thousand front line combat hours. Other members of his team would apply rust paint as needed and one guy (Lefty) would bang the prop with a sledge hammer to give it that "bumped- into-something-on-the-flight-deck-look". Otherwise I guess your model is O. K.
Mike, your suggesting that Vought were sending out aircraft that were pre aged and with props that had been whacked with a hammer , WHY would they do that and why would the USN accept them, Cmon get real
N.
My British cousin,
I would think you'd understand a bit of humor from outrageous satire delivered in a "deadpan" way... I thought the part about applying "rust paint" was self evident as being a poke at the builders that need to weather every model they build. Rob's plane is most excellent in "factory fresh" appearence, and I would NEVER insult a builder's work. You need to appreciate a bit of Yankee humor the same way I "get" Monty Python, nudge nudge, wink wink. Cherrio, old Bean!
Sorry Mike , Unfortunately I tend to get on the computer after a couple of hours in the pub which I really must stop doing! it's now the morning after the night before and I get it now ,nudge nudge wink wink you were just joking right?
N.
Hey S I did it again!
I should point out Nov 5th is a bit of a celebration night here in Blighty.
N.
Is that where the Japanese got the idea of using all those chips in their paintwork? Mike, I think you should have waited until April 1st for that! Nice model by the way, Rob.
Nice! Brave to go with a finish that will show all faults and imperfections in both the build and finish - looks to me like you nailed it, looks flawless to me!
BTW, I think Mike's comment above was meant to be tongue-in-cheek.
Looks sharp! Well done.
Did you use Tamiya lacquer spray paint for the sea blue color?
I used the acrylic sea blue out of the rack thinned with mr color leveling thinner. The paint was sprayed through an airbrush.
Rob
Very nice work, Rob.
Super finish!
OK thats a very nice jewel. It is the Trumpeter kit, isn't it?
Holy smokes! That's some Glossy Sea Blue goodness, right there!
Very nice model, great gloss. Maybe if you decanted that "hot" stuff it would be less delicate to use?
Rob,
Nice bui,ld. Very shiny. Overall I like it.