1/48 Scale Monogram P-51D Mustang
Well, after over 40 years of building aircraft models, I finally got around to doing one with a natural metal finish. I have always had reservations about doing NM, as I am a brush painter, and I have always heard that you will have to use rattle can or air brush to get a good finish, or use bare metal foil. I have to admit I did learn a lot about doing a NM finish with brush/qtip, as in what paint brand and type to use, as well as how finicky the final finish can be when you are doing the inevitable touch ups. But in the end, the aircraft did not come out all that bad at all, and the apprehension of doing a NM aircraft is gone. In fact, I am now looking forward to doing another one by putting the lessons I learned to good use.
The aircraft that I used for my first NM aircraft was the venerable Monogram P-51D, with decals for Detroit Miss. This is a staple aircraft model of Monogram and Revell, thus there are millions of them out there so I could replace it easily in case I messed this one up.
In the Beginning
Opening up the box, I found that there were not as many parts as I remembered. The cockpit and the wheel wells both had very good detail (the wheel wells were not just holes in the lower wing, they actually had a well area), but most of the panel lines were raised. I did notice that there seemed to be a fair amount of flash, which I thought was a little odd, as this is an original 1977 issue and not a repop with old molds. The cool thing about this model is that you can build it with the lower half of the engine exposed. You could also show the left wing gun bay open as well. After some very light clean up, the fun began.
Construction
Construction began with the cockpit. The cockpit has very good detail straight OOB. I assembled the whole cockpit area (floor, seat, stick, instruments panel) separately, then installed it into the fuselage. The interior cockpit area was painted Pollyscale Interior Green, except for the floor, which was painted Testors Burnt Umber. The tail wheel assembly was painted at this same time. After these assemblies dried, the interior of the tail wheel area was painted Tamiya Zinc Chromate. The Mustang has the air intake right below main fuselage, and there is a small amount of assembly to this. The interior of this area was painted Zinc Chromate, as were the main wheel wells. After the paint dried in these areas, the tail wheel assembly and cockpit section were installed into the main fuselage. When all was judged to be in order, the fuselage was glued together.
While the fuselage was drying, I painted the exposed engine area. I used interior green for the overall area of the engine well, I then painted the engine aluminum, along with assorted other colors showing lines, hoses, spark plug wires, etc. I dry brushed a lot of this detail, and it came out pretty good. At the same time, I painted the lower cowl hood that would have covered this section of the lower engine.
After the fuselage had set for a day or two, the seam work was started, which went very well. You have to try and make sure that the seam work is as flawless as you can get it, as natural metal finishes will show all flaws. So a lot of 1200 grit sand paper was used. While the fuselage was drying, I assembled and painted the drop tanks (the 108 gallon “paper tanks” were the ones supplied with this kit). I also got the landing gear, gear doors, and canopy slide ready and painted. After this was done, the wings were up next.
Because I was going to display the gun bay open, I assembled and painted this area before I installed the top portion of the wings. Again, this area was painted interior green, with the guns themselves being painted Tamiya gun metal. The machine gun belts were painted brass using Testors enamel (I used enamel based paint for the belts because I could not find water based brass color at the time I bought this color. I rarely paint brass, so it works out). After installing the gun section into the wing gun bay using white glue, I put the wing halves together, did the seam work, and mated the wing assembly to the fuselage. After more seam work, the new frontier in painting for me began.
Painting
I have never done a natural metal paint scheme on an aircraft before, and as I am a brush painter, I had a unique challenge. I decided to use the Tamiya Flat Aluminum paint as I had a lot of it for some reason (I don't remember buying two bottles, but I that happens when you get older I guess). Before I painted the NM finish, I painted the ID stripes on the wings and stabilizers with Tamiya Flat Black, which, after drying, were then masked off. At the same time, I painted the nose area using Testors Flat Yellow and the propeller nose spinner. This took a lot of time and paint. The nose was masked off after drying.
I started out using a Testors synthetic brush for the first NM coat, and it worked pretty well. Coverage was OK, but there were spots that got missed. The one thing I did notice with the Tamiya paint was that it seemed to dry really fast. I had noticed this on the Tamiya Yellow Green which I have used for Zinc Chromate color for years, but since I use this color mainly for wheel wells, which are not too prominent, I did not think too much about it. Because the paint dried fast, there were more brush strokes that I usually have. I sanded these down with worn 1200 grit sand paper, and repainted.
For the second coat, I did my Qtip method I usually use. This coat went down OK as well, but I did notice that there were areas that looked like it had bubbles in it. I am not sure why this occurred, but they had to be all sanded down, and redone. In some cases, this took two or three tries to get it right, and even then I had to go back to the brush to smooth some of the areas out. Ironically, the areas where I had done seam work, which worried me the most, came out very good, with little to no extra work at all.
After finally getting the paint job at an acceptable level, it was off to give this bird a personality.
Decaling and Weathering
The decals I used were the kit decals that came with the model, which as mentioned above, was Detroit Miss. After making sure the model was as dust and dirt free as possible, I sprayed a layer of Glosscote straight out of the can. After letting the Glosscote dry for a day, the decaling phase began.
The decals were in very good shape, considering their age, but they did have a lot of glue, which is typical for decals of this era. There are a fair amount of warning stencils, so you have to pay attention on where they should be on the aircraft, as the model instructions are small, and not easy to read. You are also supposed to paint D-Day stripes on the lower fuselage, but I didn't do this has I have always disliked D-Day stripes. Also, this aircraft is depicted as it was after the invasion, so I did not bother.
The decals went down very nice and they all reacted quite well with Microset and Microsol. After making sure the decals were set, I covered everything with another layer of Glosscote to seal the decals and cover any silvering that might have occurred. After a few days for the Glosscote to dry, I laid down a good layer of Dullcote to seal both decals and paint. I had a debate with myself about the Dullcote, as most model magazines and websites show a shiny NM finish, with very minimal weathering. I tried using a semi-gloss, but it did not seem to be much different from the regular gloss. I then consulted the web and the Squadron Signal P-51 in Action book, and saw that many NM aircraft in the ETO acquired a dullish finish, thus I went with the Dullcote. I did try to keep the lower parts of the aircraft gloss, but it looked odd, so I did the whole kit as matte.
After the flat coat was laid down, the usual weathering process, which would have involved dry brushing high wear areas with Flat Aluminum, did not apply in this case, although I did do some aluminum weathering on the ID stripes and the nose area. I did do exhaust and gun powder staining, as well as fuel spills. I also did a dry brush of grimy black over the whole model. Lately, I have gone with this method to depict a light grimy overall appearance vs. the grimy wash I used to do. I think it looks a little more realistic, especially on American aircraft. A light dry brushing of mud on the lower wings, rear fuselage, and back wheel area was also applied. I then did a dry brushing of grimy black over most of the decals to tone them down.
Final Assembly
After the final weathering, I painted the canopy slide that the bubble canopy sits on (no canopy lines!), installed the canopy (in the open position) with Microscale White glue, and did the inevitable last minute touch ups. After all was judged to be in order, my first Natural Metal Bird took her place on the display shelf.
Conclusions
As I stated in the beginning of this article, this is my first natural metal aircraft. A lot of the apprehension about doing a NM finish are gone, but I did learn that brush painting this type of finish in this scale takes planning and a bit of trial and error learning. I also learned that certain types of paints work better than others in this type of painting. I discovered by accident that the Testors brand of acrylic Silver seemed to lay down better than the Tamiya version did (I discovered this when I wanted to try out the Testors Silver I had bought on the drop tanks. Not only did it lay down without drying to quickly, it looks exactly the same), so I will be trying the Testors brand out on the next NM bird to see how it works.
After finishing this aircraft, I could not believe that it took me over 40 years to actually do a natural metal finish. It is not as bad, nor does it look as horrible as I imagined it would look, and now I have a whole new paint scheme to play with.
Until next time…
Copyright Kipling Mitchell © All Rights Reserved.
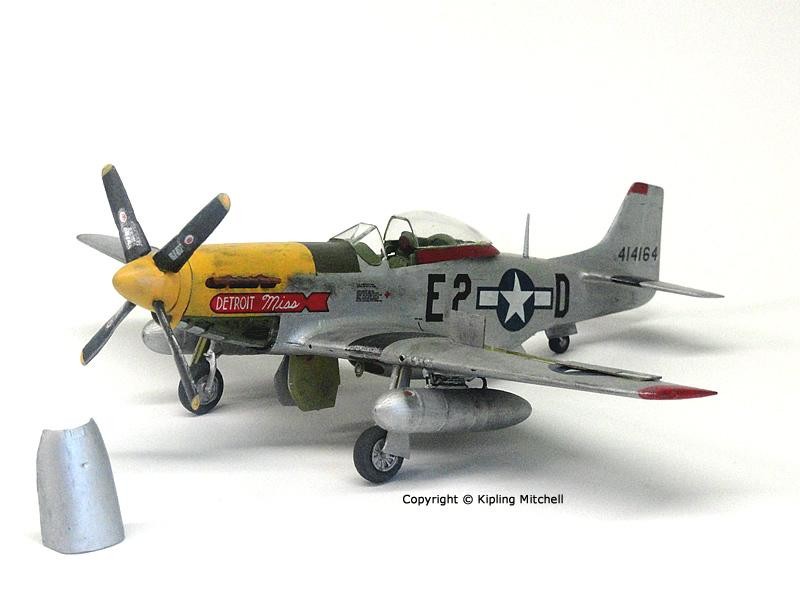

Always nice to see these Monogram Kits Kipling - their P 51 D was a mandatory part of my collection as a boy in the 60's - thanks
Nicely finished and photographed, sir...can't go wrong with those "old" Monogram offerings IMO.
Absolutely awesome brush work! Well done. Monogram kits can still hold their own against the latest kits. They only need TLC.
Nice work on brushing the NMF. Years ago, I also brush painted Testors Silver on several builds, but never could really get the result I wanted. I eventually gave up brushing NMF and use MM rattle can metalizer when I venture into NMF. I try not to do NMF very often, as it's still more difficult without an airbrush to get panel variations, weathering, etc. with NMF. I applaud the fact that you finally tackled it, after 40 years!
Inspiring! It looks so natural..
Nicely done, still a great build
What paint did you use?
Nice work.
Good Morning,
I generally use acrylic paints on all my builds. In this case, the NM coat was Tamiya Flat Aluminum acrylic. The black and red colors were Testors Model Master Acrylics, and the yellow was some older Pollyscale acrylic I had left over from years ago. The interior green was Model Master, and the zinc chromate was Tamiya yellow-green, both being acrylics.
Hi there,
I'm putting together a book on the P-51 Mustang for a UK-based publisher. I would like to ask your permission to use images of your Monogram build as well as extracts from your review. Please get in touch at kerrincocks@gmail.com.
Many thanks
Kerrin