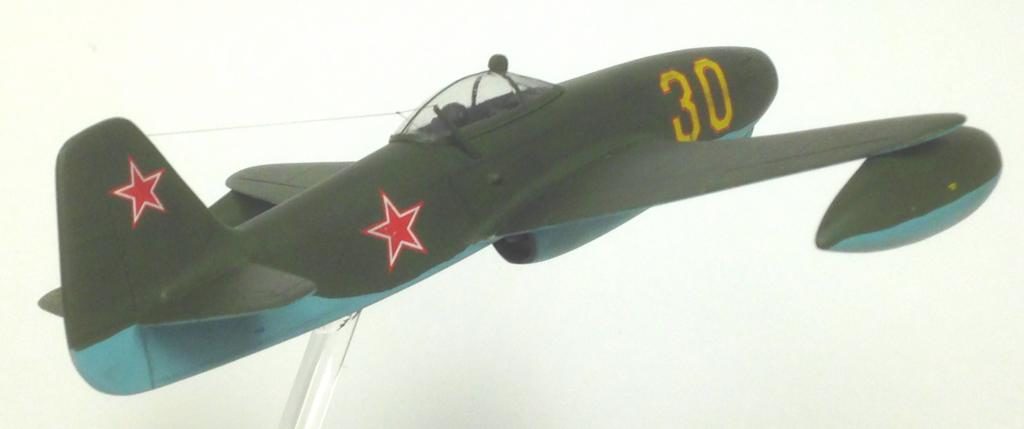
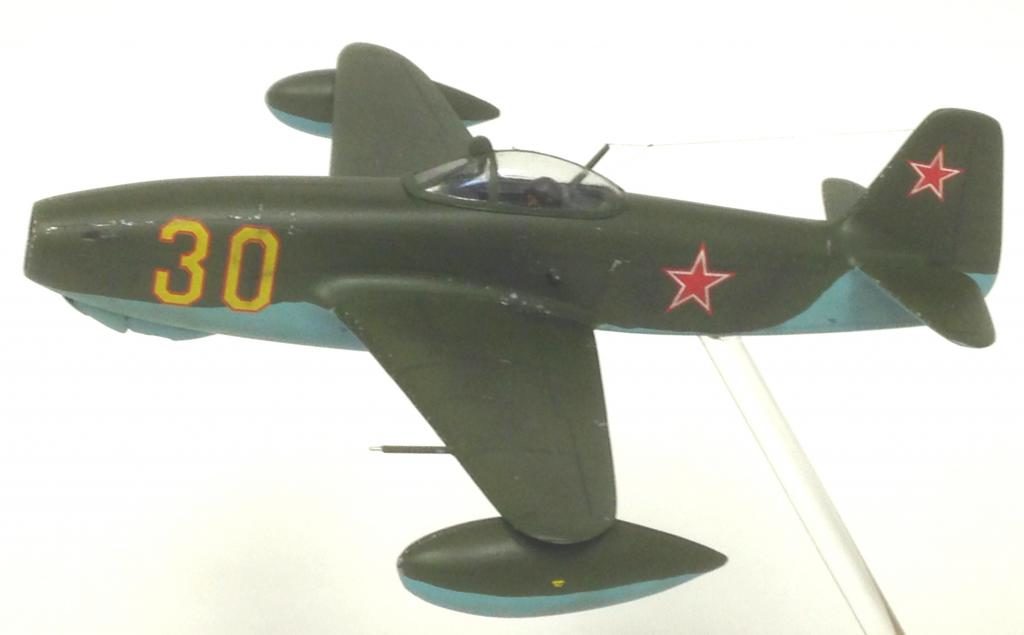
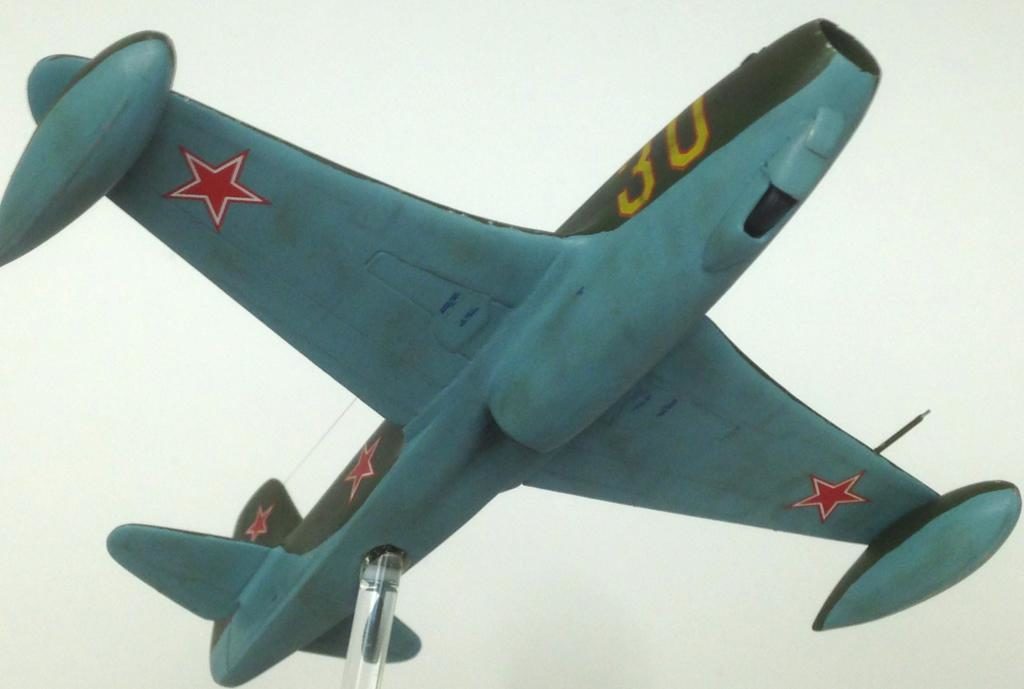
Special Hobby 1/72 Yak-17
Several months ago, a modeler in Tulsa passed away, and his family donated the kits to our club asking that we pass them on to modelers who would build (rather than sell) the kits. We ended up distributing the kits to our club members and others on our mailing list, a modeling club at a local school, and a place called the Coffee Bunker - which is a hang-out for vets. I took several of the 1/72 aircraft offerings, and this Yak-17 was among them.
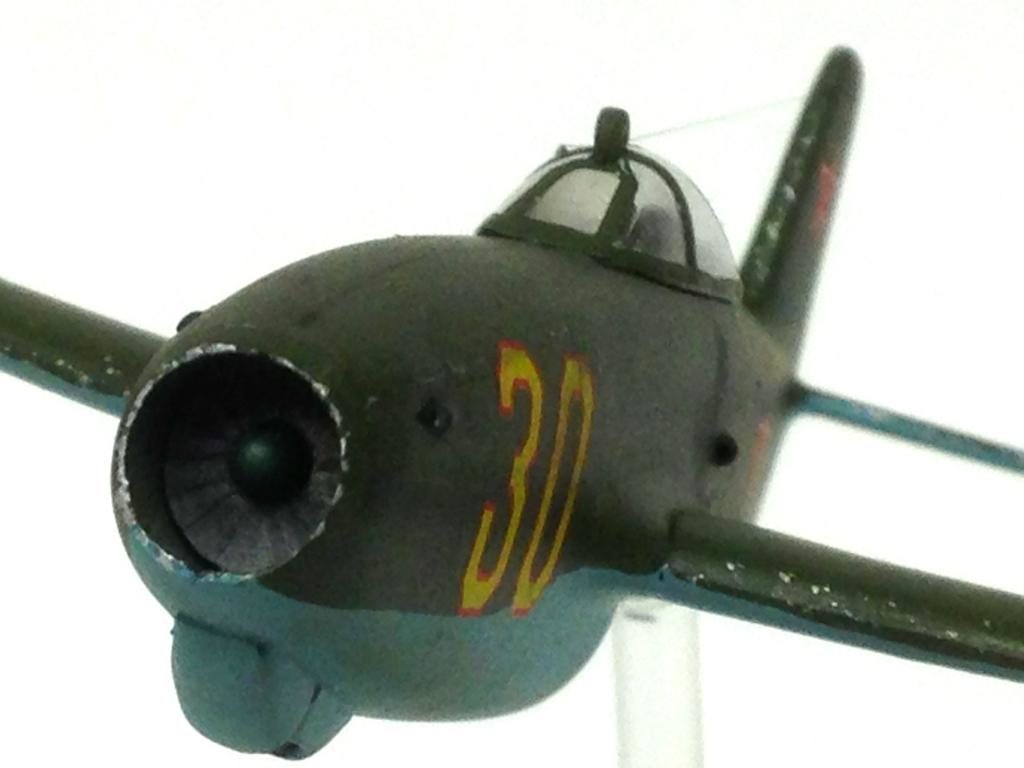
I had not built a Special Hobby kit to date. Short run kit with some resin cockpit details in the box. I used all but one piece of the resin (some type of canopy spanner or something - it wasn't real clear where it was supposed to go, and I didn't see it on reference photos). Once installed and closed up, it is hard to see, but does provide an impressionistic view of cockpit detail! I added a pilot figure from PJ Productions, and scratch built some canopy deck detail behind the seat. It ended up that the pilot sat a bit too low in the seat, but I had to close up the fuselage with the pilot installed, and once glued together, I couldn't really fix the situation.
I'm not a fan of vac-formed canopies - because I brush paint, the paint doesn't adhere well to the different type of plastic. I also don't like the tedious work of trimming and filing them down to shape. They are thinner/clearer, so it's a trade off.
Took a bit of work shaping the fore and aft engine blade pieces to get them to fit and close off properly. Once I got the fuselage closed off, most of the other parts went together fairly quickly. As usual, it took a bit of effort to get the gear doors to fit well, since they are not made to be closed - especially the nose gear set, which is really unusual on this aircraft. I had no real reference photos of a "gear up" aircraft - only a few illustrations - so had to guess at how the front part of the nose gear hump fit. I'm thinking it's a bit too thick and in real life probably sat down much more streamlined to the hump.
I did drill out the gun ports and added sprue barrels, and drilled out the intakes under the canopy on the sides of the fuselage. I added the pitot tube since the kit didn't include it, and used Uschi rigging thread for the aerial rigging.
Bottom color was mixture of MM blue shaded with some green, and the top color was Vallejo Russian Green shaded back with some white (and something else - don't remember). Post shading as usual with pastel chalk powers. I was going to use oils and dot filtering to break up the monochromatic scheme, but decided to just use pastel chalks as well so I didn't have to apply another round of dullcoat and use another medium for the weathering. It ended up looking pretty realistic, but doesn't show up well with my amateur photography. Also used some of the Tamiya soot after the final top coat for some additional smudging on the wings, and then MM Aluminum paint with sponge and brush for paint chipping. First time using a piece of sponge, and I had the paint heavier than I should have - lesson learned for next time!
The decals are from the kit, and were a bit fragile, but handled well and laid down good with Humbrol DecalFix.
I just realized as I was posting that I forgot to paint the wing-tip lights (red/green). I'll take her back home and add that detail tonight. Whoops!
I've got a Special Hobby Pucara in the stash, and I guess now I know what I'm in for!


I knew that was yours as soon as I saw it (that display stand, donchaknow). 🙂
Yeah - kinda hard to disguise that!
No need for a "disguise" (I kinda like e'm anyway) - besides, ya never [almost never] have to deal with 'fiddly' landing gear. There is, however, the need for trying to make the gear doors fit that sometimes aren't designed to be closed. 🙁
Son of Yak -3 ! I remember the old Pioneer kit. Yours looks lots better!
Nice build ! Hey the pilot could be a short guy. You could probably market those stands of yours.
Looks great Greg. I haven't done a vac form either, but there's a Rare Plane Fairy Fulmar somewhere in the stash. Some day.
Vac form canopy is all I'll every attempt! I'm not interested in an entire aircraft from a vac form kit!
awesome as always, Greg
Fantastic work Greg. You don't see this one built hardly at all.
I'm glad to hear that the collection of model kits went to good use too.
It's always good to get youngsters involved in our hobby. If we don't then eventually the companies that produce our stash piles of plastic will end up like the dinosaurs did...
Two thumbs up my friend.
🙂 ... Greetings ... 🙂 :
That one is a very rare one, thanks for sharing this one Greg.
Very nicely built.
Greg, nice work on this and a very good thing you and your model club did !.
Glad to see I'm not the only one that spots bo-bo's after I post something, Usually cat hairs are my culprit !
Well done, Greg!
Neat looking little plane, nicely finished as usual, Greg.
Rare and well done Greg. Glad you shared it with us.
Nice work