Su-27 Flanker B (1/48 Academy or what’s left of it)
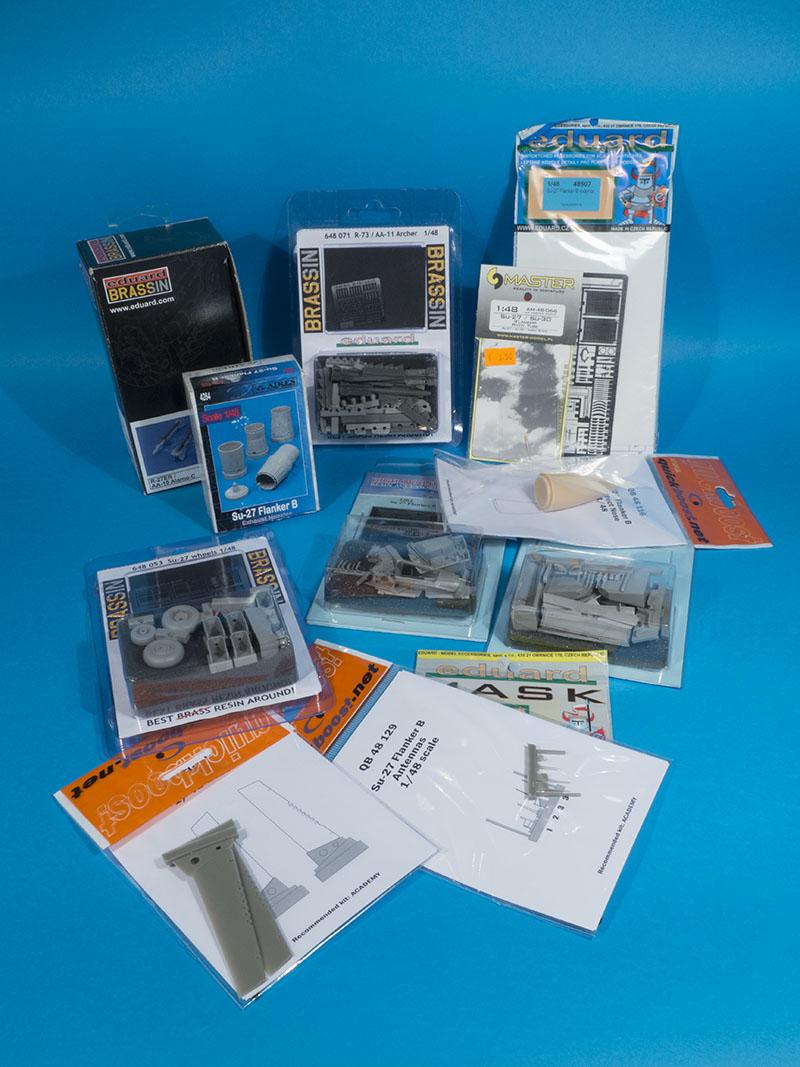
Having bought the original box almost 20 years ago, I never intended to build my flanker out of the box, so during the years the kit box was filled with almost every available aftermarket offering available. And even then I knew that the amount of aftermarket accessories and a lot of elbow grease will be needed to bring this old kit to acceptable standard.
Construction
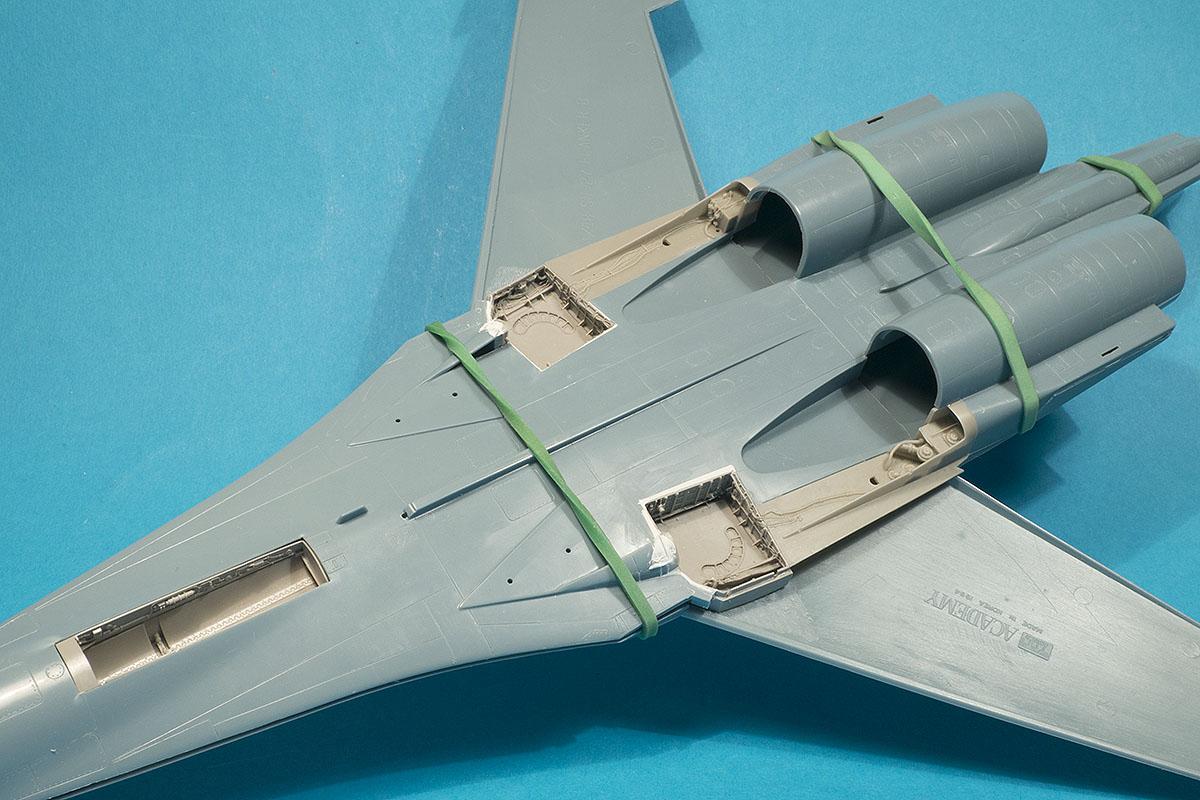
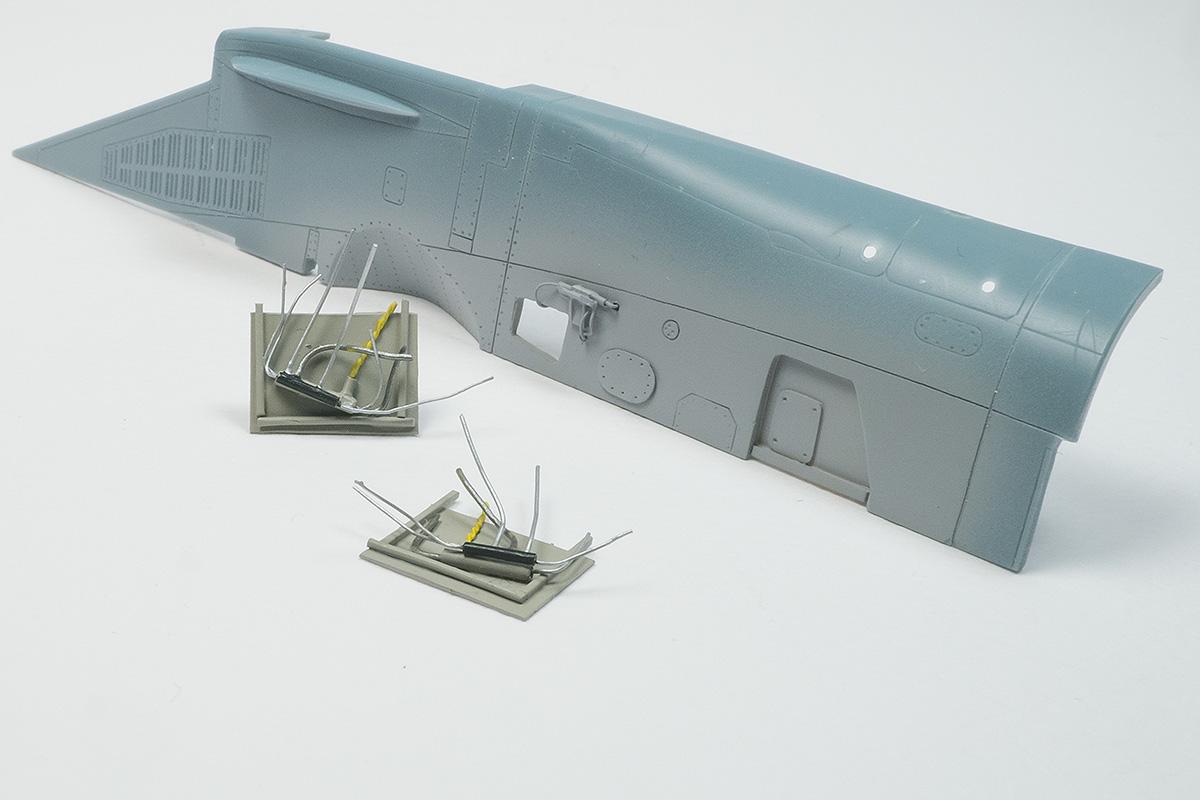
The build started with throwing away almost half of the kit plastic away and trying to figure out how all the resin aftermarket is going to be installed. From the experience I have with resin aftermarket, I knew that the biggest problem will lie in wheel bays, as they usually require a lot of cutting of the kit plastic. I was proven right as I literally had to dismember the bottom section of the kit in three separate pieces in order to install the bays. With them glued back in place with 5-minute epoxy glue and lower portions of the wings reattached, engine intakes were next on the list. They were enhanced with some schratchbuilt items and Eduard photo etched grilles and louvers. Edges of the intakes were also significantly thinned as they were way too thick. As predicted, they didn't fit well to the fuselage, again lots of filler and sanding time was wasted until I was satisfied with the result. Wheelbays and air intakes were painted in Gray-green shade; RLM 02 (C60) was the closest shade of paint that I could match to the reference photos. Small details were then picked out with a brush, dark green wash and some light drybrushing completed this step of the build.
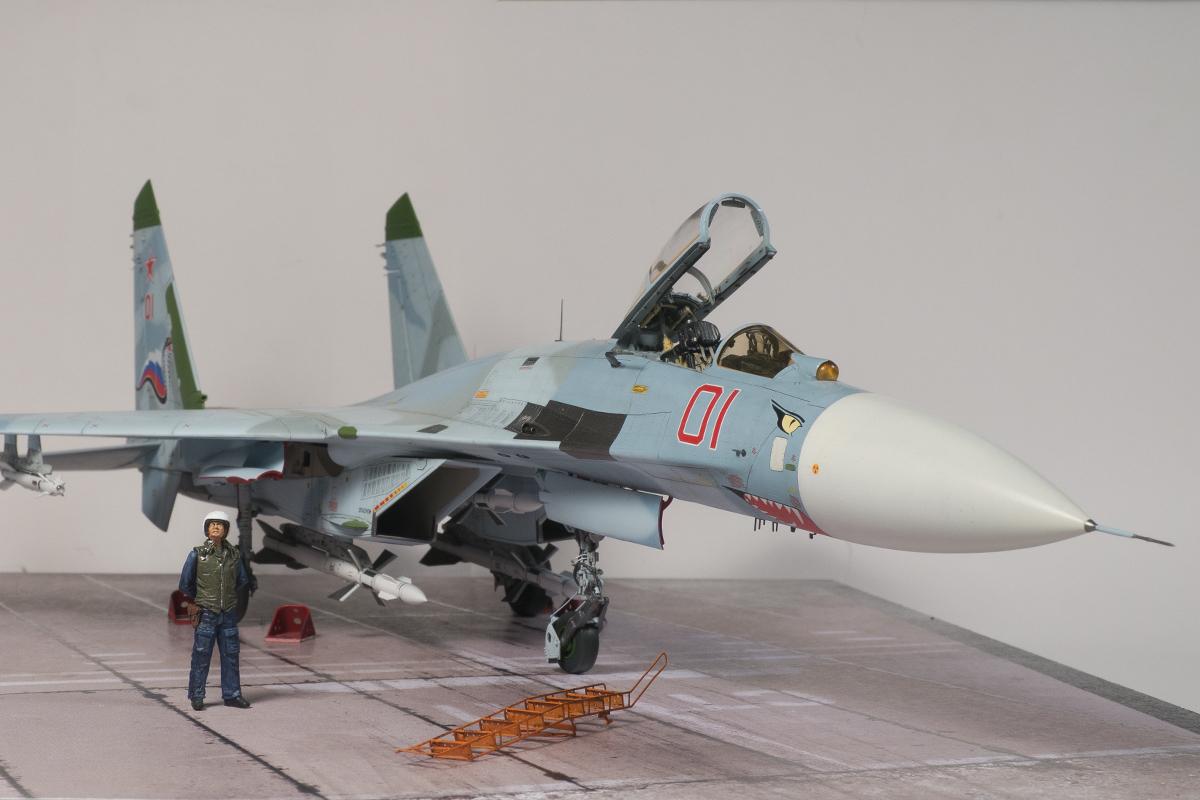
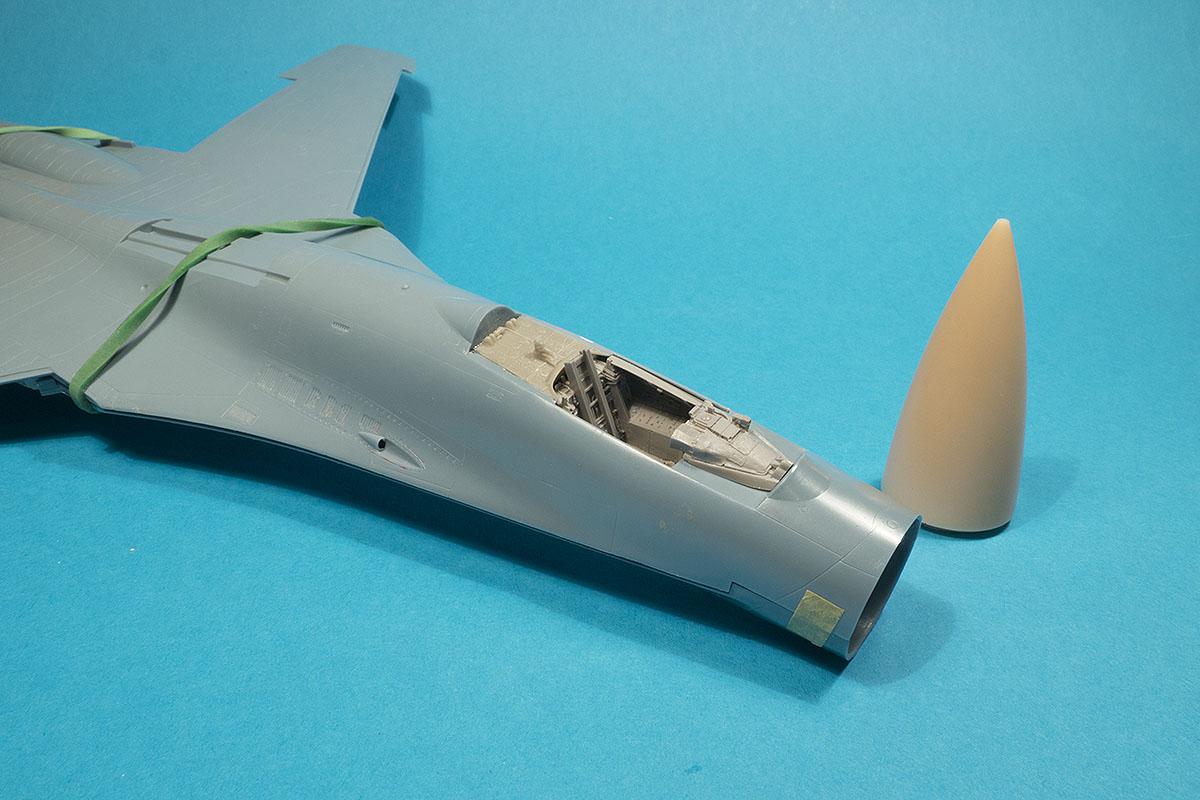
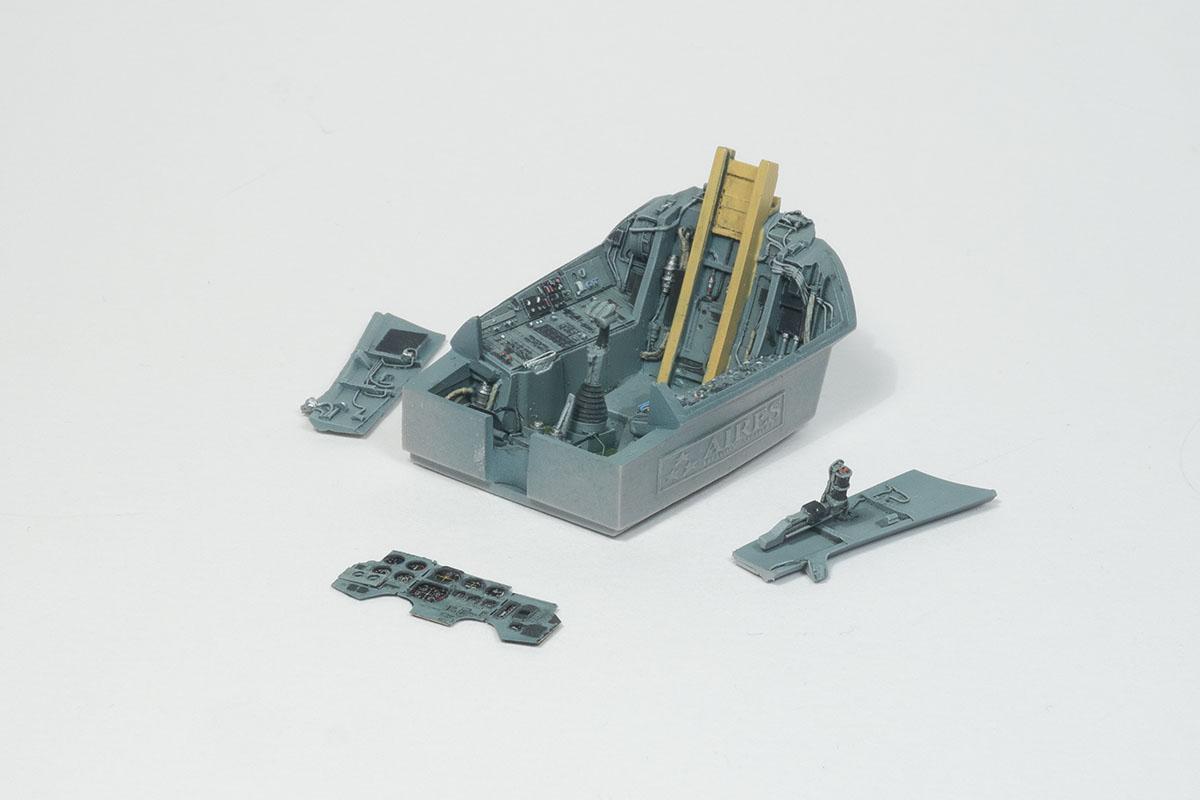
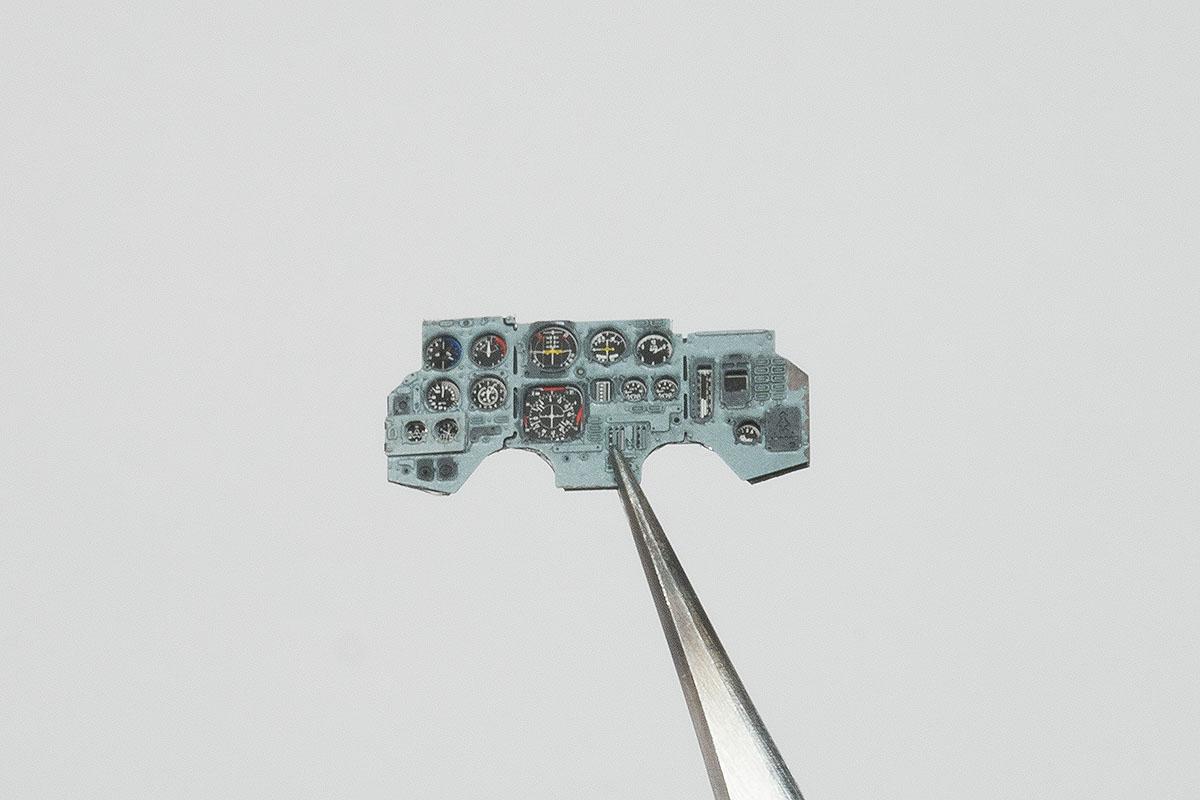
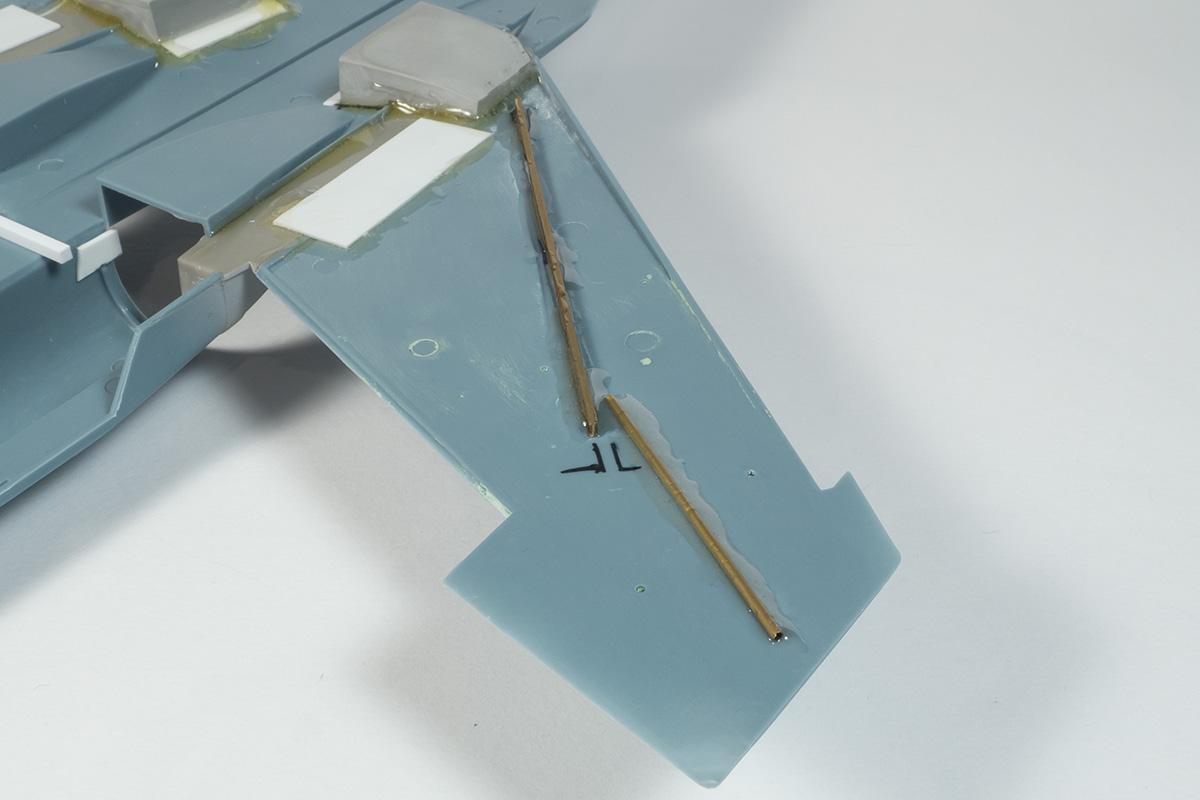
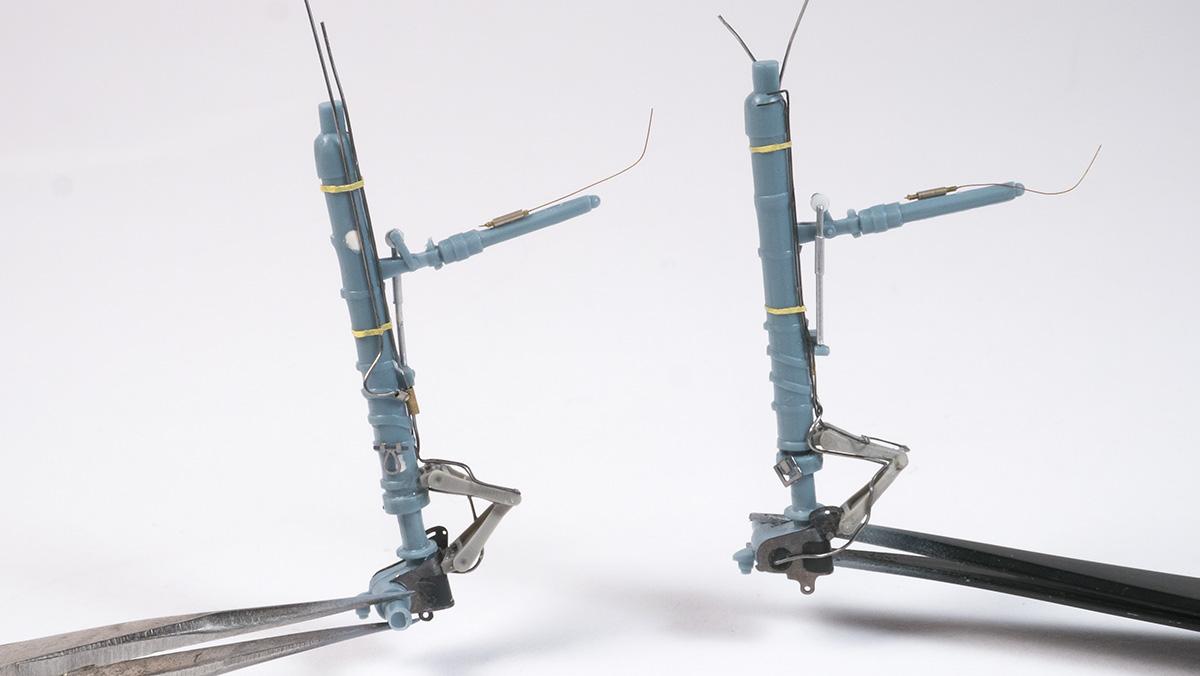
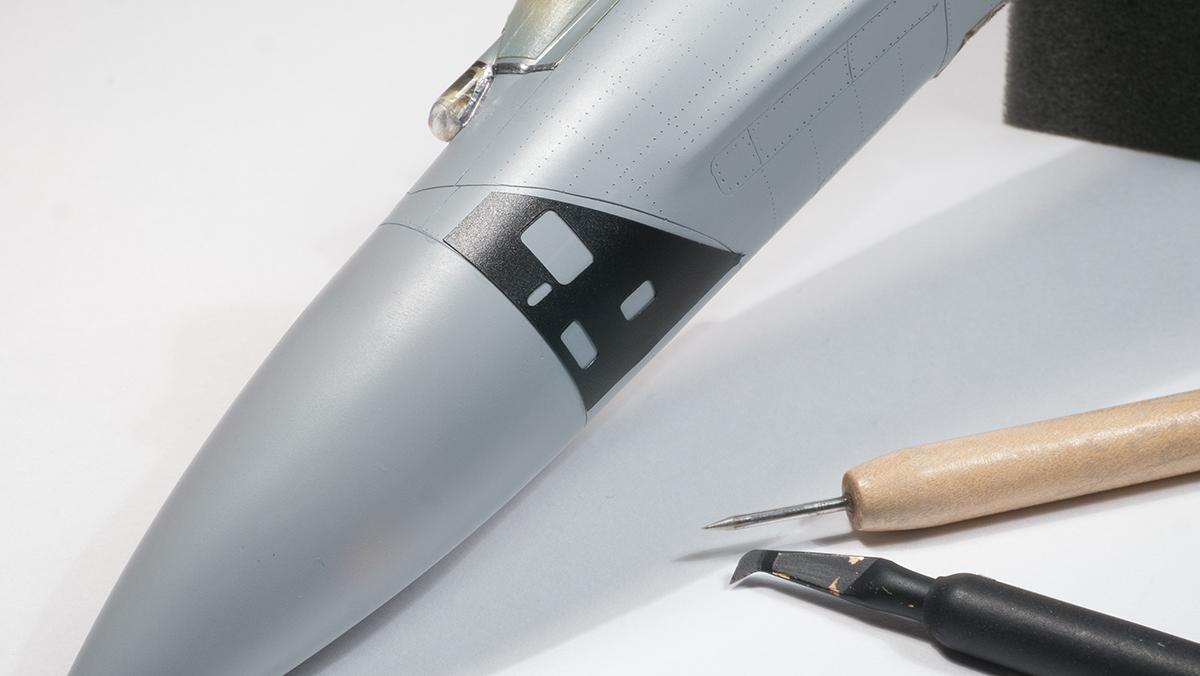
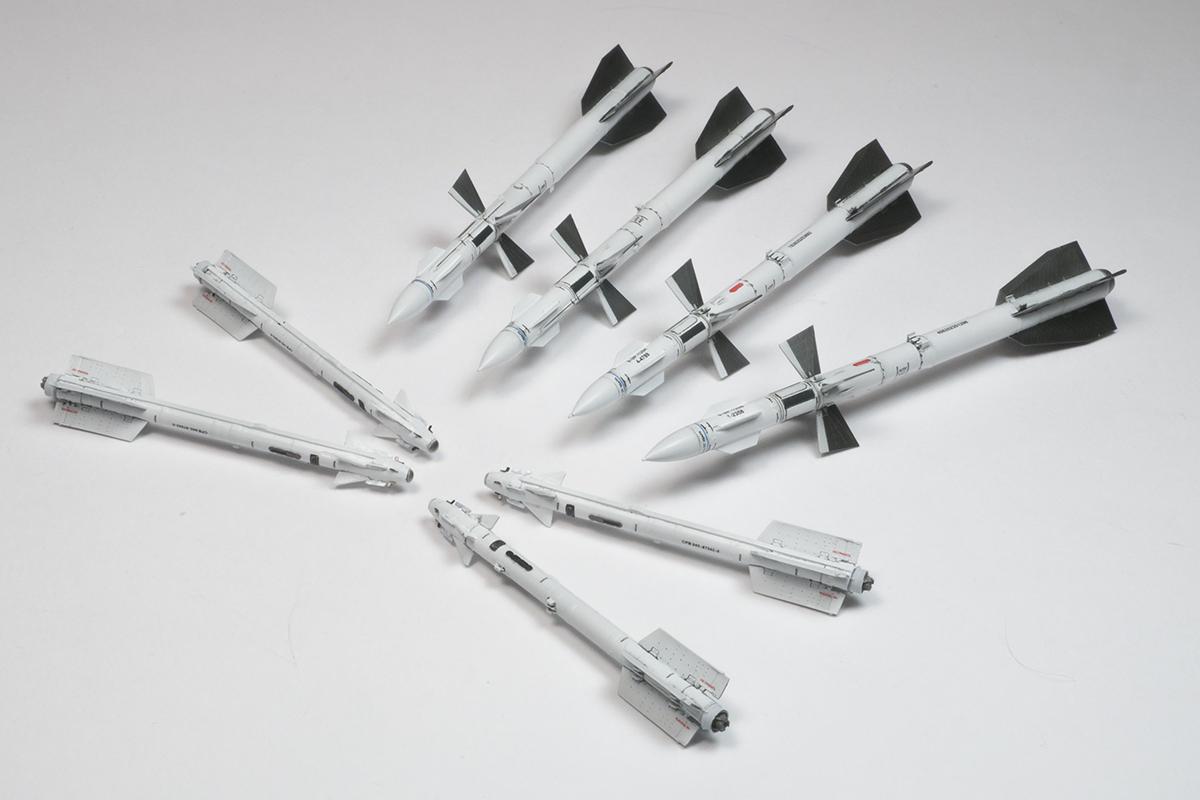
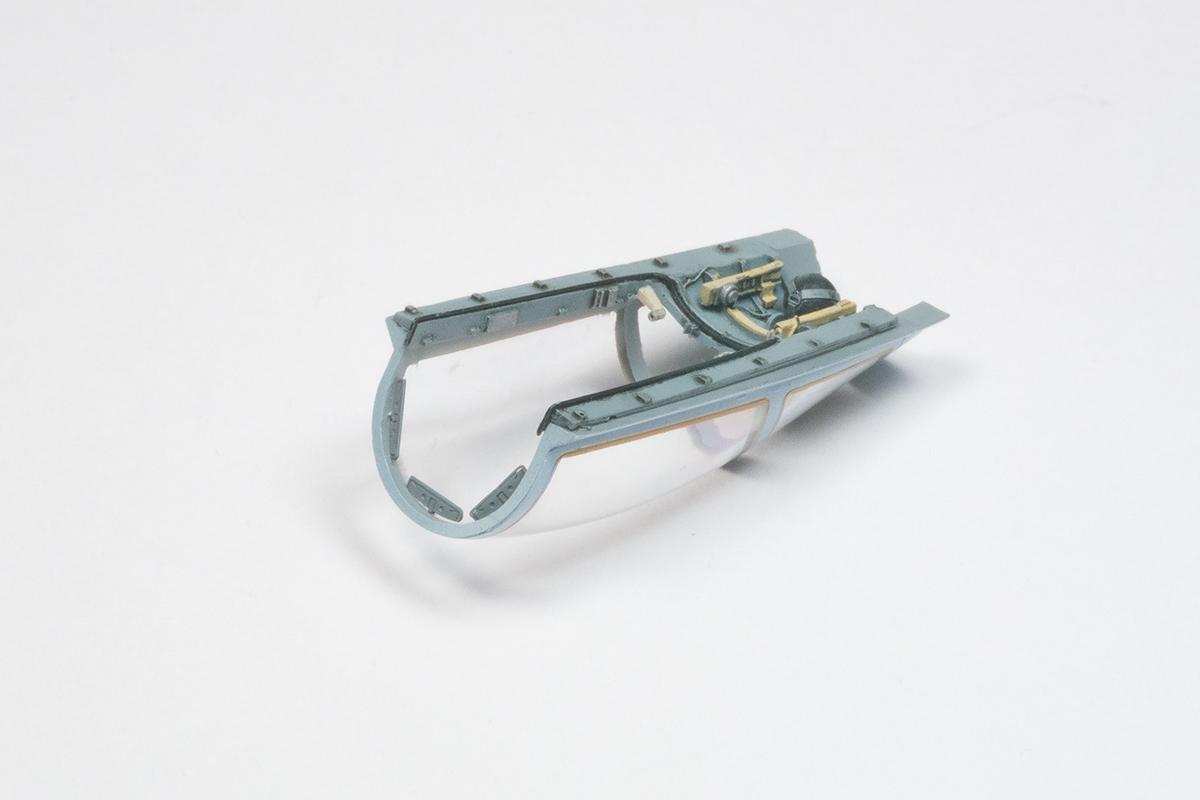
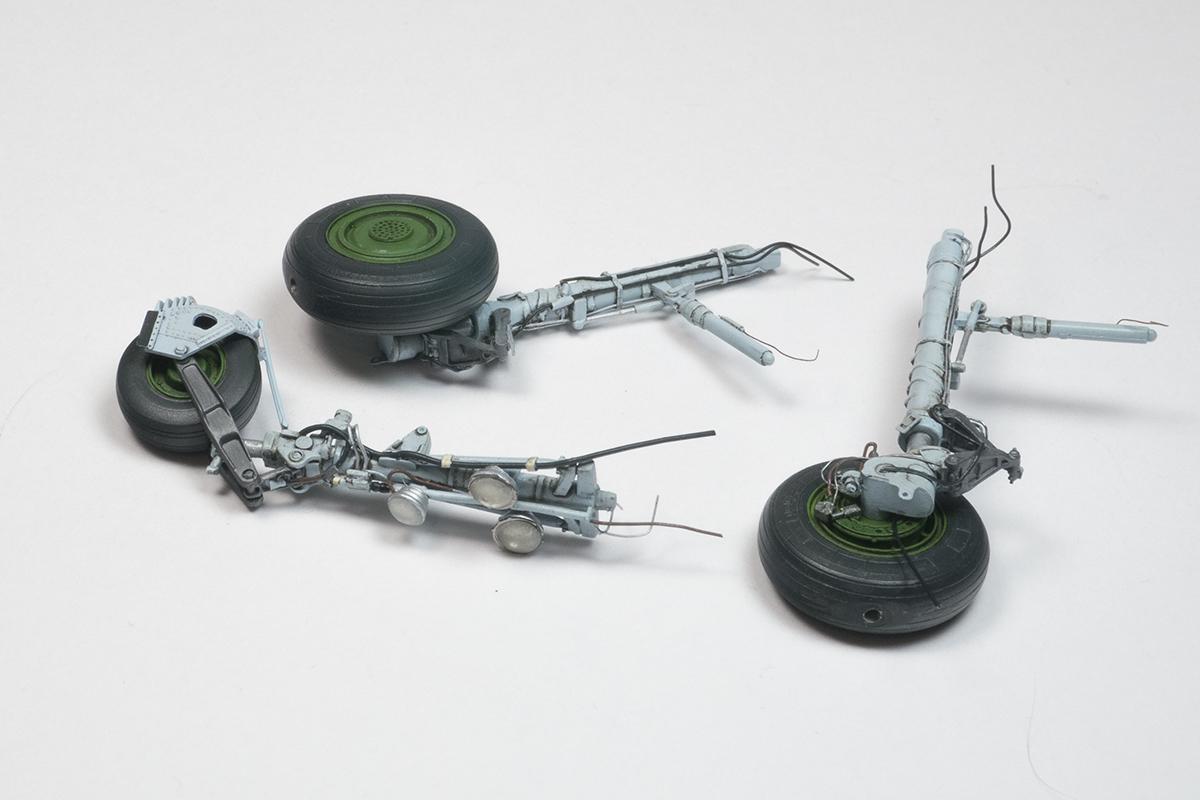
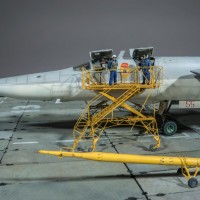
I was pretty happy that the cockpit was much easier to install. The cockpit was primed with Mr. Surfacer, painted with Mr.Color RLM65 light blue (C115), dials and details picked out with Vallejo acrylics. AK 070 Brown blue wash followed and after a coat of semi matt clear it was ready to install. With cockpit finished and wheelbays completed, It was time to marriage the fuselage and wings. The fit here was surprisingly good for the age of this kit, but I've noticed a significant sag of the wings. Wings of the Flanker are straight and level with no sag, so brass rods were clamped to the wings and glued together with strong epoxy glue in order to get the wings back to the correct shape. The fuselage joint seams require a bit of filler, especially behind the wings, so some of the access panels were erased in the process, but were recreated back using 0.2mm styrene sheets. Up front, Quickboost resin nose fitted perfectly, acting like nose weight rather than an improvement to the original plastic part. At this moment I've realized how big the finished model will be and I was getting a bit worried about the amount of paint required to cover this beast. But I was still far away from it, as I had to repair the wrong panel lines on the wings (according to the drawings I had), filling them with putty and superglue, and re-scribing the new ones. The trick when using CA glue as gap filler is to start sanding it within 15 minutes after application, otherwise it will turn rock hard. Back airbrake doesn't align well when in closed position, so I had to use same method there as well. (and now I know why almost every Flanker built has one in open position). Just before first layer of paint (Mr. Surfacer 1000 was already sprayed) I riveted the model with RB rivet tool and using 3M blue plastic tape as a guide. I also re-created some panels that were lost during the construction process using templates made out of the vinyl foil cut out with plotter. With main assembly ready to be painted, I still had to complete the undercarriage, canopy, rocket pods and missiles. Canopy had a nasty mold seam across the center so careful sanding and polishing was required. Eduard masks came in handy, as they provide two sets of masks, one for the main camo color and the other to create the canopy seal edge. Gear legs and wheels are a combination of plastic, resin, photoetch and some scratch built parts. But the most pleasant aftermarket set to work with was the Brassin missiles and pylons. They are a model by itself, just the amount of the decals is mind blowing, but they are a real pleasure to assemble and when completed, they are light years ahead of those provided in the kit. Painting
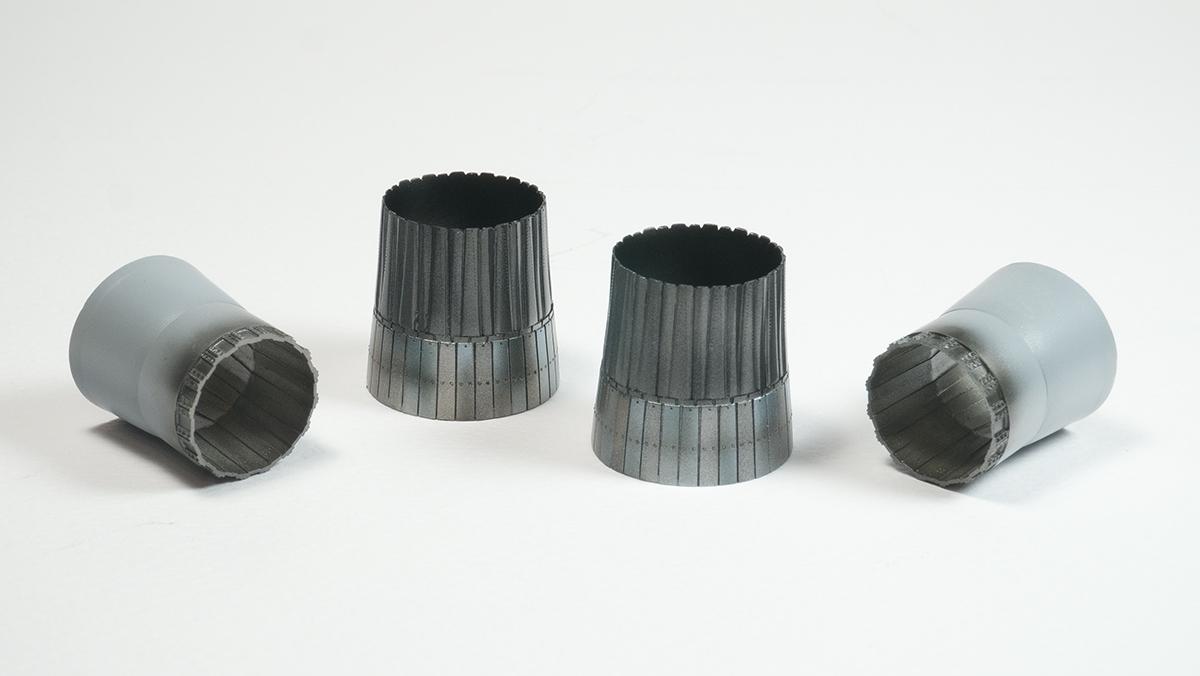
Painting procedure started with afterburner cans and exhausts covers that are in natural metal. Key to the great looking burned metal is using different shades of Alclad on different panels (I know, masking is a boring process), followed by black wash, and finshing them by rubbing some blue and raw umber oil paints with cotton swab on the chosen segments of the metal. This final step gives depth and disrupts the uniformity of the underlying metal shade.
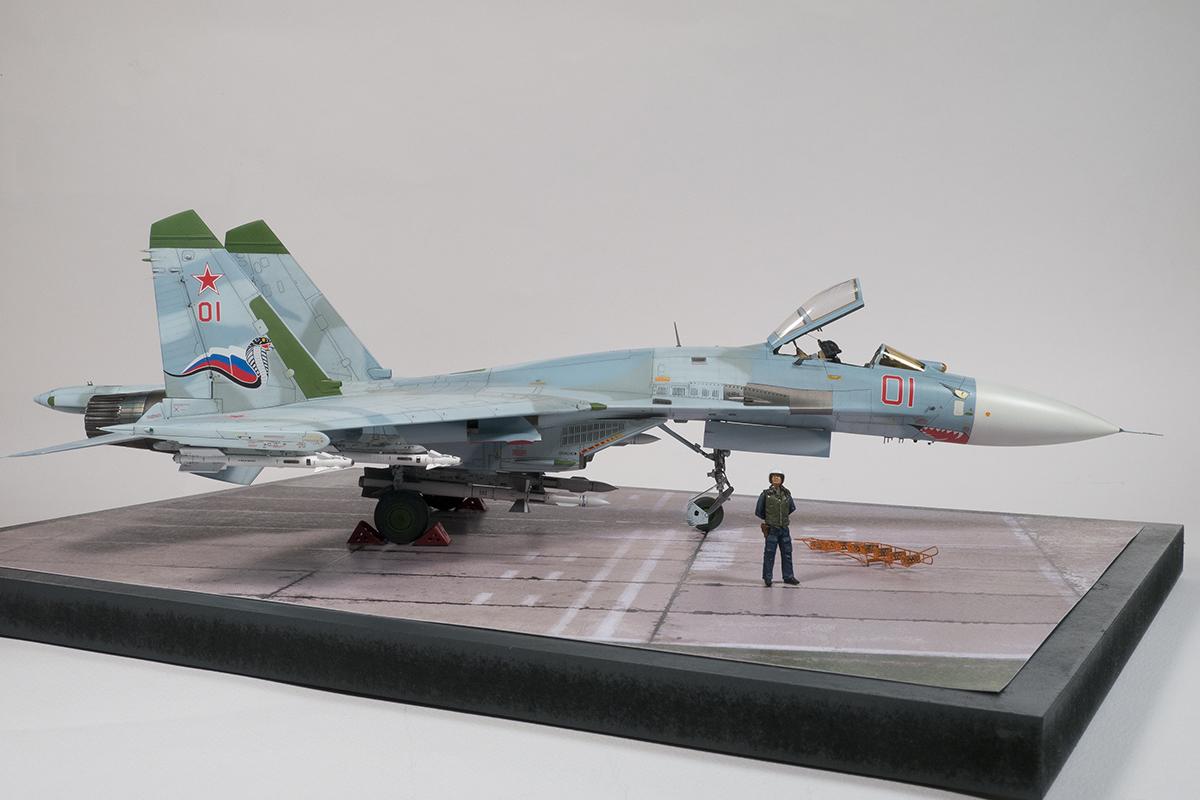
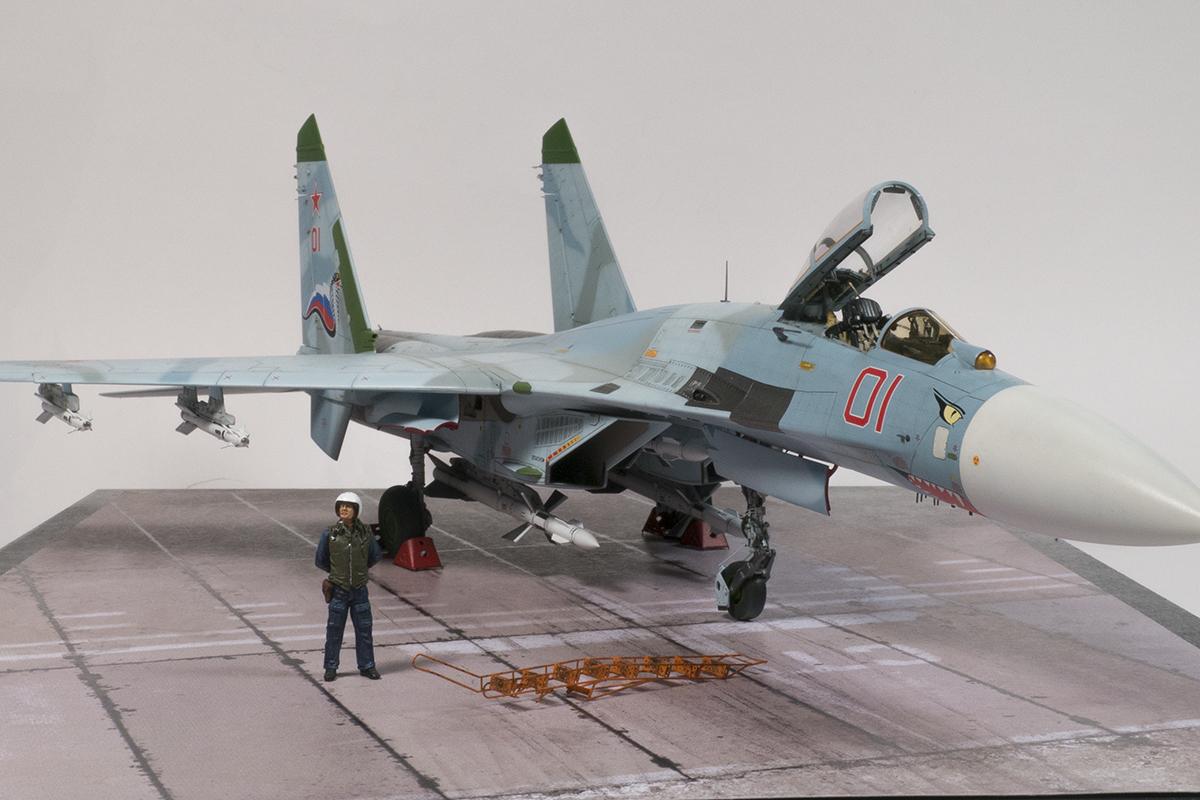
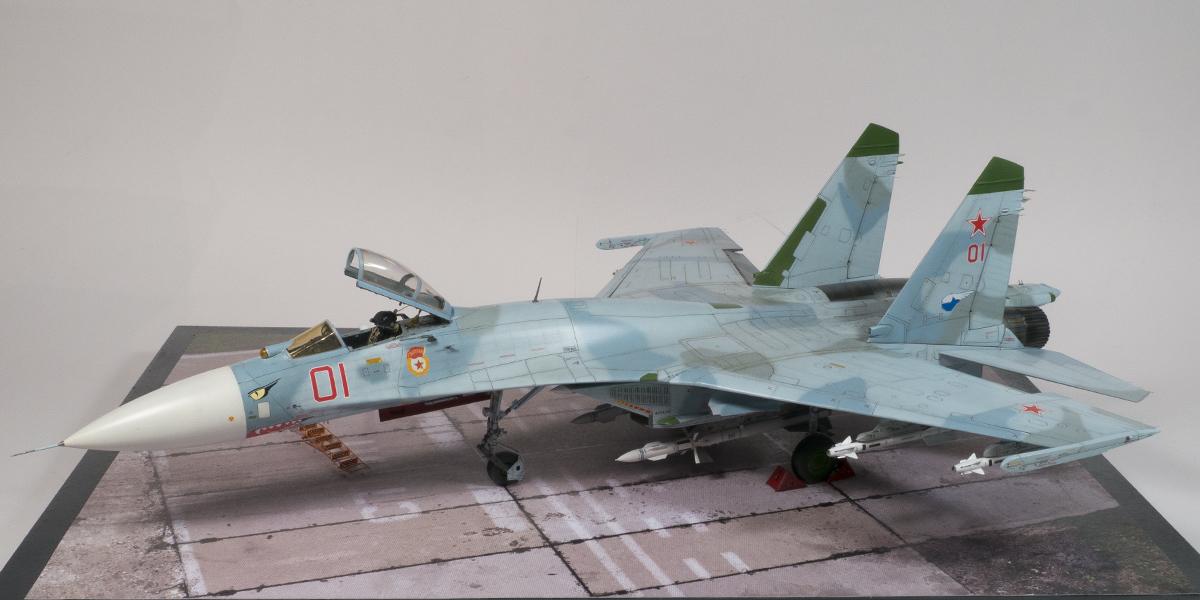
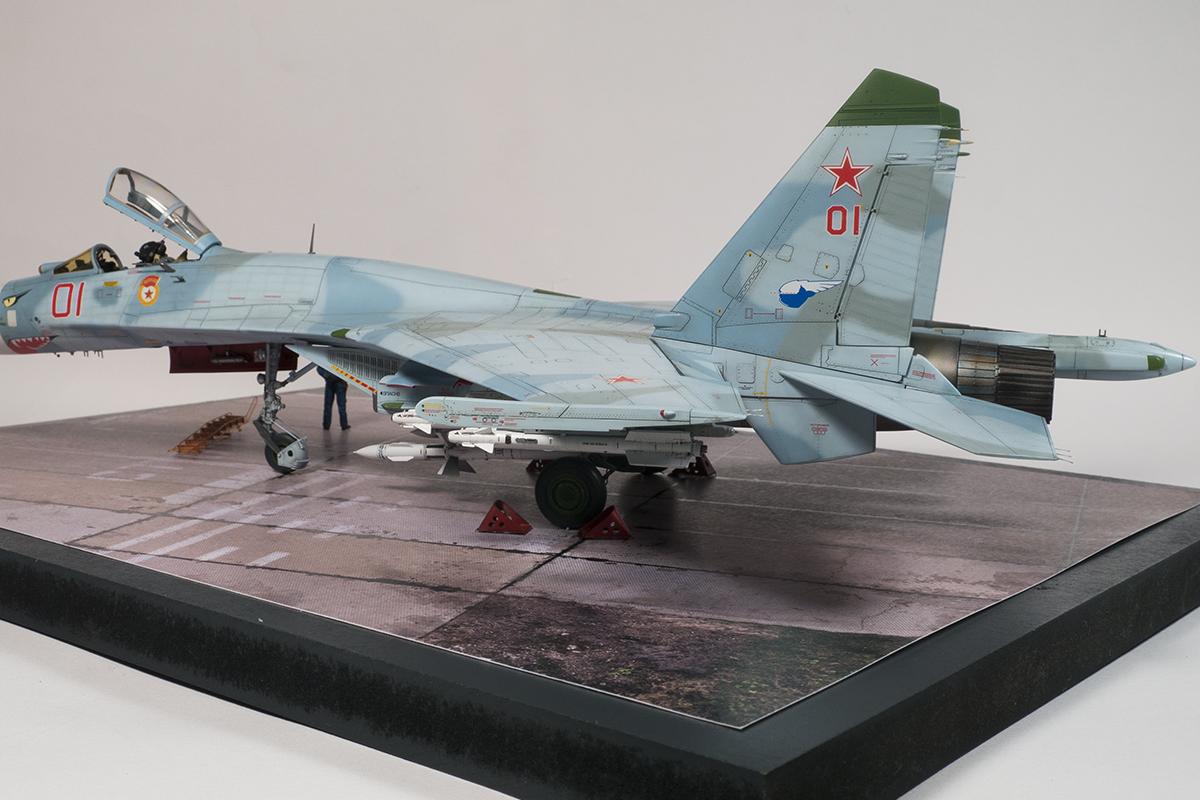
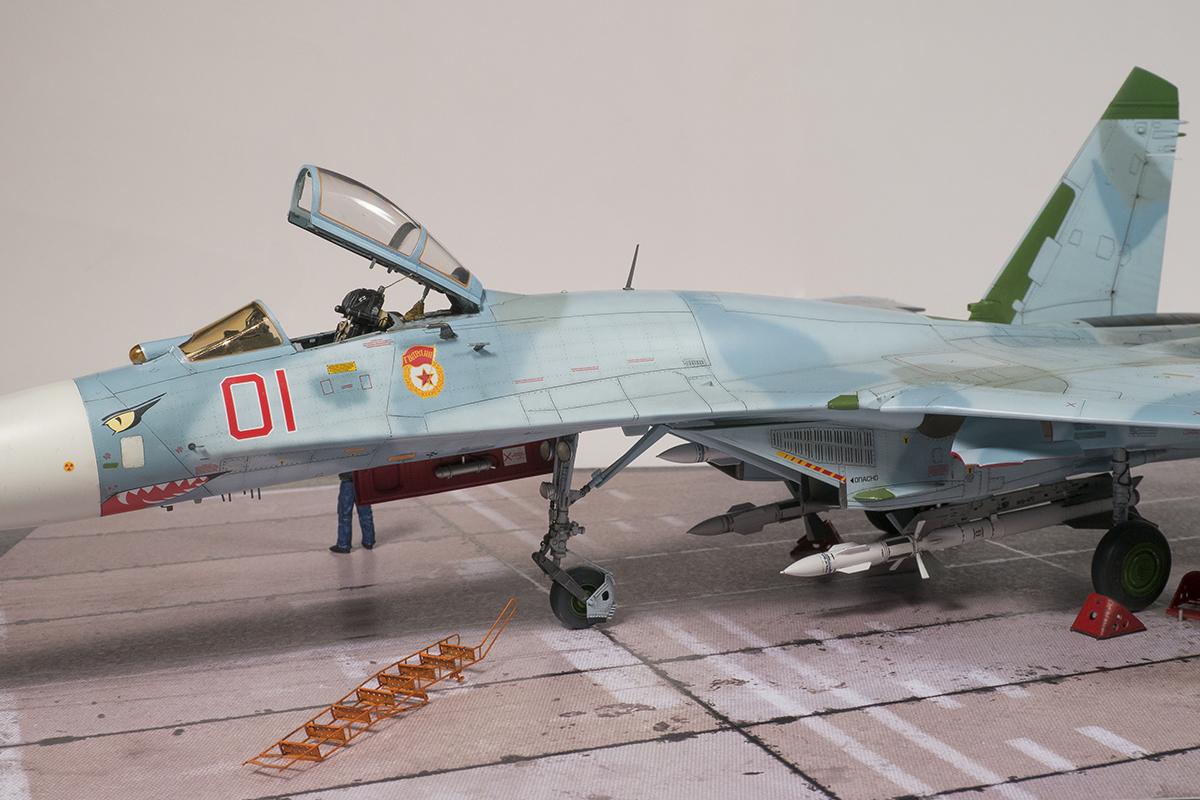
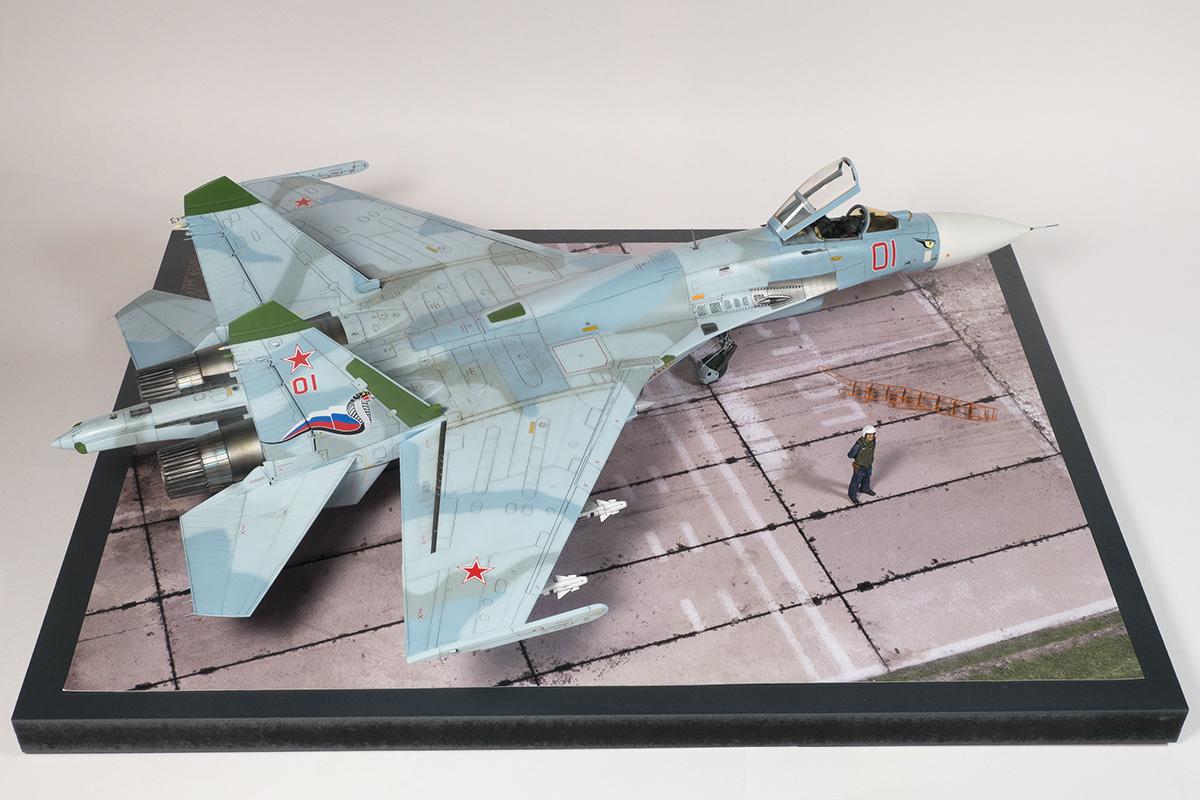
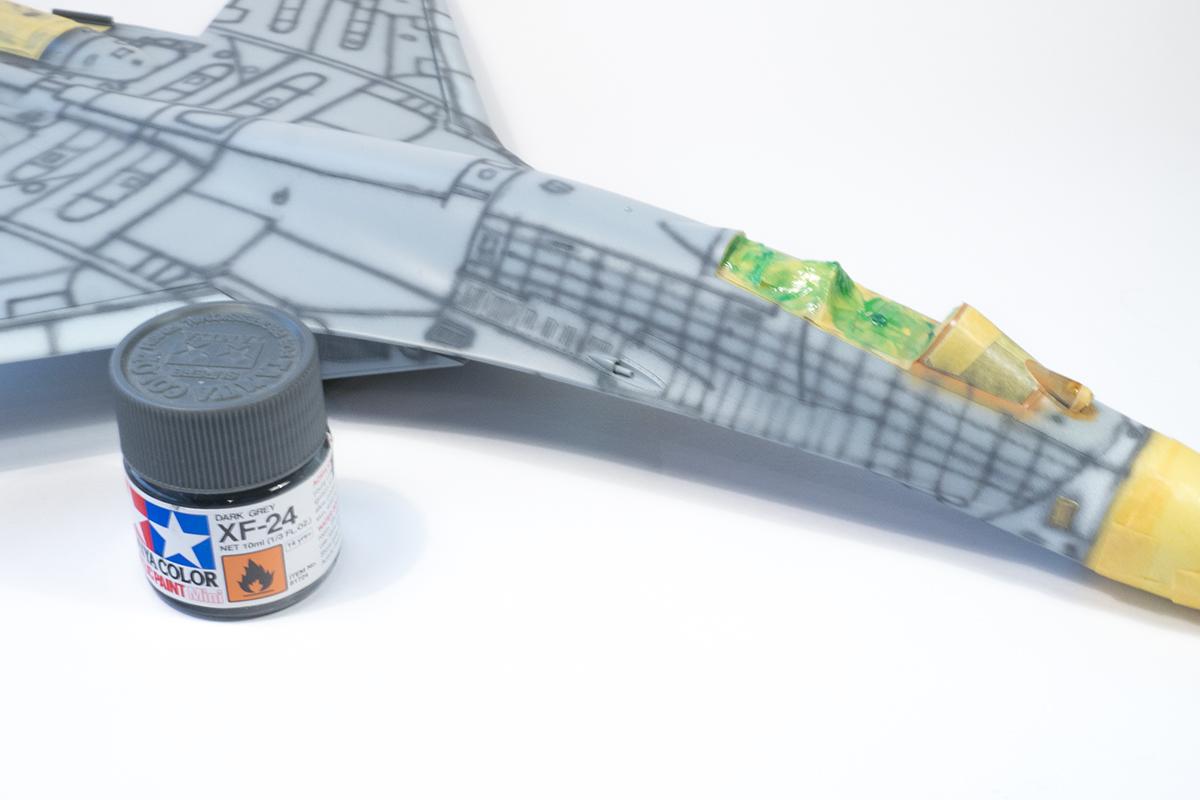
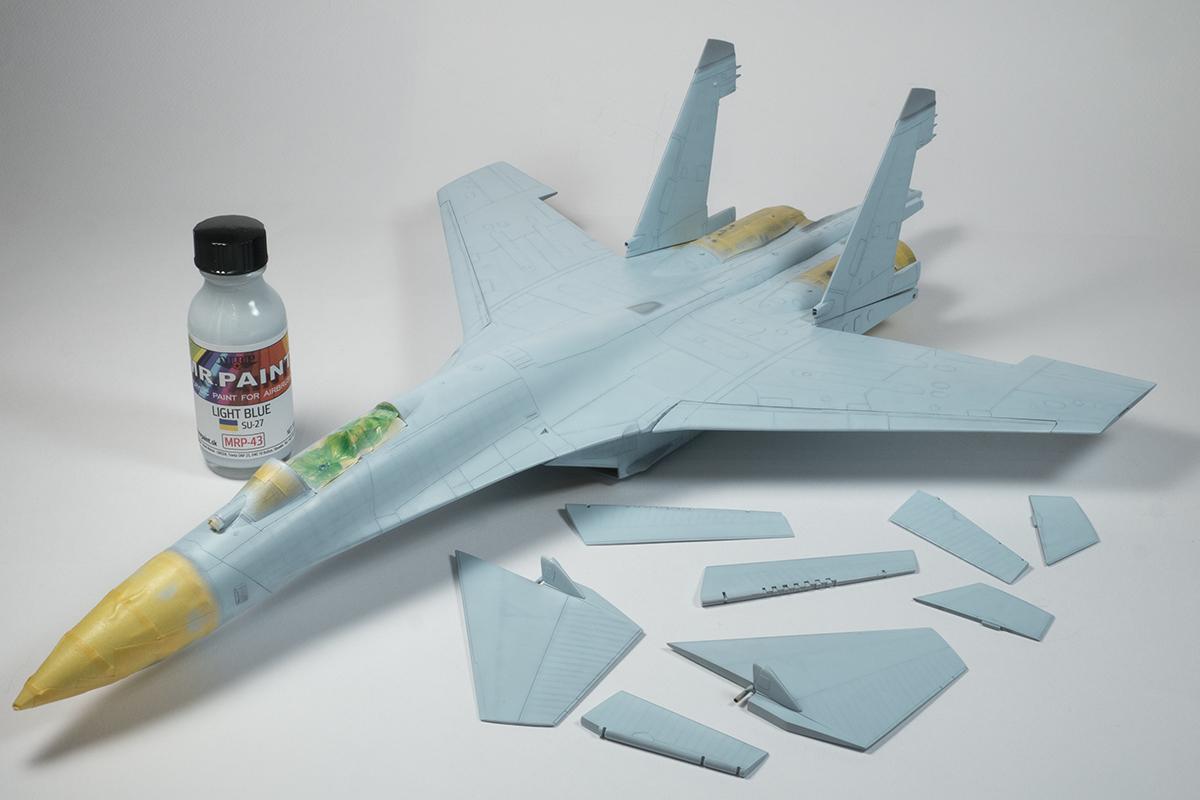
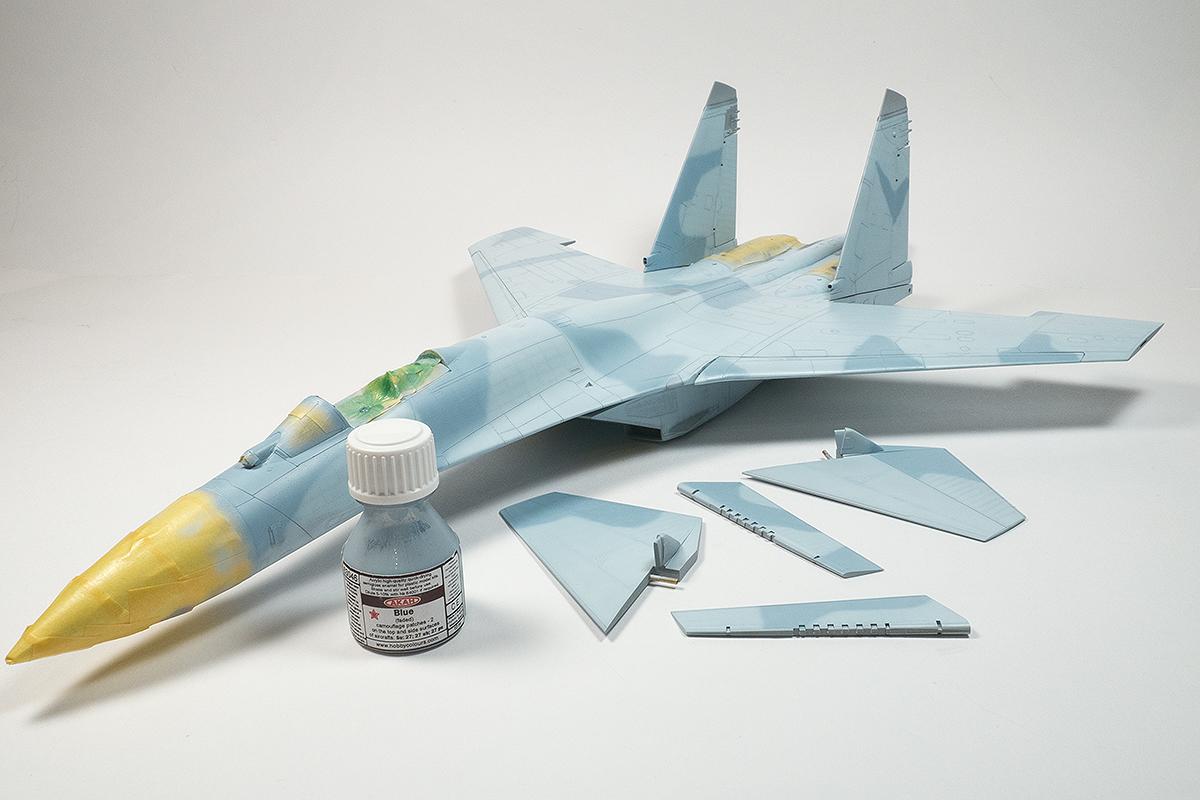
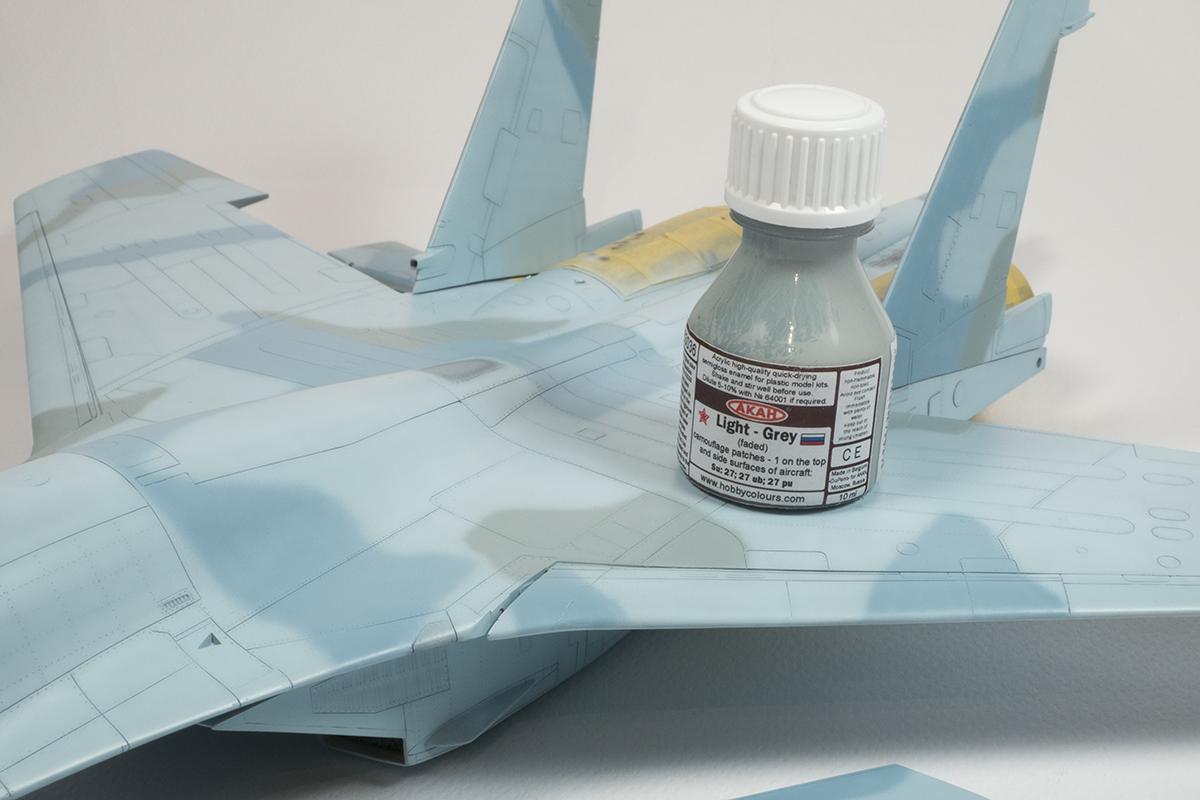
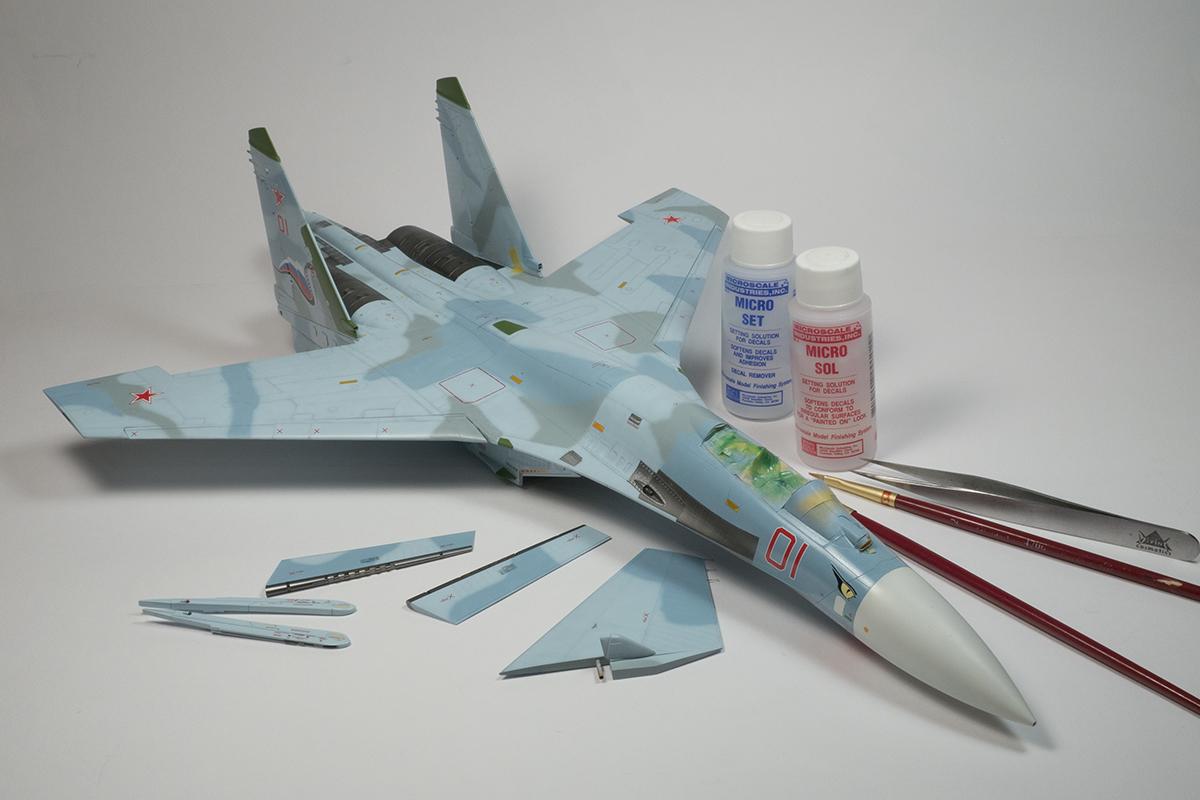
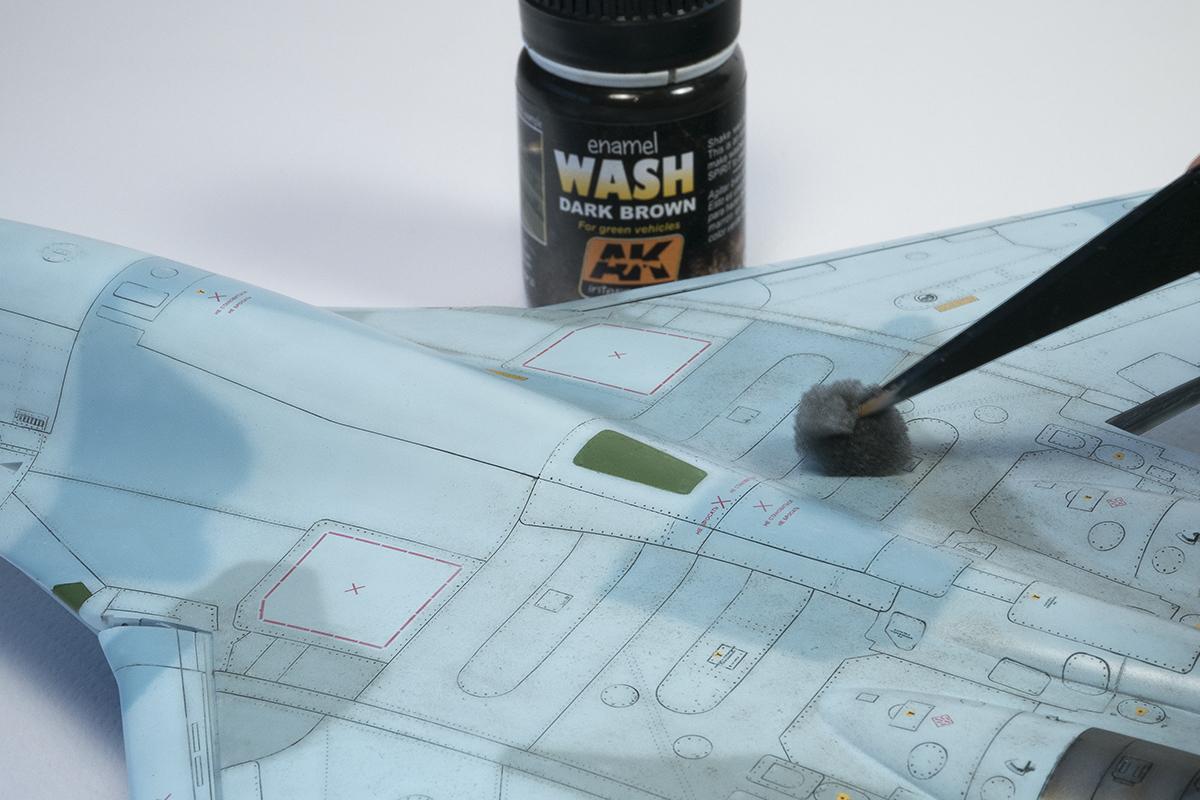
With metal sections masked, I pre shaded the panels and rivet lines with Tamiya XF-24 dark grey. I knew from the beginning that I will build RED 01 (dubbed one Kopeyka) from 689th GvIAP with unusual teeth, snake eyes and a cobra on the tail. Camouflage of this plane was pretty much standard with the exception of blue grey patches sprayed on the lower sides of the plane. For the base I choose Mr.Paint Light blue (MRP-043) which is already thinned for airbrush but had to be lightened a bit with Mr. Color White (C01). For the camouflage patches AKAN (set 46301 Modern Russian Air Force: SU-27) paints were used. Known for their tone accuracy but also extremely hard to find, paints are packed in small 10ml bottles and I was not sure if that was enough, but they cover the surface really well, so no need for worries. A small bottle will last at least a couple of normal sized models. Camouflage was sprayed freehand with the exception of green panels on the tail fins. (Mr. Color C135 Russian green). With painting completed, entire model was clear coated (Mr. Color C46) so decals could be placed. Decals (from Eduard limited edition kit) printed by Cartograf posed no problems and reacted well with Microset and Microsol. With decals left to dry thoroughly, I sprayed semi gloss clear coat over them and I could start with weathering, dirt and grime. Weathering and final assembly
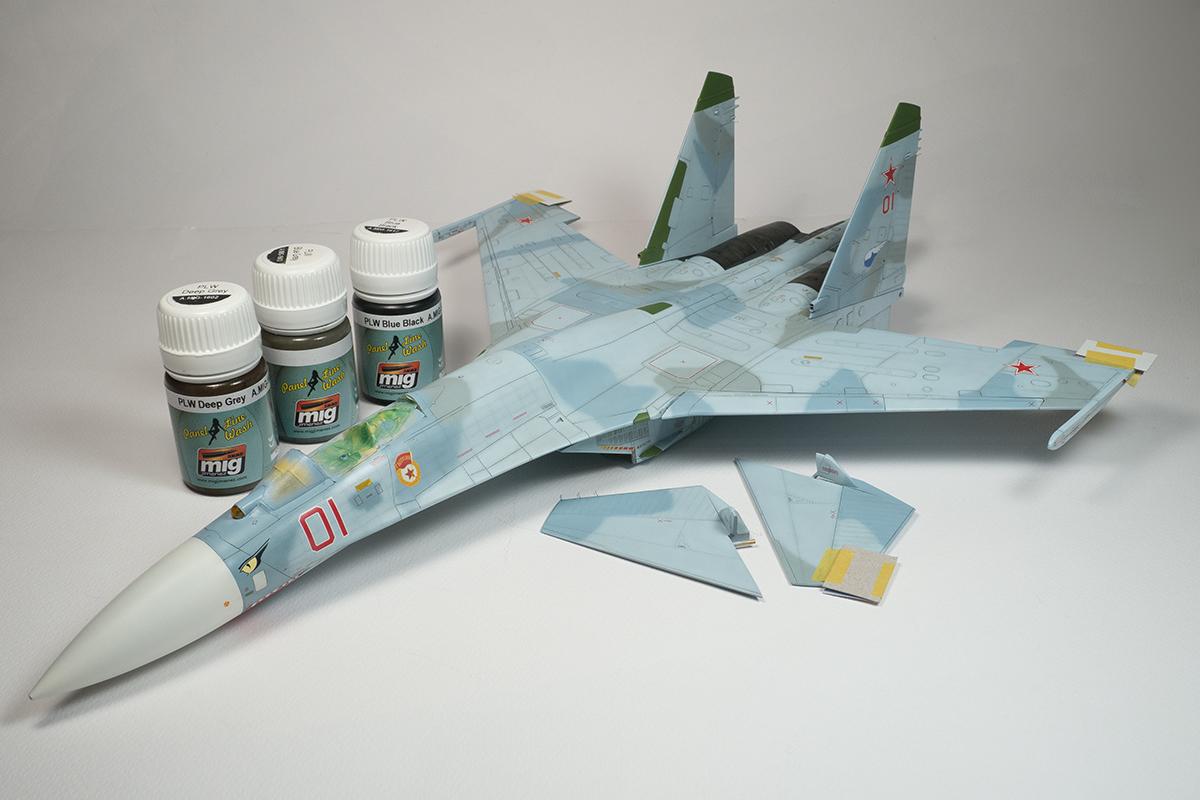
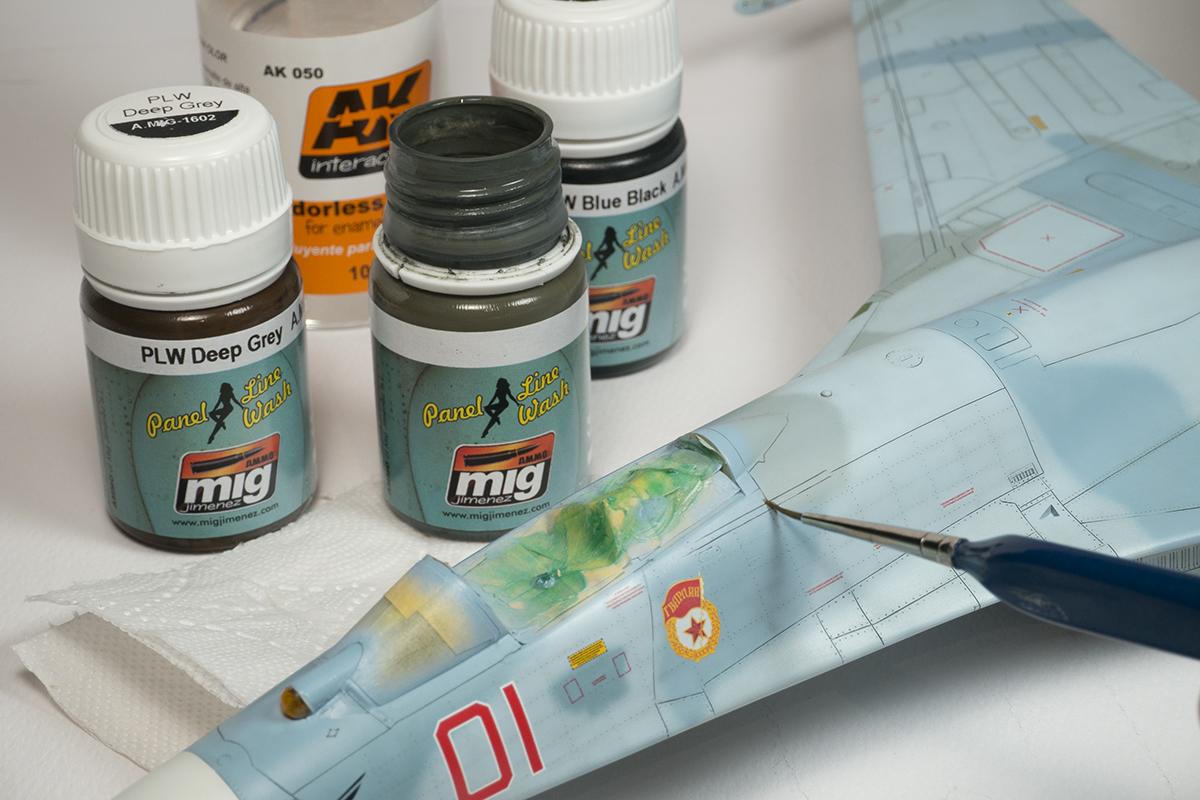
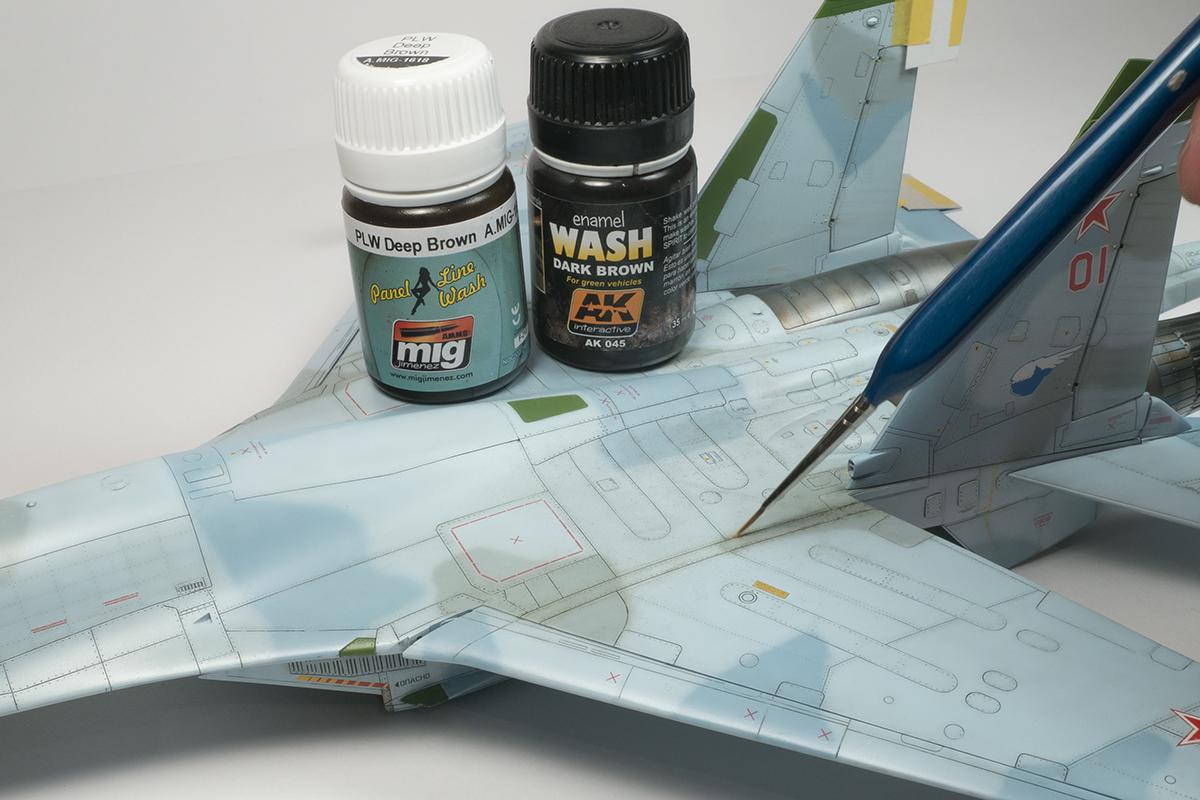
Weathering was done in several steps, as I wanted to produce well worn aircraft. Oil dot technique was a first step in the process. To be honest, the effect is barely visible at the beginning, but when everything dries, one can see the difference. Panel washes from Mig followed. Deep grey, blue grey and blue black wash enhanced the panel lines and rivets, but that was just the beginning. Reference photos in Verlinden Lock on.17 book show the back of the plane around the engines and access panels was really specked and dirty, so for this effect a sponge dipped in dark brown wash was dabbed onto the surface, followed by engine grime used in the same manner. Some minor scrathes (black grey) were done with brush and as the last step some subtle fading was done with white oil paint. Apply small amount of white in the corner of selected panel and then gently scrub it with a cotton bud). The model was then set aside for a week before it was sealed with semi matt finish from Mr.Paint. All that was left to do was to attach all of the remaining parts together, saving the most fragile ones for the end of the build.
Base and display
Display base was made out of the MDF board with NOY miniatures printed Soviet PAG-14 airfield surface glued on to. A Dream model PE ladder and Aerobonus Soviet pilot finished this long and sometimes not so enjoyable build. Academy Su-27 is not easy to build and it definitely shows it's age. But with some hard work and determination (and extra details), this kit can still make you proud. Additional accessories
Aires:
4549 Wheel bays
4264 exhaust nozzles
4262 Cockpit
Quickboost:
48116 Correct nose
48310 Flaps
48129 Antennas
Eduard:
48507 Flanker B exterior
EDEX104 Masks
Master Poland:
48066 Pitot tube
48113 Static dischargers
Brassin:
648053 Wheels
648101 R-27ET Missiles
648094 R-27ER Missiles


Hi Greg
I took great pleasure in the reading of your post.
Its so perfect it could be in an international modeling magazine
and the technical details of the build are of great interest.
Its a gold medal model but with quite a price tag I suppose.The value of the detail sets must be 2 or 3 times that of the kit alone but frankly, given the result you got I'd say It was worth it!
Its a great model of a superb plane you got there.
Thanks Kloster,
Unfortunatelly, i am declared aftermarket junkie and usually my builds are not cheap. But I only build 2-3 models per year and my stash is really, really small, so i guess that should be some kind of an excuse then :D.
Well...all the extra goodies certainly paid off in the end...a very nice build indeed, sir - as well as an excellent narrative and photo work.
A beautiful model.
A beautiful model. I appreciate the in-progress pics, and the detailed build notes. I've used most of the weathering and finishing techniques you mentioned, but you listed one or two that I want to try on my next build.
Beautiful work and a great result.
Tremendous result! I've got the Eduard limited edition kit in my stash with other various aftermarket goodies. If it turns out anything like this I will be pleased.
Excellent! In my opinion you can easily skip the wheelbays as they are PITA to install (you can always add a wire or two to make it look busy) and they are almost invisible once the model is completed. Cockpit is a must, as well as the burner cans.
Masterful! All of your hard work paid off...this is an excellent build. Congratulations!
Great! I was just admiring Your work!
Champions league modelling, Grega.
Allow me to curiously ask a question: did the Mr. Paint Semi Matt entirely let the carrier film of the decals disappear?
Thanks Halvar. About decals. They are superthin and if you follow decal procedure by the book (gloss, decals, setting solutions), the final semimatt coat hides the carrier film. If the decals are too thick, you might clearcoat them a couple of times, then gently sand the clear and then proceed with semimatt clear. HTH
Got it, Grega. I'm just about to get my usual clear cote blues like every time a build leans to its end. You know, i don't like it when surfaces are dead flat but I don't want the carrier film to shine through either which can happen easily, if the final cote is just a little too glossy. I guess one just has to test it out for every model specifically.
Just add more layers of semi matt over decals and You should be fine...
Spectacular flancer, your detailwork is outstanding!