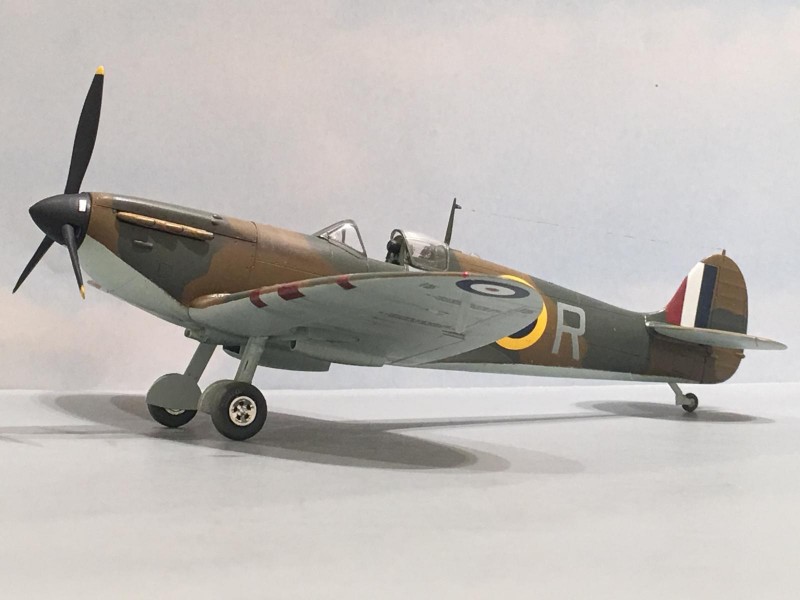
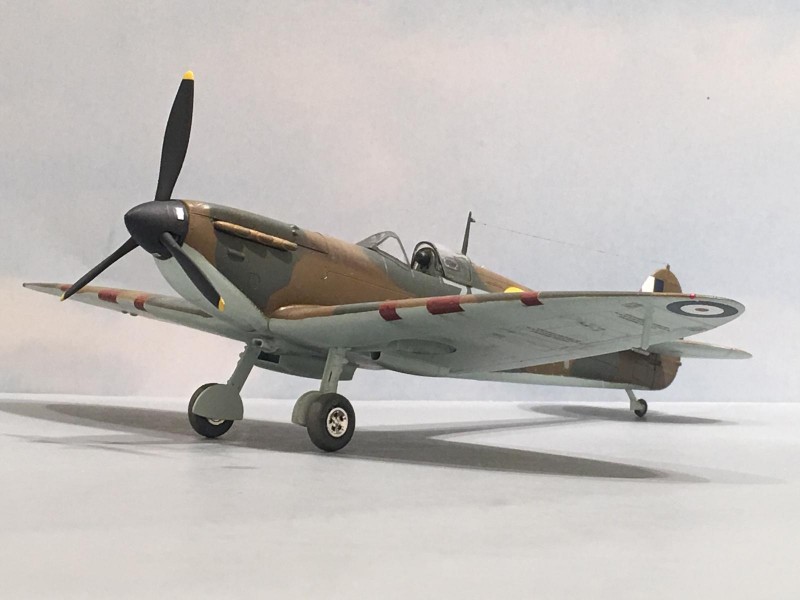
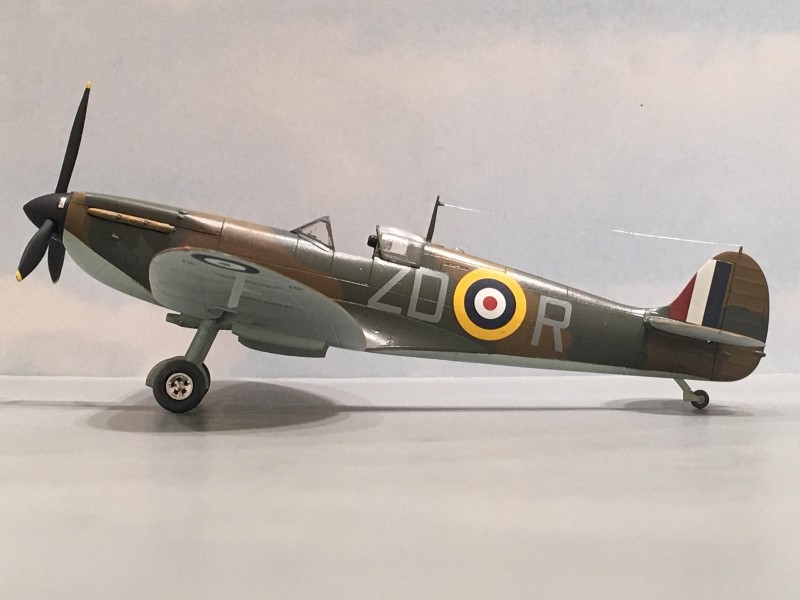
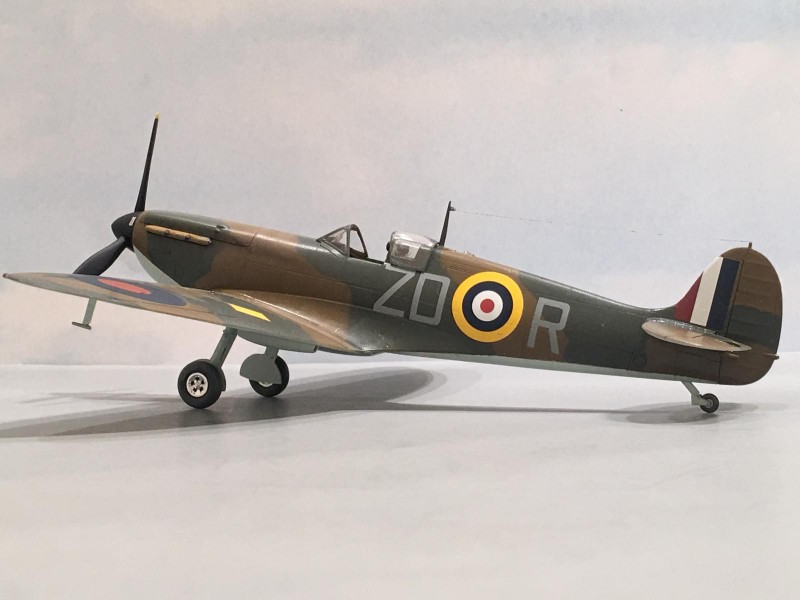
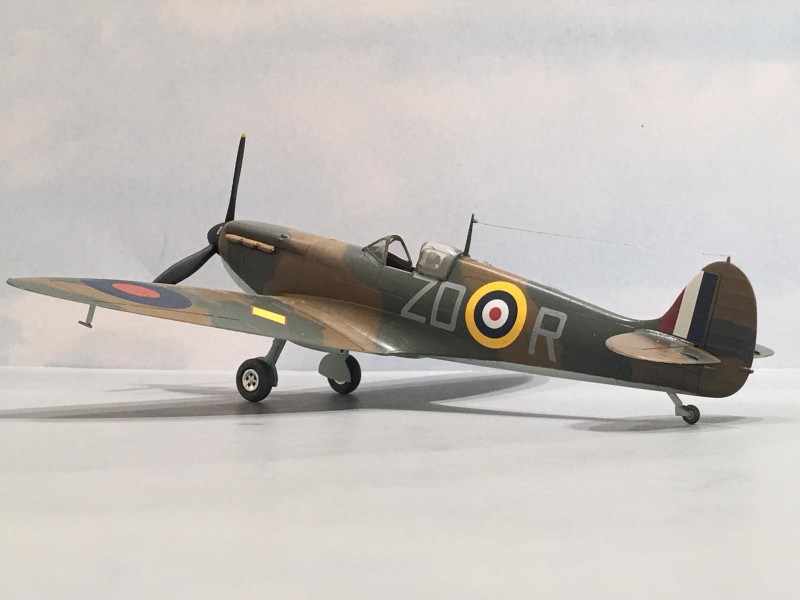
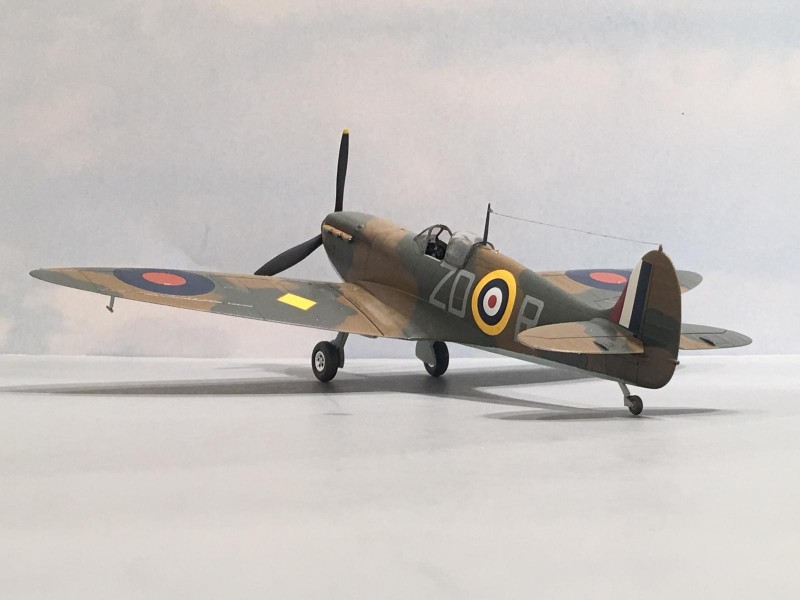
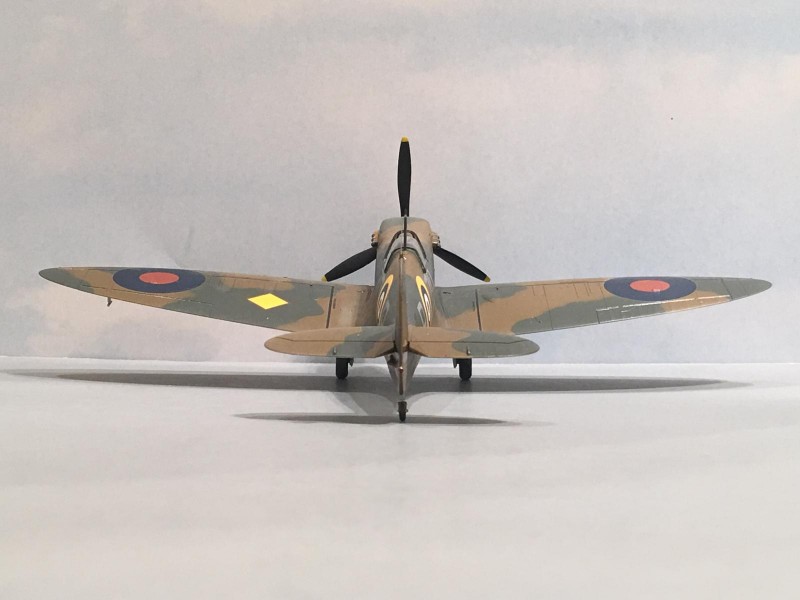
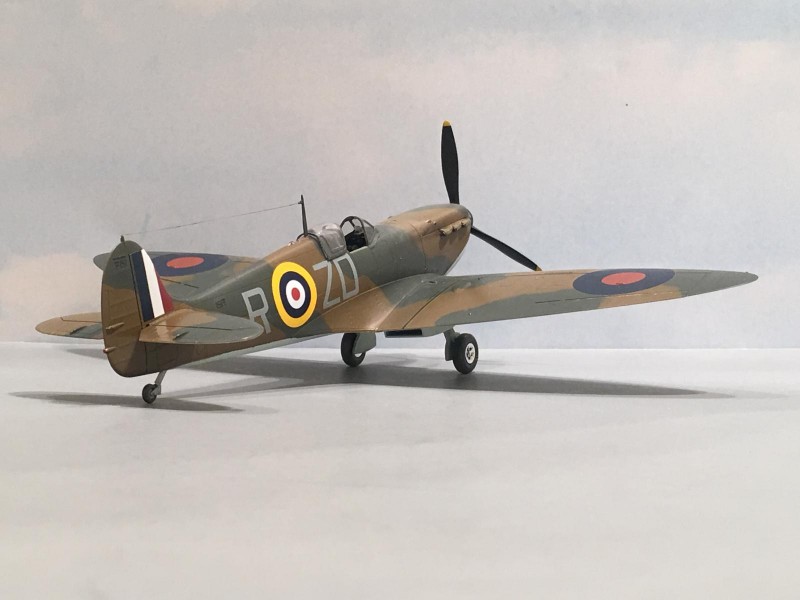
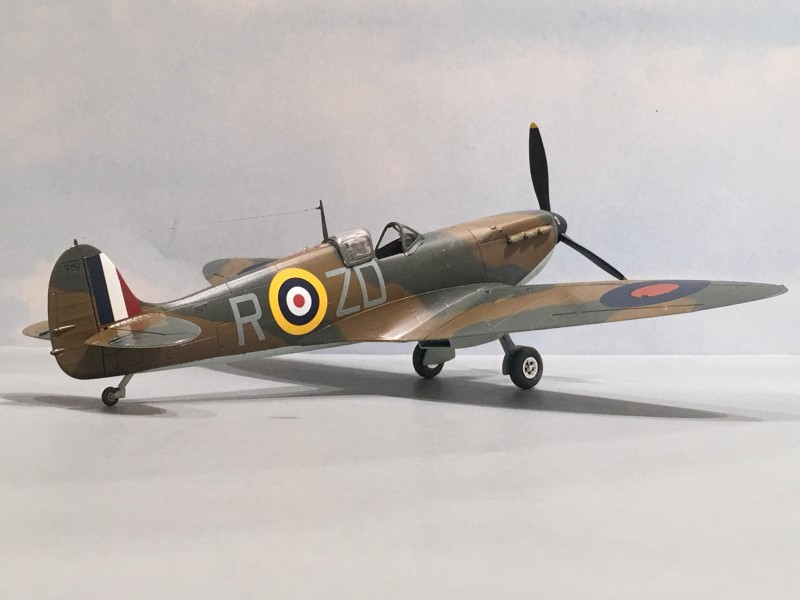
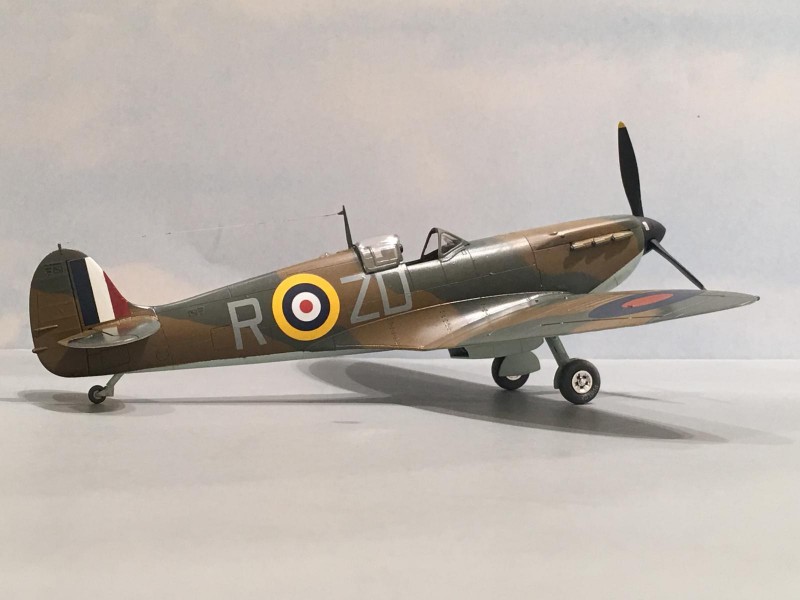
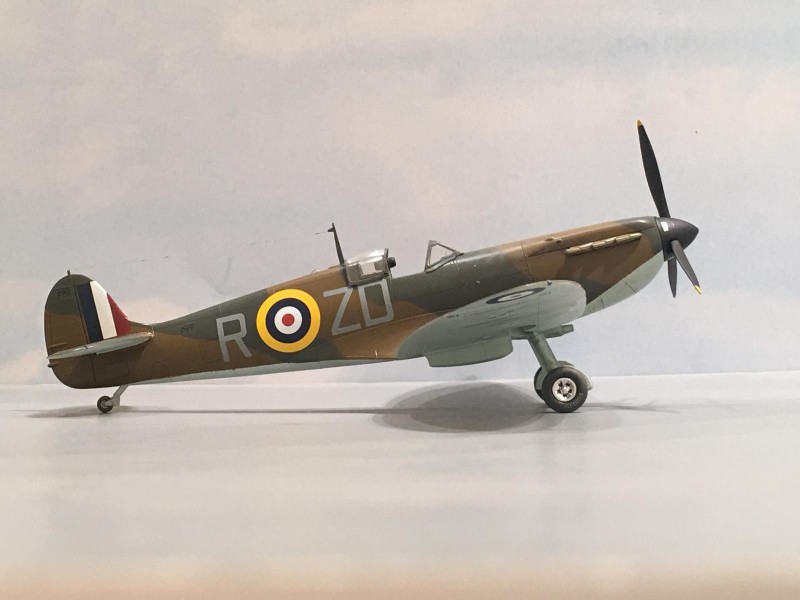
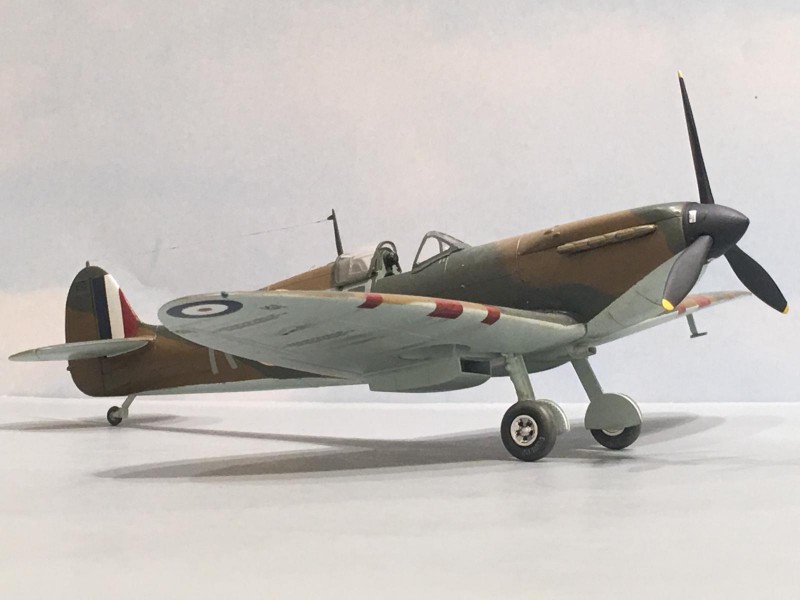
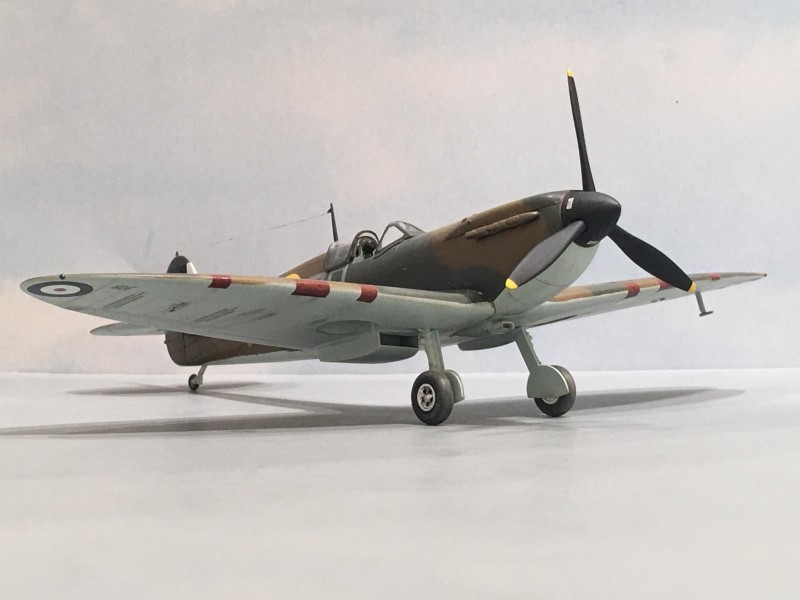
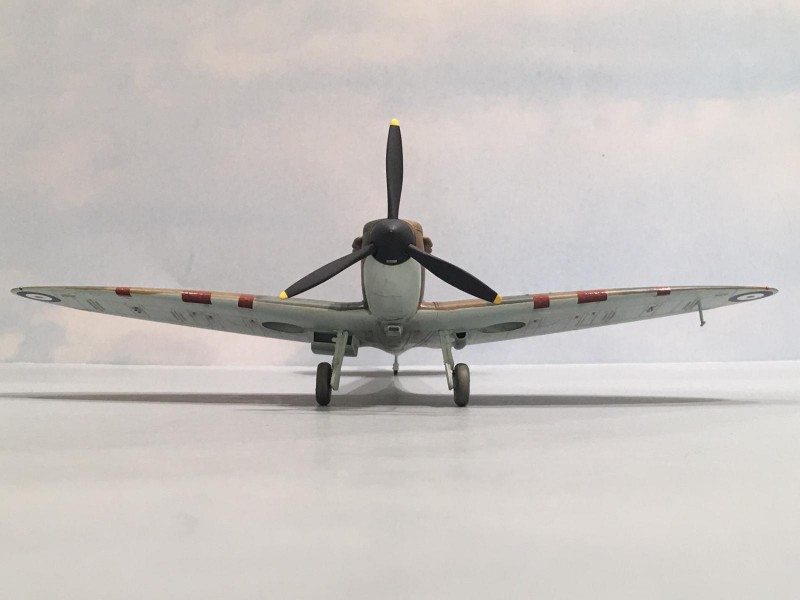
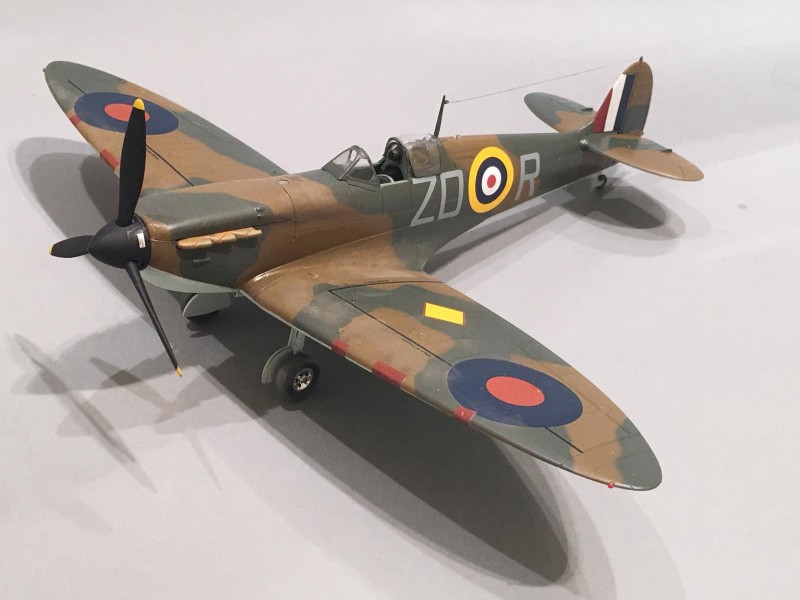
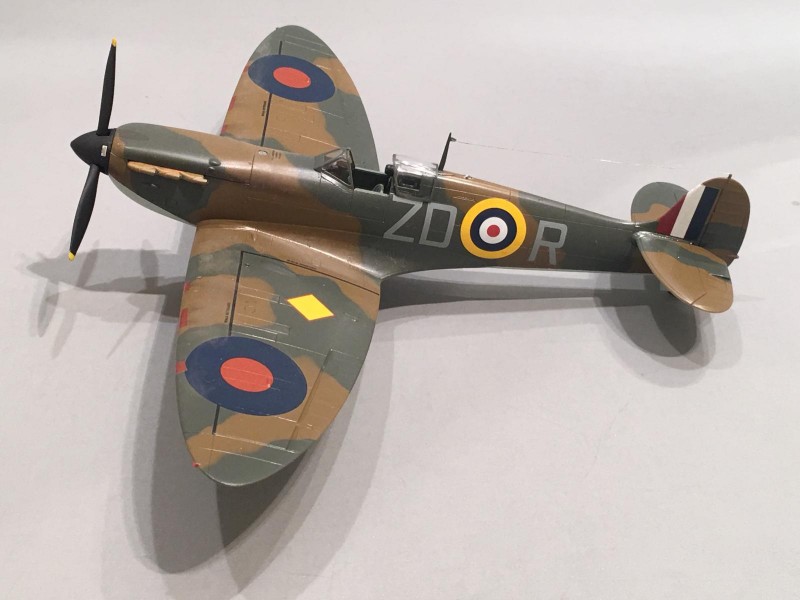
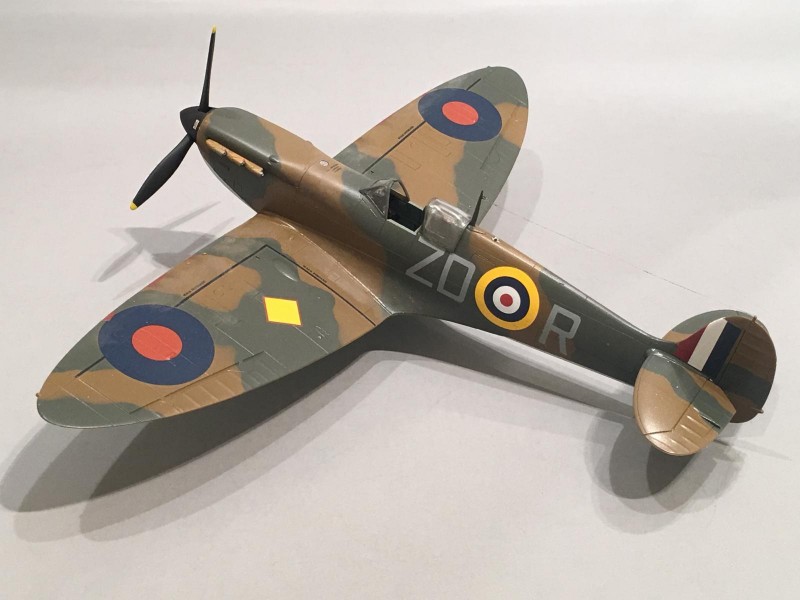
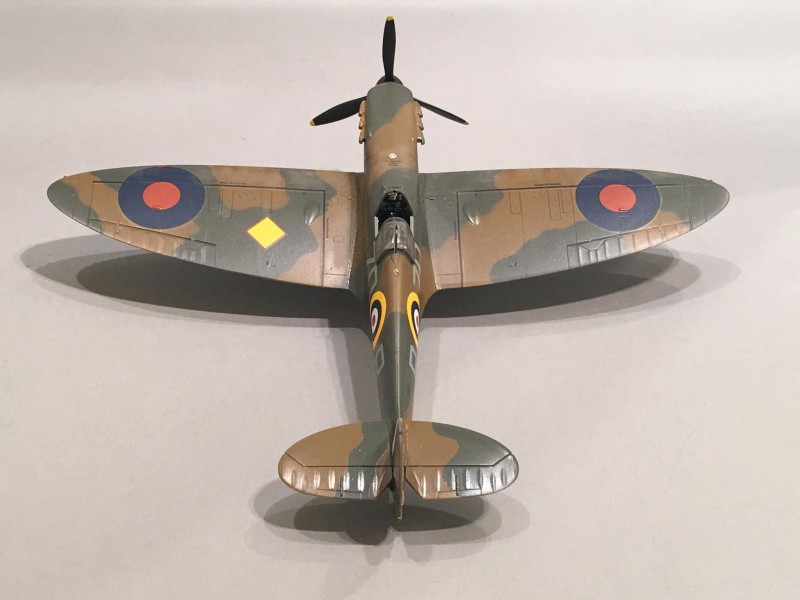
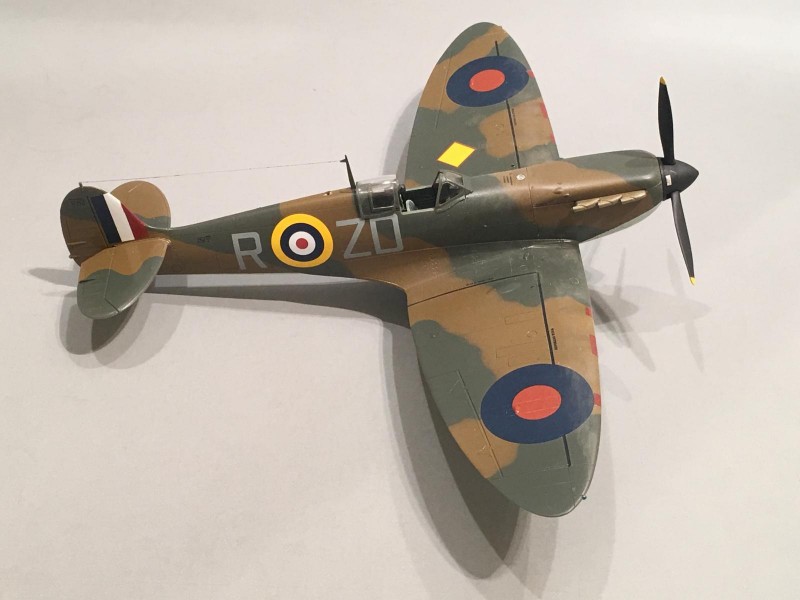
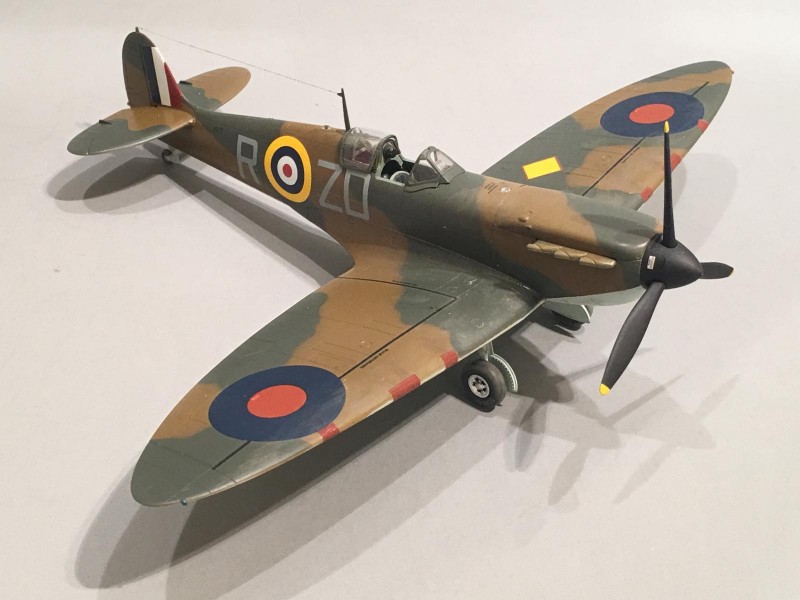
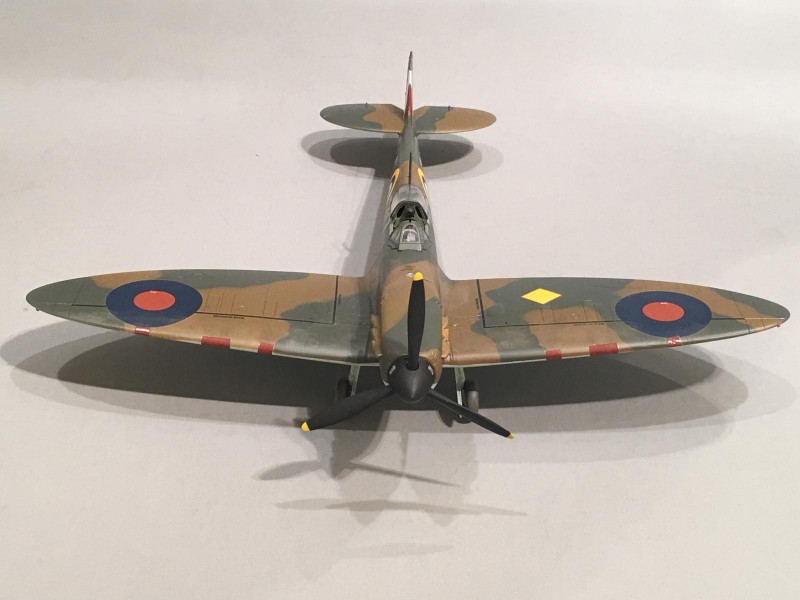
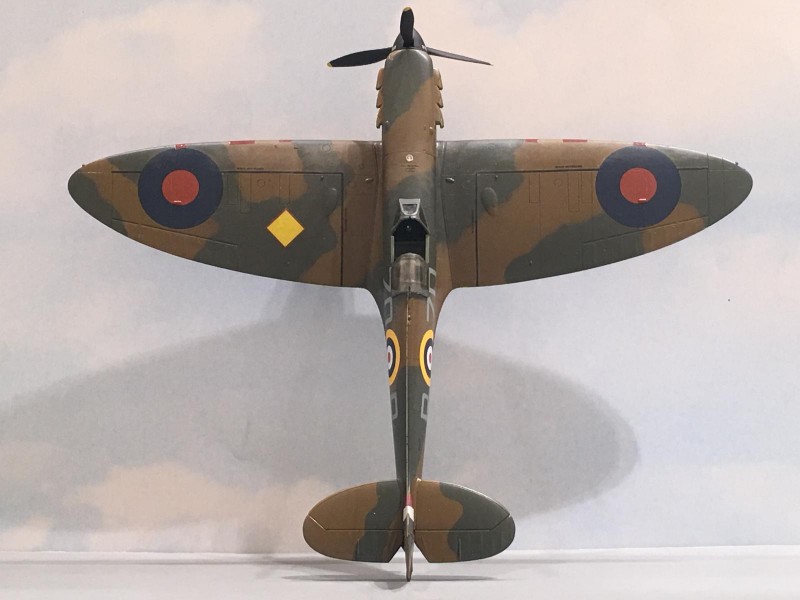
100 Years of the RAF, No. 222 Squadron RAF Hornchurch, September 1940, Spitfire Mk Ia, “ZD-R” Tamiya 1/48
This article is part of a series:
- 100 Years of the RAF, No. 19 Squadron circa August 1938, Duxford, UK 1/48 Airfix Spitfire Mk I “early”
- 100 Years of the RAF, 541 Squadron late 1944, Spitfire PR MK XIX, 1/48 Airfix
- 100 Years of the RAF, No. 601 Squadron, Egypt November 1942, 1/48 scale Tamiya 61035 Spitfire Mk Vb
- 100 Years of the RAF, No. 222 Squadron RAF Hornchurch, September 1940, Spitfire Mk Ia, “ZD-R” Tamiya 1/48
- Spitfire Mk Vb Tropical, EP-706 “T*L” No. 249 Squadron as flown by George Beurling at Malta
- 100 Years of the RAF… Alan Deere’s Spitfire Mk I “Kiwi”, No. 54 Squadron Tamiya 1/48
- 100 Years of the RAF, Spitfire Mk Vb, 81 Squadron RAF Hornchurch, June 1942 “FL*A” / BM-461 Tamiya 1/48
I want to start out by saying "Thank You" to Paul Nash @white4freak for technical assistance, and Paul Barber @yellow10 for starting this great idea for a Group build to honor the RAF. Thank you also goes out to Martin and his staff here at iModeler too, for providing a great website for us to display our work.
Without any of these gentlemen, this Spitfire build would not be here for you to view, nor would it be as "historically" accurate.
I wanted to have some Spitfires in my collection that represented the various colors and camouflage schemes (A and B types), that the RAF used during this "Early War" time frame. After conducting some research on my own, and becoming thoroughly frustrated with what I was finding online and in books on the various colors, I reached out for some professional help on the matter. Not the sort of "professional help" afforded by my friend David Leigh-Smith @dirtylittlefokker, although some would say his help would be in order after my building too many Spitfires

Paul Nash came to the rescue and helped to guide my decisions as far as the colors that were used on the undersurfaces of Spitfires during this era. He even sent me the fuselage code letter decals that were needed, and 1/48 scale paper patterns to use as masks for painting the "A" style (and "B" style) camouflage that were used on the Spitfire too!
What more could you ask for ? A true gentleman indeed. iModeler is a great place for fellow model builders to lend a helping hand to each other when needed.
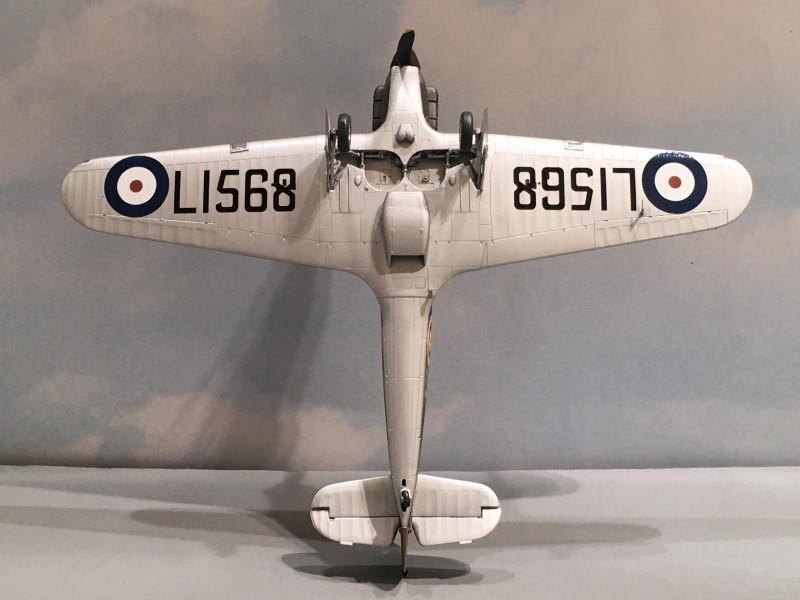
As it turns out, the RAF used at least four distinct colors on the undersides of the fuselage and wings of it's fighter aircraft during this time frame. To begin with, at the time the Hawker Hurricane and the Supermarine Spitfire entered service, all of the front line fighters in use at the time were biplanes in the RAF, as well as the majority of the World. These fighters were primarily covered with fabric. In an attempt to prolong the life of the fabric covering, aluminum dope color was used to help shield the fabric from the effects of the sun and the associated UV rays.
Another important consideration that was taken into effect was weight. The added weight of various colors was thought to degrade the performance of these machines. As such, these planes were not to be painted with an excessive number of layers of paint. The added weight from just the paint alone could be in excess of 60 pounds! On larger aircraft such as bombers, this amount could be quadrupled.
Another very important consideration was aircraft balance. They didn't want to affect the center of gravity and change the flying characteristics or possibly even make the plane unsafe to fly.
As a side note, a similar balance problem happened later with P-51"D" Mustangs, but it was more extreme since greater weights were involved.
They had a large fuel tank on the "D" model Mustang that was located behind the pilot. The pilot was supposed to draw fuel from this fuel tank first, then switch over to the other tanks when it was dry (or close to it). There are recorded cases where the pilot failed to do this and spun the plane in which often resulted in a fatal crash. These crashes were attributed to "improper balance" and "pilot error".
So during this time between the Wars, most RAF aircraft had an overall finish in Aluminium Dope on the fabric covered areas. When the Hurricane and Spitfire arrived, the RAF started painting the upper surfaces in a two color camouflage as things were "headed south" in Europe (and the Pacific) and another War was eventually eminent.
Here's a photo of a Hurricane showing the undersides painted in an overall aluminum color. The "buzz" numbers were painted rather large at this time.
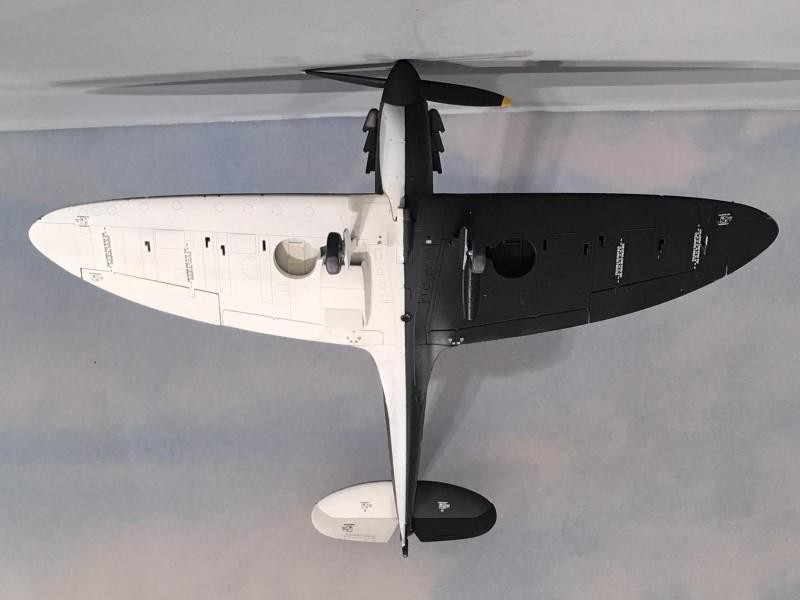
It was very common to see a Spitfire (or Hurricane) during the time of the Dunkirk Evacuation with one wing painted in "Night" (which was black), and the other side of the plane would be painted in "White". The dividing line between the colors would usually run right down the center of the plane, as seen in this early Mk I Spitfire.
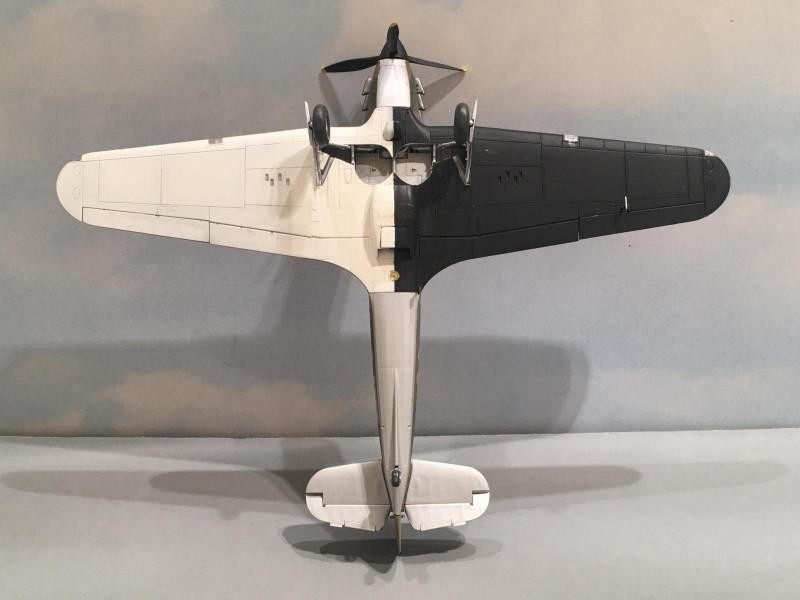
On occasion, only the wings would be painted as such, with the remaining portions of the fuselage and stabilizer remaining in "Aluminum Dope" color. Here's a Hawker Hurricane painted in this manner.
Now here's where the confusing part sets in: The use of "Sky" colors, and how it was implemented into service on aircraft in the RAF.
There is a lot of confusion here, and I do not claim to be an expert on the subject. Apparently there was a conflicting description in the name of the color. Some times I found the colors referred to as "Sky" while other times it was called "Sky Type S". To make matters worse, the color "Sky" was occasionally described incorrectly, or the orders to paint the planes were not properly written and hard to understand. So this led the ground crews to paint the undersides of these planes using the colors they "thought" were appropriate.
Then supply problems came into play as well. Certain units didn't have access to the "new" color paints, while others did.
Then toss in the similar colors of "Eau-de-Nil", "Duck Egg Blue", "Duck Egg Green", BSS-381, "Blue Gray", "Light Blue", and you will see why so much confusion exists even to this very day... all of these colors (and names) were used at one time or another by the RAF.
Some were simply the same color described with a different name. Others were slightly different colors with the same name... confusing to say the least. I'd love to hear your comments on this matter. Please keep it civil though.
Here's where Paul Nash stepped in and saved the day. He told me about a Spitfire from 222 Squadron that was excavated years after it had crashed. This plane flew with 222 Squadron and was lost in early October of 1940, on October 7th (I believe). They were able to accurately match some of the parts that were recovered to existing color paint swatches.
What these aviation archaeologists found out was remarkable. It appears as if the Spitfire in question was repainted in various places at least three times during it's rather short service career!
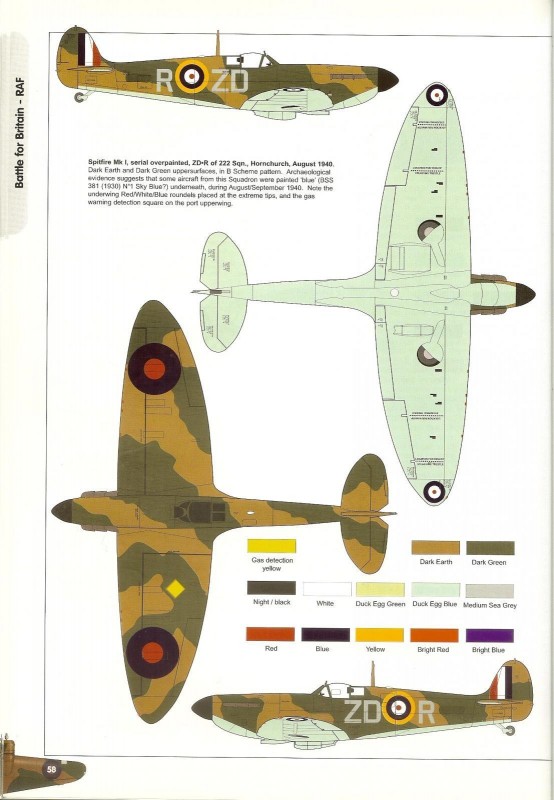
Each time a different color was used. One just happened to be a perfect match to the BSS-381 color. Paul was even kind enough to send me a few pictures of this color matching process, and an artists rendition showing an illustration of Spitfire "ZD-R".
Normally I don't place too much credibility on artists renditions. However this time I made an exception, as it had a lot of archaeological proof that this color was indeed used on Spitfires from this particular Squadron.
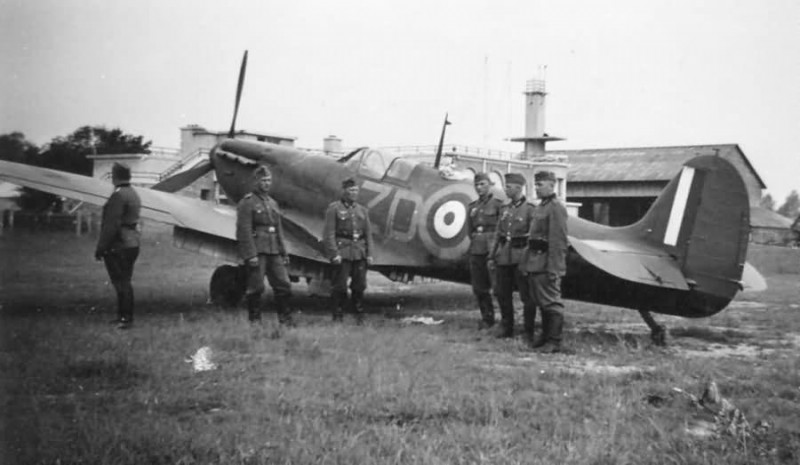
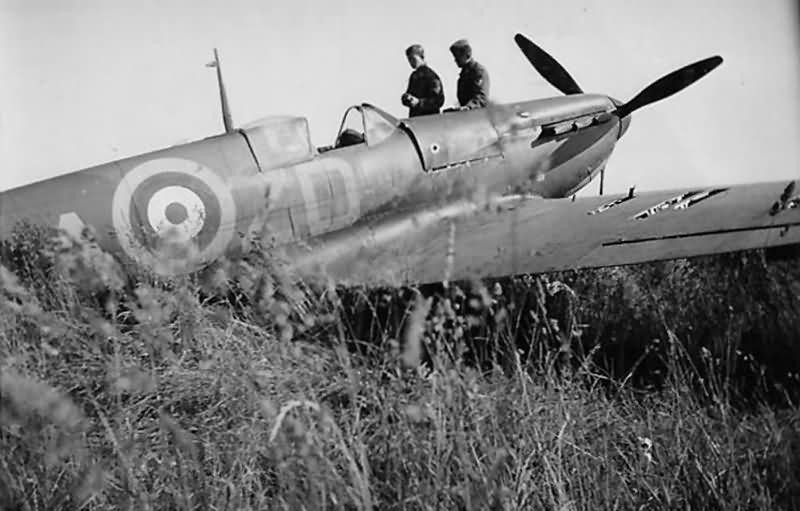
If you look closely, you will see that the fuselage Squadron code "ZD" is not in the typical location of the Starboard side. Having looked at various wartime black and white photos of Spitfires in 222 Squadron, this was often done on their planes. Here's a few pictures showing a Spitfire from 222 Squadron that was forced down and was photographed when it was in German hands. You can clearly see how the fuselage codes are arranged.
To add some icing on the cake, the rendition offered the Spitfire wearing a "B" Scheme which was the mirror image of the other Spitfires I had under construction at the time.
So this made it even a better choice for me to paint my Spitfire in this way.
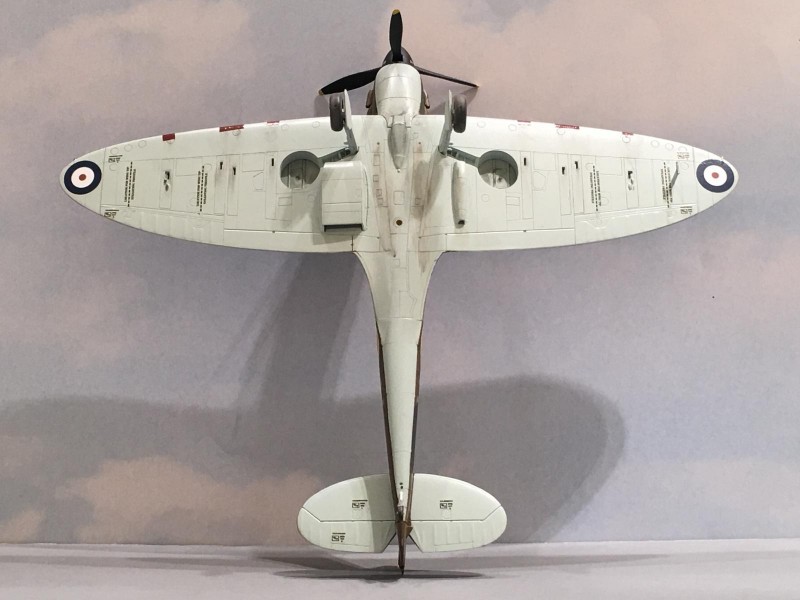
The artists drawing had the underside color listed as BSS-381, which was a 1930 era No. 1 "Sky Blue". Needless to say I was ecstatic at this information, since now I could build up an accurate model depicting the "Sky Blue" color that I wanted to use. To make things even a little easier, this particular Spitfire had it's fuselage serial number over painted, so that was one less problem to deal with. Things were getting better all the time!
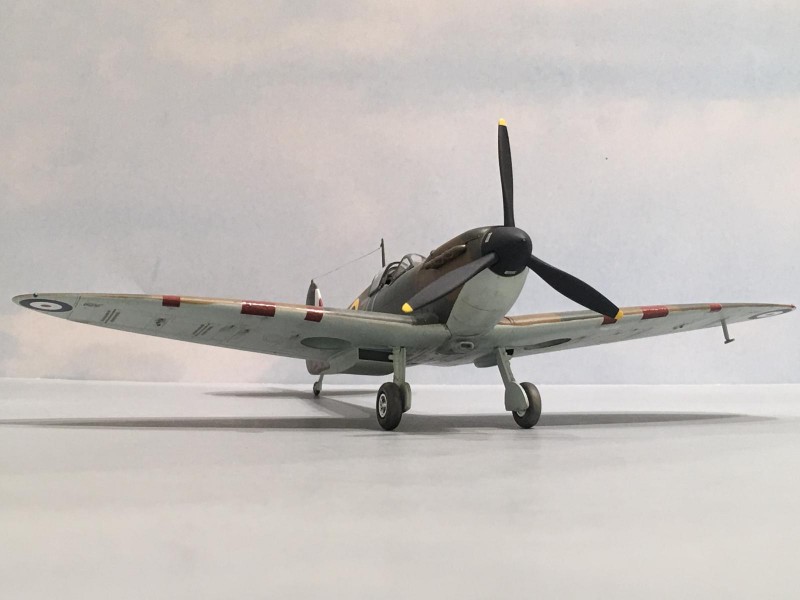
Here you can see the "Sky Blue" on the underside of my 222 Squadron Spitfire. Notice the tiny under wing RAF roundels and just how far they are positioned outboard on the wing.
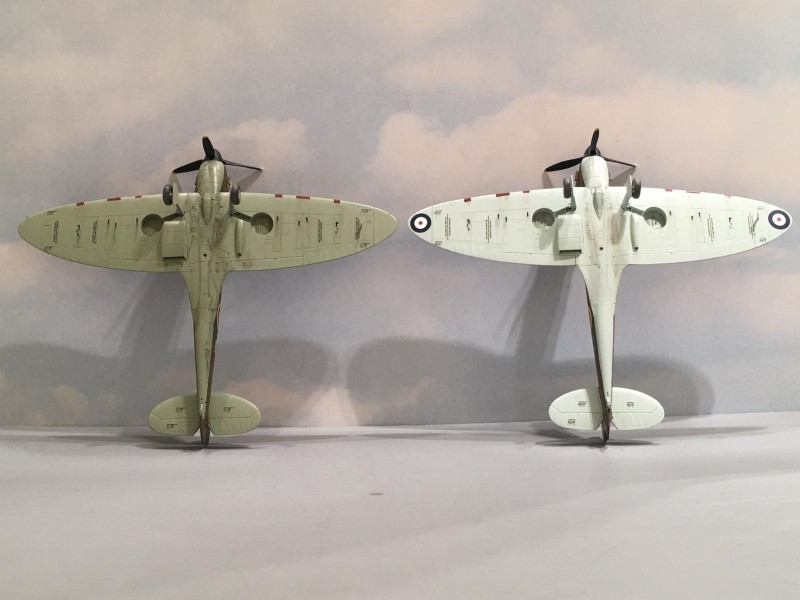
Here it is placed next to another recent Spitfire build that is wearing the "Sky" color. The lighting has made the light "Sky Blue" appear a little too light, and the "Sky" looks way too dark...
In all actuality it's more of a true "Sky Blue" color that it was named for. Someday I hope to get better lighting for taking pictures of my builds. I plan on building a photo light box in the future. The Spitfire on the left had the underside painted using Tamiya XF-21 "Sky". The plane on the right used Model Master FS 35622 "Duck Egg Blue".
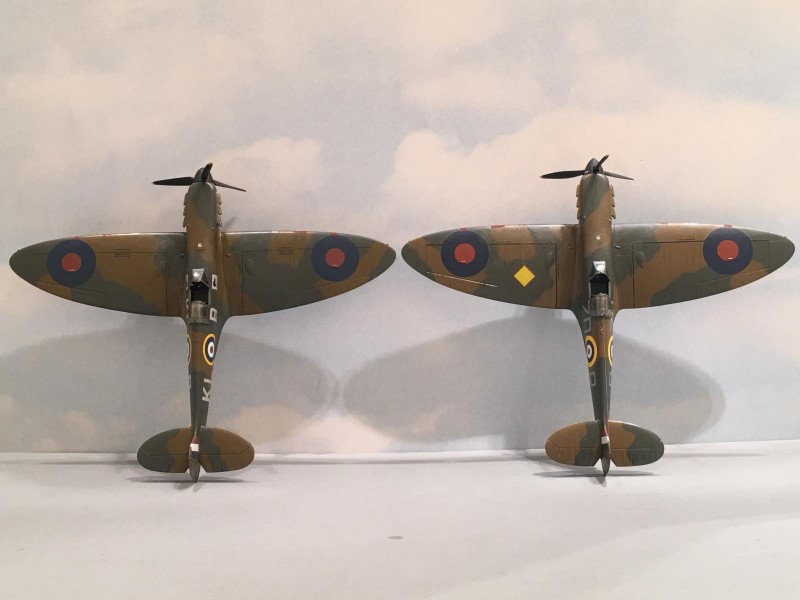
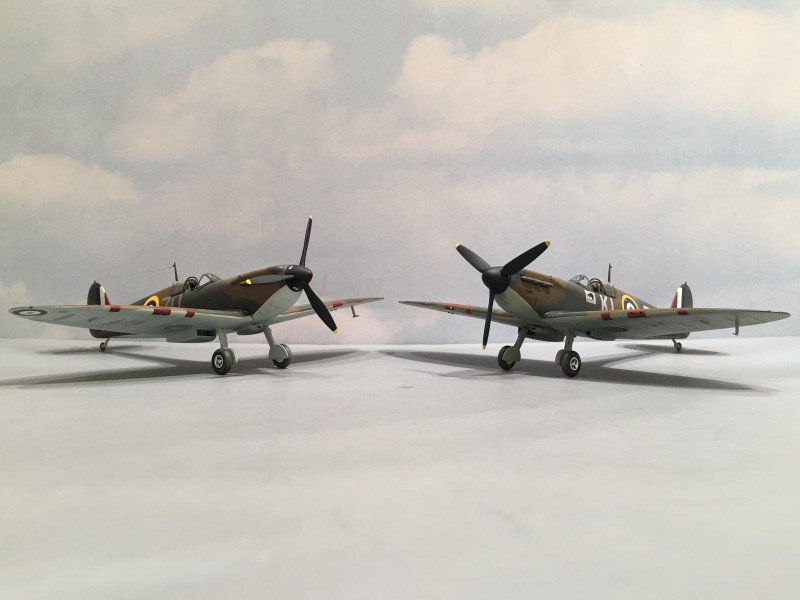
In this next picture, you can see the difference between the "A" and the "B" camouflage schemes. The "A" Scheme in on the left side Spitfire, while the "B" scheme is on the right and has the yellow "gas detection" panel on the Port side wing. They are basically a mirror image of each other.
During this time of the War, the Brits didn't know if the Germans were going to use gas weapons like they did during “The Great War”. So various planes had these gas detection panels on them. They were supposed to act as an early detection system. The panel was supposed to change colors if it was exposed to a gas.
Occasionally the colors were reversed. This would have the Dark Earth color (which is the Brown) used in place of the Dark Green. It pays to have a photo reference when you are lucky enough to find one...
Supposedly the fuselage serial numbers were to determine the type of camouflage pattern that was to be used on the airframe, with the even numbers having one pattern and the odd having another. I have found that it was not always true that the serial number dictated the "A" or the "B" patterns.
During the wartime production, an airframe was not always ready to be painted when the painter was ready to spray the plane. So on occasion they "improvised" at the factory and painted it with what ever pattern they had ready at the time. Here again it is best to have a picture if you can if accuracy means that much to you.
This model is the older Tamiya kit number 61032. If memory serves me, it was originally released back in 1993. It still builds up into a nice looking Spit. I have read on other websites where the fuselage is too fat or the shape of the wing isn't spot on. This may be true, as I didn't take the time to check for these alleged problems.
I can say that it looks like a Spitfire to me once it's built. Close enough for Government work ! This one was built right out of the box. Well almost...
Instead of using the kit supplied De Havilland style propeller, I used one from the new tool Airfix Spitfire Mk I kit. With a minor alteration to the prop shaft, it fit like a glove. No other additions were made other than to add some aftermarket decals.
In case you are interested in looking at how this Spitfire was built (and a few more along with it), here's a link to the build journal. It's currently active and has more Spitfire models underway.
The following history of 222 Squadron was obtained from Wikipedia:
World War One
The squadron was formally formed at Thasos on 1 April 1918 from "A" Squadron of the former No. 2 Wing, RNAS when the Royal Air Force was formed. At this time, Richard Peirse became Officer Commanding 222 Squadron. Later, on 6 April 1918, former "Z" Squadron of No. 2 Wing, RNAS was added to the strength. Renumbered No. 62 Wing and consisting of Nos. 478, 479 and 480 Flights, the squadron was given the task of maintaining raids on Turkish targets in Macedonia and Thrace, operating from islands in the Northern Aegean, officially adopting the 222 Squadron number plate on 14 September 1918. The squadron continued to carry out raids on Turkish targets in the Balkans until the end of the war, eventually disbanding on 27 February 1919.
World War Two
On 5 October 1939 No. 222 Squadron was reformed at RAF Duxford flying Blenheim Mk.If's in the shipping protection role, but in March of the following year it re-equipped with Spitfires and became a day-fighter unit. It fought during the Battle of Britain, being based at RAF Hornchurch on 15 September 1940, under Squadron Leader "Johnnie" Hill. It later took part in Operation Jubilee, the 1942 Dieppe raid. In December 1944 the squadron converted to Tempests, which it flew until the squadron was recalled to the UK to re-equip with Meteors.
Entering the jet age
From October 1945 the squadron flew various marks of Meteors for nine years and later, after December 1954 Hunters, being part of Scotland's defense, but on 1 November 1957 No. 222 was disbanded.
On Rockets
In its last incarnation on 1 May 1960, No. 222 became a Bristol Bloodhound SAM unit at RAF Woodhall Spa, but after four years service in this role it disbanded on 30 June 1964.
This model was painted using Model Master enamels. A light dusting was applied using colors from the Tamiya weathering decks.
I hope you enjoyed this article as much as I have enjoyed doing the research and the actual building.
As usual,
Comments are encouraged.
Thanks for looking and please have a safe and Merry Christmas!
Well done Louis, looks good, with use-full info !
Thank you Allan, @kalamazoo
I hope this article will be of use to someone who is looking to build one up. Merry Christmas !
Great job Louis! Remarkable research and info.one question, what is the purpose of that yellow square on the wing? I put it on my Defiant, not knowing what it is.
Thanks Robert ! @roofrat
I appreciate the compliments. Merry Christmas !
It was a gas detection patch Robert
Thanks George @blackadder57
for answering his question. I didn't notice it until just now.
During this time of the War, the Brits didn't know if the Germans were going to use gas weapons like they did during "The Great War". So various planes had these gas detection panels on them. They were supposed to act as an early detection system. The panel was supposed to change colors if it was exposed to a gas.
I'll go back and add this information to the article. Great question ! Thanks again.
Oh, that gas, thanks.
Great job Louis with the added bonus of colour explanations
Thanks George. Eventually I want to post an article showing the various colors that were used by the RAF during WW2. I plan on using models to show the differences in colors, similar to how I posted the Black and white underside Hurricane and early Spitfire Mk I on this one. I think that by having a model to look at, would be much better than an illustration only.
But first I need to get some better lighting that will enable me to take a more "accurate" color picture.
Thanks again !
Looking forward to it. I'm still working on the lighting as well. A good background is essential too. On another site I illustrated the differences using a black, powder blue and light grey background. Using the identical camera setting with all 3 backgrounds sure showed some differences.
That sounds like a very interesting article. Can you send me a link to it ? I'd really like to read it. Thanks George, @blackadder57
and have a Merry Christmas !
Sent you a PM Loius
Not only an excellent bit of modeling on the Spits. But the history and great research on the paint schemes as well. Very well done and presented Louis.
Thanks Chuck, @uscusn
I appreciate the compliments. It's always good to hear from you my friend.
Merry Christmas to you and your loved ones !
Louis, Nice looking Mk I, I also really enjoyed reading through your very informative narrative on RAF camo and paint use. I also was glad to finally learn what that yellow triangle on the wing was. Nice work and thanks for the useful info !
Terry, @shoobiz
I'm happy that you found the article to be a decent read. I have been trying to make them better as time goes by. I also try to incorporate a little bit of history in each one, with some having more information than others.
Merry Christmas !
Simply fabulous post, Louis. Such a pretty, elegant bird!
Thank you David. @davidathomas
It's always great to hear from you. Merry Christmas !
Louis this is an outstanding model. You really delivered a WINNER! Well done!
Thank you Morne @mornem
for the kind words. Having seen some of your work posted here on Imodeler, this compliment means a lot coming from you. You do some splendid builds... Merry Christmas !
Thanks Louis for the nice compliment. Have a merry Christmas and a model filled 2019!
Beautiful Spits, LG! And great history as well. It's been fun following this one all through it's many postings.
Muy bien, Amigo ! Bravo !
Hey there my fellow DAT brother ! Great to hear from you Jeff ! @mikegolf
Tanks for the kind words, and I hope that you and your family have a wonderful Christmas... Merry Christmas buddy !
Yes I said "Tanks"...
Louis - This achieves the goal that you were aiming for when we first exchanged thoughts on which a/c would demonstrate the changes in RAF Fighter Command undersurface colours during the early days of WW2. You may have answered this question before in another post, but where do you manage to store/display all these Iron Werks products? Me? I don't yet have a problem since my output is miscroscopic compared to yours. A shelf under the one containing my BoB library currently holds most of mine, but just your recent Spit builds amounts to more than I have on this shelf. Great looking build and an informative account of a complex problem on the painting front. Really well done. Paul
Yes Paul, @white4freak
This ended up being exactly what I wanted for my collection of Spitfires. This Spitfire filled in a gap since I wanted to have a model of each color and camouflage pattern in use on the Spitfire during this era. I sincerely appreciate all of your efforts and help with this subject.
As far as storage of the completed "Iron Werks" projects go, I have them placed in several large glass display cases that are sitting in our garage. Eventually I would like to move them into our home... but I need to get that approved by the misses first ! and I don't see that happening any time soon...
As a side note, I really enjoyed your most recent article on the Bf-109 ! That was a great posting.
Thanks again for all of your help, and I hope that you and your family have a Merry Christmas.
Take care.
Louis
The bar in this site seems to be exponentially raised every few months or so. It’s clear when you look back at earlier posts from some years ago (and I’m not singling you out here, Louis) that the skill levels of iModelers is definitely rising (self included, I’m glad to say). This is a great added extra of the community here.
This post is a great example. It seems to me, Louis, that you have been working harder at achieving ever more detail and better painting techniques, striving to find extra degrees of improvement. This is an excellent build with great interest and background; the range of comments is testament to that.
Well done Louis.
Funny thing you mentioned this David... @dirtylittlefokker
several weeks ago I went back and looked at some of my earliest postings on Imodeler. There has definitely been a learning curve. In my first postings I had all of my accompanying photos posted at the end of each article. Then I found out how to incorporate them into the text. That was a major step in the right direction as far as improvements go.
I do indeed strive to make each article an improvement on the last. My next step has to be taking better pictures with a proper light source. I really would like to present the colors I use in a more accurate way. My light source seems to alter the look of the colors on occasion. Some colors are affected by it more than others.
I agree, the articles are getting better here on Imodeler all the time. I think seeking improvement is something that most of us do.
Thanks so much for the observations, and I hope that you and your family have a safe and happy Holiday Season.
Take care my friend !
I’m sure we’ll have a happy holiday, Louis. As for safe...well, with my track record of mishaps, accidents, and the like - safe would be great.
I hope all’s peaceful with you and wish you all the very best of wishes from the old country.
I’ve always looked at early war/BoB RAF fighter camouflage as rather uninteresting from a modeler point of view. After all they all looked like wearing standard issue uniform, meaning, Dark Earth/Dark Green/Sky. Thanks to you, and in particular this here article, I got a whole new perspective about it. It’s still not as interesting as their Foes ad-hoc camouflages, but it certainly opens new possibilities in building Spitfires or Hurricanes that are not exactly so look alike the next one.
Now go see some therapist...
Pedro my friend ! @holzhamer
It's always a pleasure to hear form you. Originally I thought that the RAF had some rather dull uninteresting paint schemes. Then after starting a little research, I found this to be quite the opposite. In fact here's a little color chip showing some of the colors that were used by the RAF. This shows just some of the color combinations... add in the planes flown from Australia and New Zealand or even the ones flown in the Burma theater you can add another whole set of colors.
I whole heartedly recommend checking into this if you're interesting in building some one off planes.
Now speaking of therapists...
Here's another example would be to make a model of a captured Spitfire... one that David LS
@dirtylittlefokker
shared with me a while ago. This one might be more to your liking !
One of my all time favorites though is to see a German plane wearing late War colors. Practically anything goes there... just like German Armor.
Good stuff.
Merry Christmas to you and your family !
And a Merry Christmas to you and all your loved ones Louis!
There are quite a few people that have a special interest on captured birds, not me I assure you. However we all agree that there are some highly interesting subjects in categorie.
The RAF will be in my modeling bench in the new year, besides the one going on at the moment I plan to finally build my all time favourite British aircraft, the Mosquito. It is also one of those aircrafts that have some uniqueness of its own even when it comes to camouflage... Luftwaffe projects will obviously be on the bench too
Nicely done Louis, a great looking Spit you have added to the GB. Really enjoyed the info on the various camo schemes, like you I was always stumped as to what in god's name is the difference between Sky and Sky Type S. Always assumed it was the Brits being British, then I remember what Bernie Hackett was fond of saying, "there was a war on, they used what the had on hand." Good job buddy nice addition from the Iron Werks.
Thanks Tom @tom-bebout
and Merry Christmas buddy !
I think our dear friend Bernie was on to something with his statement... After corresponding with Paul Nash about the use of these colors, it seems that exactly what Bernie said was indeed done on occasion. They simply used what they had on hand in some units or maintenance depots.
I like to call this close enough for government work.
When you figure out the difference between "Sky" and "Sky Type S". please let me know what the difference is... I still don't know either !
Another added benefit, the capture Spitfire...rarely do you see a Spitfire on the ground with its flaps down.
Another point written in the article, often modelers will paint the exhaust that brown patina from extended use and frequent applications of full power. If the plane had a short life measured in hours...that patina on the exhaust never turned brown.
Neat article Louis. A "Teach a man to fish" moment . Spitfires where constantly evolving and when you read the information provide on some of these archaeological digs its amazing what can be found. One aircraft site ...they found that the Brits recycled fire hoses and used the material for making the straps on the rudder pedals.
Two thumbs up on the "You can never have too many Spitfire build."
Good thing for Louis ?
You know Stephen , @stephen-w-towle
I also noticed the flaps down in the pictures. Then I had an "AHA" moment. This Spitfire was forced down by a bullet hole in the oil tank next to the engine.
The pilot probably kept the engine running as long as he could, (with the flaps down) in an effort to destroy the machine to where it would not be flyable after a relatively "easy" fix by patching or replacing the oil tank.
By having the flaps open, it reduced the airflow through the radiator and oil cooler when the plane was on the ground. This action, when combined with knowing that he was losing engine oil, I'm sure the Spitfire pilot was trying to sabotage his machine before it fell into German hands by ruining the engine due to lack of oil and excessive heat. This is a great combination to destroy an engine if that is your intention.
Later on during the War, another captured Spitfire Mk V was re-engined with a Daimler Benz engine and flown by the Luftwaffe. This one was damaged by Flak and made a forced landing too.
Your comments on the service life of these planes is correct in that many ( not all) only survived combat for a few months. This is why I didn't go over board with chips and weathering on this one...
That was a neat bit of information about the recycled fire hoses ! Being a former Fire Fighter myself, I found that very interesting.
As far as the exhaust manifolds on these planes, that's another story. They were constructed of sheet metal to save weight, and stamped into shape. These stamped parts were then welded together.
Since the metal was thin and not a cast iron like one would find in an automobile, the heat affected the color almost immediately. Just from starting the engine up and running it the first time was enough to change the color of the metal to a more burnt shade. Burned sheet metal often has various shades of blue and darker grays. Brown colors would probably be more of a rusting effect which would probably take some time depending on the environment it was operated in. Heat from the exhaust would usually remove the flash rust that would be present if the engine had not been ran for a while.
It was not uncommon at all to see flames emerge form the exhaust as the engine was first started...
a scary sight indeed if one wasn't accustomed to it ! The threat of fire was a real one, and that's why you will often see a ground crew standing nearby with a fire extinguisher at the ready upon engine start up.
Think about this last picture from a fire fighters perspective... At one end you have a fire. In the middle you have the pilot. See that empty space between the exhaust fire and the pilot ?
That's where a fuel tank was located !
Thanks and have a Merry Christmas !
That bullet hole in the oil cooling tank...if it were that single round in Nam they called it the "Golden BB".
One round to take you down.
A couple of observations that might be relevant. On the question of the flaps in the down position, whatever the technical reason for this not being normal practice, one of the experts on early BoB RAF Spits made the comment that kinda supports your theory about ensuring max damage to the Merlin. Apparently, RAF fighter units used to fine pilots that made the mistake of leaving the flaps down when the a/c was stationary.
The other thing is that I believe all the Merlin exhausts were actually manufactured from stainless steel which colours in a non uniform manner when subjected to the heat of the exhaust gases and any unburnt fuel. We have in our local museum a recovered Merlin from an early Spit where you can see the 3 manifolds are s/s.
Paul
Thanks for sharing this information about the stainless metal used on the exhaust. This is something I didn't know. I knew about the stampings, but I never realized the type of metal used was stainless. It all makes perfect sense now... and perfectly explains the colors of the metal once it was heated.
I still believe the flaps were left in the down position on purpose, in order to cause the Merlin the maximum damage possible before shutting it down. I had heard about the fine imposed, and I'm sure that's part of the reason why you rarely see a picture of a Spitfire with the flaps deployed.
Thanks again for all of your help Paul. Merry Christmas !
Great information, Stephen! These are the kind of little tiddly-bits of information that really help those of us striving to improve our techniques and / or simply learn new facts. Thank you! Plus, finding out about used fire hose straps is kinda cool and interesting, too.
In another "direction," so to speak.: I worked part-time for extra ca$h in a gun shop years back (I was there when 9-11 happened, for instance) and the owner built one of the first indoor firing ranges in Indianapolis. Down on the target end is a large enclosed pile of cut pieces and chunks of tires ... and pieces of fire hoses. These are used to stop the bullets in place so everything can be totally contained for safety. It works VERY well. 17 years later the place still has a 100% safety record.
Now we know TWO ways old fire hoses are re-purposed!
@lgardner @dirtylittlefokker @stephen-w-towle
Stephen, I really like your posts in response to builds; always helpful, considered and with a great evidence base.
I echo David's sentiments... Thanks !
Great job Louis!
I've been a stickler for "color" and patterns when it comes to models. Cars had to have the correct engine color, Ford blue or Hemi orange. Aircraft, ADC gray or SEA. More recently, what color is the cockpit of a A6M Type 52? Depends on who built it!
So, yes great info here Louis, and I really enjoy the atmosphere here at iModeler.
Hey Robert ! @beauslx
I think we have a lot in common... You got my attention when you mentioned Hemi Orange ! I like to use the proper colors in my work too. I remember the days when everyone thought that all Japanese aircraft used "Aotake" Blue on all interior surfaces... Then it was discovered that this was all incorrect and that there were numerous colors used on Japanese planes... It even changed between different manufacturers building the same plane !
The prime example you mentioned being the difference between a Nakajima or Mitsubishi built Zero... Good stuff.
I still have not forgotten about the Ju-88 A5. It's getting closer to the top of the build pile. I plan on cranking it out in 2019... but there's a certain ICM He-111 in the way that needs finishing first.
Imodeler is a great place !
Thanks again my friend,
and here's wishing you and your family a Merry Christmas.
Thanks Louis, you and your family have a Merry Christmas and Happy and safe New Year!
BTW, picked up the 111H-6, very nice. Looking forward to the finish of your 111 build.
We are hoping that all is well here on Christmas, Thanks !
As soon as I finish these Spitfires, the ICM 111 is next on the chopping block. I really need to get it done... I'm so glad you picked up one of these kits... they're excellent in my opinion.
So far all of the problems I have encountered were all self induced and my own fault. Please don't hesitate to reach out if you have any questions along the way. I'd be happy to help if needed.
Hey Louis,
What a great build, the model looks absolutely fantastic, interesting History lesson as well. Fantastic...
Thank you Marc ! @marc
I am amazed by just how much I have learned on this journey. In turn I try to pass this knowledge along in the chance it might become helpful to another fellow model builder.
Take care and I hope you and your family have a Merry Christmas.
An excellent article, Louis. An inspirational build and lots of good information.
For those interested, if you can find the old Profile Publication (from the 1970s) "Camouflage and Markings - Supermarine Spitfire" it gives camouflage patterns and a detailed discussion of much of this material. Very useful and extends out to 1945. Has a very good discussion of the changes that happened when they went to Ocean Grey/Dark Green over Sea Grey Medium.
Thanks Tom @tcinla
for the compliments. The plan is to eventually build some more Spitfires in the later colors you mentioned. Lots of options out there if you start digging a little.
Merry Christmas to you and your loved ones.
Top stuff again from you Louis.
Thank you very much Anthony. Merry Christmas !
Another great-looking Spit Louis!
I have to admit I saved this one Louis, the wider family have just left after Christmas, and I had a quick scan a while back but didn't want to do this the disservice of not reading and digesting it properly. The effort you have put into the article alone is immense, it summarises all of the deep and accurate research you did across this monumental set of builds for the group. The model itself is immaculate. It embodies all of the background work you did, and all of your peerless skill and experience, and distils them into something so much more than plastic, paint and glue!
This build, technical guide and historical reference piece is simply my favourite article ever on iM.
I don't think I'll ever really be able to express my gratitude for what has been going on at 'Casa Bromwich' adequately, Louis. This is the stuff of legend and you have my complete admiration!
It looks ready to face the “yellow nosed bastards” head on! Early Spitfires are the most beautiful ones, and your rendition looks great, Louis. Thanks for all the useful info for us Spitfire enthusiasts!