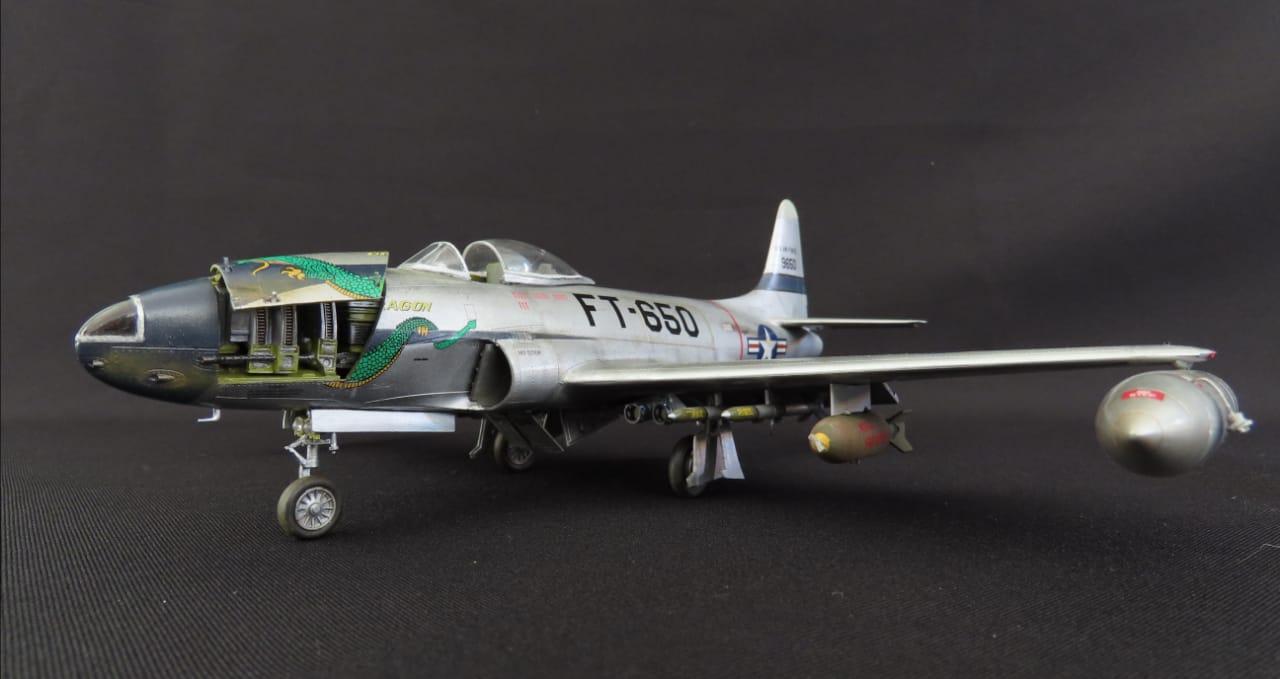
Hobbyboss F-80 C Shooting Star “Saggin Dragon”
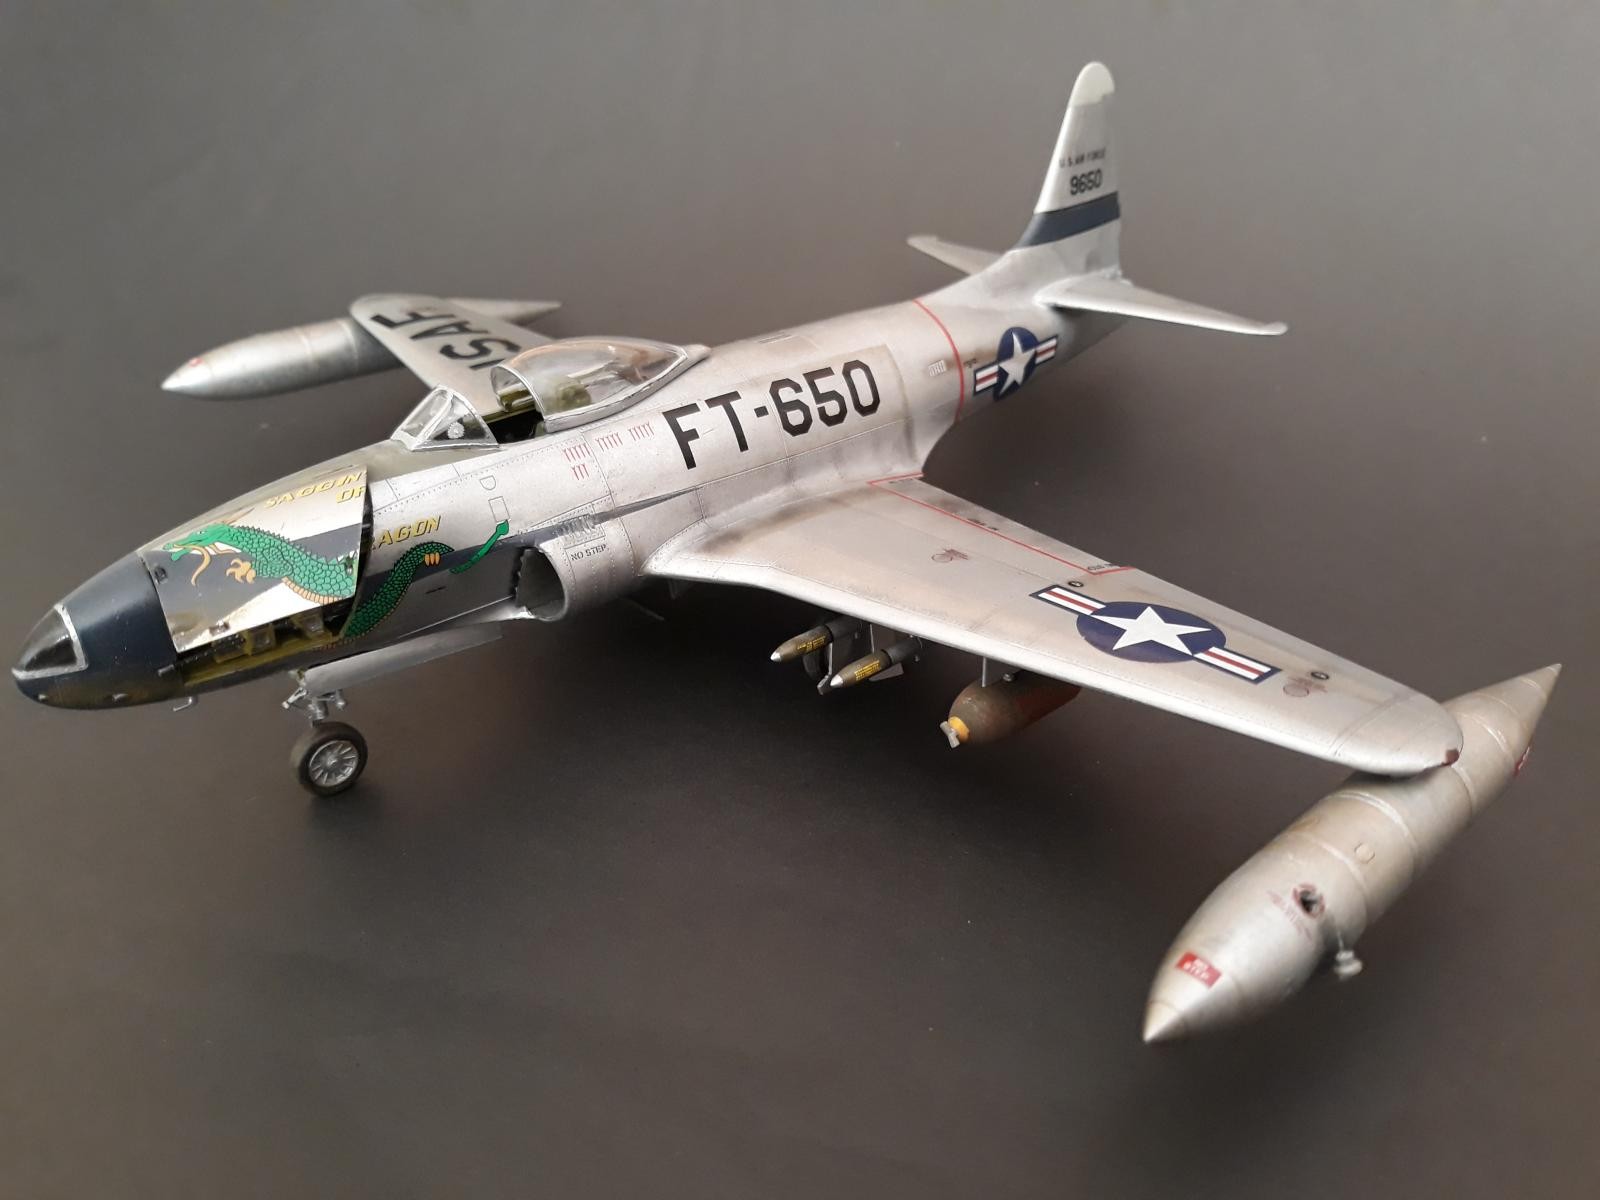
Although serving in small numbers towards the end of World War II, Lockheed's pugnacious fighter made a name for itself as a fighter and strike bomber during the Korean War. To commemorate the start of the Korean War 70 years ago and to pay homage to those brave pilots and soldiers that answered the call to arms, I decided to build the 1/48 Hobbyboss Shooting Star.
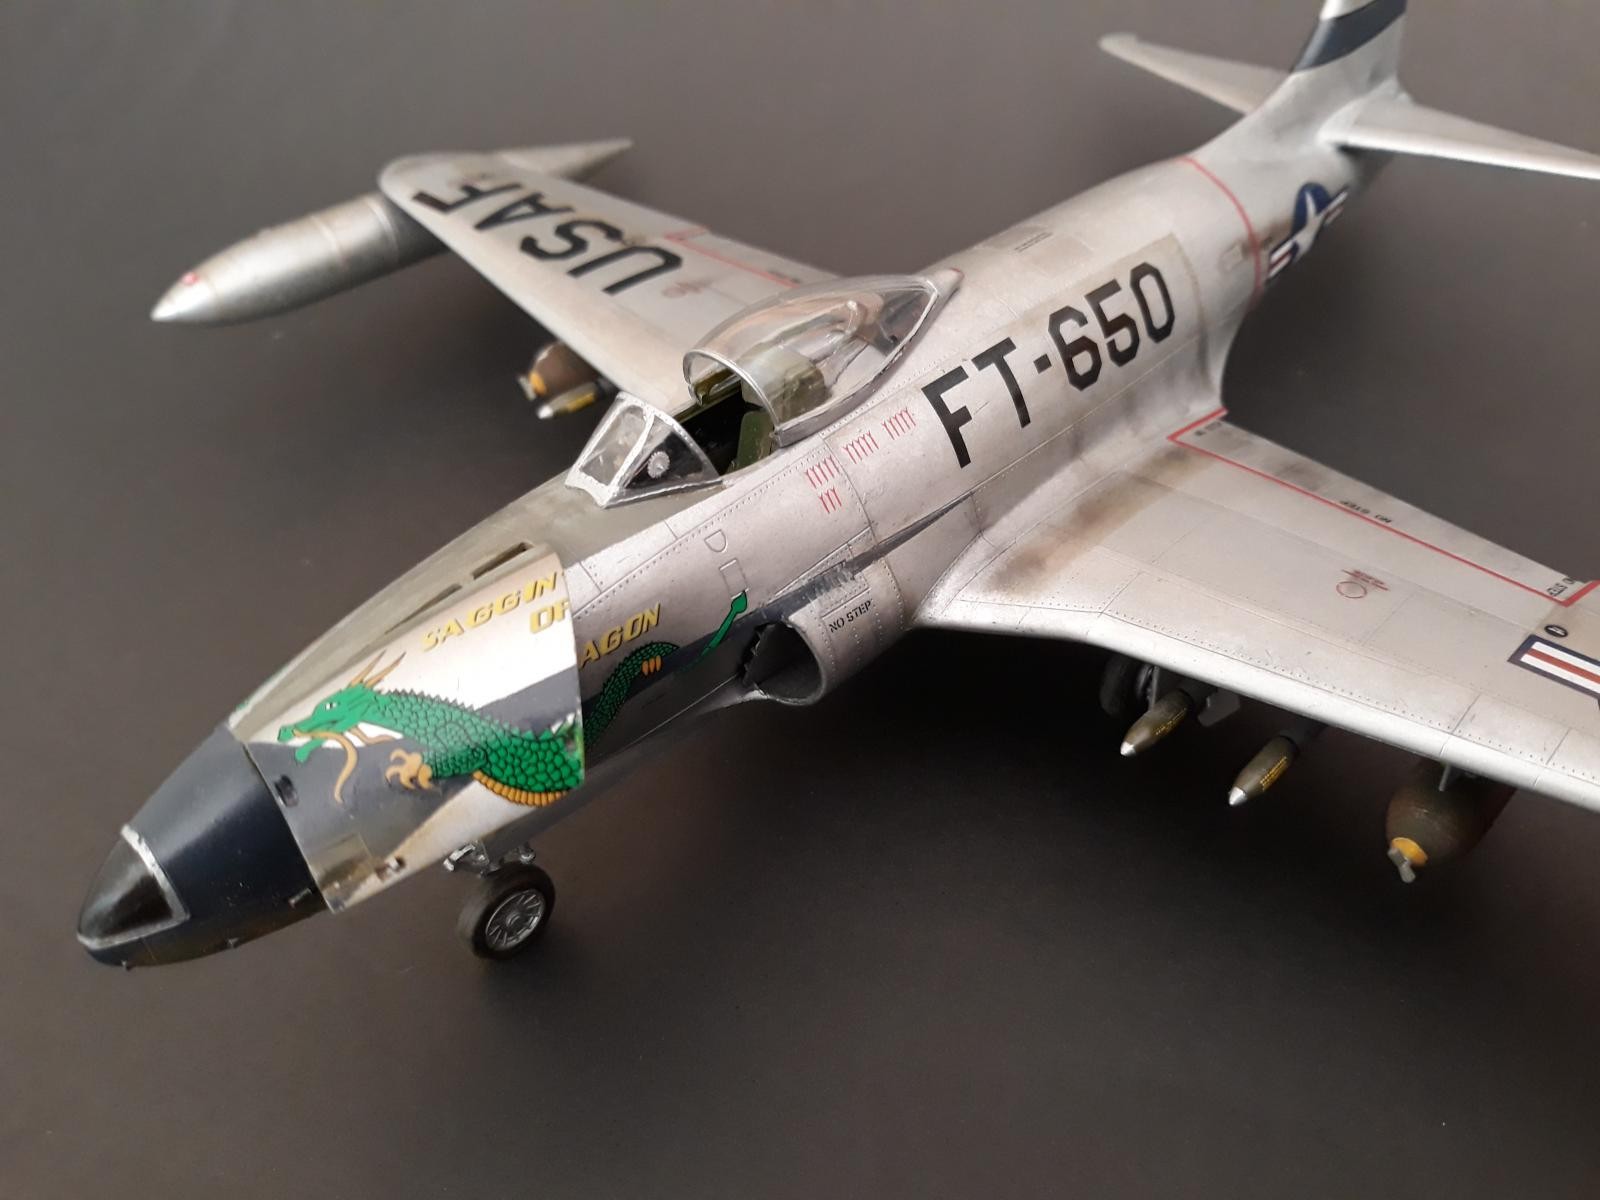
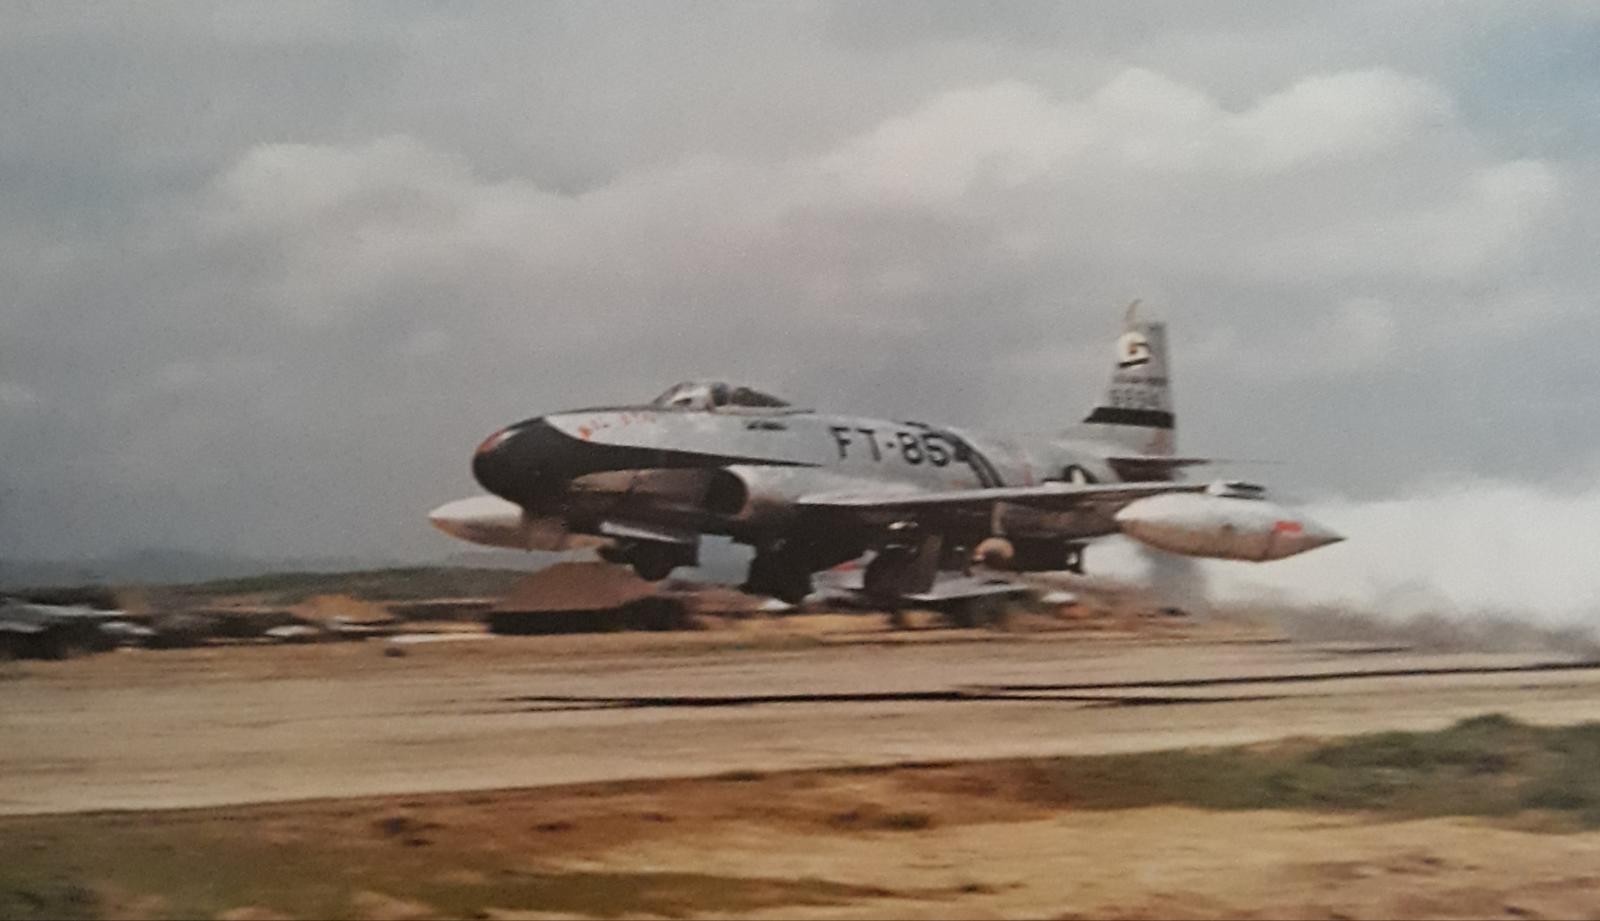
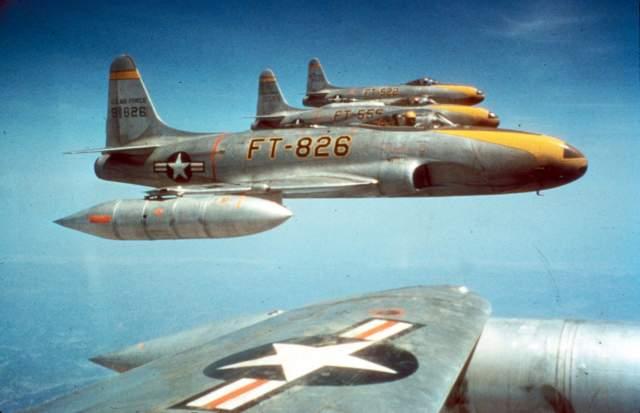
The Shooting Star was one of the workhorses of the Korean War. Being the most numerous fighter aircraft within the FEAF meant that it was used extensively as a fighter, strike bomber and recon platform. Within the first four months Shooting Stars flew 15 000 sorties. By the end of the war in 1953 the Shooting Stars had amassed an amazing 98 515 combat sorties. As a fighter it was hopelessly outclassed by the radical Mig 15. Nevertheless, Shooting Stars achieved 17 kills of which 3 were Mig 15's but was soon declared obsolete for the fighter role. This was a blessing in disguise as it proved its worth as a strike bomber. It dropped 33266 tons of bombs and fired 80 935 HVA Rockets during the war. The strike missions it performed exerted a heavy toll, 368 F-80's were lost, including 277 in combat missions. Of the 277 lost in operations, 113 were lost to ground fire, 14 to enemy aircraft, 54 to unknown causes and 96 losses were classified as “other”. One of the F-80 pilots, Major Charles J. Loring of the 80th FBS was awarded posthumously the Medal of Honor when he dove his damaged F-80 into a Chinese anti-aircraft battery saving the rest of his flight from the withering fire directed against them.
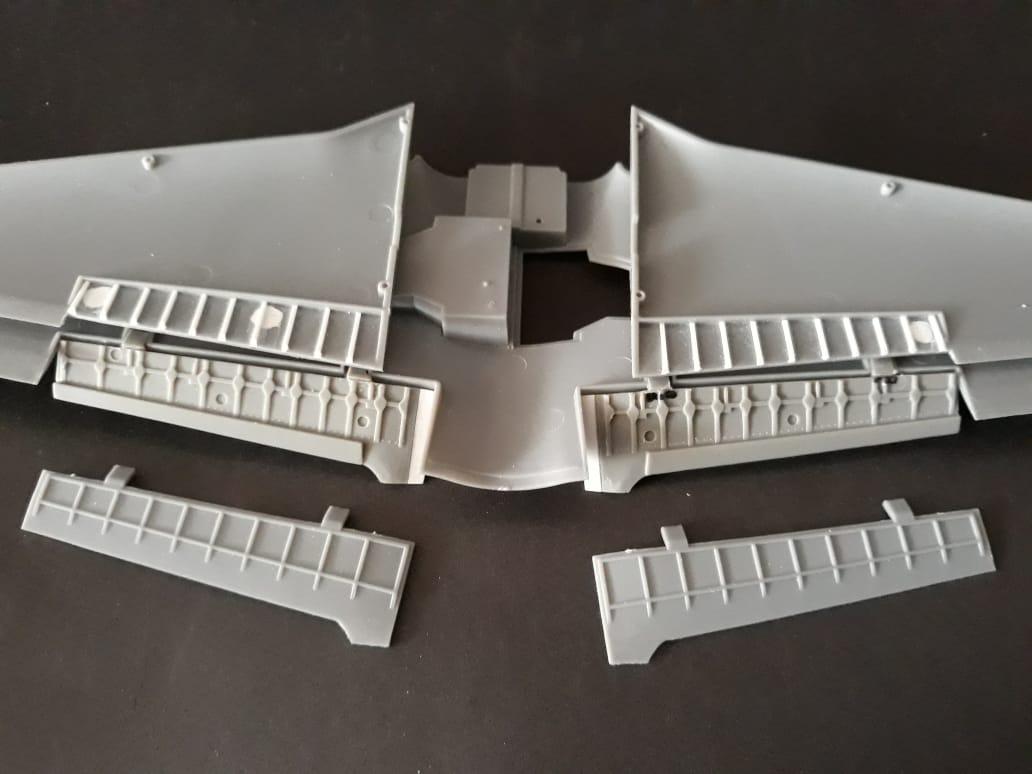
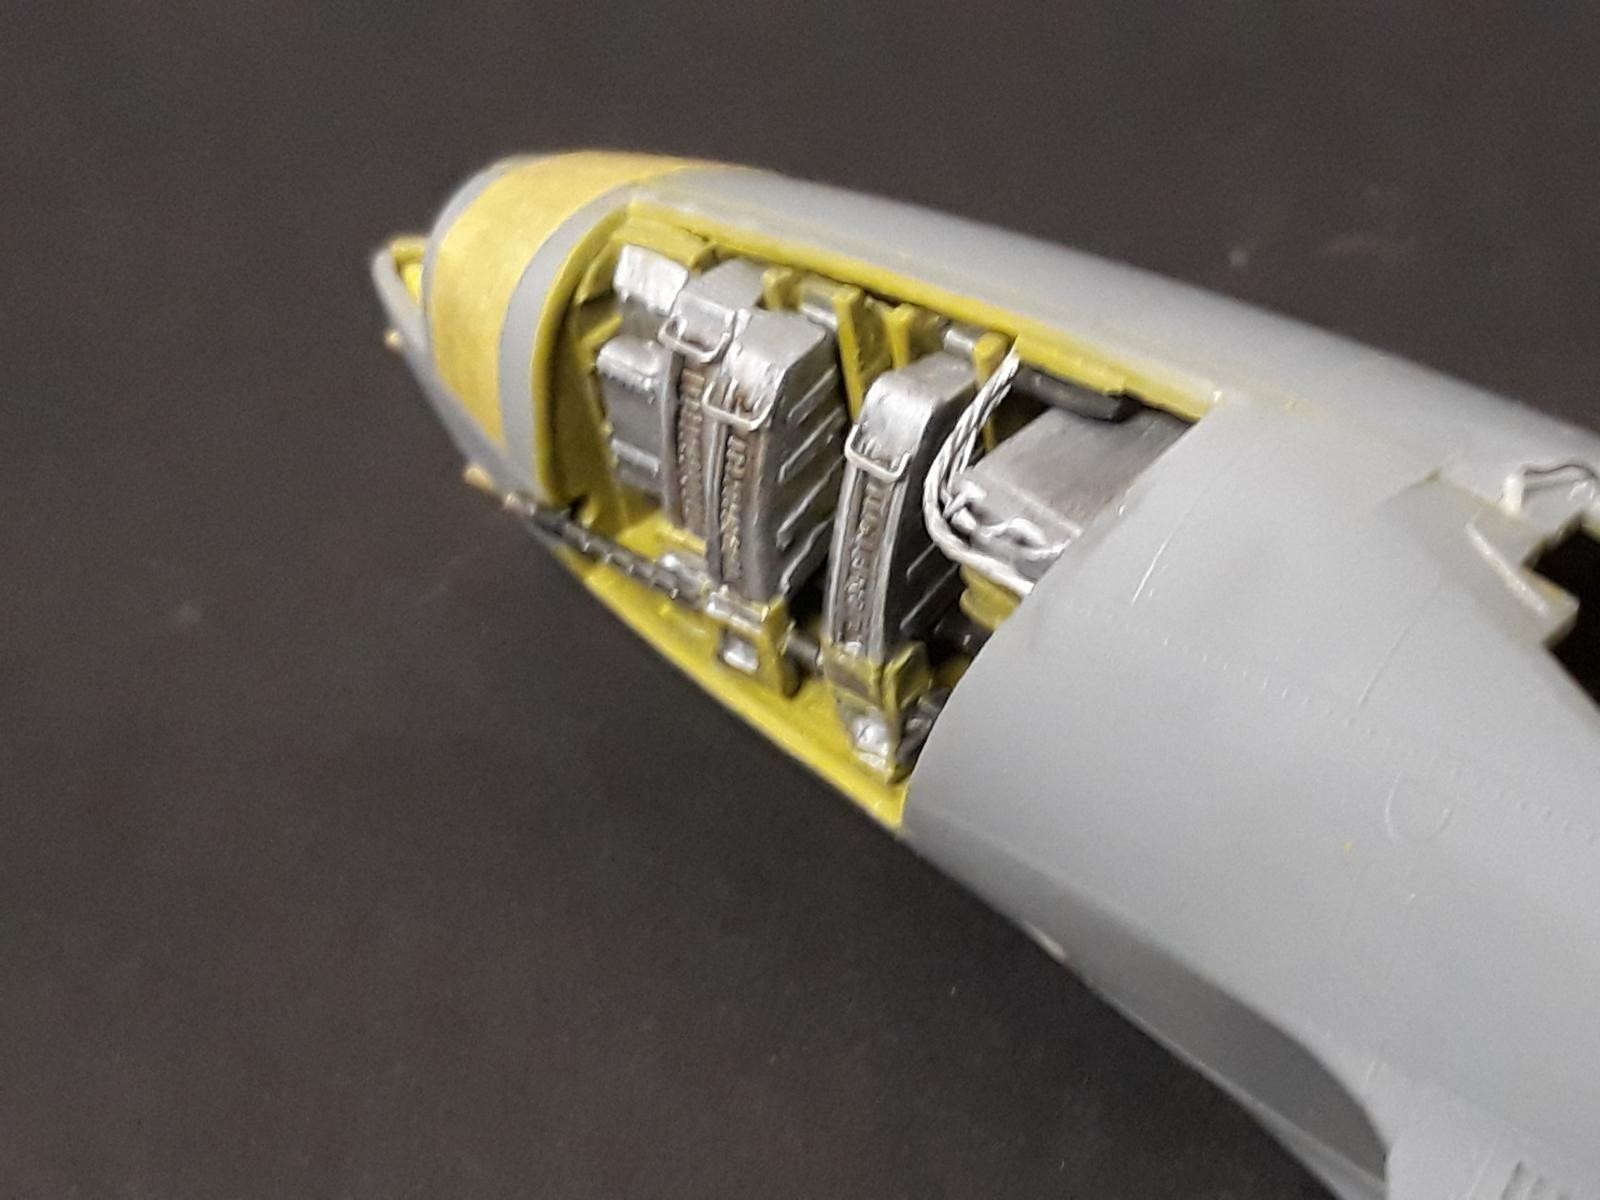
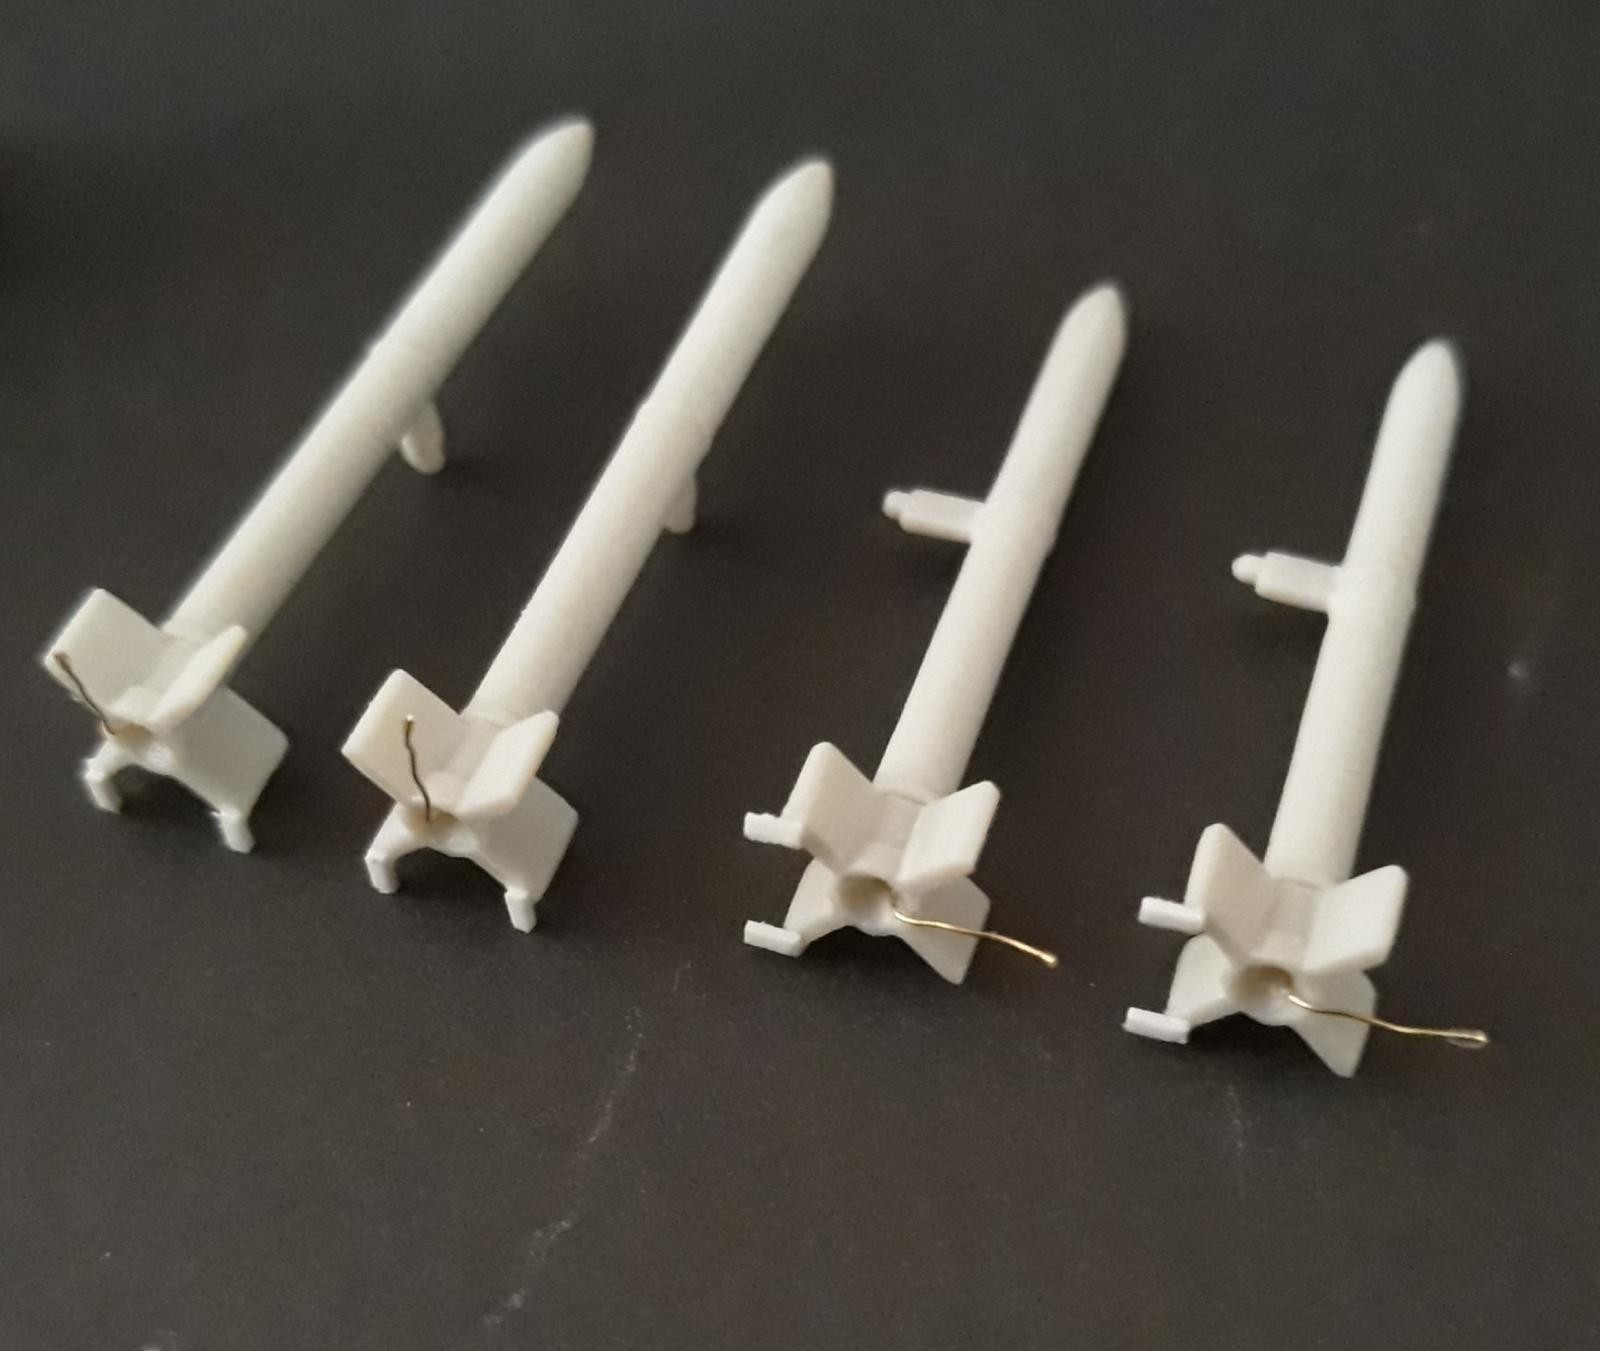
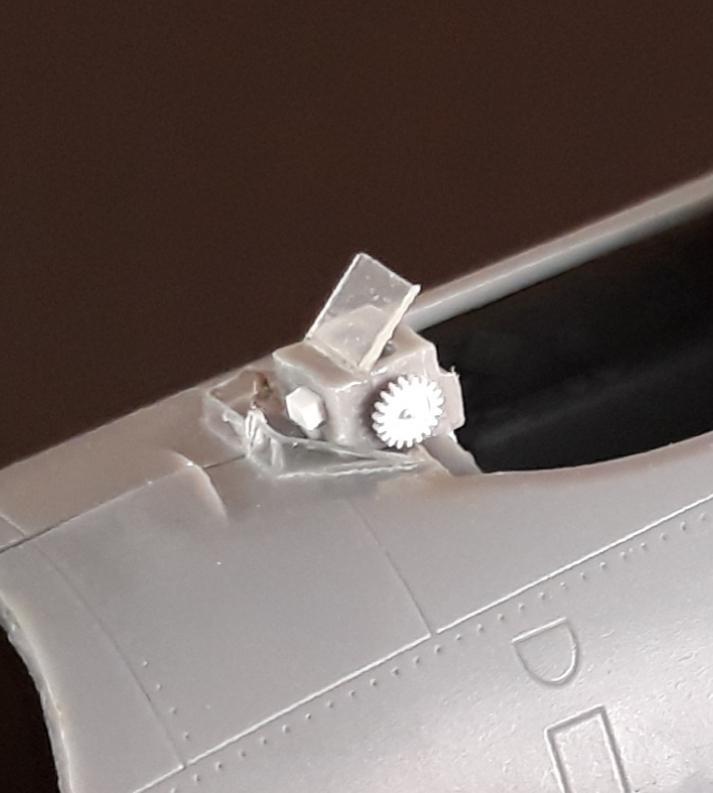
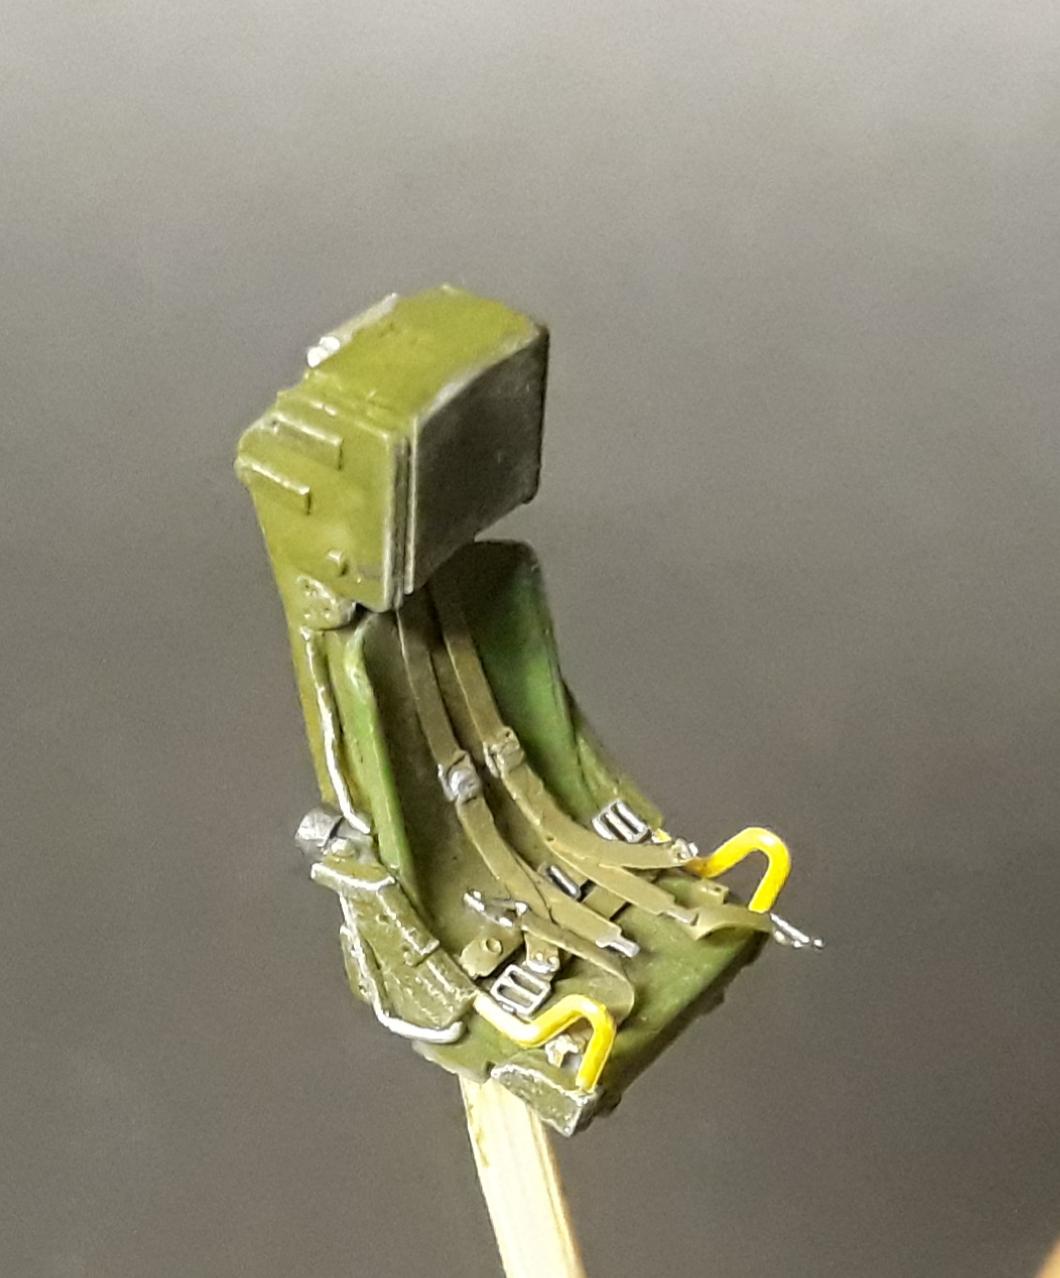
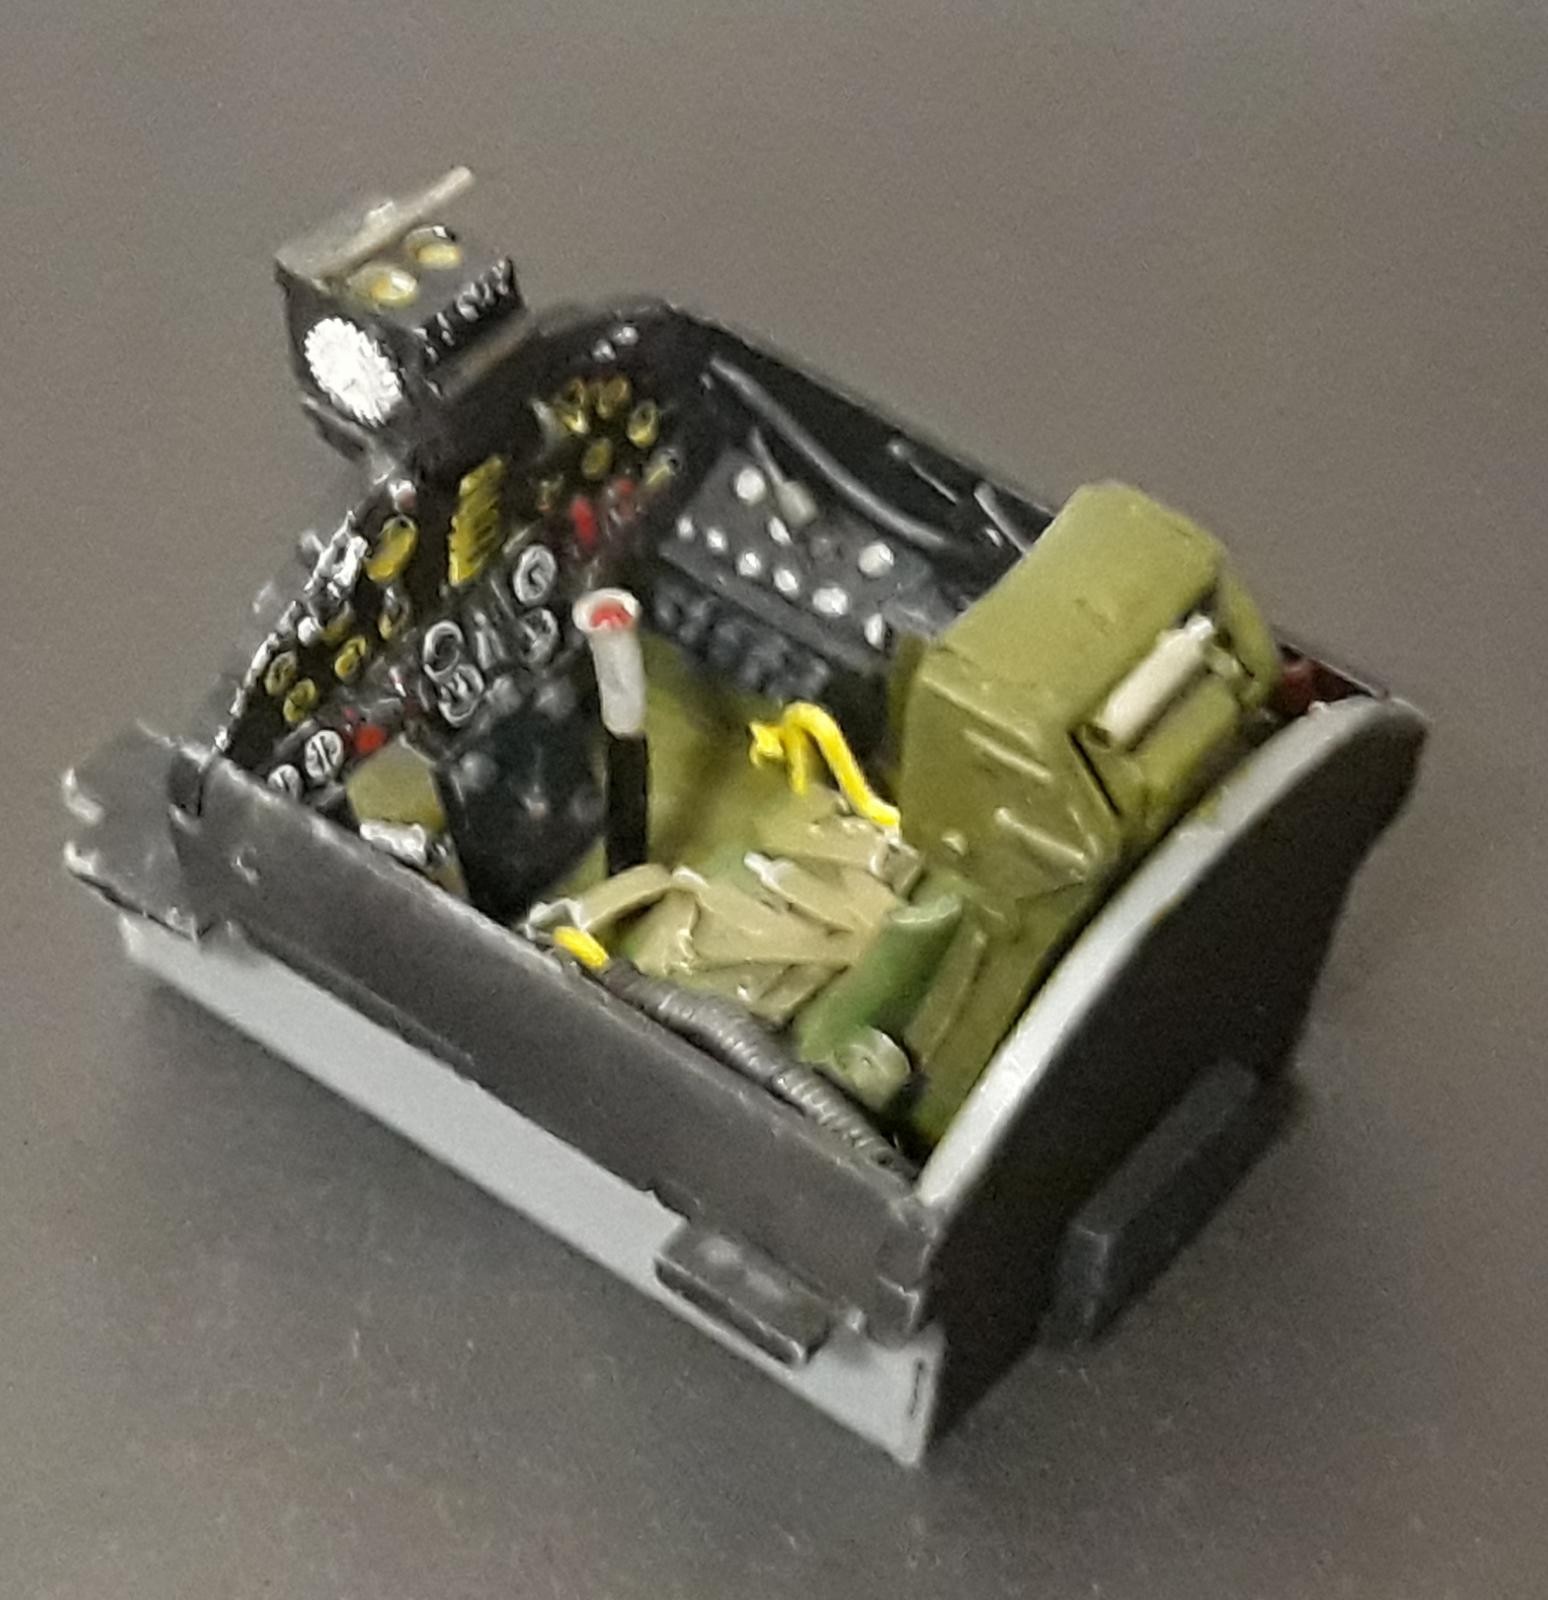
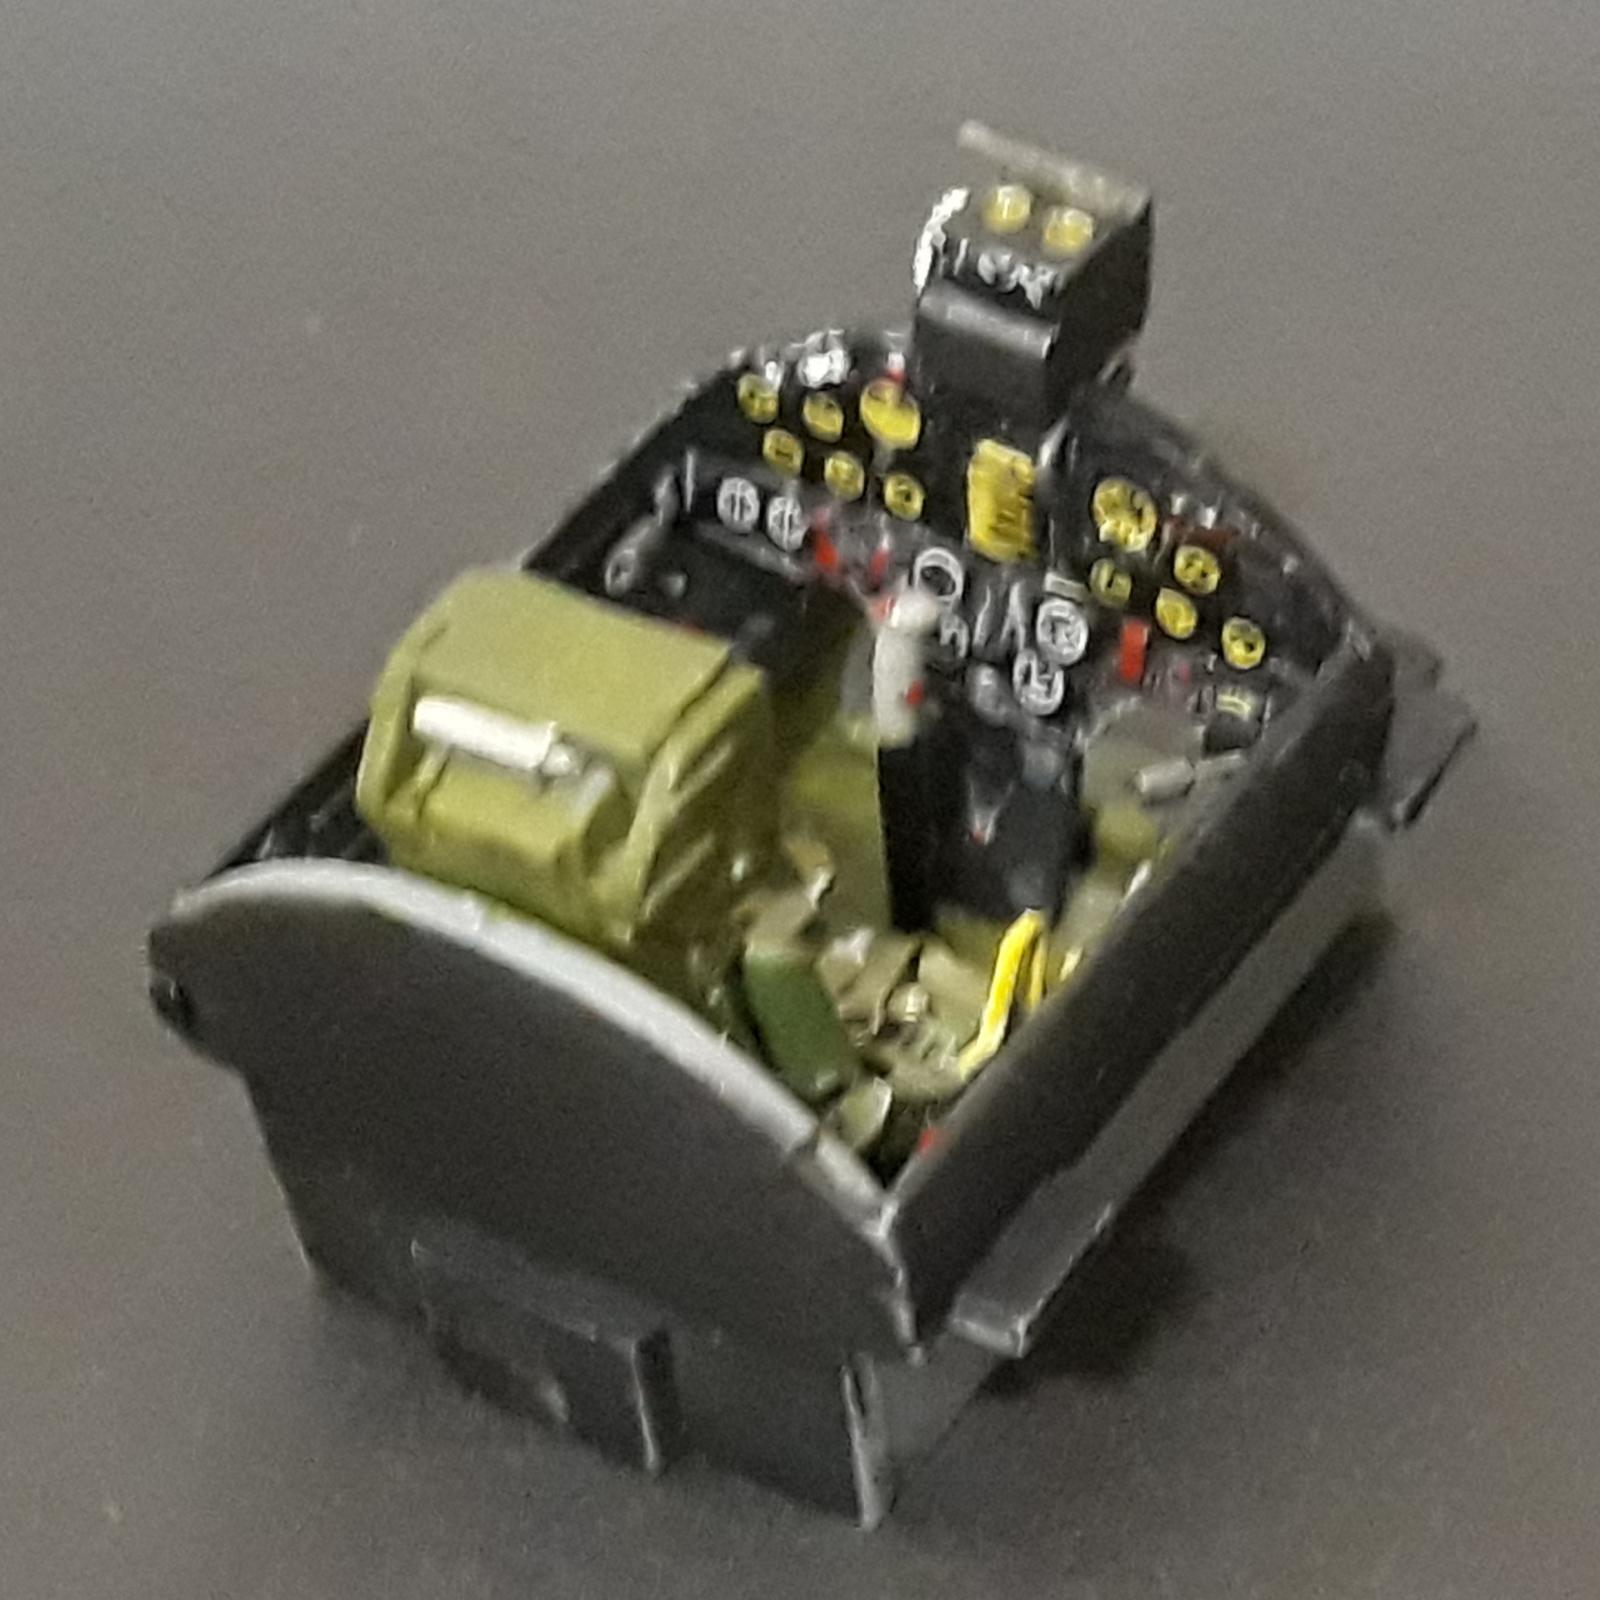
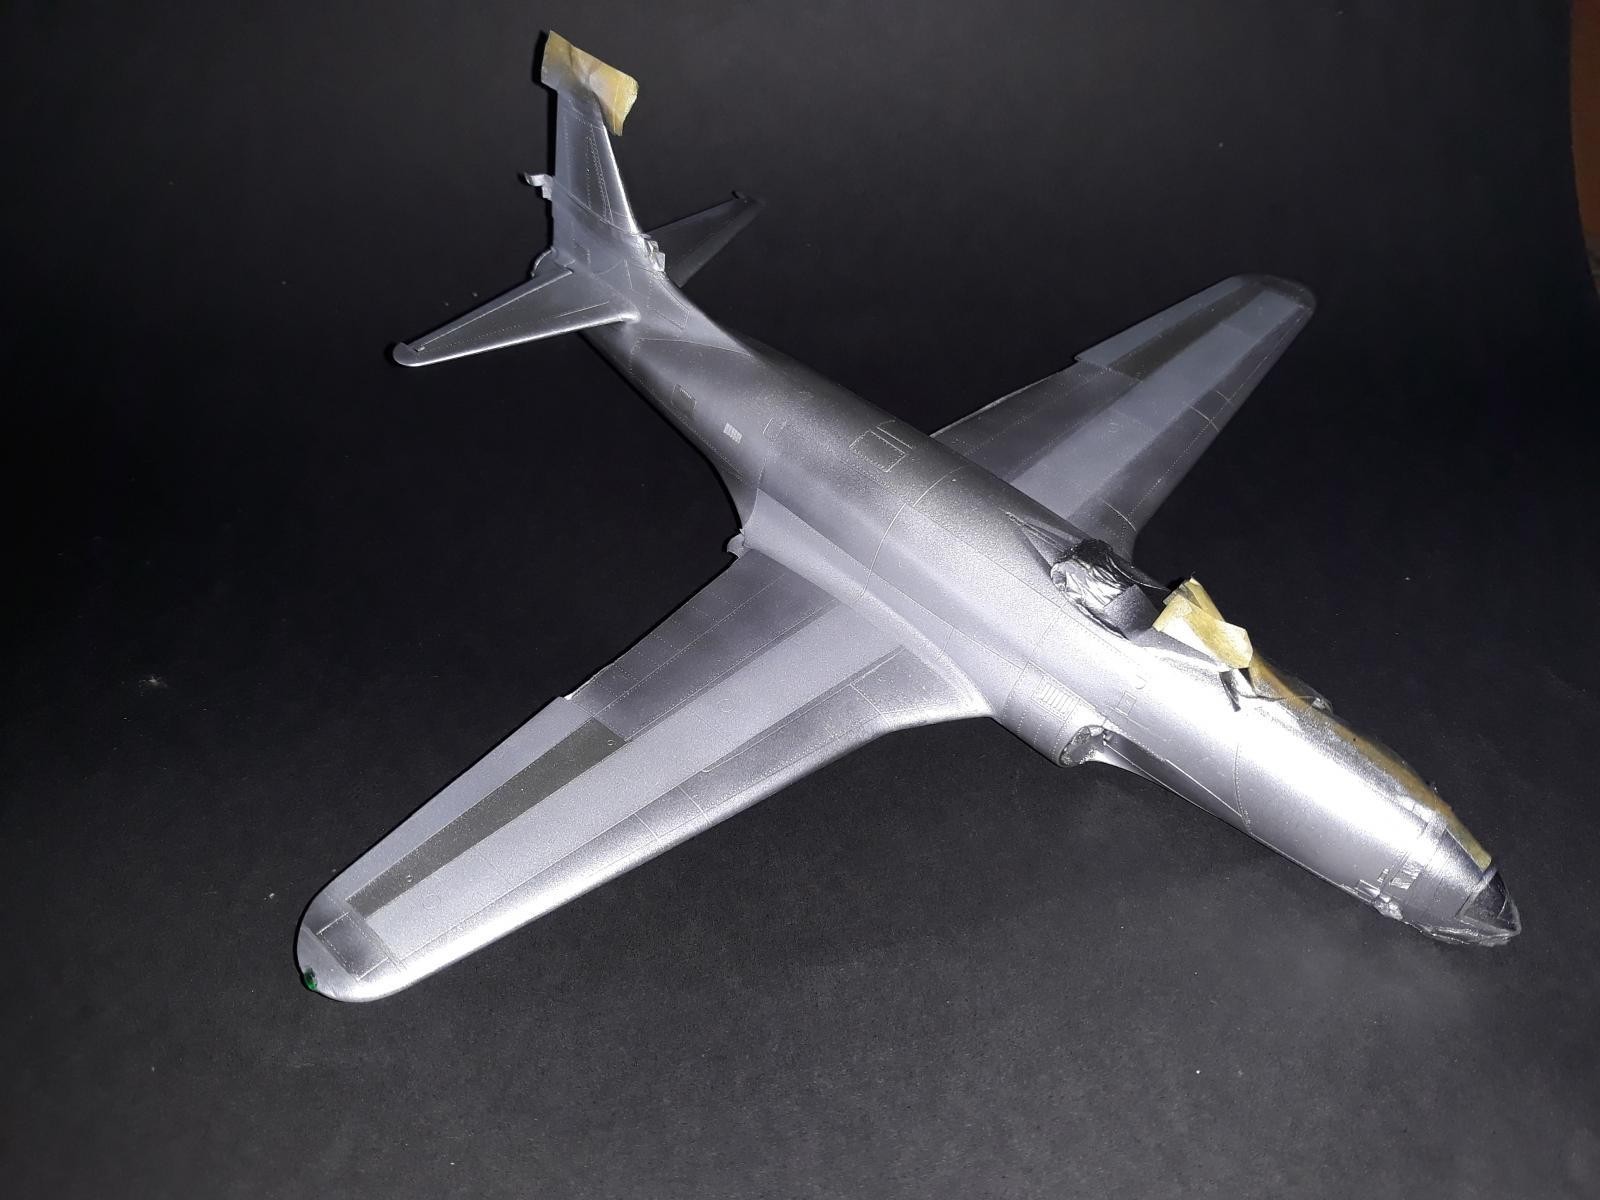
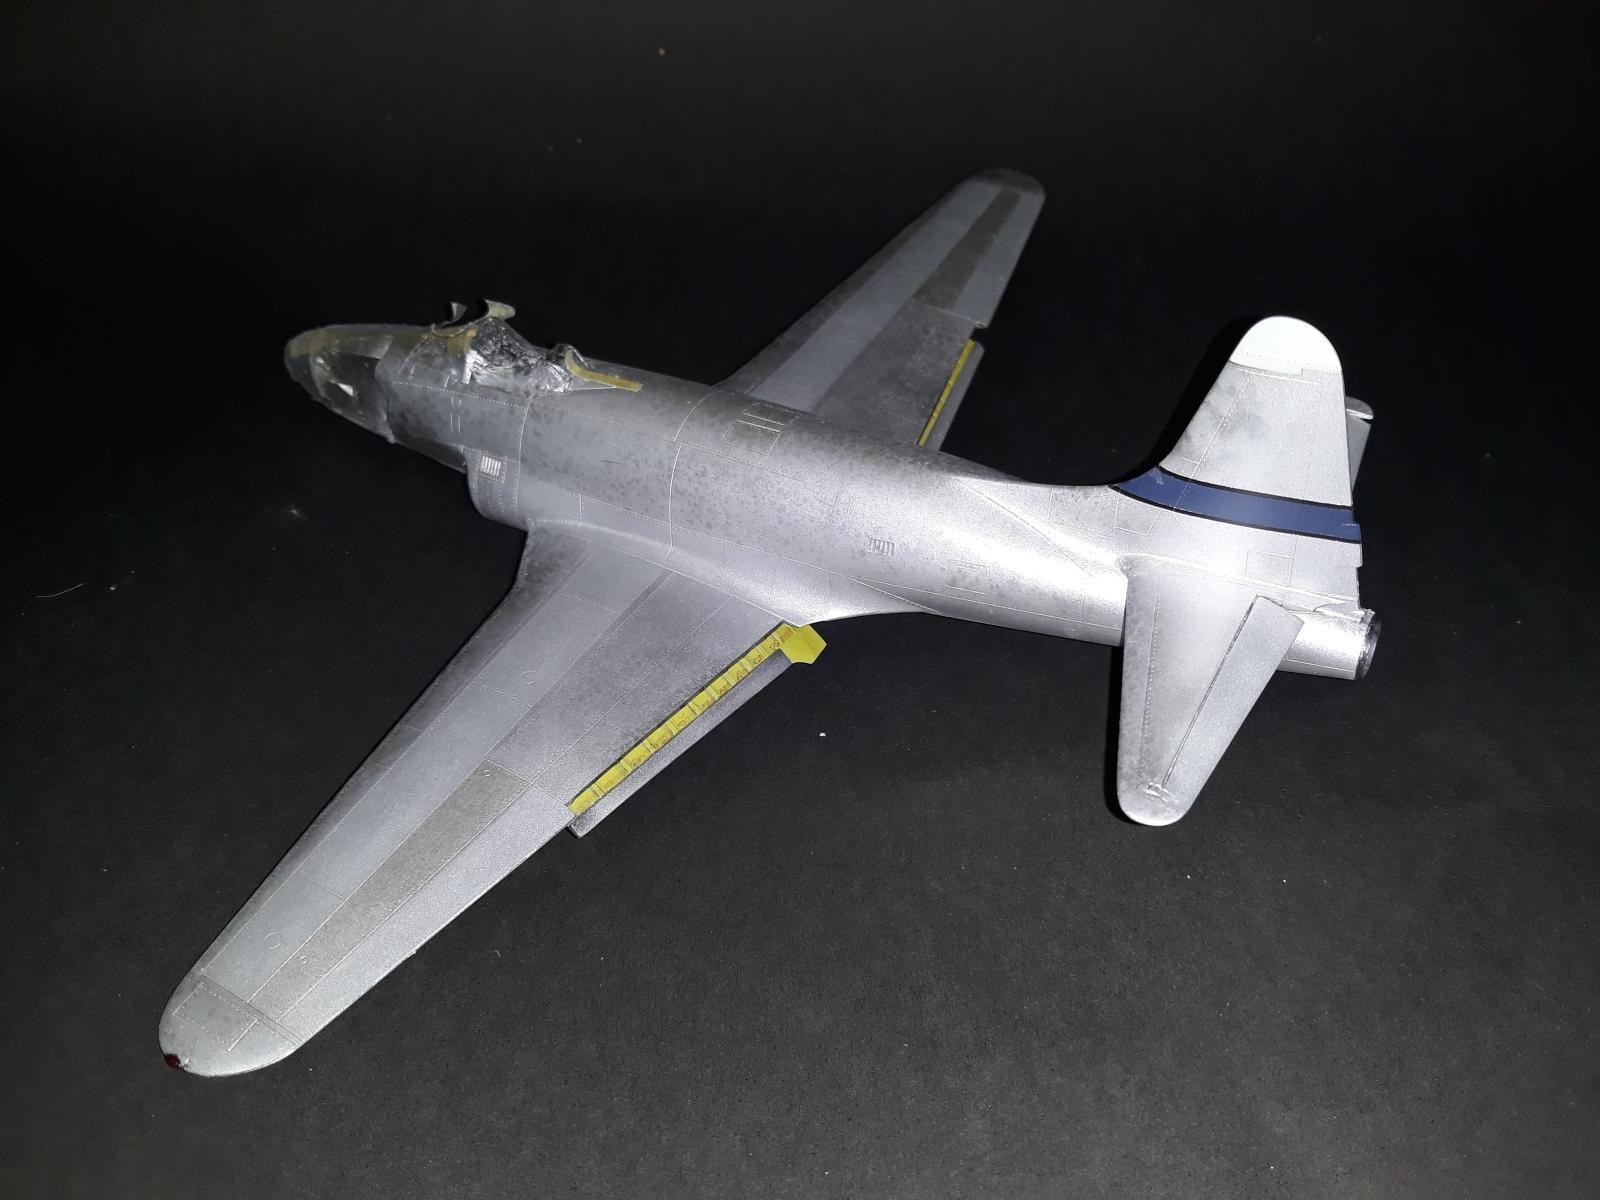
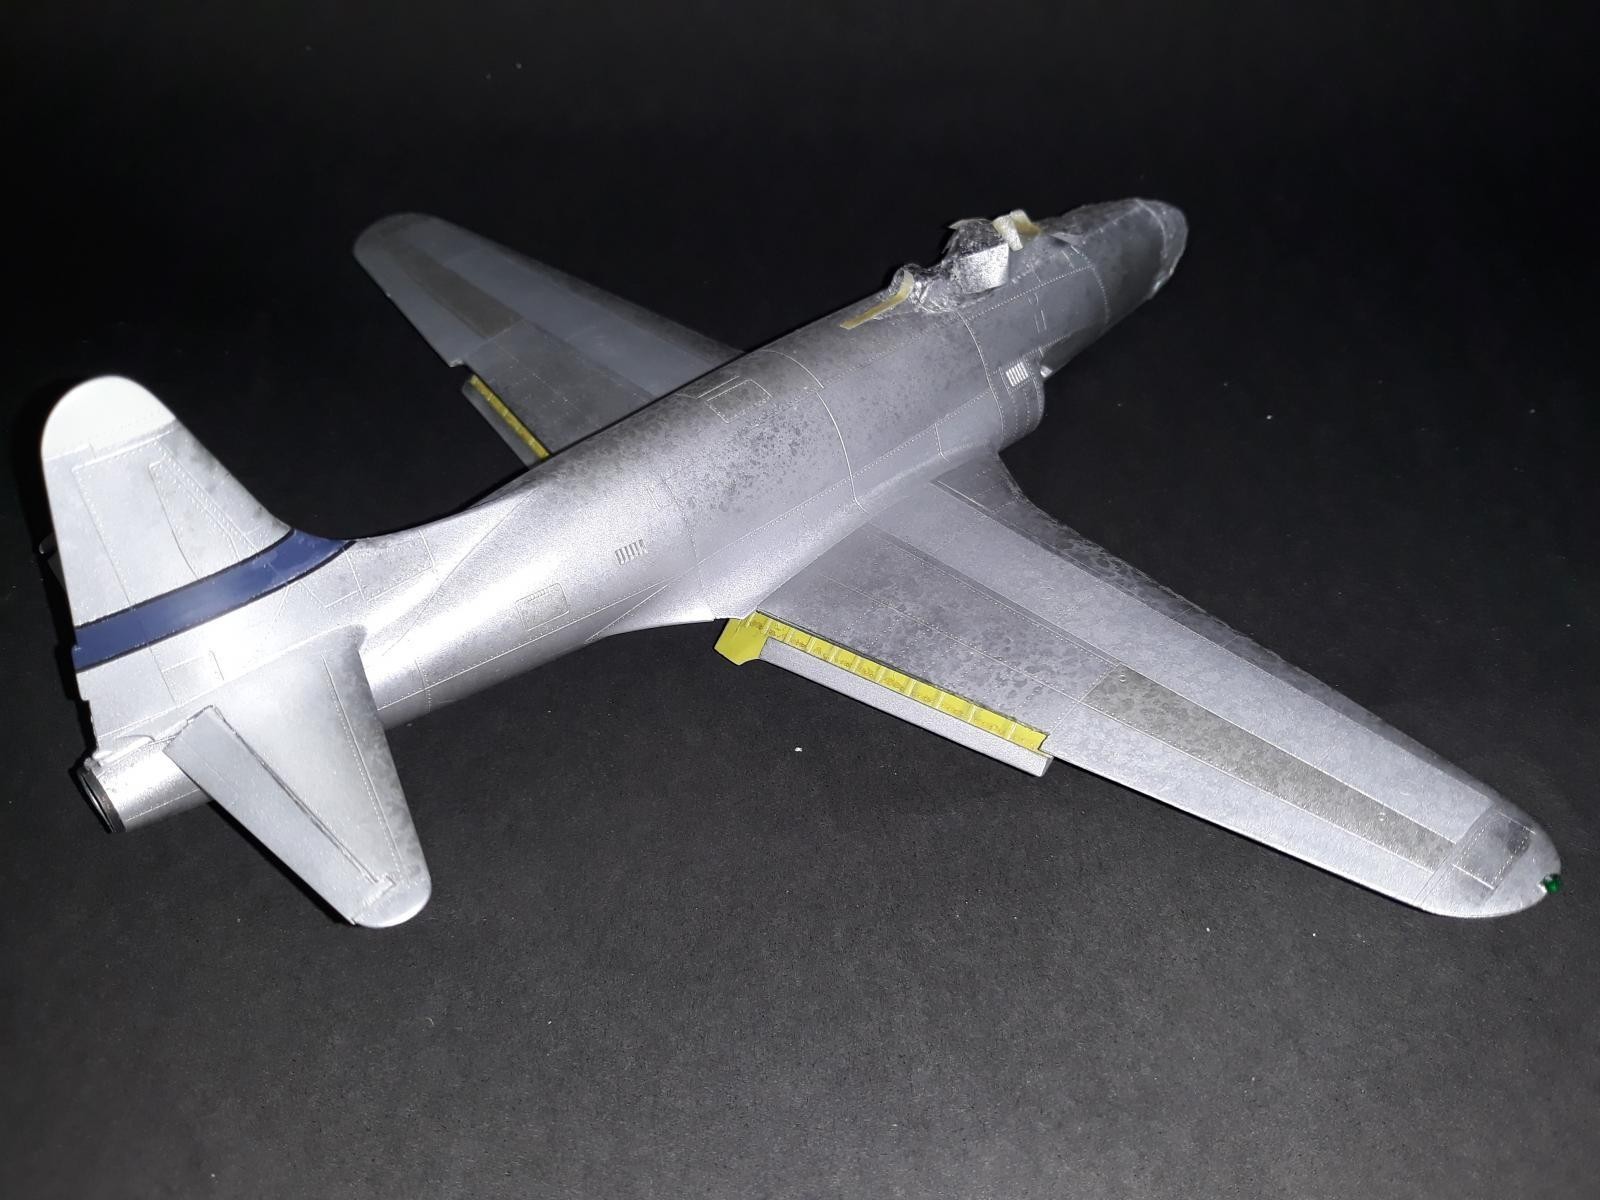
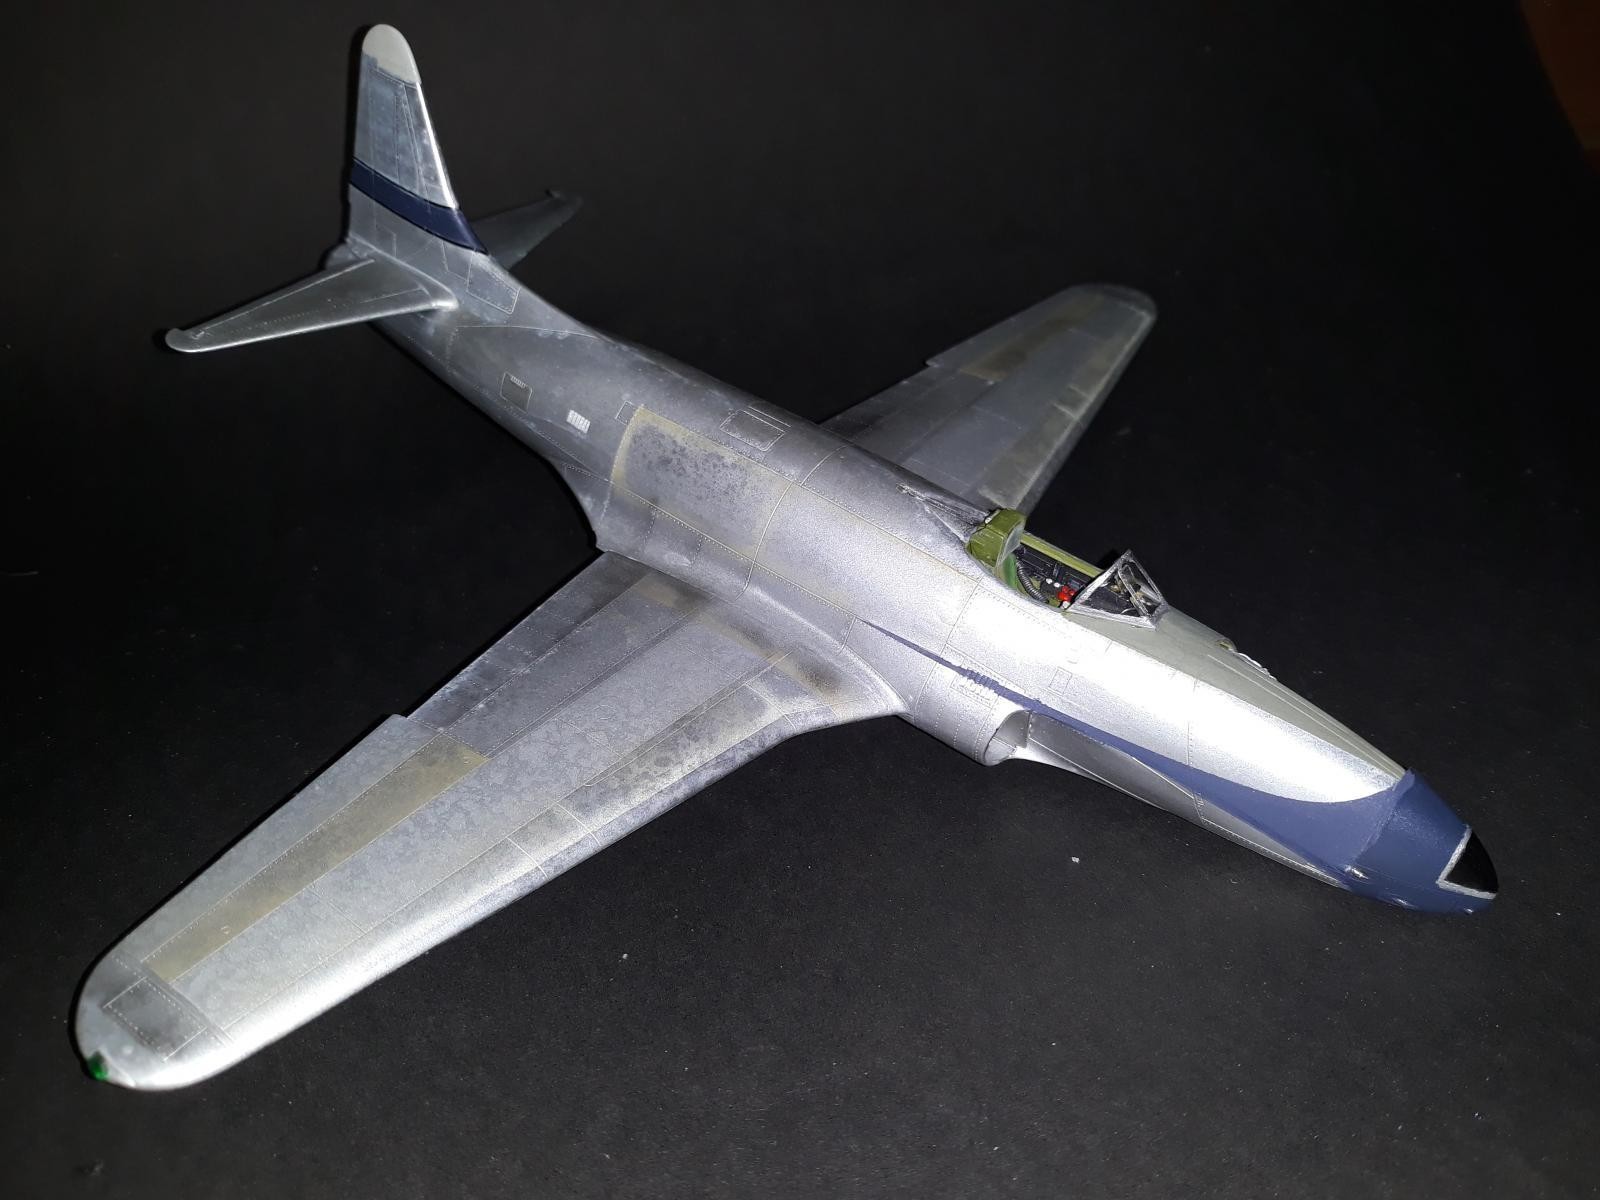
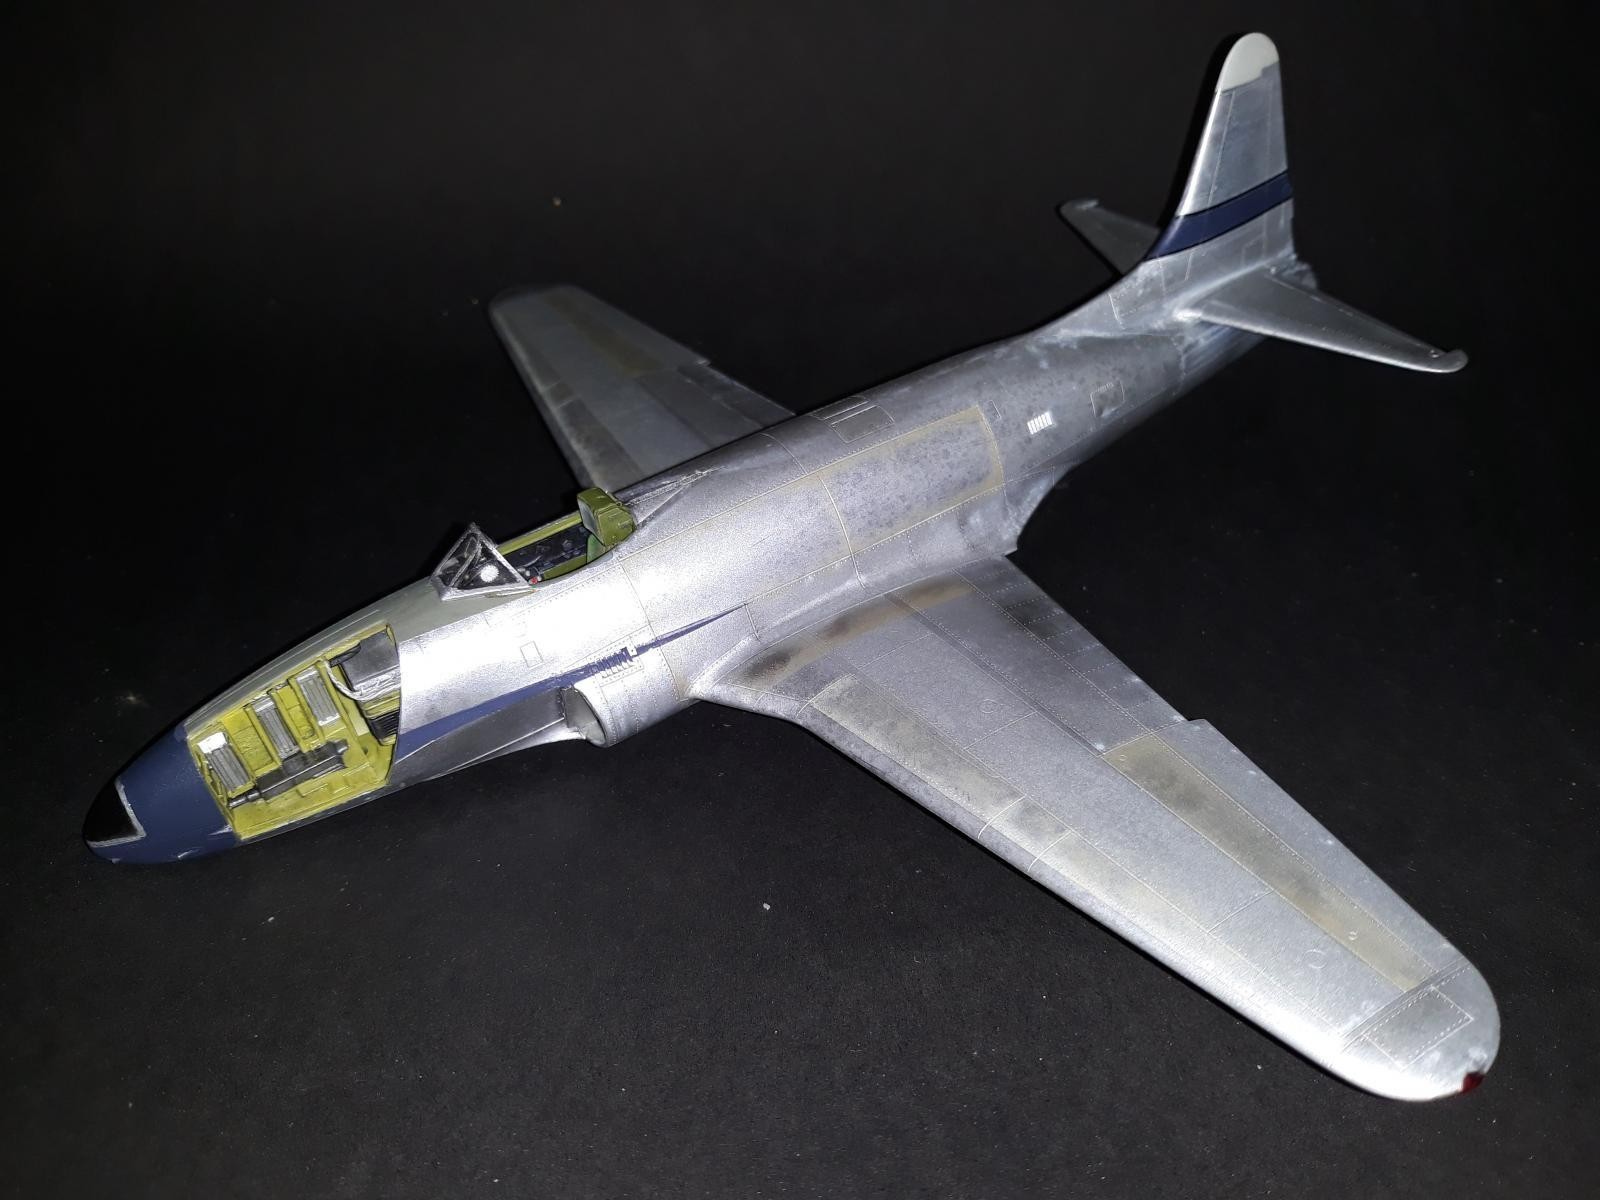
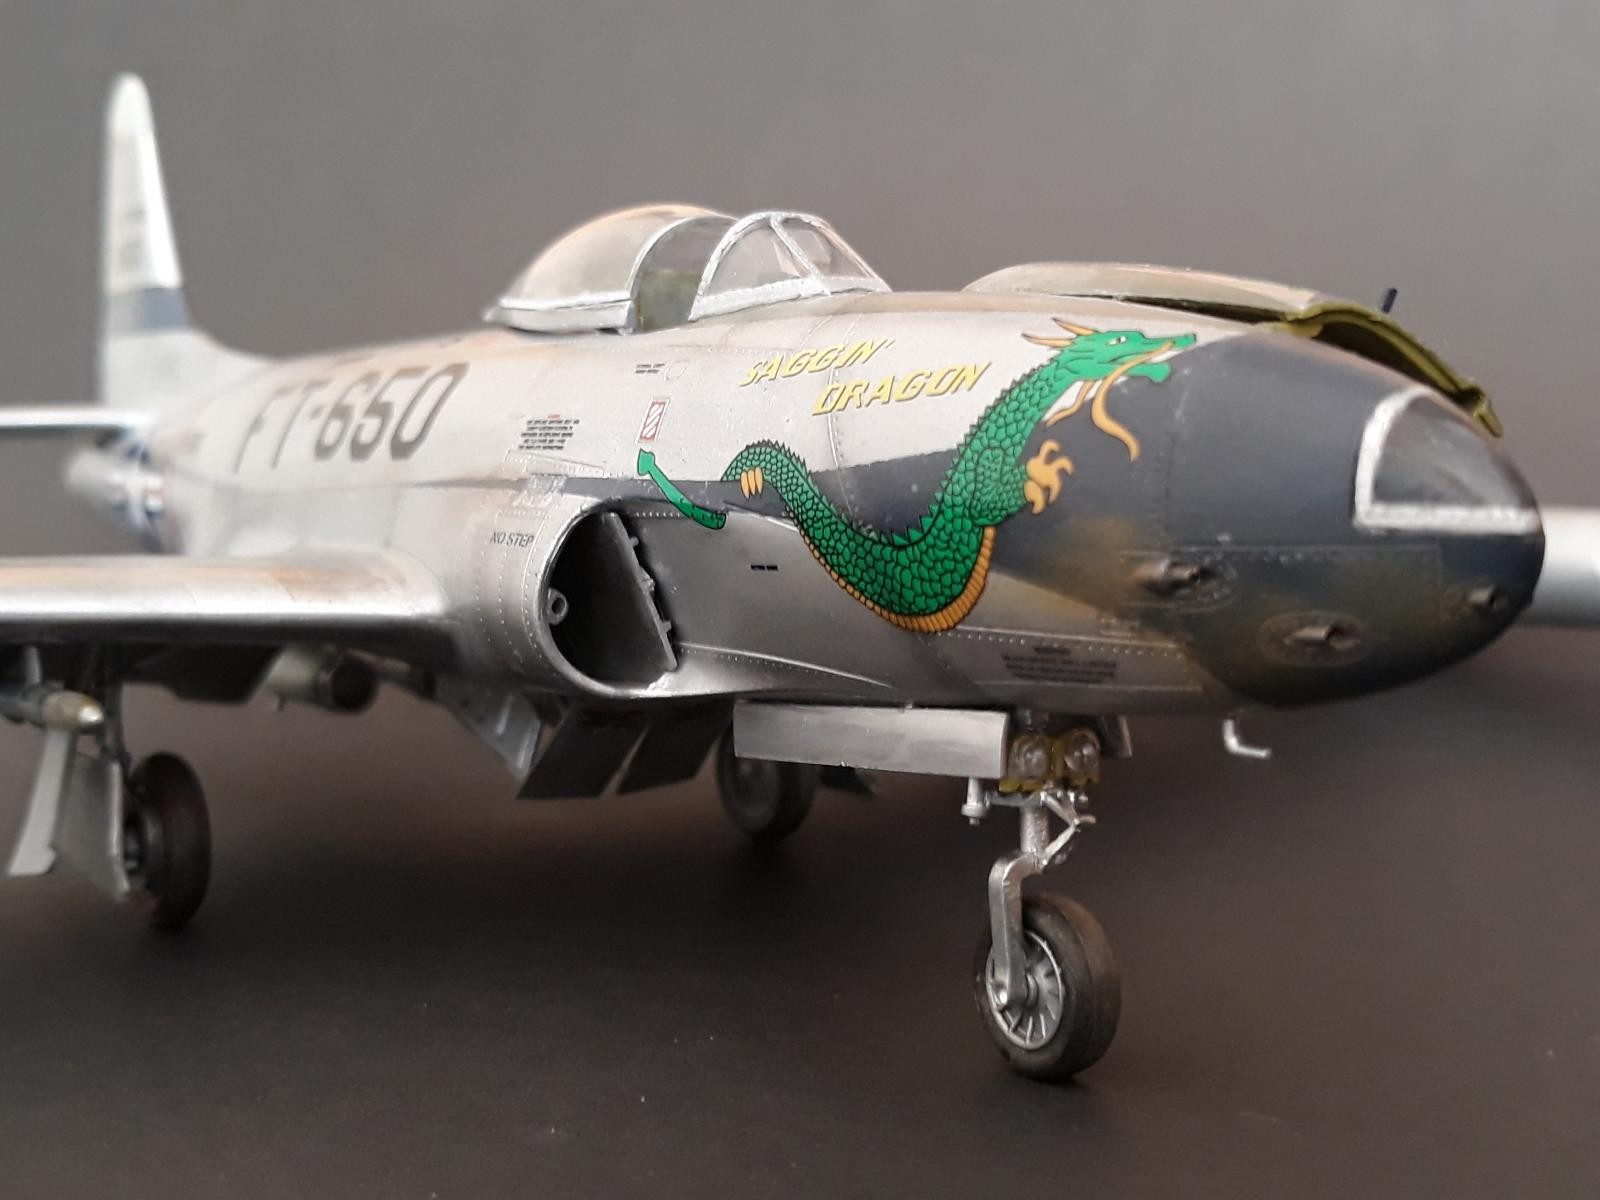
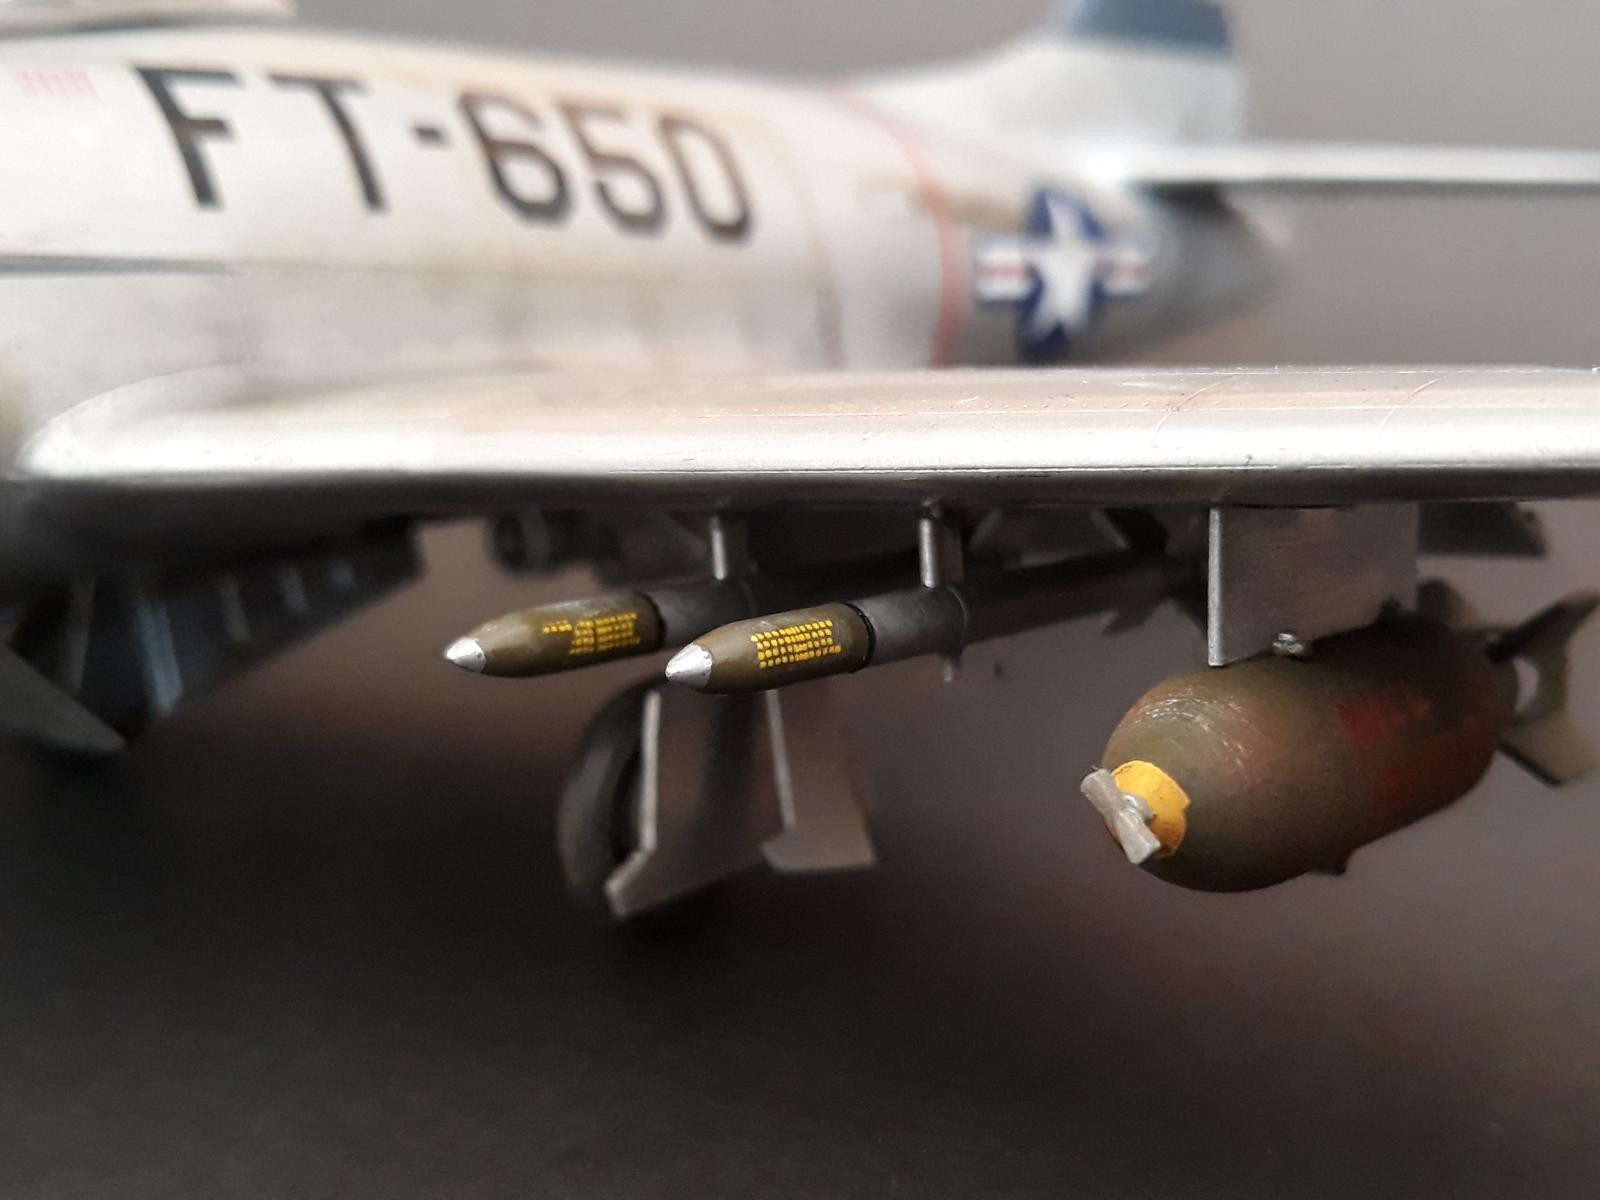
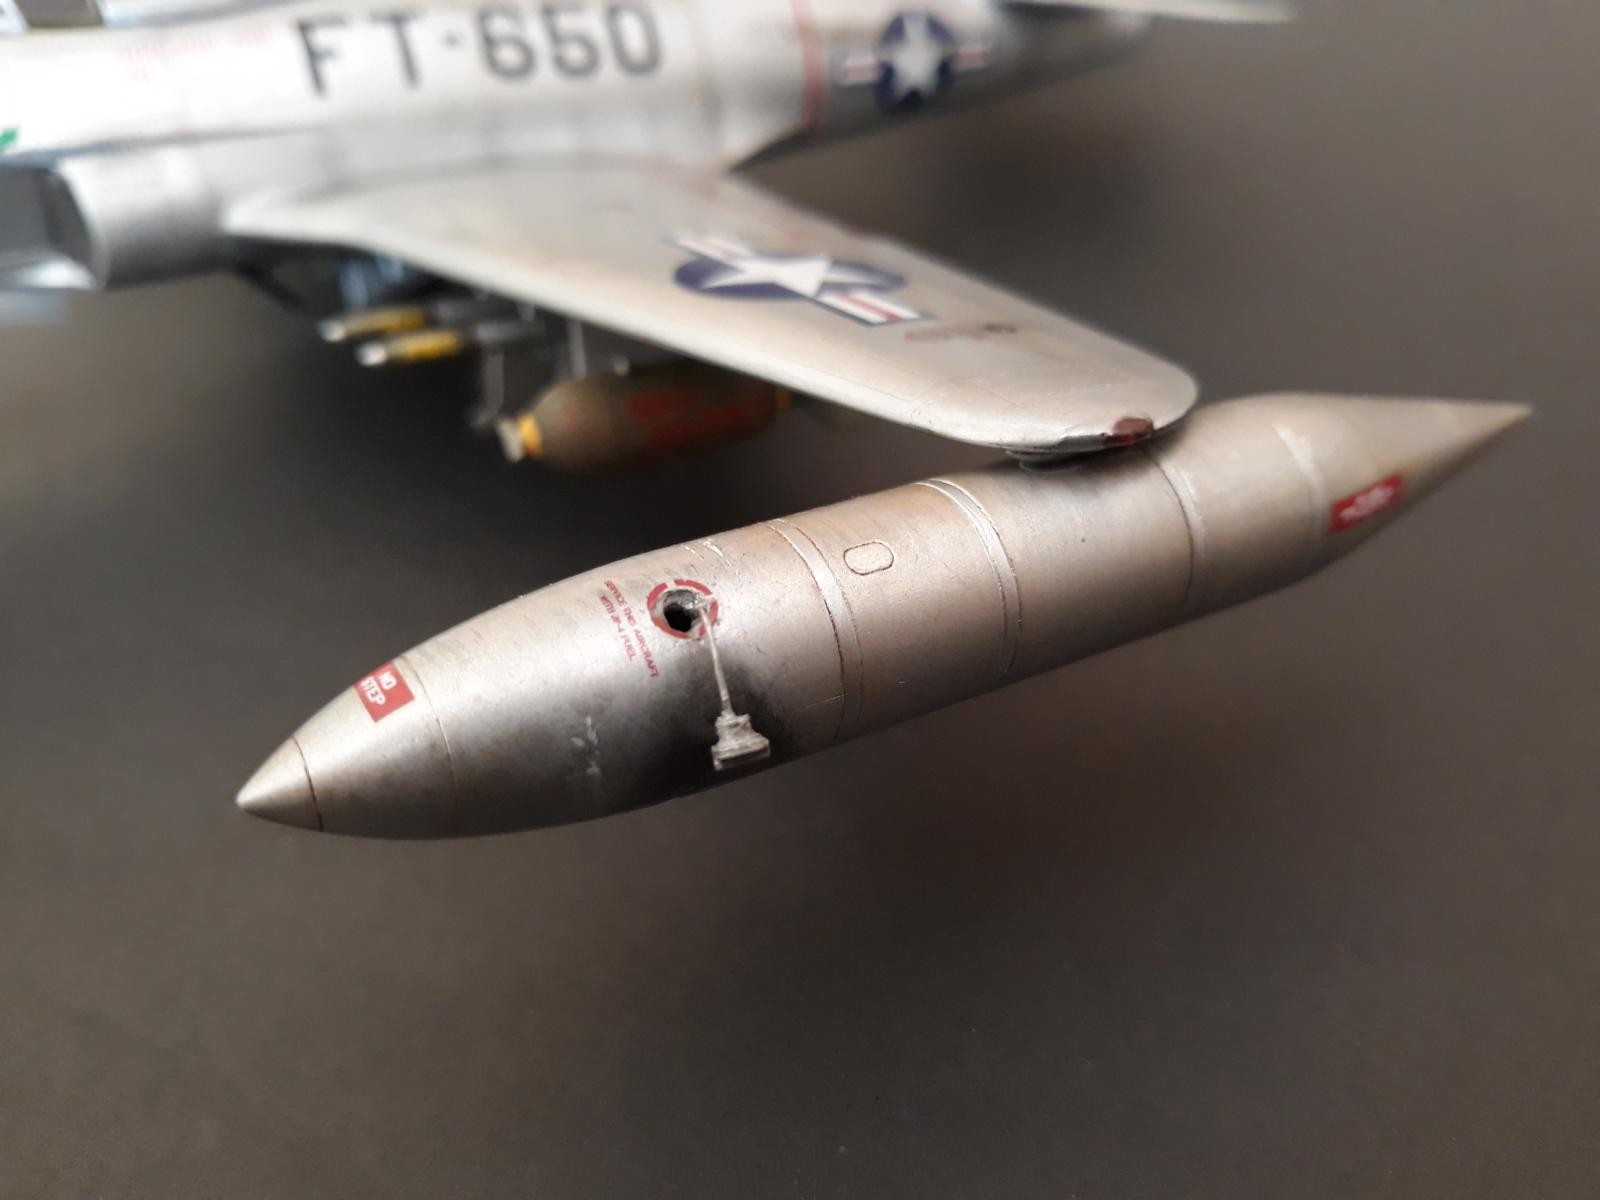
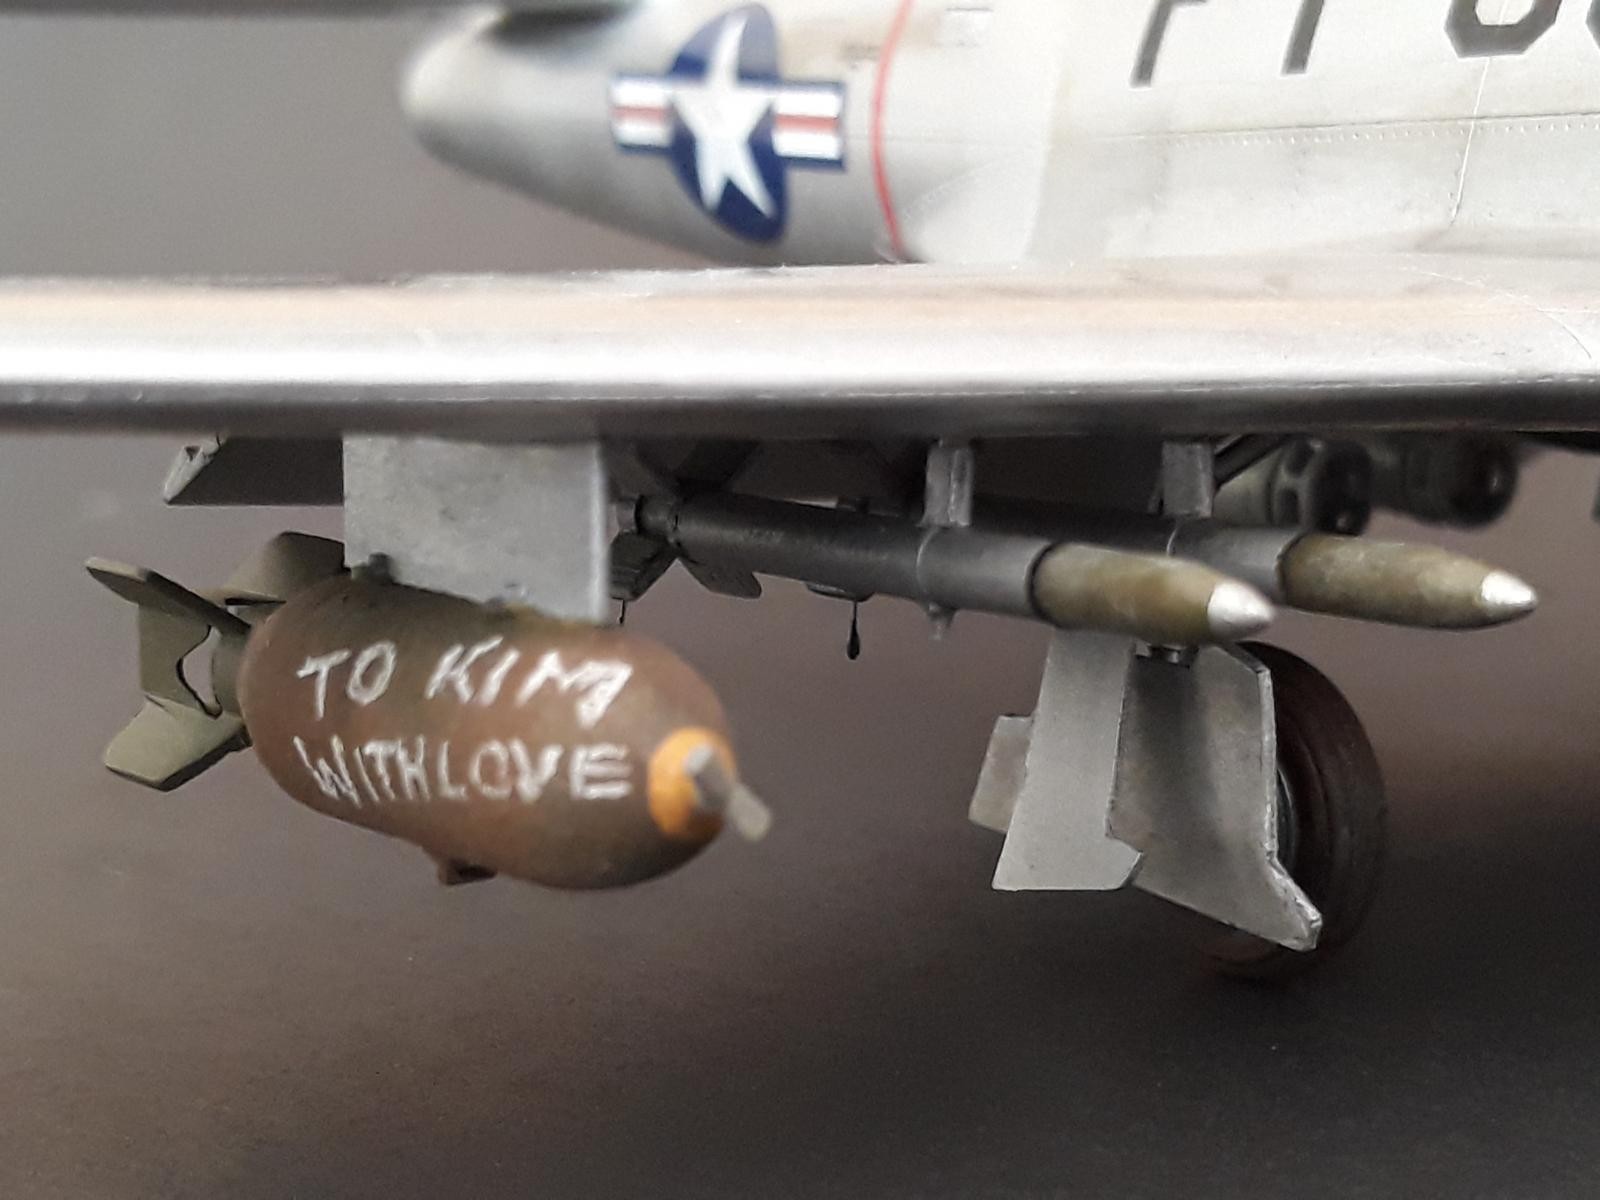
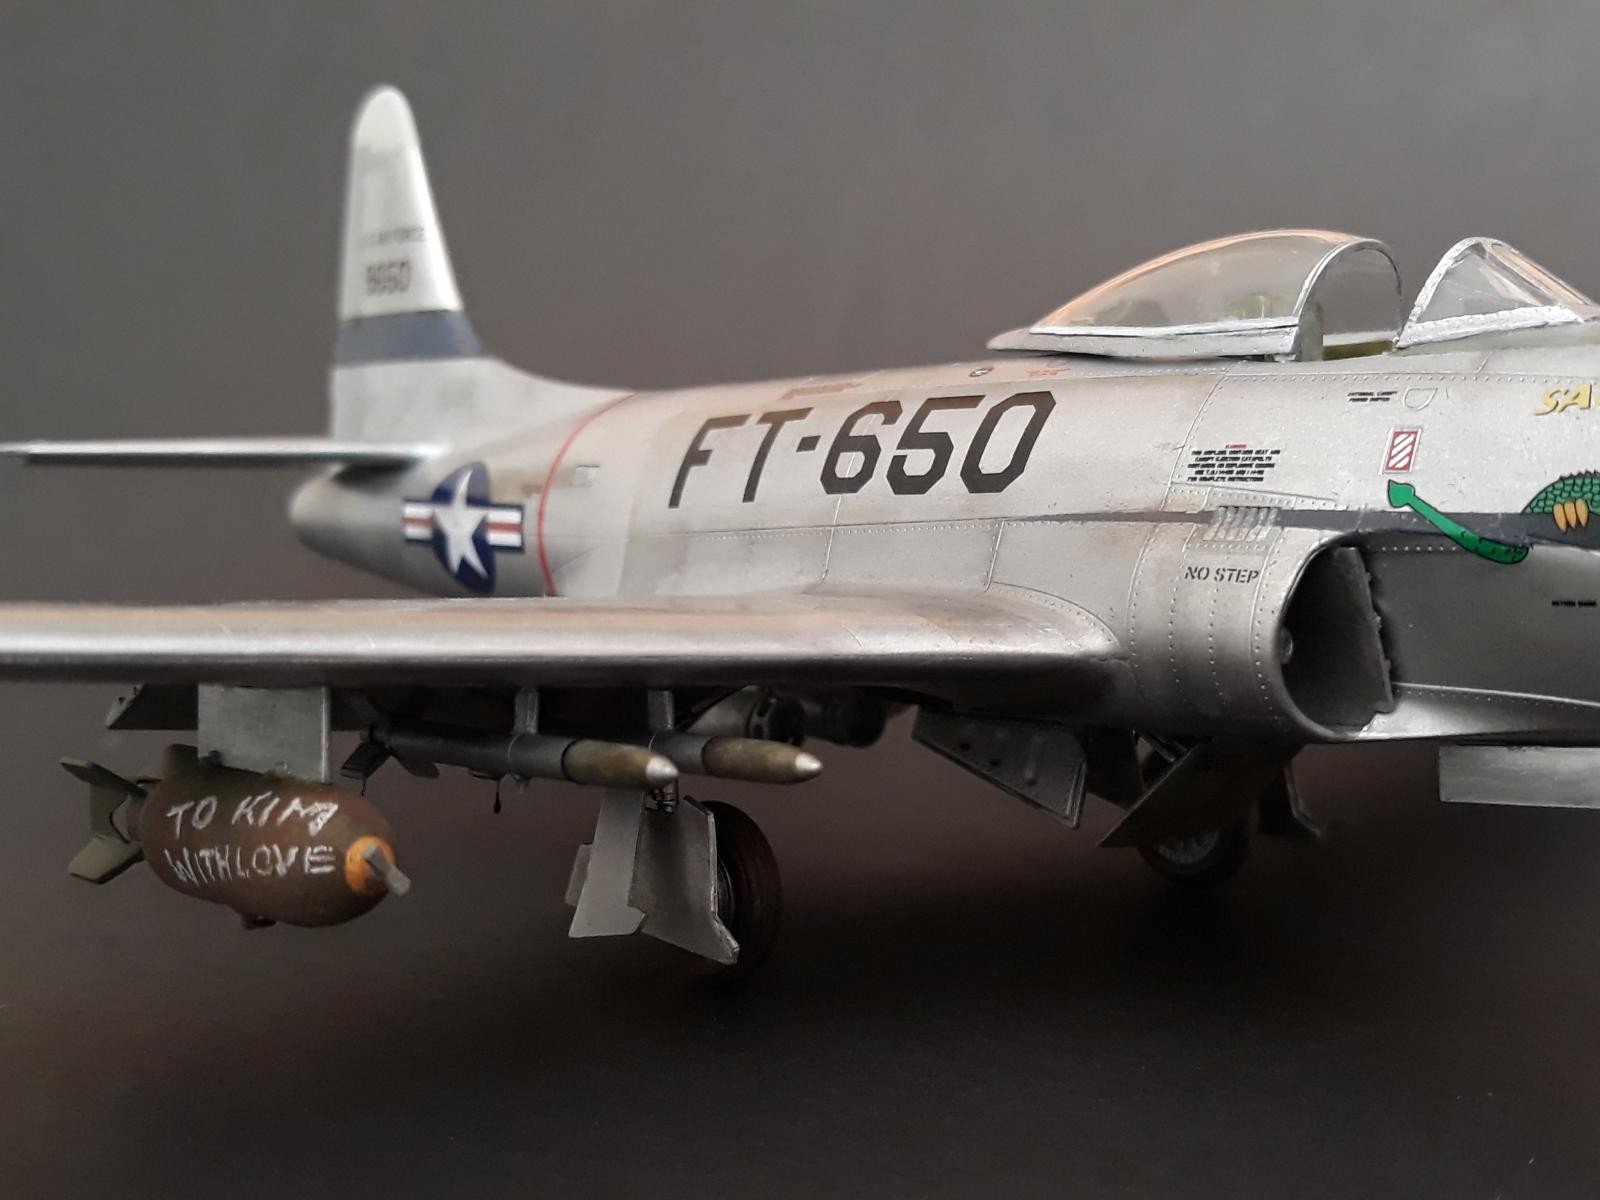
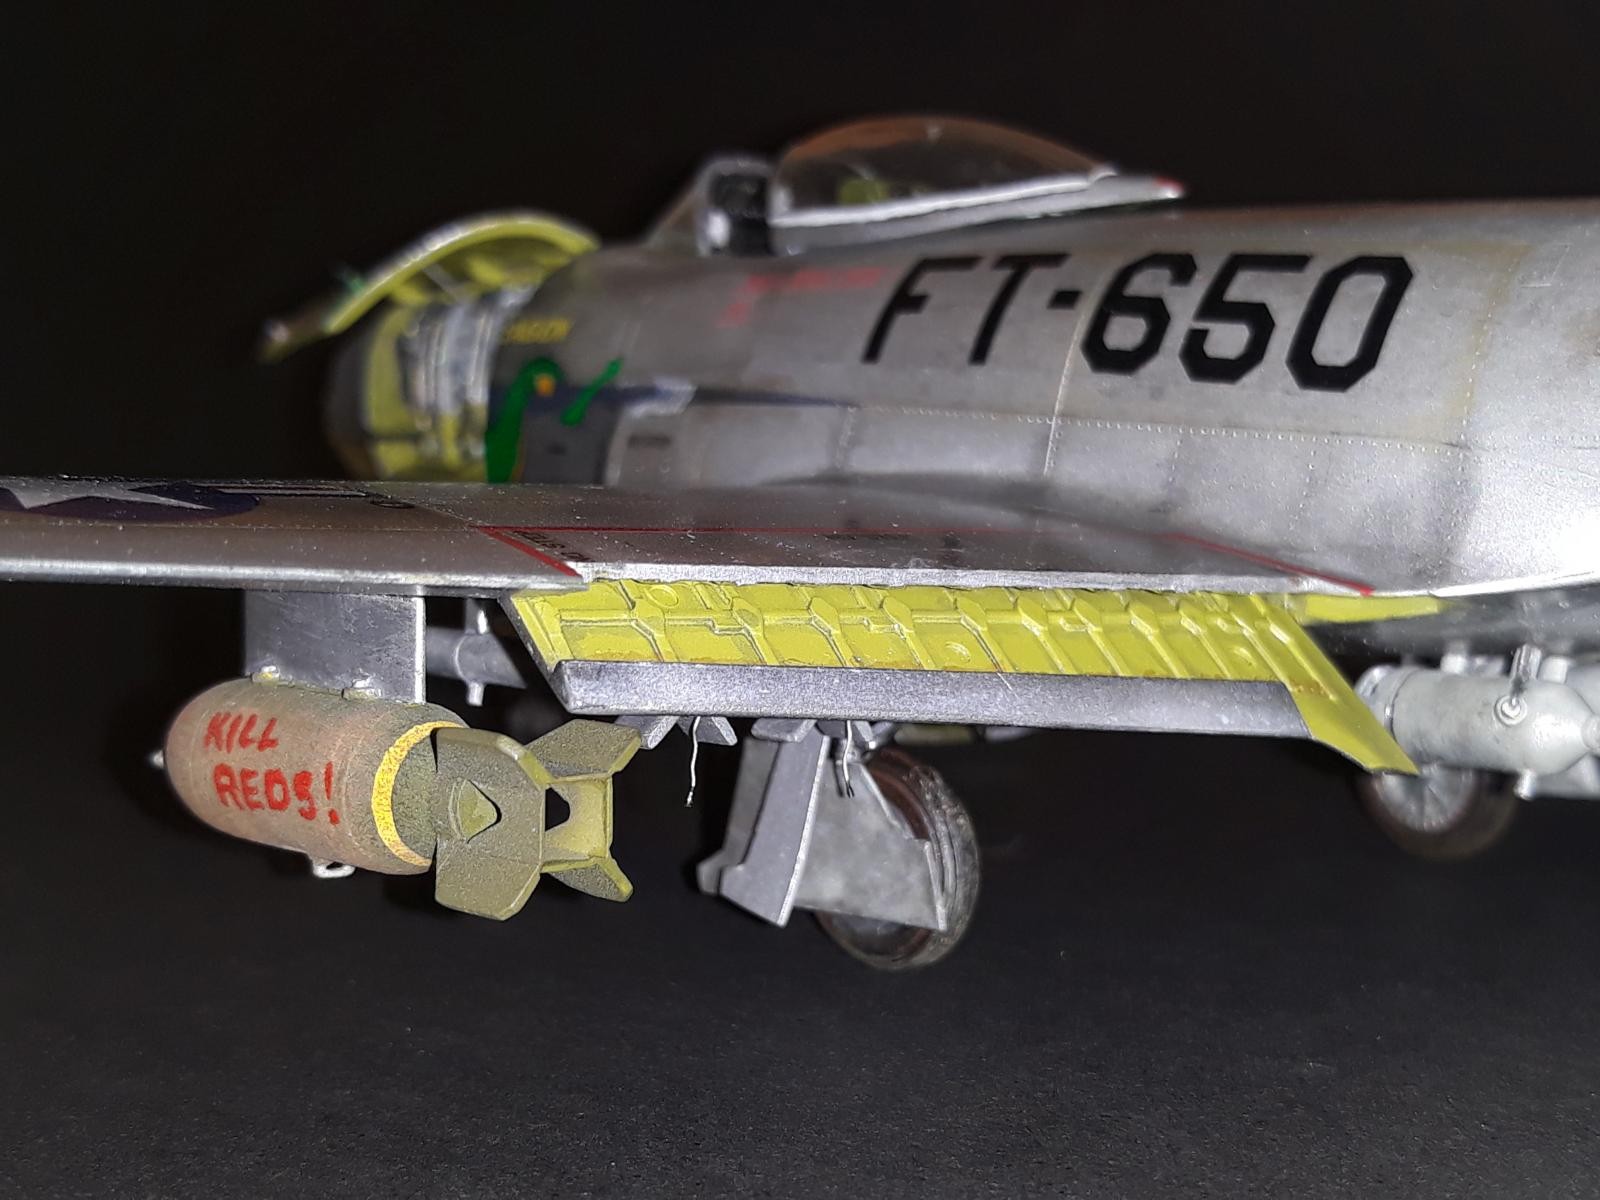
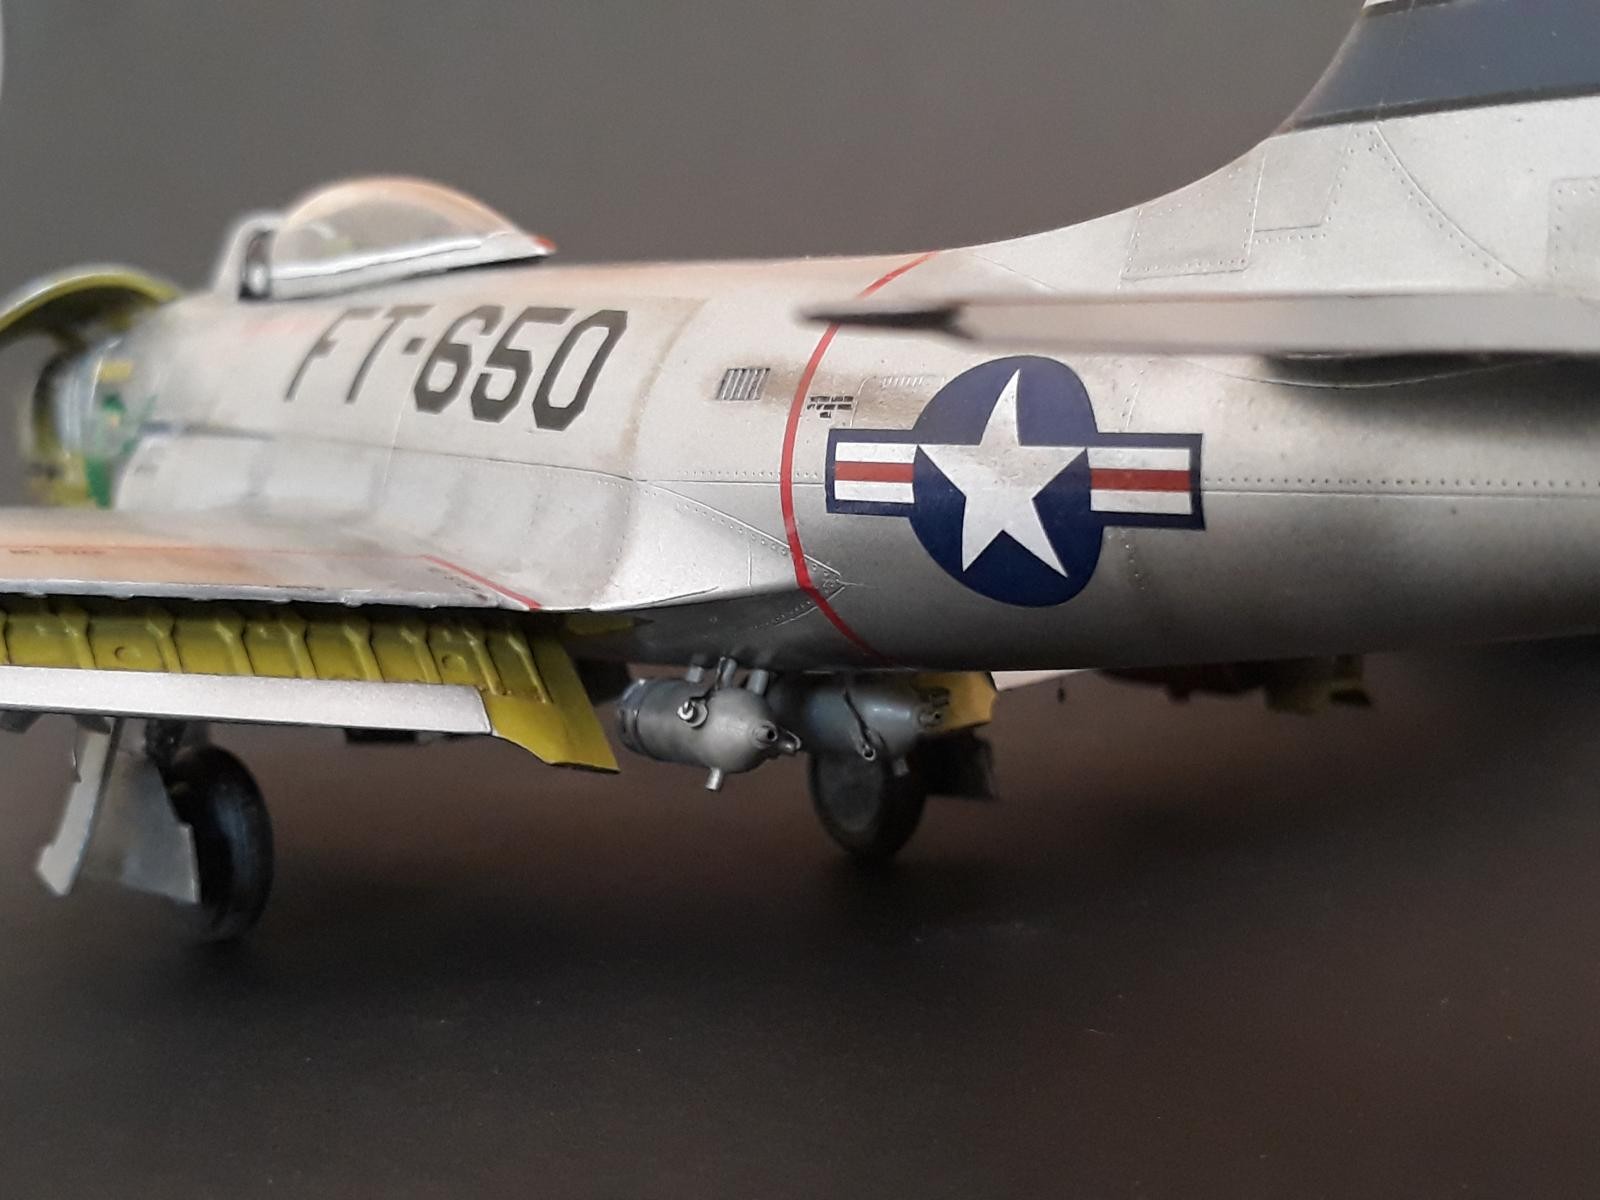
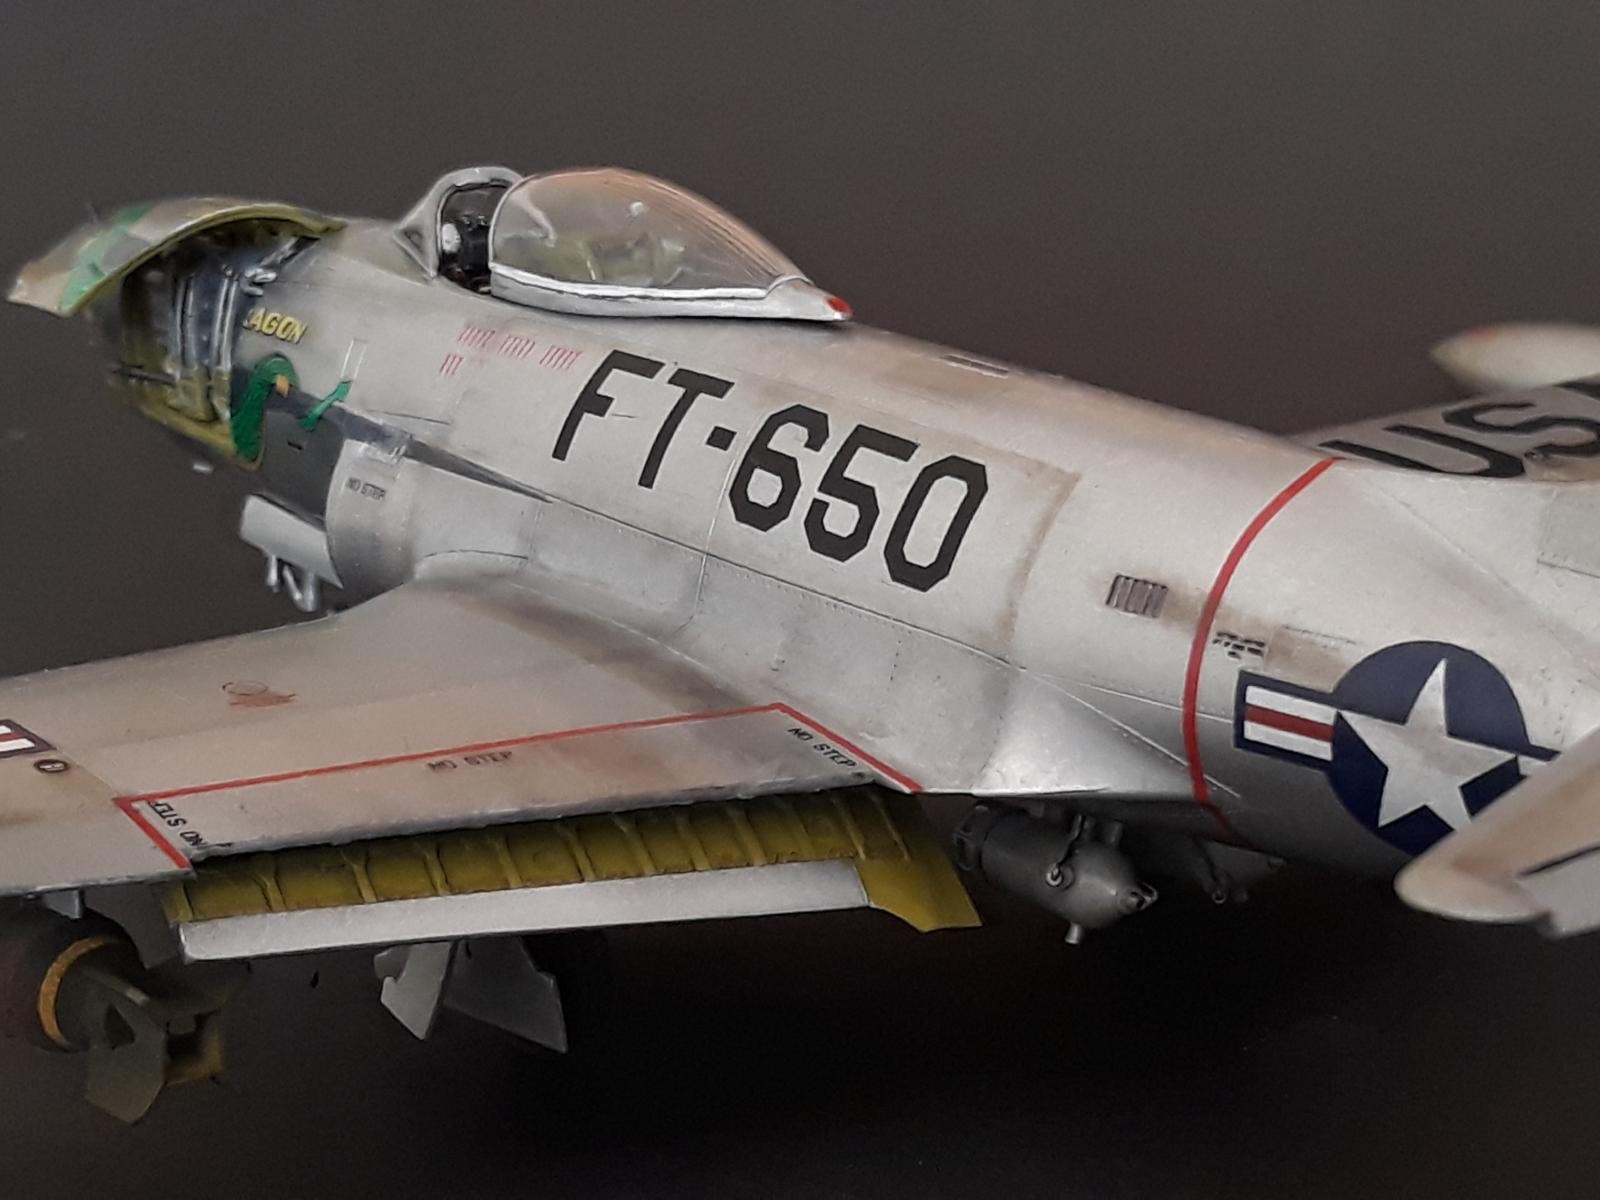
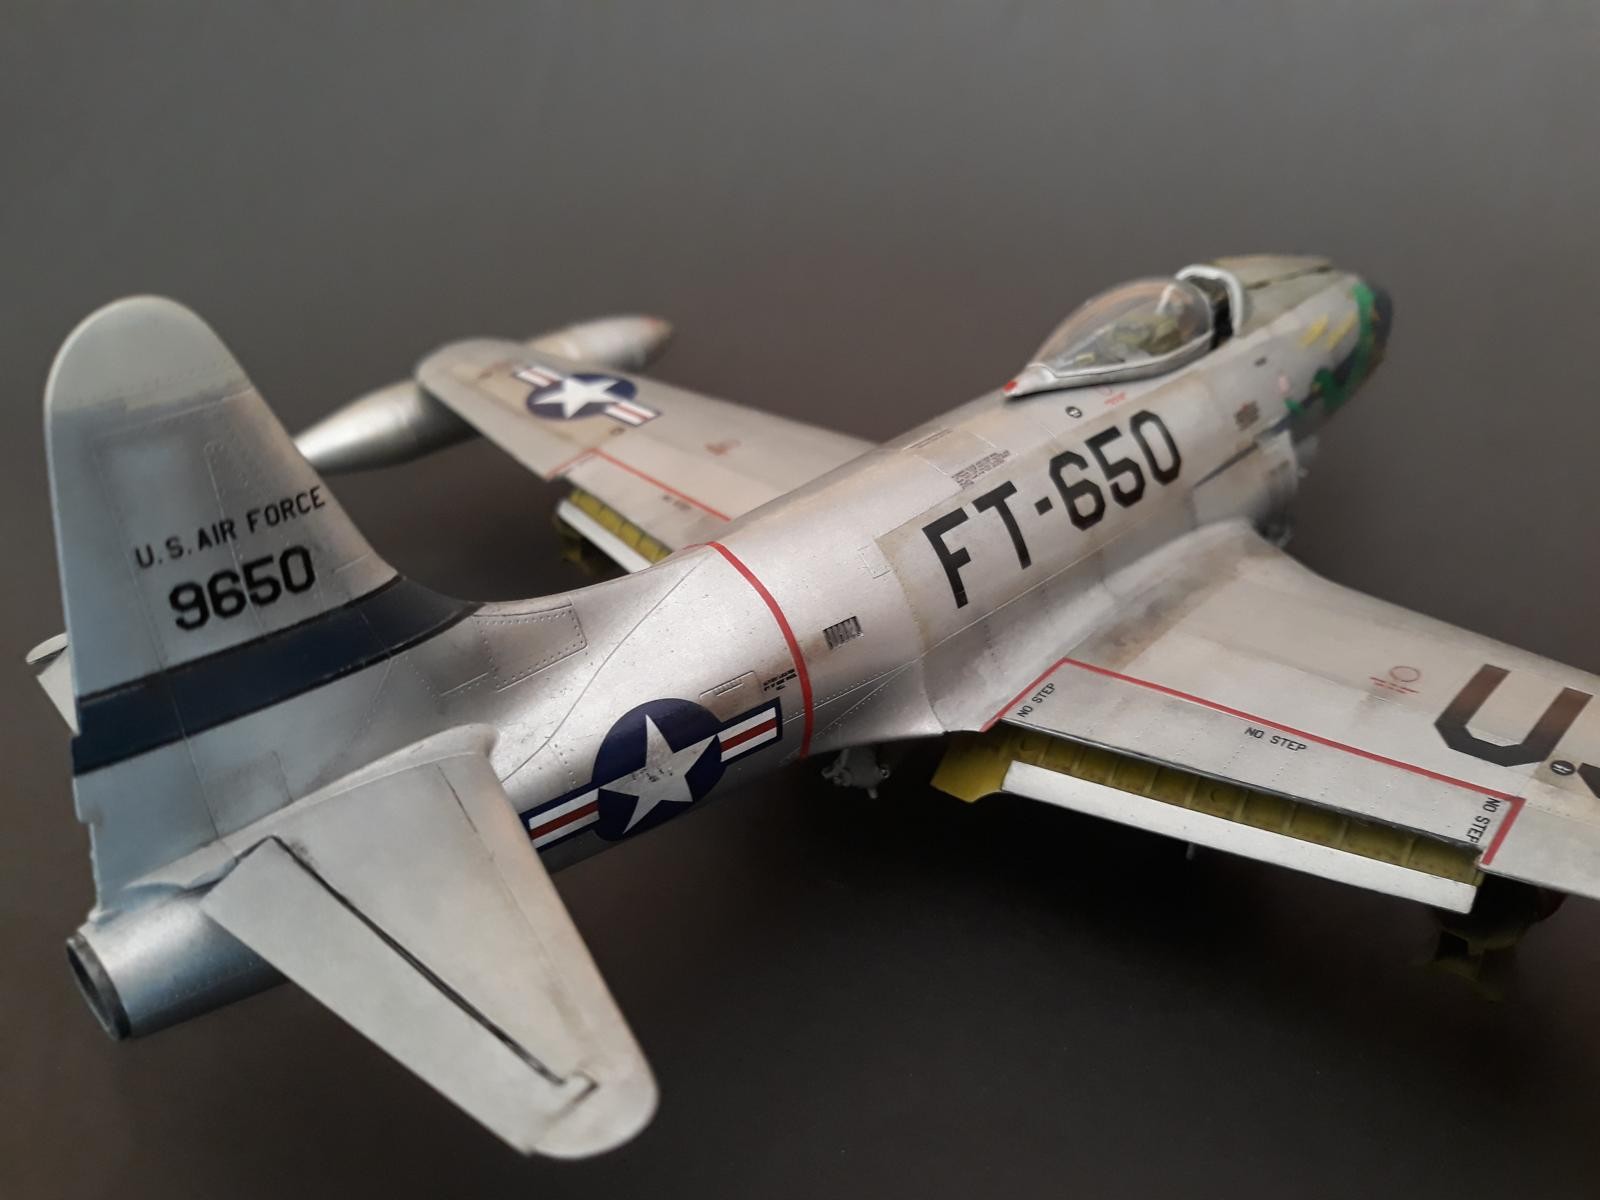
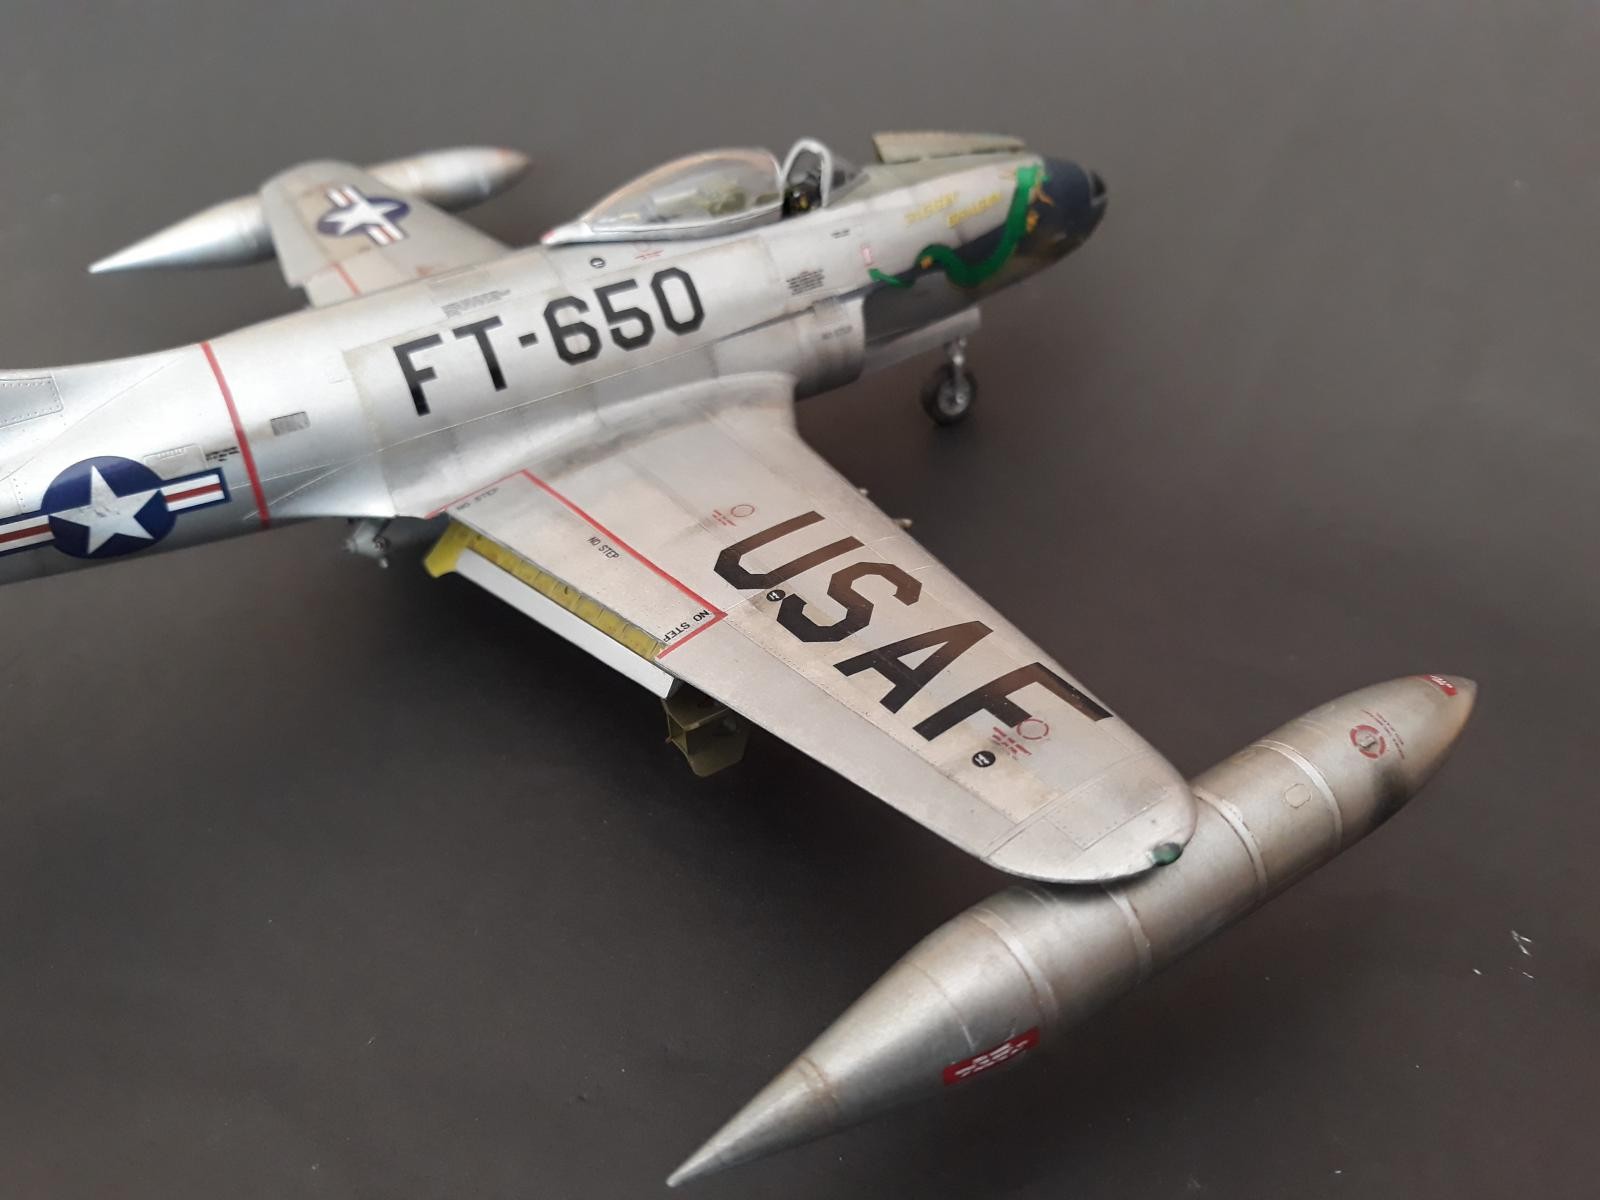
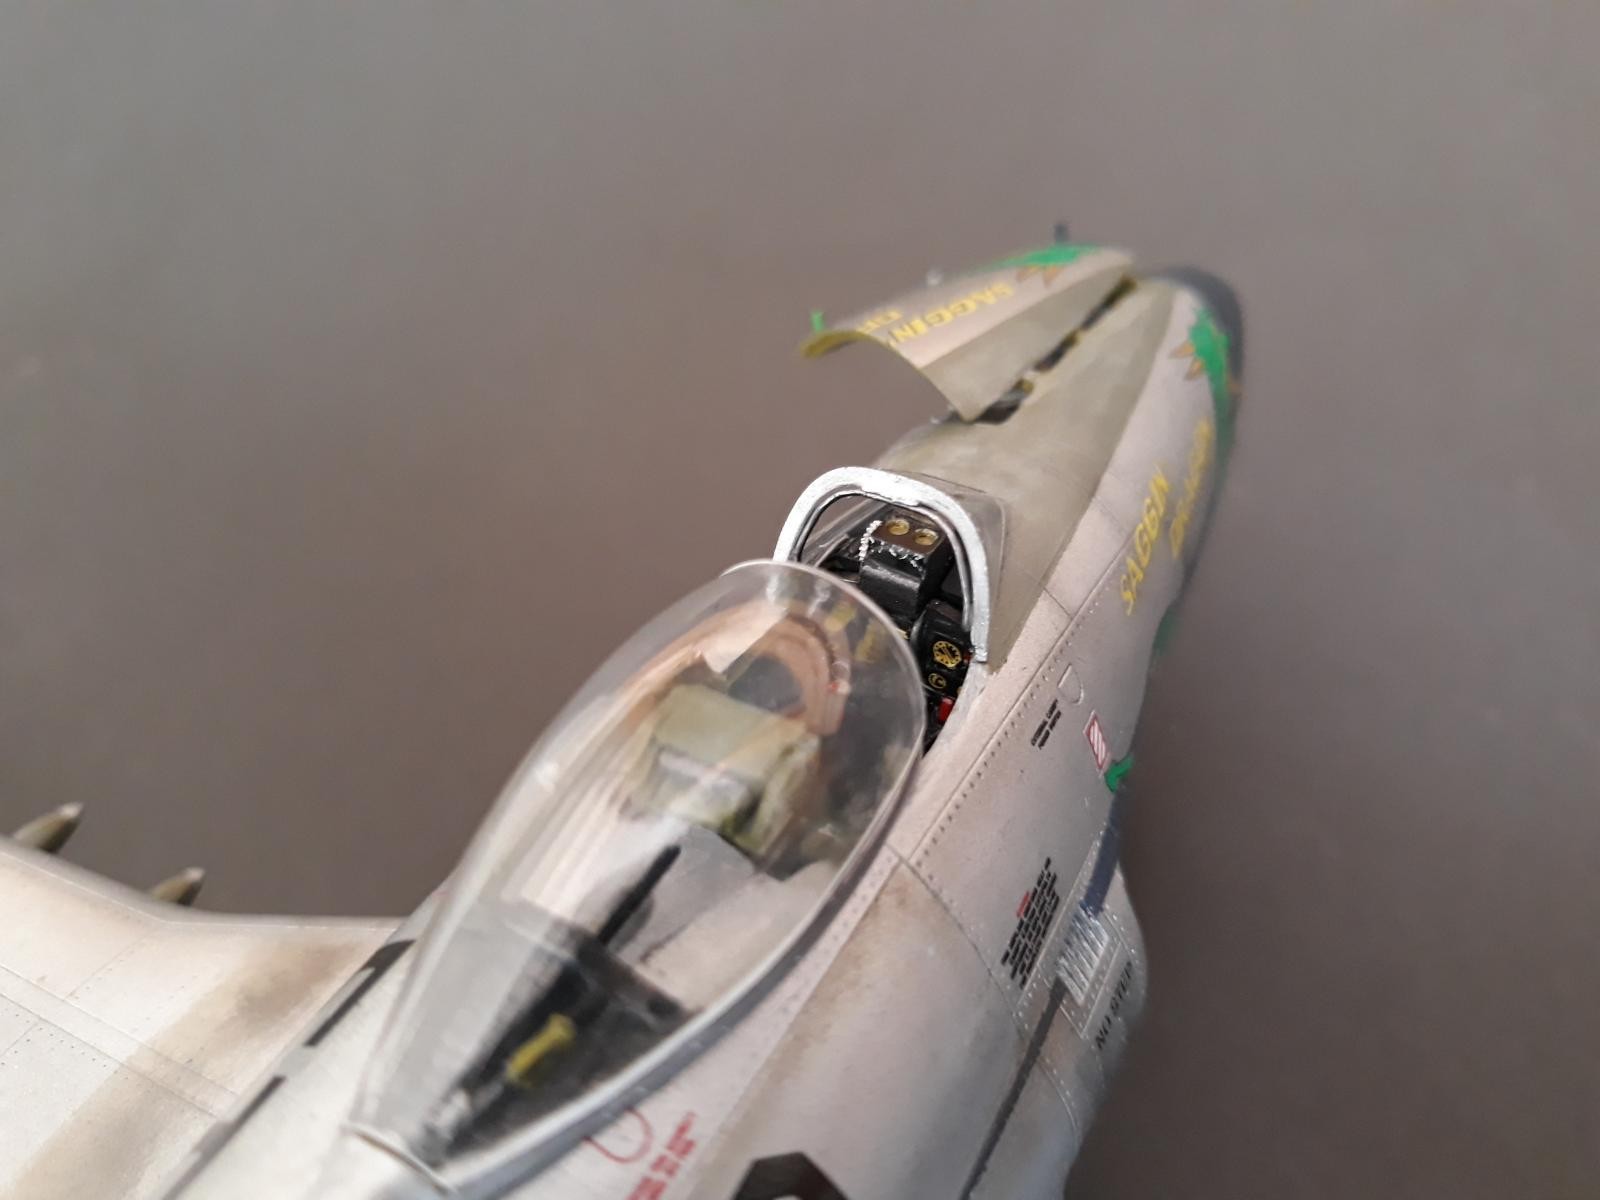
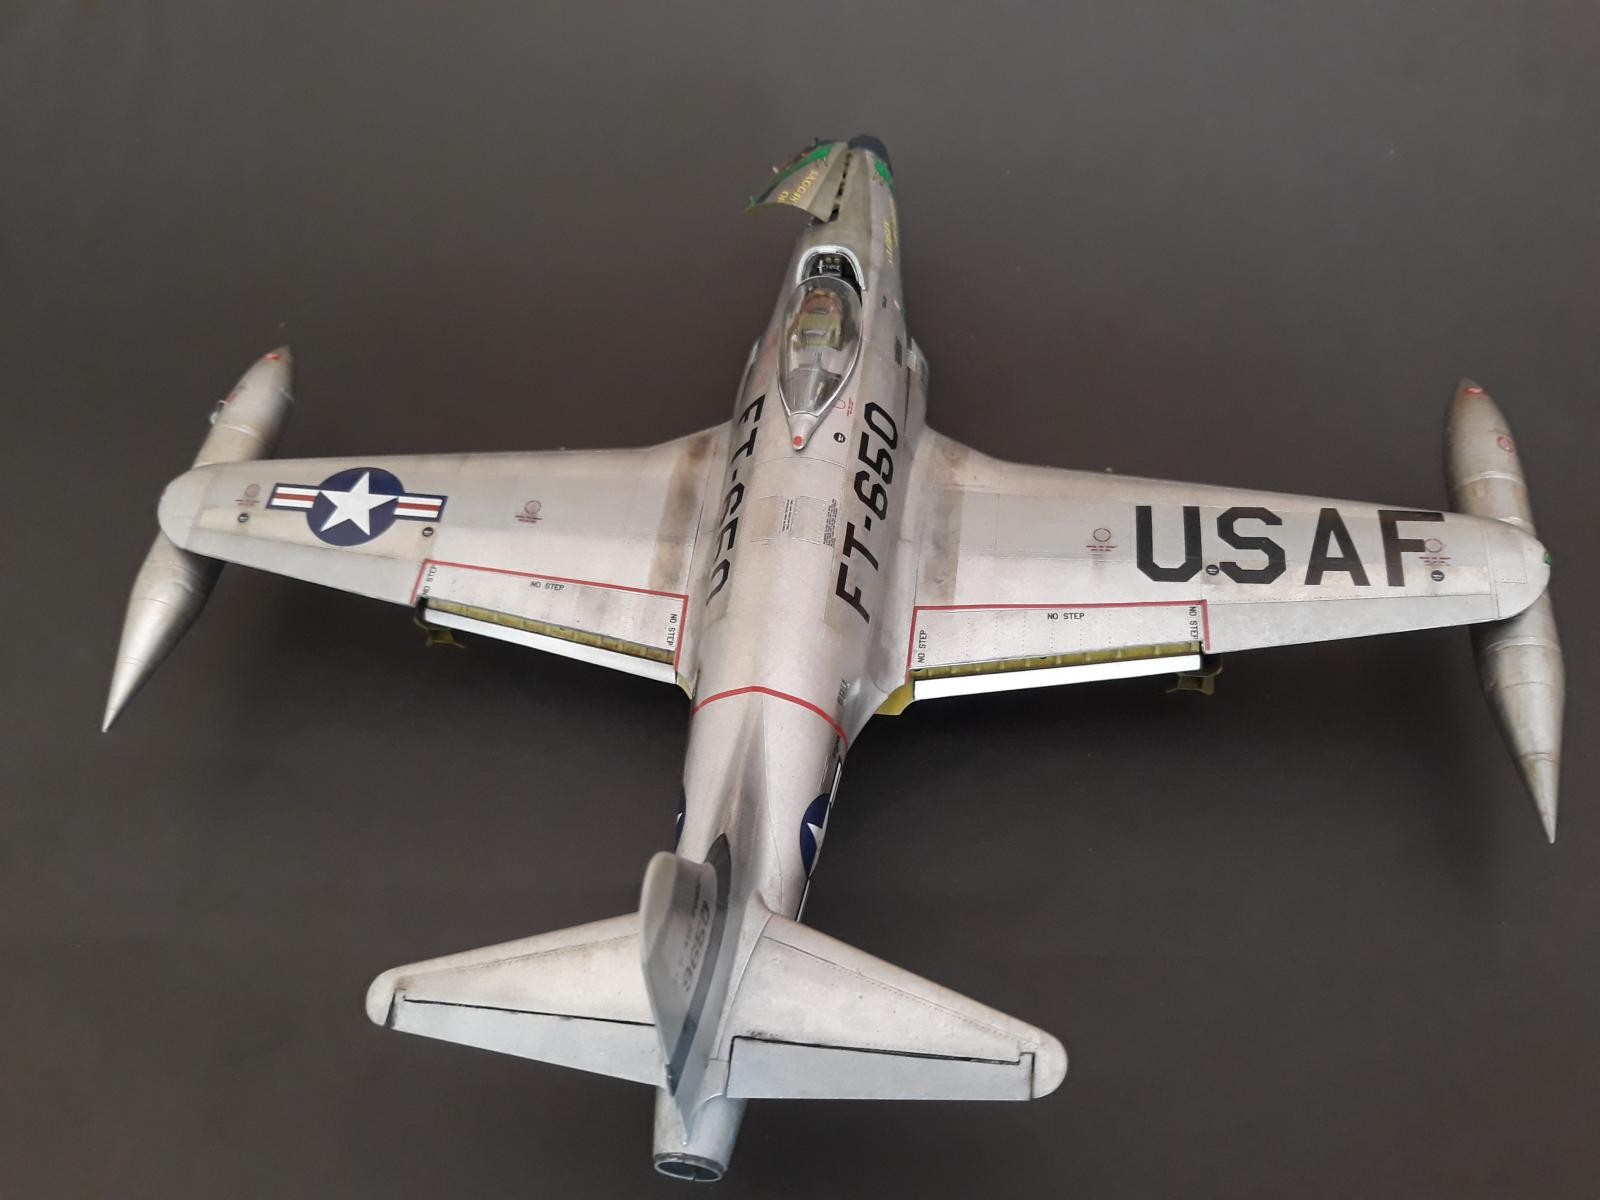
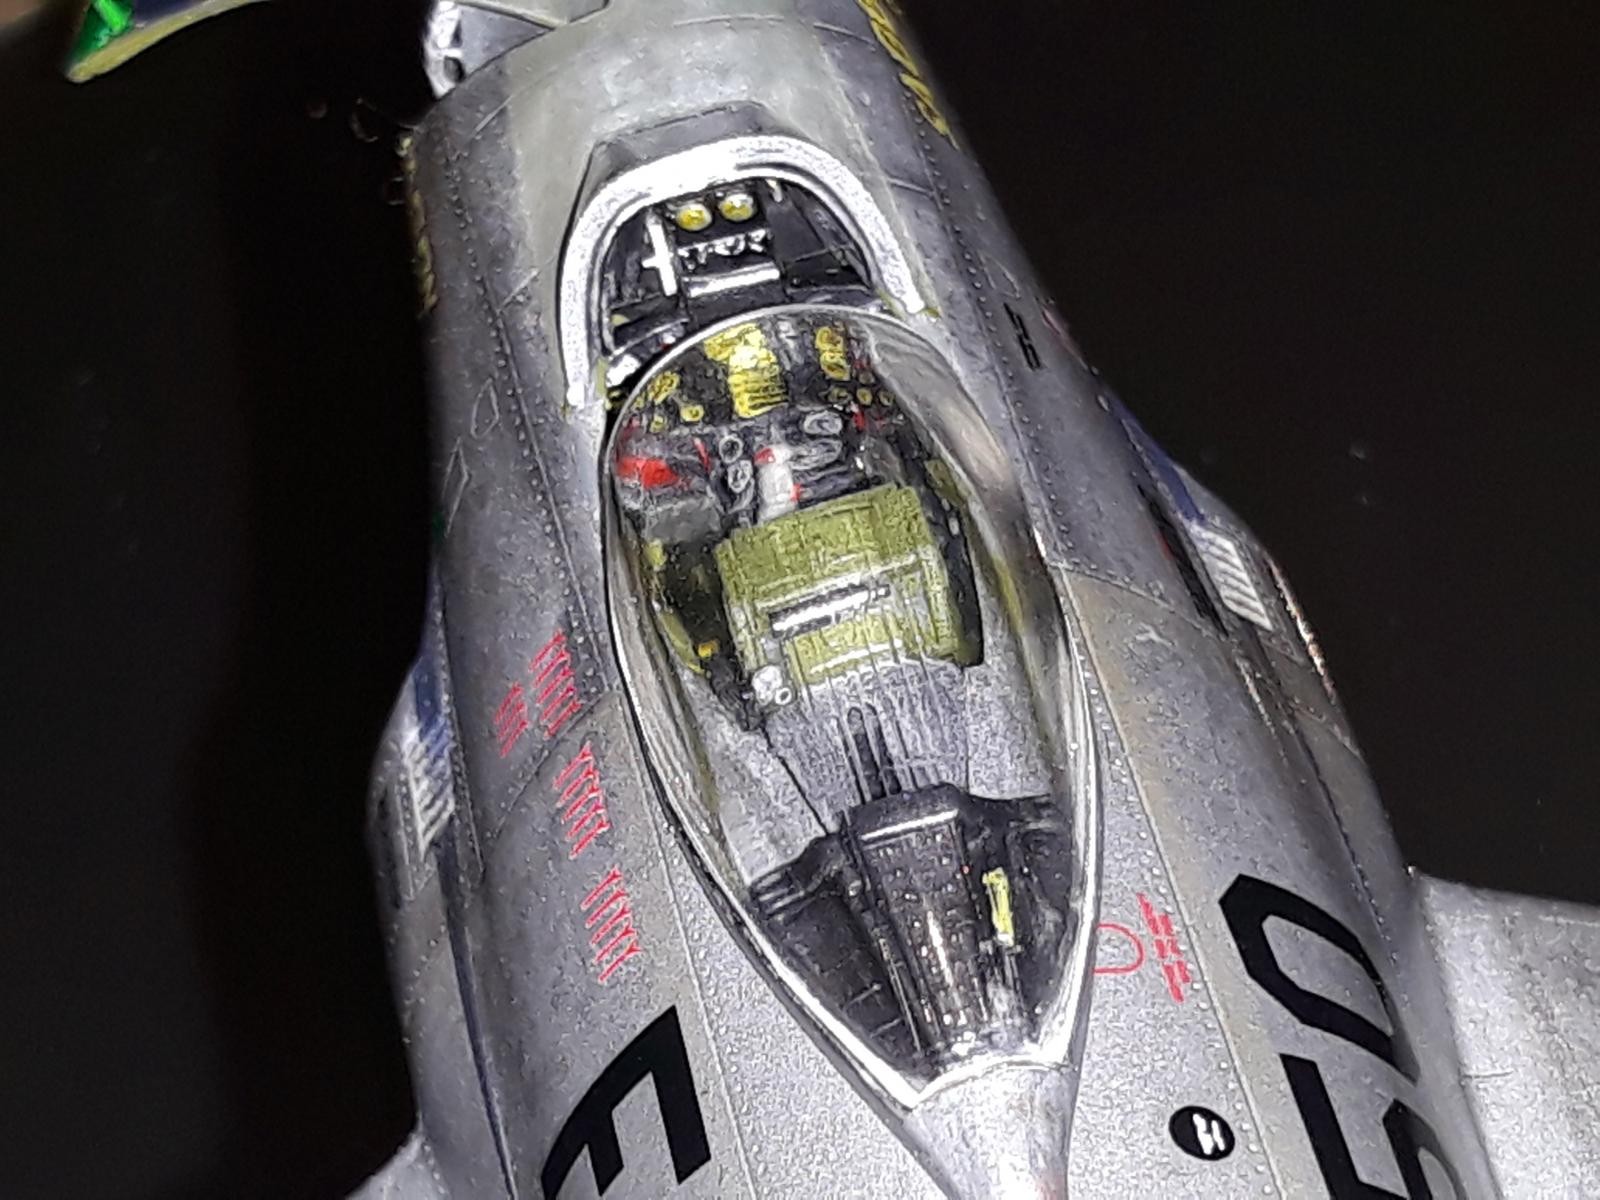
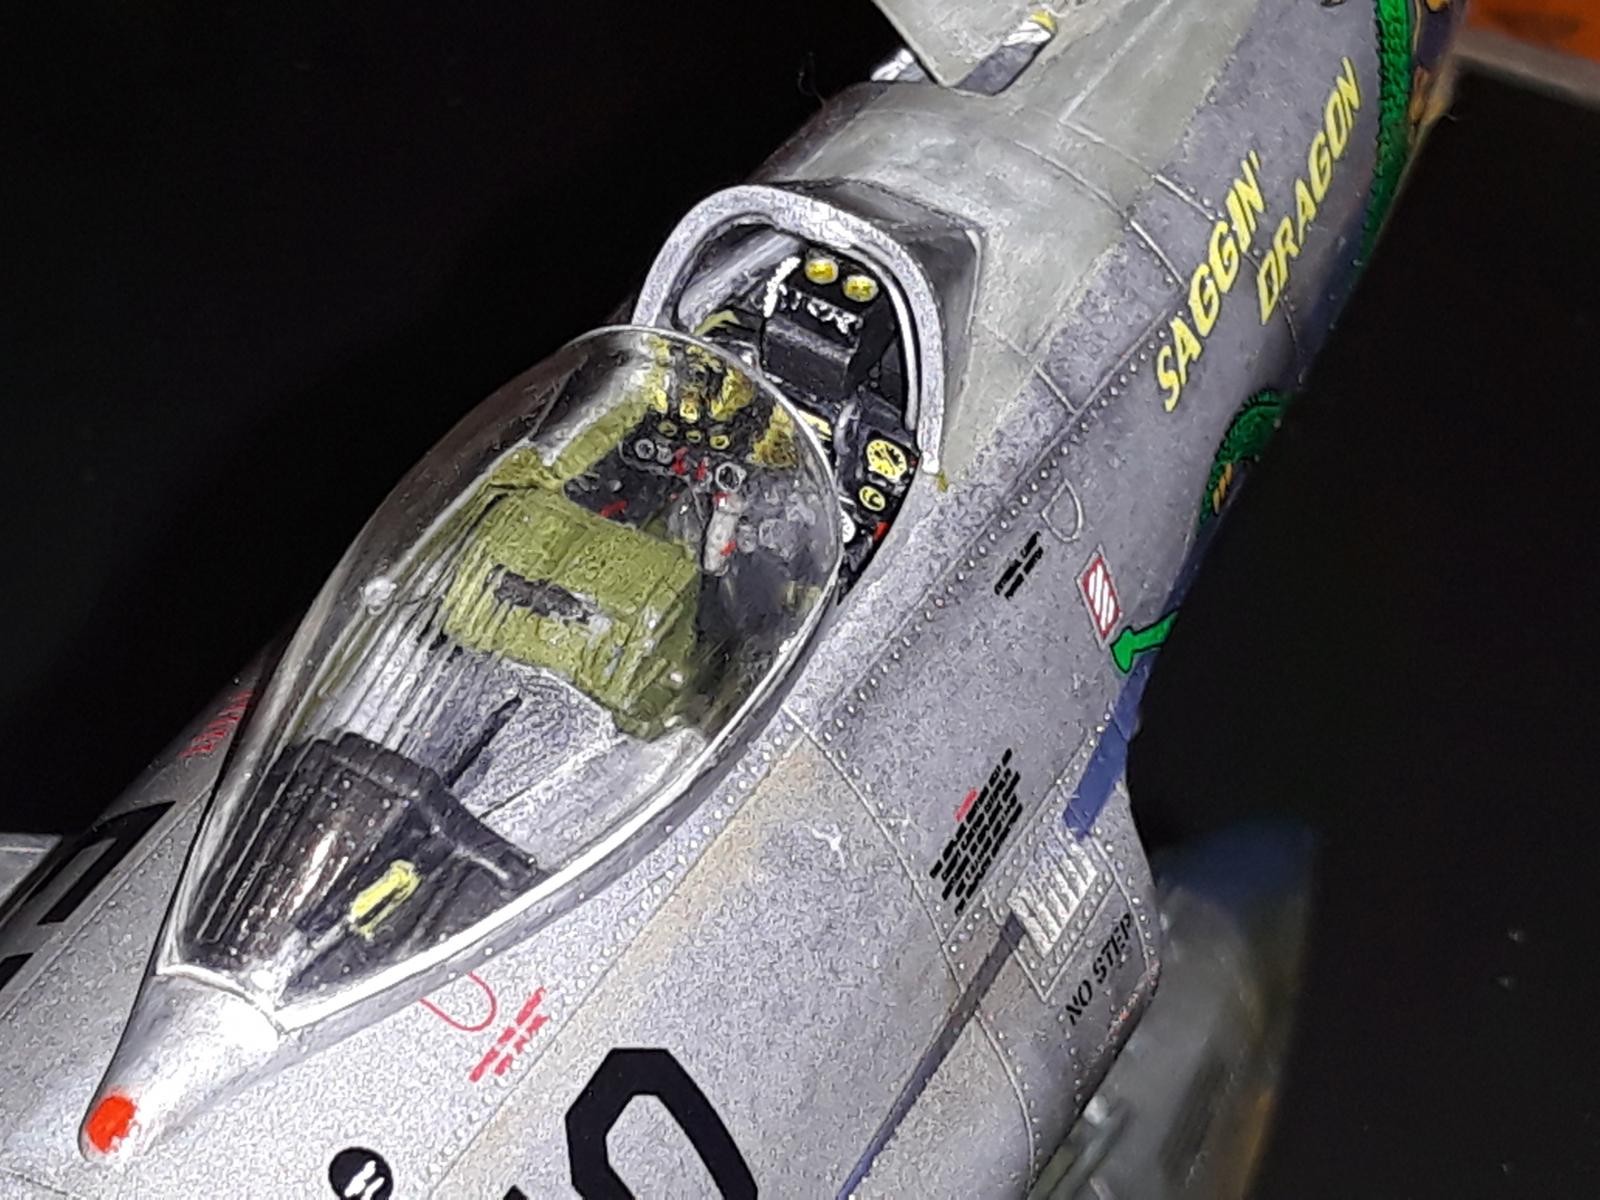
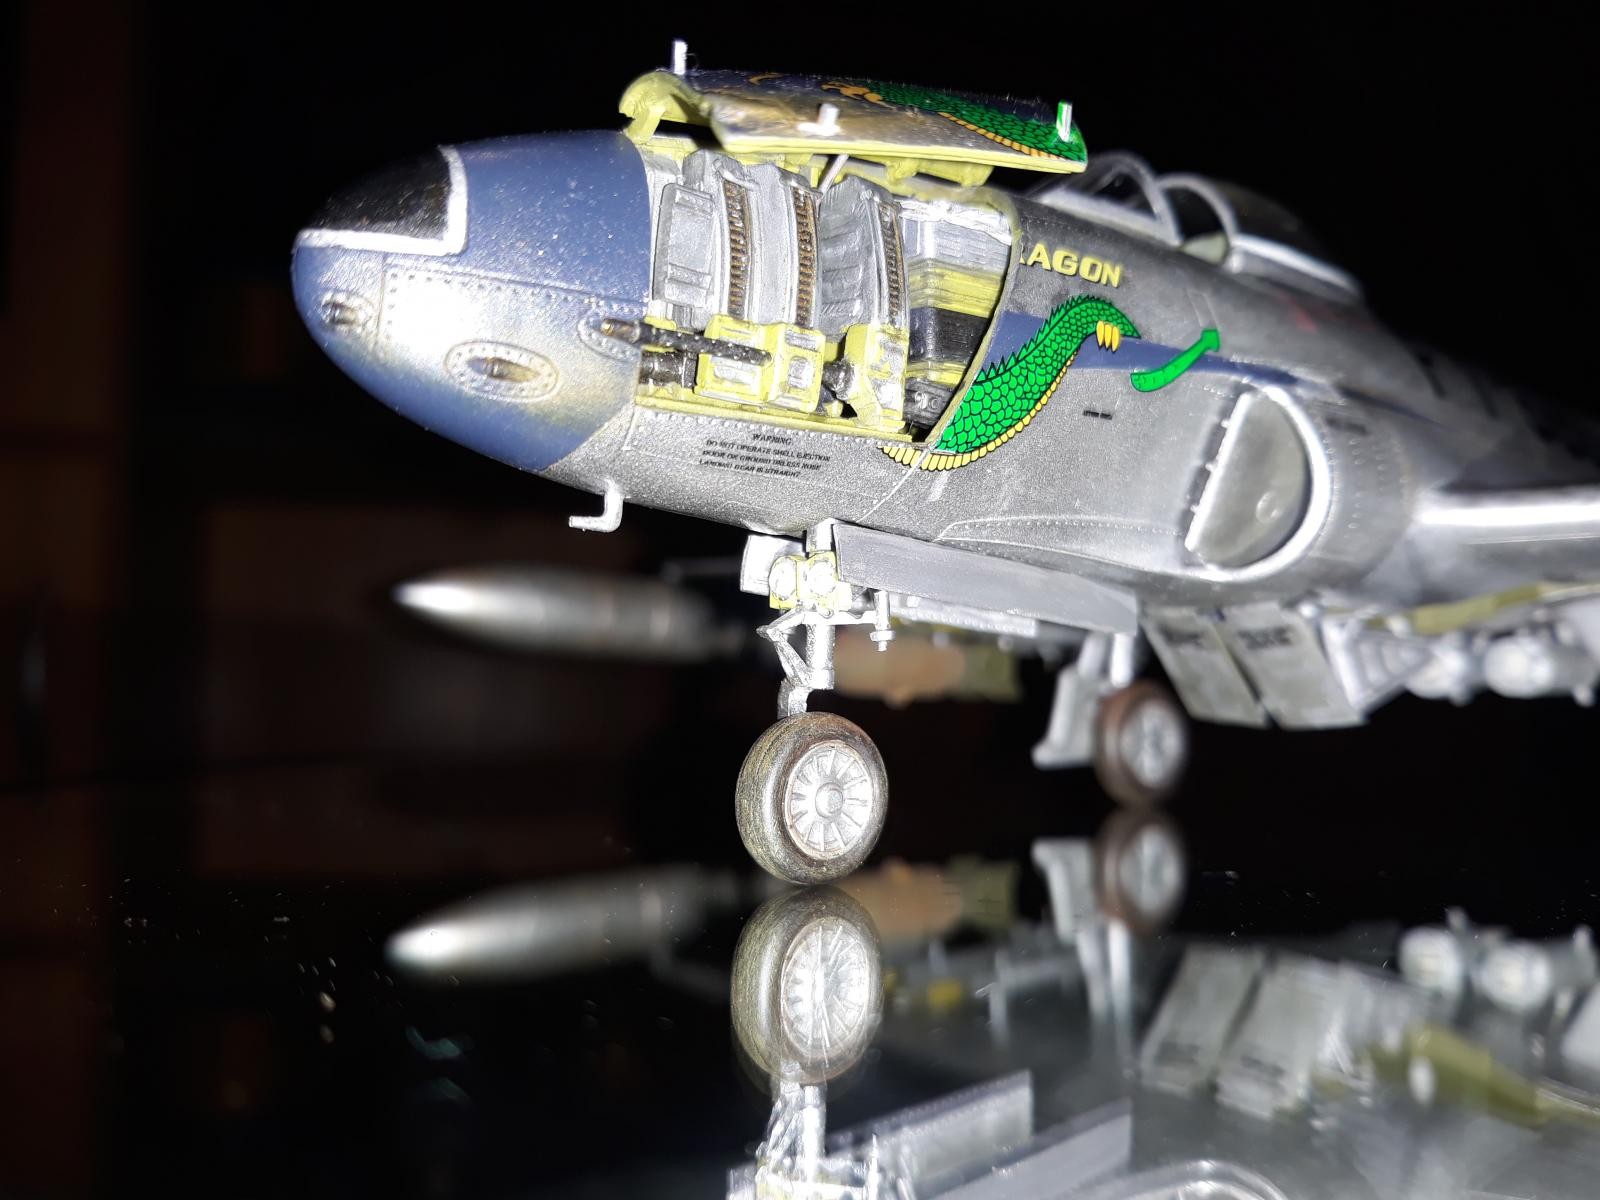
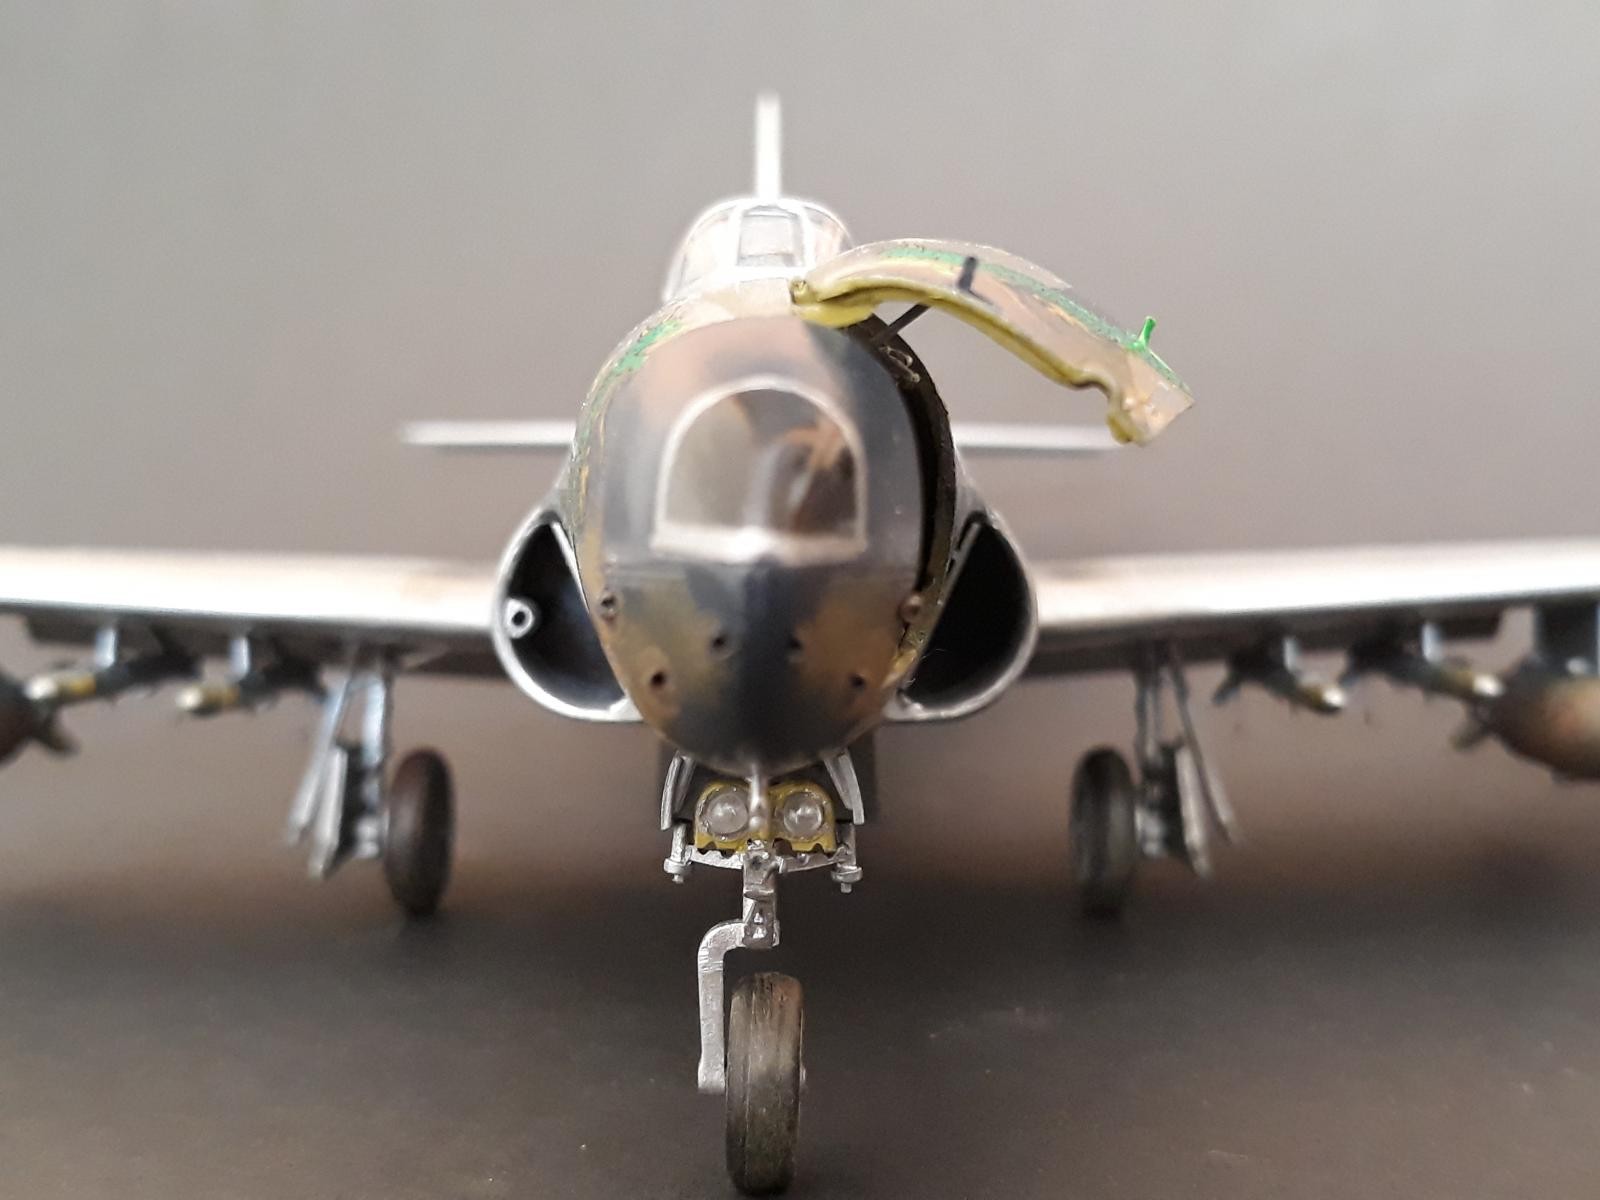
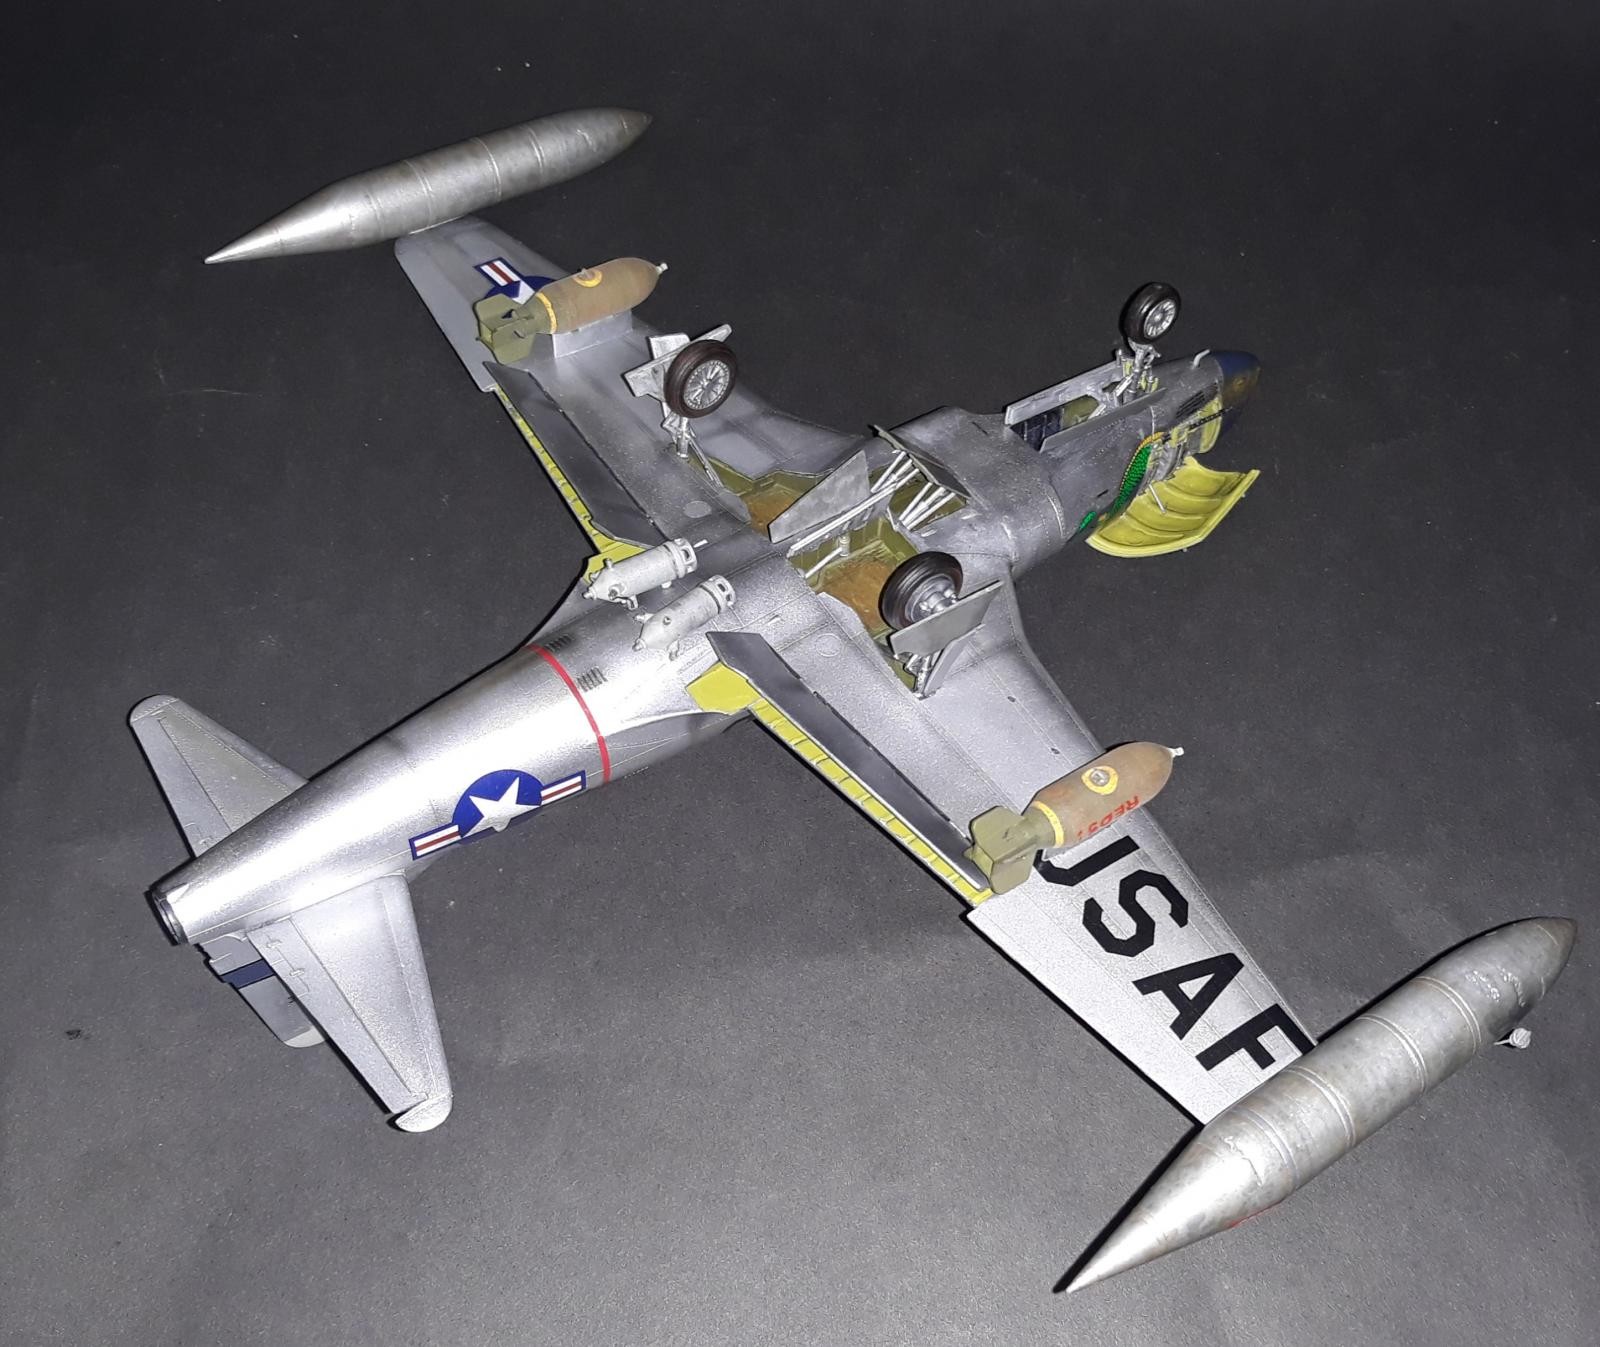
The Hobbyboss F-80 C kit offers finely engraved panel lines and rivets. The kit comes with two bombs and three different types of fuel tanks. Cockpit details are adequate for an OOB build and a small PE fret is included for the seat harness. The instrument decal even simulates the yellowish tint of the various instruments. I added scratchbuilt details to the reflector gunsight, cockpit sidewalls and ejection seat to take the cockpit to the next level. I liked the open gun bay with ammunition cans that the Monogram F-80 offered. I decided to perform some rhinoplasty and added the Monogram F-80's gun bay to the Hobbyboss F-80 nose. The perforated machine gun barrel came from an Academy F-86 Sabre. I decided to add HVAR's and two bombs from an AMT Grumman Tigercat. The flaps from the Monogram F-80 replaced the Hobbyboss flaps because they had better upper surface details. The canopy from the Hobbyboss kit is not the correct shape of the F-80 C and it also lacks the D/F sense antenna that is visible on the real aircraft. To this end, I replaced it with the Monogram F-80 canopy. The RATO gear, that was essential when carrying heavy loads, were sourced from the Tamiya F-84 Thunderjet. The nosewheel undercarriage bay from the Monogram kit replaced the one in the Hobbyboss kit as it offered more details. I also added more details to the landing gear and undercarriage bays. I opted to use the extended Misawa tanks as I like the look of these lengthened tanks that often displayed dents and discolouration. I scratchbuilt an open fuel cap for the one Misawa tank and dents were simulated with a Dremel tool. F-80's also carried a strike camera inside the right intake. I scratchbuilt the strike camera from a piece of sprue sanded to shape.
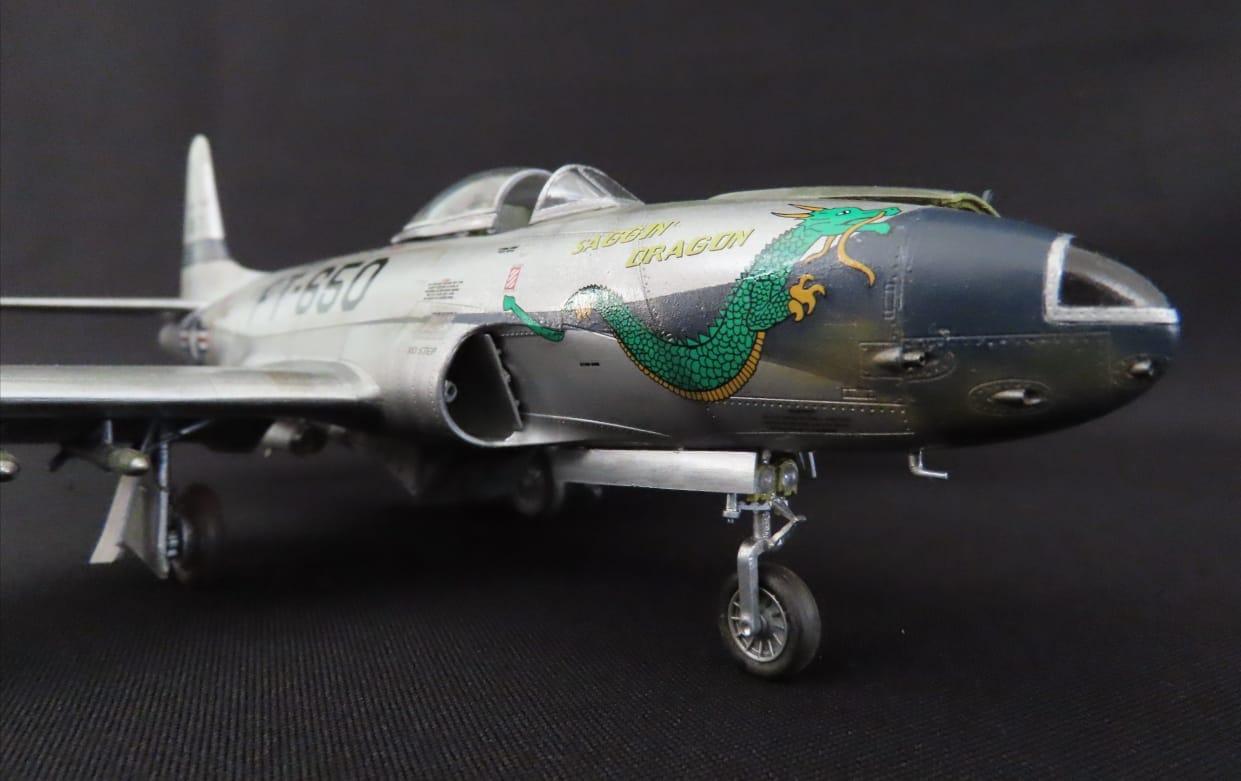
The colourful markings of “Saggin Dragon” of the 16th FIS / 51st FIW always appealed to me. This squadron was the leading Mig killing squadron at the start of the war. “Saggin Dragon” was sadly lost in 1951 in a take-off accident at Taegu airbase. Photos of the real aircraft show a weathered NMF. To replicate this finish I sprayed Tamiya enamel Titanium Silver, Chrome Silver and Humbrol Polished Aluminum Metalcote over a Humbrol 85 Satin black base. The model was sprayed with a fine mist of water and covered with coarse salt from a salt grinder. After drying thoroughly, I sprayed Tamiya Matt Alumnium over the salt and after the paint had dried, the salt was removed with a brush and soft cloth. The blue markings are supplied as decals but I opted to spray these markings after careful masking. The rest of the markings are a mixture of the kit decals and stencils from the Monogram F-80 decalsheet. Photos show that “Saggin Dragon” carried red coloured mission markings below the cockpit. This was replicated with custom made decals. Further surface weathering was simulated with Tamiya weathering kits, Doc O'Brien's weathering powders and graphite powder. All weathering and decals were sealed under a coat of Humbrol Satin varnish. The build took about three months to complete. Use the following link to view the full build.
https://imodeler.com/groups/work-in-progress-aircraft/forum/topic/lockheed-f-80-c-shooting-star/


Really sharp work. I especially like the the NMF finish.
Thanks Dale. The salt method is very easy to use and it allows for a realistic weathered aluminum finish.
I also like the salt method and it works really well to weather painted camouflage schemes also. I used this method on the 1/48 Special Hobby He 115.
3 attached images. Click to enlarge.
Really nice job on that monster! That was a p i s s a n t of a kit to finish, but it looks so nicely weird when finished.
gorgeous work!
Thanks Ramon!
Nicely done! I know the intake shapes are an issue, but they look good enough to pass muster. Well done man!
Hi Rob. For one or other reason Hobbyboss got it wrong again. Correcting it would have been difficult. I can live with it. However, the wrong shape canopy and flaps I could fortunately do something about. Thanks for the nice comment!
Lots of great details added to the basic plastic, thumbs up!
Thanks Pedro. Attention to small details always add visual interest to the final result!
Morne, @mornem
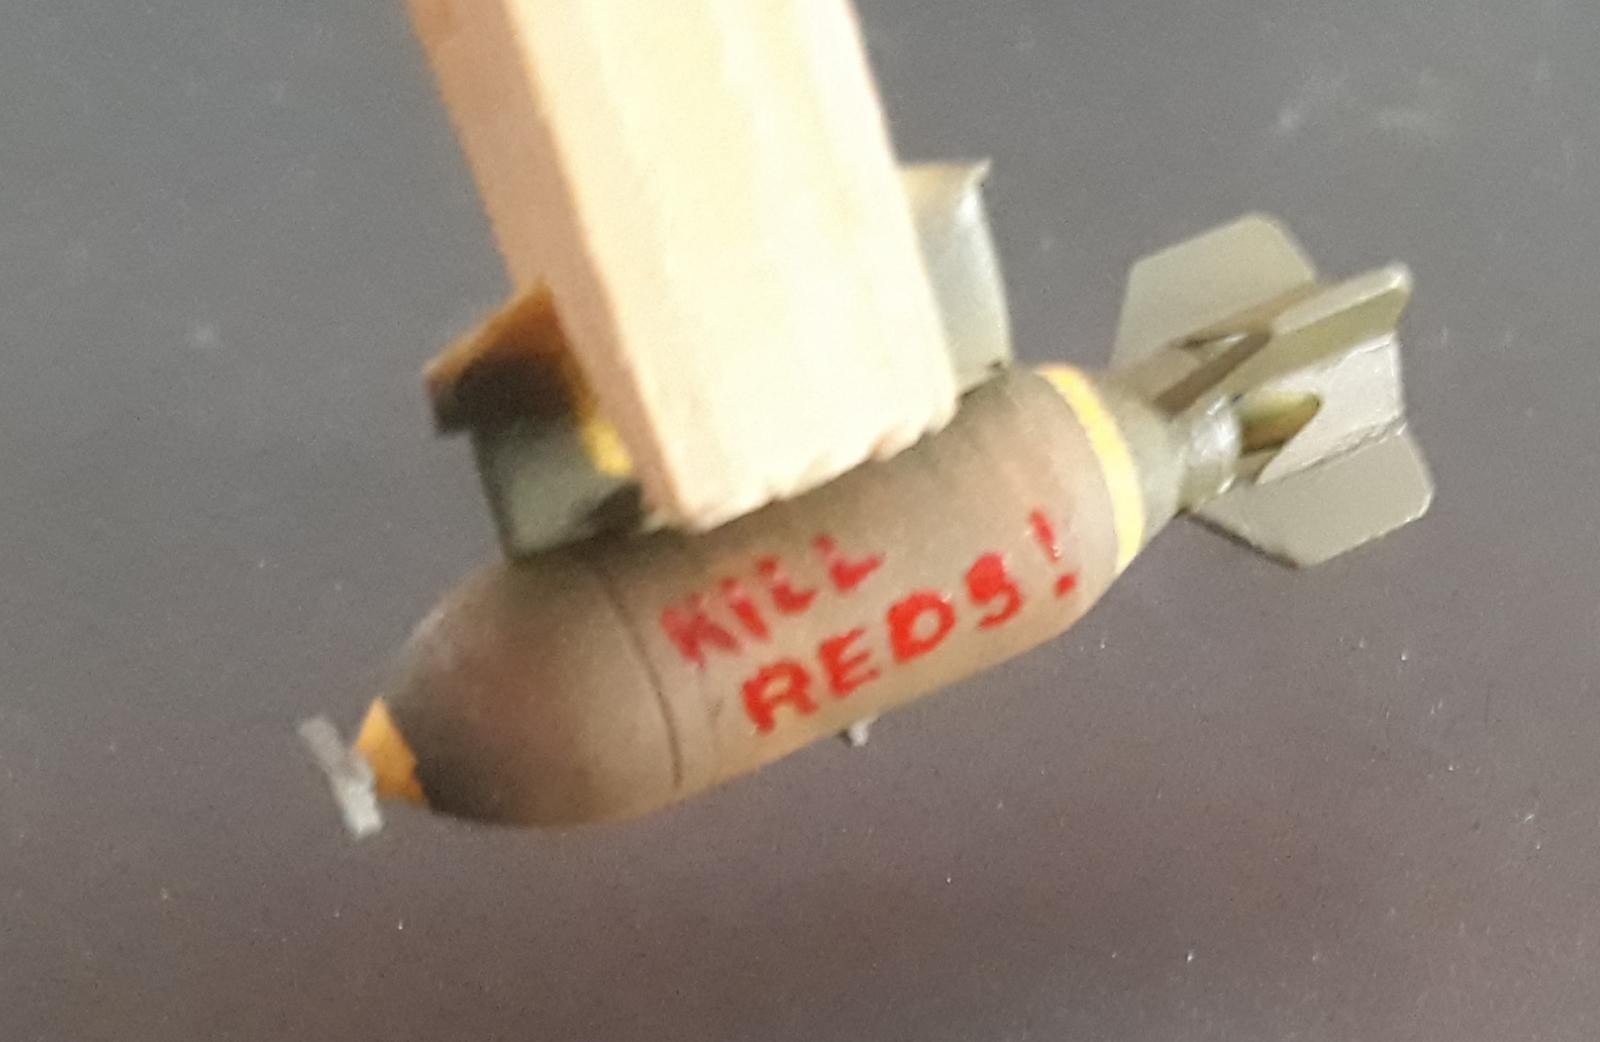
This is an amazing build. I really enjoyed watching you build it. Thank you very much for taking the time to post this article...The graffiti written on the ordnance is a nice touch. This was often done to the ordinances that were carried by many United Nations aircraft.
This article a wonderful way to kick off our new Korean War group build. Lest we forget, and Freedom is not free.
"liked"
Thanks Louis! Your kind comments during the build was great motivation to get this one done!
This is a real beauty, Morne.
You brought a lot of detail into it.
Nice story to read as well.
Thanks John. I am happy with the final result. All those details takes the model to the next level when it comes to the element of realism.
It looks so real ! One could be mistaken on some of your photos into believing that.
Thank you for showing your cool build. The salt technique I’ll try out sometime.
Best in modeling
Thanks Bernard for your nice comment. It is greatly appreciated!
Hi Morne!
You've done a fantastic job, with amazing attention to detail, of an admittedly difficult kit.
Having followed this build, I have to say I am deeply amazed by the end result.
Also, a big "THANK YOU" for the always kind responses to my (our) modelling related questions during the Work in Progress session (of course, the salt method springs first up!).
It was a great journey; thanks for letting me being a passenger.
All the best!
Hi my friend. It's always a pleasure to share skills and tips with others. That is why this site is the best in my humble opinion. I must also thank you for all the kind comments and motivation to get the build done. We all commit to this hobby because of the satisfaction we derive from it.
Wow! That kit has so many problems that I wouldn't touch it. You detailed it into a masterpiece. I think your open gun bay distracts the eye from the oversized intakes. Really well done!
Hi John. Thank you for the kind assessment of my build. I did not want to mess with the intakes as it would just open Pandoras box. I opted to leave it as I can live with it. Overall it is not a difficult kit. It is just one of those that need a bit of TLC.
A real beauty as always! Love the salt treatment of the NMF - going to have to attempt that soon. And all the other weathering looks spot on. Just a fantastic build.
Hi Greg. Thanks for the kind comment on my build. I am hooked on the salt method. It was the first time I tried it for a NMF. The photos unfortunately don't do the overall visual effect justice. Try it, you won't be disappointed!
Fantastic build!
Thanks Robert!
Excellent build Morne! Thanks for sharing.
Thanks Clark. I appreciate the comment.
Tail end Charlie here, a lot of thought and patience went into building this kit Morne. I like the article and the photos too. Taking the time to show a progress build and pulling back the curtain and showing how the magician does his magic is very honorable. Or teaching a man how to fish...
You've really captured the look and feel of a 50's fighter in this build too.
Two thumbs up Morne.
Hi Stephen. Thank you for the very kind assessment of my model. I always like sharing tips. We all love this hobby and we grow as modelers through helping each other to grow our skills.
Awesome work Morne, really like the way she turned out, a real show winner.
Thanks Tom for the nice comment. I am pleased with the overall result. I always strive to improve on previous builds.
This is very well done, an impressive amount of work & attention to small details ! That HE-115 looks impressive too, Morné @mornem
Thank you my friend for the kind assessment of this build. It's all a labour of love for us modelers.