Three Me 262s Part 1: Me 262A-1a/U4
As indicated by the title, this is the first of three Me 262s built simultaneously;
- Dragon Me 262A-1a/U4
- Hobby Boss Me 262A-1a/U3
- Tamiya Me 262A-1a
The concept of an Me 262 armed with a large calibre weapon originated in February 1944, but it was during armament discussions between Hitler and Goering on New Year's Day, 1945, that led to the requirement to fit a 50mm MK 214 gun to the aircraft, to be designated as Me 262A-1a/U4.
Conversion of the first prototype, W.Nr. 111899, commenced on the 11th of March with the first flight occurring on the 19th. A second aircraft, W.Nr. 170083, was converted in April. This second aircraft differed from the first in having a different arrangement of nose undercarriage doors with two doors to the rear that fully closed off the wheel well when the gear was retracted. It is unlikely that this second aircraft flew prior to it being captured by the Americans at the end of the war (Smith, J. R. and Creek, J., Me 262 Volume Two, Classic Publications, 1998).
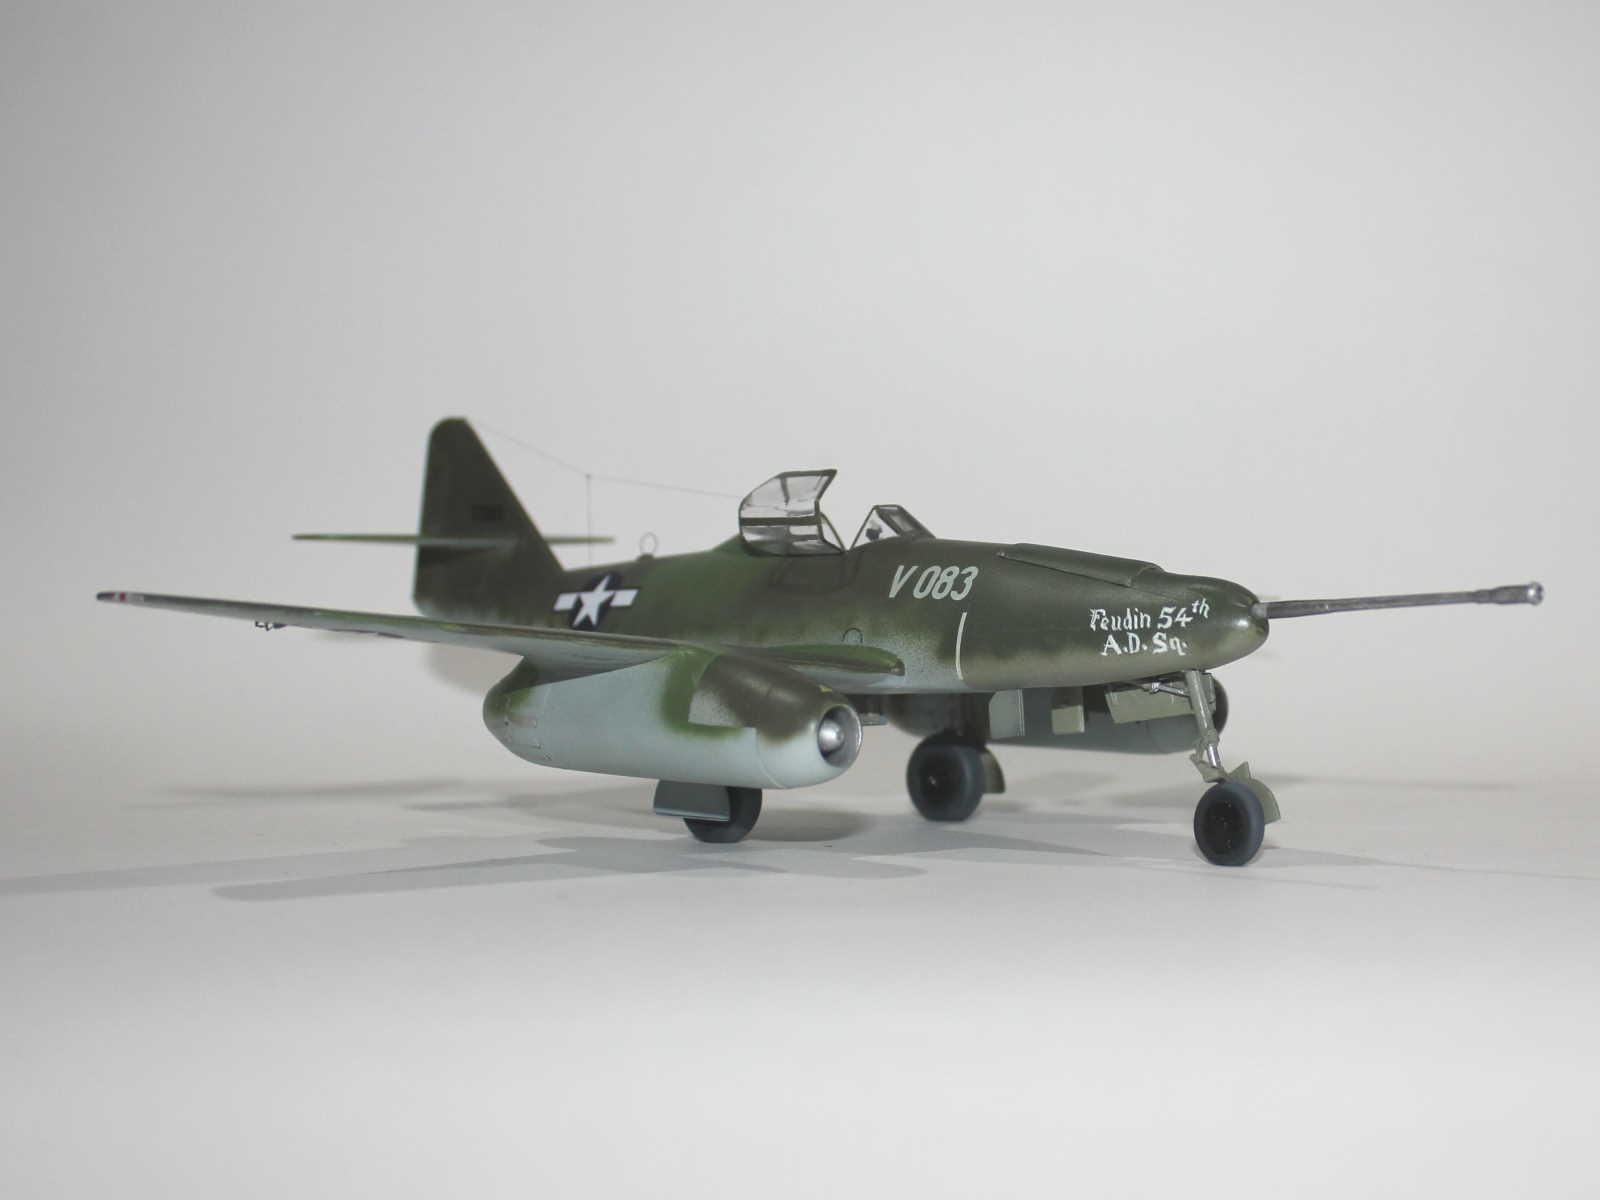
With the nearing of the end of the war in Europe, the US and UK formulated plans to capture examples of advanced German technology for examination and exploitation and jet aircraft were naturally high on this list. To this end, the US created an intelligence exploitation division under the code name LUSTY (LUftwaffe Secret TechnologY). With the end of the war, elements of the 54th Air Disarmament Squadron (Feudin' 54th ADS) arrived at Lechfeld to discover a number of Me 262s and attempted to make 15 of them flyable for transport back to the US. The squadron was latter named "Watson's Whizzers" after its commander, Col. Harold E. Watson (Smith, J. R. and Creek, J., Me 262 Volume Four, Classic Publications, 2000).
The captured aircraft were individually named on the port side of the nose by the 54th ADS personnel and most received a "Feudin' 54th ADS" inscription on the starboard side. After being ferried to Melun, south east of Paris, the aircraft were renamed by the pilots assigned to ferry them and the 54th ADS label over-painted.
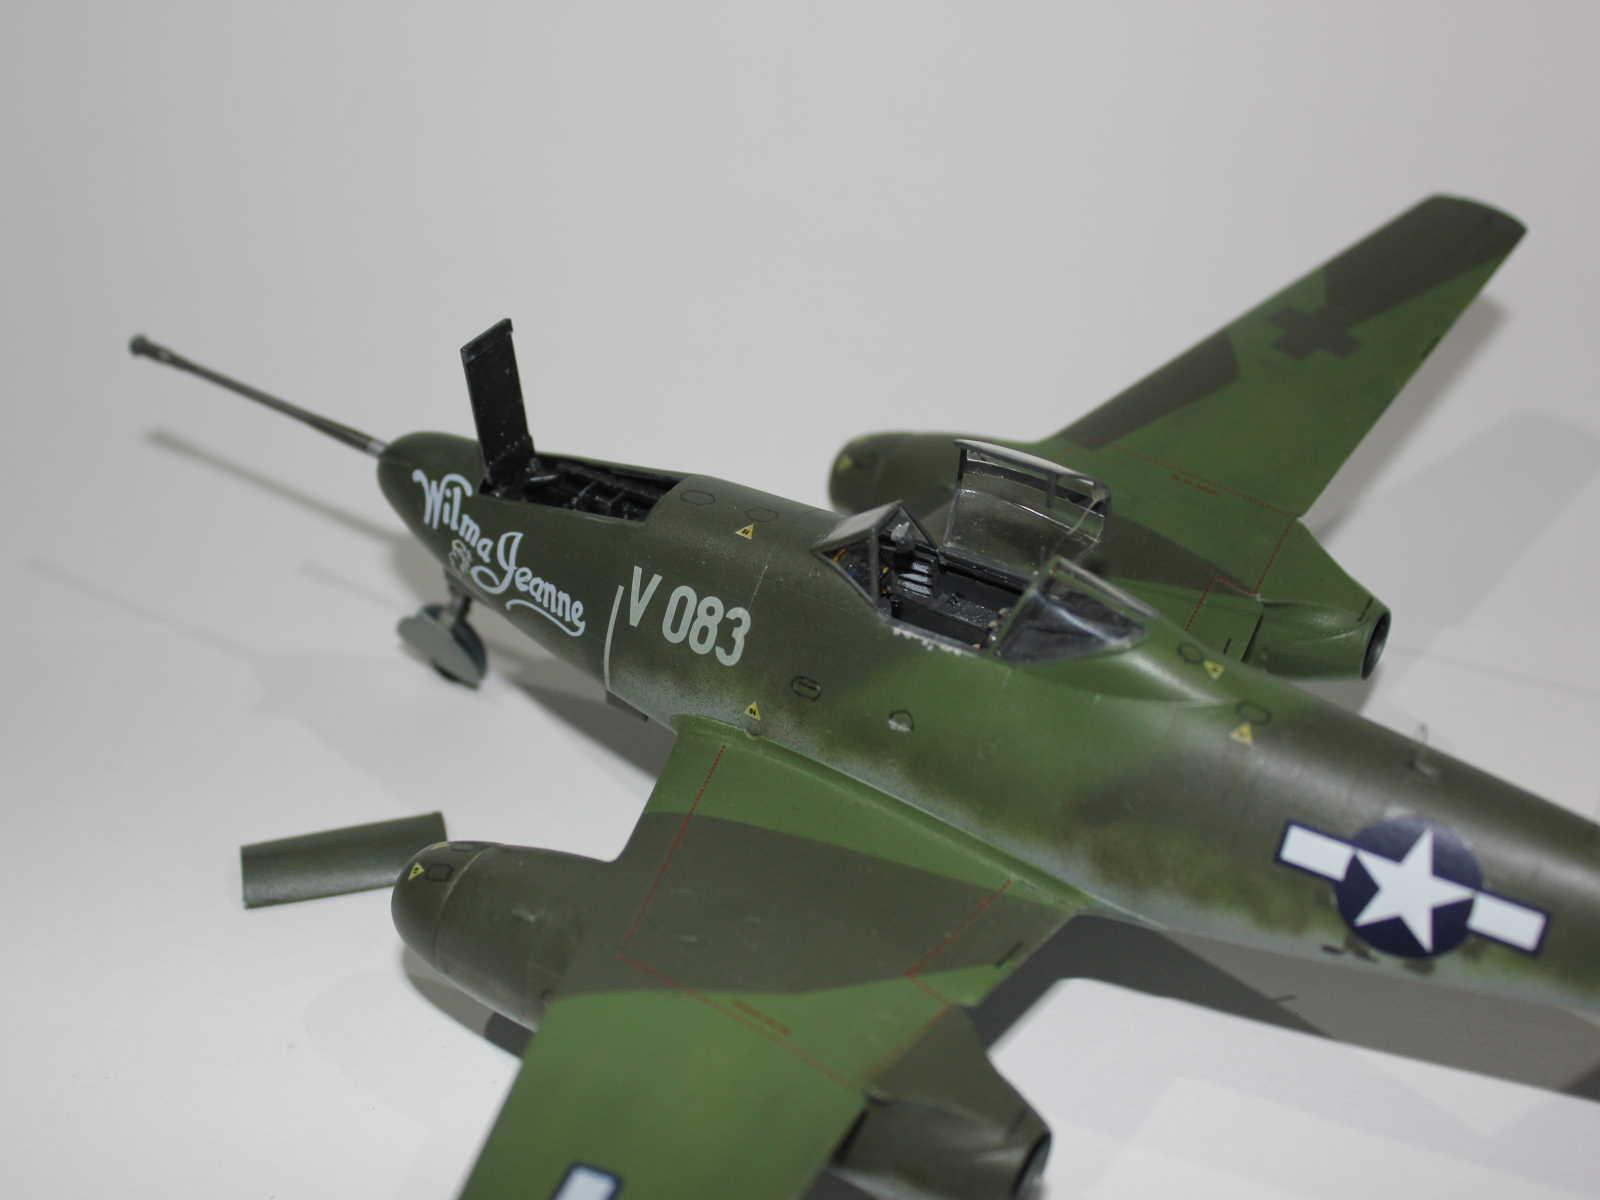
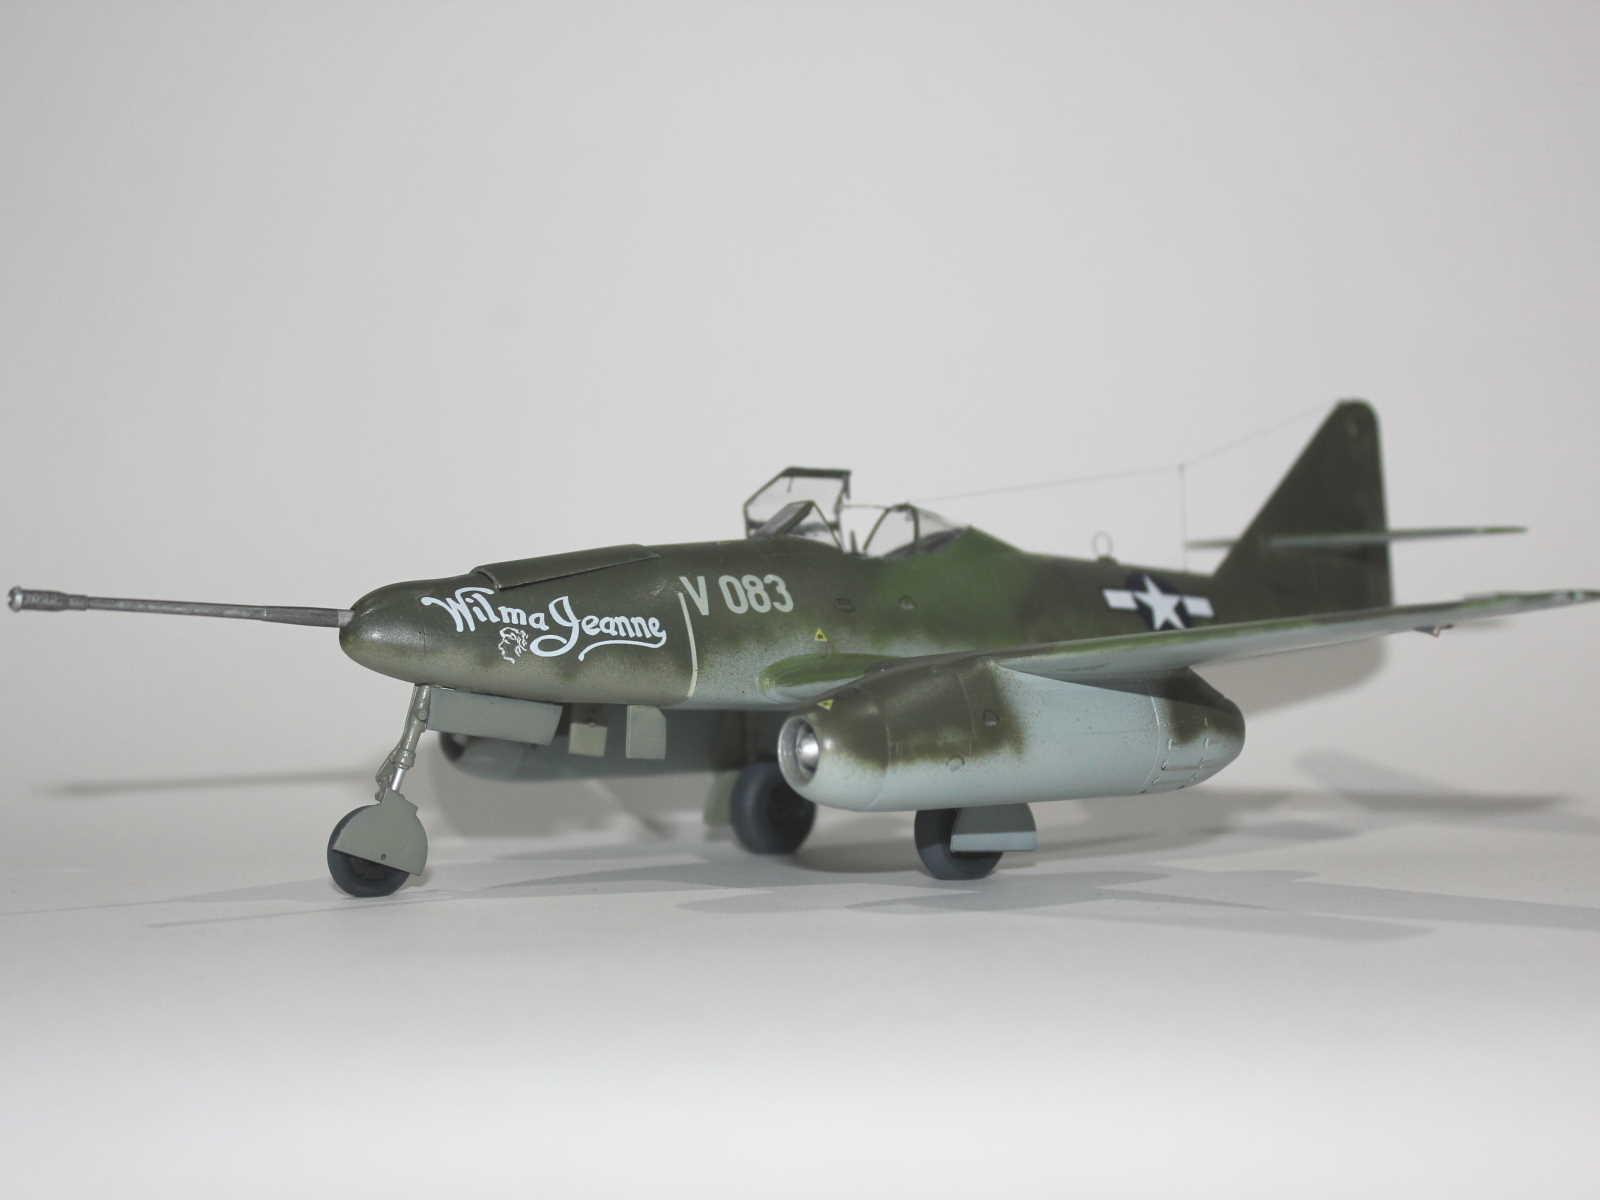
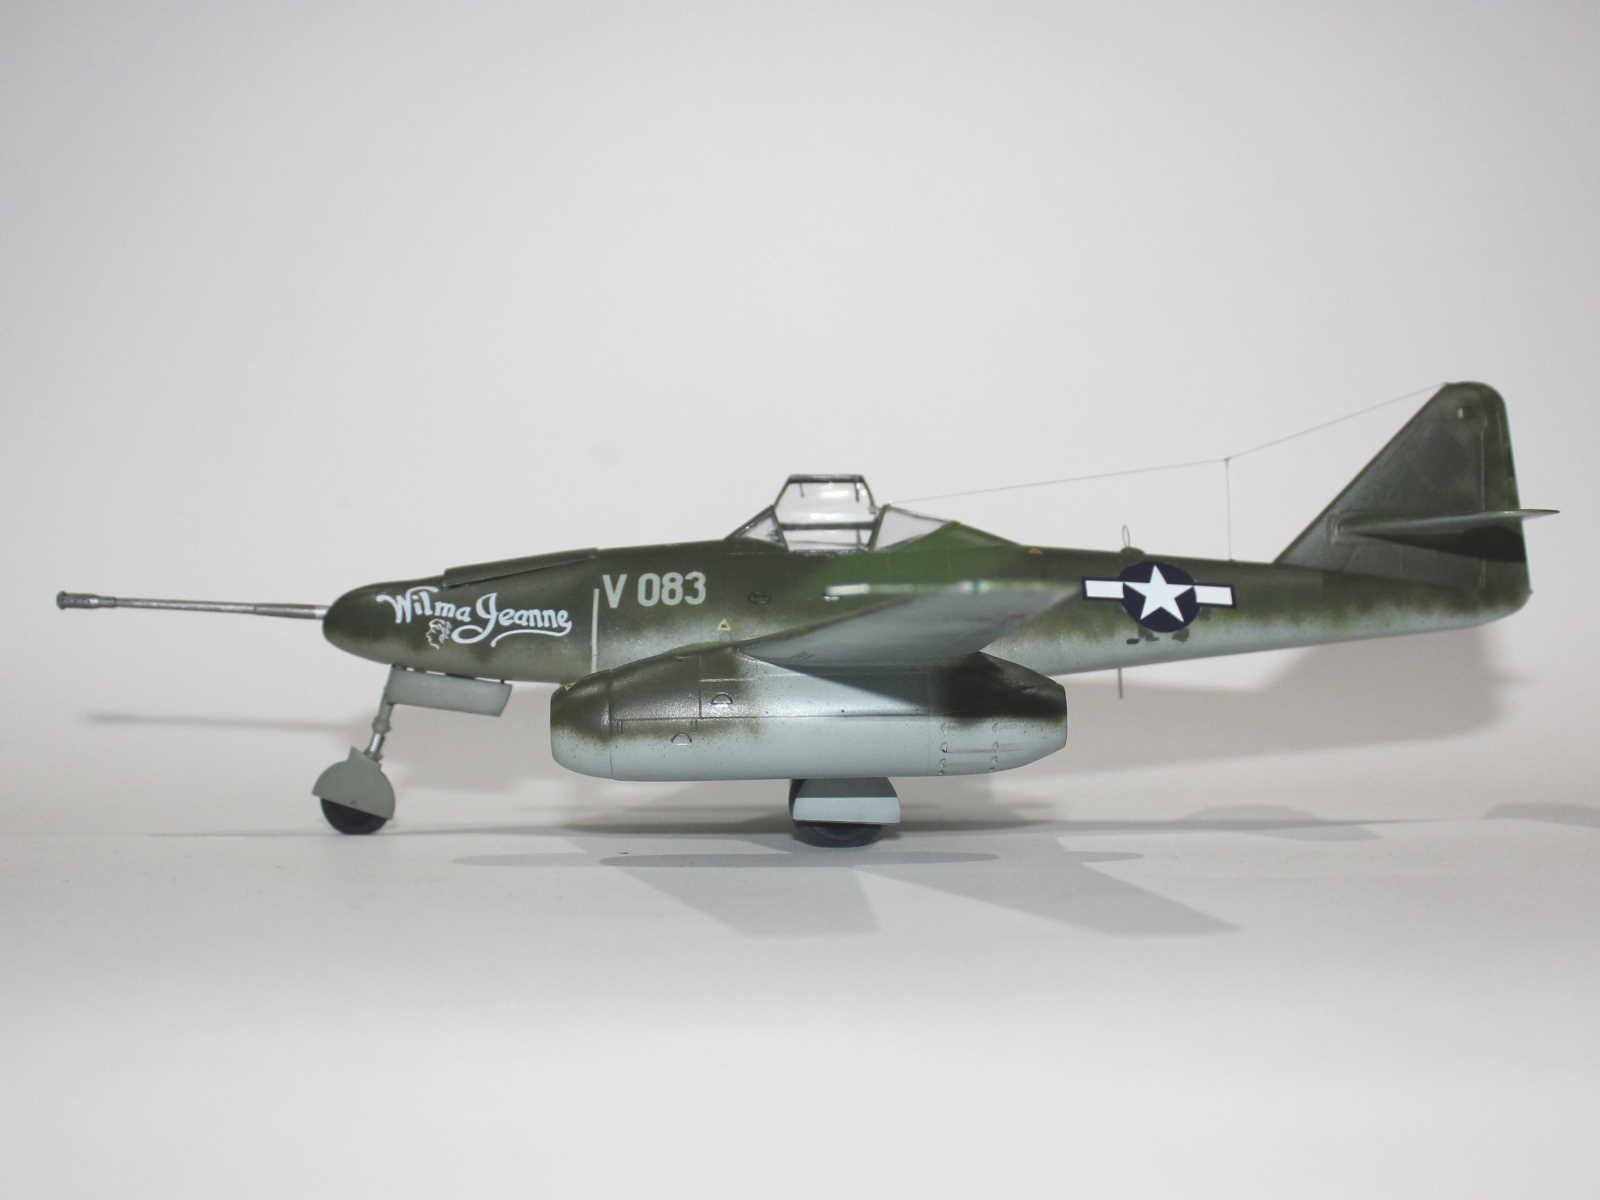
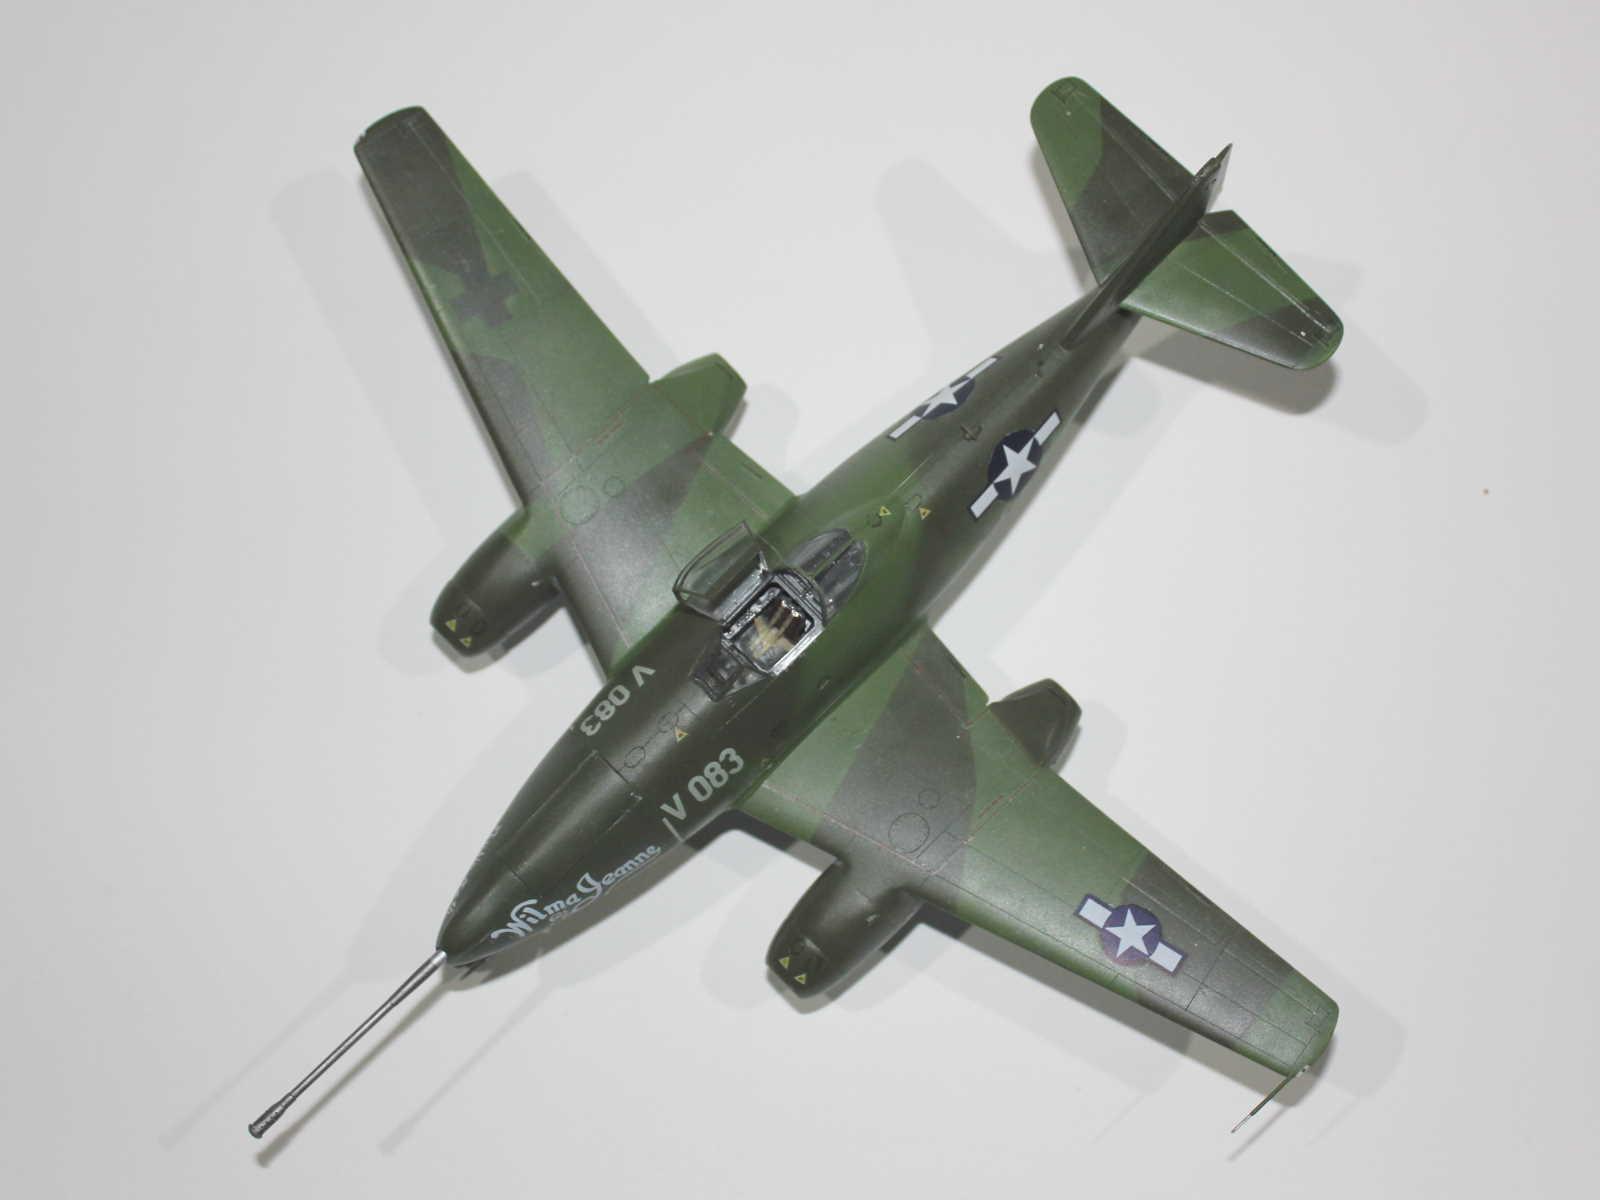
W.Nr. 170083, "Wilma Jeanne", was one of the captured aircraft and is the subject this model represents.
This is an aircraft I've wanted to build ever since I read about it when I was a teenager (Smith, J. R. and Creek, J., Jet Planes of the Third Reich, Monogram Aviation Publications, 1982). At some stage I purchased the Ventura decal sheet (Ventura Decals V4859, American Captured Me 262's:- Me 262 A-1a/U3, U3 and B-1a versions), which covers this aircraft (and the name change to "Happy Hunter II"), Me 262A-1a/U3 "Connie the Sharp Article"/"Pick II" and Me 262B-1a "What Was It?", with the hope of one day building one or more of them.
While originally released by Trimaster with white metal parts in 1989, this version of kit was released by Dragon in 1994, with plastic replacing the white metal. I picked this one up at a swap-meet years ago.
This is not a simple kit to build and the moulds are showing their age, however, it is a very accurate representation of the aircraft with a good level of detail.
This was part of a three Me 262 build project and details of the build can be seen here: https://imodeler.com/groups/work-in-progress-aircraft/forum/topic/three-me-262s/
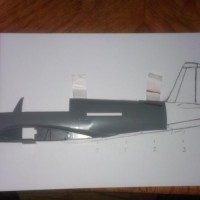
The kit instructions list the upper surface colours as Gunze H304 Olive Drab (RLM 81?) and H309 Green (RLM 83?) with a standard pattern on the wings but a single solid colour of H304 with a low demarcation line over the fuselage.
However, close examination of photos shows the fuselage aft of the nose to have what appears to be a standard two-tone camouflage with a mid-height demarcation line obscured by heavy mottles down to a low fuselage line (http://silverhawkauthor.com/axis-warplane-survivors-german-aircraft-part-iii-junkers-ju-290-to-messerschmitt-me-261_566.html). That would fit with the aircraft having been modified from a standard Me 262.
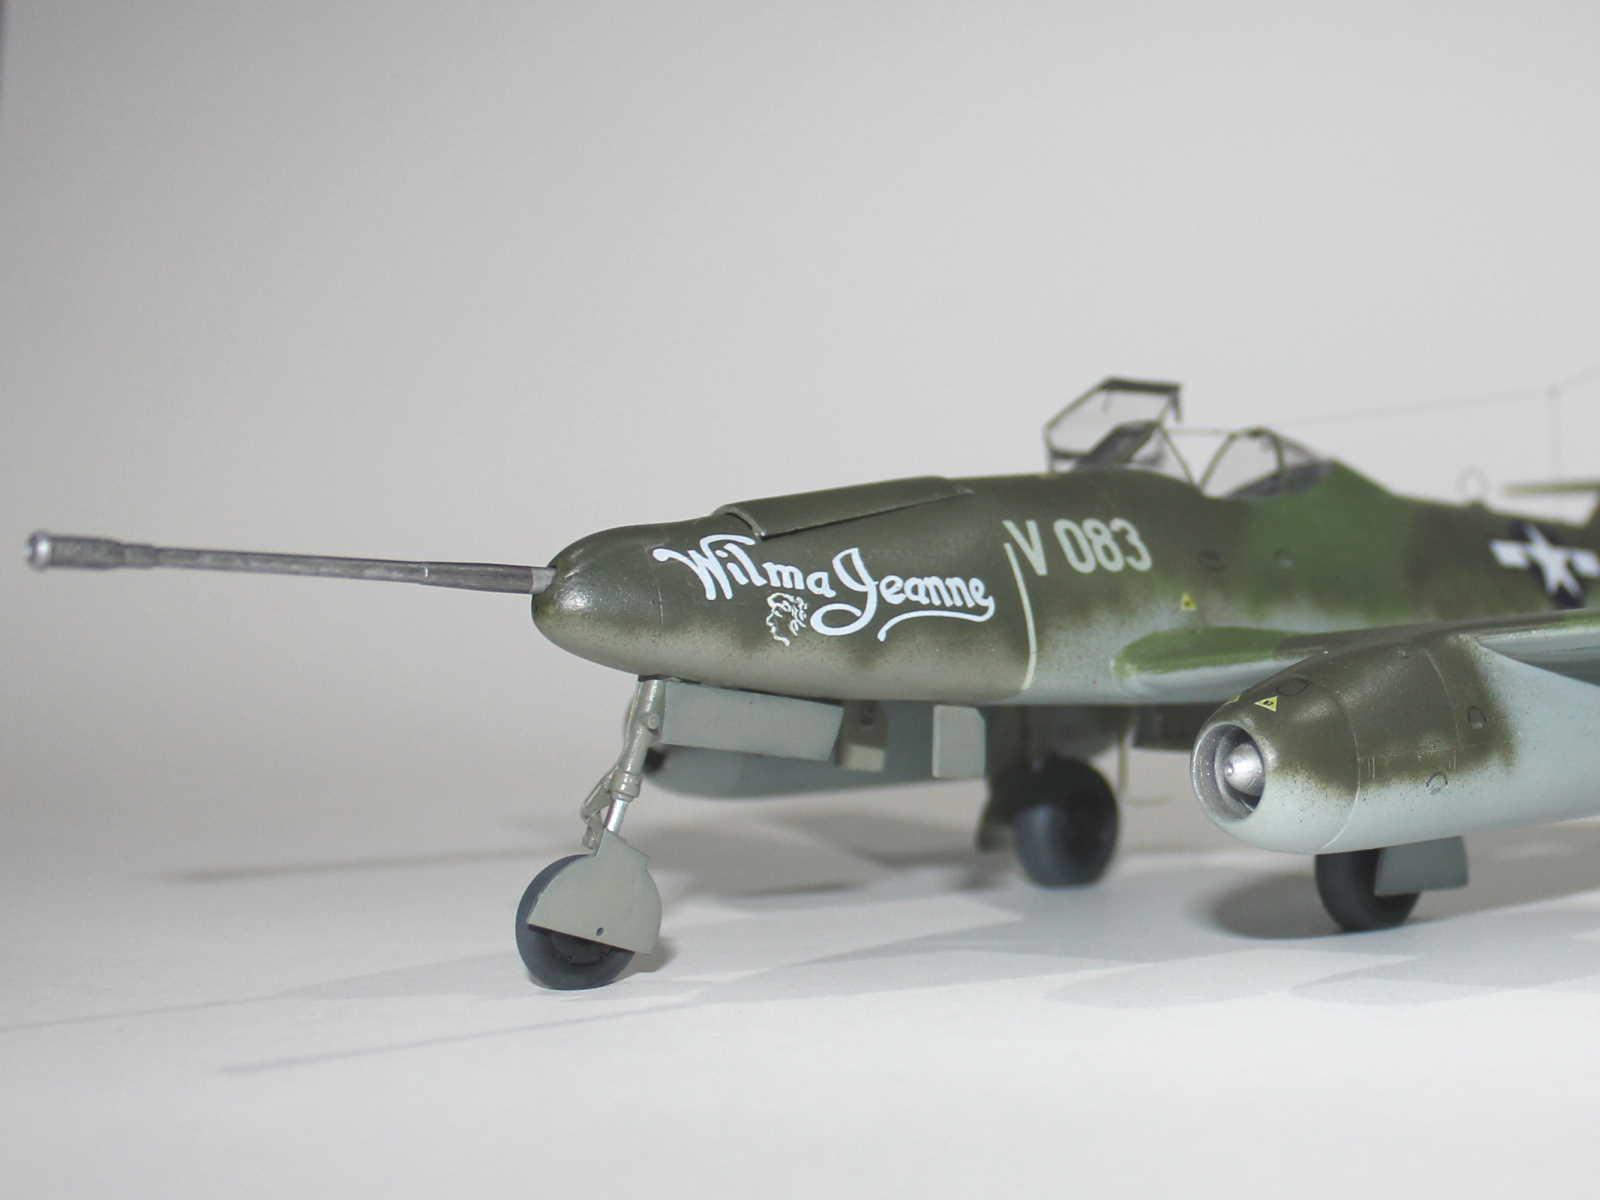
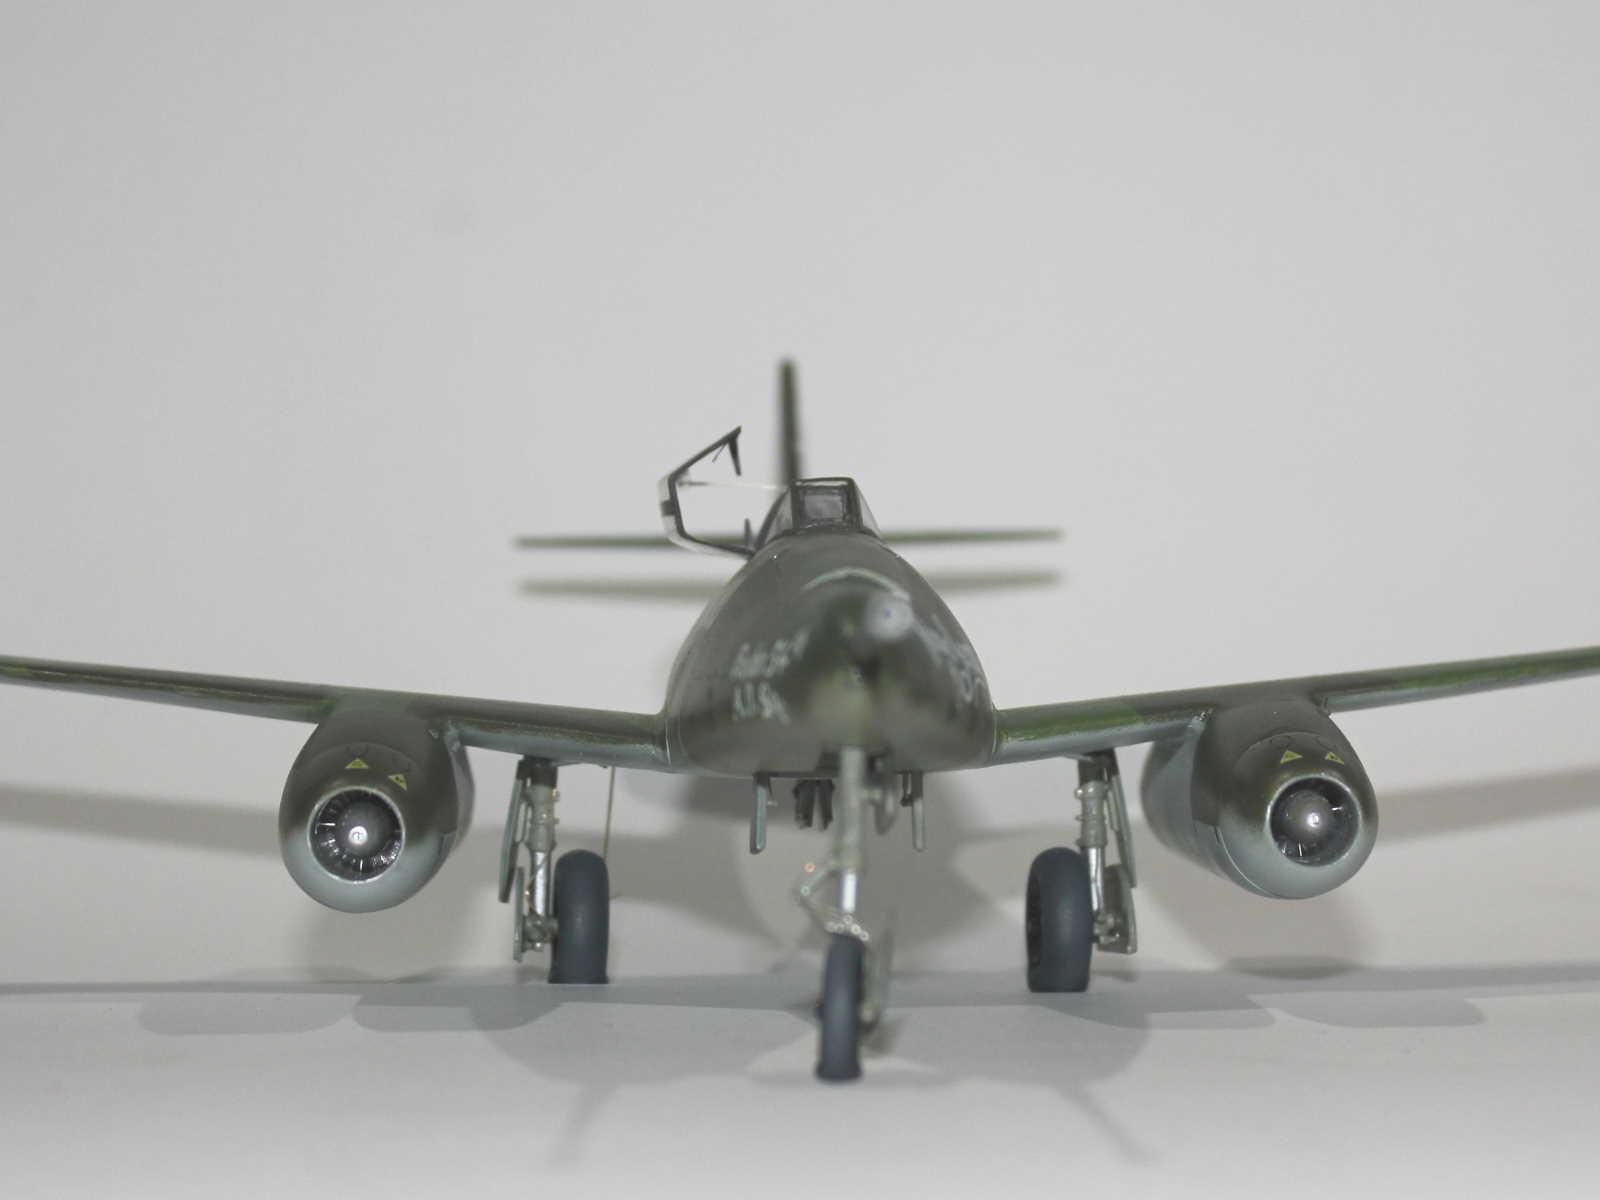
The nose of the aircraft was a new construction and on the first Me 262A-1a/U4, W.Nr. 111899, this was left unpainted. On this aircraft, however, the nose has a single, darker, solid upper surface colour with a low demarcation line with some overlap over the forward fuel tank (forward of the cockpit). This would seem to indicate that the new nose was painted after it was attached to the fuselage.
Looking at photos again, I think that the nose underside is slightly darker than the main fuselage and that this could be RLM 02. This fits with the fact that the standard nose of the Me 262 was manufactured using non-strategic steel sheet and were delivered to the final assembly point with a protective under-coat of RLM 02 (Brown, D. E., Poruba, T. and Vladar, J., Luftwaffe Over Czech Territory 1945, Vol IV: Messerchmitt Me 262 Production & Arado Ar 234 Final Operations, JaPo, 2012).
My interpretation of the aircraft's colour scheme is a s follows:
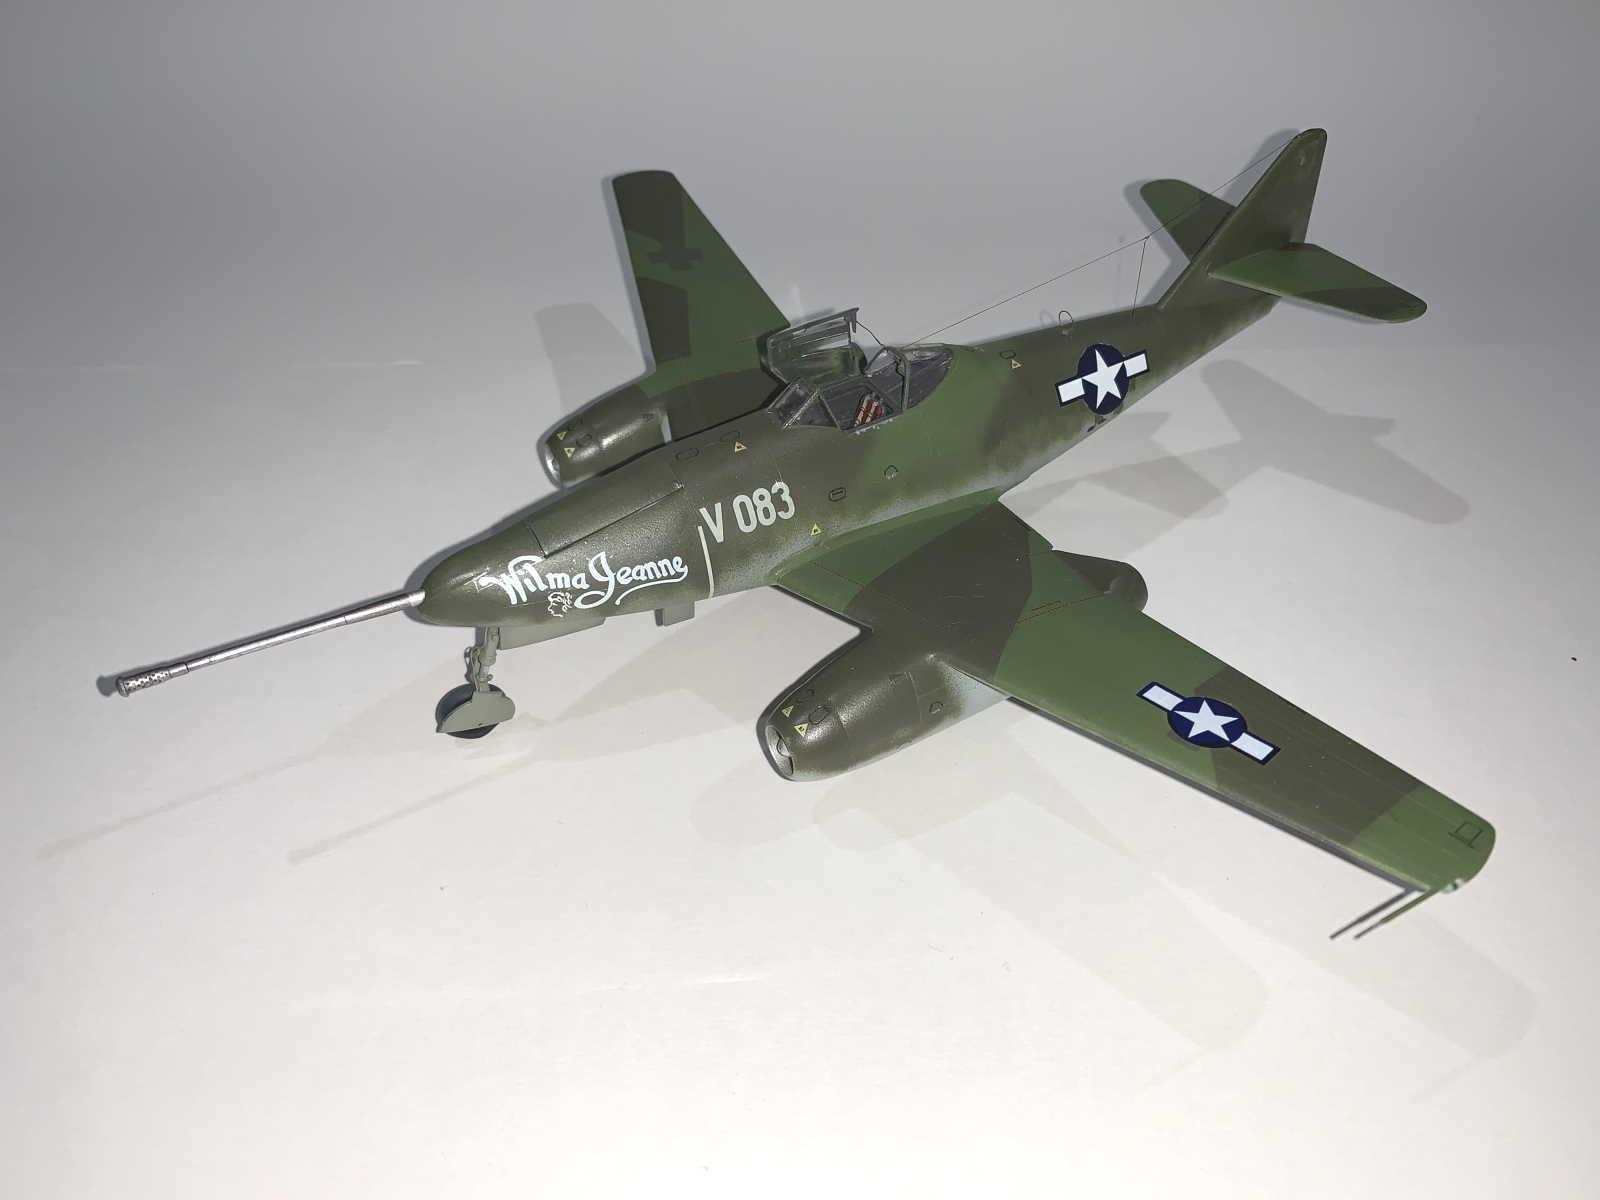
Aft of the nose, the aircraft was painted a more or less standard Me 262 camouflage of Gunze H417 RLM 76 Light Blue underneath and H422 RLM 82 Bright Green on top with contrasting H421 RLM 81 Brown-Violet with dense mottles of both colours along the lower fuselage and vertical tail.
The underside of the nose was masked off and painted H70 RLM 02 while the upper surface was painted H423 RLM 83 Dark Green. Unfortunately, this latter colour didn't end up giving as much contrast with the RLM 81 as I had hoped for and the difference in colour is very subtle.
I have included a grey-scale photo that shows that both the upper surface colours and the under-surface colours have minimal contrast.
The above website has photos that show both engine nacelles whilst the aircraft was named "Wilma Jeanne" and these reveal that the both sets of engine covers were a mismatch with obvious discontinuities in the camouflage patterns. This was probably due to the Americans having to find working engines for all the aircraft they intended to ferry. The photo of the aircraft at Melun, when it had been renamed "Happy Hunter II" show that these covers had been changed for a set with a very different camouflage scheme.
As I was building "Wilma Jeanne", I paid particular attention to these photos and a lot of masking was required to replicate what I saw.
The second photo of this aircraft on the website shows the aircraft with US stars and bars over the fuselage cross but with the swastika still visible. This would indicate that the US national insignia were applied without the German ones having been over-painted.
The fourth photo shows the aircraft on the flight line with the swastika over-painted with a dark colour, underwing colours over-painted in a light colour and the fuselage crosses over-painted in a colour a little lighter than the underlying German camouflage. The upper wing crosses are not visible.
I interpreted that by masking and painting the swastika and upper wing crosses H64 RLM 71 Dark Green. The underwing crosses were painted a lightened RLM 76 to give some contrast. I applied the kit decals for the fuselage crosses and then overlaid the Venture stars and bars, which were of non-standard dimensions, but the white is a little translucent so the German cross show through. Then I brush painted RLM 71 over the exposed portions of the crosses, leaving slivers of white close to the US markings.
The third photo shows the aircraft a little later than the second, as evidenced by the "Fudin' 54th A.D.Sq." now applied to the nose. This inscription is missing from the Ventura decal sheet and is also missing from other sheets that I have seen online. It is written in a Gothic script and was probably applied via a stencil as other aircraft appear to have an identical inscription. Either way, the unit evidently had a skilled signwritter in its midst as is evidenced by the quality of the script used for the individual aircraft names.
However, I wanted to include this on my build, so I found a font that was as close to the one used on the aircraft and printed out the inscription in 12-point font to use as a visual guide. I then masked an appropriately sized rectangle around the location on the nose and then masked off the lower half of this. This provided me constraints on the size of the font as I hand painted the top line of the inscription. I then removed the lower mask and hand painted the lower portion. I surprised myself in managing to do all this in one go, although the "th" part of the "54th" is a little bigger than I intended.
The other individual marking from the Ventura sheet is, of course, the aircraft name "Wilma Jeanne". Me 262 Volume 4 has a close-up photo of this side of the aircraft nose. Although partly obscured by one of the American pilots, Capt. Ken Dahlstrom, it shows a profile of a woman's head, presumably Wilma Jeanne herself, painted to the lower left of the name. This is not present on the Ventura decal, so I hand painted this as well, although this took two attempts for me to be happy with it.
The final individual markings were the V083 either side of the nose and the aircraft W.Nr. on the starboard side of the tail fin. The Ventura sheet only supplies one V083 and the kit W.Nr. was of a better size and font so I used the kit decals for both of these, the former providing a nice contrast with fresh painted US name.
The remaining stencils and the and white pieces of sealing tape on the nose were kit decals.
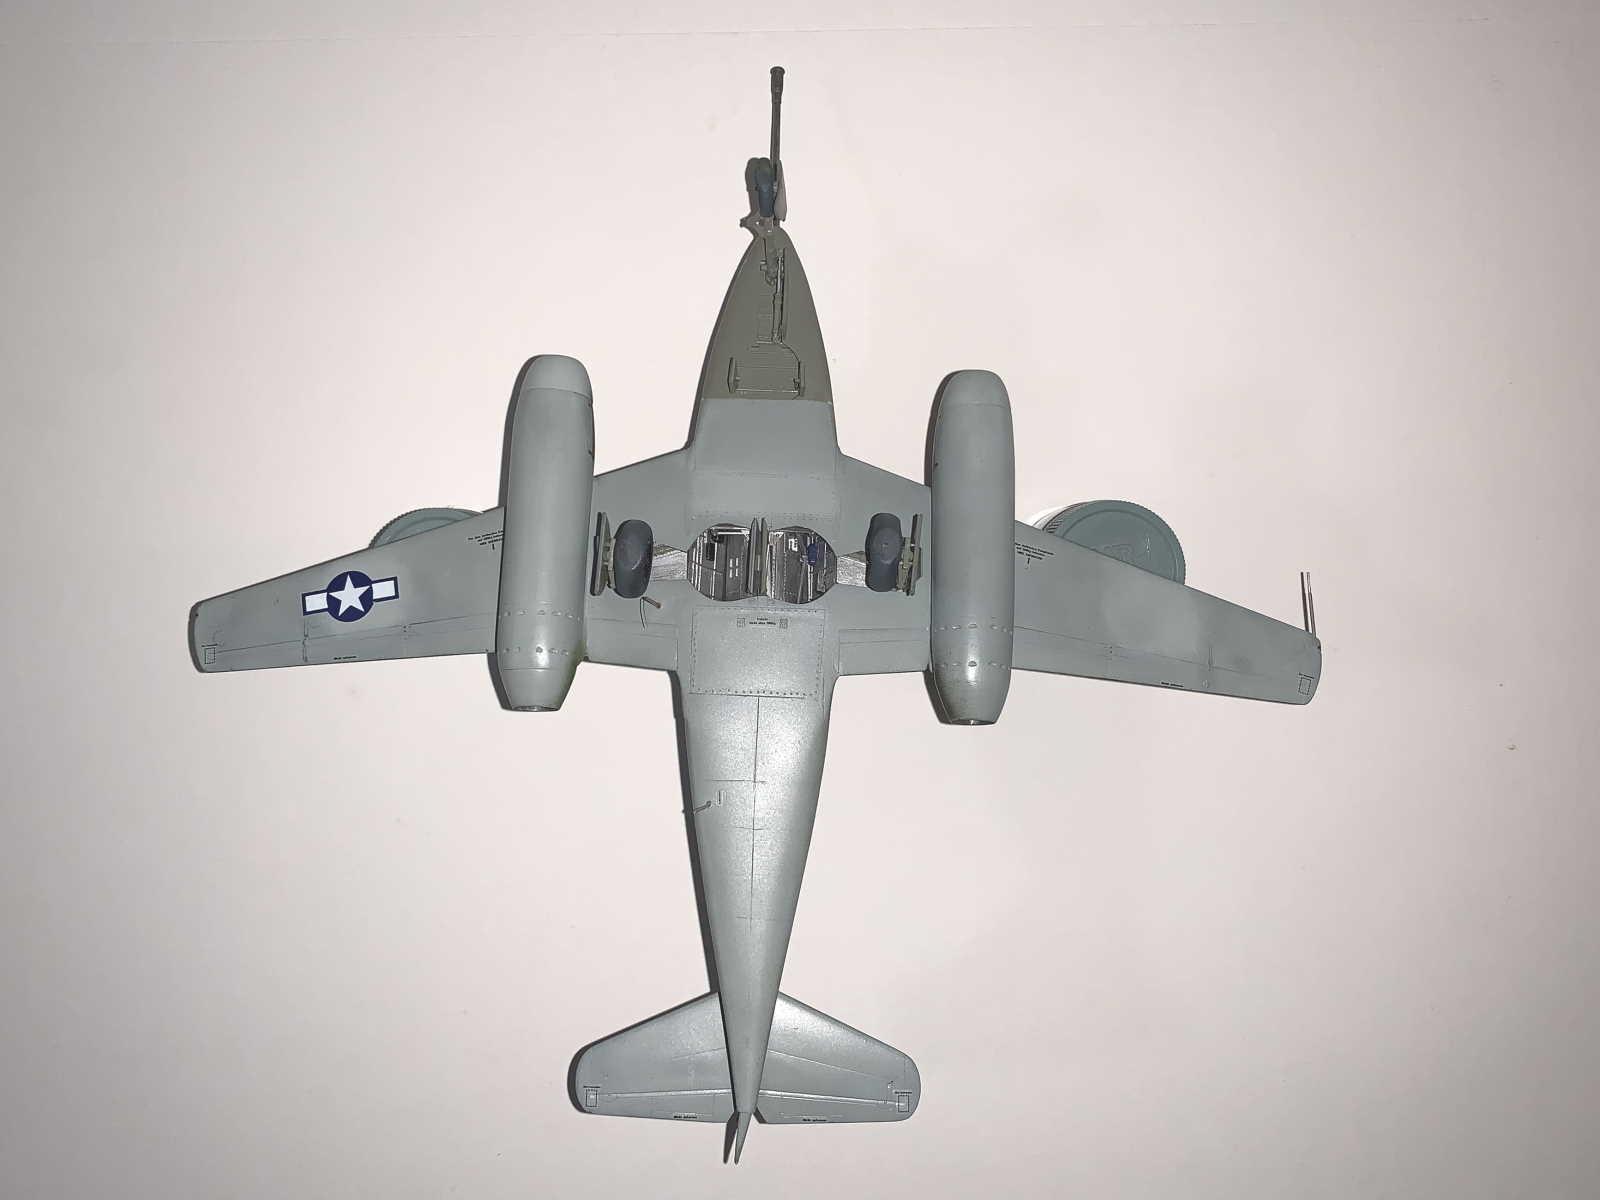
The tyres were painted over-all Tamiya XF-85 Rubber Black, which was then mixed with white and sprayed around the circumference to give a worn look that I am quite happy with.
As this aircraft probably never flew prior to its capture by the US, I added minimal weathering.
Ironically, while it required more work than either the Tamiya or Hobby Boss kits, I ended up finishing this build first, thanks mainly to the simpler camouflage scheme. I really enjoyed this build and am very happy with the result.
I have a couple more Dragon Me 262s in the stash and will still build them in time.


Nice work, Michael, very nice indeed, particularly given that the Trimaster Me-262 kits, no matter the "modernization" have definitely reached the end of their line.
That there are any Me-262s left is thanks to Kurt Welter, CO of NJG 10, "Kommando Welter." He realized as early as February when he was ordered to found the unit, that it was only a matter of time till the war was over. He collected Me-262s from everywhere, keeping them to trade with the Allies in return for good treatment of his men. Indeed, while they were instructing the British and Americans how to fly the plane without killing themselves, he had a deal with the CO of a POW camp to let his men "surrender" then turn them loose after 5 days, sending them a few at a time over the summer of 1945. When the project was over in late September, the British commander apologetically told him that he and his men would now go to POW camp, to which he replied "I think not, sir," and they all had their discharge papers. I thank my friend Jorg Czypionka, who was the last living member of Kdo Welter, for telling me this bit of history.
Thanks Tom (@tcinla).
I've heard that story about the POWs before.
It is just a pity that more people didn't have the foresight, or historical perspective, to preserve more aircraft types - both allied and Axis.
Great job, Michael @michaelt on that now classic kit. I love your hostorical supporting text, as well as your color interpretation and implementation. I had the pleasure to follow your build (as part of your trio buld.
Tom @tcinla, nice info! Explains the existence of 262s today.
Thanks Spiros (@fiveten).
It turned into a wonderful build, Michael.
I really liked following your thread of the three 262's.
Thanks also for the informative part of this healine.
Thanks, @johnb.
Michael, @michaelt
This is a wonderful article and very impressive build. It has been an absolute joy to watch you tackle not one, but three Me-262's at once. This is my kind of building !
I have learned a lot about the differences in these types, and hope to put this knowledge to use in the near future when we start up a group build dedicated to Luftwaffe types... 🙂
Your work on this older Dragon kit looks outstanding. I never realized just how far the camera positions were off... until you posted a good head on picture from the front, and only then does it really show up well. I have one of these older Dragon kits in the stash, along with quite a few of the Hobby Boss kits, a couple of Monogram ones, and about 4 or 5 Tamiya's in the stash in 1/48. I will definitely be using your build journal when it comes time to start my assembly line... Thank you for being so detailed with the steps you took along the way.
I'm seriously thinking about building them all at once, using the same methods that our friend Erik Gjorup @airbum
uses with his "Kindergarten" approach of building subassemblies. The final building is then done later.
I do hope that you will join us in our upcoming Luftwaffe venture... it should be a lot of fun.
I am looking forward to seeing the other two jets in the headlines section soon. They are all masterpieces, built on some very good information with documentation to back it up. The late war Luftwaffe schemes are my very favorite.
G'day Louis (@lgardner),
Thanks for the comments.
I started all three together but issues with their differences, some build issues and paint schemes, they didn't finish together.
I may have one or fifty more Luftwaffe kits in the stash suitable for the group build...
I do seem to have a thing for complex camouflage schemes.
Nice build. Man, those Germans were nothing if not innovative! They tried just about everything.
Thanks, @gkittinger.
Desperation will do that I guess.