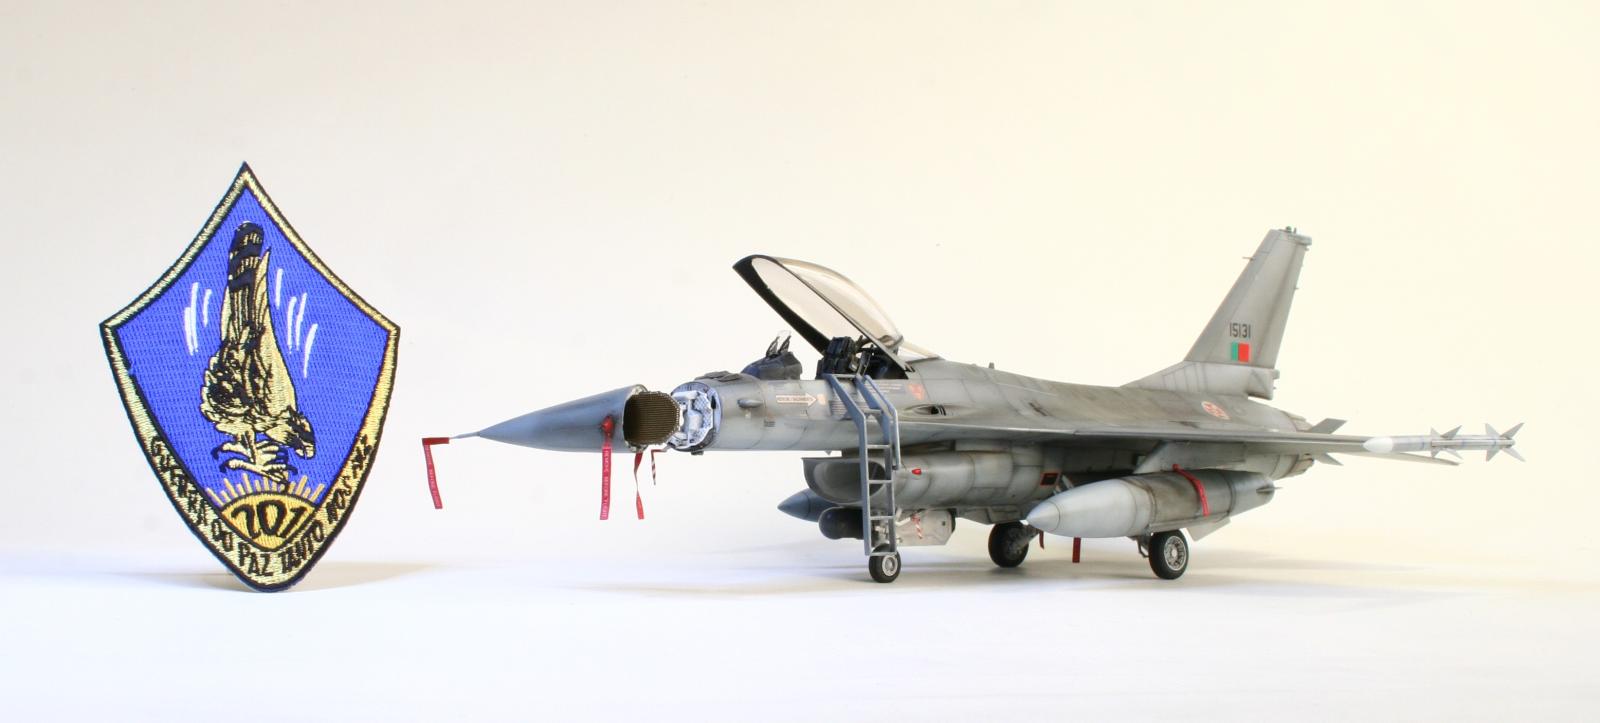
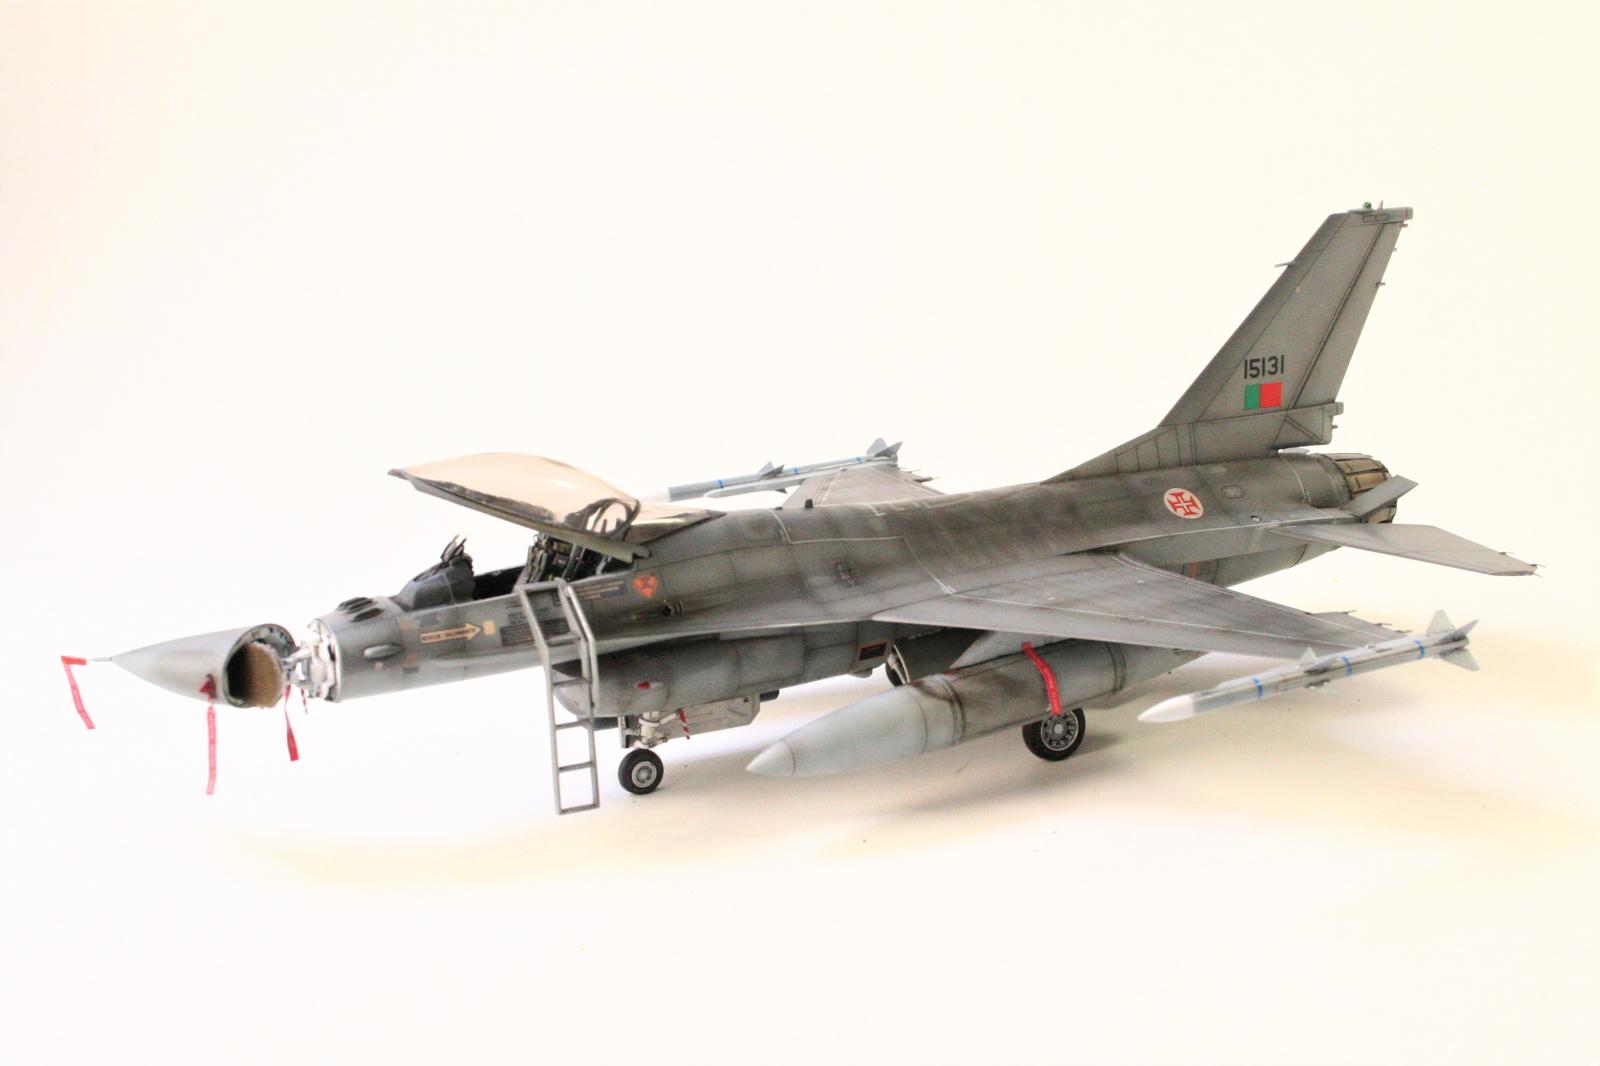
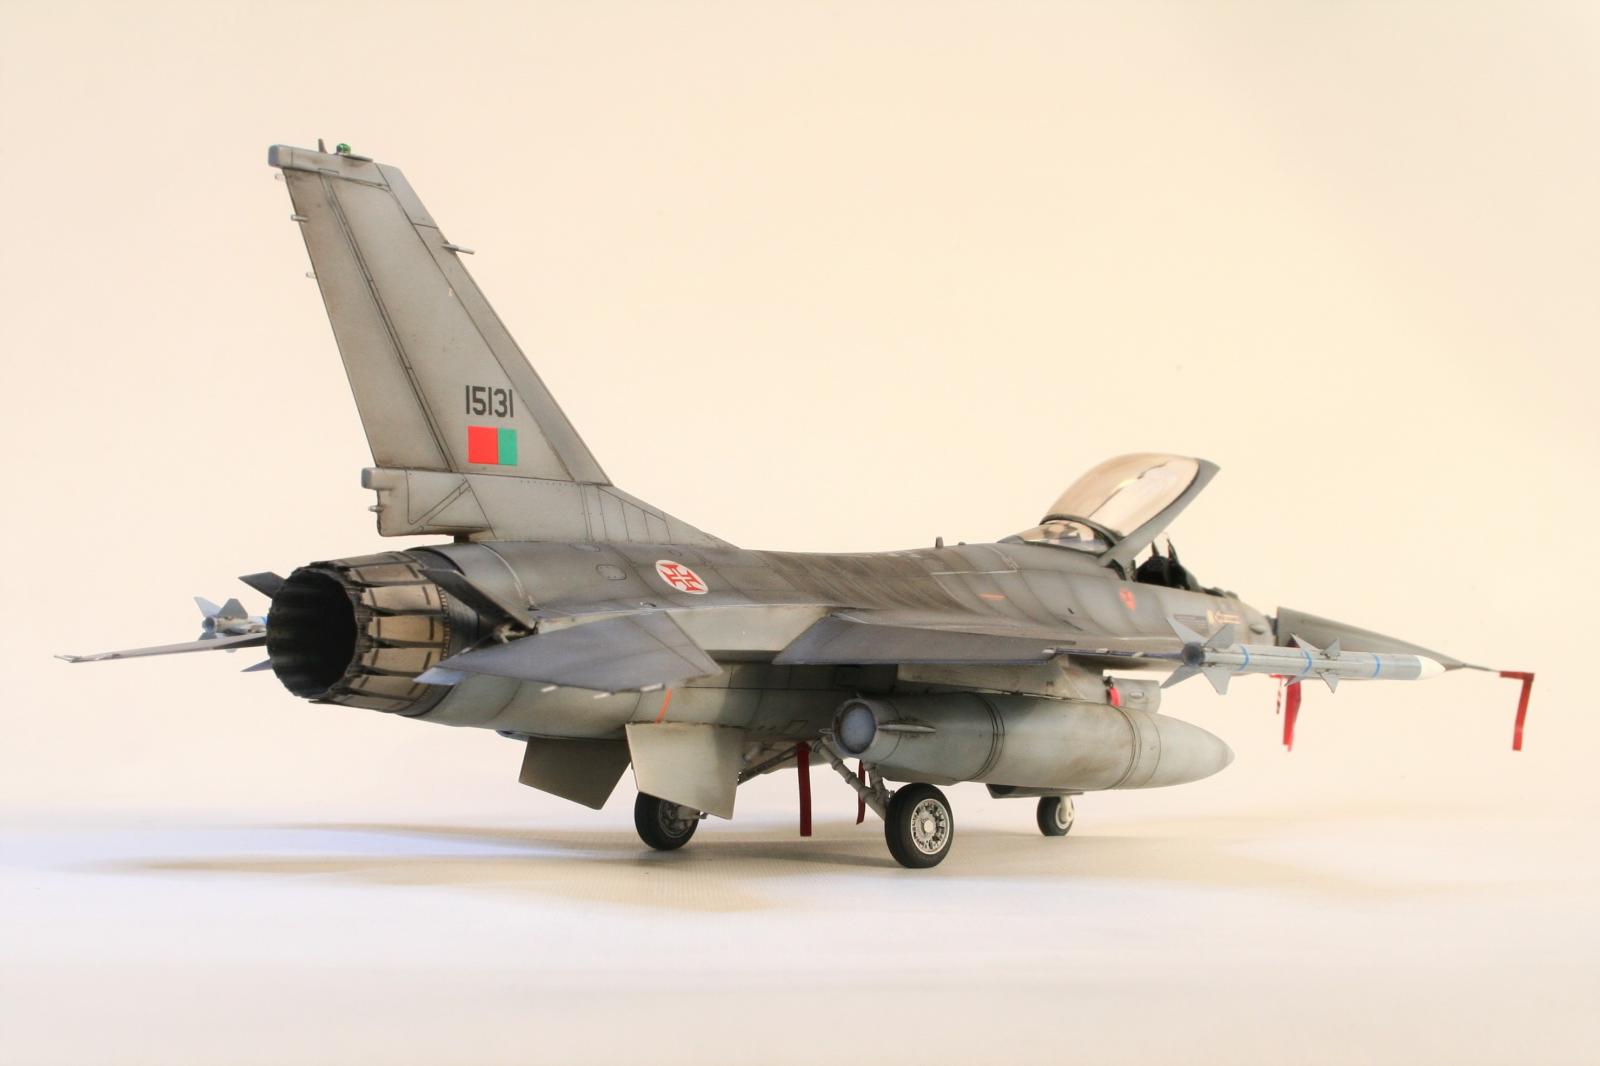
Portuguese F-16 AM (MLU)
F-16 MID LIFE UPDATE (MLU) VERSION
The MLU program emerged in the early 1990's, following the need to keep the F-16 in operation for another 20 years whilst maintaining the same degree of effectiveness and operational capabilities. The program aims to keep this weapons system up to date for operation in any international theater of operation through the regular improvement of its capabilities, in an effort shared by several European countries and the United States of America.
Having started with just 5 countries (Belgium, Denmark, Netherlands, Norway and the United States), Portugal would enter the program in 2000, starting the modification of Portuguese aircraft in 2001 and culminating with the first flight of a Portuguese F-16 MLU on June 26, 2003.
(photo from the internet)

BUILDING THE KIT
Not having a kit to build the Portuguese version out-of-the box, and with an F-16A in my stash, I decided to use what I have, with some add-ons and scratchbuild:
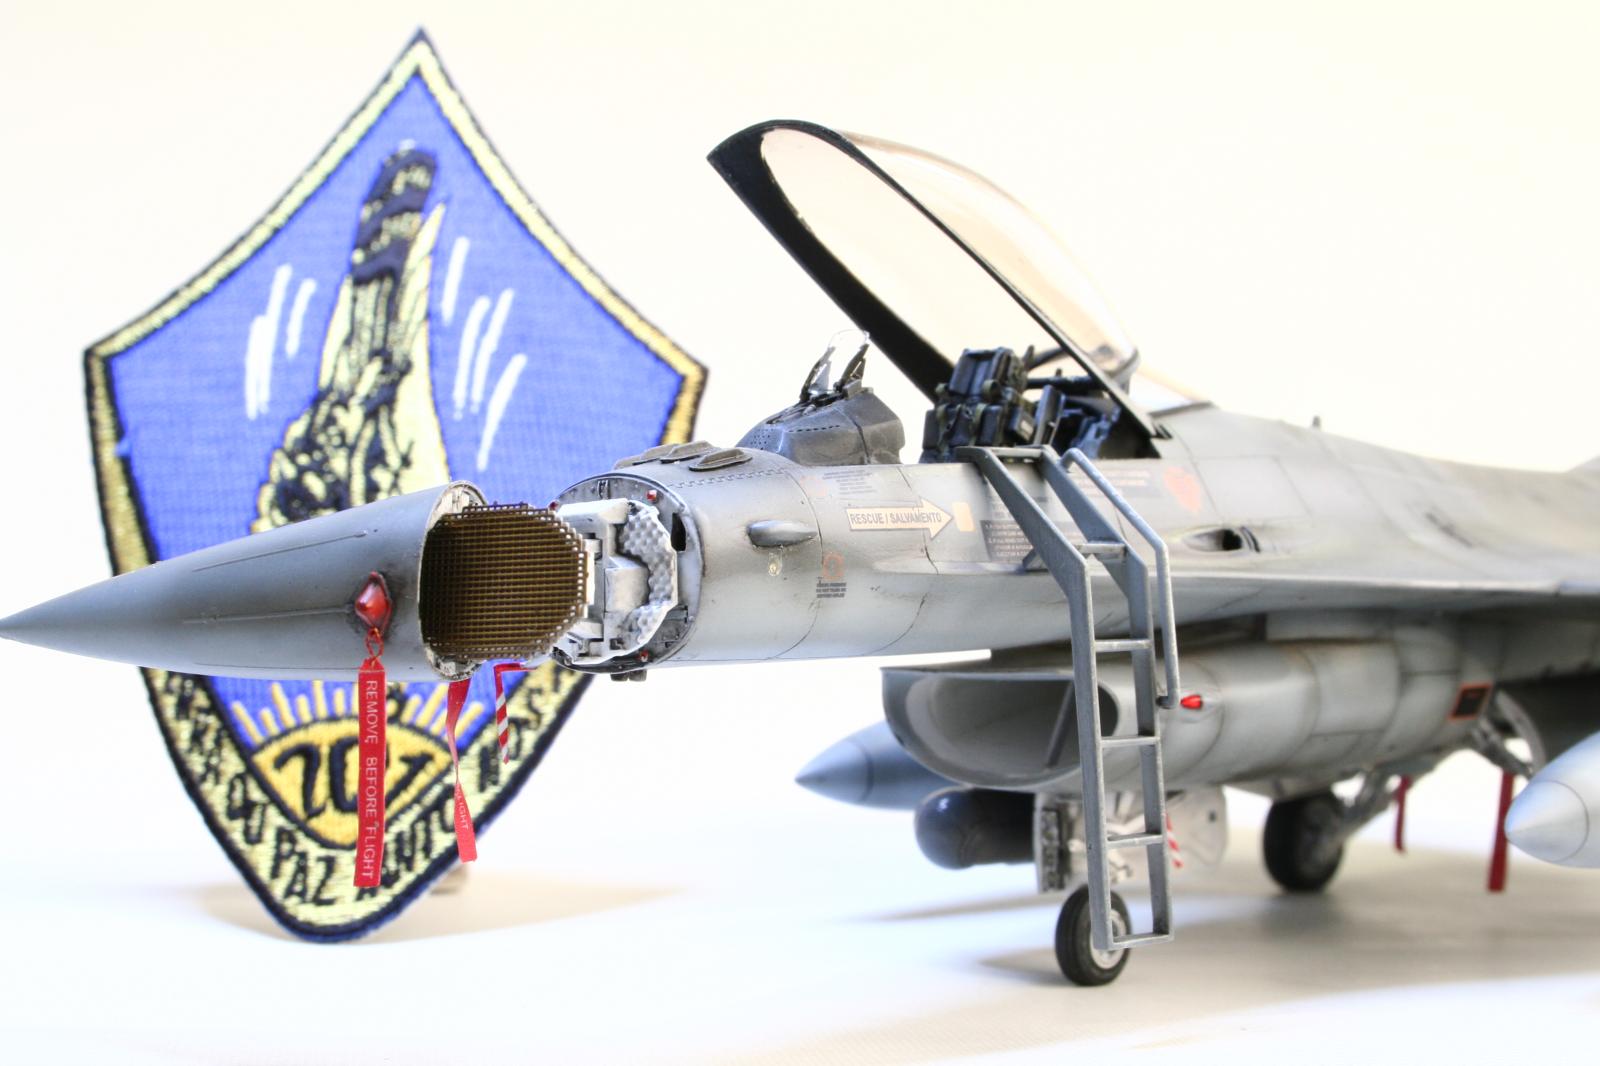
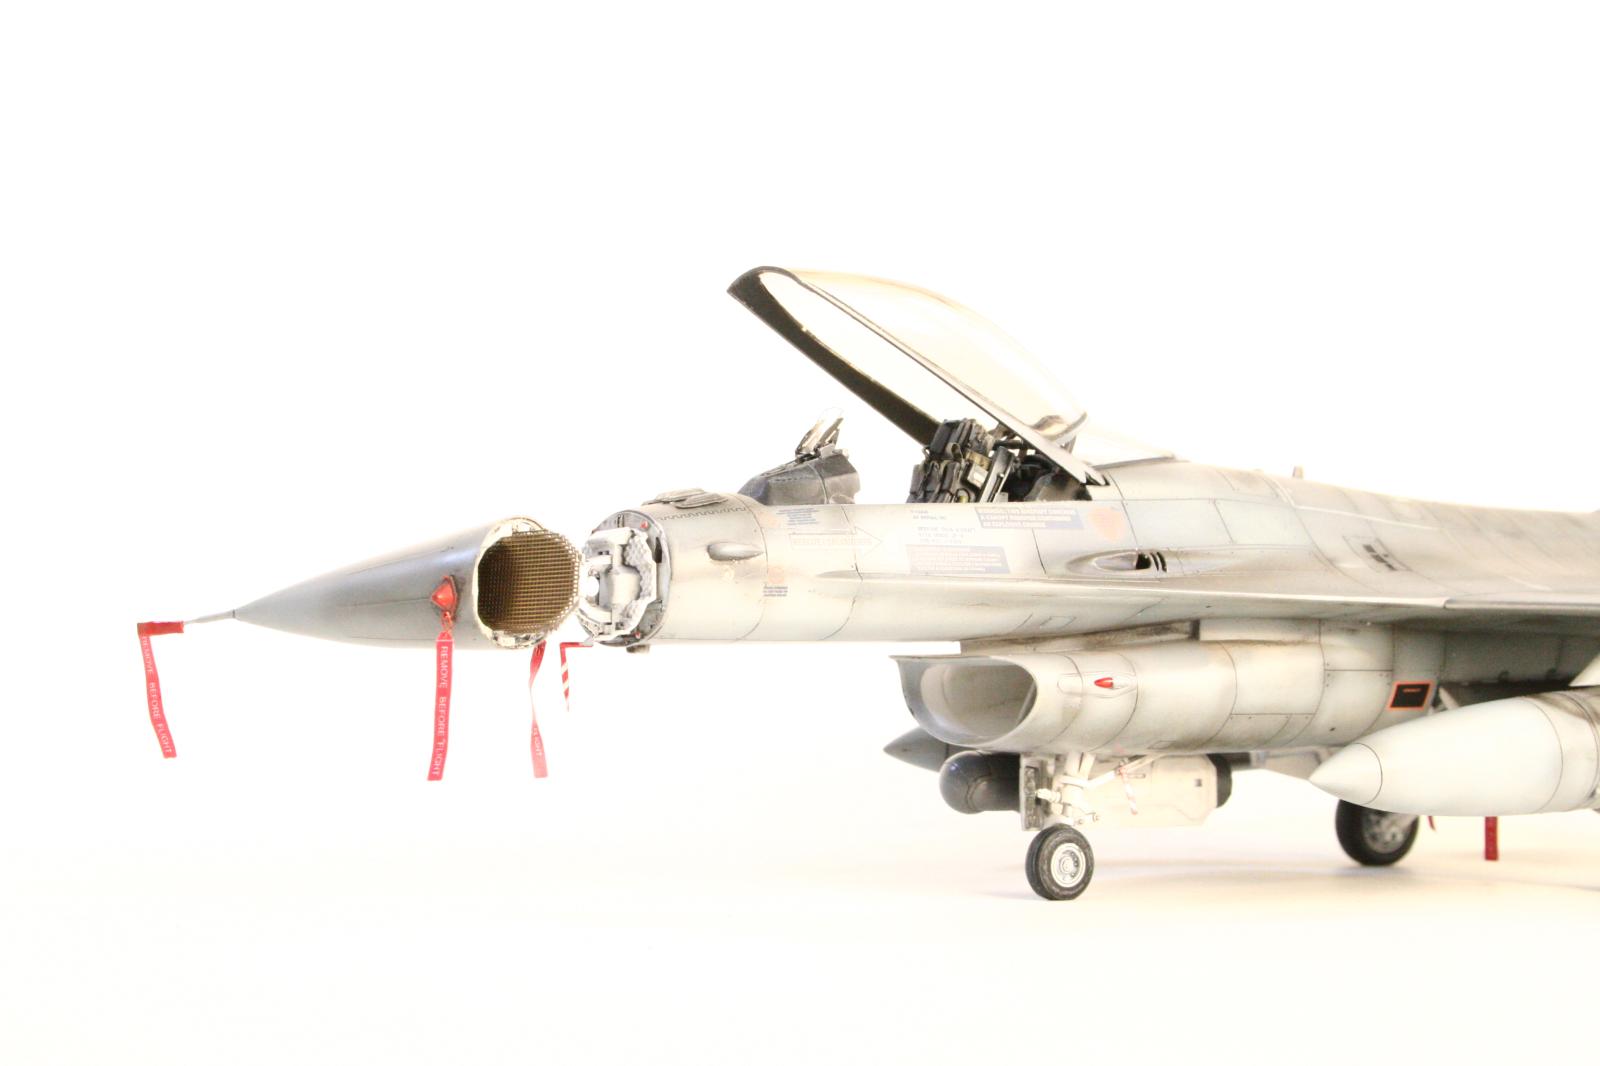
• Eduard 648033 Nose cone + Radar
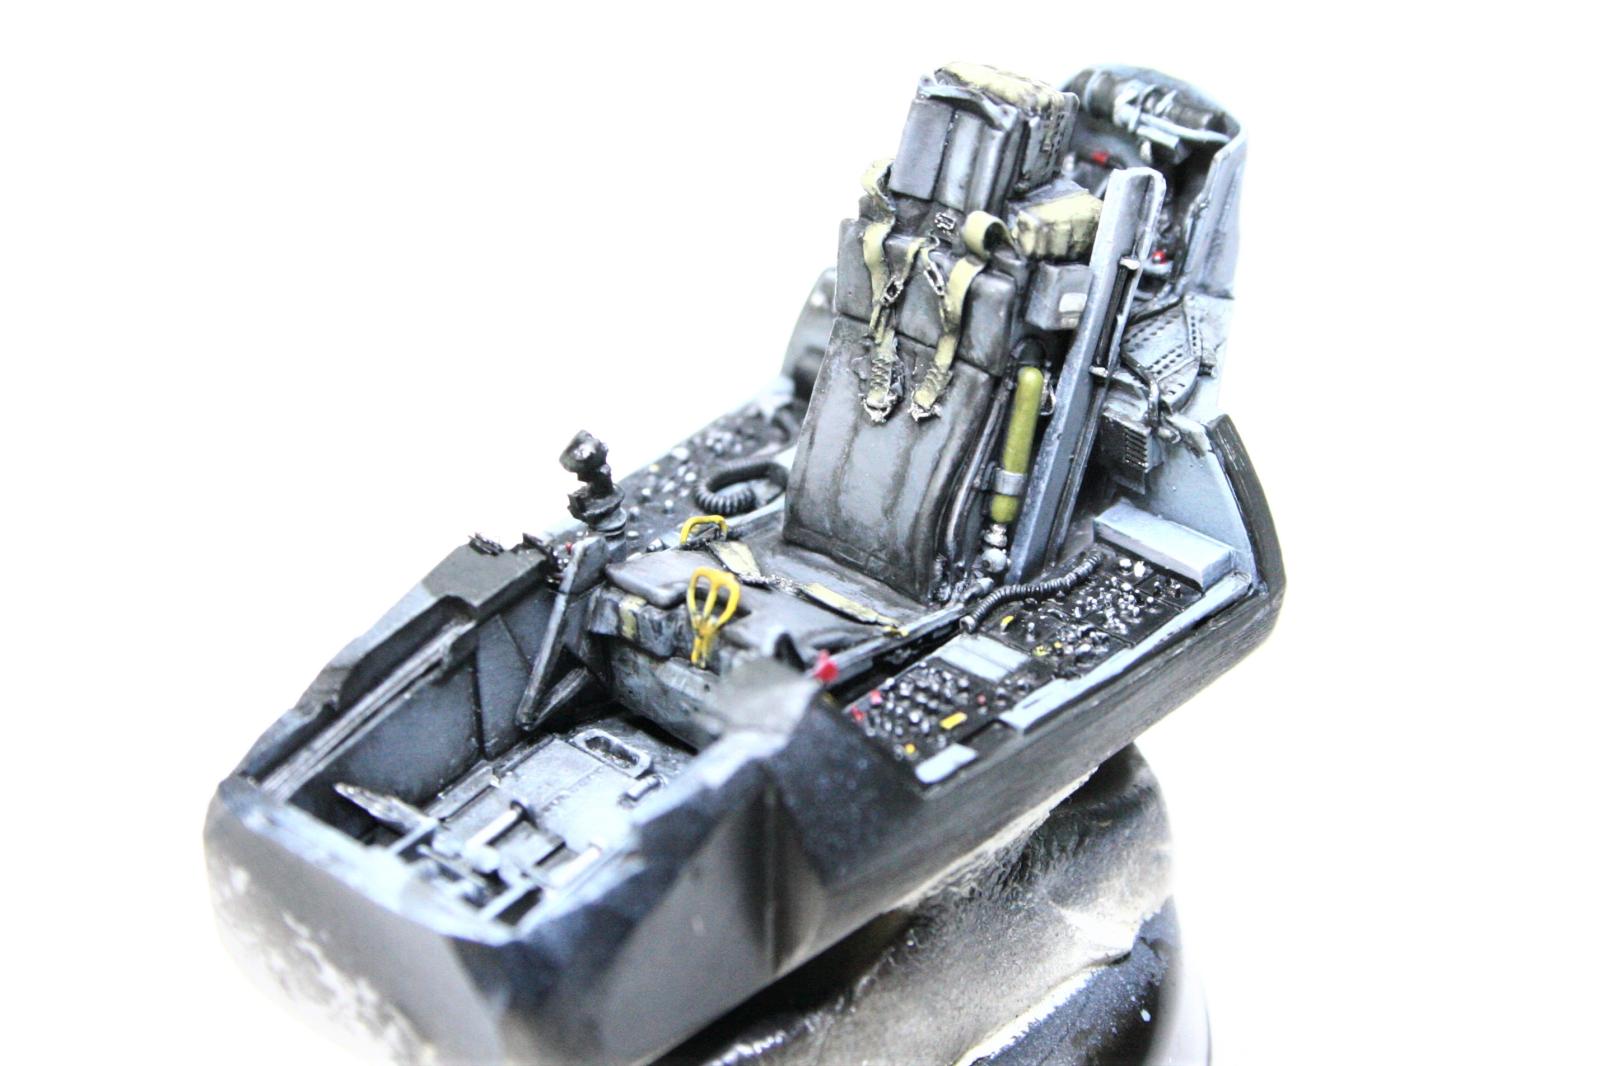
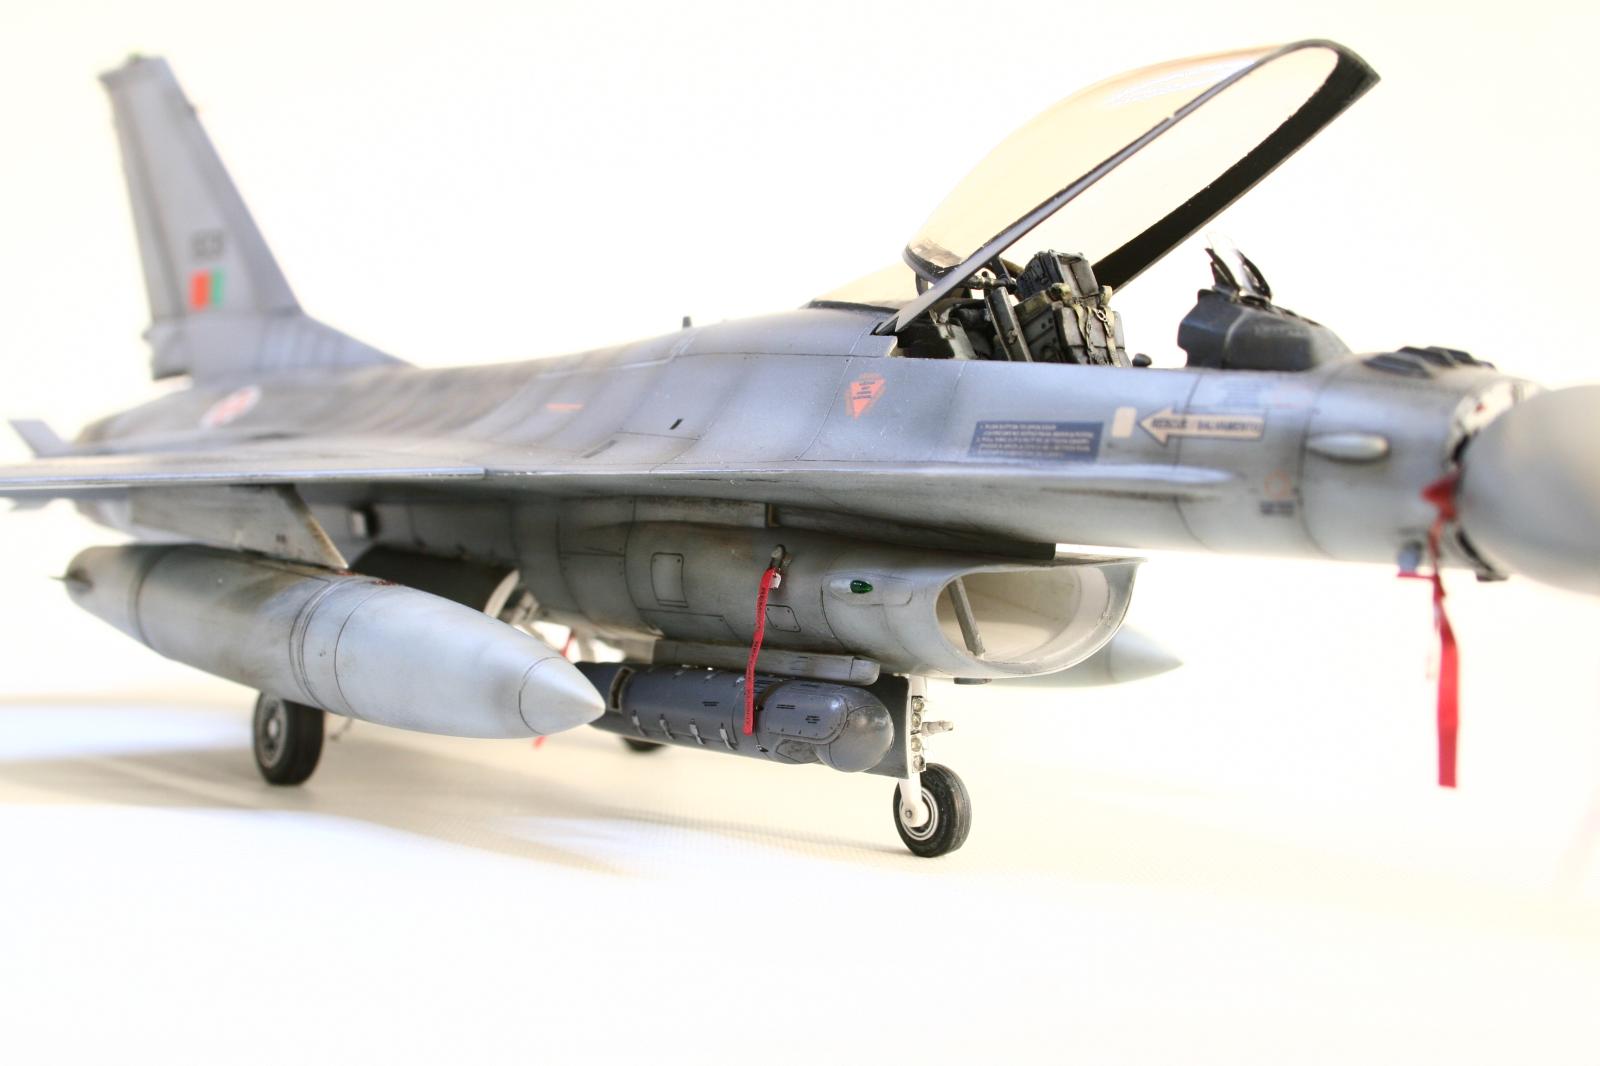
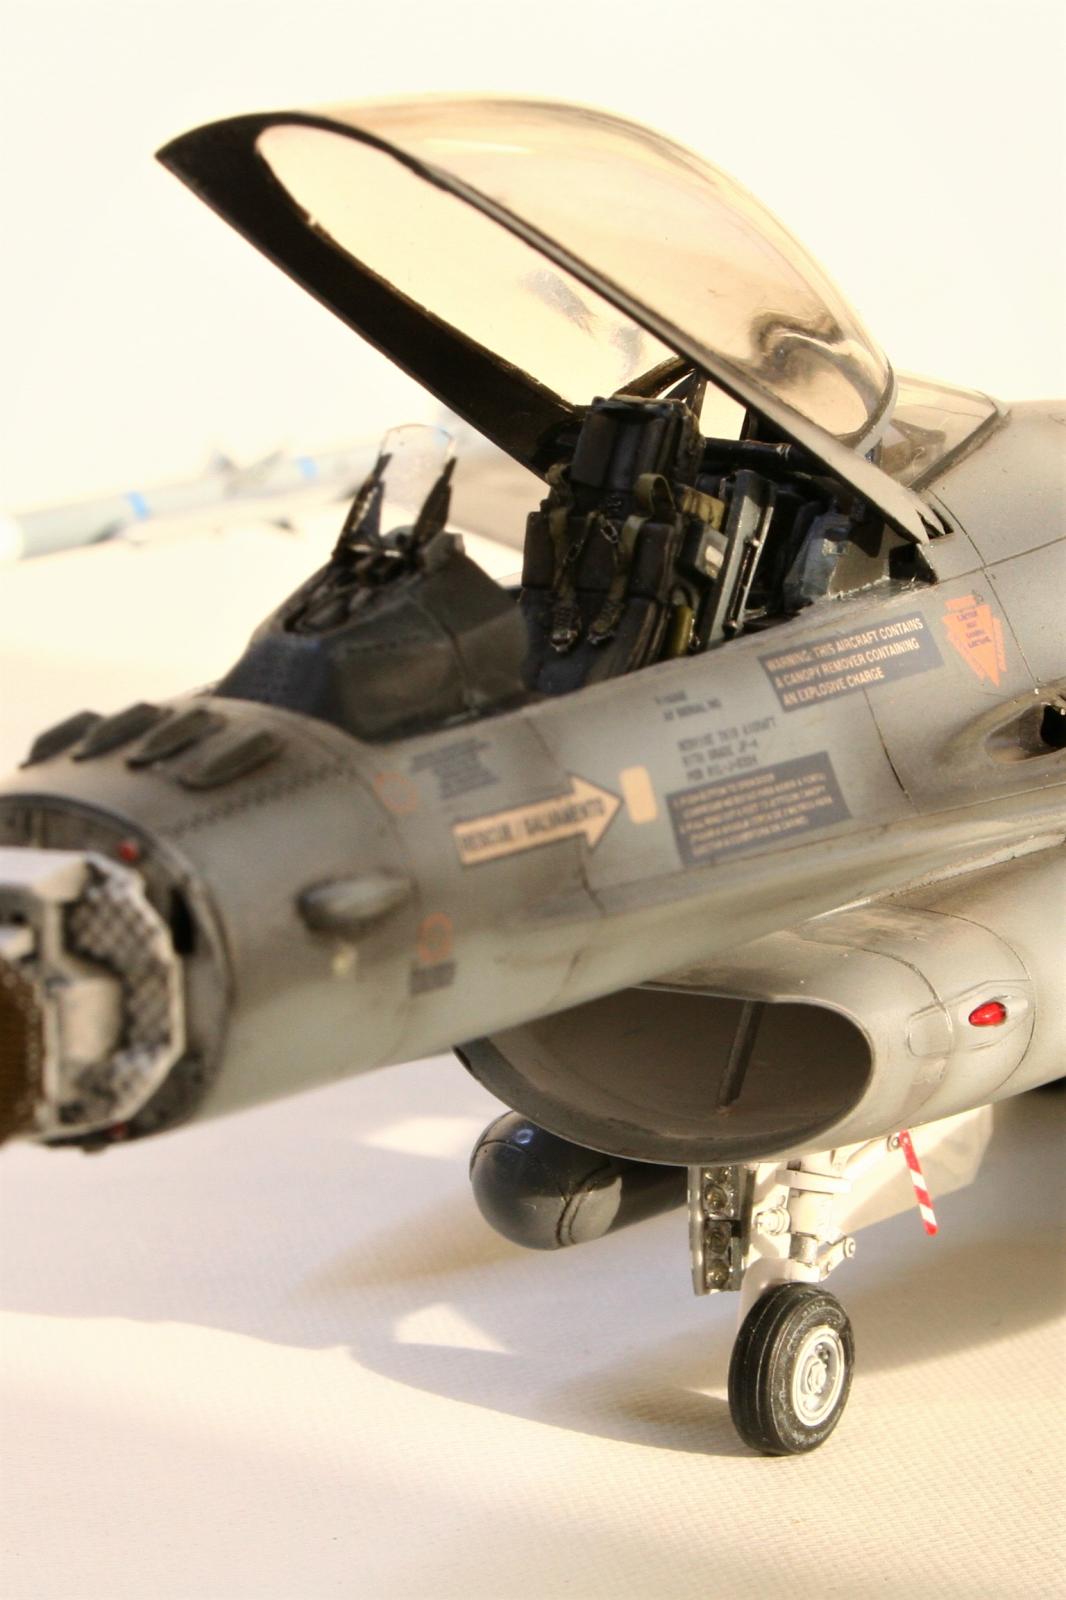
• Aires 4411 Cockpit set (+ Ejection seat + AFF antennas)
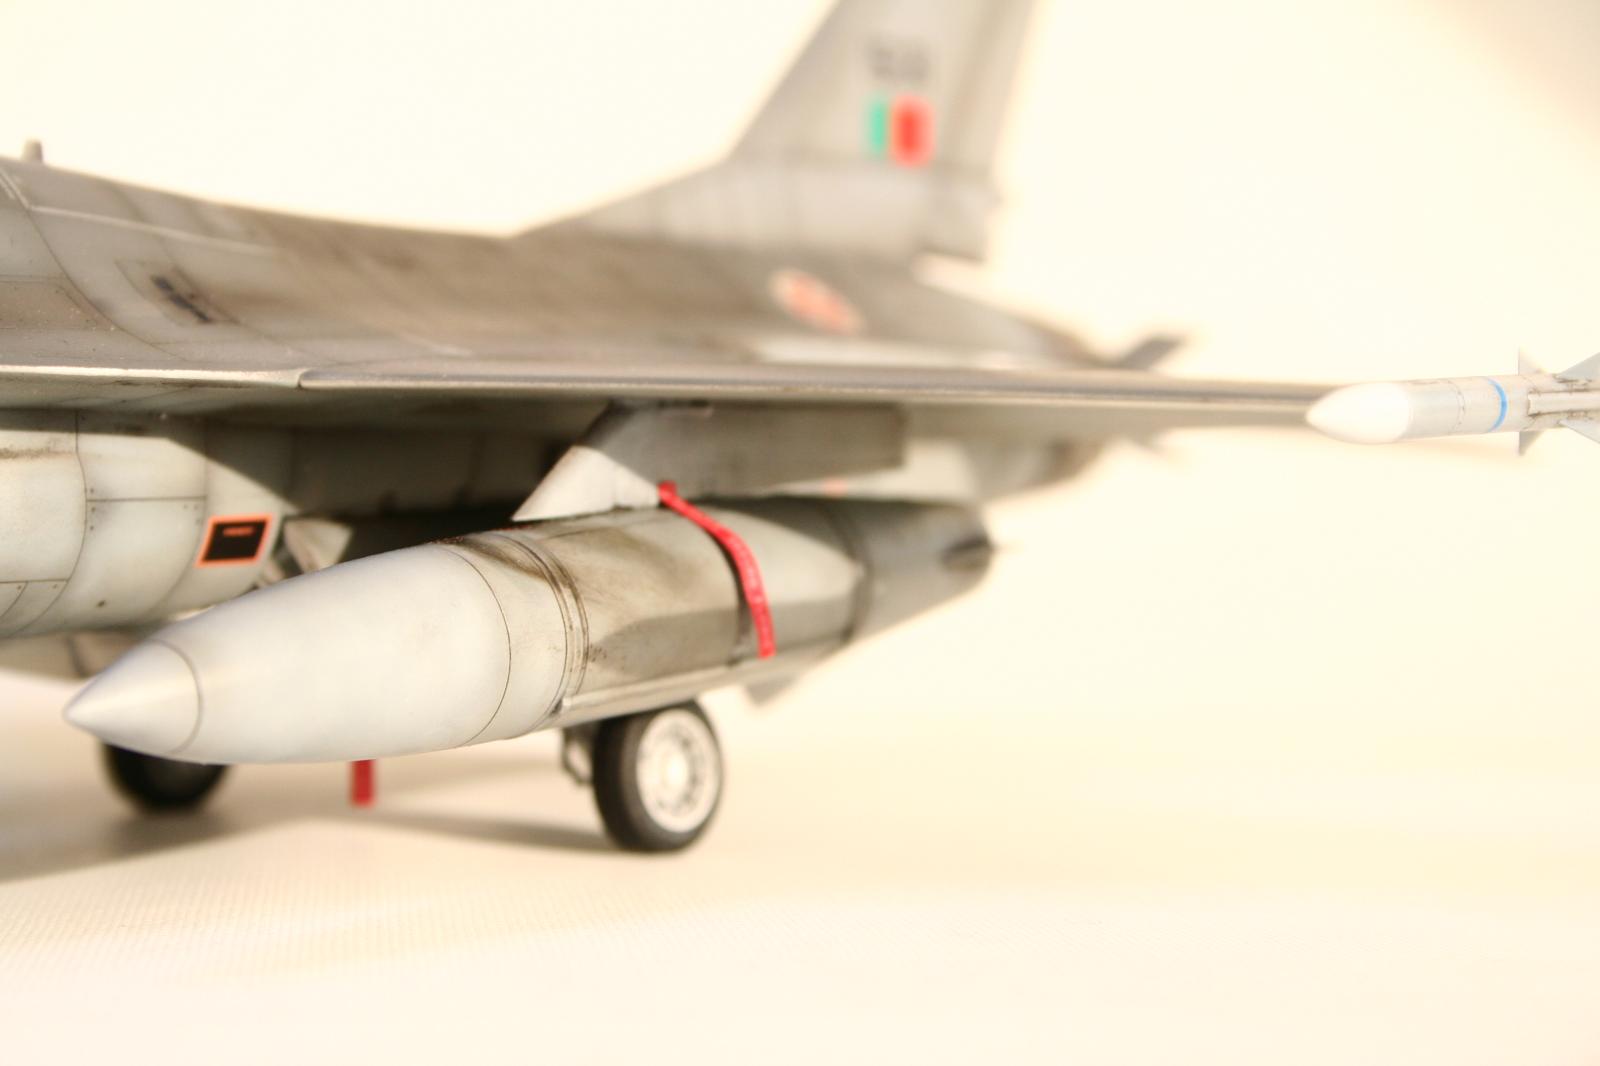
• Eduard 648237 AN/AAQ-28(V) Litening pod system (starboard)
• Some wheel wells detail (scratch)
• Reskit wheels and rims
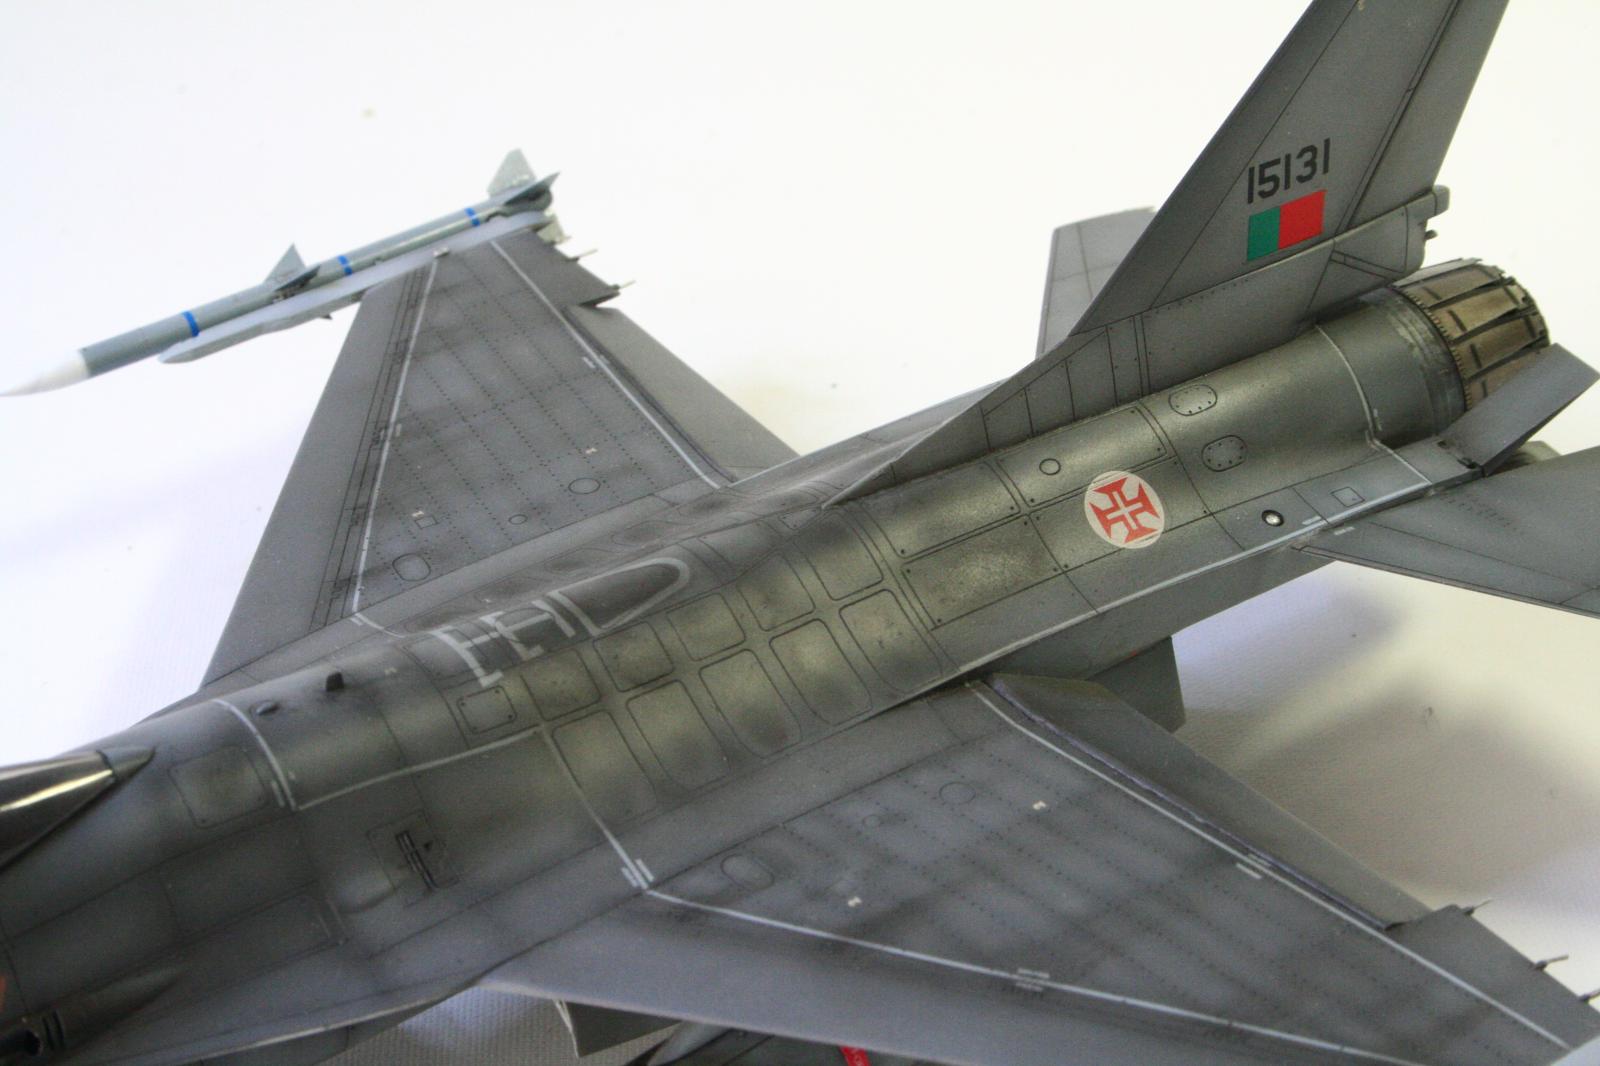
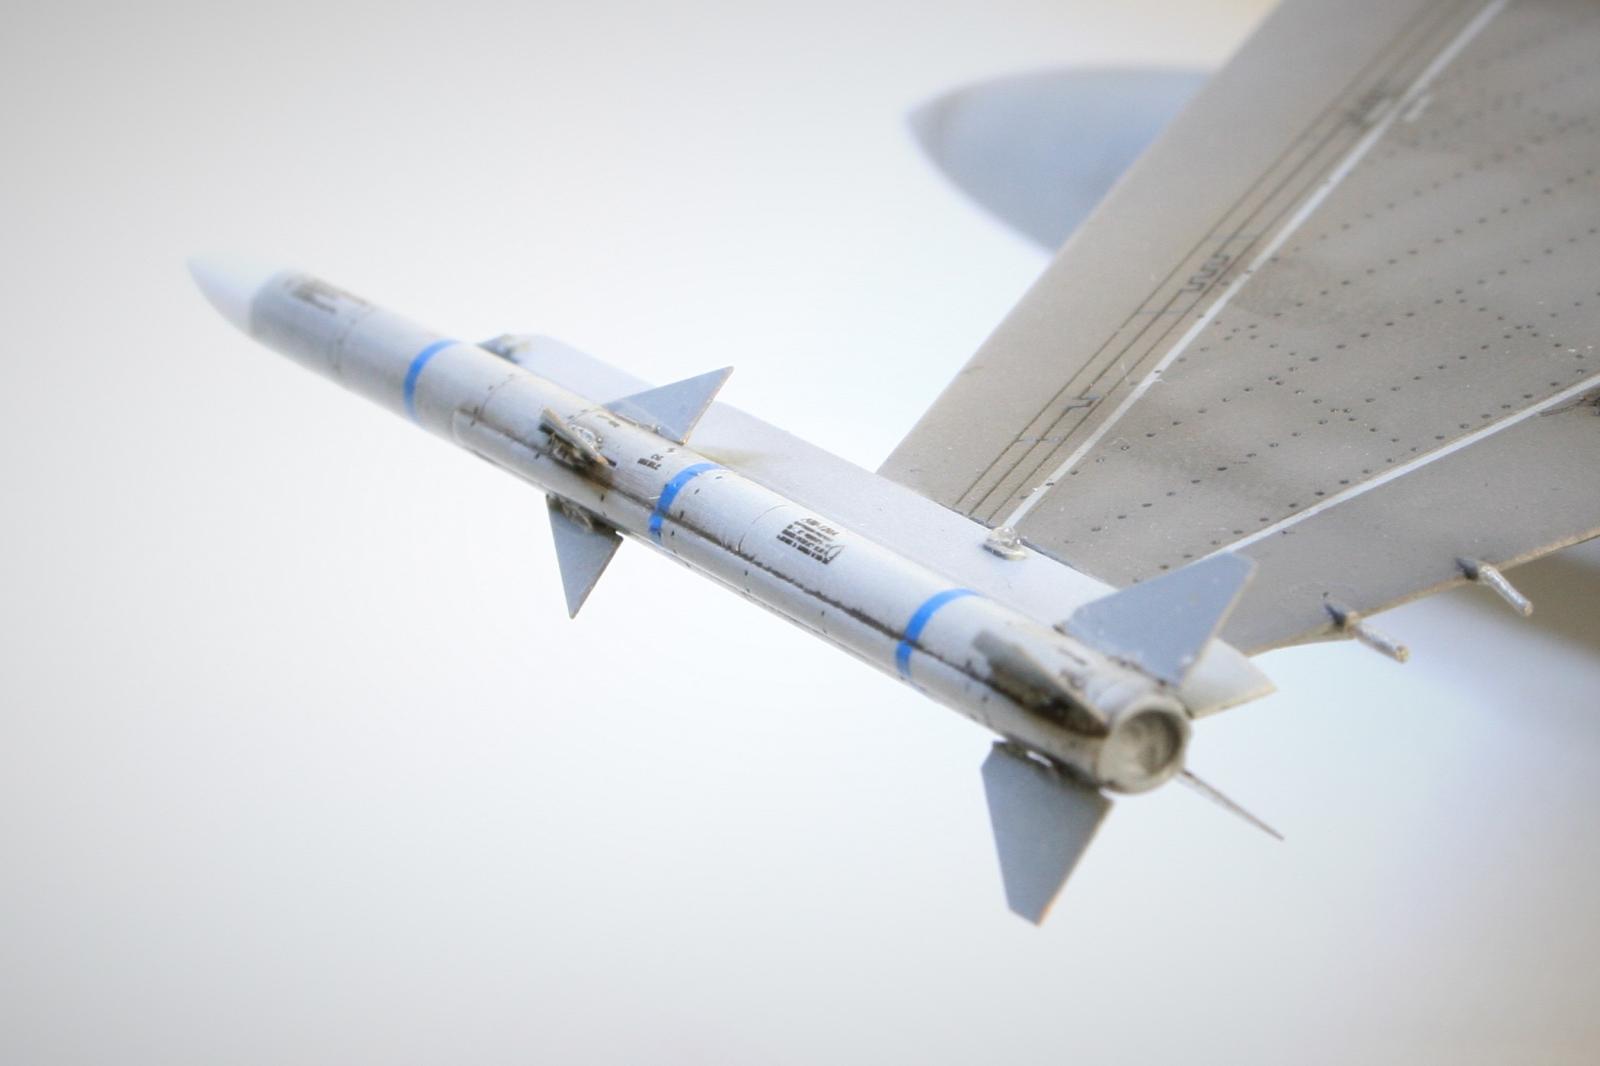
• Reskit AMRAAM Missiles
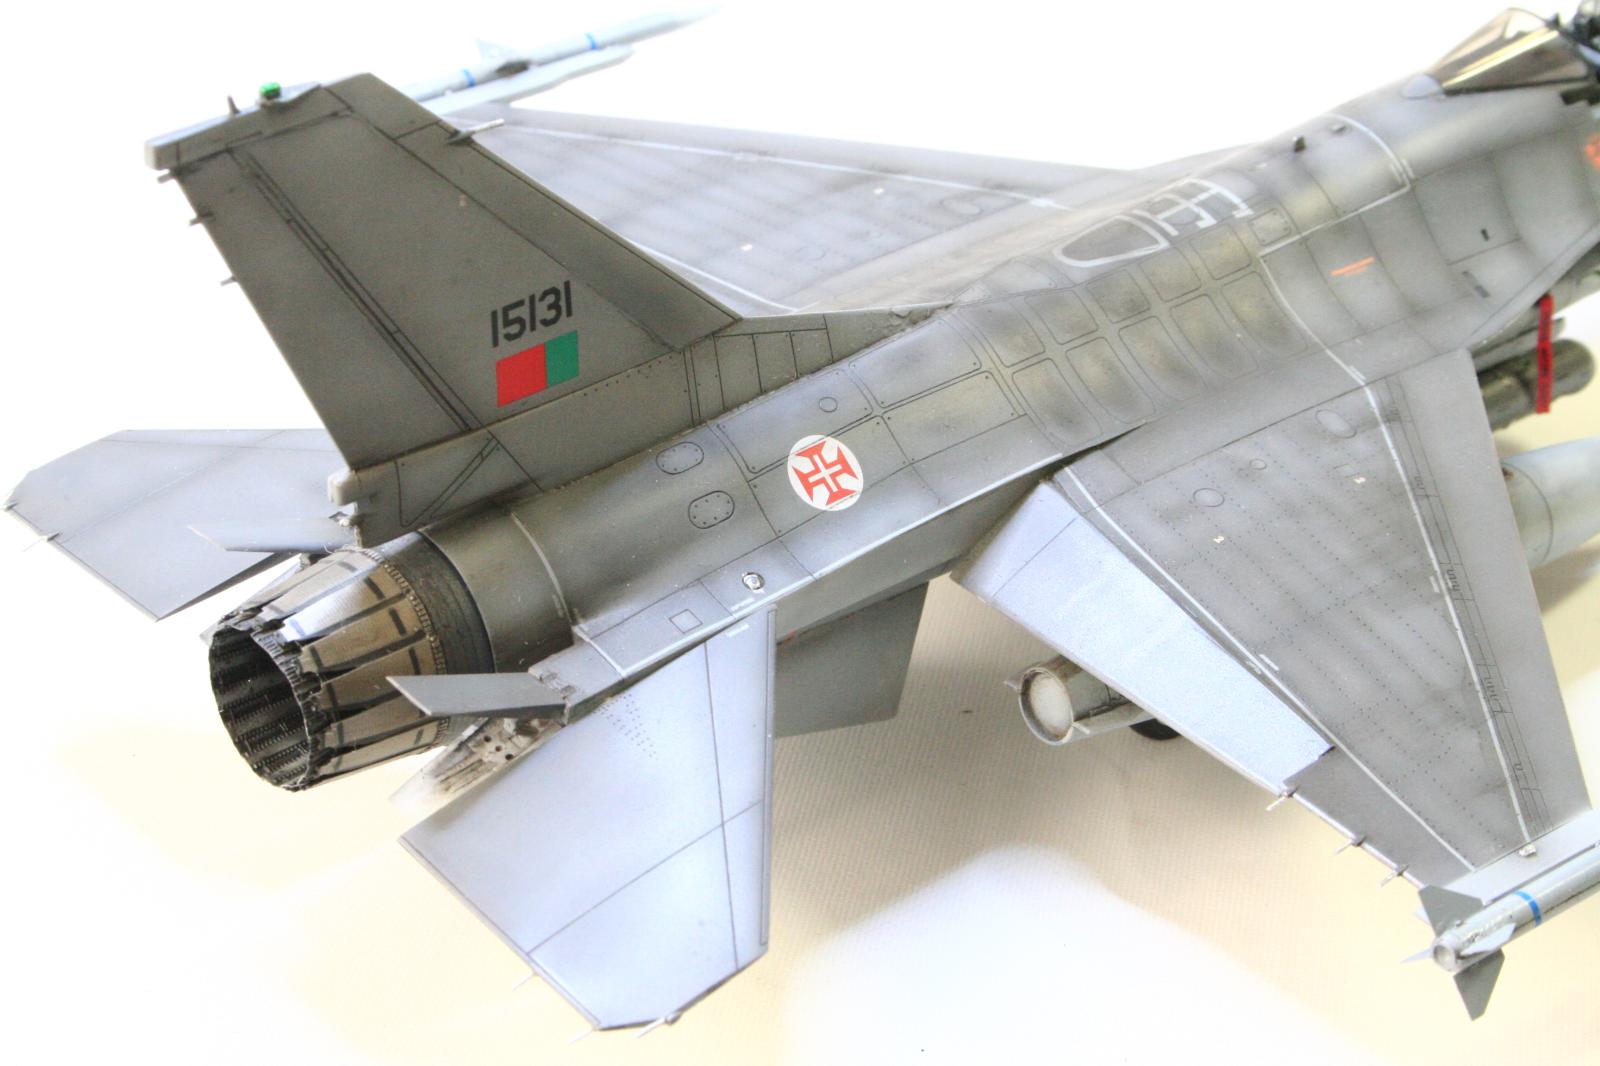
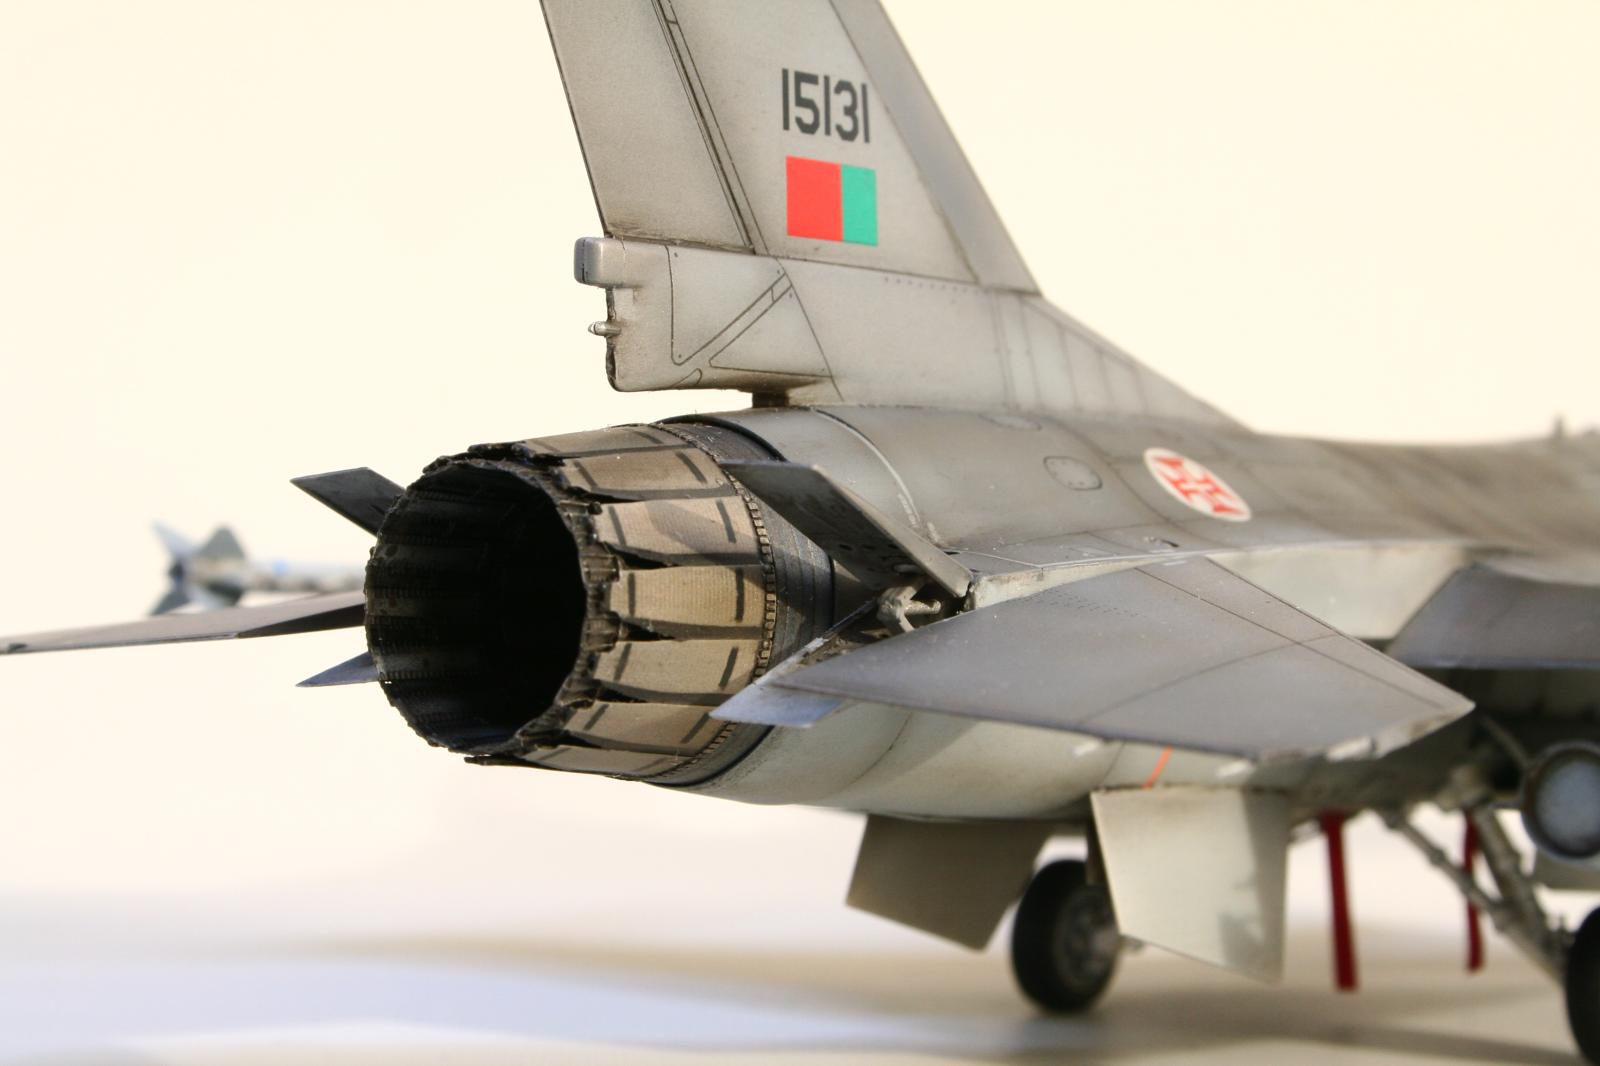
• Aires 4133 Exhaust noozle
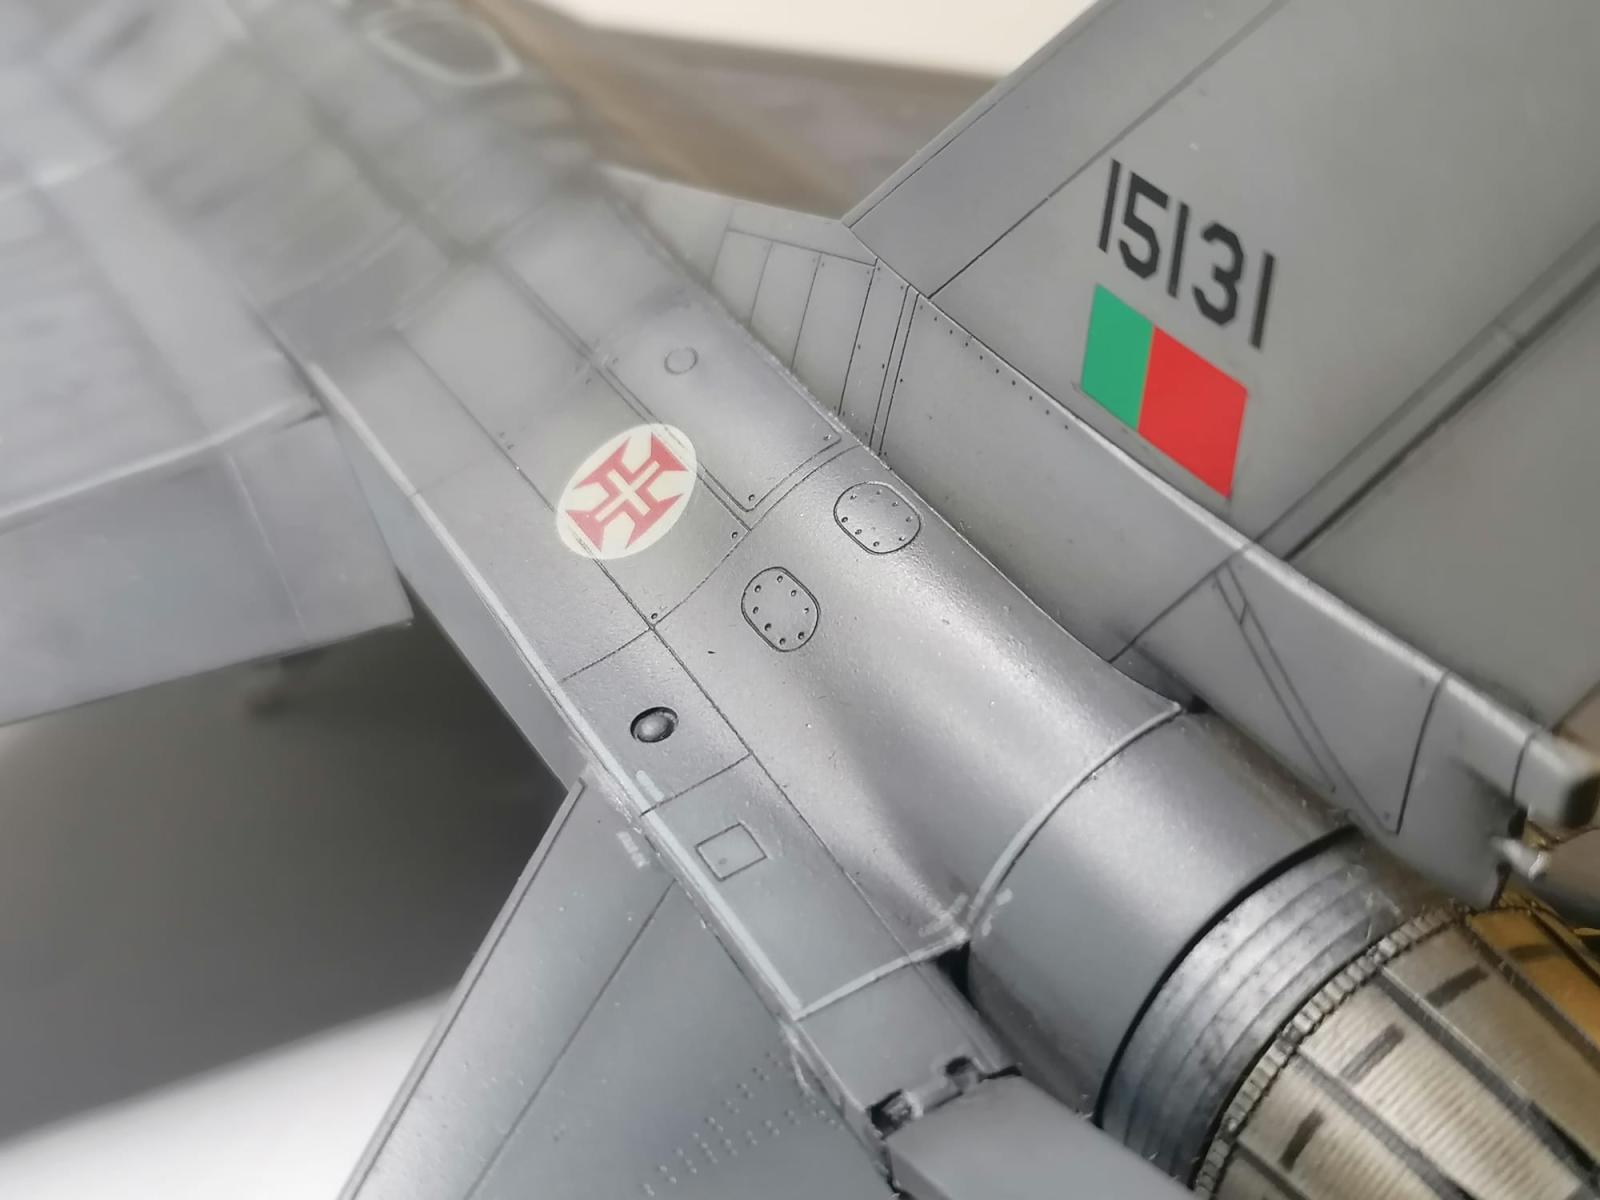
• Model Master D48136 Decals
• Speed-brakes (scratch)
• Front wheel headlights (scratch)
• Navigation lights (scratch)
• Anti-collision lights (scratch)
• External fuel tanks (from spare box)
• Port front light (scratch)
• Static dischargers (scratch)
• Eduard Remove Before Flight tags
The build started, as usual, by the cockpit. Although it was a set for the kit I had, it was necessary to work it a lot to fit it in the fuselage. This was, by far, the most laborious, time consuming and unpleasant task of this build.
Before joining the two fuselage halves, I also cut the speed-brakes area in order to rebuild them in an open position and prepare the nose area to receive the open nose and radar set.
The rest of the build went on quite uneventfully, keeping however some separate sets (wells, exhaust, AMRAAM's, …).
PAINTING
The Portuguese colour scheme follows closely the American one and, as usual, I used my favourite paint combo: Mr. Hobby paints, thinned with Mr. Levelling Thinner through my H&S Infinity airbrush.
After all the painting, the usual (Mr Color GX100 super clear III) gloss clear coat followed as a base for the next steps.
DECALS
For this aircraft I used some Model Maker decals, which went on beautifully with Micro Set and Sol.
WEATHERING
As always, a well-known internet search-engine provided me with many photo references of the aircraft I intended to build, so it was quite easy to decide the weathering level to aim.
After another gloss clearcoat over the decals, I mixed some artist oils with enamel thinner and applied it thoroughly over the entire model. Having it touch-dry, I gently removed the excess with some paper towel in order to have a kind of a unifying filter and keep it in the panel lines. As oils takes a long drying time, I set this aside and proceed with painting other elements, such the wheels, missiles, etc.
After almost a week, I returned to it and kept on with the weathering process, this time focusing more on the panel lines and other details.
I finished this stage with a matt clear coat.
FINAL DETAILS AND ASSEMBLY
Having it almost ready, it was time to focus on the lights (painting the rear in silver and building the bulb with Microscale kristal klear), attaching the wheels, missiles, AQ/AAN system and radar and nose cone as well as the canopy.
The Remove Before Flight tags ended it all.
It was a pleasant build (still I couldn't get photos to make it justice).
Nevertheless, I hope you like 🙂
Cheers,
M


Excellent work!
Thank you 😀
Really great job, nice weathering
Many thanks, Sir.
It looks very good, excellent detailing and convincing weathering.
Thanks for your kind words.
I think your photos turned out pretty clear.
Great job bringing so many components together to achieve the Portuguese version of this jet.
Many thanks, I really tried my best on this one.
A superbly researched, built, improved, painted and weathered F-16, my friend Manuel!
Clearly one of the best F-16 models I have ever seen.
Congratulations!
thanks @fiveten, you're always too kind 🙂
This is an amazing build, Manuel @magrus
To me the pictures look really great.
Superb weathering and detailing.
thank you @johnb, much appreciated my friend.
Nice work, particularly the paintwork.
thank you Sir!
Fabulous Viper Manuel! I may have missed the info but what’s the brand of the plastic?
Aires stuff, particularly cockpit tubs often need a lot of sanding, measuring and cursing in order to fit well 😉
I too think it’s one of the finest F-16s I’ve seen in 1/48, even more using the nations flag
Hi Pedro @holzhamer! And thank you for your kind words.
Yes, as the kit was so much modified, I didn't post plastic brand. But you're right, the base is there, so its quite fair to mention it: It's an old F-16A Thunderbirds Hasegawa kit a friend has given me. I'm building all the Thunderbirds, but in 1:72, so I could 'spare' this one.
And yes, You're right, there was a a lot of sanding, measuring and cursing involved during cockpit tub assembly.
Um abraço,
M
Hi Manuel! I finished a 1/48 Tamiya F-16 last October, and see many small details in your build that I could have done a better job with - that is a stunning model you built! Learning from fellow modelers is one of the reasons why I really enjoy this website. The cockpit, radar cone, afterburner, and coloring/shading are absolutely amazing. I'd say you nailed the Portuguese F-16 reference picture you posted - well done!
Hi @jroamer!
I'm really glad you liked and I do appreciate your kind comment.
Thank you,
Cheers,
M
HOORAY. Fantastic build. And the cockpit is a masterpiece.
Thank you Bob @bails,
Much apreciate.
Greetings from Portugal
Manuel
Beautifully done! Love the paint and weathering work especially.
Thanks Greg! Tried to replicate what I saw in a number of photos of this particular aircraft.
I love seeing Portuguese aircraft built- I have a few in the wings I need to get started. My parents were from the Azores and I was born (and live) here in Bermuda, and I am a Portuguese speaker.
You have some great shots- even though you think you didn't do so well with the photography. One tip for you would be to get the shot in focus first- a little further back than you want, then zoom in after that for closer shots. We all tend to go too close to the model, inside the focal length (phone, or actual camera) and then try to get it in focus which won't work. I also prefer ambient daylight to direct light when I can, although people with great lighting setups in their homes do an excellent job. You had some nice lighting and some neat angles in your shots, not to mention the kit looks great and has wonderful weathering.
Hi @danfrombermuda
Thanks for your kind words and advice.
Um abraço de Portugal
Manuel