Monogram 1/16 Kenworth Conventional Aerodyne W 900
For years I'd wanted to do one of these and in early 2017 I found one in the LHS so home with me it came. If I'd kown what was coming at me it may have stayed at the LHS.
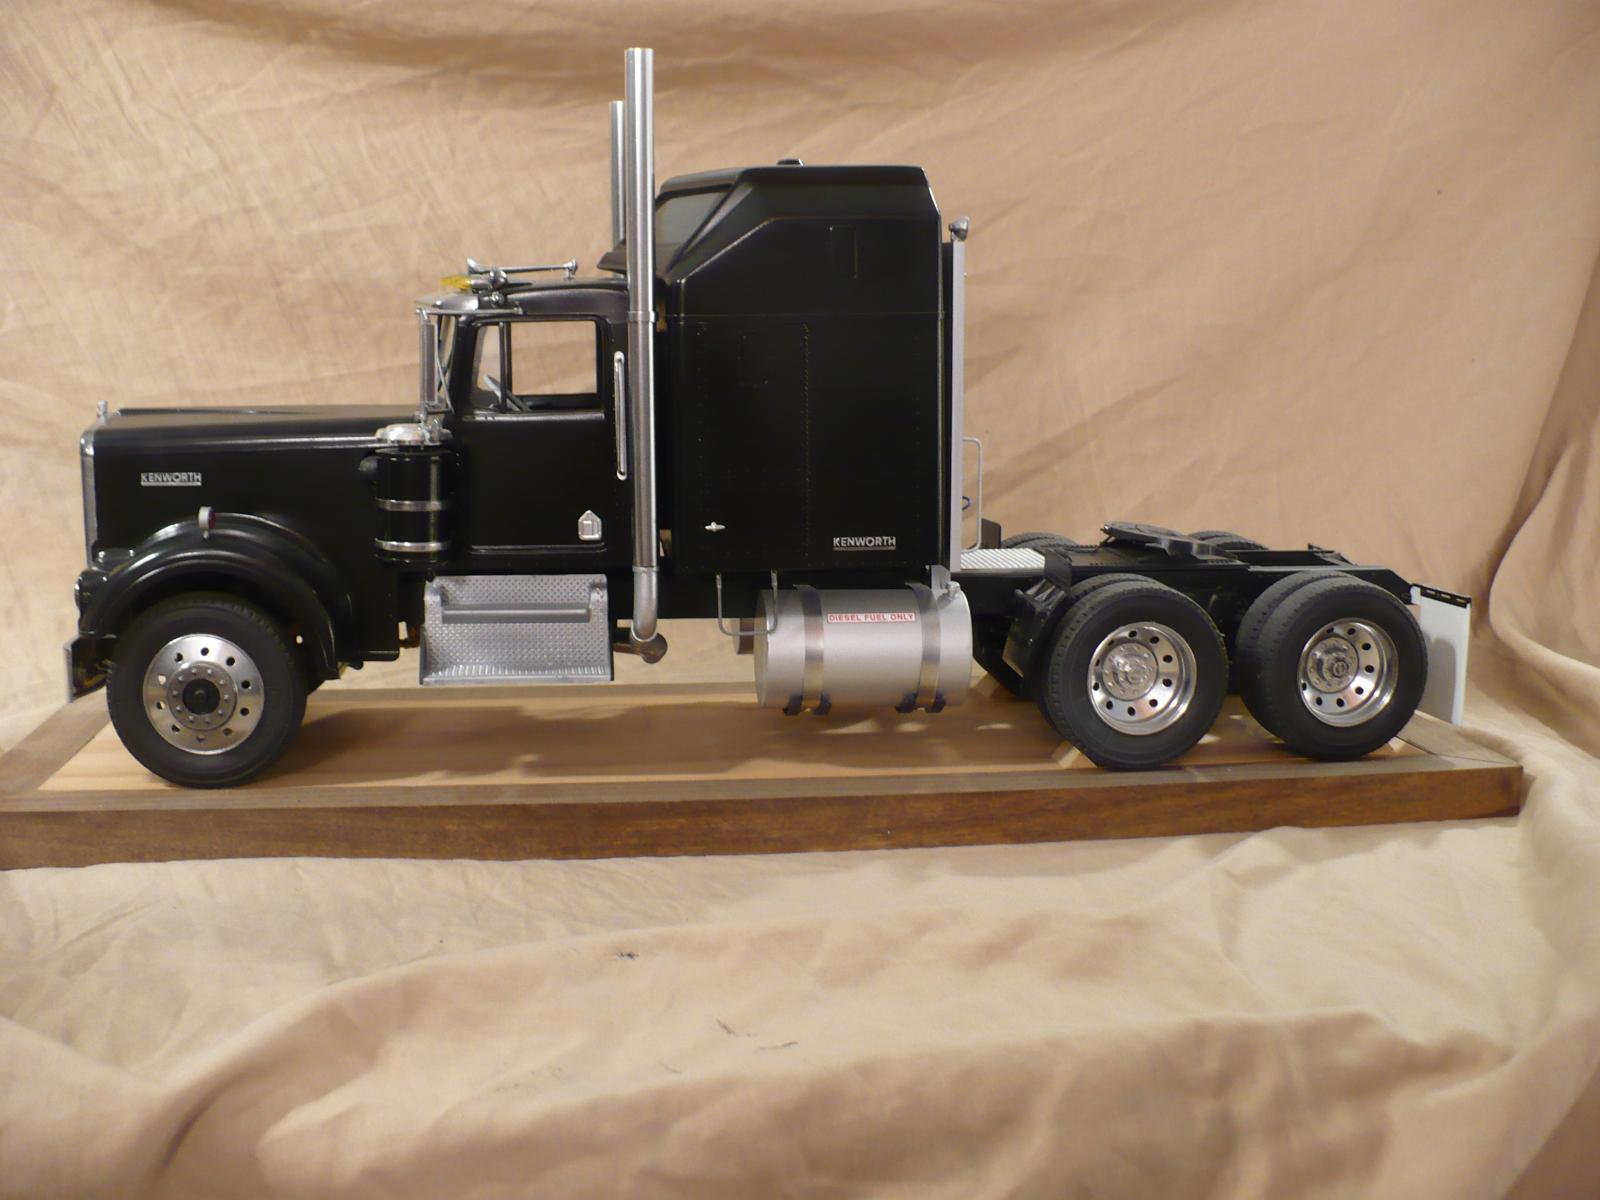
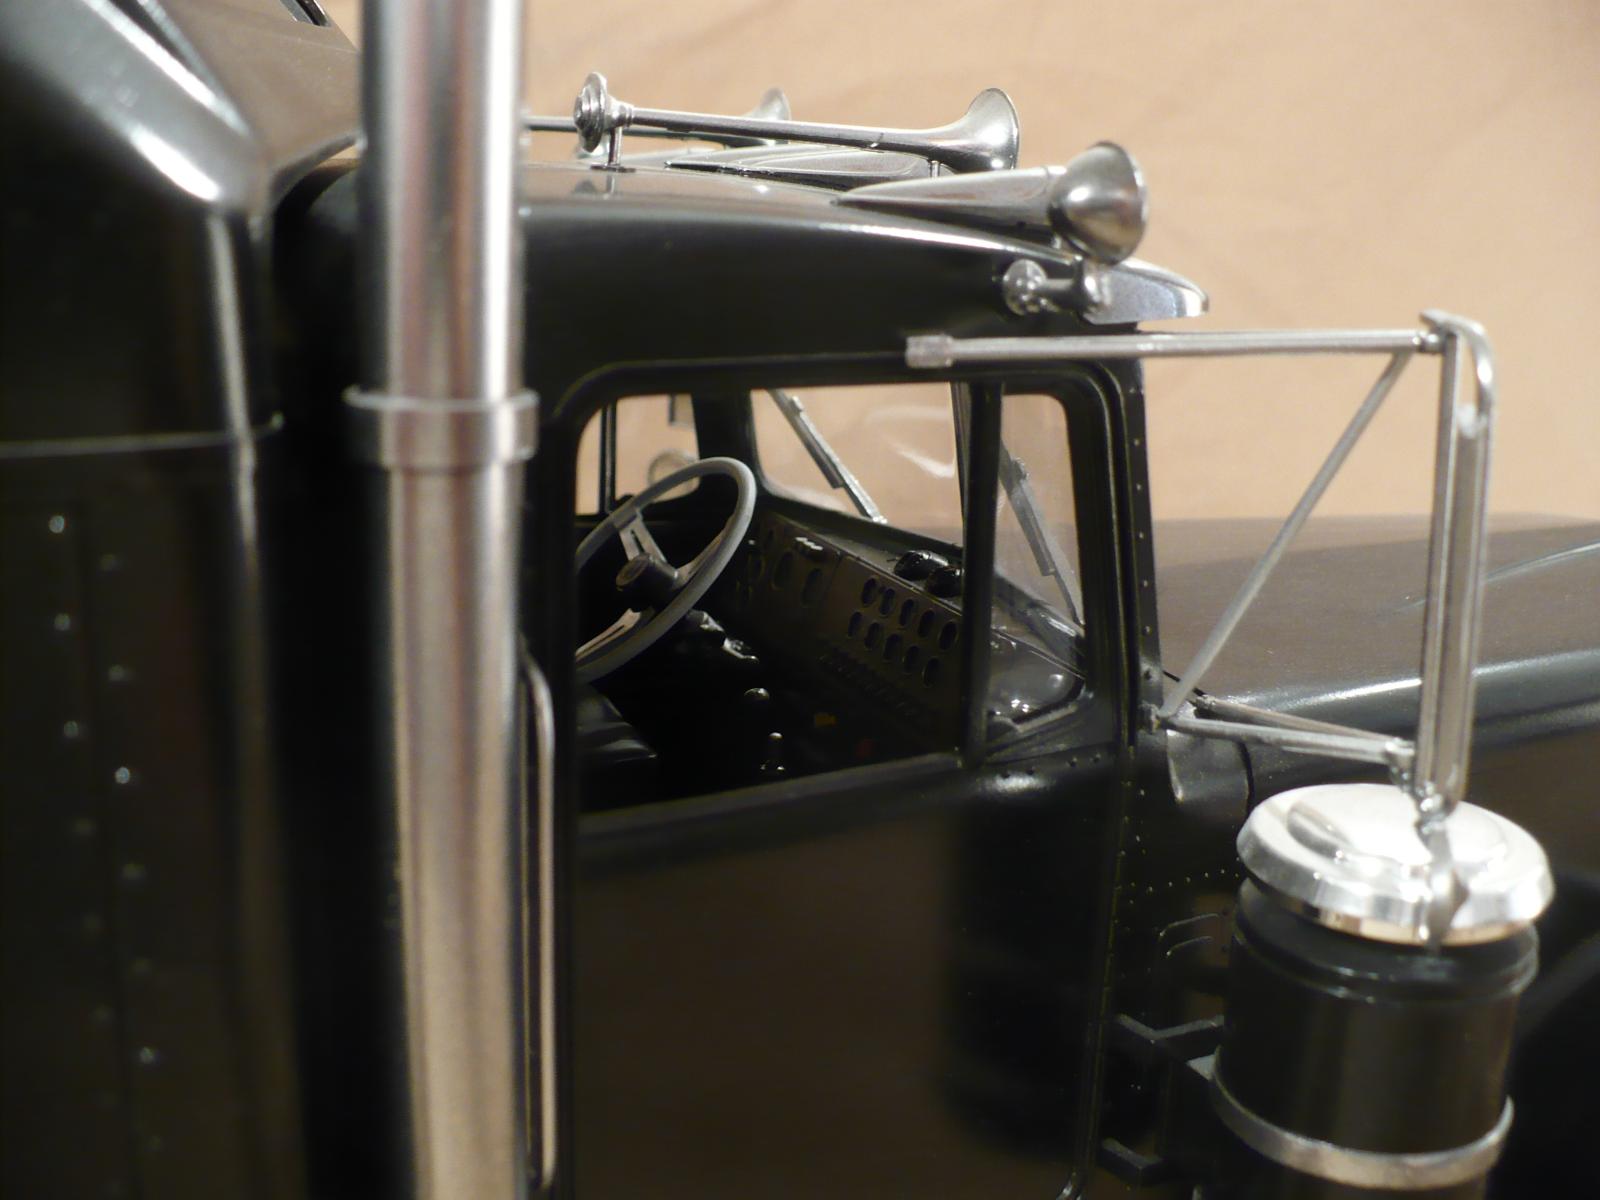
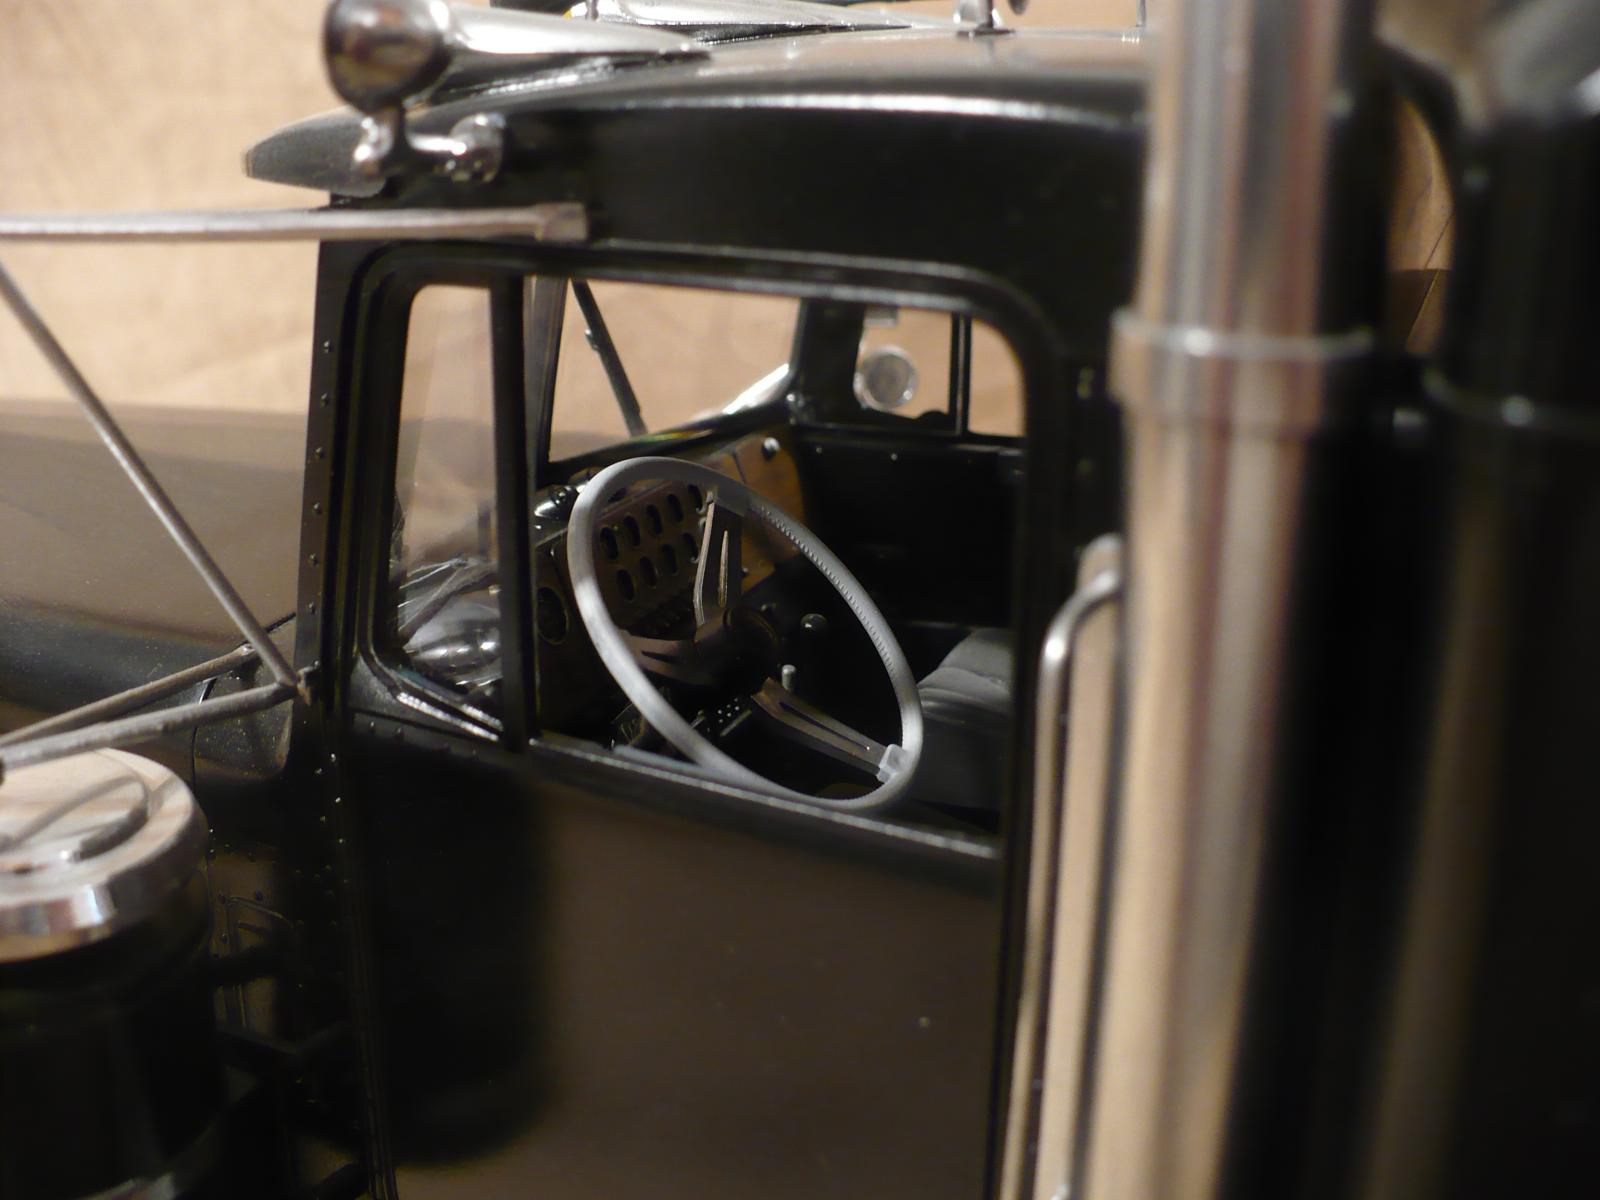
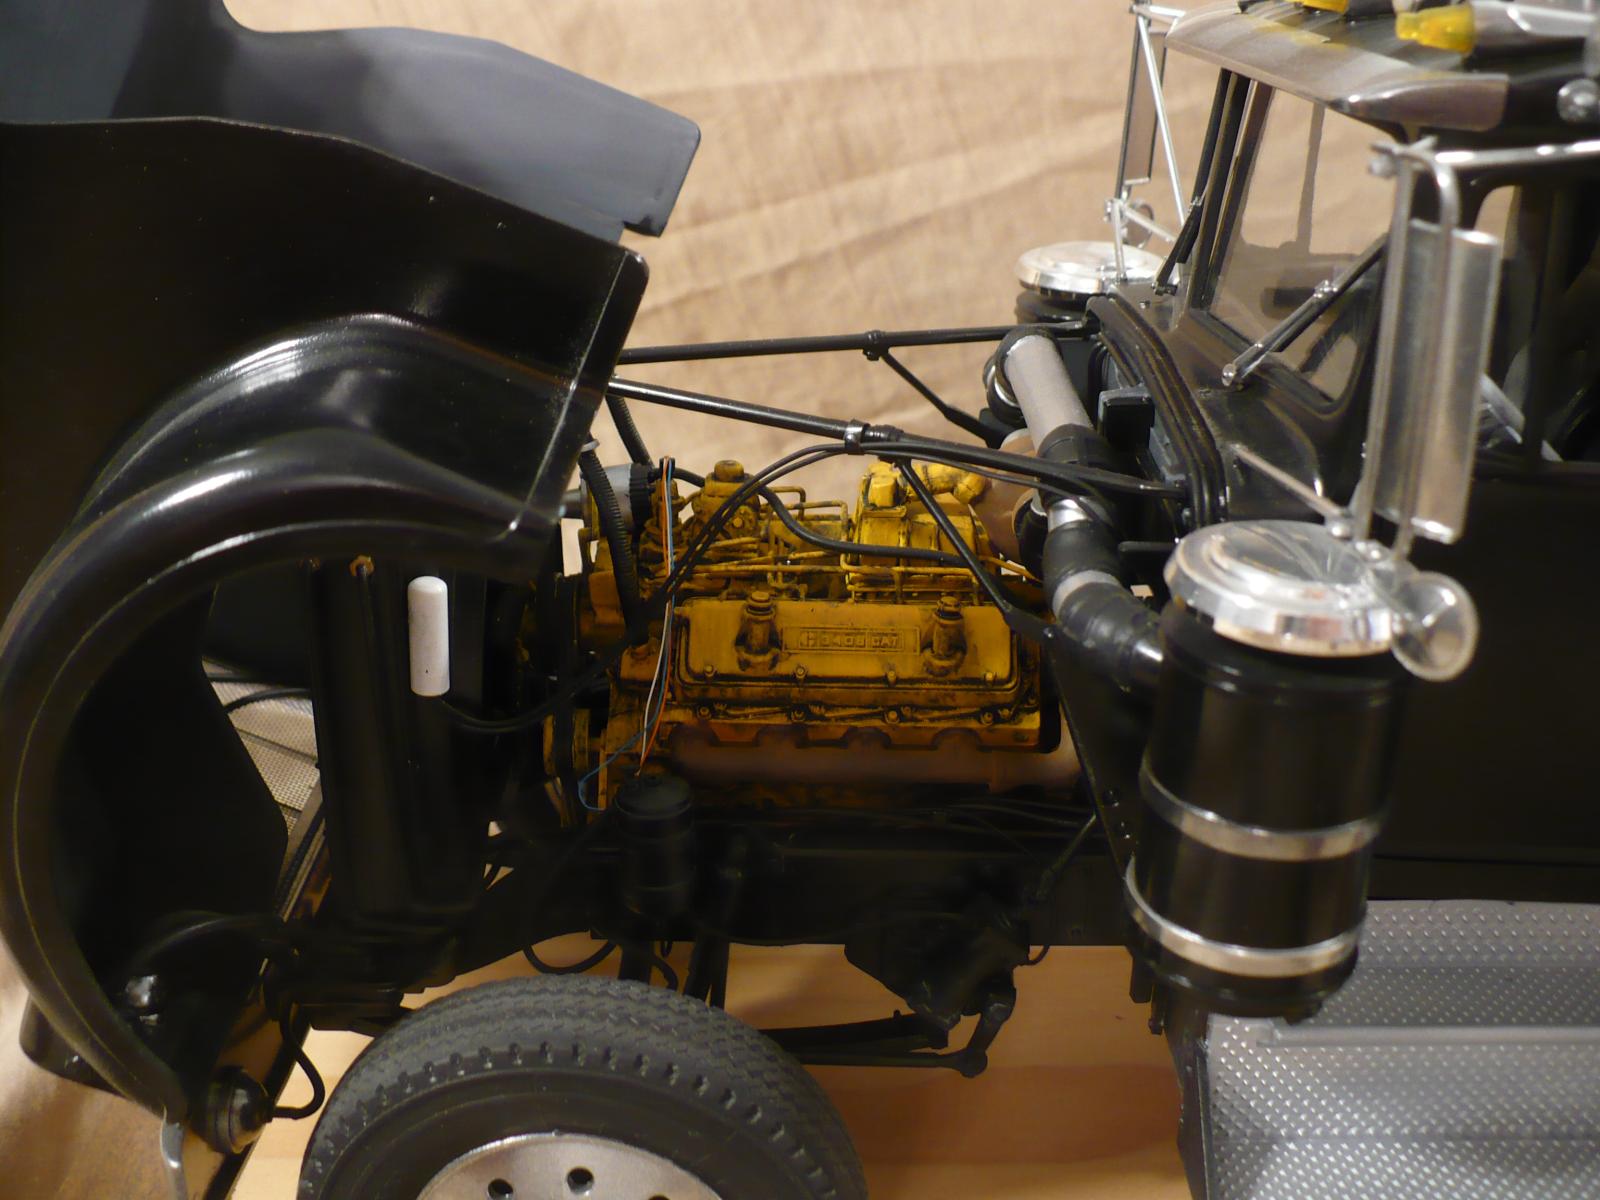
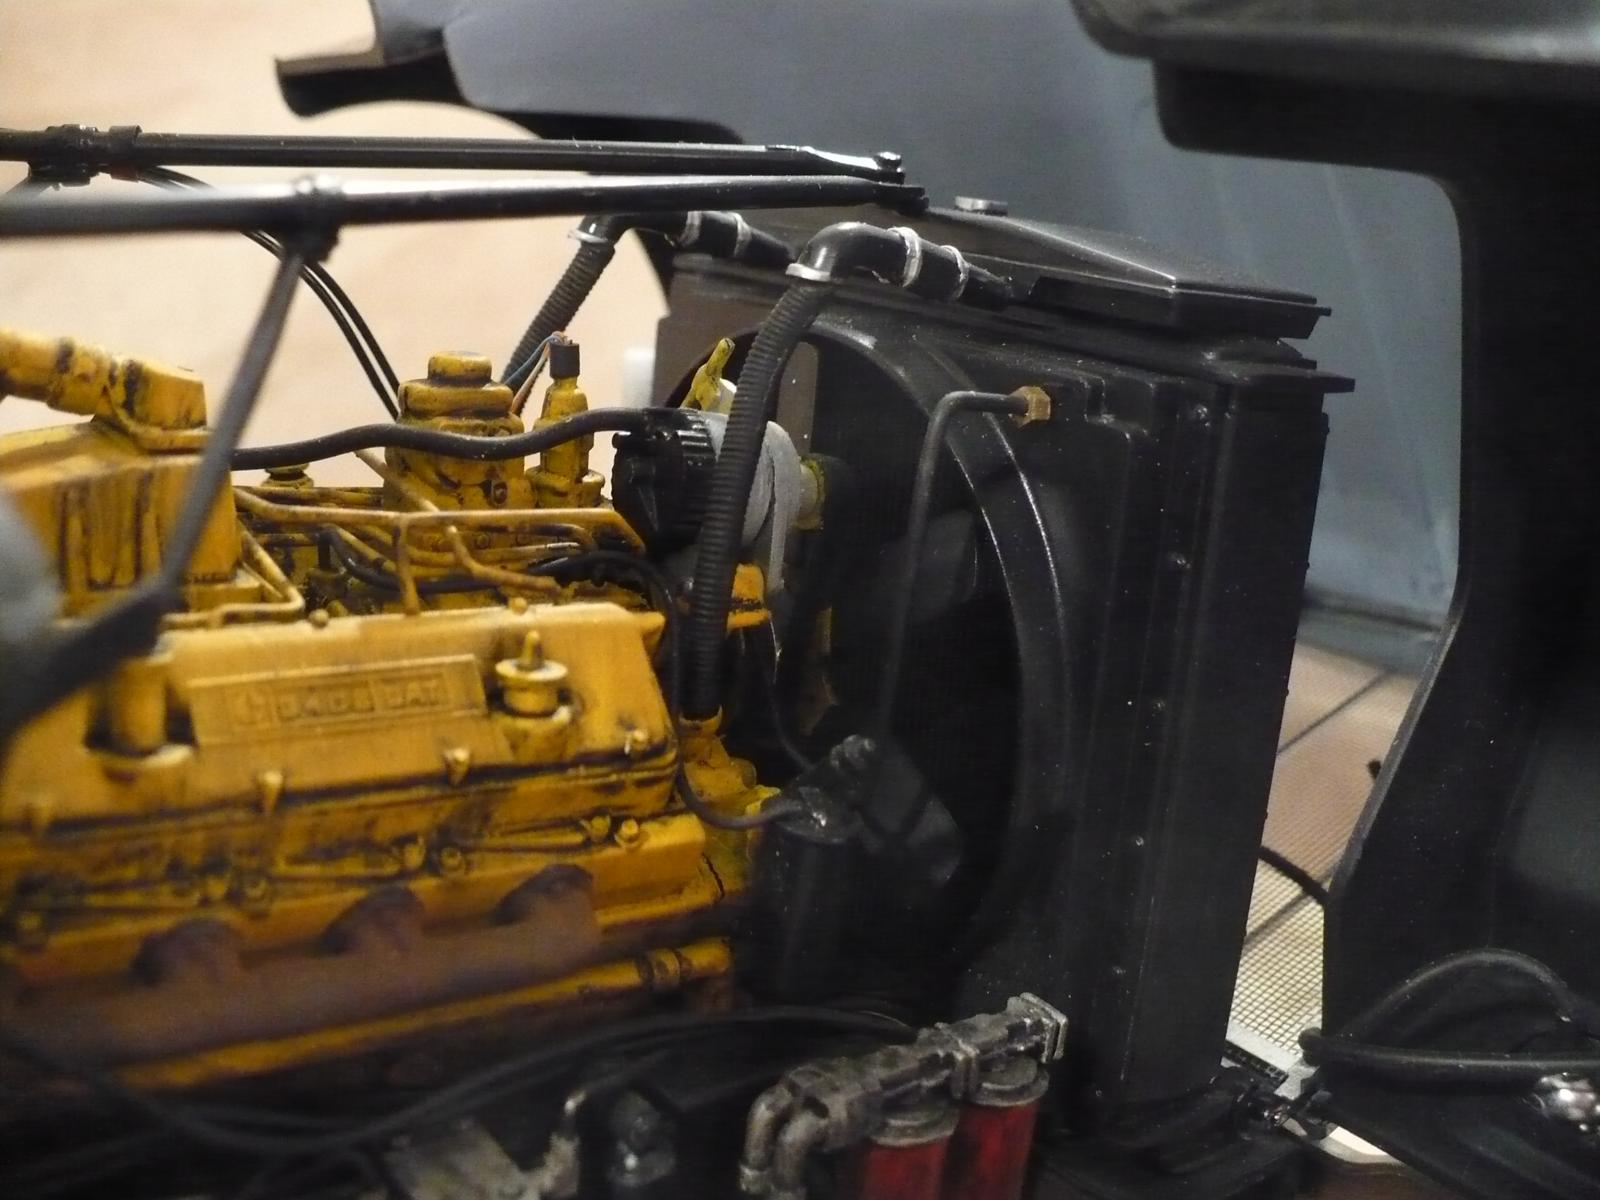
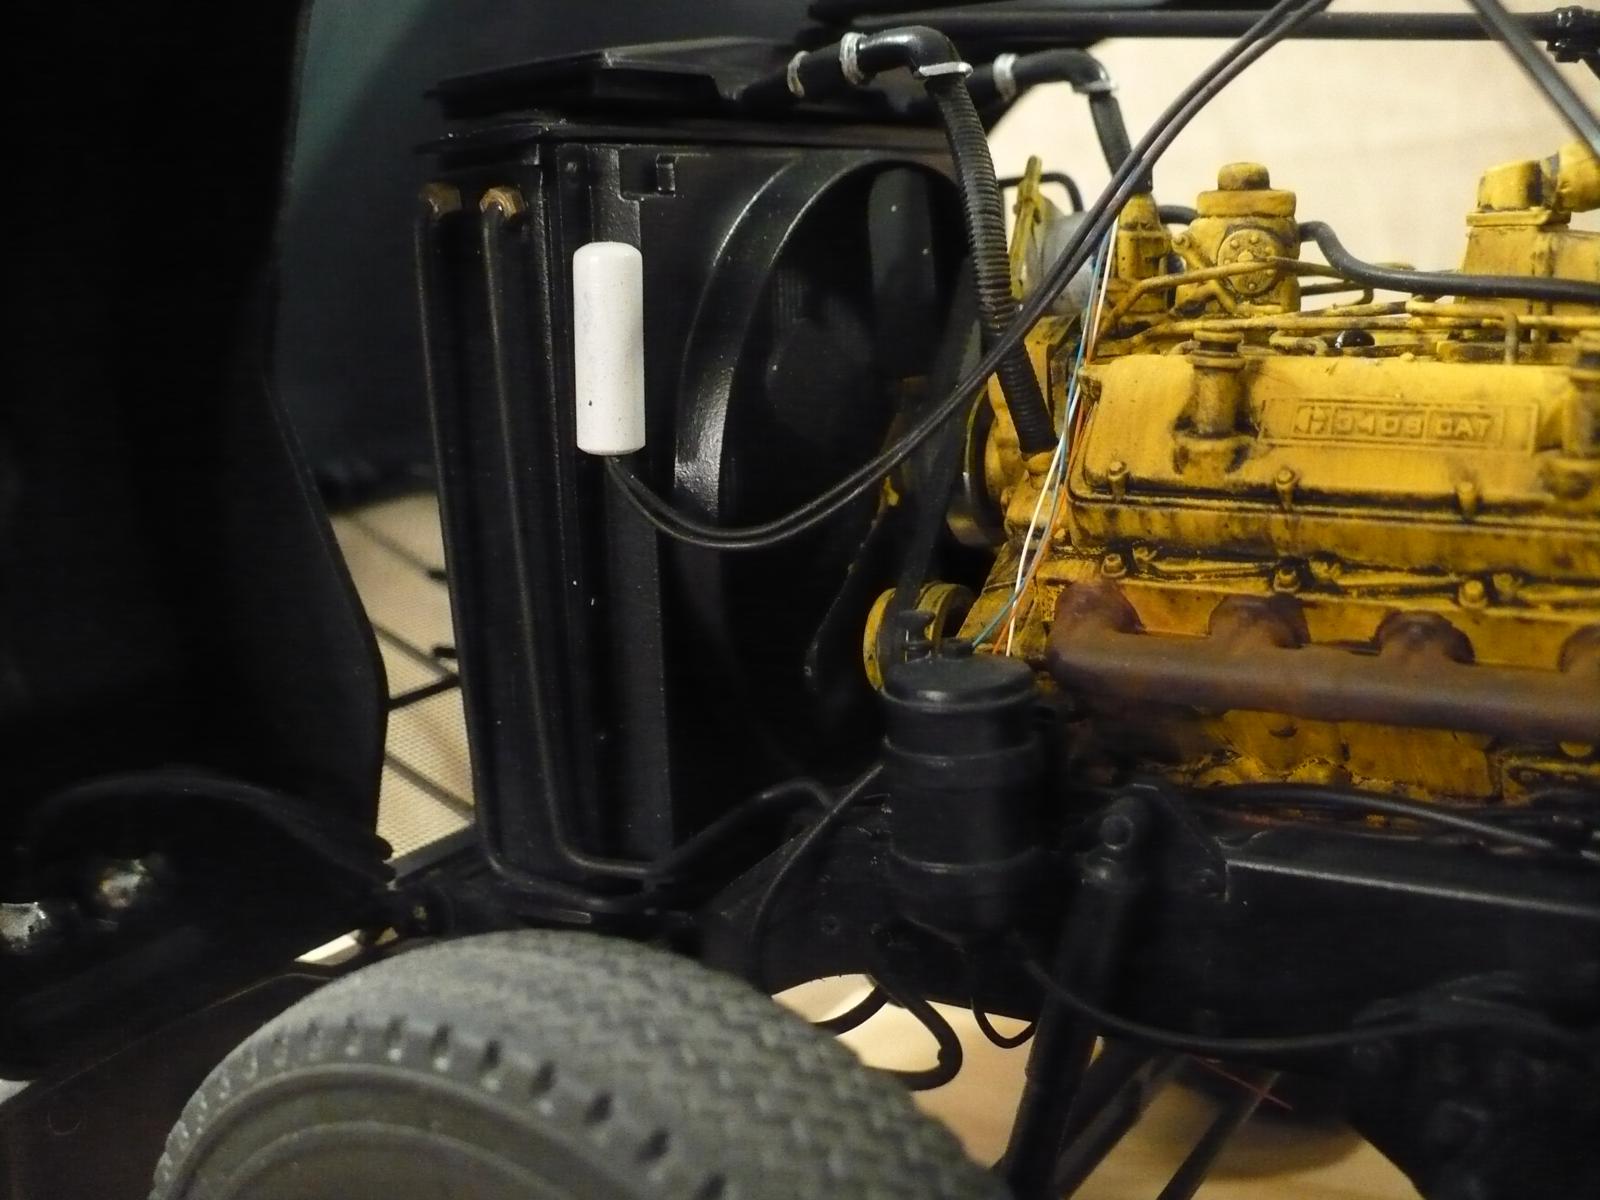
For something of this size detail was very sparse, and some assemblies were badly simplified. Fit was skeechy, and getting the hood, cab, and sleeper to mate up correctly took some though and clever surgery. Since I did not want it to look like a toy there was a great deal of scratchbuilding done. I probably put ten feet of various sizes of solder in it for the wiring harness, injector lines, air lines, and oil lines.
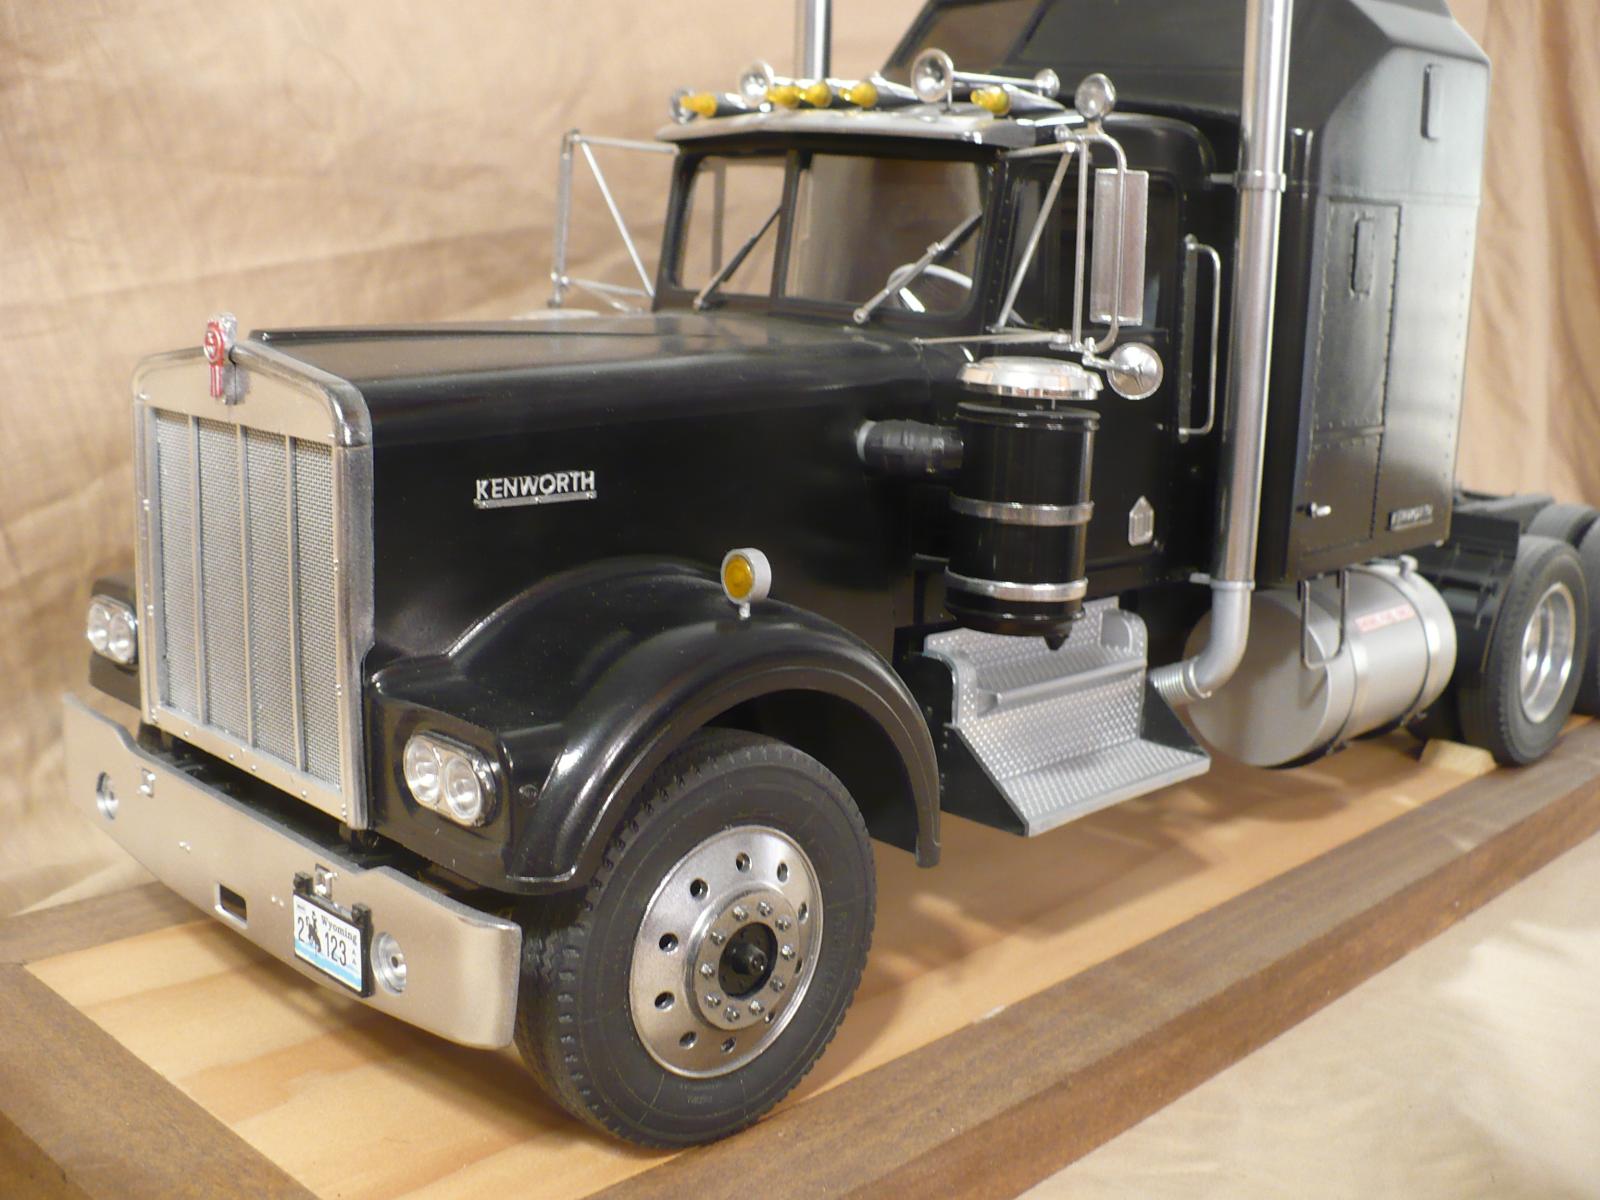
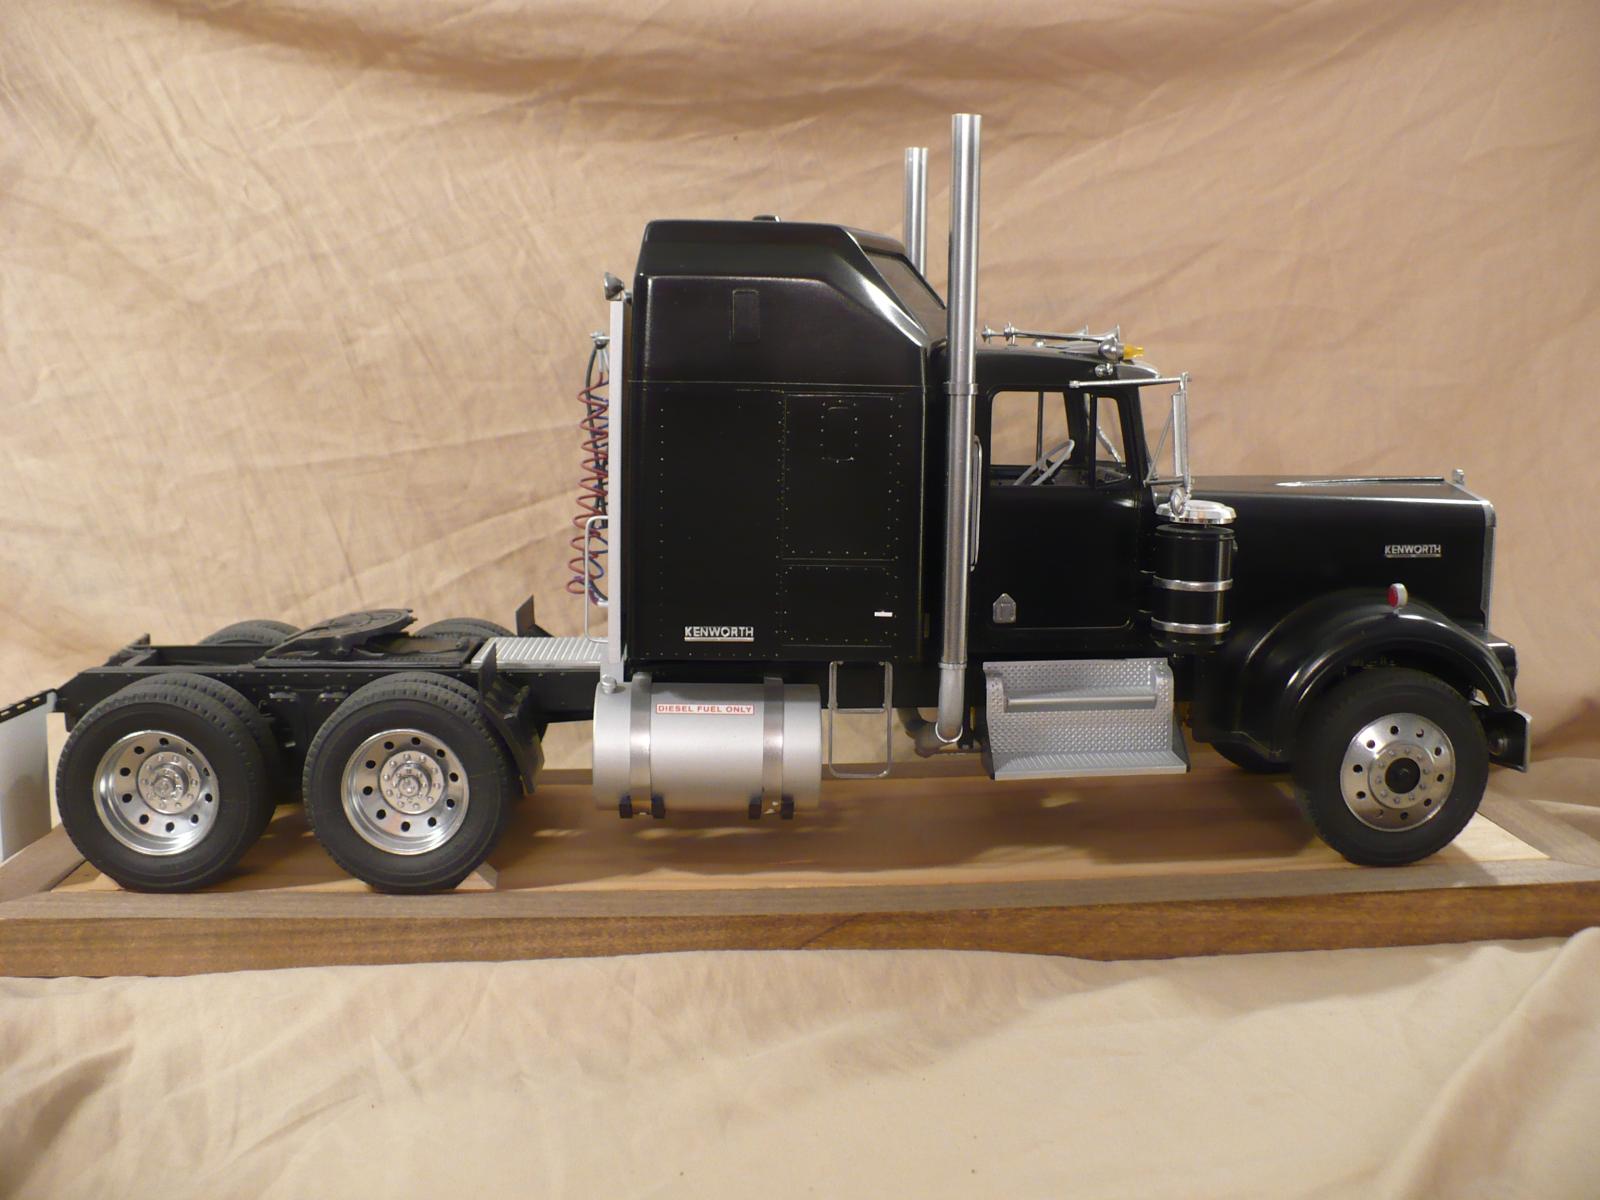
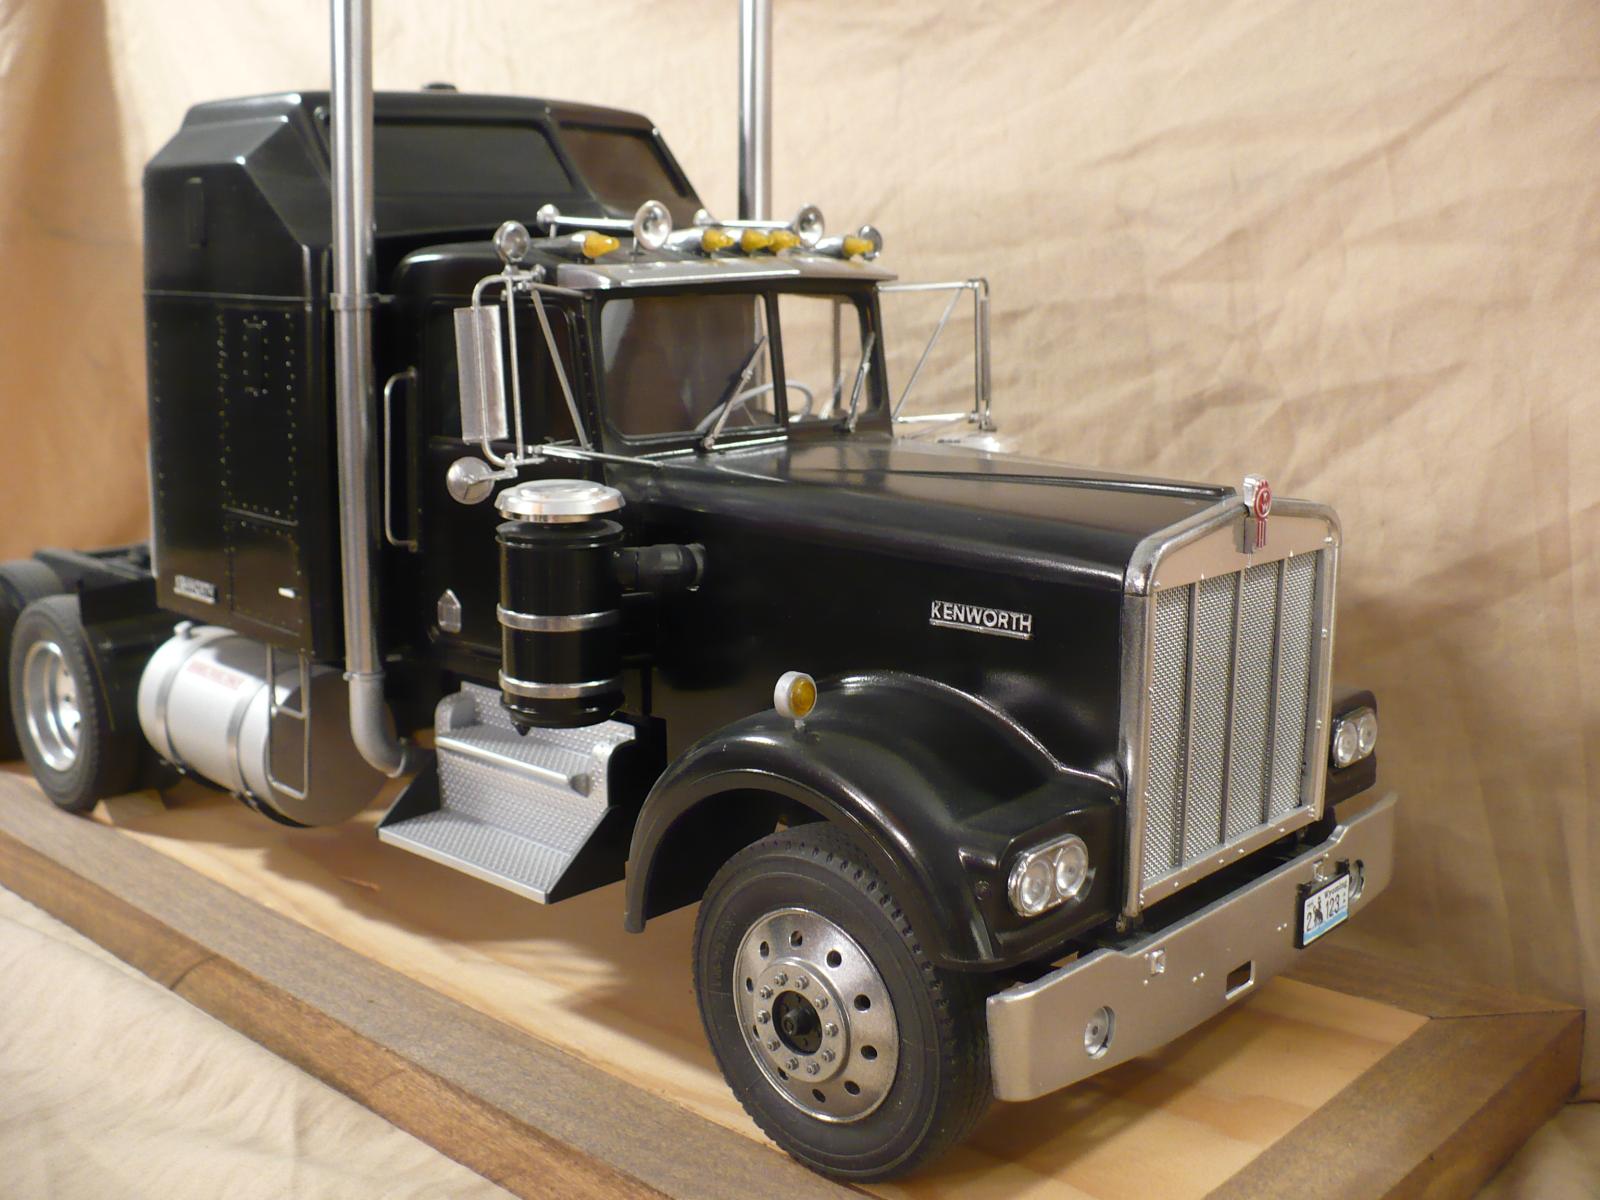
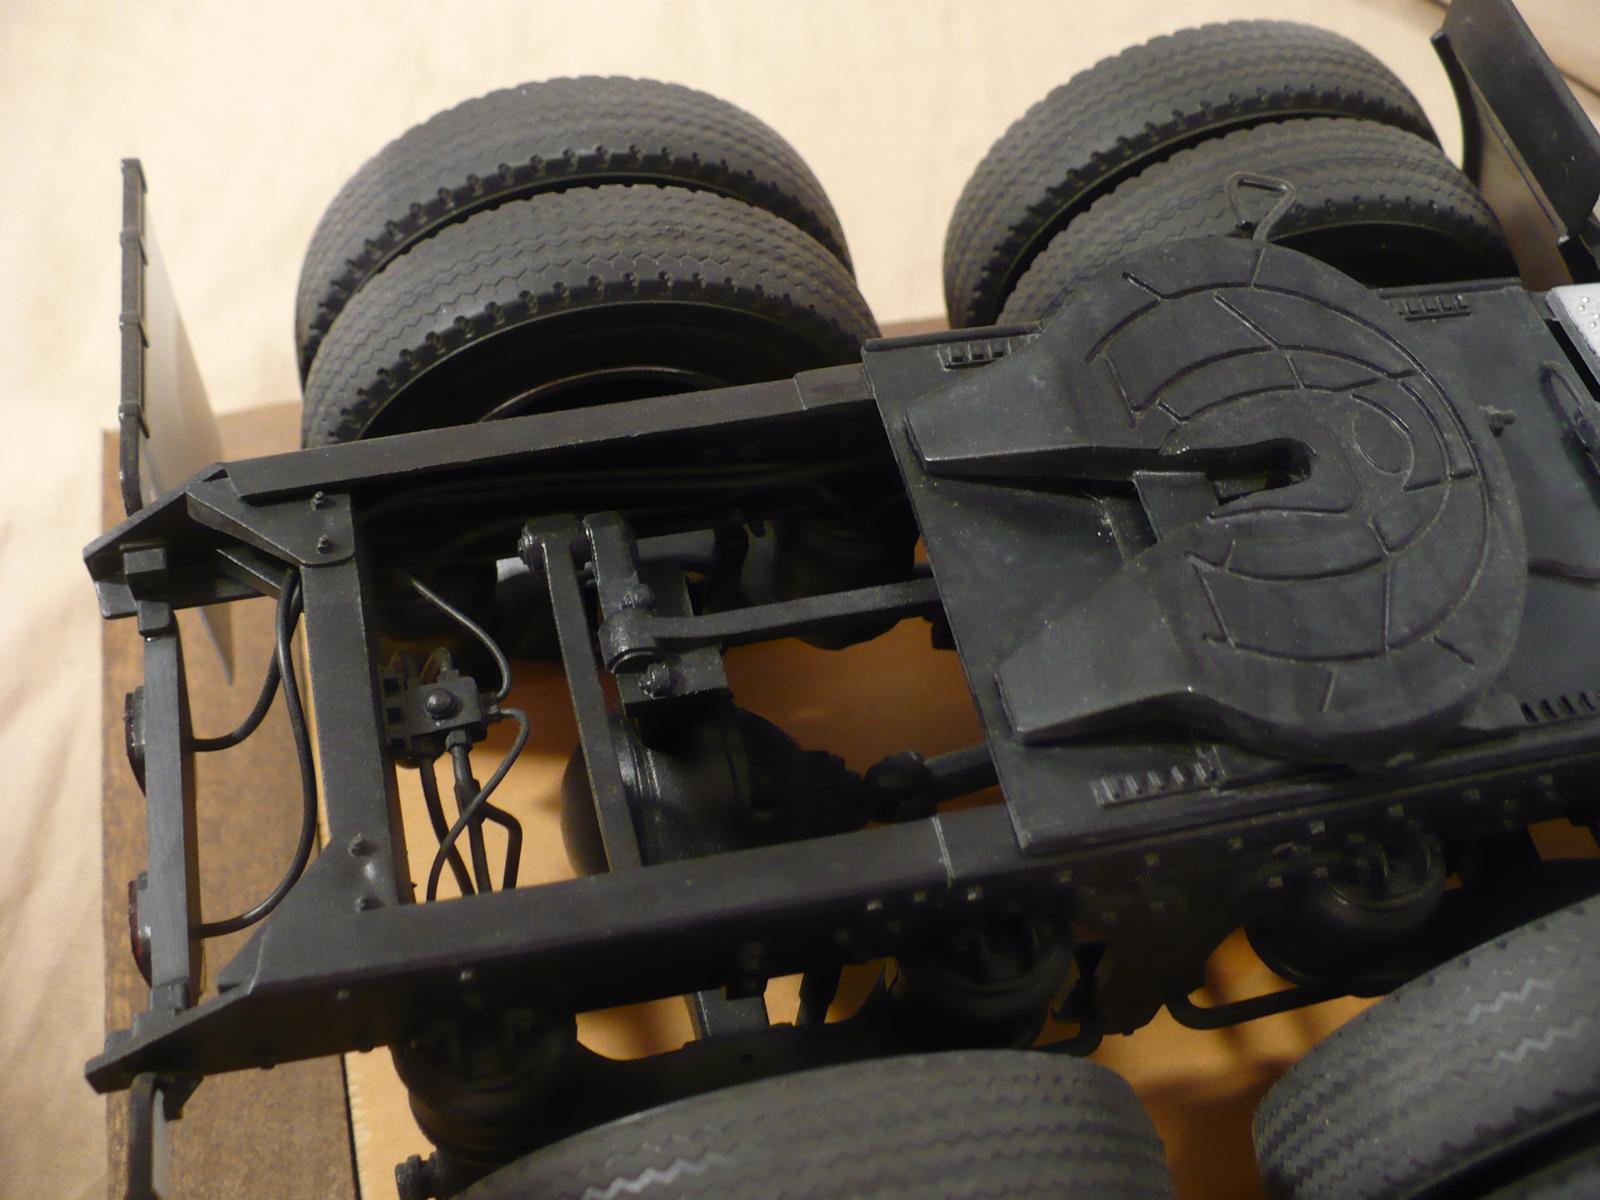
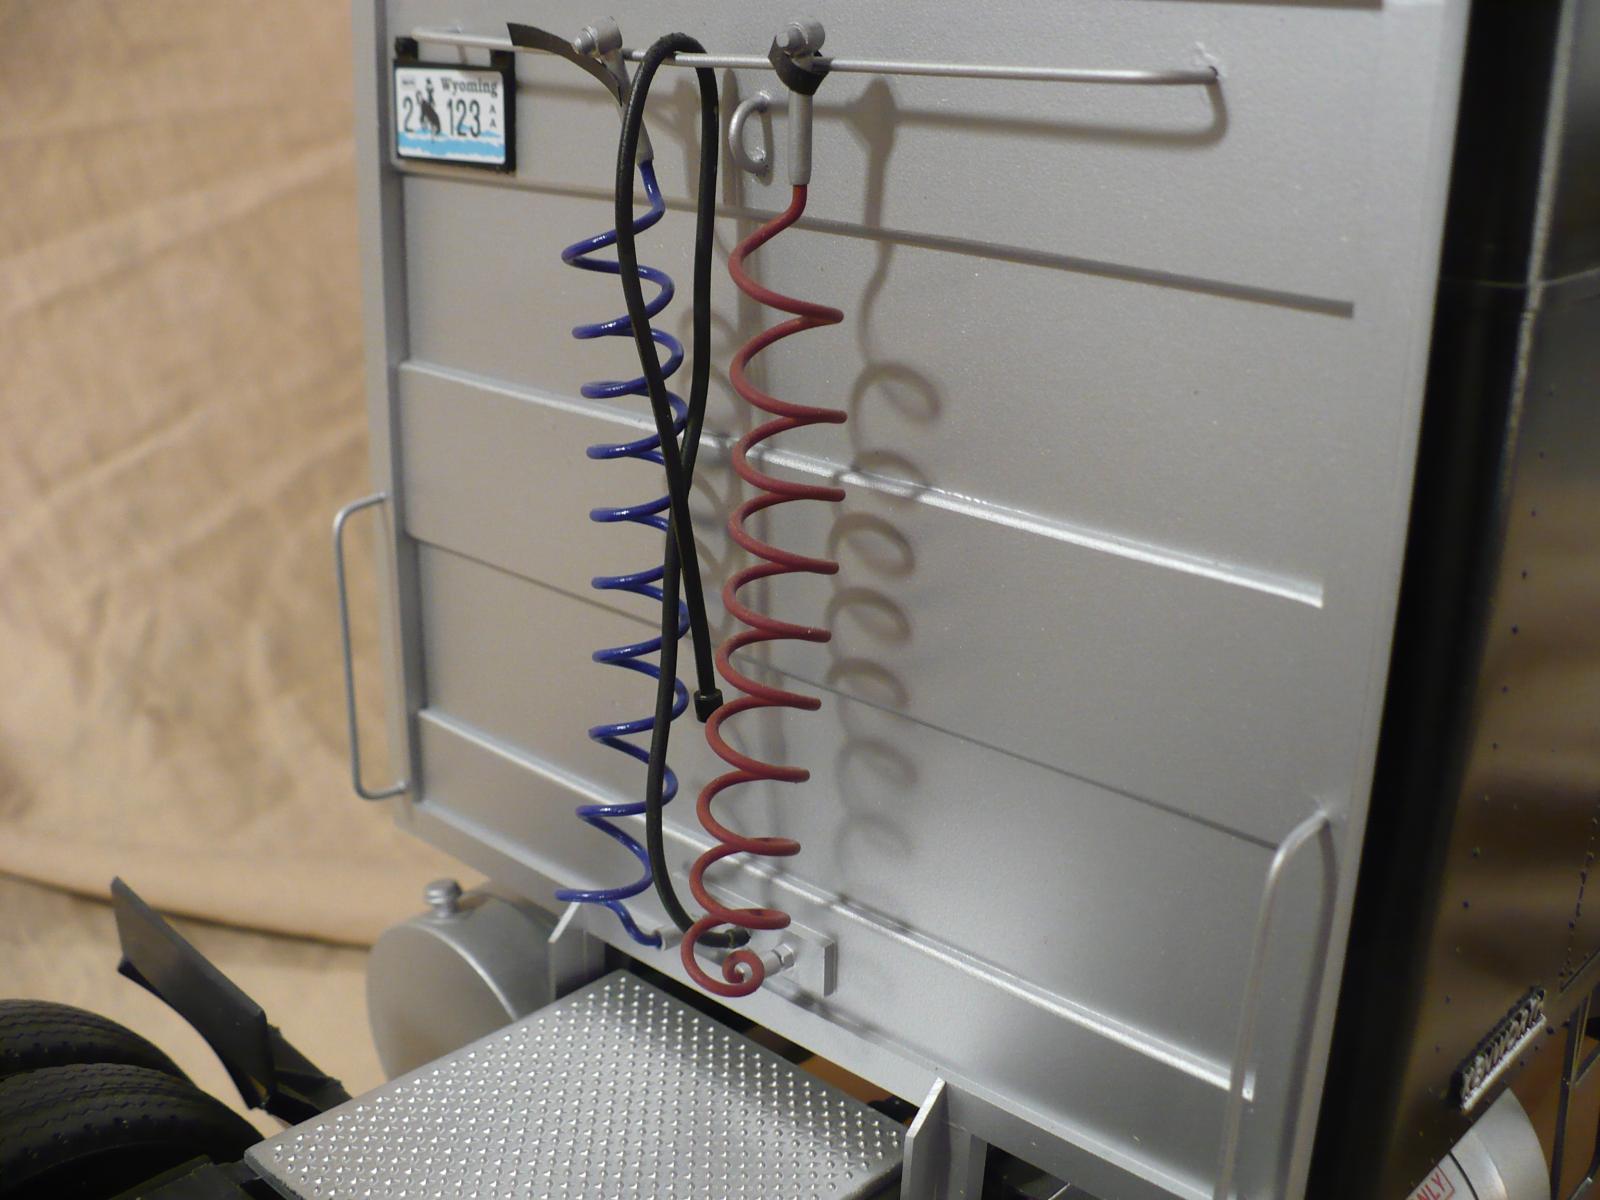
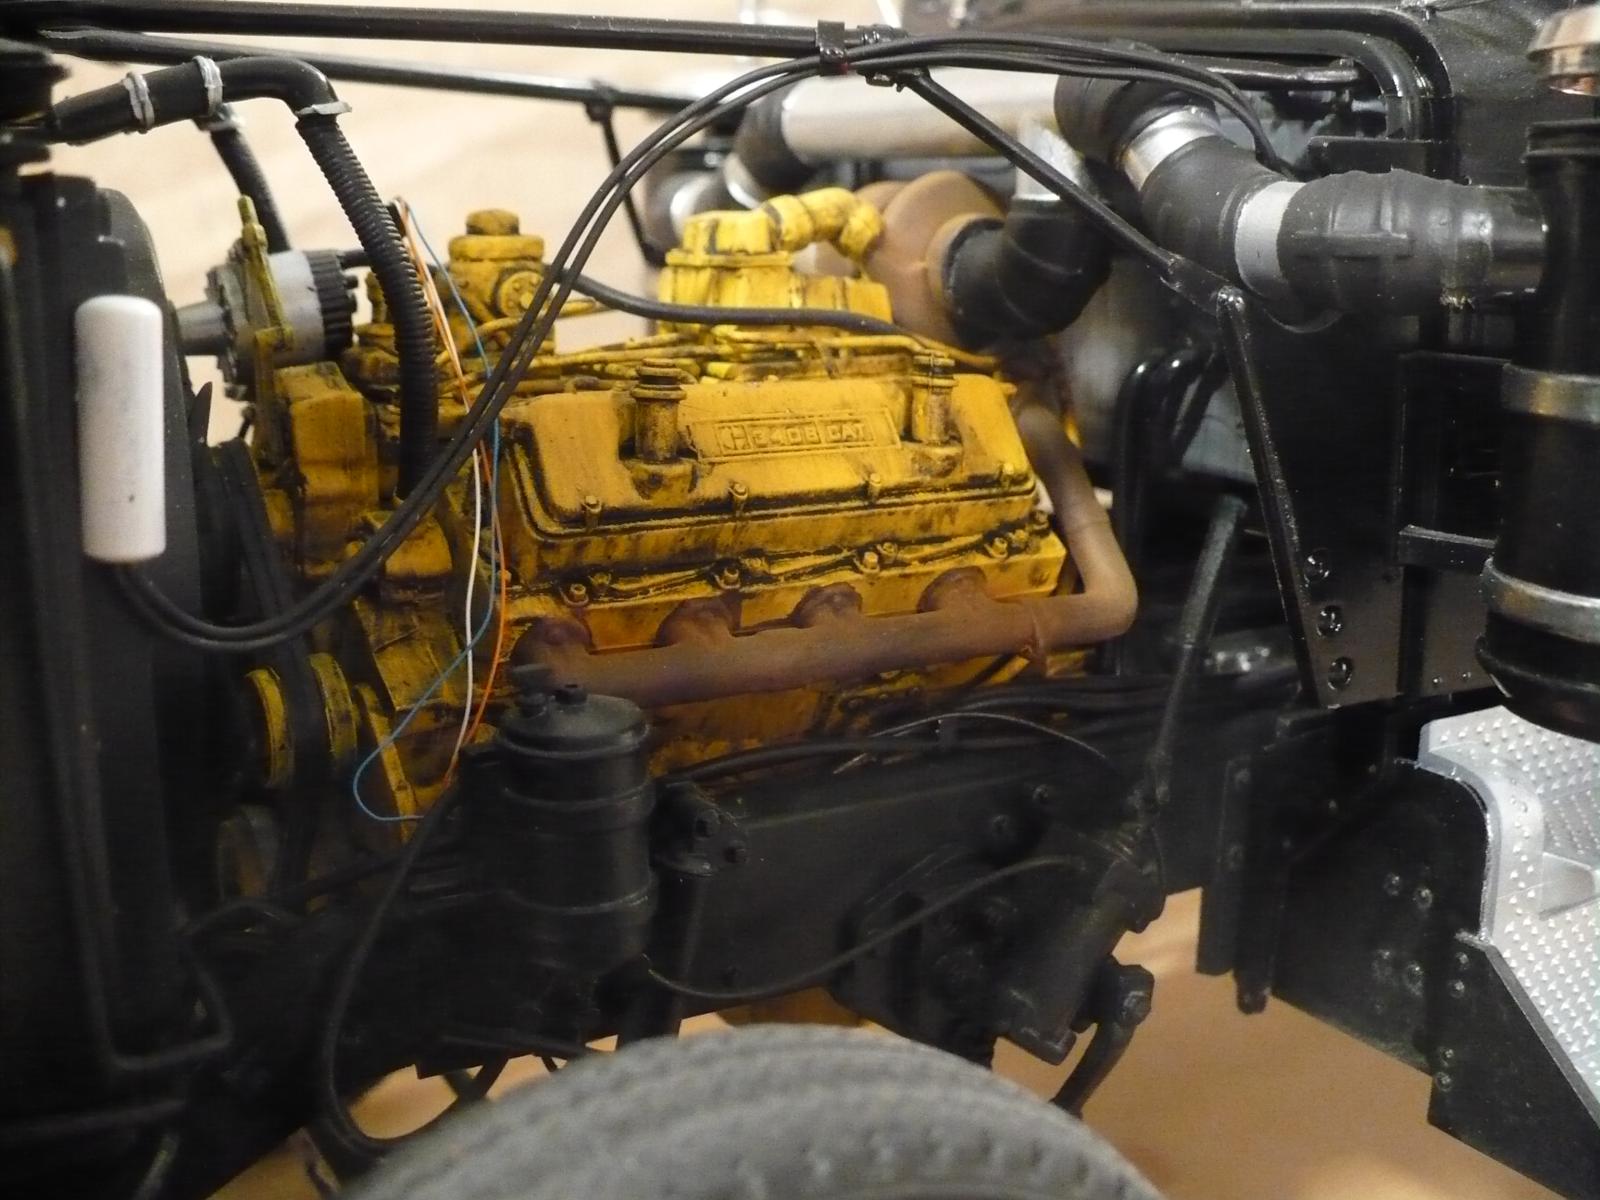
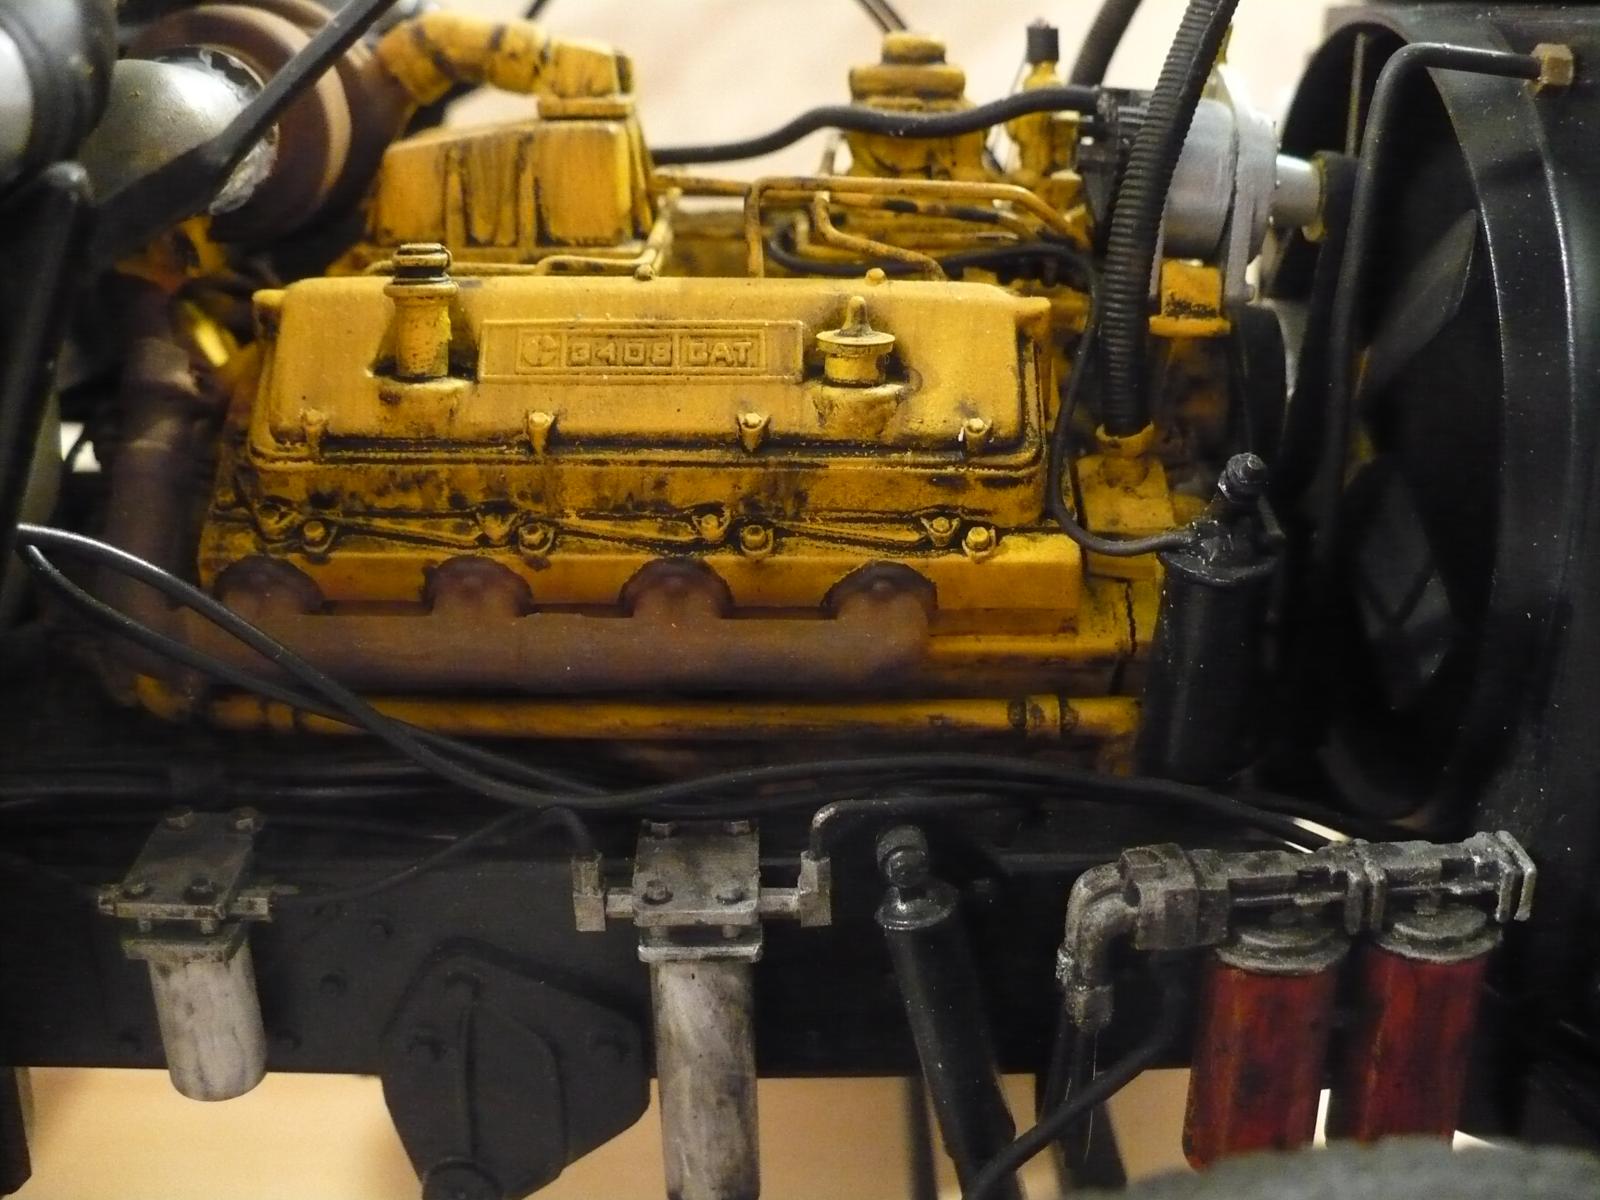
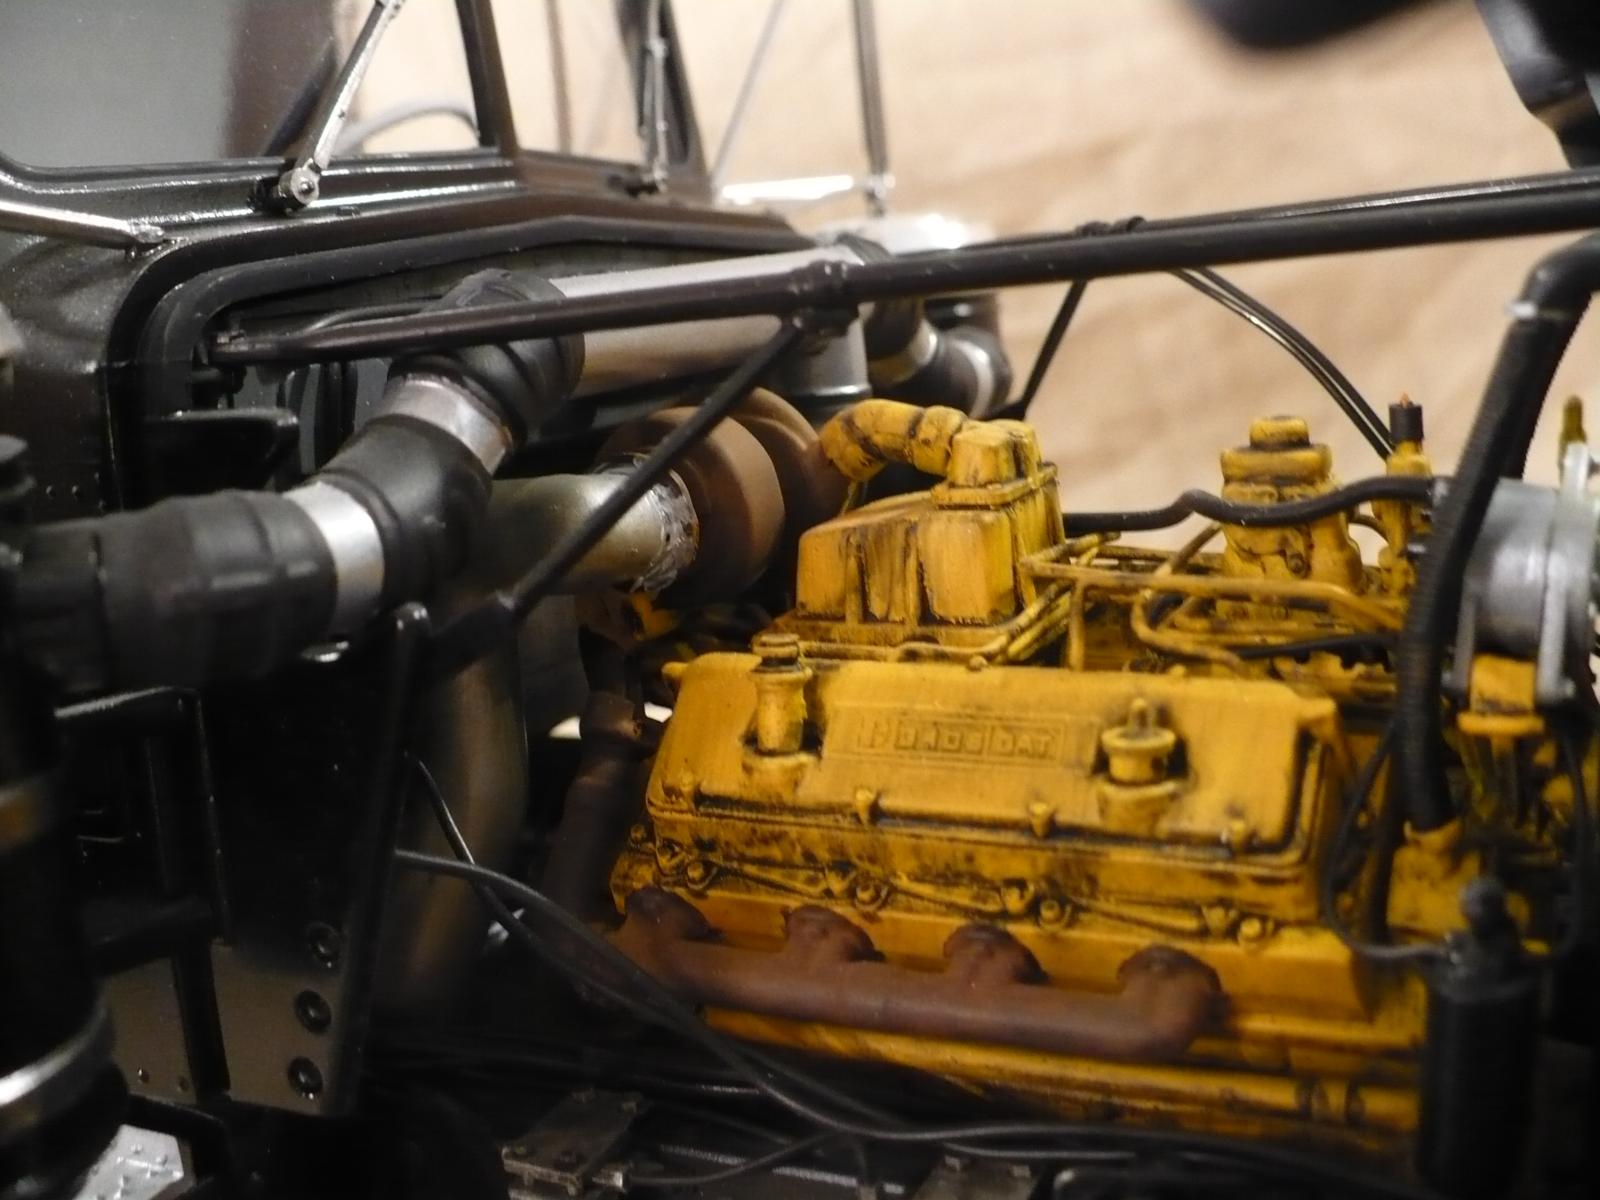
I began by stripping all the chrome plating with gas chamber grade oven cleaner. I primed these parts, then sprayed them with acrylic gloss black. They were finished with Alcad polished aluminum and chrome depending on what they were. The kit fuel tanks were appalling so I visited the local Lowe's and got a stick of the proper size schedule 40 pipe for the tank bodies, then capped them off with .080 sheet styrene. This was filed and sanded to shape, then the tank hangers were scratched with a variety of Evergreen products. The stacks were awful also so I scratched straight pipes which are a common sight on trucks equipped with the 3408 Caterpillar engine that's supplied in this kit. The engine was not bad but had a few major problems like the fuel filters and starter molded on the left side of the block. These were cut out, the holes filled with styrene, and replacements were scratched. Injector lines are .030 brass rod. The grille was molded solid so I cut the supposed to be open section out and stuck a piece of nylon mesh I had laying around in. I added a couple oil filters and heads by the right front wheel, and the headache rack was scratched with Evergreen sheet styrene. Trailer air hoses are solder with scratched plastic gladhands.
When it came time to mount the coachwork I installed the hood then dry fit the cab, discovering the cab needed to move forward .150" to mate up correctly. This meant the sleeper had to move up also, so some time was spent scratching new mounts for cab and sleeper. At first I'd intended to age and weather it some, but when it got to that point it'd been on the bench for six months and I was weary of it so I finished it in Model Master acrylic gloss black and semi gloss black.
So I got what I asked for. I'm glad I did this and kept a stiff enough spine to work it thru but it's something I'll never do again.


Very impressive build, all your added details and corrections were really worthwhile, but I suspect there are other better kits around to start with.
Thank you sir
Regrettably there are not, especially in this scale...at least there were not when this was underway
Fantastic result, Mark!
What a tremendous amount of extra work!
Congratulations!
Thank you brother sometimes tangling with something like this shows you things can be done that you thought could not
Glad you kept your spine stiff, Mark @markh
Your modelling experience turned this challenging kit into a great looking Kenworth.
Well done.
It did give me cramps for awhile tho. Definitley added to experience as well. Thank you for the look and positive comments sir
Wowzer ! this looks awesome , well worth the effort you put in.Well done.
Thank you sir
Wow, talk about triumph over adversity. Great looking Kenworth Mark, love the added detail.
Thanks brother I think most anyone can do something like this, just depends on how bad ya want it
Mark, I don't post much anymore, but this build made me break out the keyboard. This is a great looking build, and we can see that the level of detail is beyond an out of the box kit, but only you know the true effort. Great job! I'd be proud to have something of that caliber on my shelf.
Very kind of you sir, thank you
Last night on a whim I looked to see if these kits were available anymore and it seems they've gone out of production. I did find some in the ususal places the scalpers hang out and they wanted an average of $200 more than I paid at my LHS.
The hardest part of this project was reference. Happily there are a couple of truck junkyards local to me so I geared up with a digital camera and a .22 pistol (Montana junkyards are full of rattlesnakes) and went for a couple visits. When I went to the offices to ask permission to be on the property and explained what the visits were about the reactions were universal. They'd look at me, look at each other, and say something like "Uh, sure, I guess, why not don't get yourself hurt watch out for the snakes" and the like. I should have filmed this it was funny as all get out and it only made it funnier trying not to laugh at the guys who were kind enough to let me do my thing
Awesome work, your efforts have paid off!
That is a handsome beast!?
Thank you sir this is one rare instance where the thing turned out as I planned
Looks great!
Thank you sir
I love these type of trucks!
It's a shame that these aren't also on the road in my country (Austria):(
You did a good job!
The engine is also impressive!
Thank you sir. Having these on the road is not always a good thing; they can be really bad if operated by a stupid driver
Great work Mark. Well done. I did this kit in Germany years ago for my landlady's son. Your reworked chrome turned out really well. I have a 1/25 FLD 120 Freightliner I want to try your technique on. I love the weathering on your yellow bulldozer motor! Interior not too bad either.
Thank you sir
Good luck with the Alcad paint idea. Make sure you get the real, old style over cleaner that smells really bad as the new "safe"stuff will not work. When you get to the point of applying your Alcad do three to four light coats...build it up slowly for the best effect
Very basic work you have done to the kit, still looks like it came straight out of the box with a couple of extra modifications added to it.
Guess you don't have to look at it then
Here's the same kit with a tad of work applied to it.
1 attached image. Click to enlarge.