1/48 Hasegawa F-14A Tomcat (My moment of Triumph on the highway to the Danger Zone)
Note: I wrote this 12 years ago for Modeling Madness. The original photos were lost after my laptop HDD crashed in 2013 and I couldn't recover them to my dismay so this is what the model currently looks like which isn't bad as it survived with only the boarding ladder snapped off in what I called the "Model Massacre of 2016" when the horrible drugged up person in my life (now long gone) decided to attack the contents of one of my model cabinets. Enough personal history, onto the model history.
“There isn't enough thrust in Christendom to fix this plane.”
With that sentence, Vice Admiral Thomas Connolly sealed the fate of the F-111B and his Navy career. Out of the ashes of a plane totally unsuited for carrier operations appeared the F-14 Tomcat (aka the Turkey) in which Thomas Connolly played a big role in its development and was said to be named after him.
The US Navy realized in the early 60s that the F-4 Phantom wasn't going to be the 1970s/80s Fleet Defender as it did not have the sophisticated radar and long ranged missiles to intercept Soviet Missile Armed Bombers before they could attack the Carrier Battle Groups (CVBGs.) In the days of the Cold War, the US Navy's primary offensive mission in World War 3 was to push several carrier battle groups past the GIUK (Greenland-Iceland-United Kingdom) gap and attack the numerous submarine/missile/bomber bases on the USSR's Kola Peninsula. They would have had to fight their way through a gauntlet of missile armed bombers (and subs) just to get into strike range. The main threat were the USSR's Badger bombers (and soon the much faster/better Backfire Bombers) carried a variety of anti ship missiles that flew at speeds of Mach 4+ and had a range of almost 200 nautical miles to 300 nautical miles. Against that kind of opposition it was in the Navy's best interest if the Fleet Defenders could intercept them before they were within range of the Fleet's CVBGs (the doctrine known as “shooting the archers, not the arrows.”)
Originally, the “ideal” new Fleet Defender was supposed to be the Douglas Missileer which proved that some ideas are better left on paper. It carried a radar (later known as the AWG-9) that can lock on while scanning up to 6 targets simultaneously and carried up to eight monster missiles called Eagles. The major flaw with this plane was that it was a subsonic pure interceptor (no dogfighting required.) The weirder proposals had the Missileer based on the Intruder and Tracker (!) Fortunately, someone wisely pointed out that subsonic didn't really make sense as interceptors often had a need for speed while flying the highway to the danger zone.
Along came SecDef McNamara and his PhD geniuses who decided that the US Navy Fleet Defender and the USAF's low level strike aircraft were similar and decided to base them off the same airframe known as the TFX or F-111 in probably one of the first ever examples of that dreaded corporatese word, synergy. Unlike the combination of peanut butter and chocolate, these two missions did not go well together as low level strike was really a different kind of plane than a carrier based fighter. The F-111B could not meet the Navy's requirements on pretty much everything including being able to take off and land on a carrier as the all so important forward visibility for a carrier landing was pretty poor and made already tough carrier landings even tougher. By 1968, it was obvious to everyone but the main contractor, top bureaucrats and certain top brass that this was a spectacular failure. It took Senator John C. Stennis (probably one of the reasons why the Navy named a carrier after him) to goad the truth out of Vice Admiral Connolly to kill it.
Fortunately, Grumman (a prime sub contractor on the F-111B) had some ideas about a replacement. Grumman redesigned the airframe and kept the swing wing to optimize performance at low speeds for landing and dogfighting based on the Vietnam experience where old school dogfighting proved to be as critical as firing long range missiles. Like the F-111B, the Tomcat carried the AWG-9 radar and the very large Hughes Phoenix missile which were the longest ranged AAM (over 100nm) at the time but also very expensive and sophisticated (and sadly, have a US Navy combat record of no kills in 3 combat launches.) Unlike the F-111B, the F-14 Tomcat was designed for carrier operations with a bubble canopy for high visibility and a crew seated in tandem not side by side. It was armed with a 20mm Vulcan M61 cannon for close in work as well as fire Sidewinder and Sparrow Missiles. Later a long range camera system and IR sensor were added to compliment the AWG-9 radar.
Unfortunately, the designers used the same TF-30 turbofan engines that helped doom the F-111B. These engines would be the bane of the Tomcat's existence as it led directly to the loss of many aircraft and aircrew as they were not really designed to be used in a fighter plane (!) A replacement engine might have been developed sooner, except for the pain of dealing with the lingering financial costs of the Vietnam war and the bureaucratic mindset which believed that losing trained aircrew and Tomcats was more cost effective than funding a replacement engine. Another of the Tomcat's drawbacks was that it was a very large plane, the largest two seat fighter in US Navy history, combined with its weak TF-30 engines wasn't as good a dogfighter as the Navy or the movie Top Gun would have you believe.
In the 70s and 80s, all VF squadrons (except those that served on the USS Midway and USS Coral Sea which were too small to handle the Tomcat) transitioned from the F-4 Phantom to the F-14 where they served as the primary Fleet Defender till complimented by the Ticonderoga class Aegis CGs.
The Tomcat project also proved to be a very expensive one as the problems with the engine, various cost overruns and cuts to the number of Tomcats bought nearly bankrupted Grumman. When the Shah of Iran looked for a plane that could intercept Soviet Mig-25 recon planes, Grumman leapt at the chance to supply an export version and won a contract for 80 Tomcats which saved both Grumman and the F-14 program. Of course, no one realized that this would backfire when the Shah was forcibly removed from power in 1978 as the Iranian revolution put religious extremists in power.
Like the F-15, the F-14 export version saw more action than their US counterparts as the Islamic Iranian AF Tomcats fought the Iraqi AF during the Gulf War of 1981-1988. The Iranian Tomcat pilots were well trained/skilled and kept the Iraqis from gaining air superiority. In those rare times when US Naval Aviators could go “fangs out”, the Tomcat showed it could fight well for such a large and underpowered plane. The Libyan Air Force found out how lethal US Naval aviators and the Tomcat could be on two separate occasions in the 80s.
It was only 16 years after the Tomcat was introduced to the Fleet when the F-14B/A+ with the much better F110 turbofan engines appeared giving the Tomcat the engines it should have had 16 years earlier. The F110s gave it a 1:1 thrust to weight ratio and improved dogfighting performance. Later electronics upgrades gave it the ability to carry various air to ground weapons which allowed the Tomcat to be used for long range strike missions which was necessary as the Navy had to retire the Intruder without a true replacement. Unfortunately, the Tomcat did not get any radar upgrades to fire the AIM-120 AMRAAM and when the Phoenix was retired in 2004, it was a sure sign the end was near for the last ever Grumman naval fighter. The Tomcat ended its 32 year association with the US Navy in 2006.
Iran is still flying an unknown number of them at the time of this review (2012.) These are kept flying in large part due to parts made locally, sold to them through IranContra and/or bought (through intermediaries and front companies) from clueless Pentagon bureaucrats in 2006 as they sold off remaining Tomcat part stocks as surplus forgetting that Iran (supposed threat) was the only other nation that flew the Tomcat. Naturally, this led to a stupid Pentagon over reaction that caused conflict with various airplane museums over the legality of their newly acquired Tomcats.
About VF-143
Unlike the USAF, the US Navy has had a long tradition of salty squadron nicknames. One of the most unique (and loathed by those who are probably more serious/uptight than they should be) belongs to VF-143 aka the World Famous Puking Dogs.
It was originally VF-871 Griffins, a reserve squadron that was activated for Korea. The most often told Squadron legend is that a junior officer had the task of making a paper mache Griffin for a party dumped onto him. The junior officer of the legend wasn't very talented with paper mache and did such a bad job of it that the Griffin looked like c**p with its head drooped and a wide open mouth. Depending on the source, a female party guest, a wife or the CO's wife took one look at the sad excuse of a mascot and proclaimed that the so-called “Griffin” looked more like a puking dog and thus the World Famous Puking Dogs were born. Sans Reproache.
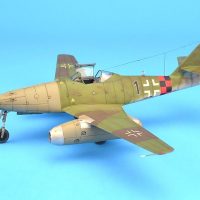
It went through a couple of Navy designation changes till it became VF-143 in the early 1960s. The Puking Dogs flew F-4 Phantoms over Vietnam during seven war cruises with one Mig-21 kill. It was a Pacific Fleet Squadron till it was transferred to the Atlantic Fleet in the mid 70s along with VF-142 “The GhostRiders” as part of Carrier Wing 7. Later, the Puking Dogs flew the first TARPS combat missions and were the first squadron to fly the F-14A+/B. After the Tailhook mess of 1991, VF-143 was not allowed to vomit anymore and changed their name to the “Dogs” to the dismay of VF-143 supporters, but it didn't last very long. Unlike its sister squadron VF-142, it survived the various drawdowns of the 1990s/2000s and is now VFA-143, flying the FA-18E Super Hornet, the standard plane for every role in a Carrier Wing except anti sub, AEW and COD (but who knows.)
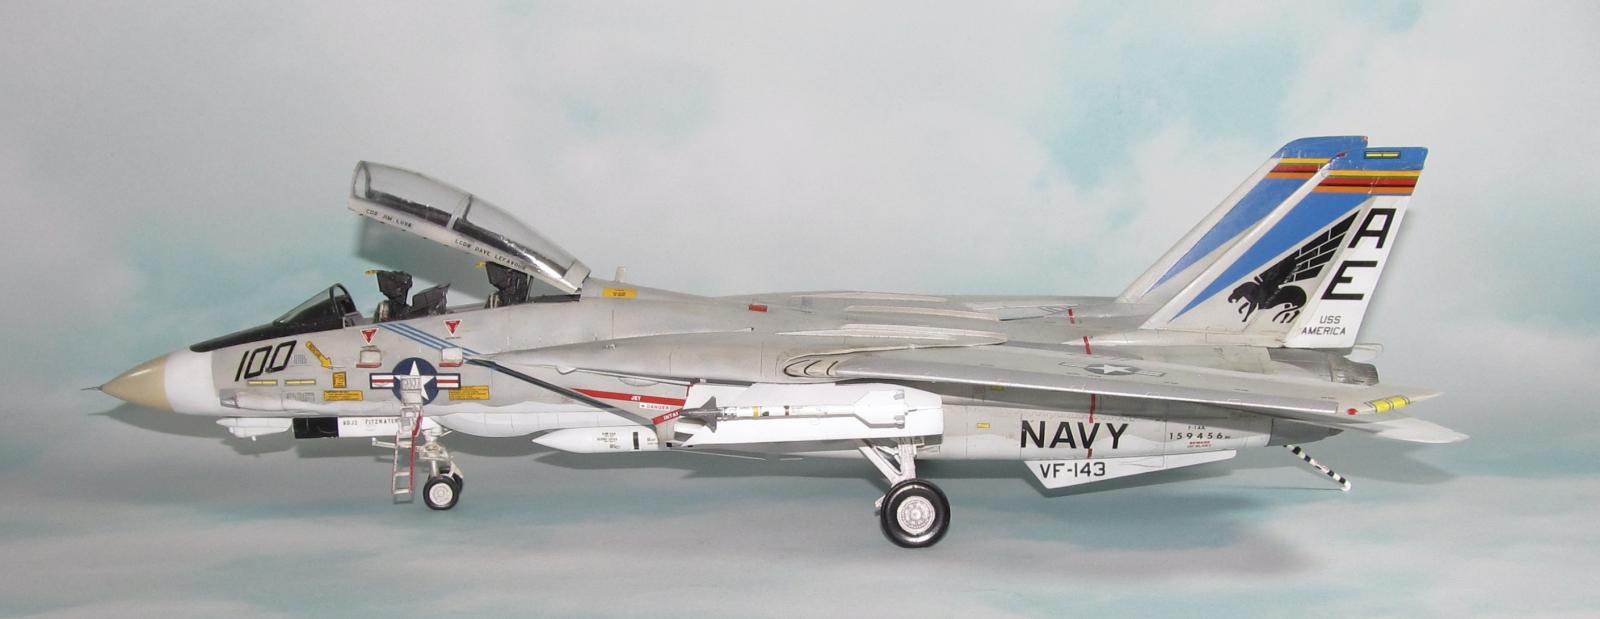
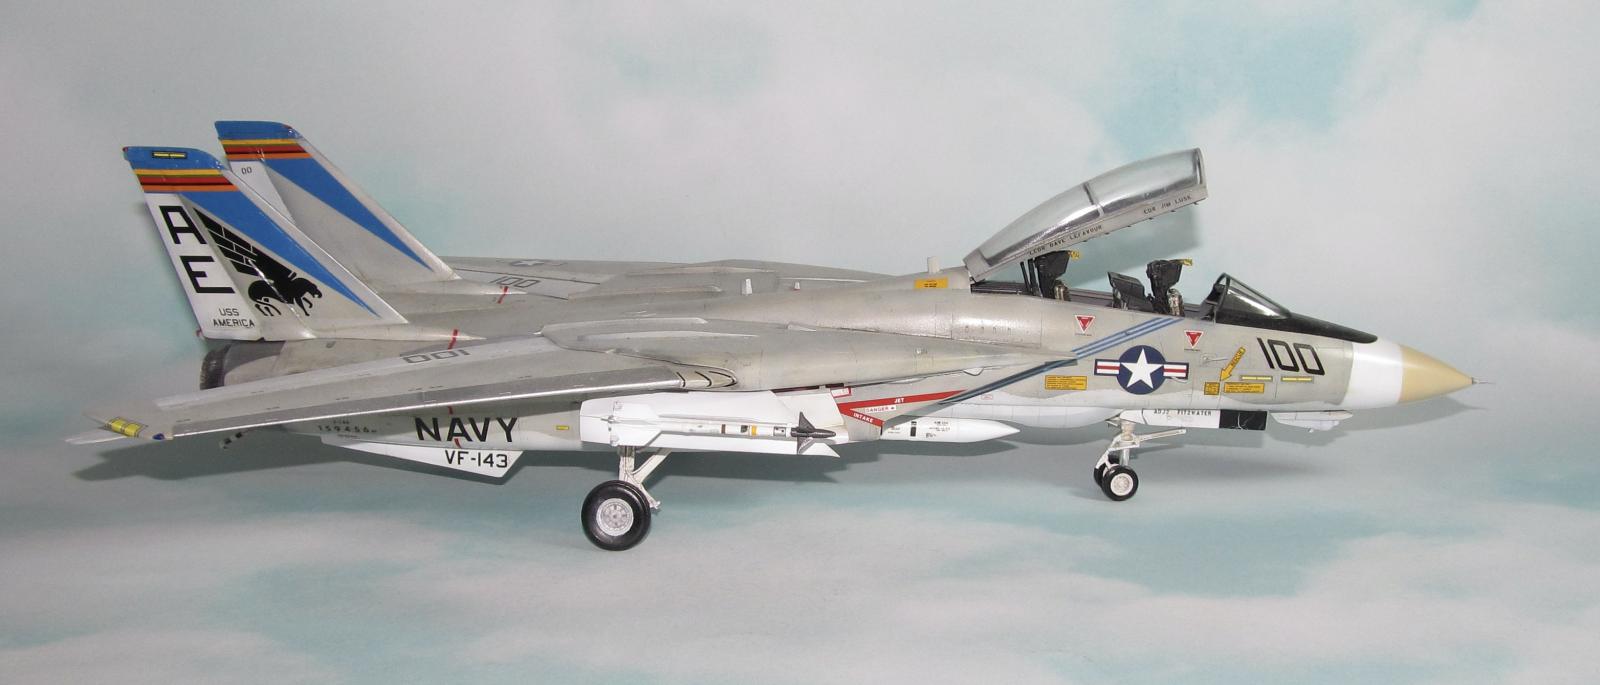
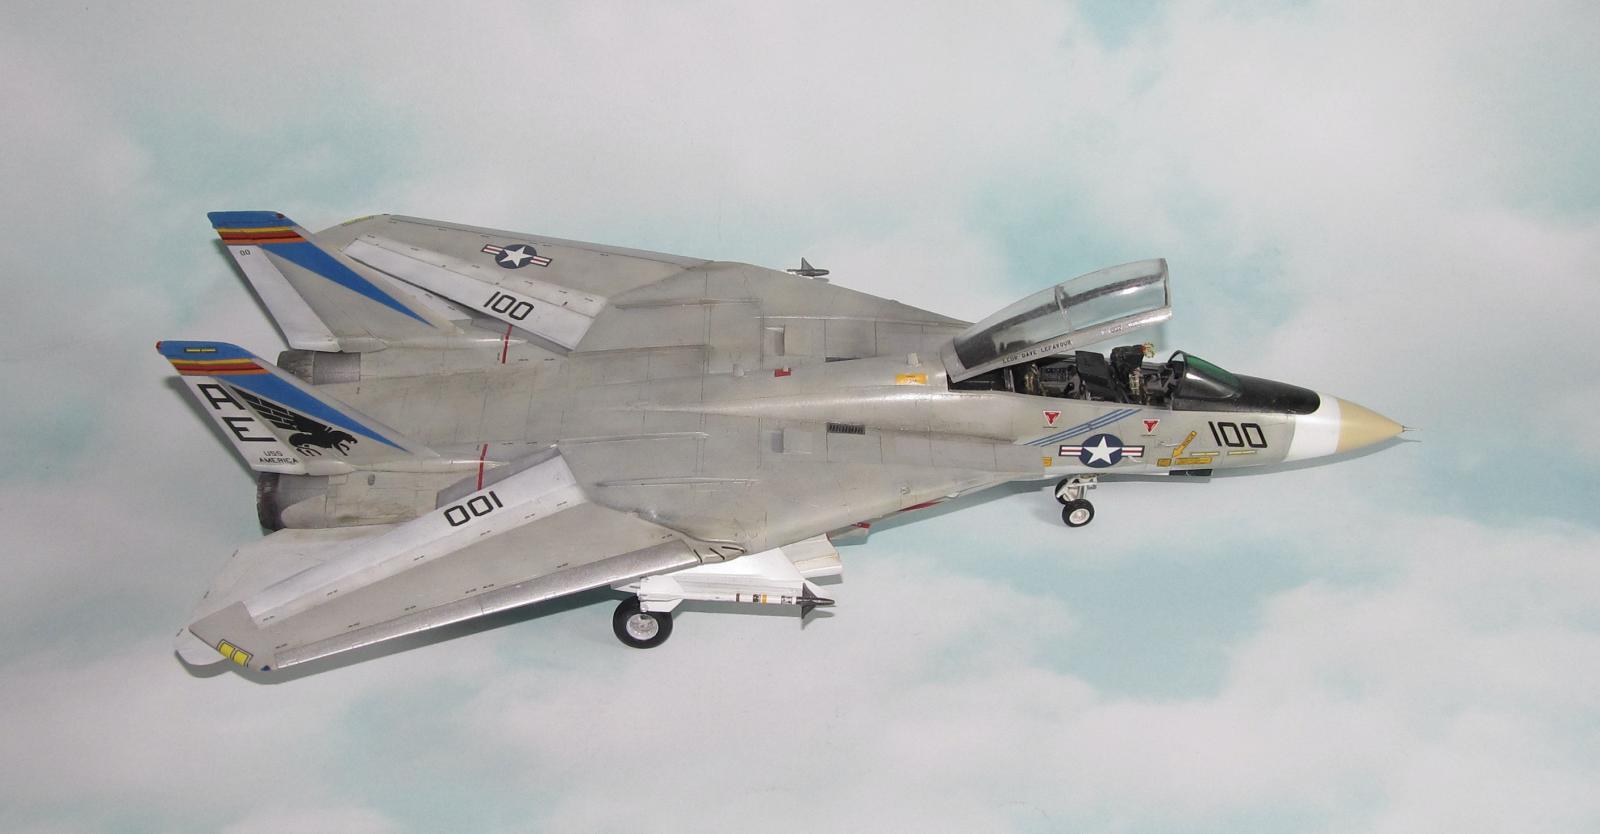
The Tomcat that is the subject of this model was the famous VF-143 CAG bird just after VF-143 was transferred to the Atlantic Fleet in 1976/77. It was later lost in 1979 during the maiden cruise of the USS Eisenhower CVN-69.
Bibliography
- F-111 by Bill Gunston
- Tomcat! by Rear Admiral Paul Gillcrist (ret)
- Wikipedia
- The Final Countdown DVD starring Kirk Douglas, Martin Sheen and James Farrantino.
- Top Gun starring Tom Skerrit, Michael Ironside, Val Kilmer, Kelly McGillis, and a guy named Tom Cruise.
The Kit
The Tomcat and I have a long history... of failure which to me is ironic as the Tomcat is one of my favorite planes of all time. Despite my “love” for this plane, the various models seem to only mock me and pound my ego into dust (sadly reminiscent of my worst ever girlfriend.) Addendum... Greetings From 2016 LOL.
The first model I attempted to build when I returned to the hobby was the Academy F-14A (because of the VF-143 markings.) It did not end well as I ended up sanding away all the detail mostly out of frustration. Little did I know that the 1/48 Tomcats were among the harder builds and a return to the hobby using the same building “skill” I had as a kid with something as complicated as the Tomcat was a surefire way to failure.
Hasegawa's F-14 Tomcat kit is probably the best available in 1/48 scale, but it is a bear to build. I should well know as I've already screwed up this kit once before as it was my 2nd attempt at building a Tomcat. I had to redo the seams countless times and nothing seemed to go together. It was when I realized that I sanded away a large part of the rear cockpit hump and messed up the intakes that I slammed it to the floor and threw it away in anger. I would have to say that both of them died due to my lack of skills and experience as the 1/48 Tomcat is not for the newbie model builder.
The kit I bought was a special boxing with the markings for the late VF-84 “(world famous) Jolly Rogers” whose white skull and bones on black markings were prominently displayed in the movie “The Final Countdown” and well known to anime fans from Macross. As much as I like the VF-84 markings, I had my heart set on building a Puking Dogs Turkey.
The 20+ year old kit molds are showing their age as the parts have many uncharacteristic (for Hasegawa) flash and sink marks (especially around the nose) on them so clean up of the parts is mandatory. The kit includes everything to build an A version Tomcat (including the TARPS pod.) The kit also comes with some stiff Photo Etch for the canopy and white metal rims and rubber tires which really should be replaced as I have read complaints about them slowly disintegrating and reacting with plastic.
Not included though are the Phoenix, Sparrow and Sidewinder missiles which must be obtained through other sources such as Hasegawa's (surprise) weapons sets. It was fortunate that I had picked up these during my first attempt at building the Hase F-14. They are much better detail/decal wise than the Academy versions.
One of my habits is to collect various aftermarket sets I would use over time as my budget allowed. I picked up the following: Royal Resin Wheels to replace the white metal and rubber tires, Aires resin exhausts, True Details bang seats, Master F-14 brass Pitot tubes, Two Bobs AIM7/9 decals and an Eduard color PE fret for the cockpit. Yeah the AMS bug hit hard, but I like to do that with aircraft I'm really interested in.
Construction
I was determined not to let this model beat me silly and make me look/feel like an a*s again. I was helped by an excellent built article in Hyperscale by David Aungst which I really recommend to anyone building this kit the first time especially part 3. It shows hints, tips and issues with building the Hase Tomcat.
The cockpit tub edges were sanded smooth and the parts were test fitted to ensure that I was trying not have a repeat of the ugly gaps in the forward cockpit I had with the 1st Hasegawa attempt. To add some stiffness to the thin rear portion of the forward wheel well which doesn't fit as snug to the fuselage piece as it should, I measured and cut several pieces of 1/4” strip and glued them as support.
Unfortunately, the interior cockpit bits do not fit well as they should. The leading edges of the consoles that touch the fuselage were carefully sanded down to get them to fit properly. If you don't sand down the edges to fit then you will get noticeable gaps between the consoles and tubs leading to gaps in the fuselage halves. For some reason this creates a chain reaction that leads to gaps in the cockpit fuselage section. There was the added job of sanding down the detail for some of the consoles and various control panels in order to replace them with PE.
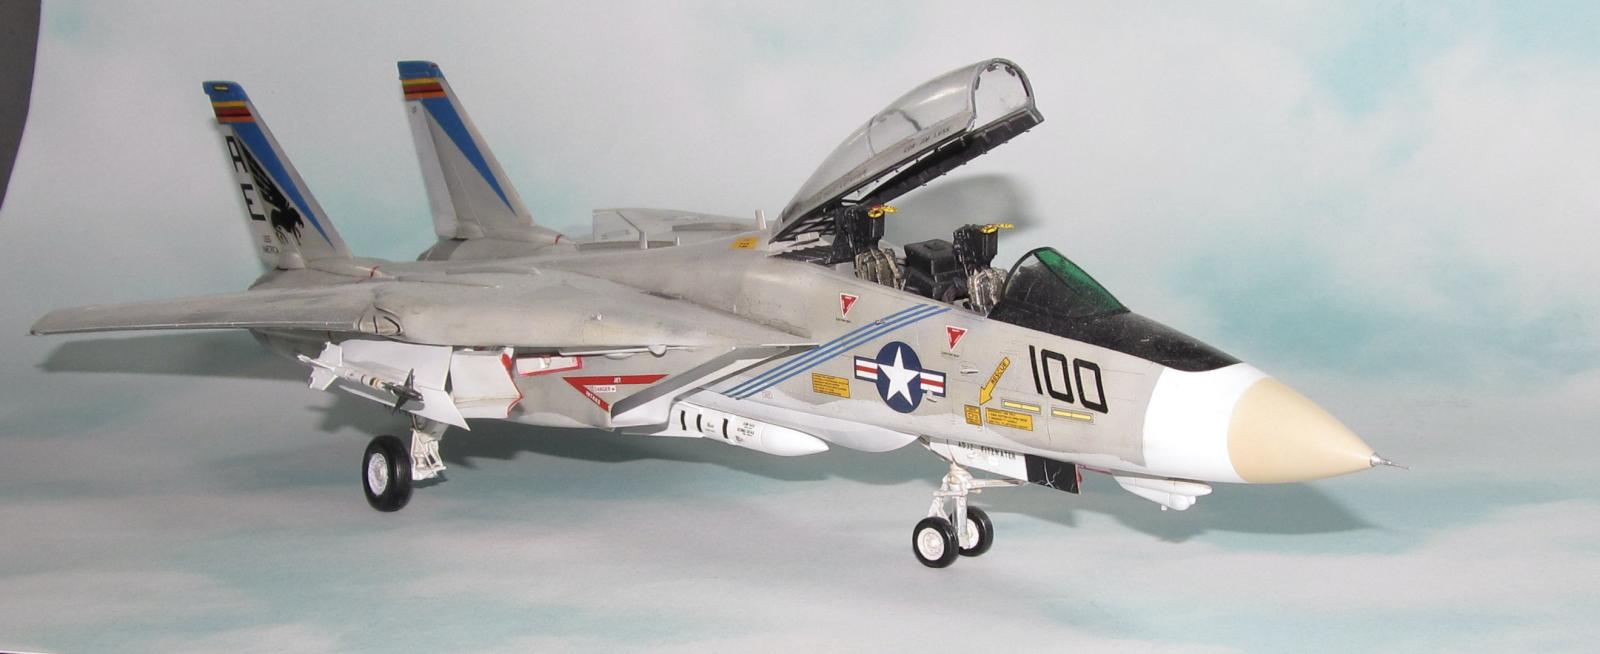
The tub was preshaded with leftover OD and flat black first. A few days later it was sprayed with Gunze Dark Gull Grey. Instead of getting an expensive resin cockpit set in my already expensive F-14, I opted for a much cheaper Eduard color PE fret (around $10!) that merely updated the instrument panels. The PE was added next which proved to be rather easy to use for PE (yeah I know, I was as shocked as you are.) The PE detail looks much better compared to the original kit parts mostly because of the sharpness of the lines between the gull grey interior and the flat black/dark grey instruments which you can not really get hand painting the panels. One minor complaint is that what Eduard calls Dark Gull Grey is not what Gunze calls Dark Gull Grey. However, I did notice in several F-14 cockpit photos that there was no uniformity of Dark Gull Grey panels whether it the lighting or different paint manufacturers so I stopped any thoughts of writing angry emails to Eduard and left it as is.
The first thing I did with the fuselage was add the landing gear wells. I sanded the edges to make sure these parts would sit flush with the main fuselage and not have the large gaps that I encountered the last time I “built” this kit.
The fuselage seams gave me fits the last time because the seams kept cracking. With a more experienced eye and the wisdom from the David Aungst article, I realized that I failed to stiffen the fuselage to keep it from flexing. I cut strips of styrene and from the sprue gates into supports and braces to stiffen the fuselage pieces to eliminate the need to sand/fill the seams 5-10-15 times. When I sanded everything down, I only needed to it twice (as per usual) as the first time got most of the gaps filled and the 2nd time to deal with what I missed the first time.
The rear section with the RWR and fuel dump was attached and reinforced with styrene strip and pieces of sprue (the last time, I had a hard time keeping it on because I only used a very weak butt join.) I ended up with a bit of a step between the two pieces here so I used CA glue to fill and then sand it flat.
One of the biggest of many headaches are the intakes. First thing was I did not remove the sprue that attaches the two sides of the intakes so as not to break them off (which is what I did the last time as there are several prominent ejection pin markings on the forward portion of the intake that need to be dealt with. I filled those with CA glue, let air dry and then sanded them down.
I glued the rear portions of the intake using CA glue (to avoid the dreaded phantom seam that helped beat me the last time.) I was careful sanding them so that I did not split them apart (again, which is what happened the last time.) The various intake parts were painted flat white while the engine faces were painted silver and weathered heavily based on photos of the actual intakes. I glued everything together but discovered that there were some pretty big gaps between the front portion of the intake and the rear subassembly that had the engine faces. I used Vallejo Plastic Putty to fill them in and sprayed down with flat white.
Another issue with the intakes is that they don't fit well with the fuselage. I made some tabs using 1/4” strip to improve the strength of the join to the fuselage. The rest of the intake parts went together okay. The intake ramps are supposed to be opened up on the ground but I have them in supersonic flight configuration to limit eyeball exposure to the obvious gaps in the intakes. I followed David's advice about sanding the mating edges and reinforcing the areas behind the landing gear wells before gluing the intakes onto the fuselage.
At this point the cockpit assembly was mated to the fuselage before I continued with the little details. Do not follow the instructions which would have you glue the completed nose portion to the fuselage or you will deeply regret it as there are many gaps and areas that needed sanding as the join is very very very far from perfect. I added plastic card tabs to reinforce what is a very poor butt join. I also drilled holes into the rear of the cockpit area and added some brass tubing and CA glue to improve the strength as well as help with the alignment (unlike last time.) Also, I didn't make the mistake of trying to do too much and practically sand down the rear cockpit hump like last time. Lastly, I glued the nose cone to the cockpit
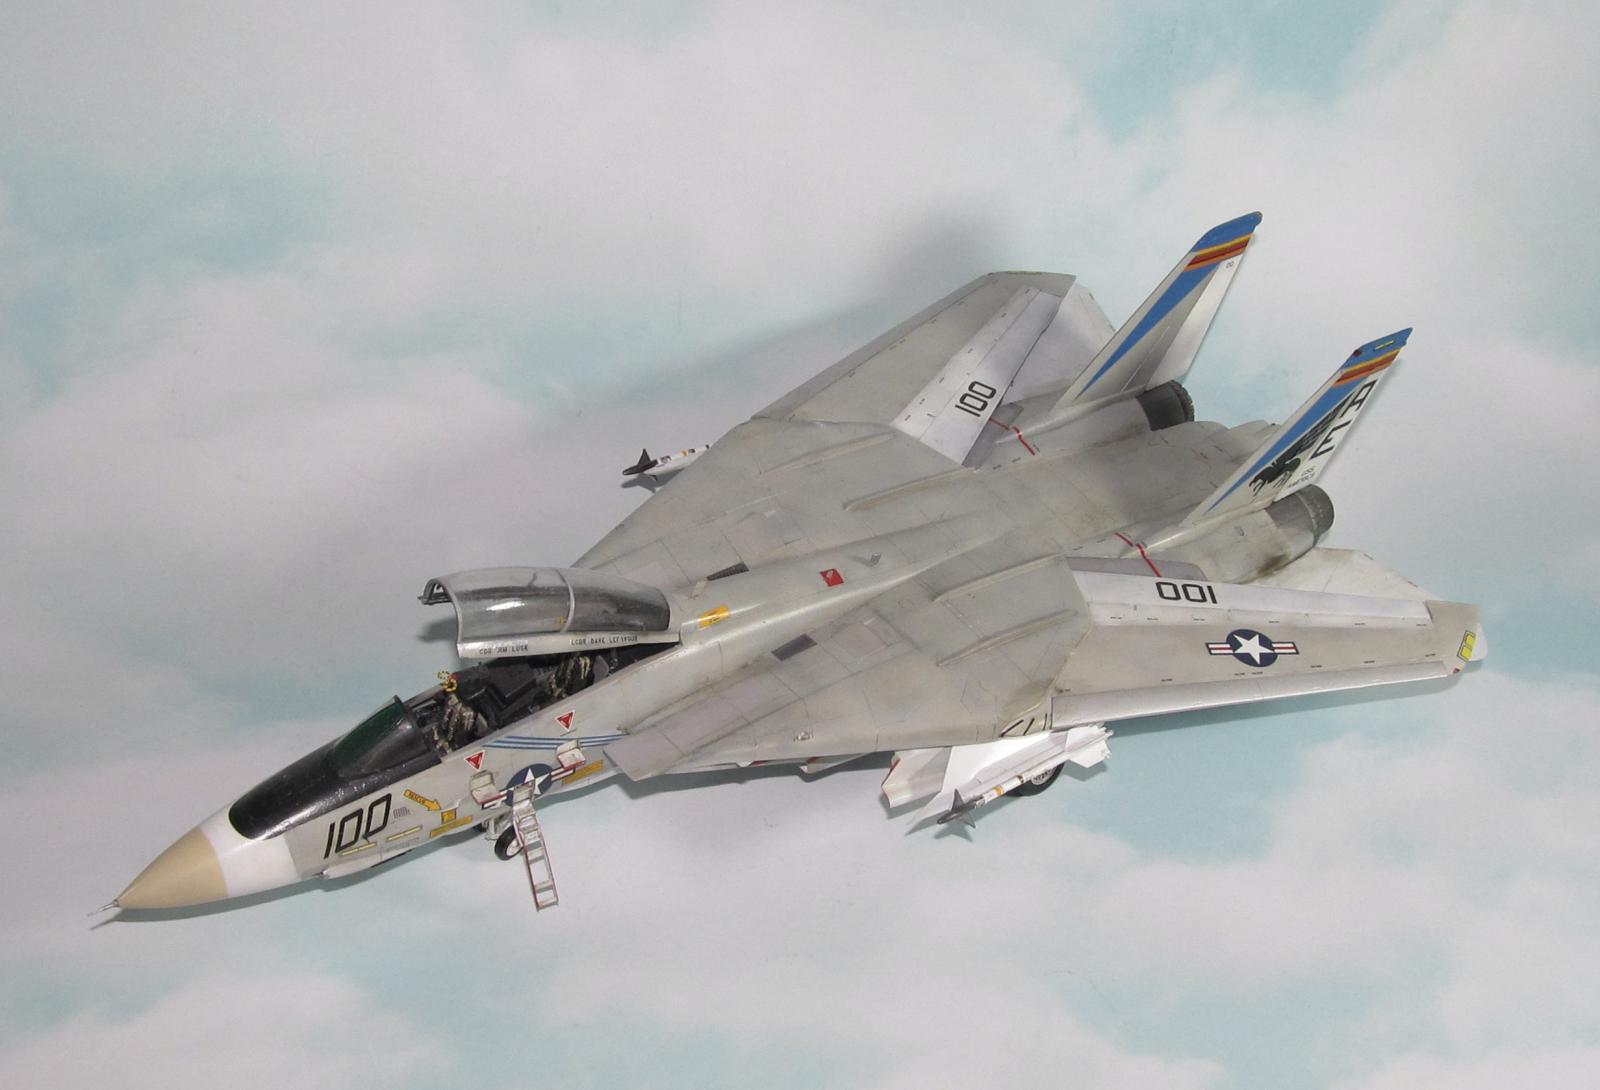
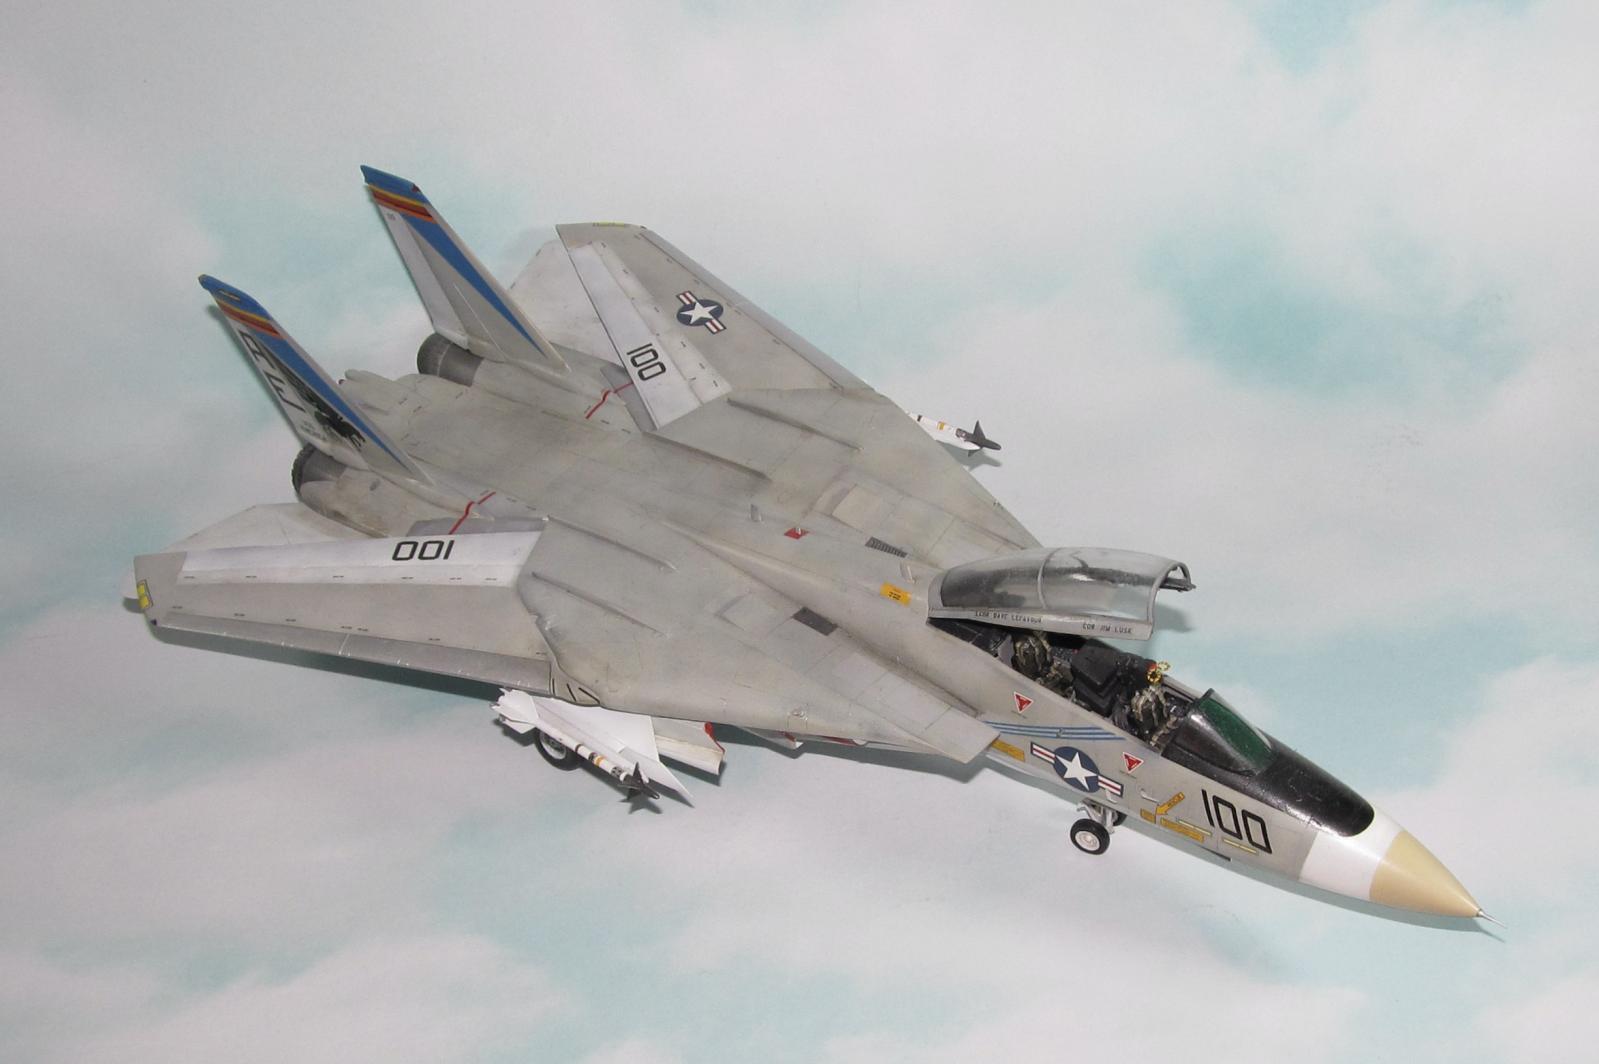
I wanted to do the Tomcat with wings extended forward in dirty configuration (flaps and slats down) but I came to the realization I didn't have enough room in my cabinet to do the Turkey that way so I opted for full sweep. Maybe next time. After reviewing what David did, I realized why so many Tomcats were done with the wings in a clean sweep configuration rather than the dirty configuration. Assembling the wings required some patience as the fit isn't perfect. I left off the bare metal leading edges till final assembly (used Talon and Tamiya Aluminum for the NMF .)
Next I worked on the landing gear. One issue I had with the nose landing gear. If you use the attachment points for the rear actuator, you will find that your nose wheel angles forward instead of straight down like in all the photos and in the instructions. Easy solution is to cut the attachment point for the back actuator rod and align manually.
The main landing gear is an assembly in itself. Much work cleaning the seams before gluing them in as there were seams and pinholes that needed to be filled and sanded. If I were to build another one then I would seriously consider white metal replacements. Next I added brake lines. It is not 100% accurate as the lines themselves (30 gauge wire) are a tad thick scale wise and that I did not capture all of them, but it looks fine to most people and is good enough for me.
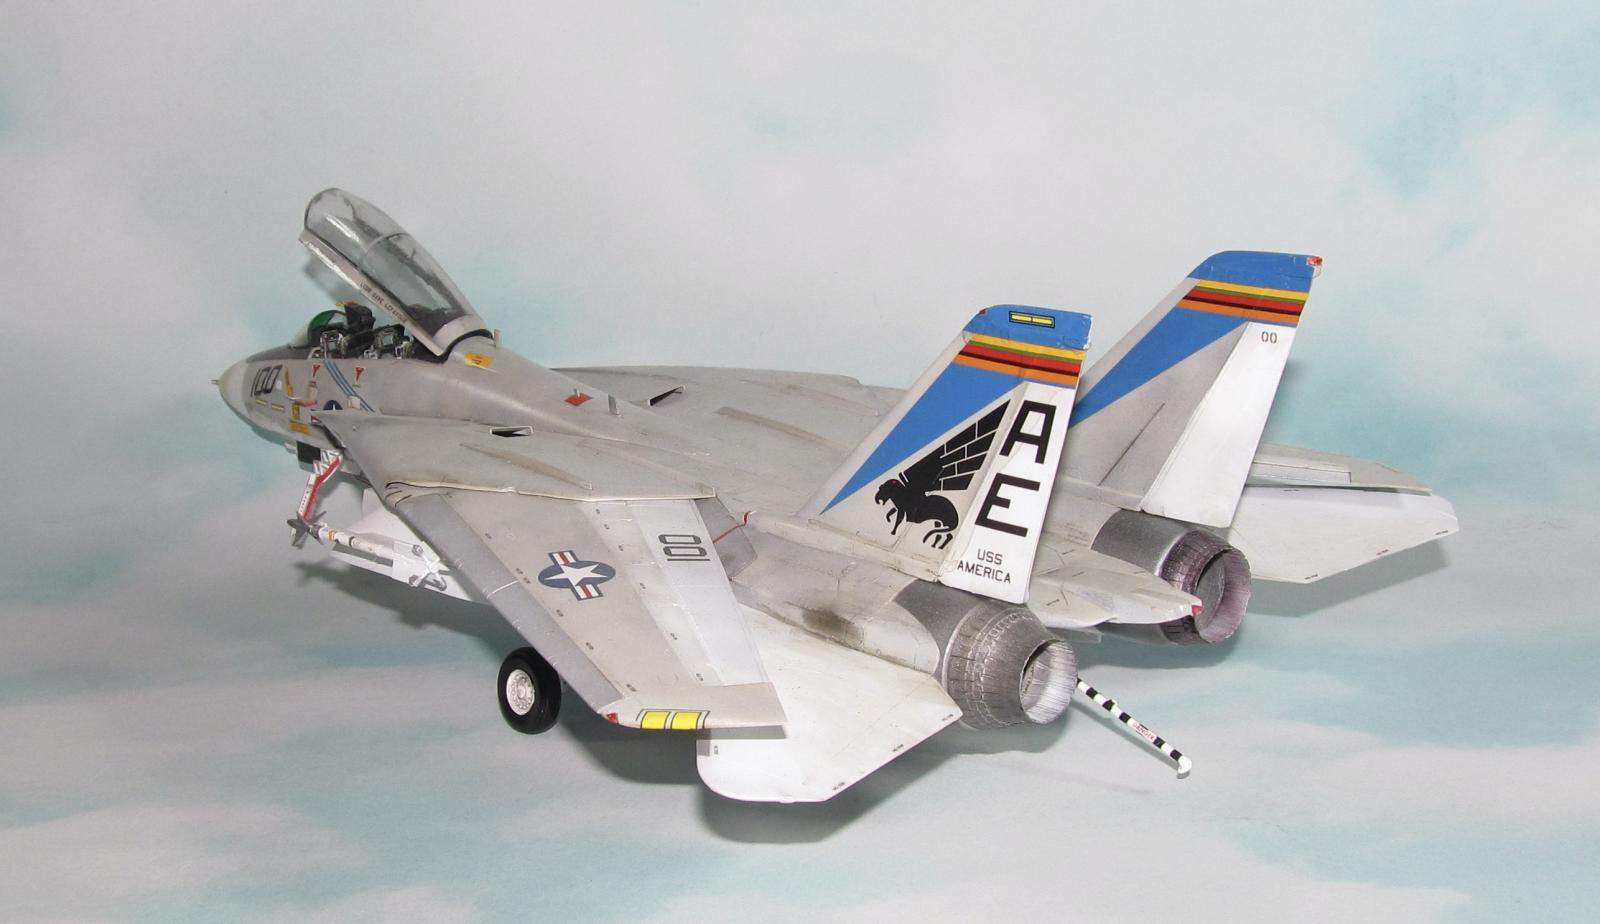
Next I tackled the Aires Resin Exhausts. The reason I used them is because Hasegawa provides a two piece exhaust pipe (which are very prominent in this model I might add) which has a more than noticeable seam running down the middle that can not be easily dealt with due to the corrugated surface. The various parts came off the pour stubs very easy as I only used a exacto knife and not a saw to remove the bits. Next I removed PE bits. The interior parts were painted flat white or burnt steel then weathered using charcoal to show the wear from use. The only area to watch out for is the Aires engine nozzles as they are about a 1mm too narrow for the Hasegawa parts which they have to go on. I had to sand a 1mm from the edge to so as to eliminate the step between the resin engine nozzle and the plastic part. I installed the engine nozzles after painting.
Lastly, I glued in the Vulcan gun bay doors as I did not want to show this area. These doors don't fit as well as they should so be prepared to do a lot of careful sanding/filling so as not to sand away the fine details.
Colors and Markings
Painting
The color scheme I selected was the high viz era light gull grey over insignia white. I understand the practicality of the many grays camo scheme and if I were a naval aviator I would probably prefer the many grays scheme, but I am just a mere modeler so I prefer to model the high viz markings.
The various Tomcat subassemblies' panel lines were preshaded with various colors (OD, dark grey, flat black, green) because I just used the leftover colors from other builds instead of shooting a fresh batch of dark grey or flat black.
The first coat of paint isn't the last as it seems I always need to fix one seam or another. The Turkey wasn't immune to that. I need to work on seams here and there due to sloppy sanding, phantom seams and pinholes. After some touch up, I went over the F-14 with a very thin coat of paint (flat white for the bottom and light gull grey for the top) to remove some of the more obvious faded panel lines and break up any noticeable patterns in the paint to make it more random.
Next I had the painful task of painting the radome, radome tan. I don't like masking nose cones because they are a pain, but it's not like I had any choice in the matter. It took a while to make a straight edge mask that aligned up correctly, but I did it... somehow. I used Gunze Radome Tan. Afterwards, I added the Master machined pitot tube which was painted Silver. This is much nicer than the plastic bit that Hasegawa supplies, but be careful when looking at it up close so as not to poke out your eye.
I masked off and painted the anti-glare panel in front of the windscreen. It looked awful and I was about to remask when I discovered that the Eagle Strike Sheet had a decal of the anti-glare panel smacks head onto desk that I should have used and it would have saved me the touch up work I had to do.
Once the paint was dry, I sprayed on a thin coat of Tamiya gloss for the decals.
Decals
My original plan was to use the VF-143 decals from the Academy F-14 I ruined. That plan ended when I discovered how awful the older Academy decals are so I bought an Eagle Strike sheet that had the same markings as the Academy one and the quality of the decal material much better.
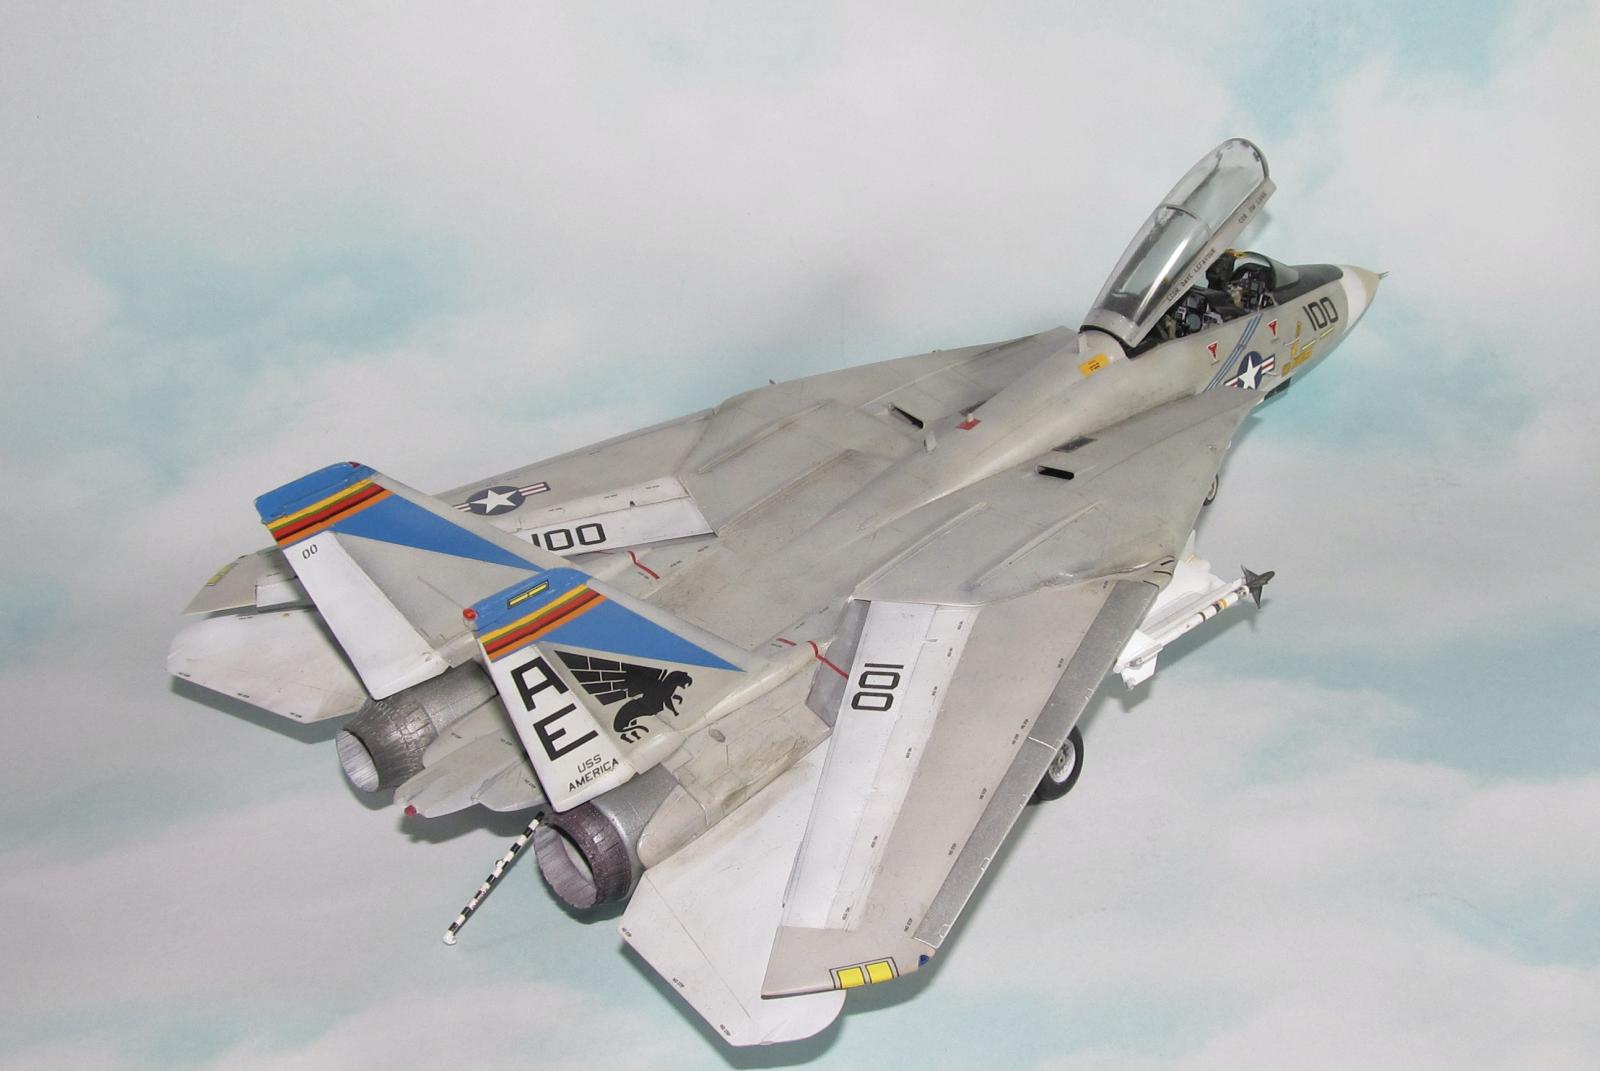
Decaling the Tomcat was tedious as relatively modern jets are prone to be thanks to the number of maintenance stencils and “No Step” markings (all from the Hasegawa kit.) The Eagle Strike decals only really needed MicroSet to get them to stick to the Tomcat. The only area that proved to be an issue were the tail flashes, but Eagle Strike provided extra solid blue decals for that reason.
It took several months on and off to complete the decals. I also actually made the effort to mark and cut the port side US Insignia and the VF-143 flash to fit the step and ladder as I wanted to build the model with the crew steps and ladder out.
Wash
Carrier aircraft are dirty by nature thanks to the corrosive environs of the sea and the long operations tempo of a carrier deployment. I tried not to make it too dirty as CAG aircraft are relatively clean compared to other non CAG aircraft.
I used the Tamiya makeup set... um, weathering kit to add a lot of grime specific areas like the rear deck where maintenance crew walk around and the area between the stabs and the fuselage. I spent a lot of time dirtying up the wing pivot as that area was usually pretty grimy. Finally, I added a watercolor wash to darken the panel lines (but faintly.) It took a long time as the Tomcat is a very big cat indeed.
Once the excess was removed and the construction was complete, I sprayed on two thin coats of Future gloss and then added a coat of Xtracrylic Satin Coat when I discovered that the Future was too shiny.
.
Final Assembly
Note: The wings and the fuselage inserts behind the wings were added after painting, but before the wash. There are some gaps between the inserts and fuselage. I used Vallejo Plastic Putty to fill in the gaps and painted the white putty Xtracrylic Dark Gull Grey with a brush. It isn't very pretty, but it looks better than seeing a gap. I suggest that you glue the fuselage inserts first, fill, mask and paint it separately than what I did. If you don't have Vallejo Plastic Putty, I'm told that Dry Wall Spackle is a decent non lacquer based filler substitute (assuming you don't need to polish the surface.)
There is a noticeable gap between the back of the pilot's tub and the forward portion of the RIO's console. I cut up some 30 gauge wire and made a wire harness to cover up the gap. The wire harness was painted black, trimmed to fit and glued in with CA glue.
I removed the True Details Tomcat Ejection seats from their pour stubs and painted them (airbrushed a base coat of flat black and then hand painted.) I removed the ejection loops from the kit seats and glued them to the True Details Seats (the loops were hand painted.) Everything was going well till I discovered that I should have removed the plastic mounting pegs for the kits seats as the resin seats sit about an 1/8” higher than they should be. It was too late to sand down those pegs before I installed the cockpit tub or sanded down the ejection seats. I did nothing as I realized that this extra height would only be noticeable if the canopy were down.
Next I added the Royal Resin Wheels which are much more stable (chemical wise) than the Hasegawa supplied metal rims and rubber tires. They look the part and require only some careful drilling of the mounting holes. A small dab of CA glue was all it took to secure them to the model.
The various tiny antenna, doors, ladders, steps and probes were added. This is probably the part I dislike the most, but this is where I make the most mistakes because I rush things. Assembling the boarding ladder required some careful work as some of the parts were Hasegawa provided PE. The red on the sides of the ladder were hand painted. Once everything was dry, I glued it to the side of the Turkey.
Now it was time to arm the Tomcat. I opted for the early warload of four AIM-54 Phoenix and two AIM-9 Sidewinders which were taken from the Hasegawa's weapons sets. They required a fair amount of sanding/filling. They were painted first flat white and then gloss white before the decals were added. One possible glitch is that I used the AIM-9Ls which were not introduced into the Fleet till 1978, but I'm going to “assume” that the Puking Dogs received the Lima Sidewinders in 78 as strange as it sounds I had no more J/P Sidewinder models left (only Bs and Ls.)
Next I had to add the canopy. It has that mold seam in the middle that needed to be sanded/polished out. I am usually hit or miss with dealing with these seams. Sometimes, it works out great. Other times, no matter how fine a grit or polish I use that I can never get out all the scratches. Unfortunately, this was one of those times. The canopy was masked then painted flat black interior and light gull grey exterior. The various plastic and PE bits were added; the PE stuff was a pain (especially the interior frames with mirrors), but it does make the canopy look much better. It was all glued in with white glue. The CAG and D-CAG name decals were added. Lastly, I sprayed it with Future. The canopy was glued onto the mounting stubs using Tamiya Clear glue.
The windscreen was masked and painted flat black. Once it was dry, I removed the center mask and sprayed on clear green for the HUD and then glued it to the F-14. For those who don't know, the F-14A/B models had the HUD as part of the windscreen glass instead of a conventional HUD like its contemporaries such as the F-15 which is why you need to paint it clear green. The F-14D had a conventional HUD. Note from 2022- I really over did the clear green and it should be more like the greenish looking glass from the coke bottle (I got better at replicating that green, but this was the first attempt.)
Conclusion
I'll admit that I did a bit of a victory jig when I had this Tomcat sitting completed on my shelf. Why not? Two colossal failures and a whole lot of modeling bad mojo were erased with its completion.
The Hasegawa F-14 is not for the faint of heart or those who like their models kits to be frustration free. The end result is impressive, but getting their will take a lot of effort and patience. It does require a lot of careful assembly and I highly recommend reading David Aungst's Hyperscale build article as it addresses most if not all of the issues with this kit. This is a kit that is for advanced modelers (or those who want to enjoy a real challenge or feel only alive when frustrated.) By itself the kit is okay, but the extra details do make a major difference in the end result.
Whooohooo! I finally finished (as in completed not as in completely wrecked) a Turkey, It took some eight (!) long years, three model kits, a lot of hair pulling and enough four letter words to blister the paint off an aircraft carrier, but I finally have an F-14 done.
For those wondering, I do not run around with this model while “Highway to the Danger Zone” blares from my speakers on a regular basis--I'm kind of ashamed that I loved Top Gun as a teen considering now that as a sort of mature adult male I realize the movie really does stink outside of the flying scenes and the soundtrack. Okay, I did it once... I swear.


An impressive result, Dan, out of the challenging Hasegawa kit. Enduring well through the years. A fantastic write-up as well!
Thanks Spiros.
Fantastic!
Thanks Richard
Very nice Tomcat, Dan @dbdlee
Still looks perfect after all these years.
Thanks for sharing all this amazing background information.
Thank you John. All this info came from being a big Tomcat fan and having read many books on the plane including the squadron histories. Wanting to build a Tomcat model is how I fell back into the hobby after many years away.
Congratulations! You don’t see many of those finished.
Mostly because they are a tough build that requires a lot of patience and skill. A dozen years later and I still don't want to build another one.
Thanks John.
I too built the Academy kit in the 90's when approaching high school age. I did like the Puking Dogs scheme as I like blue (Really it's hard to go wrong with any grey over white CAG bird from the late 70's!) and I thought the box art was amazing. I also loved the interior and the fact that it had working glove vanes and allowed for dissimilar nozzle dilation as that is how they are most commonly seen while parked. I bought it again when Academy re-released it but the decals in the new issue have the blue much too dark. I may end up masking and painting the blue. (Yours looks beautiful. Nice and bright, the way I see it in pictures!) Having done the Monogram (in VF-142 colors) I do want to try the Tamiya take on the Tomcat. I hear it is a dream to build!
Thanks Josh. I hope to see yours here soon.
I've built the Tamiya version as well (it is in the iModeler archives.) I enjoyed building it and it is a kit that doesn't fight you unlike this one. Definitely worth building one. The Academy kit is more akin to the earlier Monogram ones and an easier build than the Hase (I screwed it up anyway... go figure.)
Loved your write-up as much as you must love the model, Dan, have you built either a Tamiya or AMK kit?
Thanks George. It is probably one of the best build articles I've done.
I've built the Tamiya kit, it is in the archives here. I like it a lot more than the Hase because it is so well designed and it has a weapons load out if you want to use it.
I can't remember the last time I saw the VF-143 Pukin' Dogs colours. Great looking Tomcat, Dan! Nice to see the colours are still true after 13 years.
To be fair, I'm surprised the model is still strong let alone the colors. Thanks George
A model that has stood the test of time Dan. Very nice work (still).
Thanks Tom!
I learn more about aircraft of this site than anywhere else.
Great article. Model looks super, even after all this time. Shows that hindsight can be 20/20.
I hope to build a 1/72 Tomcat some day. Any idea which one to get ?
Thanks for posting.
Thanks Bernard.
From what I understand, the Hase 1/72 kit is a lot like its 1/48 sibling in terms of detail and complexity. Fine Molds released one a couple of years ago and it is closer to the Tamiya. If I had to get one then I would get the Fine Molds kit (I bought one last year to build it as a Tomcat Prototype.)
Great looking "Pukin Dog!" Nice job on the weathering, looks right.
Thanks very much Robert.
That is a great-looking Tomcat! I built the 1/72 Hasegawa F-14, and enjoyed it.
Thanks Greg.
Awesome F-14 build Dan, great job! I built the 1/48 Tamiya a few years ago with the VF-84 Jolly Rogers decals, and thoroughly enjoyed it, even though I had been out of the modeling game for quite a while. If you ever visit Charleston, SC be sure to visit the USS Yorktown museum where they have a F-14 from the VF-143 squadron on the deck (below); touring the carrier, seeing WWII Pacific-theatre planes on display, the flight simulator and the history is definitely worth the price of admission!
Thanks. The Tamiya kit is a notch or ten above the Hasegawa kit especially in terms of design/engineering. Glad you enjoyed building it.
I've visited the Yorktown some 30 years ago on the way to Florida. It would be fun to see again. Thanks for the heads up.