Junkers W.34hi Micro Mir 1:48
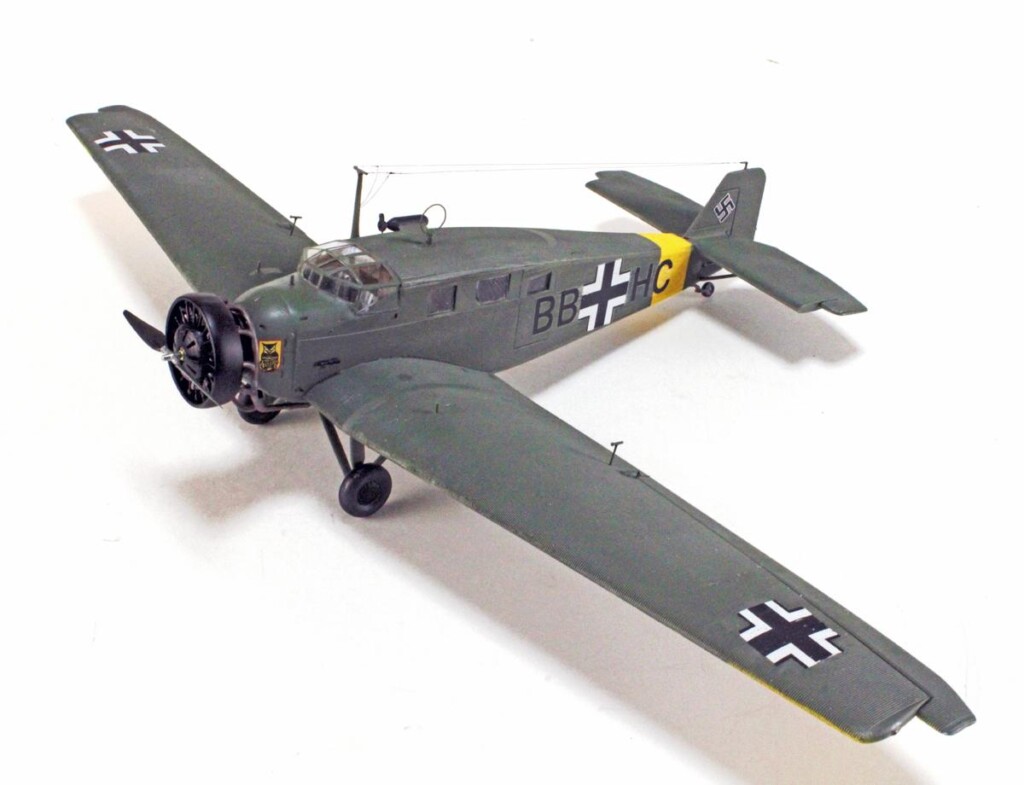
Here's my latest completion, the Junkers W.34 from Micro-Mir in 1:48. I've done several kits from Micro-Mir and this one seems to be the best one so far, although I had some issues with it. The side windows are oversized for the openings in the fuselage, so I beveled the clear parts and the inside if the fuselage openings to get a flush fit, then glued them in before joining the fuselage halves. The 4-piece windshield/canopy fit pretty well with a little tweaking with some small files. The kit has decals for two aircraft, a civil Lufthansa airliner and a Luftwaffe radio/navigation trainer for a flying school in 1938. The kit has no large antenna mast, no wind driven generator, a PE loop antenna which I didn't like, PE aileron horns which I also didn't like, and no trailing antenna mast. I scratch built all that stuff from styrene and copper wire. I discovered during the build that there are aftermarket things that I wish I had known about when I ordered this kit from Plastic Models Ukraine. Metallic Details has an exterior detail set with all the missing parts I scratch built, and also an engine and prop. The kit engine is nicely detailed, but only the top half of the cylinders can be seen in front, and the intake tubes and exhausts are good in the rear. All it needed was some ignition leads, which I made from .015" lead wire. The prop blades were not aligned perpendicular to the hub and would not track properly. I managed to heat the hub and get the blades 90 degrees to the hub. The kit comes with a nice 3-D instrument panel. I used Eduard Steel Luftwaffe belts and harness on the seats.
I questioned the paint scheme. In 1938 the Balkenkreuz should have had narrow white flanks in all 6 positions, and the yellow wingtips and fuselage band were for the Eastern front which was not an issue in 1938. The instructions called for overall slate green (whatever that is). I found a couple of profiles online for this aircraft, and they showed these wide flank Balkenkreuz markings with yellow wingtips and fuselage band over what looks like RLM63 grey top and bottom and another in overall dark green. I considered doing it in one of the SCW schemes I have photos for, but I wanted a Luftwaffe bird. I settled with Tamiya RLM Grey, which I assume is RLM 02. Perhaps the yellow markings and wide flank Balkenkreuz markings were applied sometime after the invasion of the Soviet Union.
I gave it a good gloss coat and the decals went down pretty well over the corrugated skin without much silvering. I ran out of dull coat, so I went to my LHC for more, they had one bottle of a brand I never used before, and I sprayed it on and it looked like it was OK. The next morning I found the decal edges on the top and bottom of the wings peeled up and coming off. I considered stripping the whole thing and going with a Spanish scheme. Instead, I found some crosses in my stash that were the right size and made some new codes for the bottom wing in a font that was close and printed them on decal paper. That seemed to work, and in the meantime I received some good dull coat with my online paint order. I'm glad this thing is done although I am not 100% happy with it. Maybe I'll get another one with the aftermarket stuff and do a Spanish version to sit alongside my Spanish Ju-52.


Chas, great job on this build, nice to see this one built. I have only seen open box reviews. A very interesting subject to have displayed.
Thanks, Bob.
FYI - Tamiya's "RLM Grey" is actually way too dark. You need to add about 20% Tamiya flat white to get to RLM grey. Not a complaint, just information for your next foray.
Micro-Mir kits are not a "walk in the park," so your result here is very good indeed. Truly the epitome of the Junkers corrugated "clunker look". I like it.
Thanks, Tom. Yeah, it's darker than I thought it would be. B&W period photos show up dark, like maybe it is 70 or 71. I should have used the last of my MM 02 and repainted it!
Nice work, Chas! That’s an impressive job on an interesting kit.
Thanks, John.
Excellent job on a challenging kit, Chas! Great research, nice scratch-built items and great save on the final coat / decal mishap.
Your photography is equally superb!
Thanks, Spiros. Like most builds that go this way, I think "the next one will go better", but somehow I never get around to doing another.
Great result, Chas @chasbunch
All those extras you did are clearly an improvement.
Glad your decal experience turned out well in the end.
How did you made that propellor spin in one of the pictures, is it truly spinning or is it a software rendering.
Thanks, John. After getting the prop straightened out, I drilled a micro hole through the prop hub and inserted a straight pin through it, then a length of brass tubing over the pin on the back side. That telescoped into a larger piece of tubing in the crankcase. A hair dryer spins the prop while I work the camera.
Nice job, Chas!
Thanks, Gary.
Using an unknown clear coat is always a risky business but you overcame the problem quite easily. I can’t comment on the authenticity of the colour, how many shades of grey are there? You’ve ended up with a smart looking model.
Thanks, George. Yeah, there's at least 50 shades of grey, some of them masquerade as 02!
Interesting and excellent build! A baby JU 52. I know what you mean about pe. I sometimes have severe misgivings even with Eduard stuff. Often nothing seems to stick it, even CA.
Thank you, Ross. PE has it's uses, but it don't work everywhere!
That is a sharp build on a rarely seen subject. I like it! Well done.
Thanks, Greg. I've always had a thing for things not so mainstream.
Chas, some of the eastern European molders use "slate gray/grey" for RLM 02. Most manufacturers come closer than the Tamiya color. I've got this kit and the resin aftermarket to build someday, but I'm fast running out of somedays. I also wonder about the radio setup in the small space behind the cockpit and have Eduard PE or resin bits intended for other aircraft to create an imaginary layout if nothing concrete turns up. I haven't had much luck finding photos for this a/c in war-time markings. Concerning the yellow, some of the flight schools added these yellow markings during the war to identify school aircraft rather than Ost Front, so it may be that the 1938 date is off. Congratulations for the great job you've done on this kit, and many thanks for the tips on fit and corrections!
Yes, I also had a hard time finding photos of W.34s for reference.
Very nice work Chas. Micro Mir kits are a challenge. I did their Fokker G1 kit and it was very labor intensive.
Thanks, Dale. The G-1 was my first Micro-Mir build, and yes, it WAS a challenge!