B-24 H Academy from 159 Squadron India 1945.
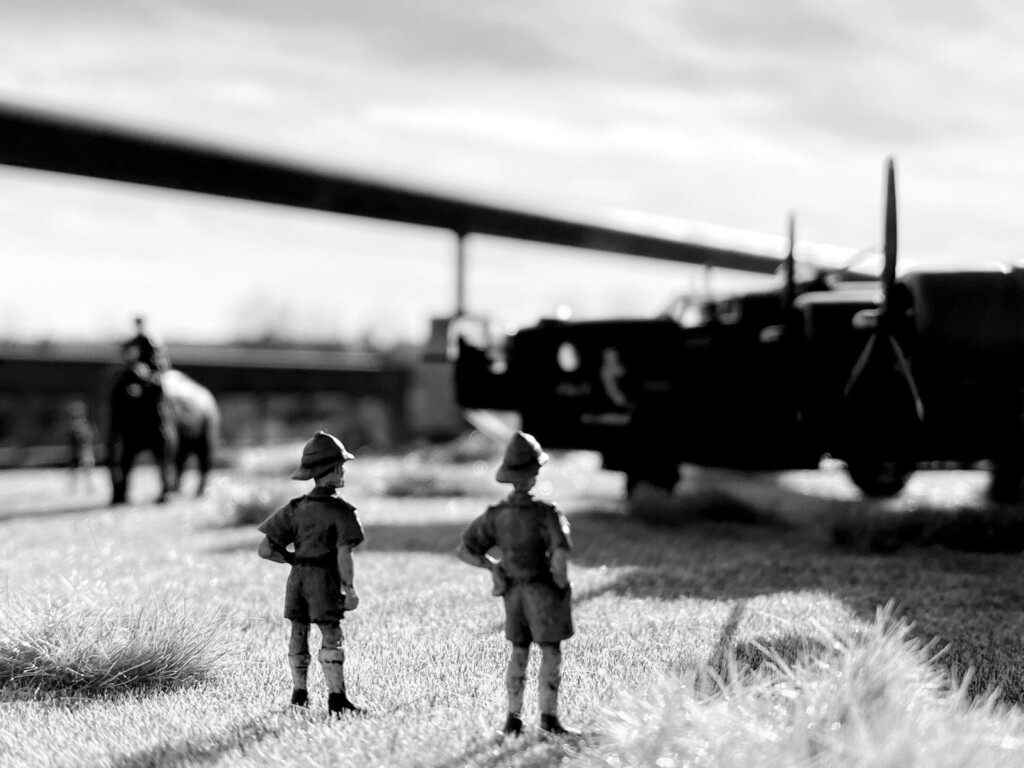
So again, I'm going back to the models that I dreamed of building when I was in primary school, and which I couldn't afford at the time. The Academy model dates back to 1996 and is almost thirty years old. As you may remember, a year ago I also built a Liberator from the Hasegawa kit. This is one of my favorite four engine bombers. Initially, I wanted to buy the old, classic Eduard set, which is a repackage of the Academy model. However, I finally bought the Classic B-24 H academy set, from the former limited series, at a good price. In fact, it turned out to be healthy, because the cheapest Eduard kits cost a minimum of $56 plus $25 shipping, and given that I am not a fan of photo-etched parts, why would I have to traumatize myself during assembly (Eduard included sheets of PE parts). So I bought an aftermarket decal set from DK-Decals and a set of RAF PJ Production pilots. The Photo Etch Kit I purchased from the Instrument Panel did not match the original parts and I did not use it. Before I started building it, I analyzed the kit for its weak points for quite a long time. I found that the front landing gear was the most vulnerable and I assumed that I would try to strengthen it with polystyrene strips, and the landing gear leg itself at the narrowest point - with a drop of CA glue. The hull of the model needed a bit of putty (I used CA gel glue as a putty). The lower part of the hull needed grinding, it was not very well matched. However, in the end everything turned out very decently. Important information, the glazing of the oval windows in the nose of the fuselage should be done from the outside, not from the inside as suggested by the manual. The doors under the fuselage also required additional work. There were no supporting elements in the model, so the door could easily fall in. I bought a set of masks for the B-24 D, but this set could only be used to cover the pilots' fairing. The rest had to be done by yourself. It's strange that no one released a set of masks for the B-24 H and J and M versions on the market. Quite a large counterweight had to be placed in the Nose of the aircraft. I placed 55 grams under the radio operator's compartment and under the floor of the cockpit, and the rest of the load, with a total mass of 26 grams, was distributed in four engine nacelles. I placed five 500-pound bombs in the bomb bay because the plane was on a Very Long Range mission. It was the maximum payload for this kind of mission. The gun turrets needed some work because they are made of two pieces and the seam goes through the middle of them. I managed to mask it, but it was one of the weaker points of the model. Similarly, the three-piece glazing of the cabin required a little filling with white glue on the edges. I was pleasantly surprised by the chassis and wheels, which didn't cause any problems. In fact, after painting, the factory set looked very good, which only confirmed me in the rightness of not buying aftermarket sets of resin wheels. It was a lot of fun to make a diorama in an Asian climate with an elephant and staff in tropical uniforms. All together created a very nice, in my opinion, Far Eastern atmosphere. Painting did not deviate from the standards adopted by me. I used MR Color paints. InreriorGreen, Olive Drab, Neutral Grey, Silver Chrome, and X-22 and X35 Tamiya paints. In addition, valorization sets Tamiya Master Set, Oil Wash Modeler's World and Weathering Pencils. The model was so nice to build that I'm going to return to it, because I am very fascinated by the M version, which is available from the Academy offer. I recommend watching the construction presentation on YT. Lieutenant Fox will be back with a new surprising project soon.


Nice result on this!
Thank You!
Congratulations my friend @lis! A superb build, an equally superb diorama, an exciting build thread, a great writeup and ditto video!
Congratulations!
Your comments always motivate me to work! ☺️
@lis - Very nice! The paint, detailing and diorama are all very nicely done!
I’m glad that You like my work!
The kits keep on getting better. Some smart, tight work on the clear parts. The cockpit canopy, the turrets and the domes all are clear and well defined. No runs, drips or errors in the paint. The figures and the elephant all add to the theme of India. The dio has excellent grass and brush which looks natural Lis (@lis). Definitely, a Liberating
experience. Looking forward to seeing your next adventure in model.
Thank You! I’m glad that You always follow my thread!
Absolutely one of your best results, Bernard @lis
Both, Liberator and the diorama are truly work of arts.
I really enjoyed watching your building thread, very interesting and learningful.
Well done.
I’m glad That You follow and comment all my thread! It’s very motivating!
Well done, Bernard (@lis). An immaculate bomber in a really cool diorama. I enjoyed following along on this one, and the video you created is very good.
I’m glad that You enjoy video! I like Your builds too!
Good looking Libby, @lis.
Liberator is one of the coolest bombers ever!
I really enjoyed looking at all the photos in this post, Bernard, there’s some very neat work on display, especially with regard to the transparencies. The diorama is very well thought out and constructed, and really brings your model to life, excellent work all round.
Transparencies was challenging but finally home made masks works! ☺️
I enjoyed following along with your build. You ended up with a really good looking model and I like the display a lot. You really made the most of this kit and presentation.
Thank You!
Very nice - creatively done!
Thank you!