Review: Magic Factory F4U Corsairs
The Airplane:
The F4U Corsair was designed by Vought Aircraft in response to a 1938 BuAer RFP for a fleet defense fighter. The prototype appeared in 1940, the first fighter to be powered by the new Pratt & Whitney R-2800, 2,000 hp radial engine. In flight tests, it was the first American fighter to exceed 400mph in level flight. The fighter w as known for its distinctive gull wing, which was used to provide landing gear that was short, yet provided clearance for the 13-foot prop.
World War II mythology has it that the Corsair was rejected by the Navy for initial shipboard use due to landing difficulties, and was kept off the fleet carriers because of that. As with most World War II “history” that is actually mythology, neither of these things are true. The Corsair was initially difficult to land aboard a carrier due to stiff landing gear and a sharp stall that came without warning. During their workup on the USS Bunker Hill, VF-17 solved these problems be devising a stall warning strip placed on the starboard wing, and reducing the amount of hydraulic fluid in the landing gear, making it less stiff. The actual reason the Corsair was kept off the fleet carriers until late 1944 was because having one type of fighter in all carrier squadrons mad supply and maintenance easier.
The Corsair was the decisive weapon employed in the South Pacific campaign to neutralize Rabaul, flown by Marine squadrons, other than the USN's VF-17. The Corsair proved to be an effective air superiority fighter that could also be used in the fighter-bomber role.
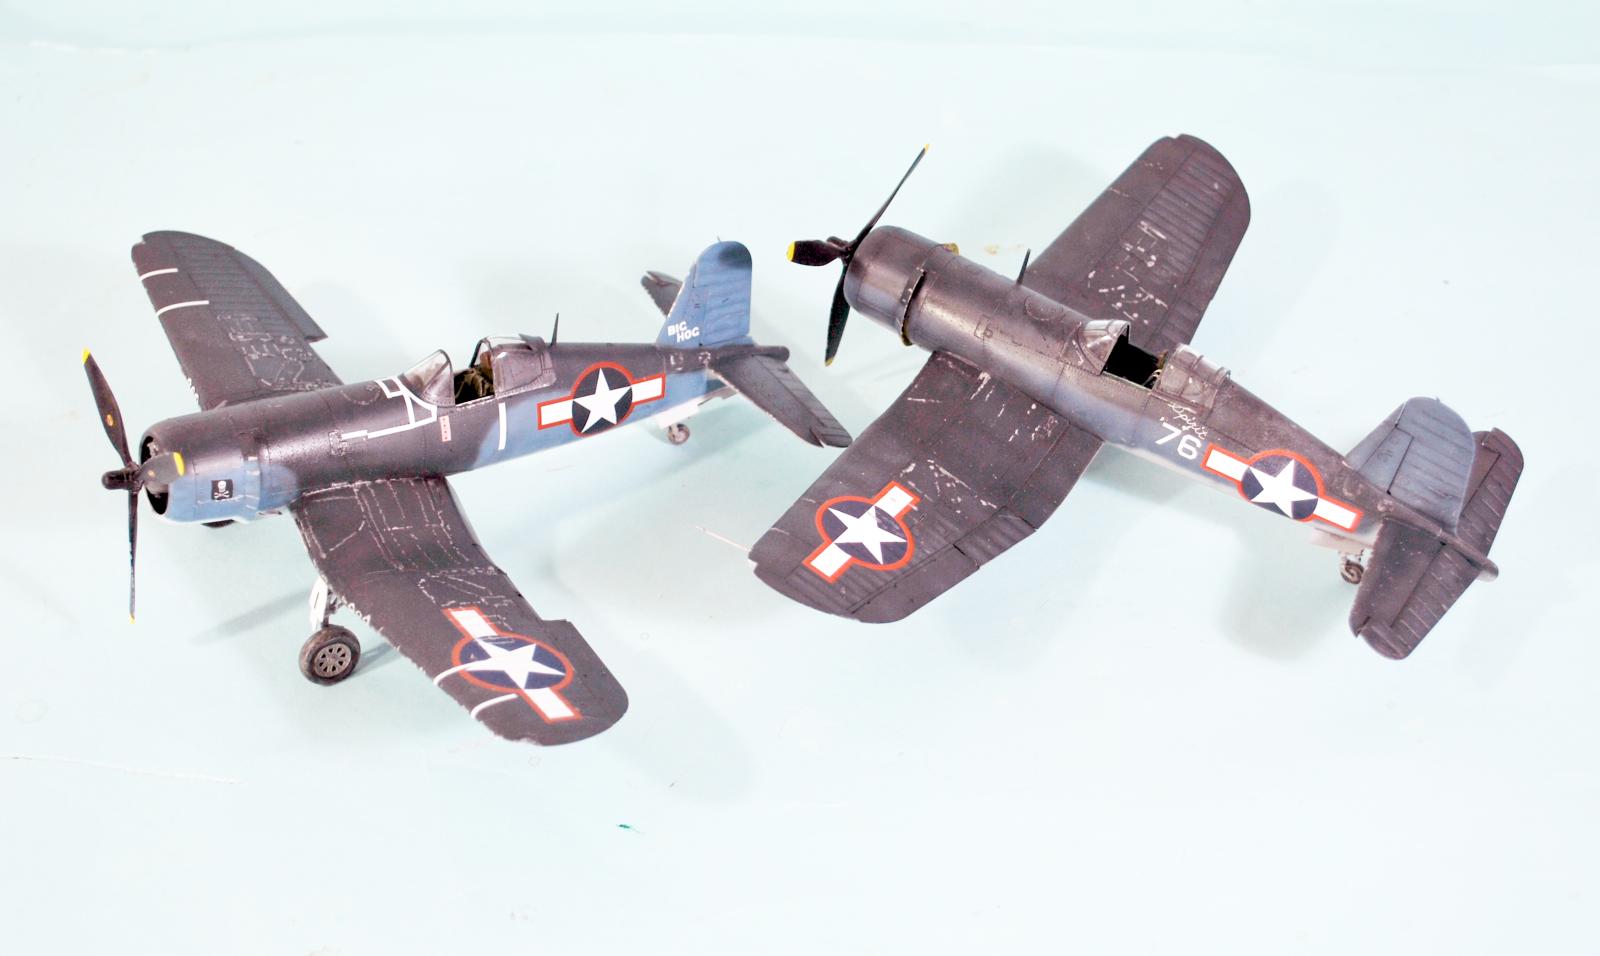
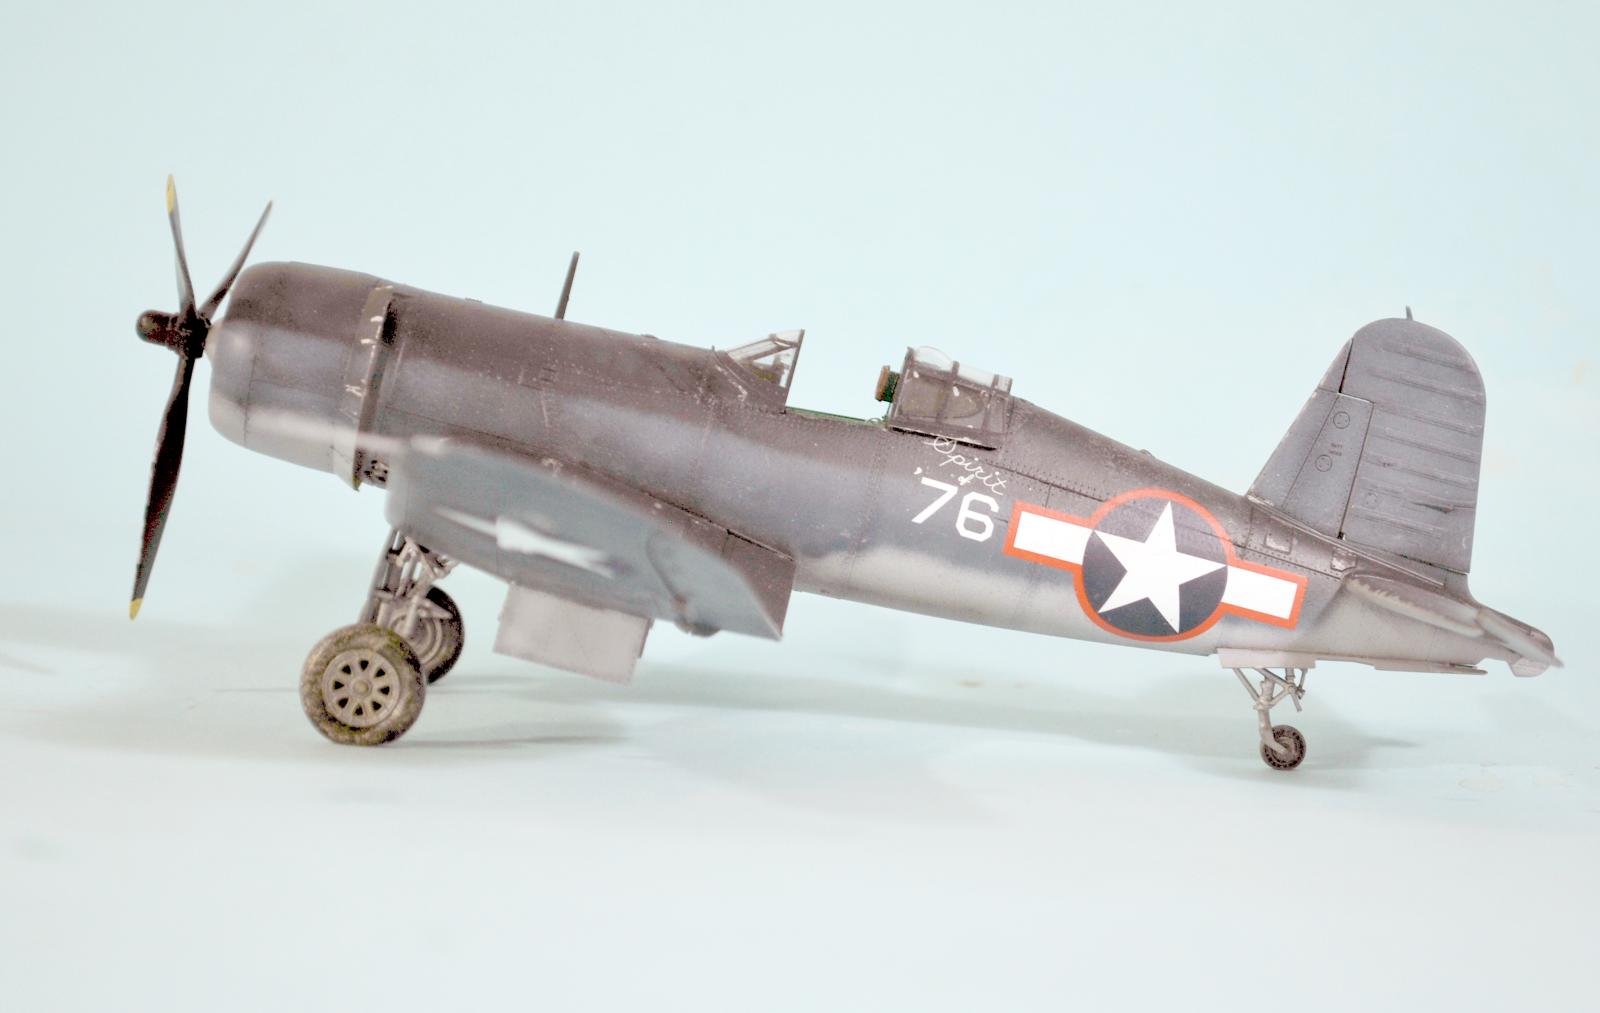
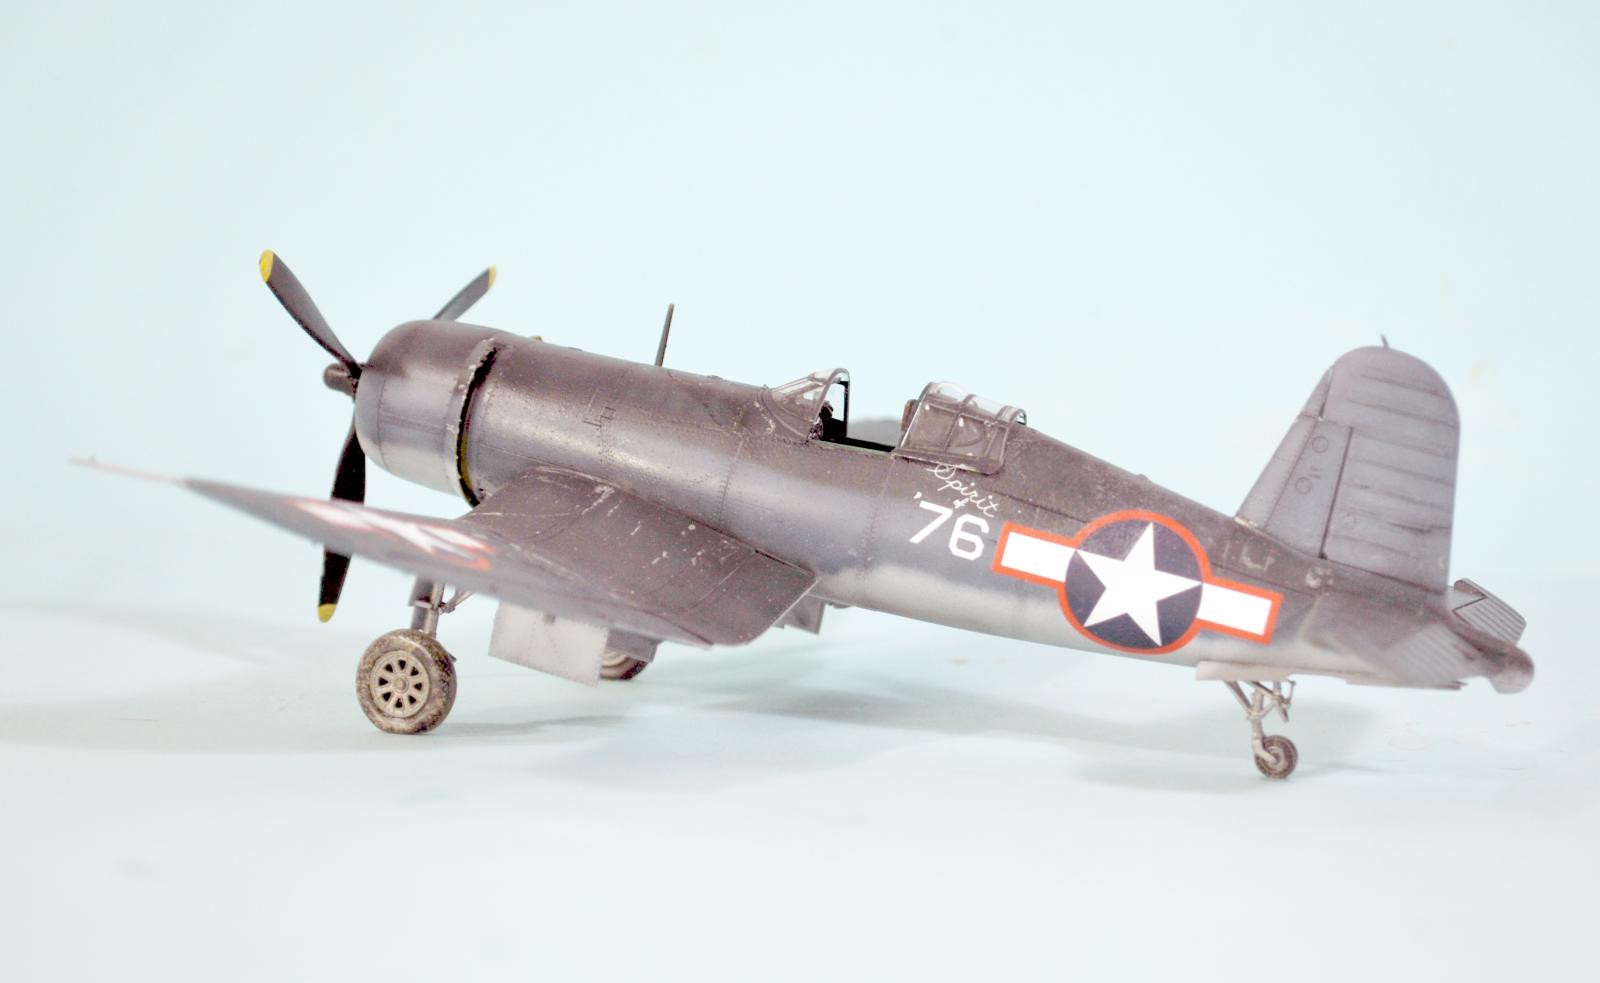
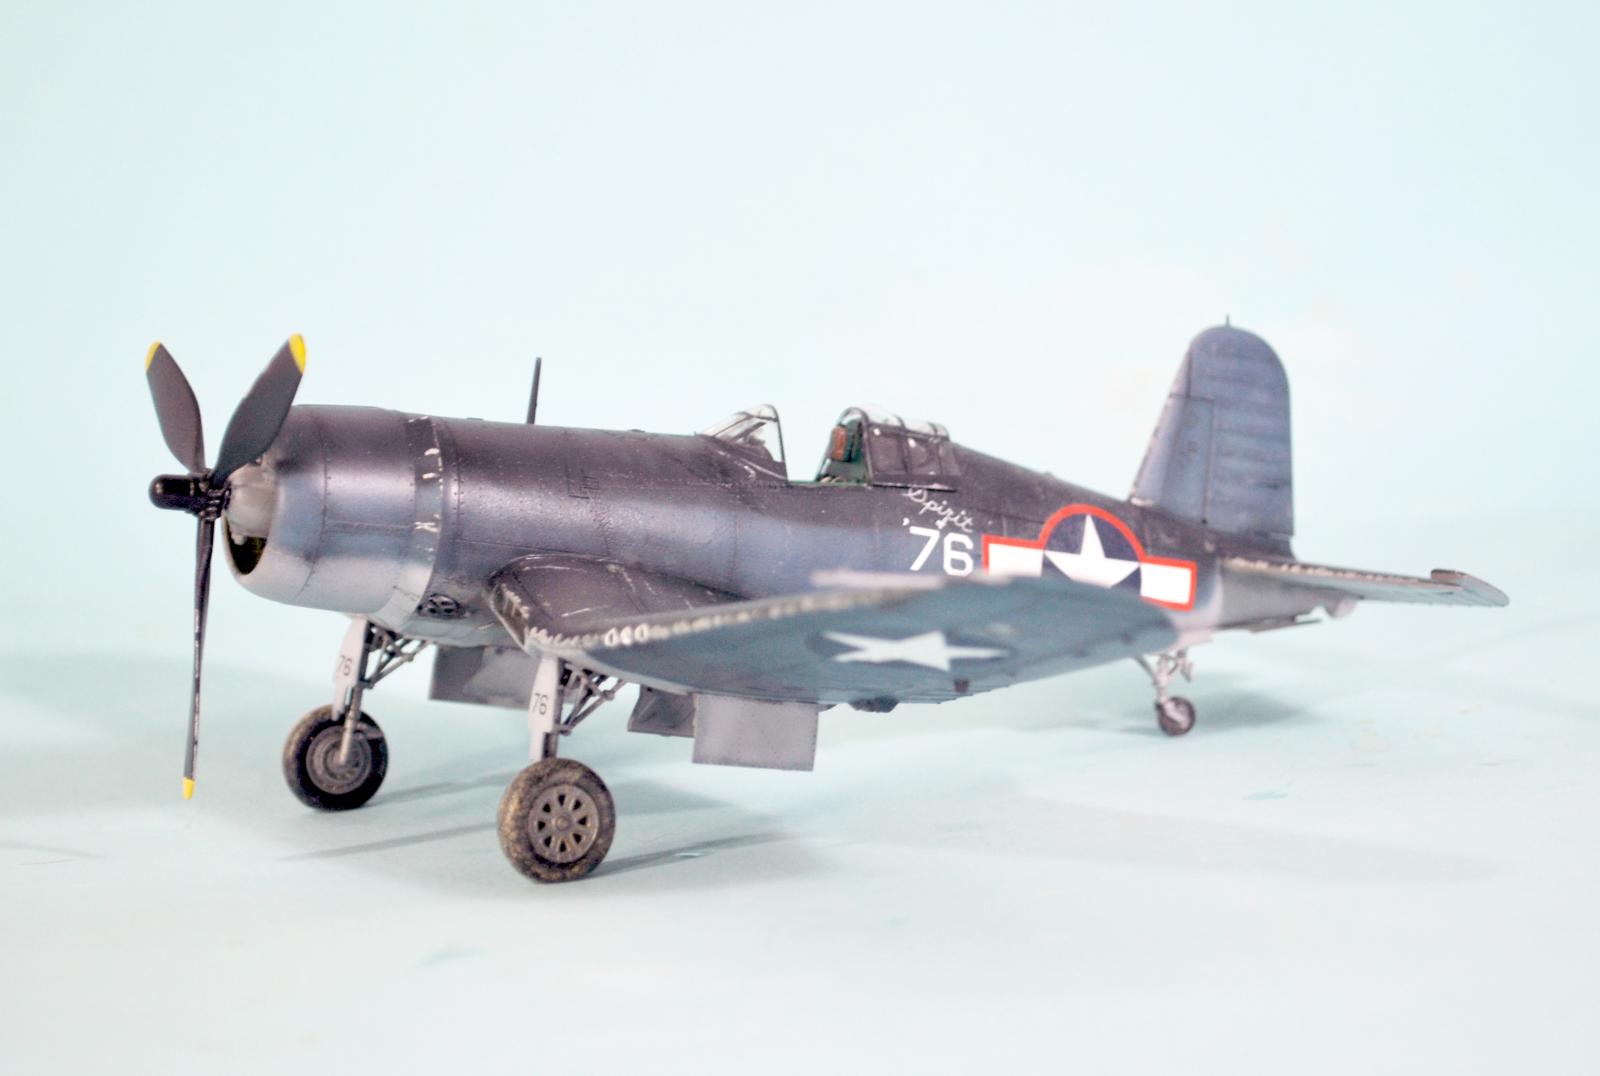
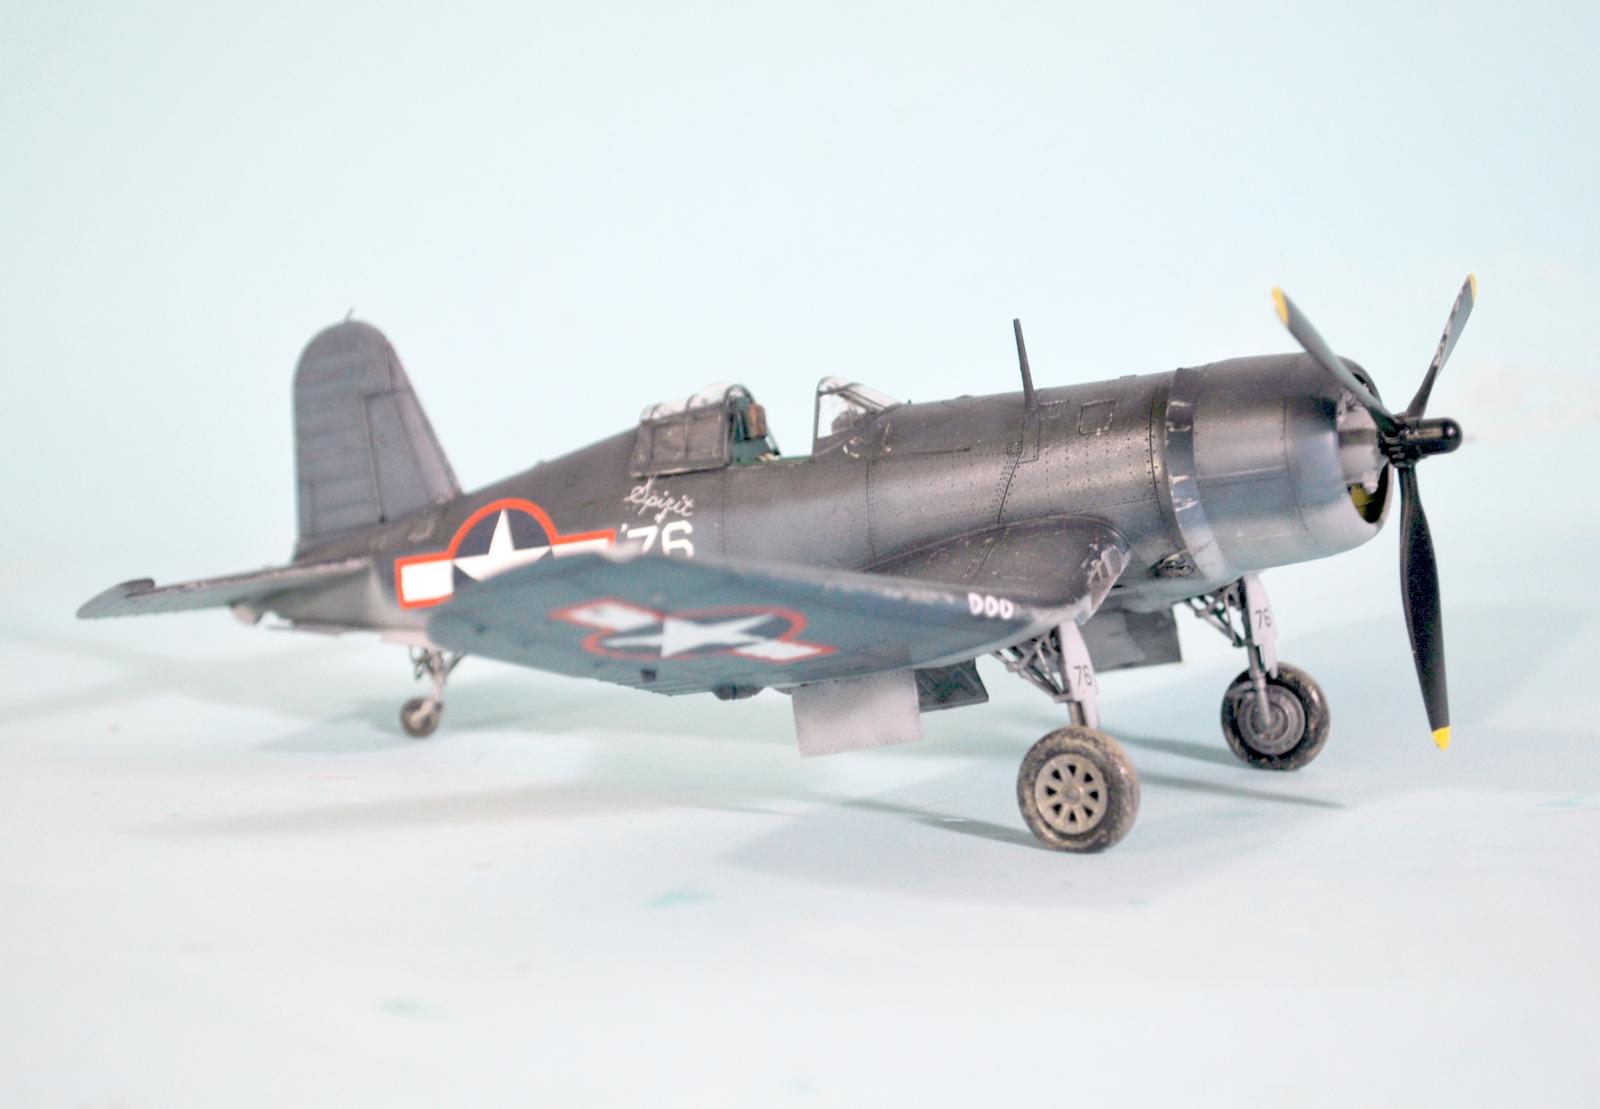
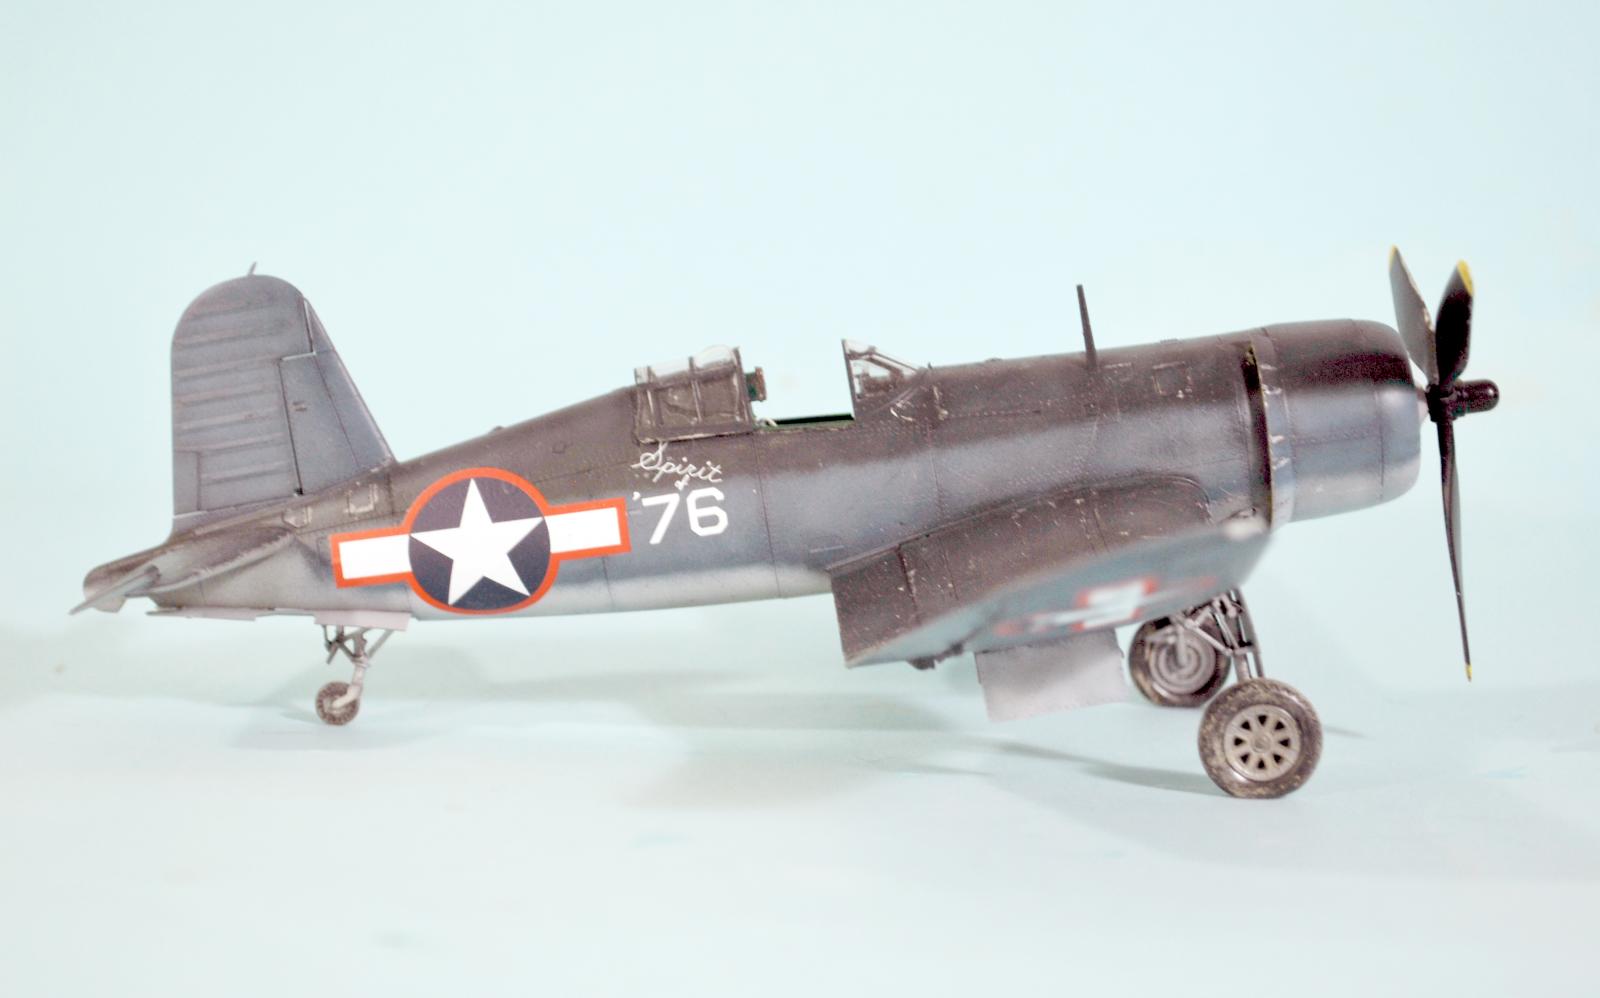
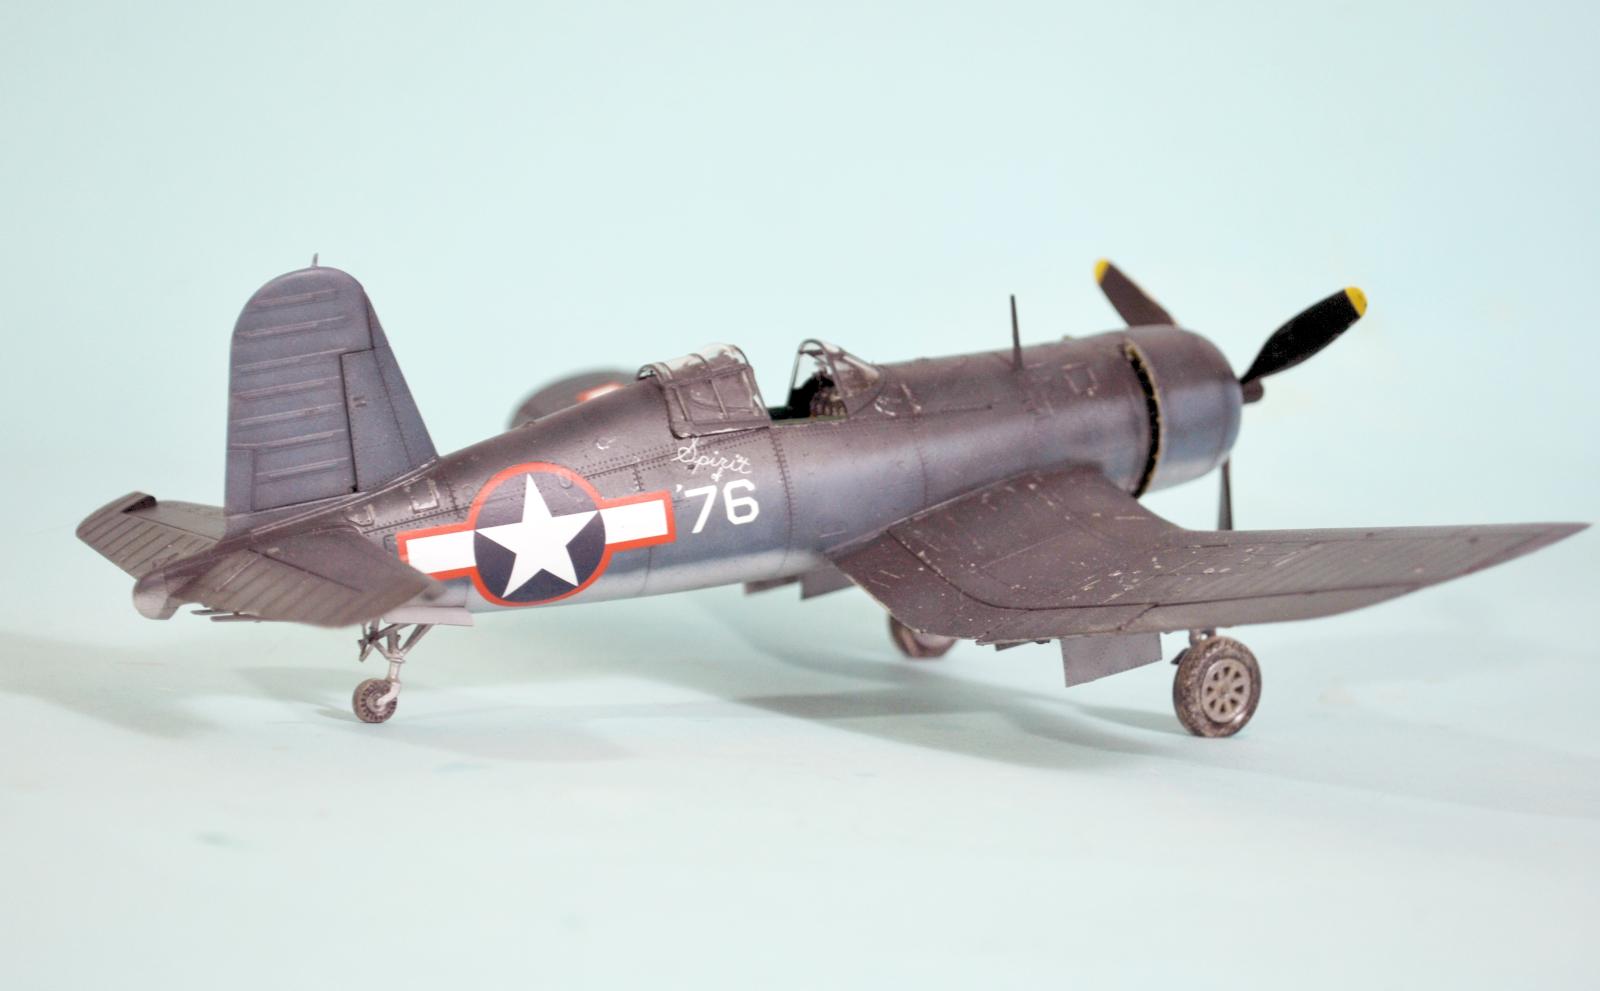
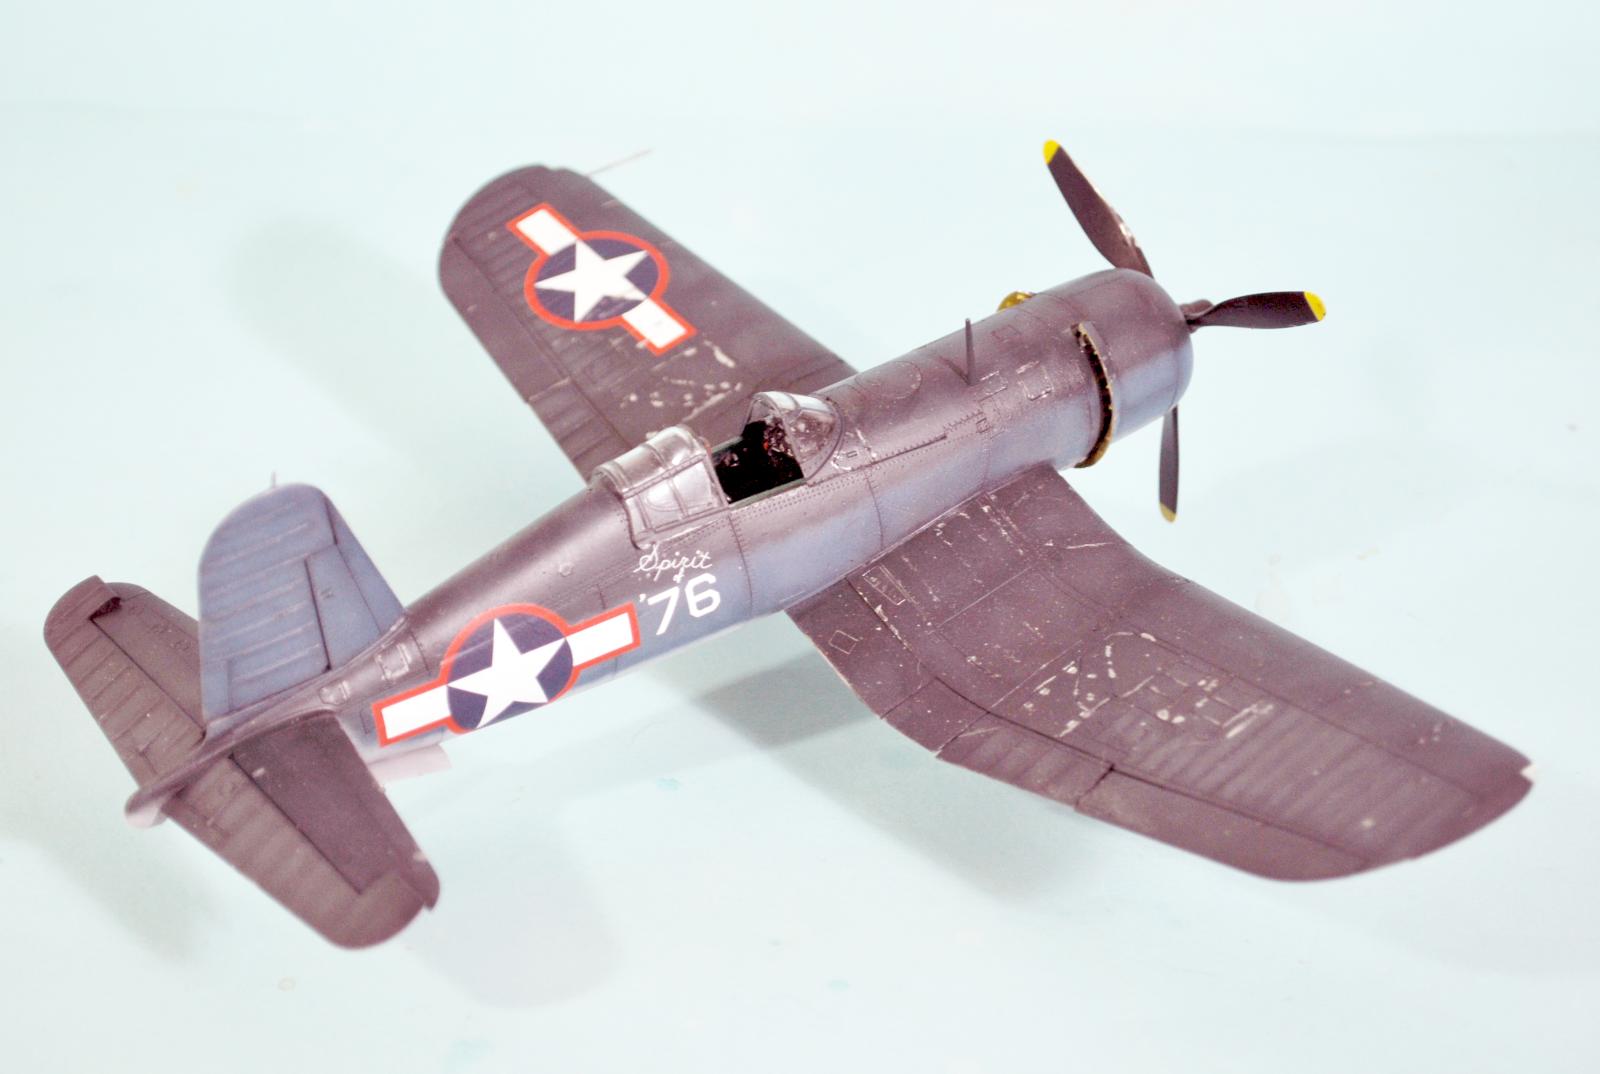
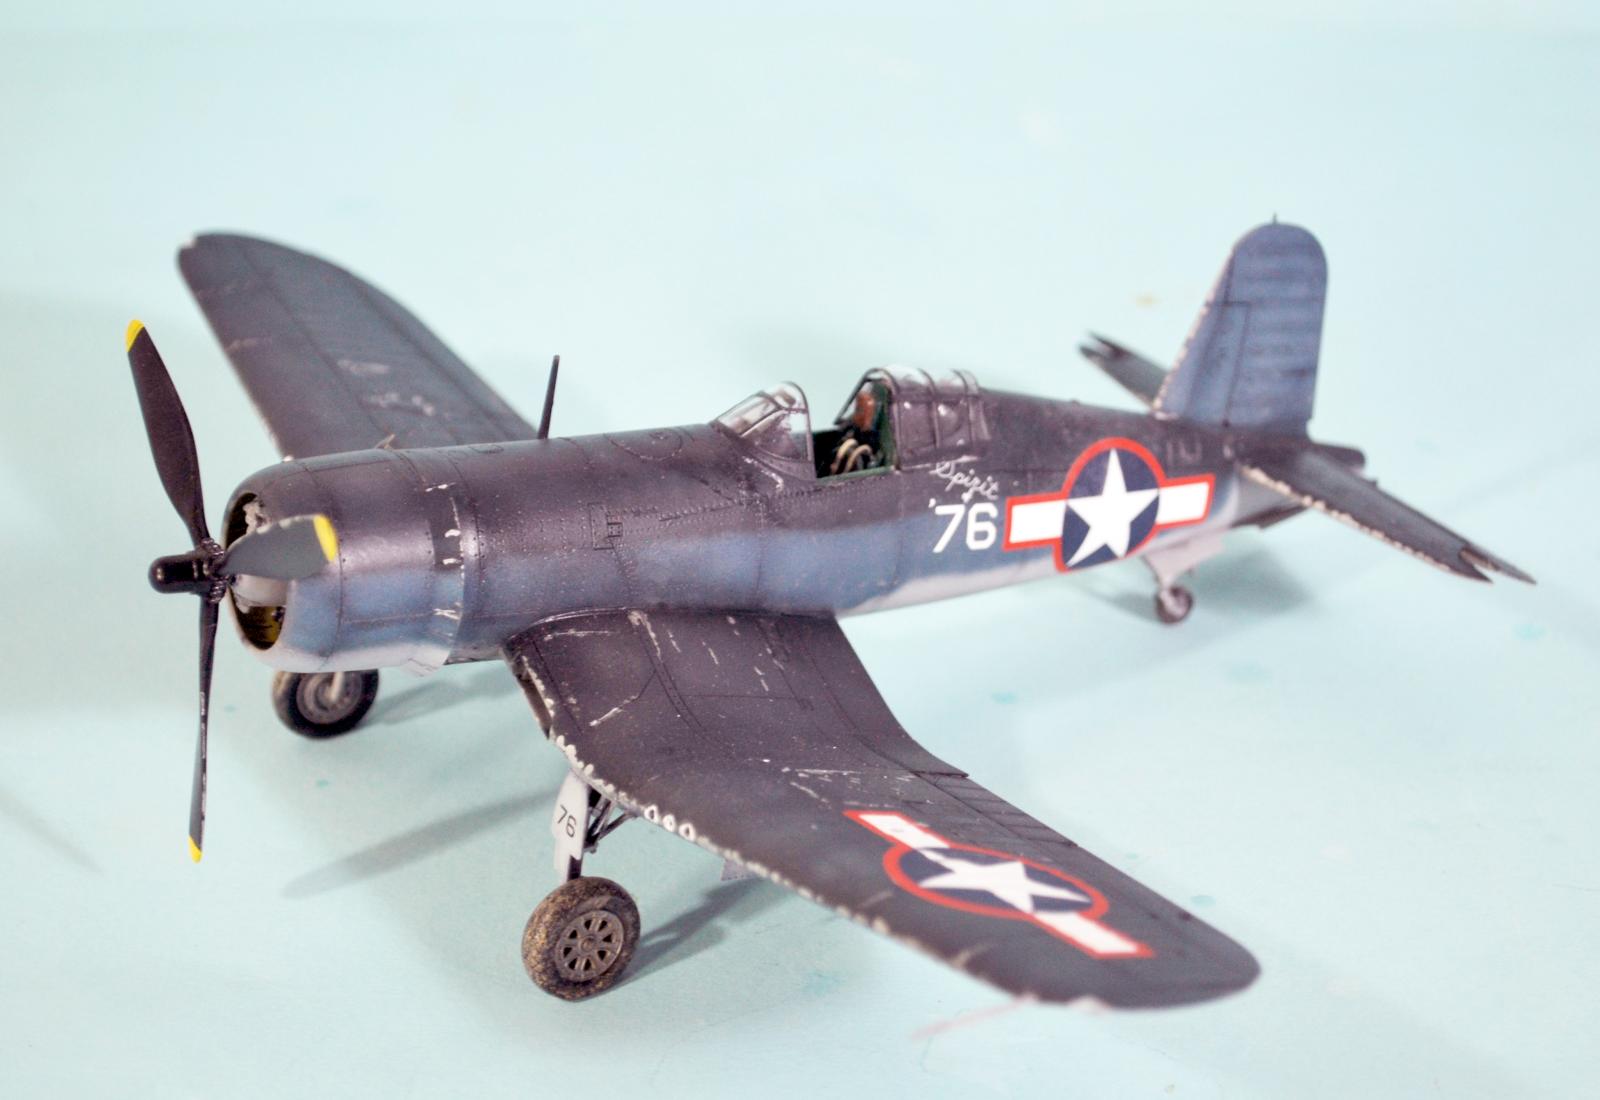
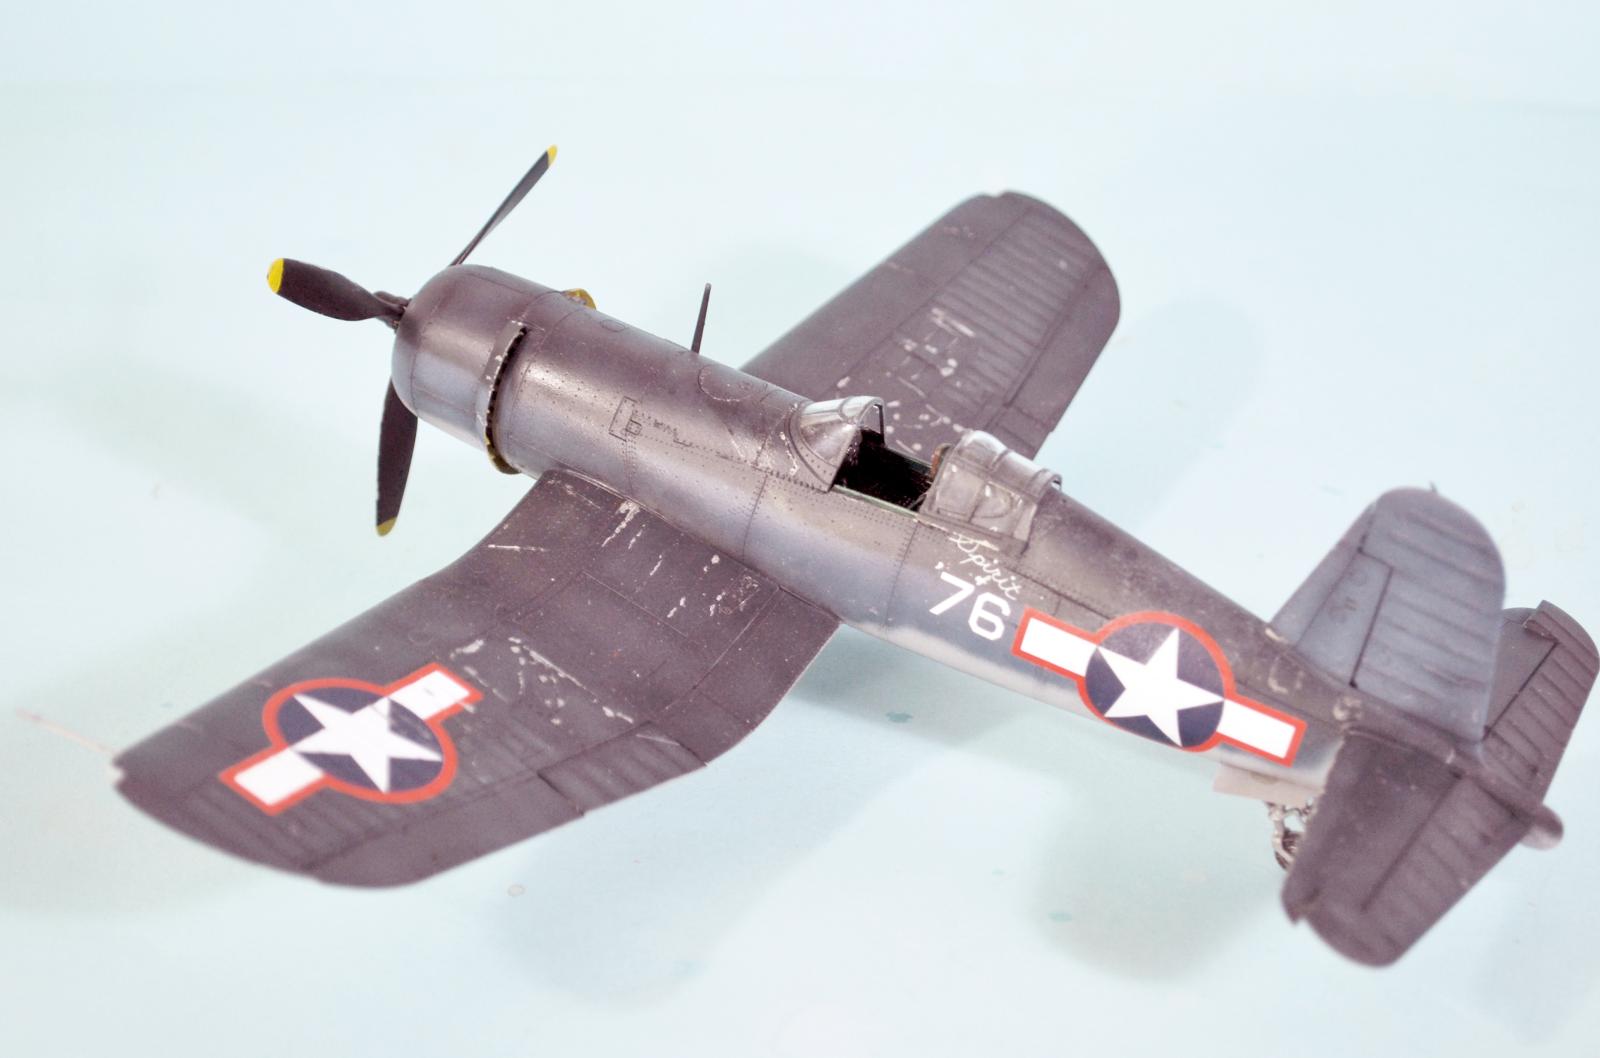
Major Robert F. Owens Jr., USMC, commanded VMF-215 when the squadron arrived in the South Pacific in the fall of 1943. He led the unit through the Rabaul Campaign, flying an F4U-1 named “Spirit of ‘76.” He shot down seven enemy aircraft in combat over Rabaul and survived the crash of his fighter when he was shot down, being picked up by a PBY “Dumbo.” He was awarded the Navy Cross for his leadership and combat record.
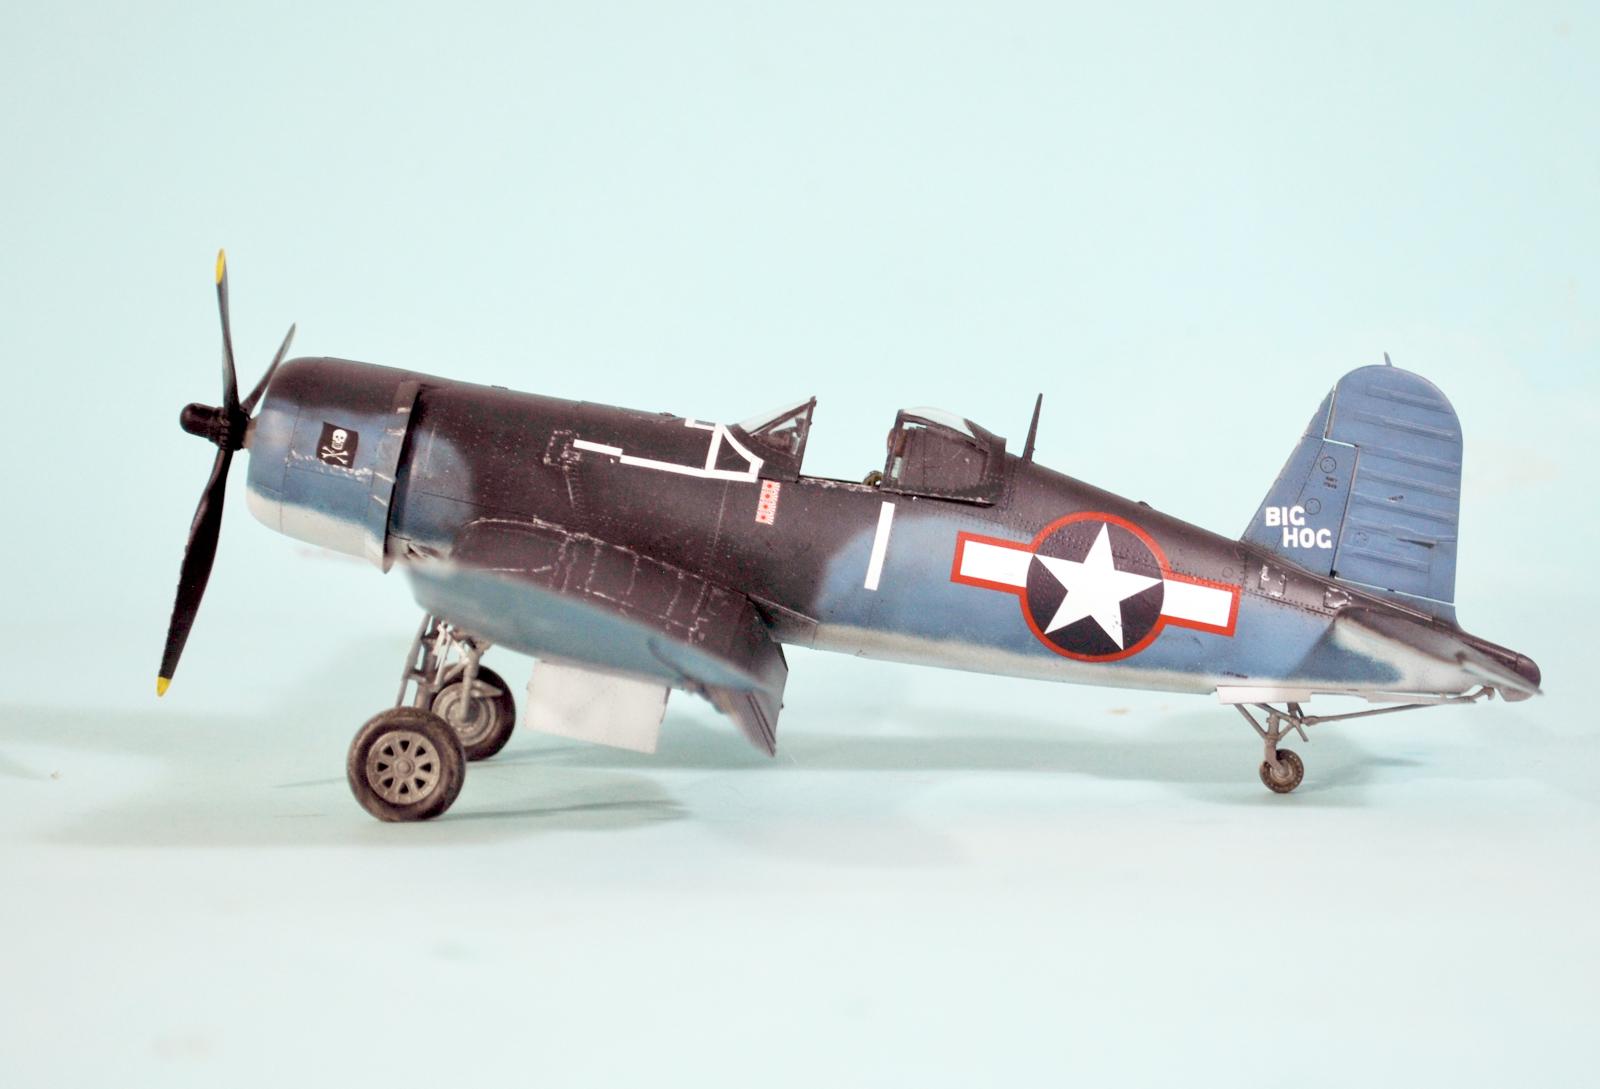
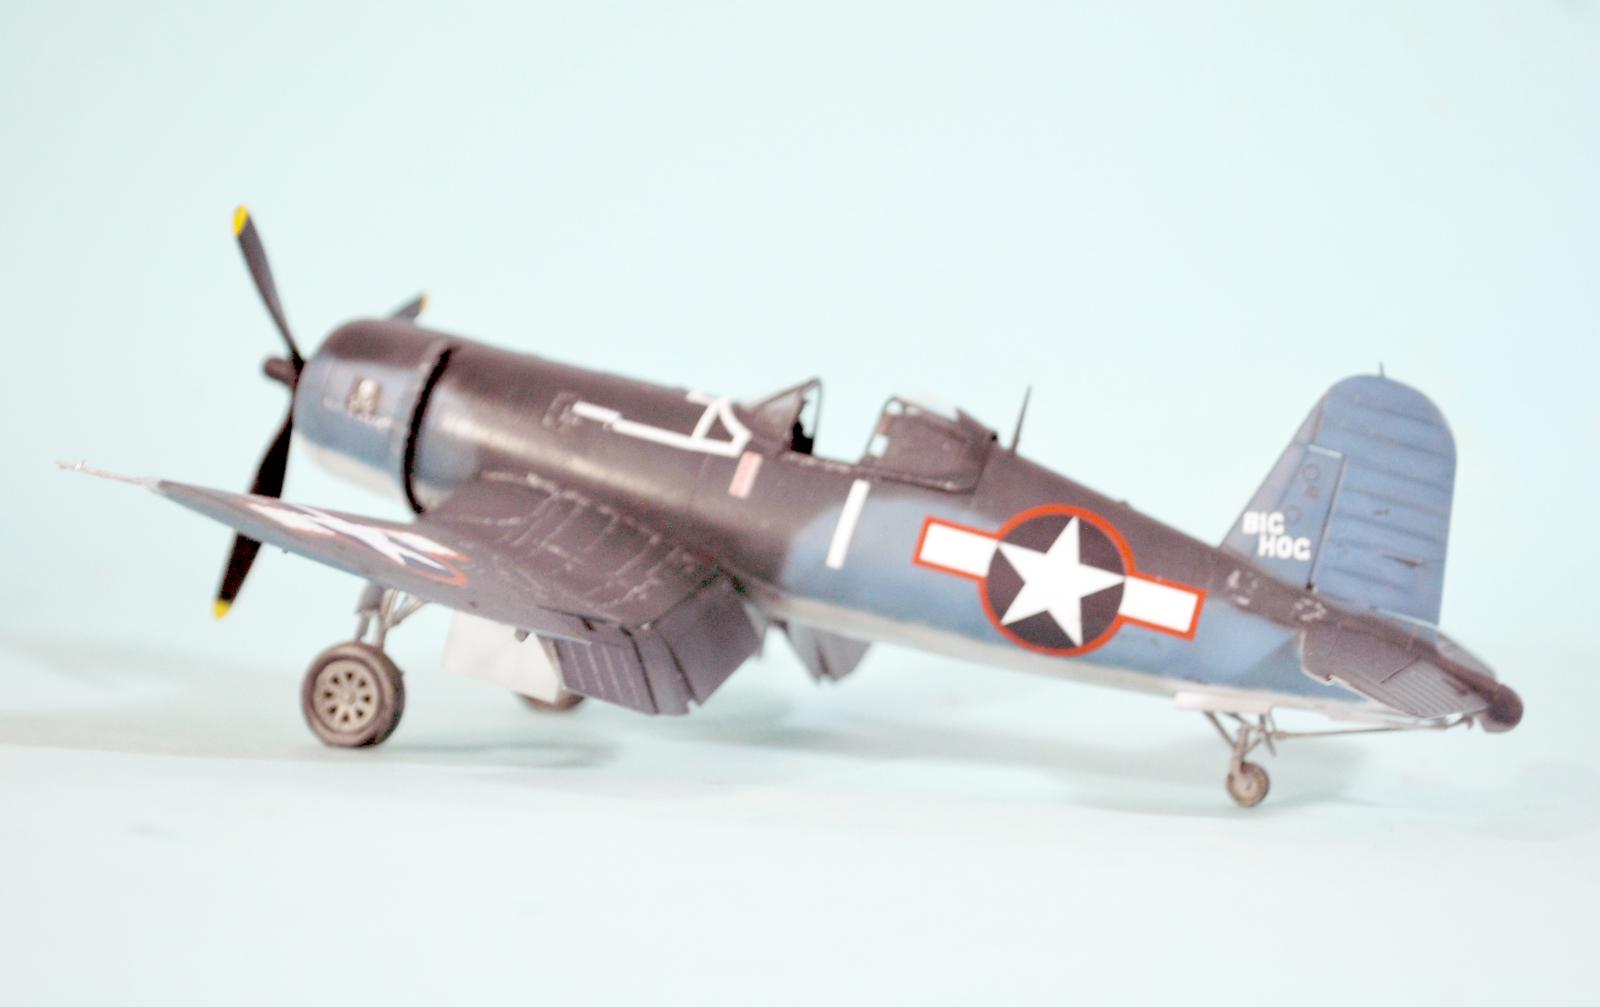
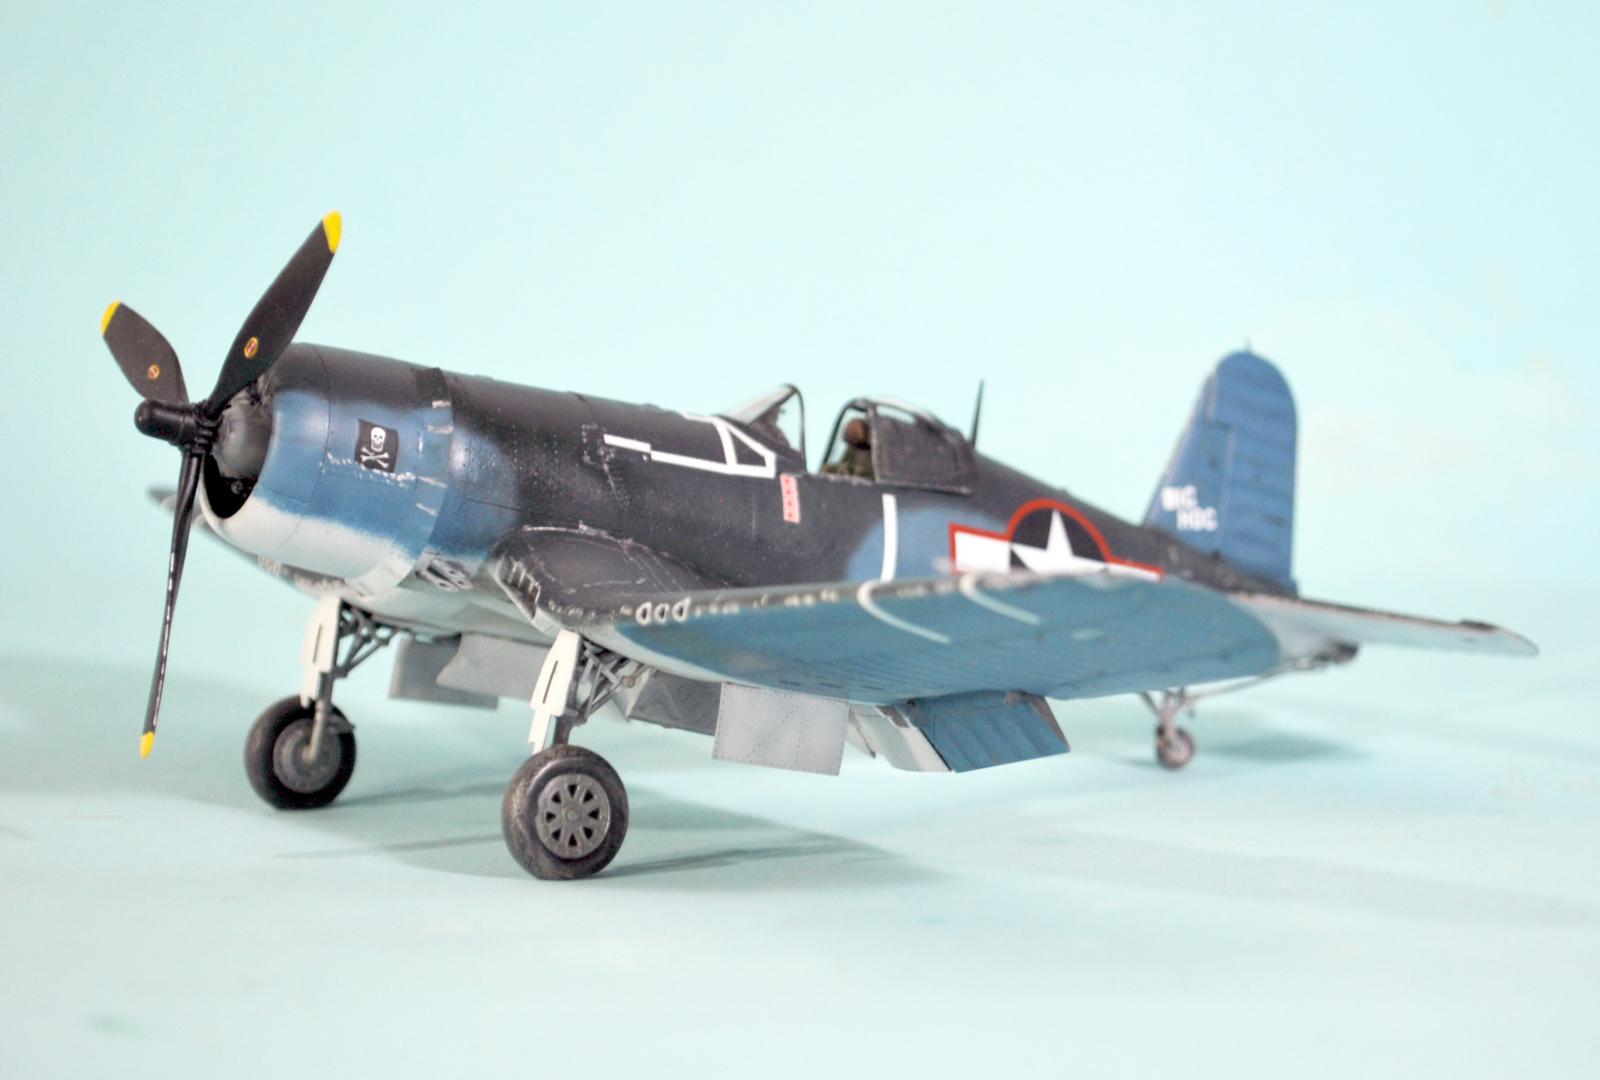
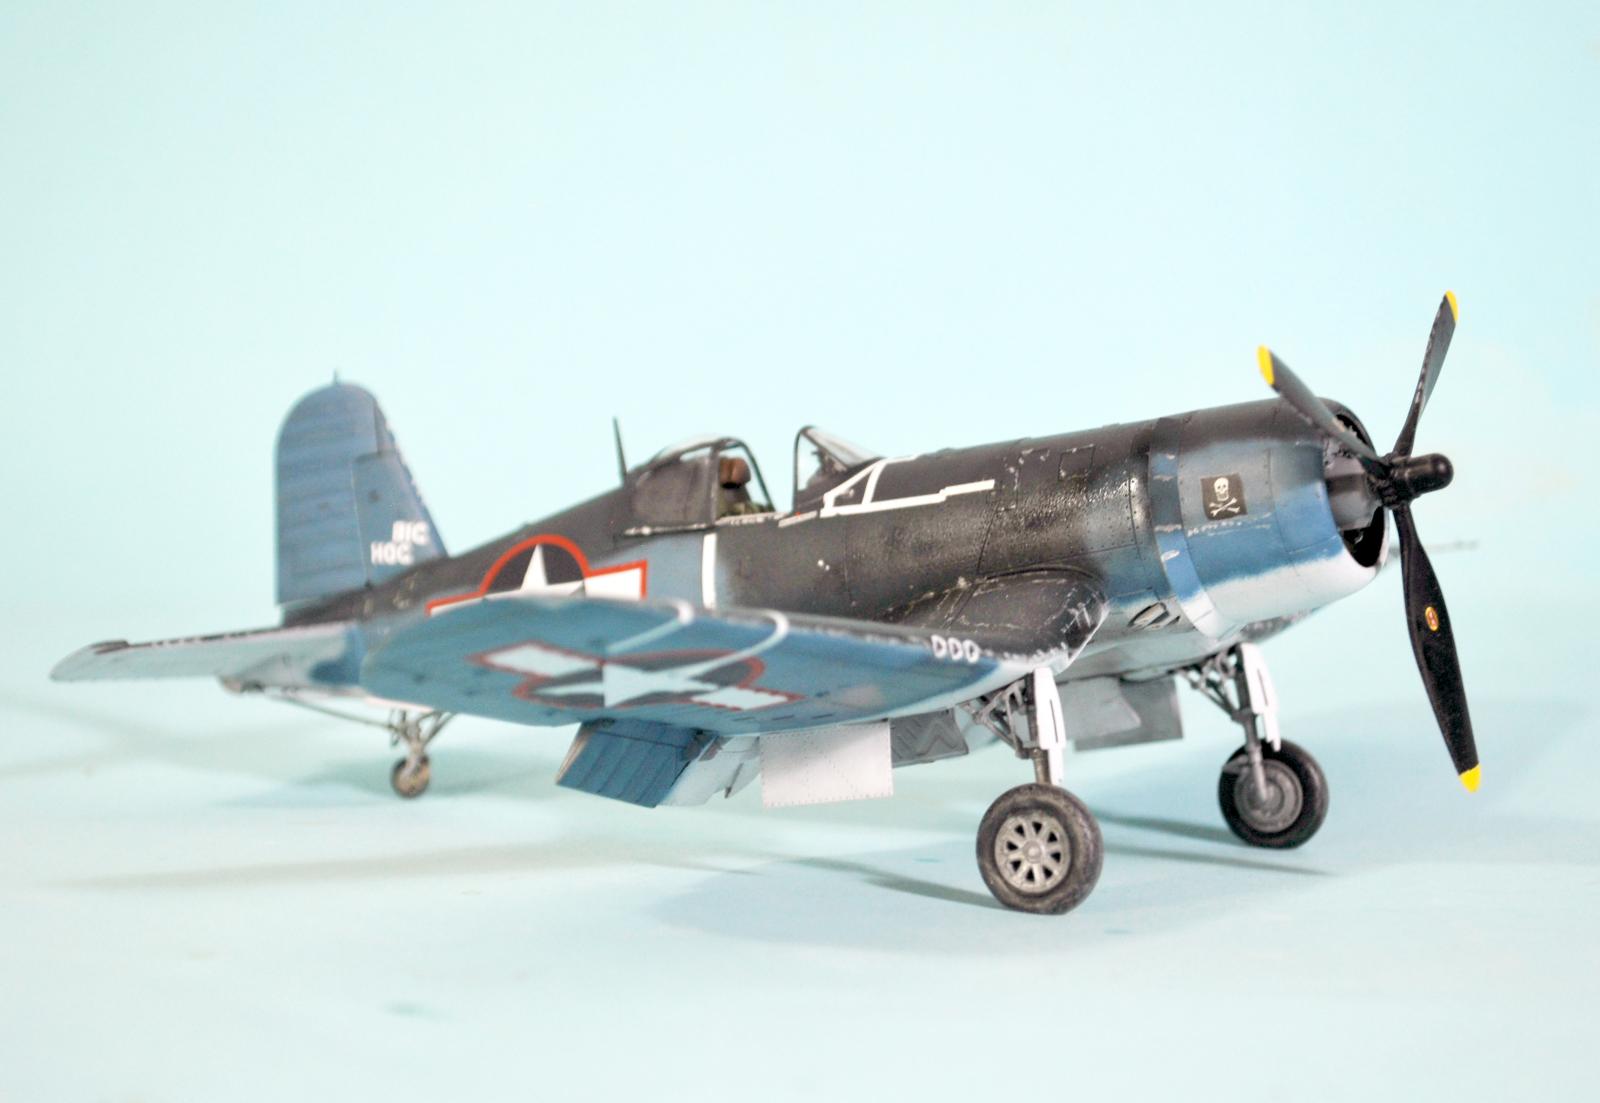
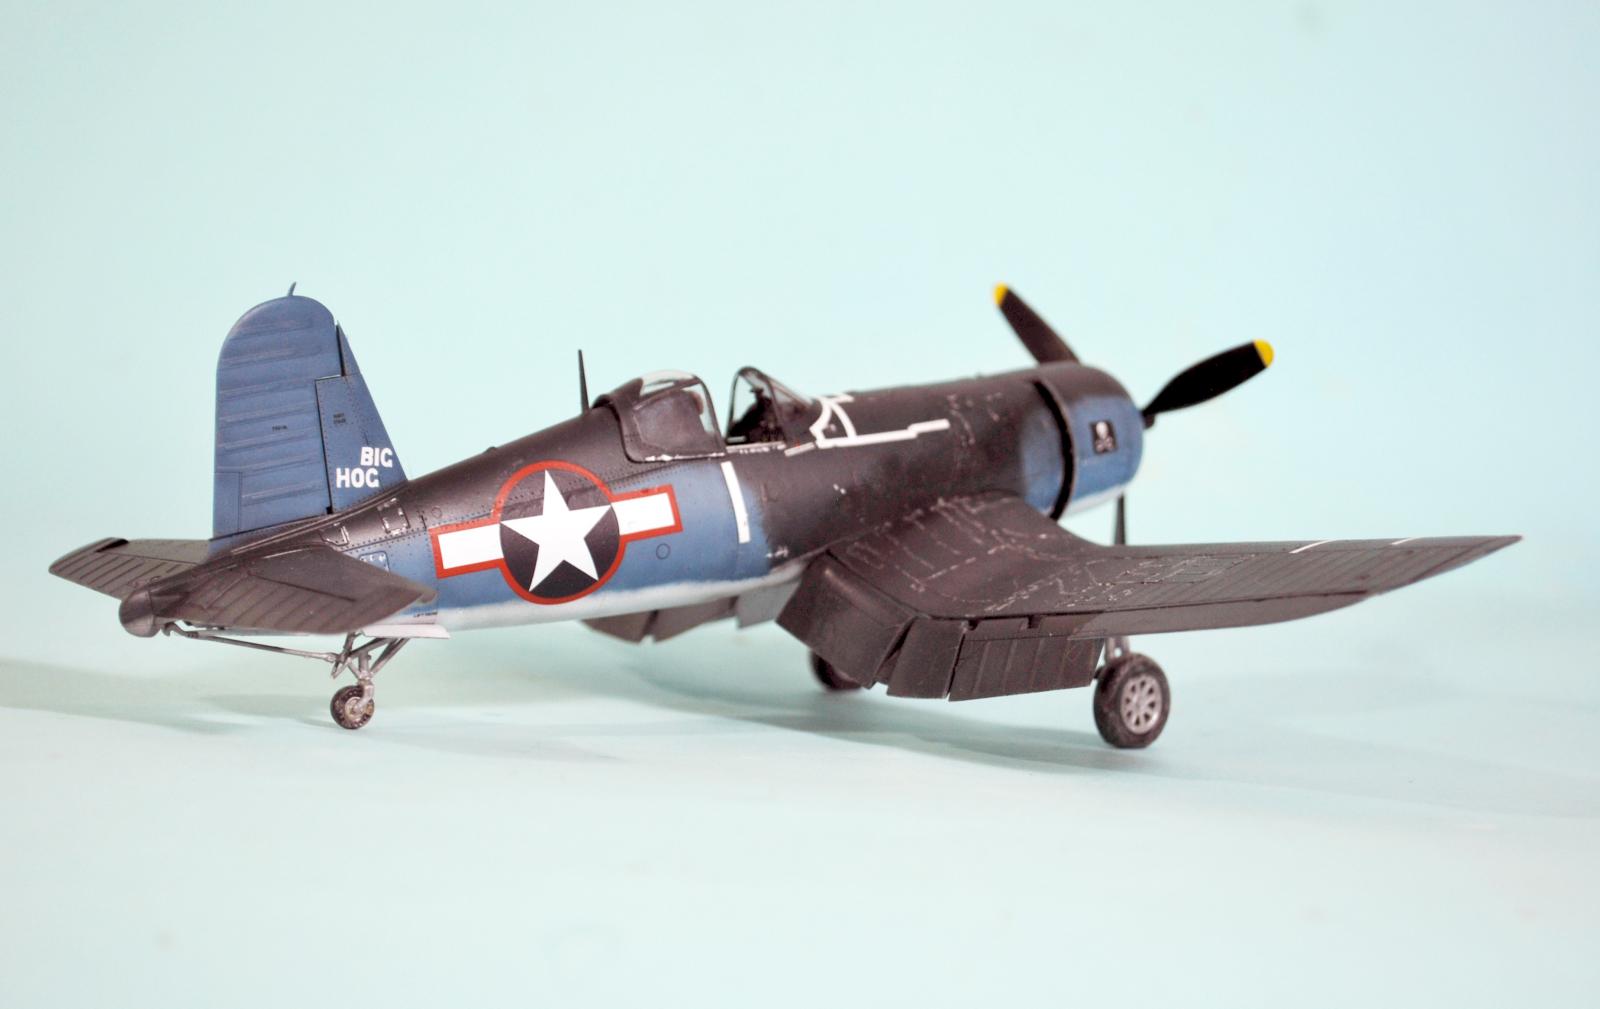
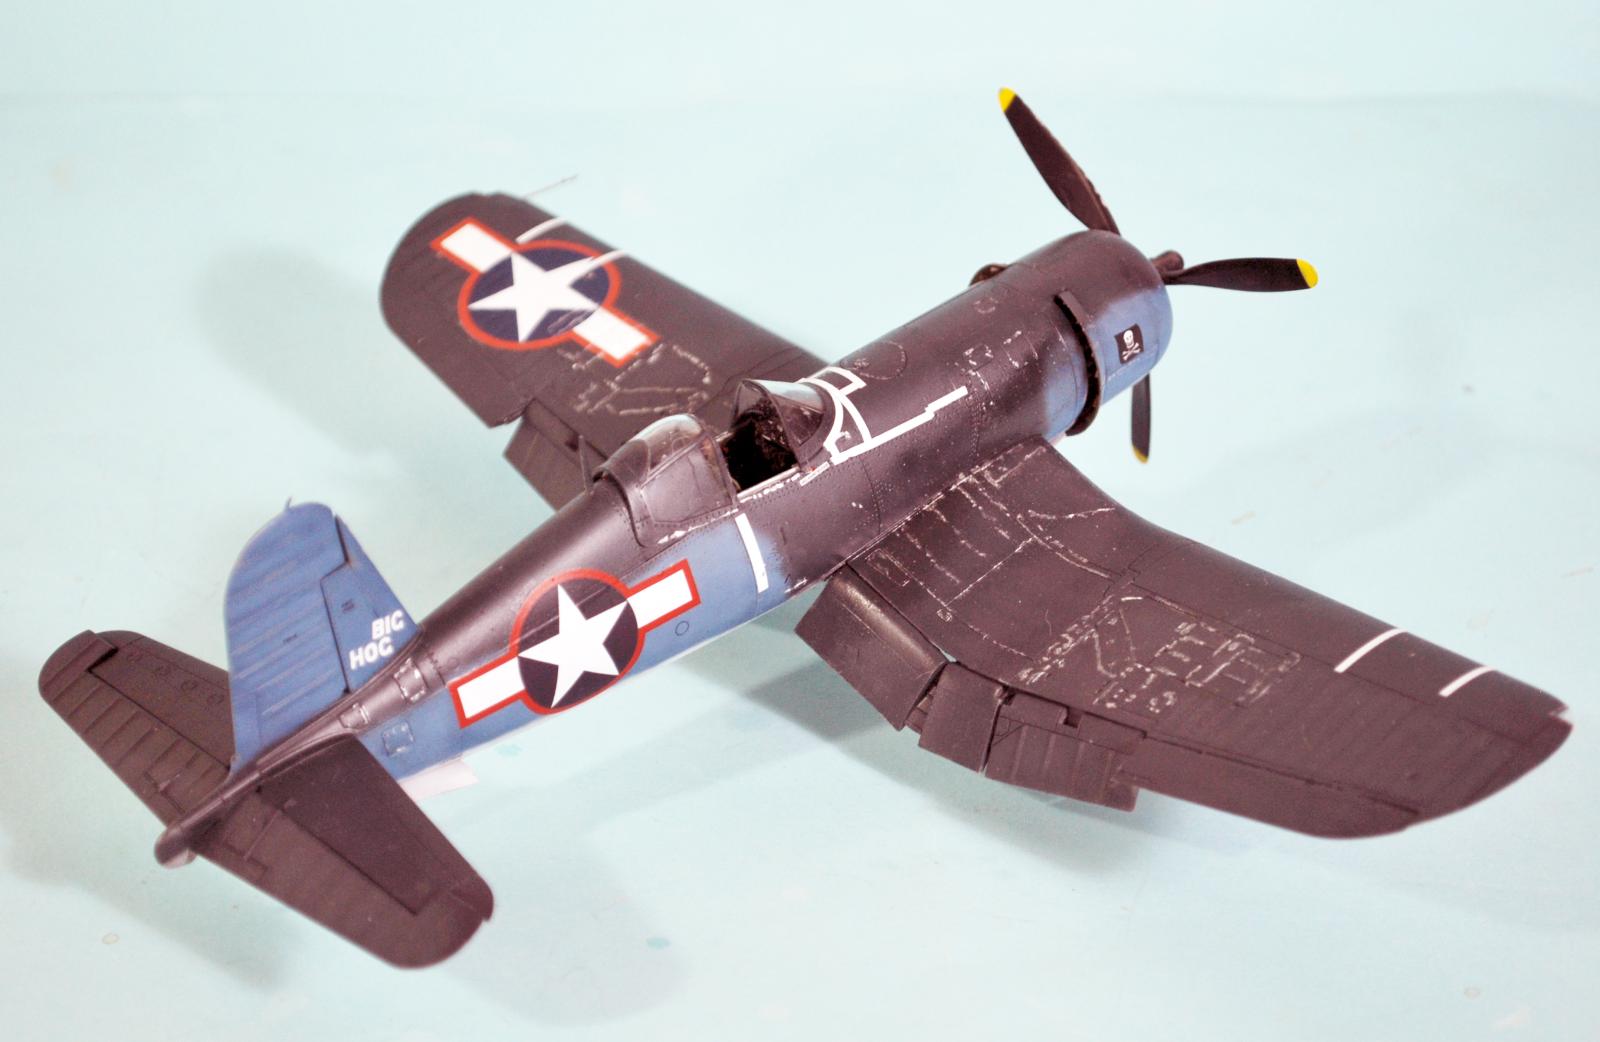
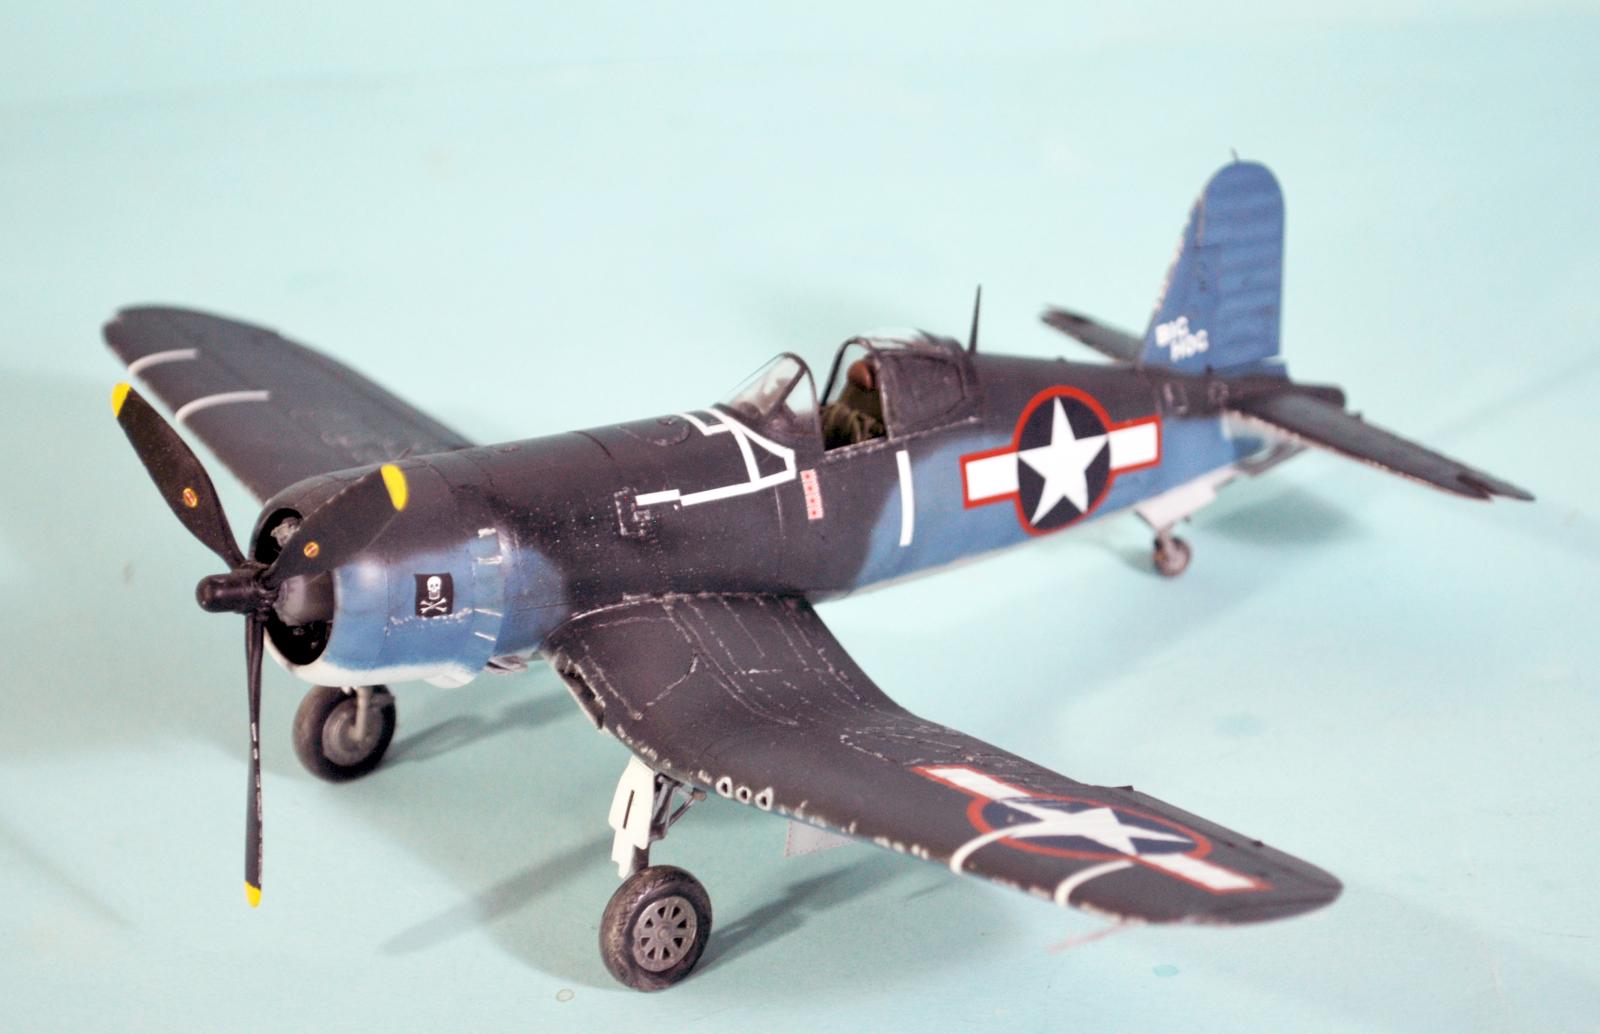
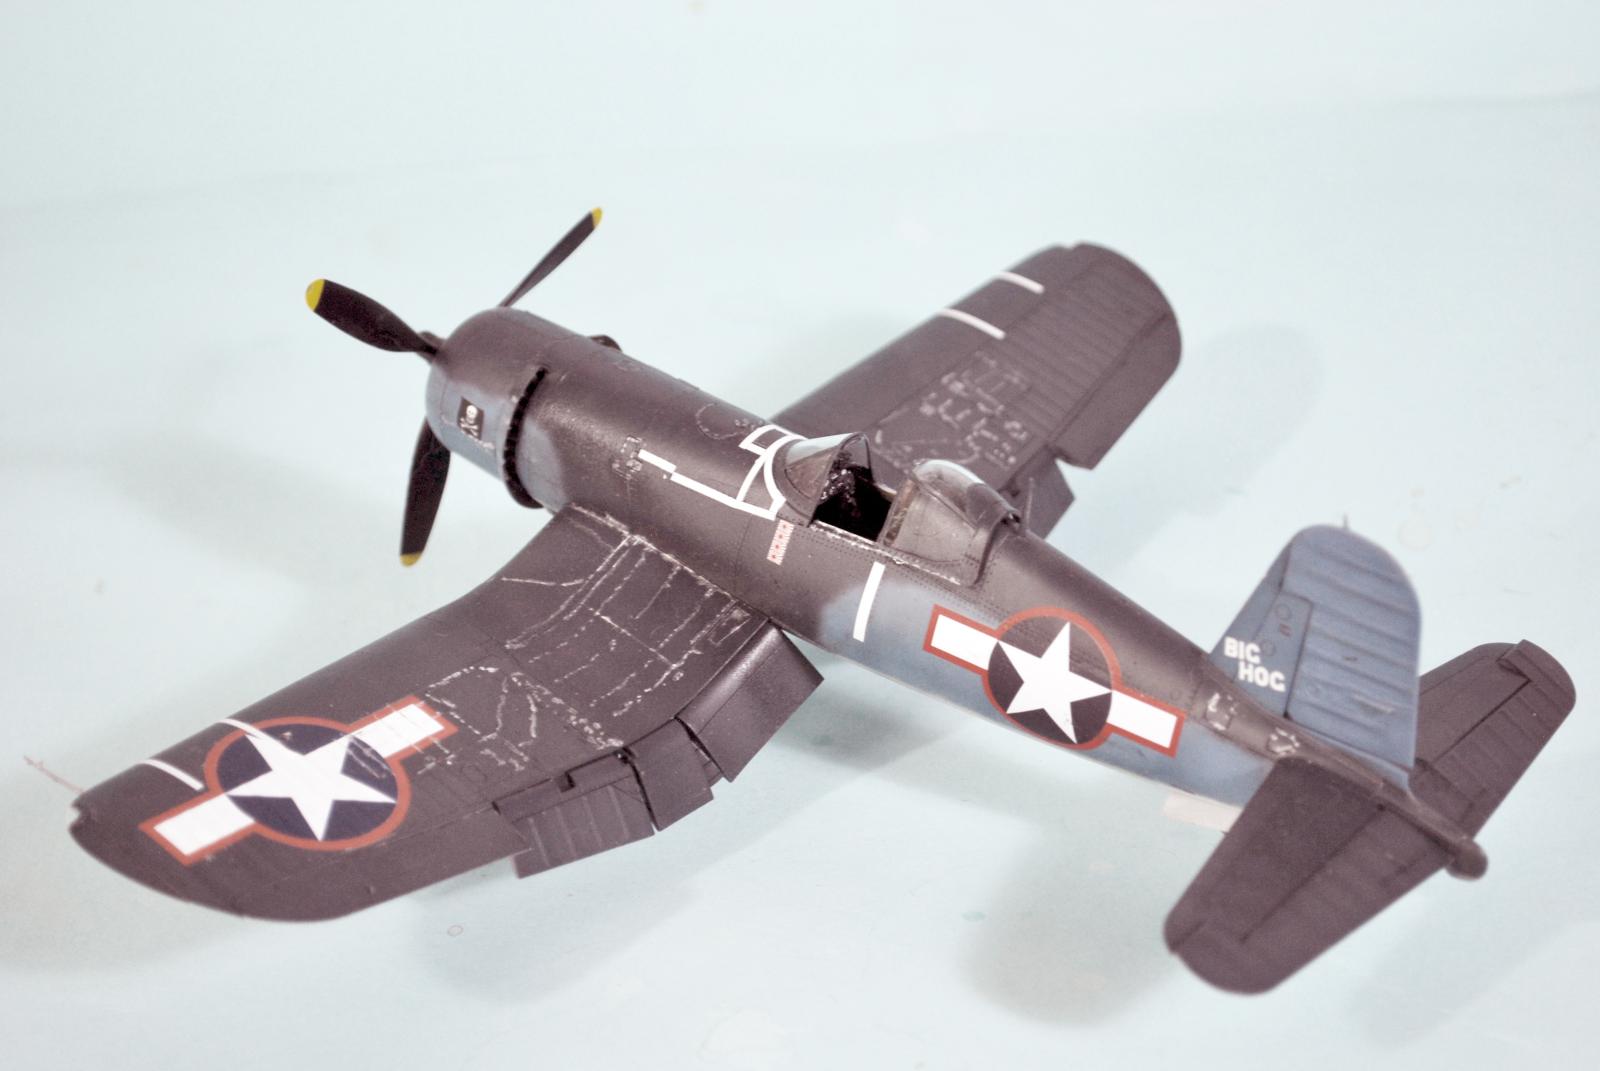
LCDR John Thomas “Tommy” Blackburn, USN, formed VF-17 on January 1, 1943. The unit was the second squadron to equip with the Corsair. VF-17 was responsible for “taming” the Corsair to operate from aircraft carriers, but when they arrived in Hawaii aboard USS Bunker Hill (CV-17), they were informed the Navy had decided to use the F6F Hellcat on carriers and they were removed from the air group. Sent to the South Pacific, VF-17 became the top-scoring Corsair fighter squadron with 174 victories between November 2, 1943 and the end of February 1944, when the Japanese evacuated their air units from Rabaul. The squadron produced 13 aces, including Blackburn who scored 11 during the course of the Rabaul Campaign, flying F4U-1A “Big Hog.”
The Kits:
When it was announced that Magic Factory, a Chinese company, was going to produce the Corsair as their first airplane model, many wondered why they would take on Tamiya, whose 1/48 early Corsairs are considered among the best kits available.
The release of a double kit of the F4U-1A and the lesser-known F4U-2 night fighter finally arrived this past month.
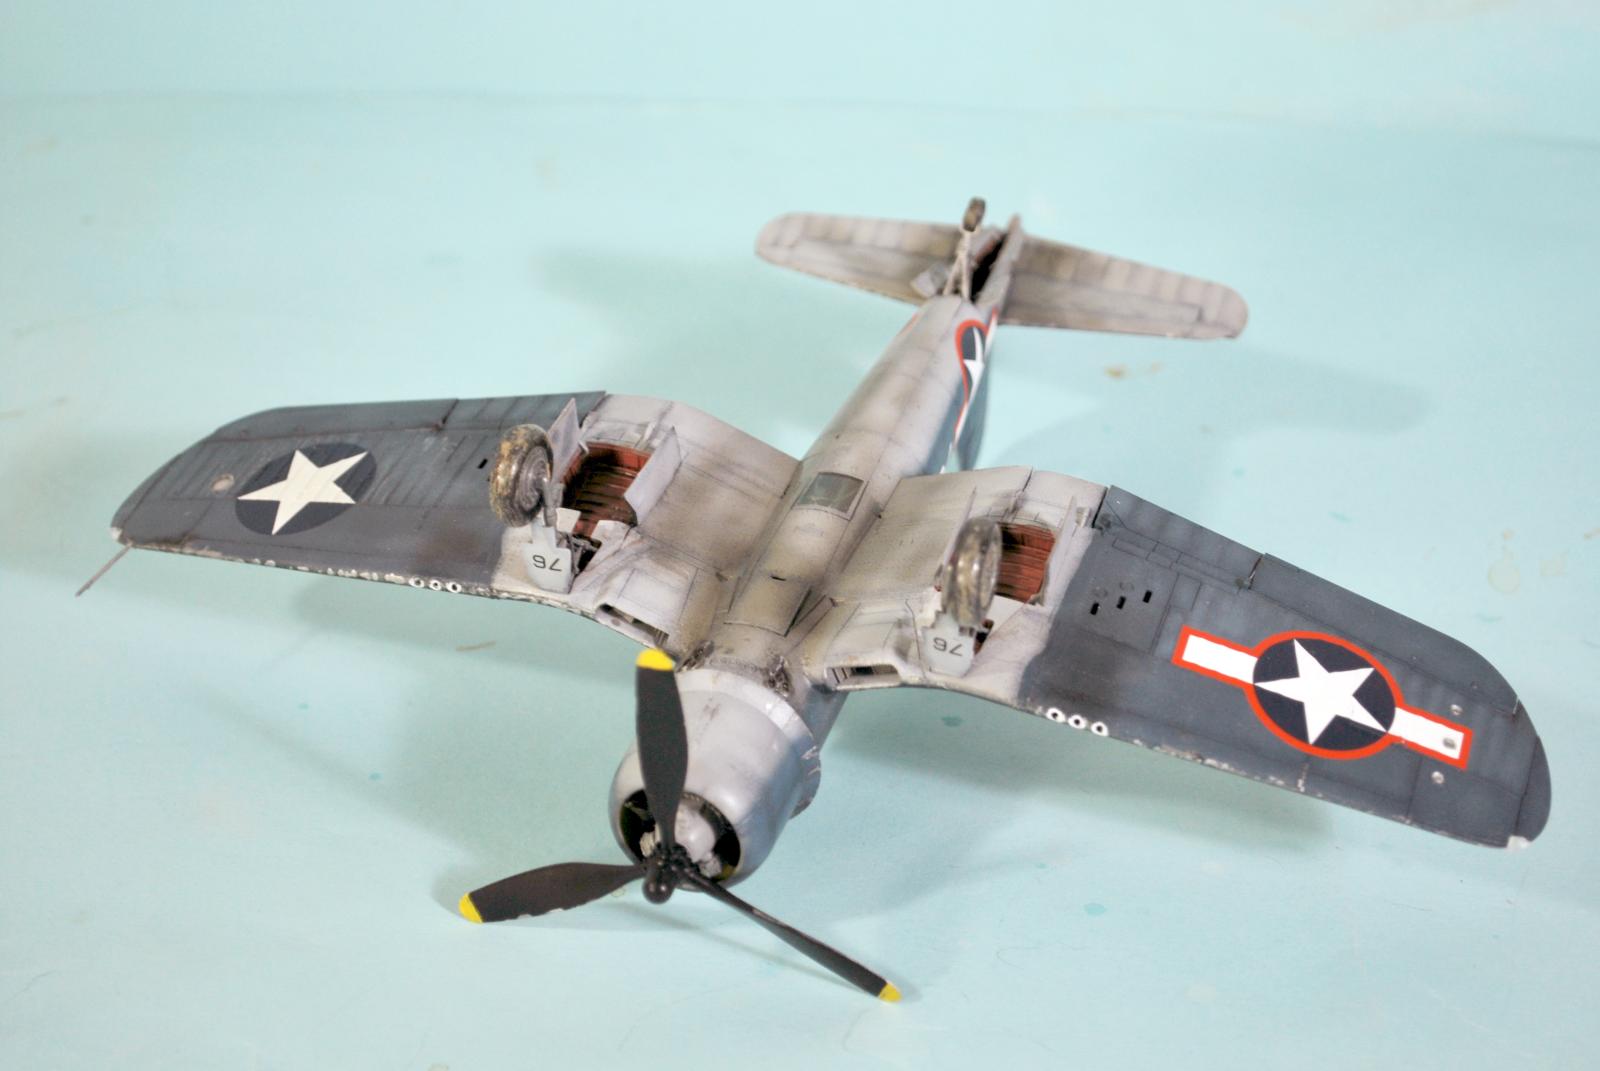
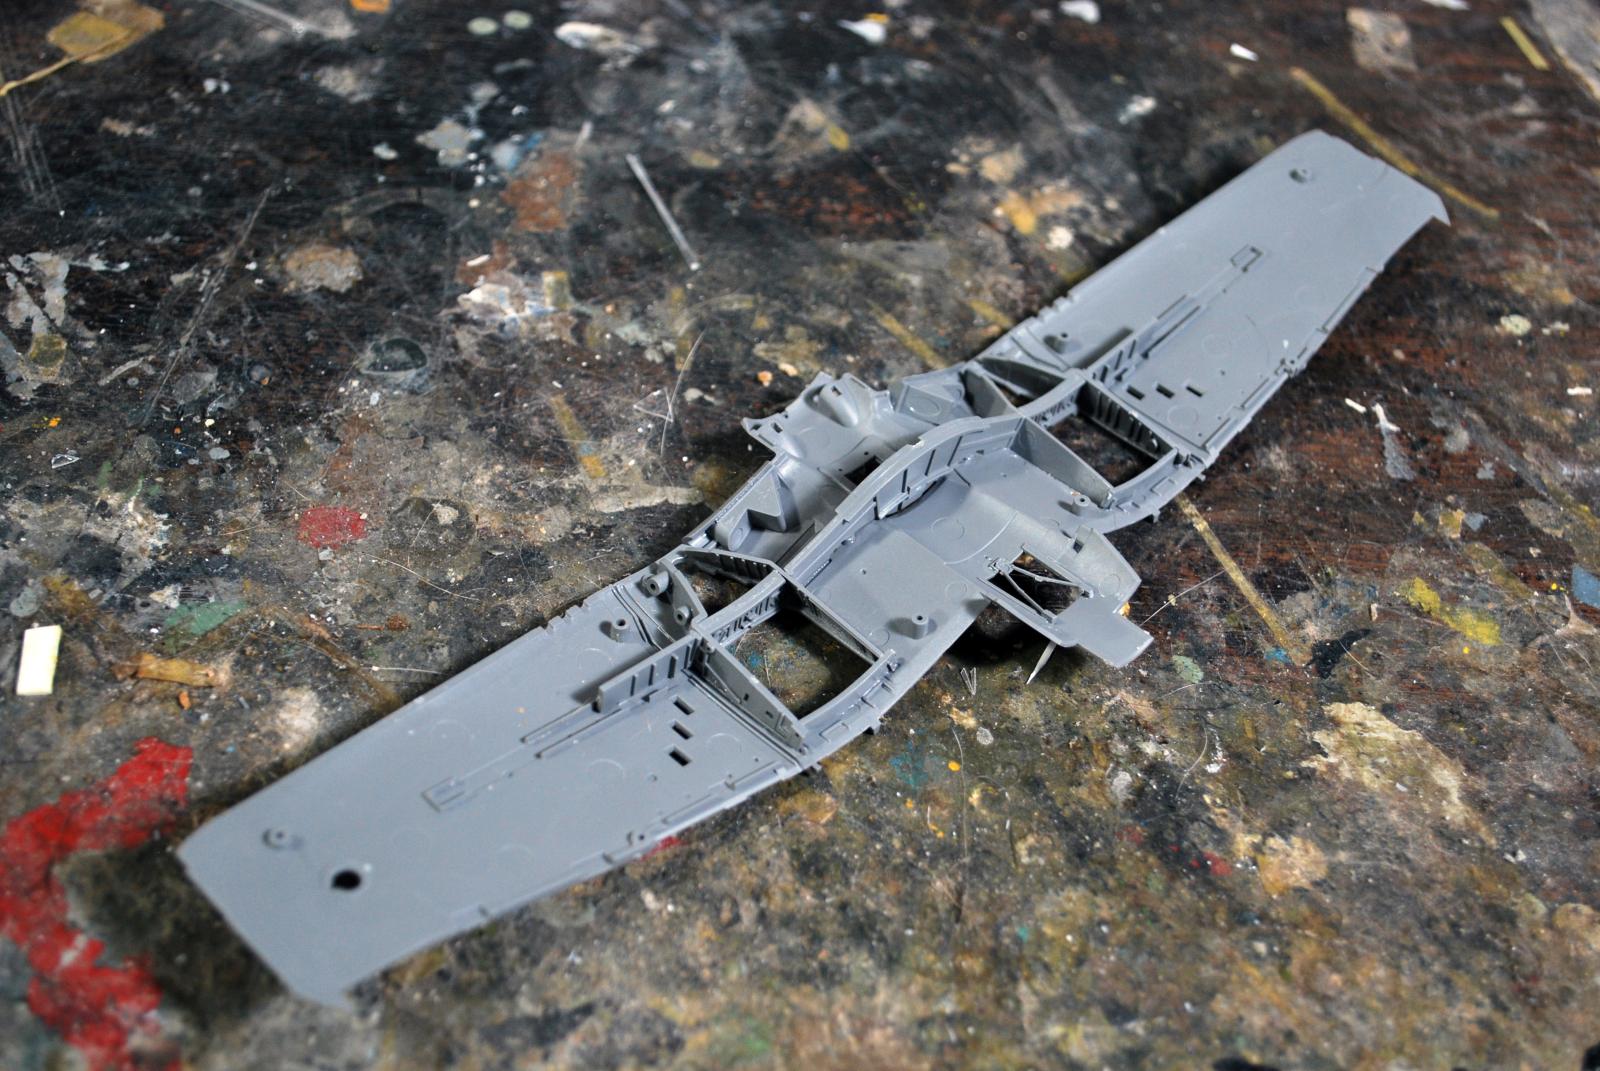
The kit provides two sets of wings, one with the wings spread and one with the wing broken down to inner and outer wing to be folded. Thus, out of the box, one can make one kit with wings spread and the other with the wing folded. The folded wing option has the flaps raised while the wings-spread option as the flaps dropped.
Examining the parts in the very full box, it is quickly apparent from studying the excellent instruction booklet (which you are well-advised to read and heed), it is quickly apparent that Magic Factory spent time examining the 1/32 Tamiya Corsair kits, because the production design follows those kits closely. The fuselage has inserts along the centerline top and bottom as does the big Tamiya kit, which means there will be no centerline seam to worry about. All joints are on panel lines. As with all modern CAD-designed kits, fit of parts is very precise and you must clean off all sprue nubs from each part to assure good fit.
Decals are provided for two options of each - the well-known F4U-1A flown by VF-17 top ace Ike Kepford and an F4U-1A of VMF-321. The F4U-2 has options for “Midnight Cocktail” from VMF(N)-532 and from VF(N)-101 aboard USS Enterprise.
Construction:
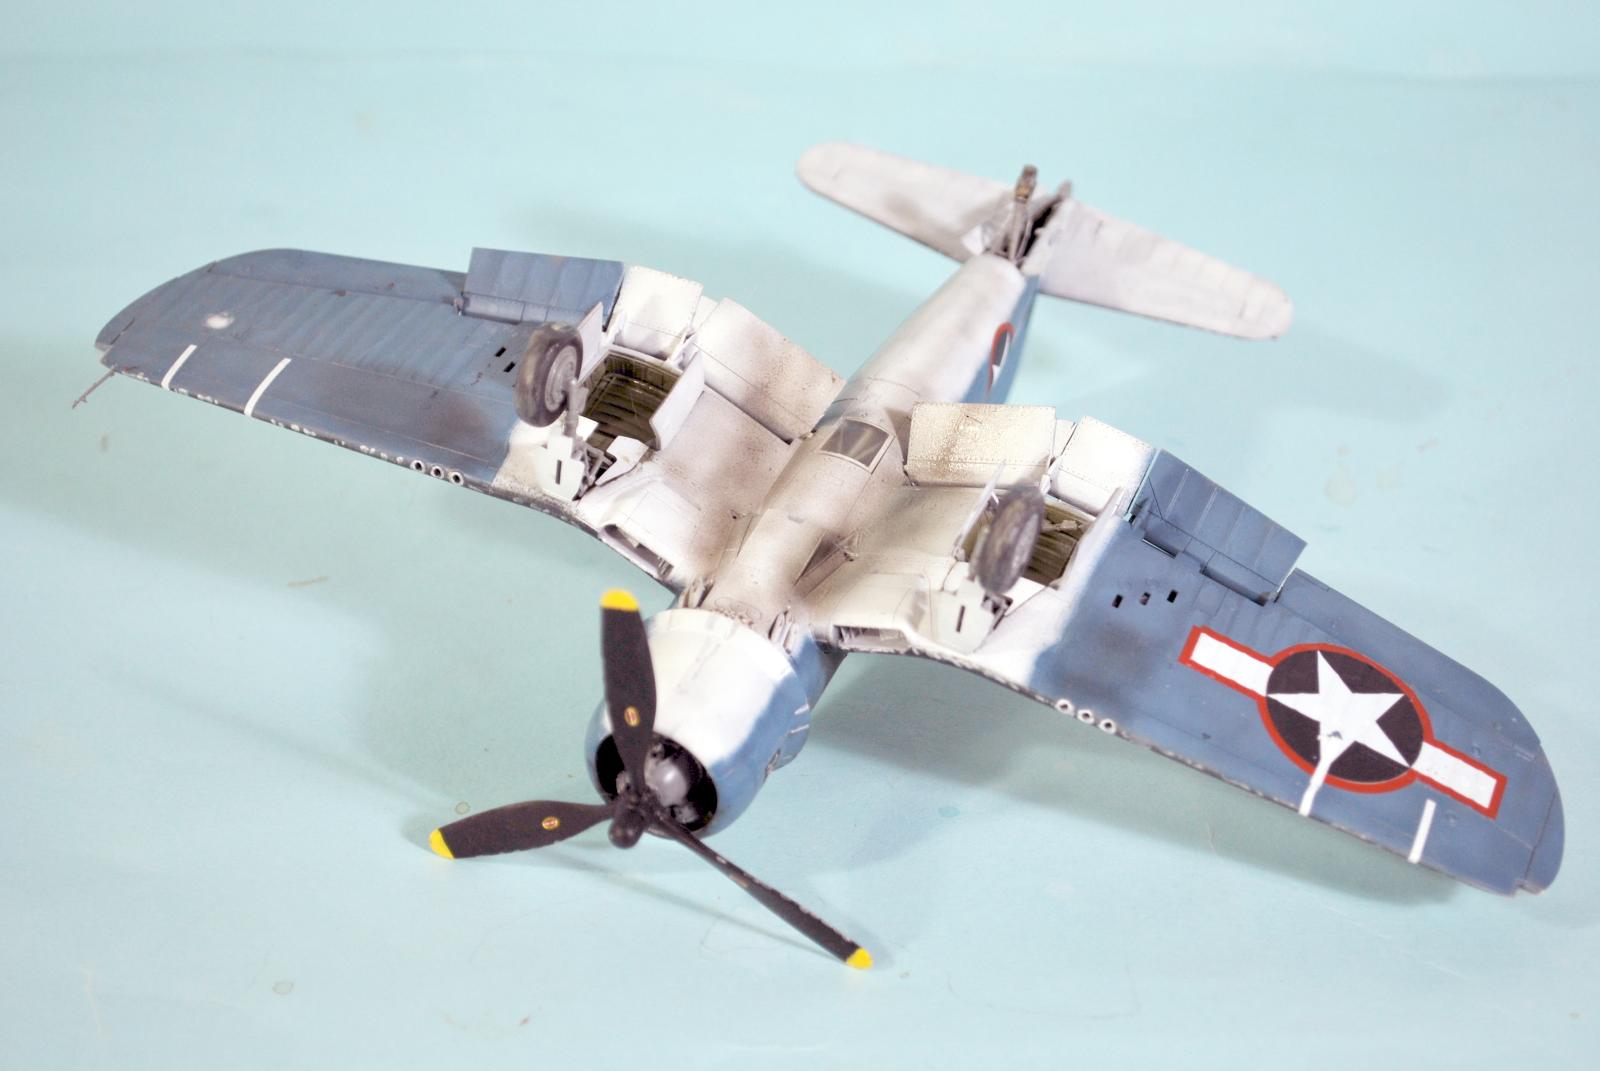
Remember that the F4U-1 and F4U-2 cockpit is overall Dull Dark Green, while the F4U-1A cockpit is overall Interior Green. The interior of the cowling is Yellow Zinc Chromate for both (but you really won't notice once the engine is installed). If you make the F4U-2 option, the wheel wells and gear legs and wheel hubs should be white like the underside. For the F4U-1A - if you do the two options in the kit - the wheel wells were most likely interior green while the gear doors were overall white.
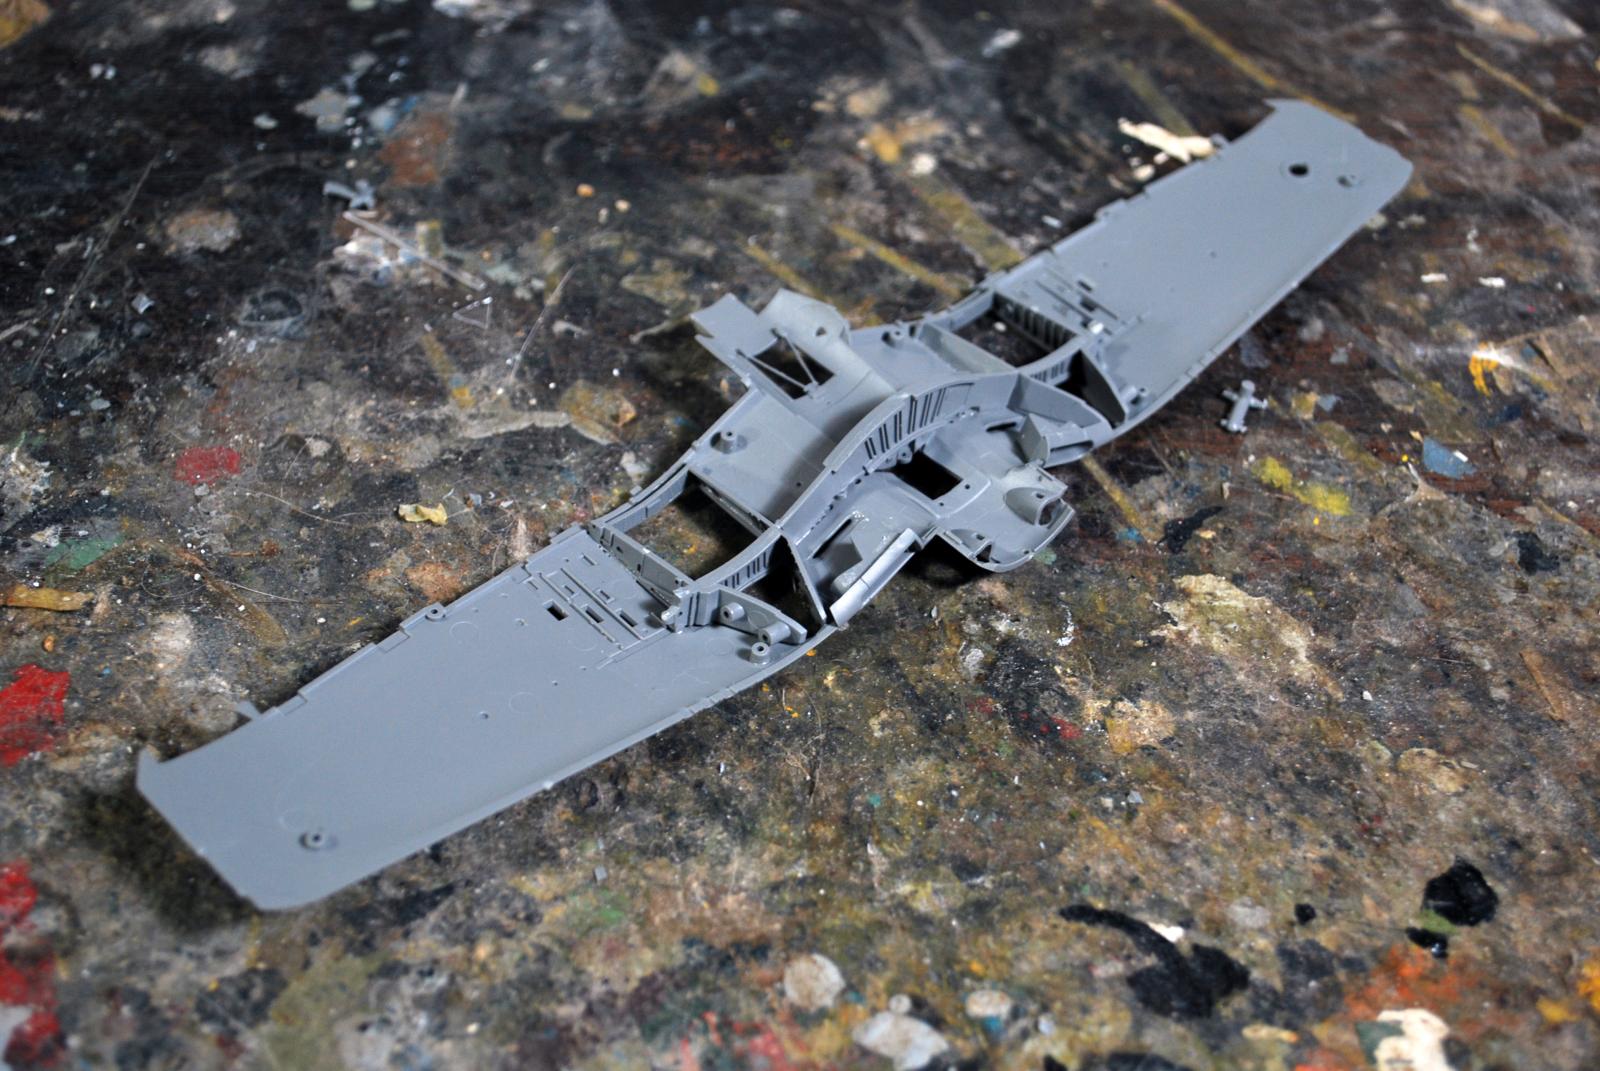
I was not interested in doing a folded-wing Corsair. On studying the instructions and looking at the parts, it occurred to me that if I took the wing spar for the wings-spread option and used that with the wings-folded parts, that I could assemble a spread wing around that spar. I could then use the wings-folded spar with the wings-spread parts, by cutting off the raised spar parts, since the wing was otherwise solid and didn't really need the extensive spar designed for it.
As it turned out, this was easily done. It took me about 45 minutes to assemble the folded wing parts around the spar. I also decided I would use this wing to make an F4U-1 rather than the F4U-2, by leaving off the radome.
The wings-spread option was also easy to assemble using the shortened spar after I cut off the wings-raised spars on either end.
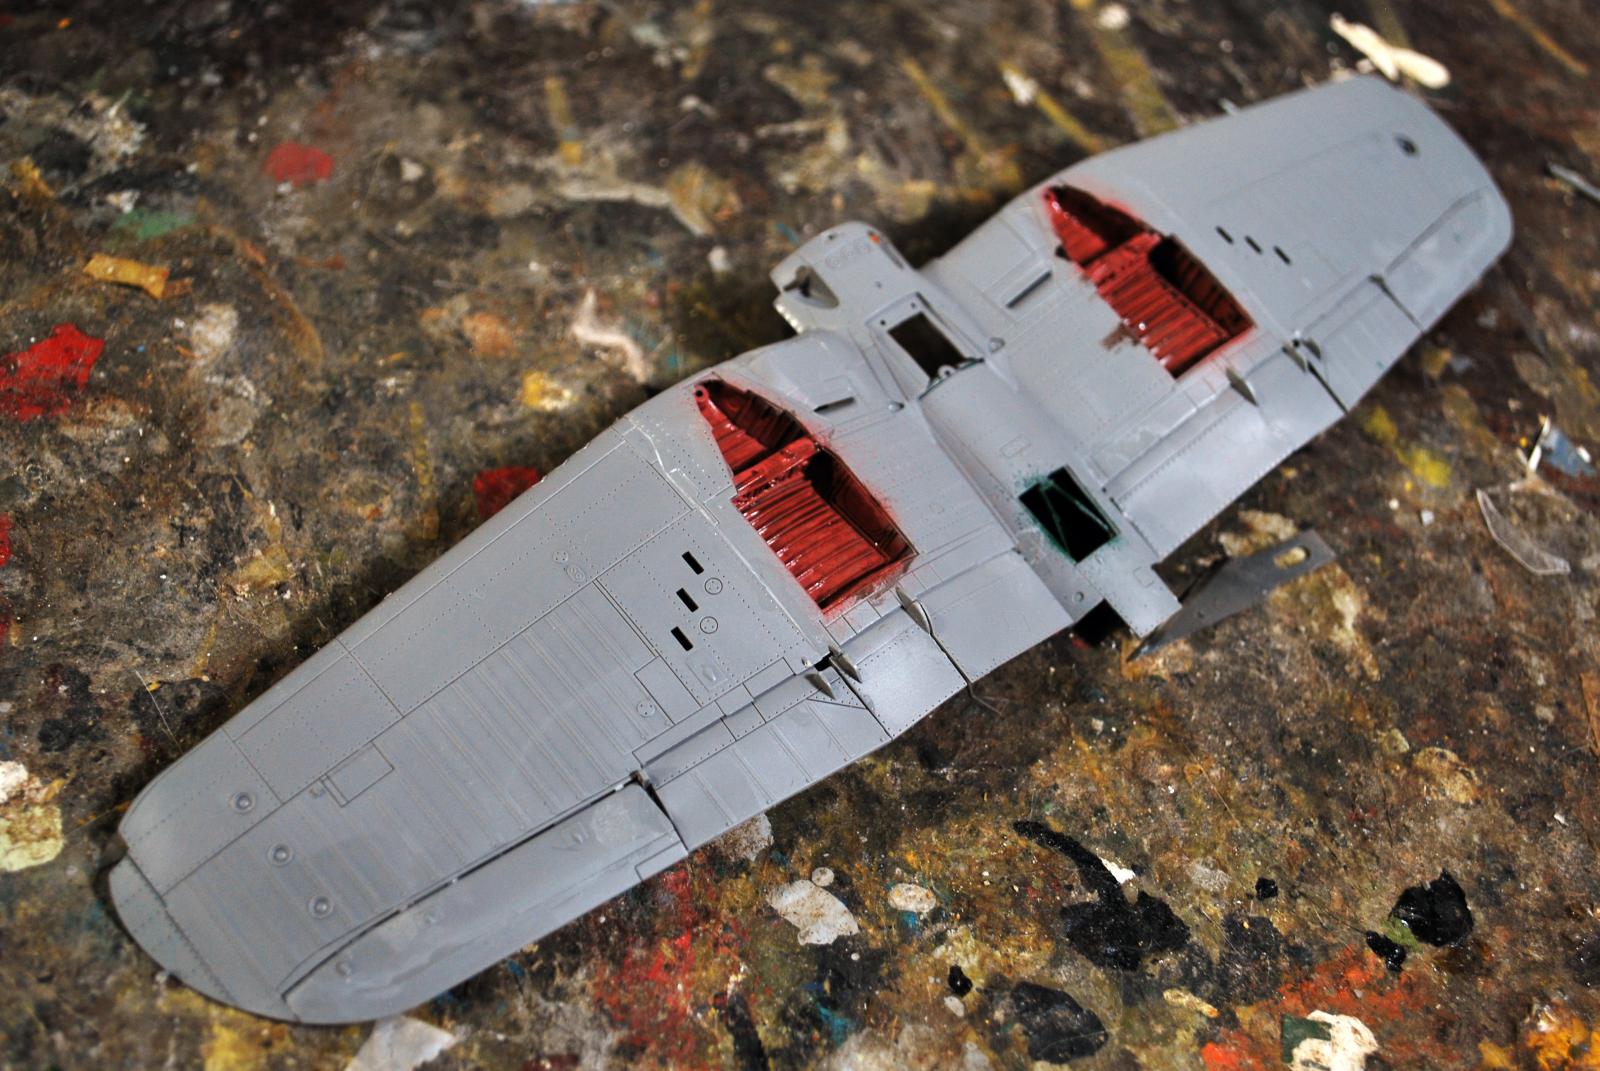
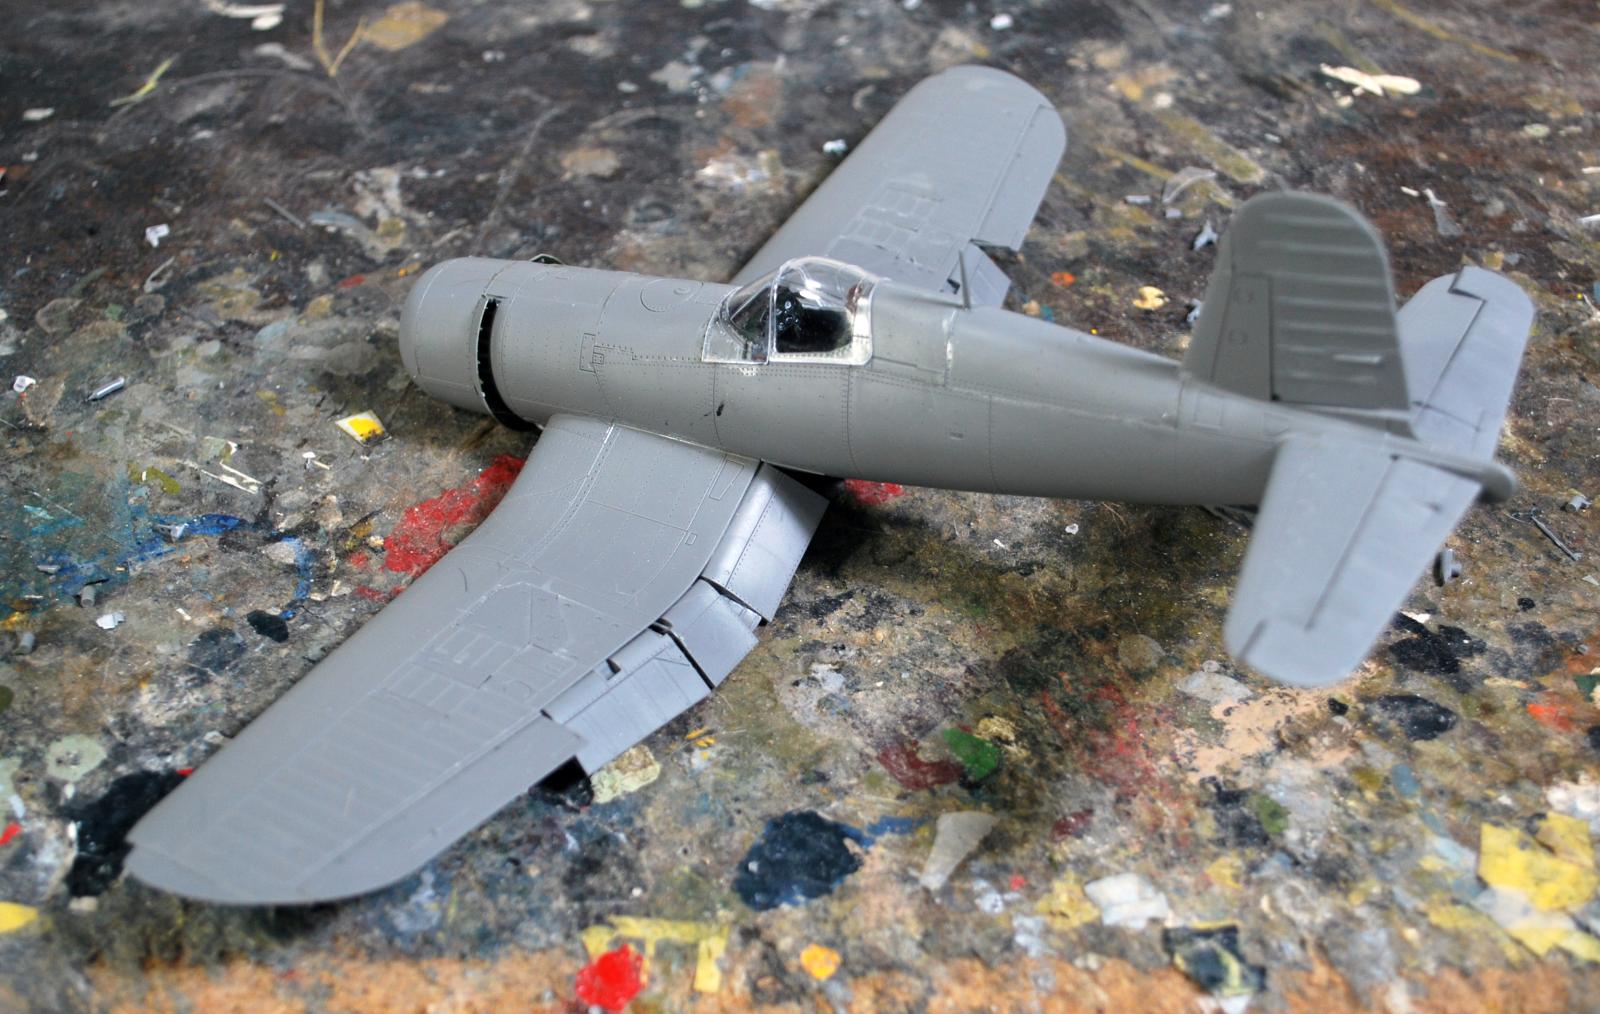
Parts fit is very precise. I was able to attach all the gun bay covers and glue them from inside which maintained the excellent surface detail.
All the parts are very easy to break taking them off the sprues. Take your time and cut the part off the sprue leaving some of the sprue attached, then cut that off separately. This will minimize breakage.
The kits provide different cockpits for the F4U-1/2 and F4U-1A with detail differences. Tamiya does not do this with their Corsairs, which all have the same cockpit.
One thing to be aware of is that the left side console is not level - it is higher at the attachment to the instrument panel and lower at the rear bulkhead, while the right panel is level. Tamiya has both level, and when I tried to assemble the first cockpit as if it was a Tamiya kit, I suddenly found that the forward part of the cockpit, including the instrument panel, was canted. It took some thought about the assembly at that point to realize what had been done wrong. Once I adjusted the left console correctly, the cockpit fit exactly.
I found when assembling the tail wheel that if I attached the bulkhead the gear attaches to separately and got it correctly positioned, that made correctly attaching the tail wheel assembly easier. Be sure to mate the part that attaches to the hole on the fuselage side first, then make the main attachment to the bulkhead. That way, there is no chance of missing the hole when bringing the fuselage halves together. The tail wheel assembly is more detailed and more delicate than the equivalent Tamiya parts.
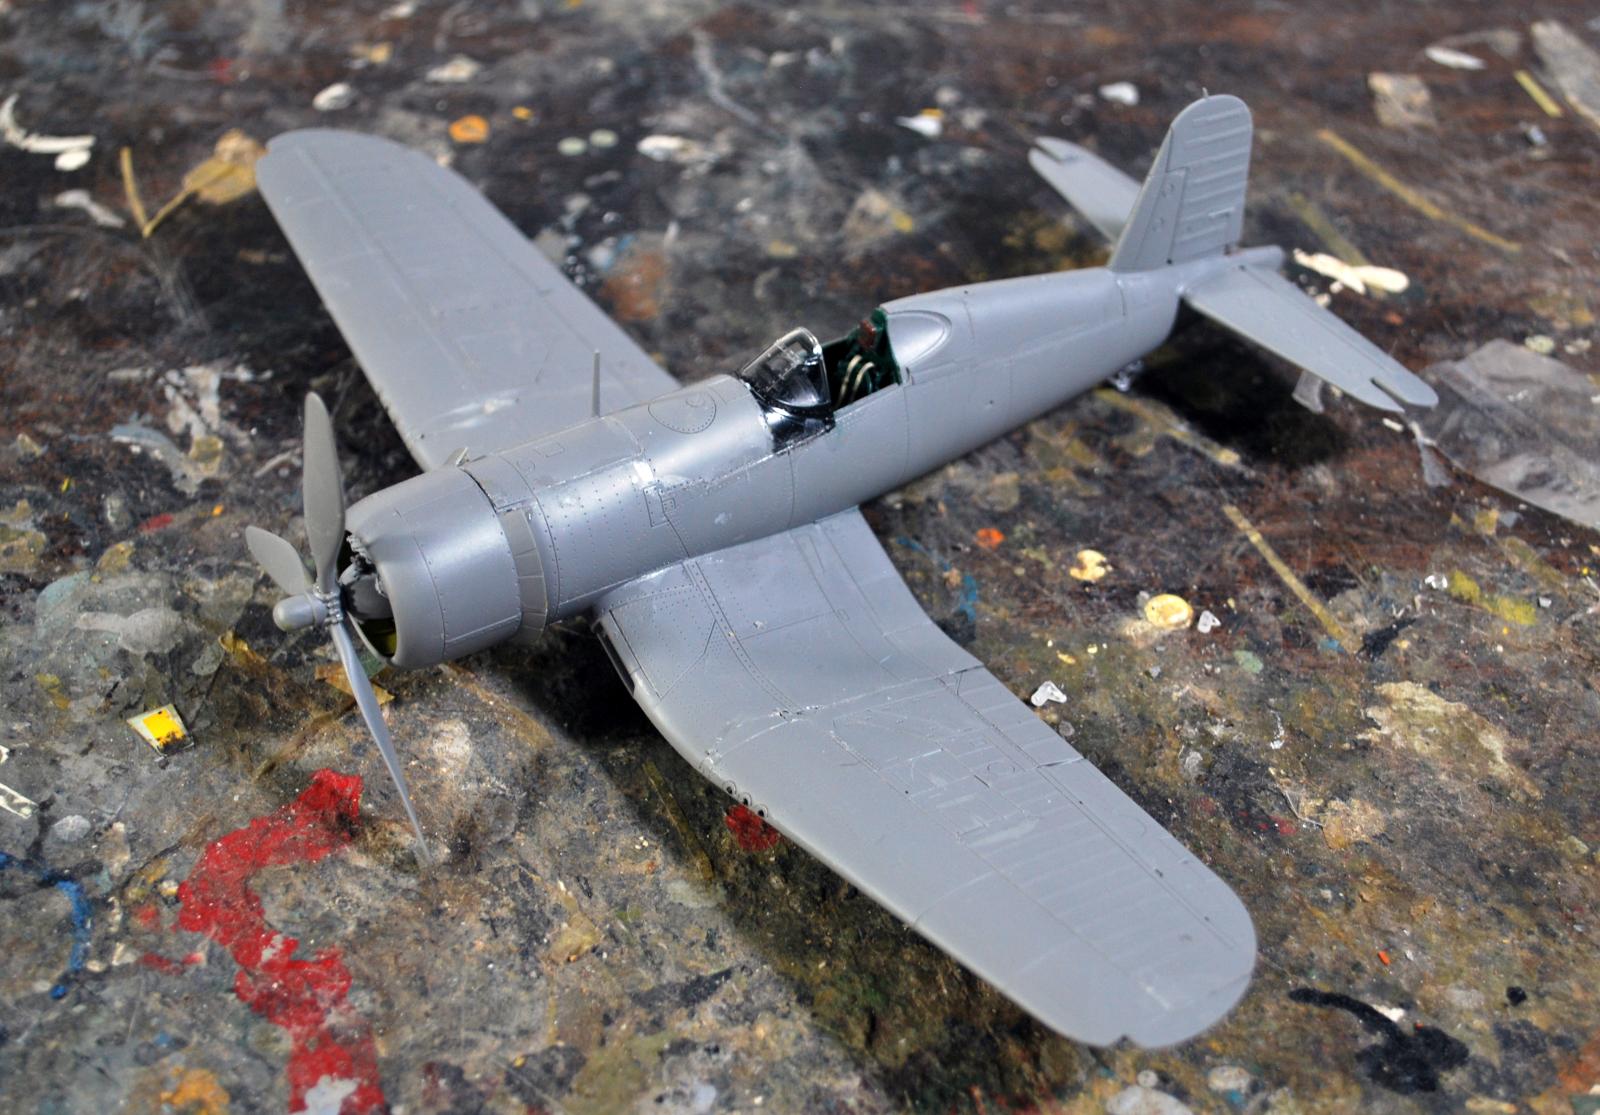
Once the fuselage halves are assembled with the tailhweel assembly, cockpit and the two forward bulkheads in position, I found it was best to attach the lower rear fuselage centerpiece first, followed by the upper front piece, then the gas tank, followed the the external cockpit canopy assemblies, and then the upper rear fuselage. Fit of these parts is very precise and you should take your time to be certain they are properly positioned before gluing.
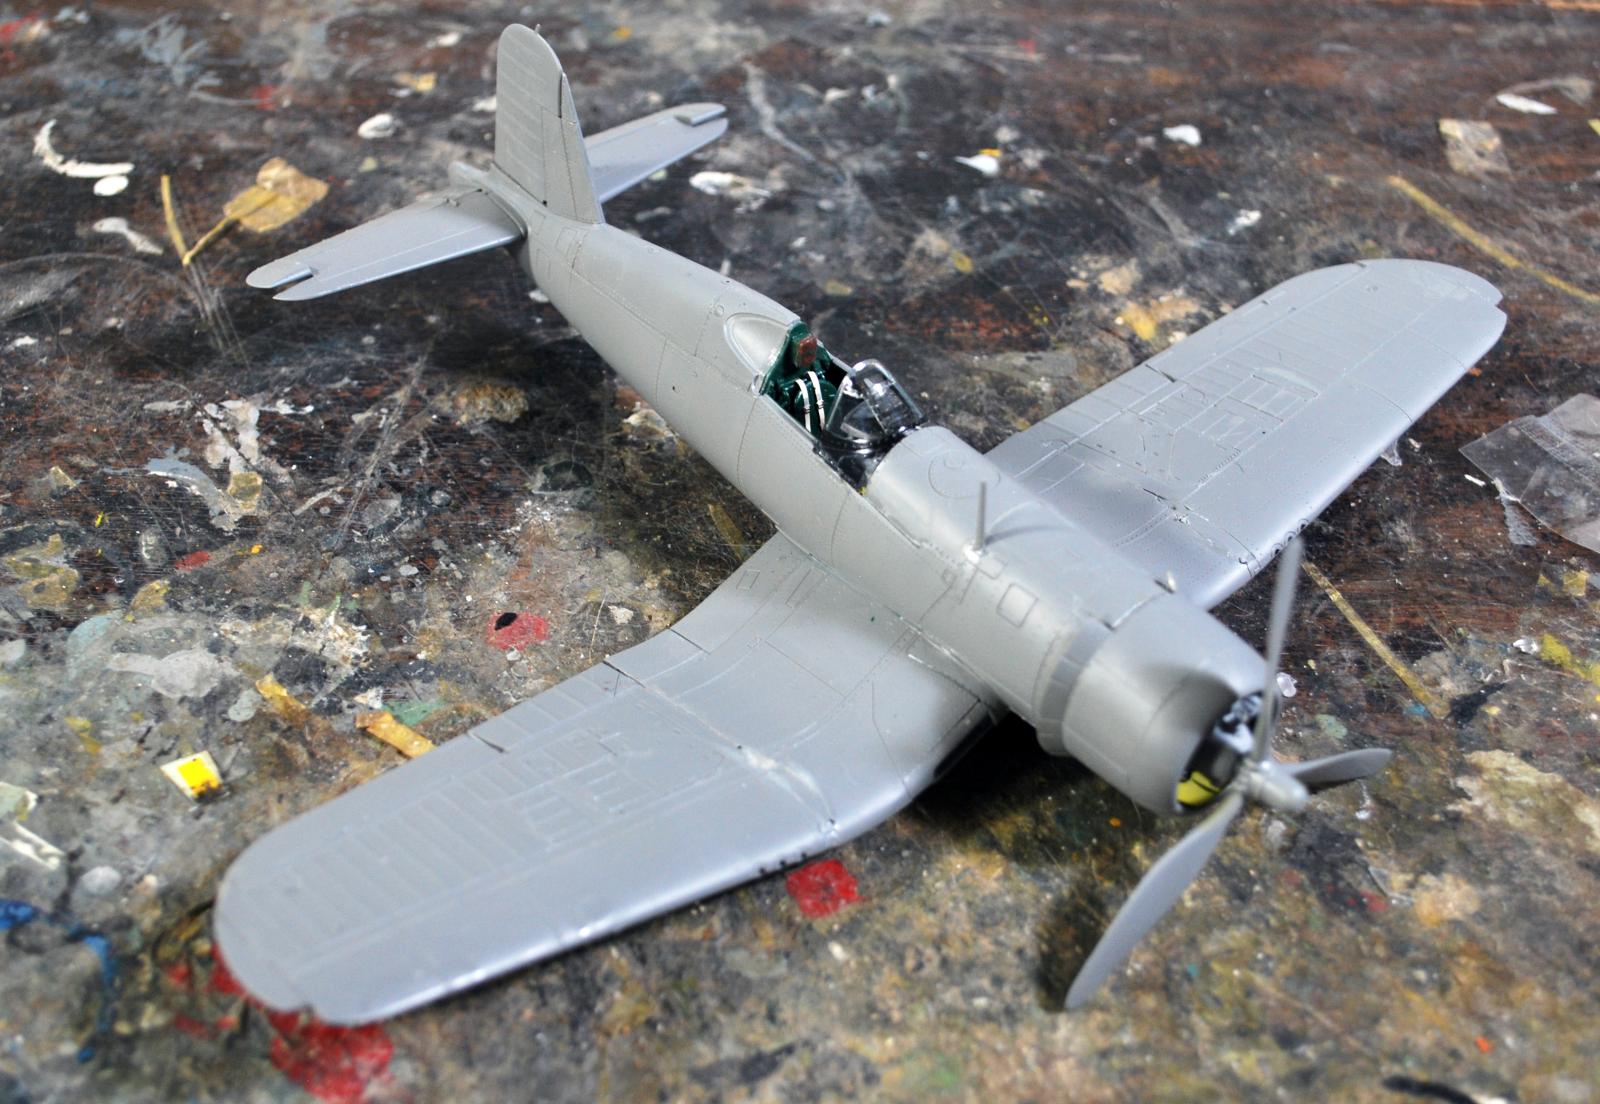
Once the fuselage sub-assembly has set up, mating the wing and fuselage sub assemblies is easy. I then attached the horizontal stabilizers, positioning the elevators “drooped”. I also attached the separate rudder offset a bit, just for looks.
The R-2800 engine is easy, other than the part with the valve rods. Those are very thin and they broke off trying to get the part out of the sprue circle it was molded in. Gluing them in their proper position was perhaps the most time-consuming single act of the assembly. Fortunately the cowling fits nice and close and once everything is positioned, you won't notice any improper placement of those parts. This engine is much more detailed and accurate than the Tamiya engine. I used the cooling flaps open parts on both kits.
The windscreen is molded as a single part with the surrounding fuselage area, like the Eduard P-51s. This makes for a much better looking canopy since there won't be any gaps and you won't be worrying about getting glue in the wrong place and harming the clear part.
The prop blades should be attached to the front part of the hub, since they are keyed to fit to slots in that part which ensures they are properly positioned.
The landing gear assembly is fairly complex. The equivalent Tamiya parts turn out to be highly simplified. The gear legs have all the parts of the assembly separate and care must be taken with small delicate parts, which are nearly guaranteed to break; I repaired three of the four. The gear goes in the wheel wells and then the covers to either side are attached; doing it the way Tamiya did the 1/32 kit allows the gear to be full-size, rather than the slimmed-down parts in the 1/48 kit to fit the opening.
The gear door retraction arms are separate. I found gluing them in position to the gear door with CA glue kept me from losing them to the wooden floor monster. Once they are in place you can attach the gear doors and they will end up in the right place in the wheel well.
Painting:
The two airplanes are in different versions of the mid-war tri-color scheme, for which I used Gunze-Sangyo Mr. Color lacquer-base acrylics.
The F4U-1 is in a field-applied tri-color scheme. The F4U-1s were originally delivered in blue-grey upper and light grey lower. When the tri-color scheme was introduced, many of the F4U-1s in the Solomons were given a coat of Sea Blue on the upper fuselage and upper wings and horizontal stabilizers. I used Mr. Color “Light Grey US Navy” for the lower color, Mr. Color “Bluegray US Navy” for the upper color and Mr. Color “Navy Blue” for the top color. Each color was post shaded to represent sun fading.
The F4U-1A is in the “Norfolk” Tri-color Scheme. I used Mr. Color “Off-White” for the lower color, post shaded with some Flat White, Mr. Color “Intermediate Blue US Navy” and “Navy Blue” for the top color, with each color lightened and post shaded.
There have been many comments about the riveting on these models. Admittedly, the riveting is the weakest part of the otherwise-excellent surface detail, since most of it isn't close to accurate. However, I found that once the models were painted the Rivet Issue turned into a Non-Issue. I don't think anyone needs to fill and “disappear” the rivets since once painted they are invisible beyond six inches from the model and are only visible up close in strong light.
Both models were “dinged” with Vallejo “White Aluminum” and had heavy exhaust staining and oil leaks applied. I also dry-brushed the wheels with Tamiya “Deck Tan” to simulate dirt from a coral runway.
Final Assembly:
I unmasked the canopies and positioned them open. I attached the main wheels and the prop and called things done.
Overall Assessment:
Magic Factory has really scored with these Corsairs. They blow the Hobby Boss Corsair “approximations” out of the water, and are more detailed than the Tamiya kits - with an easier wing assembly. The best way to describe them is “think of the 1/32 Tamiya kit, scaled down.” While there has been much pithing and moaning about the fabric detail (with one expert saying it looked like “wood planking”), that all urns out to be much ado about nothing when the models are painted. Only someone so deep in AMS that they haven't been able to complete a model in the past five years will find anything objectionable about these kits. There are lots of bargains out there. I got my kit for $72 delivered on my doorstep five days after it left Shanghai. Even at the MSRP, the price per model is competitive with current Tamiya pricing for their 28 year old kits.
I really like these models. Magic Factory has announced they plan to do a full line of Corsairs. The separate wingtips on these kits are a forerunner of Fleet Air Arm Corsairs. Those who have been praying for an accurate state of the art F4U-4 look to have their prayers answered.
Highly recommended to all Corsair lovers.
Review kits courtesy of all you book buyers.


Outstanding result and straightforward write up and assessment. Thanks for helping me to decide to add these to my must have list
Great results Tom.
Thank you for an eye opener review.
Both models look great.
Tom, I hope Magic Factory makes an F4U-4 so I avoid wasting my money on getting the HB one.
Don't waste your time on the HB kit even if they don't end up making one.
Hi Tom
Excellent review - highly detailed and full of useful advice. These are really excellent models.
A beautiful pair of Corsairs, Tom @tcinla
Looking forward to be able to build one myself and what the next models will be to be released by this company.
Thanks for sharing the valuable inofrmation.
Thanks for the assessment. Nice results, Tom
Excellent results and ditto article, Tom!
Eye-opener indeed!
@tcinla - Great writeup and review as always Tom. The build is really great. Your paint and weathering on both of these kits is really nice. I really like all of the wing detail on the Big Hog especially. I'm guessing that took a few minutes.
Great thinking on the wings, Tom. Both turned out very nice.
Great models but especially great hints Tom! I do t recall reading anyone else getting built both Corsairs with full extended wings from this box before, Kudos!
What's pithing?
substitute an "s" and then another in the appropriate place. Writing for a family-friendly editor here. 🙂
Those are both magnificent, thanks for the heads up about building both wings spread, that makes my decisions much easier!
Very nicely done and a great write up. I especially love the weathering...VERY realistic for the environment these airplane operated in. I like realistic weathering for harsh operations. I did the same thing with my Airfix AVG Hawk 81...but it seems that the IPMS judges I've dealt with think I'm just covering up a bad paint job.
Lovely brace of Corsairs!
Now that is thinking inside the box! Get it? Because you used the kit parts to make 2 wings spread models. Great review and build.
Thanks much for that @mrieth. 🙂
Great post. Just when I thought I had enough Tamiya Corsairs...somebody comes up with something better?
Yep, one of these days they'll be producing the excellently designed, accurate, kits I wanted to have when I was 10. 🙂
Well done, Tom (@tcinla). Thanks for doing a build review. I was skeptical of these kits, but I have a set on order now.
Very nice.
Thanks Tom, great review. I have had fun reading the moans and groans on the "other" site though. I swear they would argue about the color of the sky on a clear blue day
Amazing build and review, Tom. Gotta flip a coin to figure which I like better.
Really great pair of Corsairs Tom. Beautiful work! I really appreciate the history lessons and your honest opinions, and clear build descriptions. I've been going back and reading your other articles, and I've been enjoying them very much., they make me want to write better articles when I post my builds. Thank you for your inspiration. 🙏👍
Flattery will get you everywhere Clint. 🙂
😉👍😅
Great looking Corsairs. Just ordered the kit and I'm sure I will be referring to your write up quite often. Will make for a good winter project.
Great to see this built up looking so good! I appreciate the thorough review of the kit, especially how you've shown that both can be built wings unfolded which was an initial issue I had and was scratching my head over which model to do folded up and what aftermarket schemes to go for, thankfully I see I can do both unfolded which elevates that and feels more accurate for land-based F4U-1/1A schemes that catch my eye. Although I won't build an F4U-2 with my pair, having the correct radome already sets it apart from the Tamiya offering now, so much so I may try and pry off the radar from my old F4U-2 and fit the one from the MF kit to it.
Will definitely be picking this up when I get back to the bench, and if my 'pre-order' which still hasn't shipped ever arrives!
The dream would be to see if Magic Factory do a lineup of Corsairs, I'm sure we can expect an F4U-1D but an out of box 1C would be nice too. Even better than that an F4U-4 which has recessed details and isn't inaccurate like the HB kit.