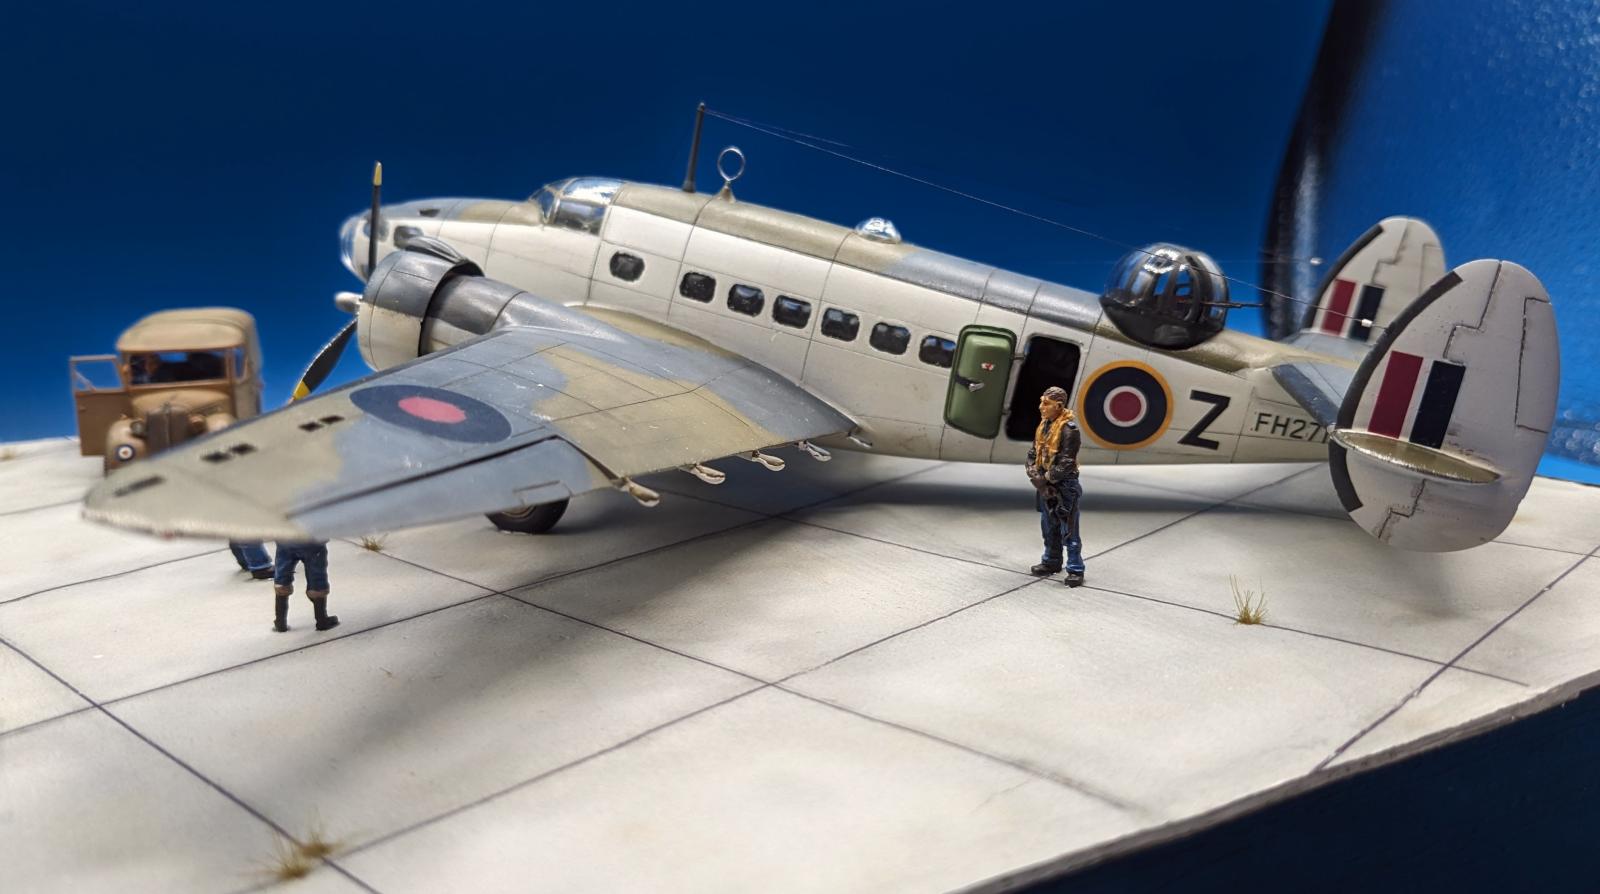
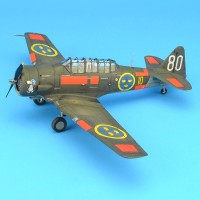
Airfix 1/72 Lockheed Hudson – RAF Coastal Command
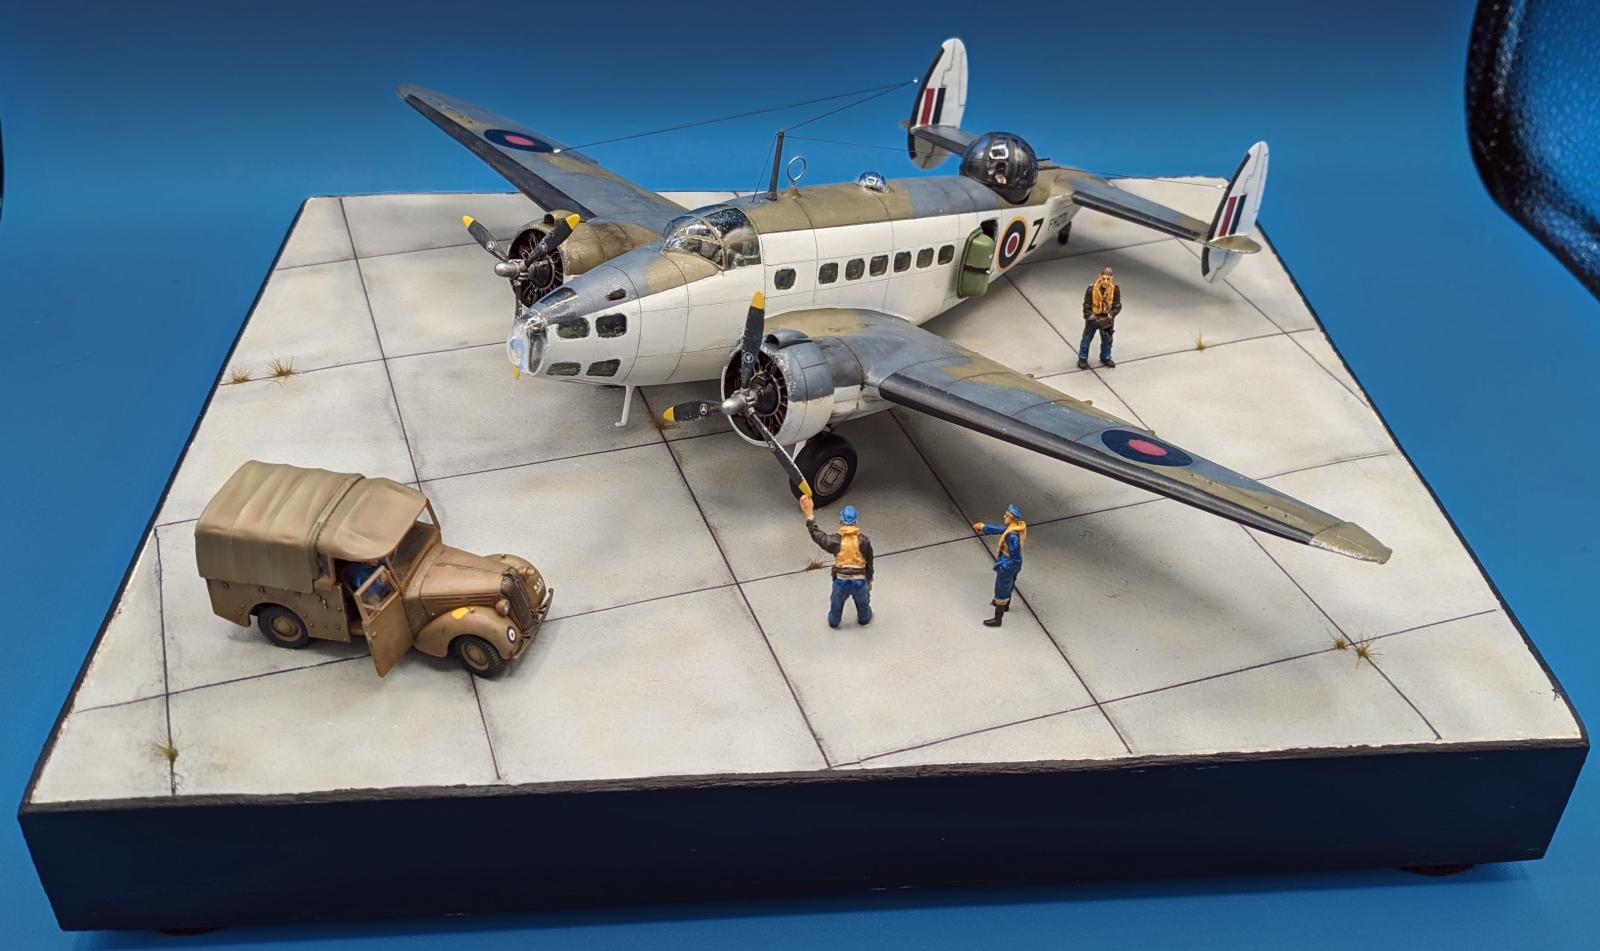
After about three months, (give or take), my update on the old 1963 release of the Airfix Hudson kit is finished. It was a fun project, but as usual for me, it highlighted some areas of my building skills that still need improvement. I won't go into that now, but taking that old kit and updating it was very satisfying.
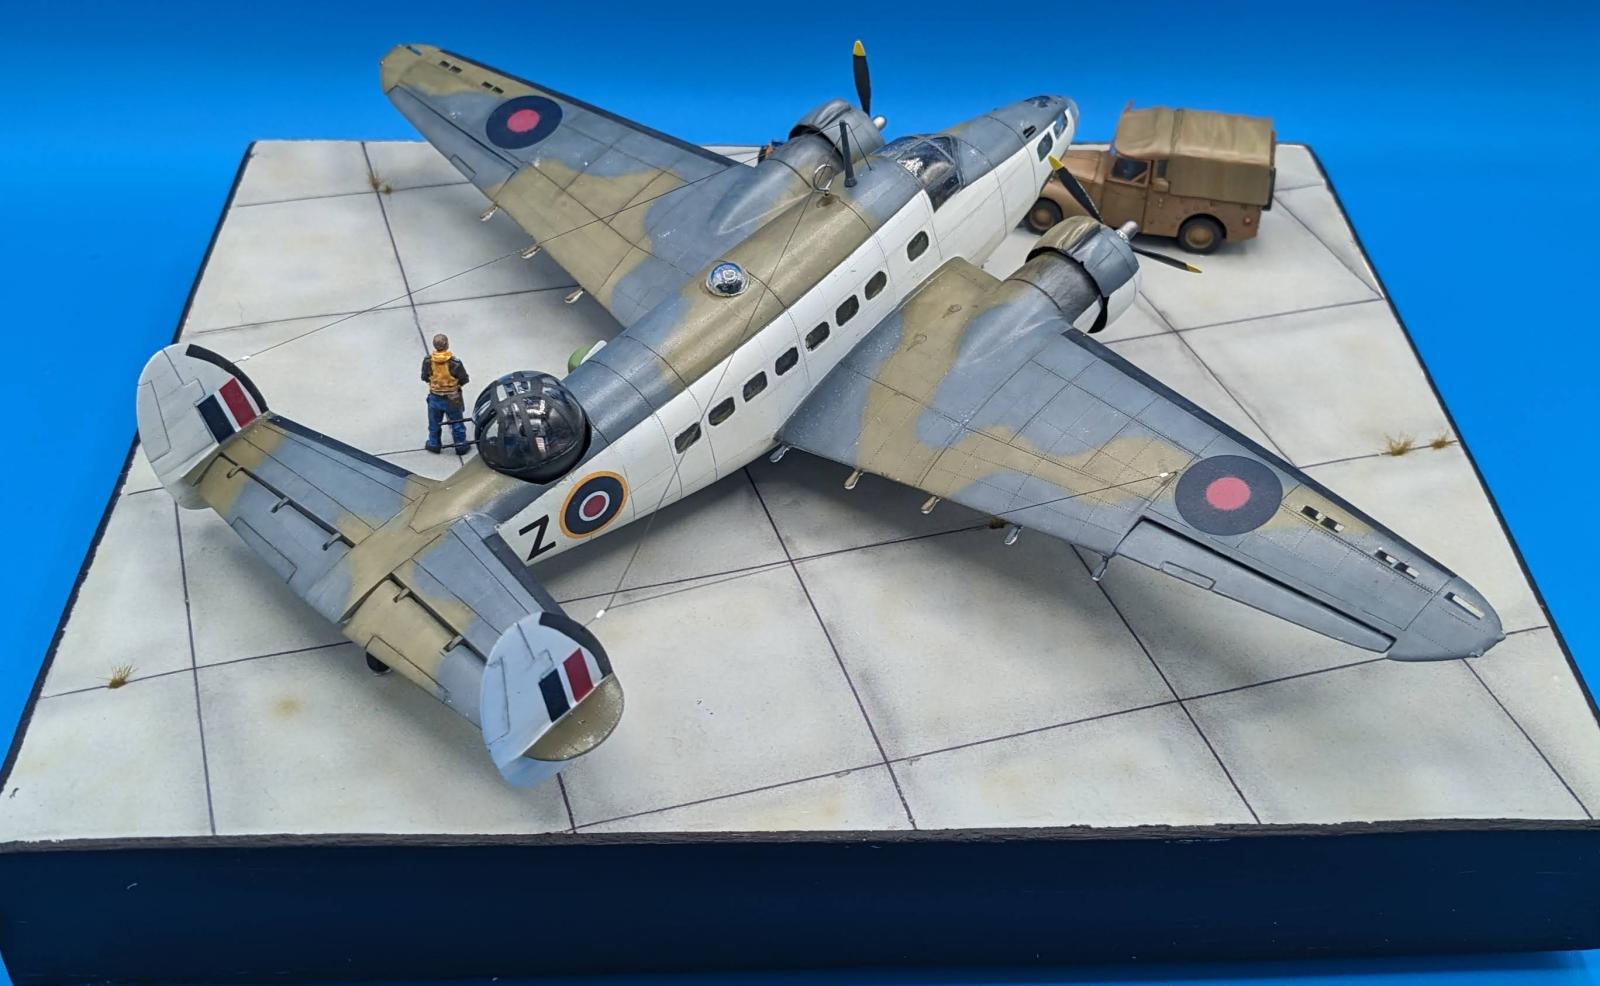
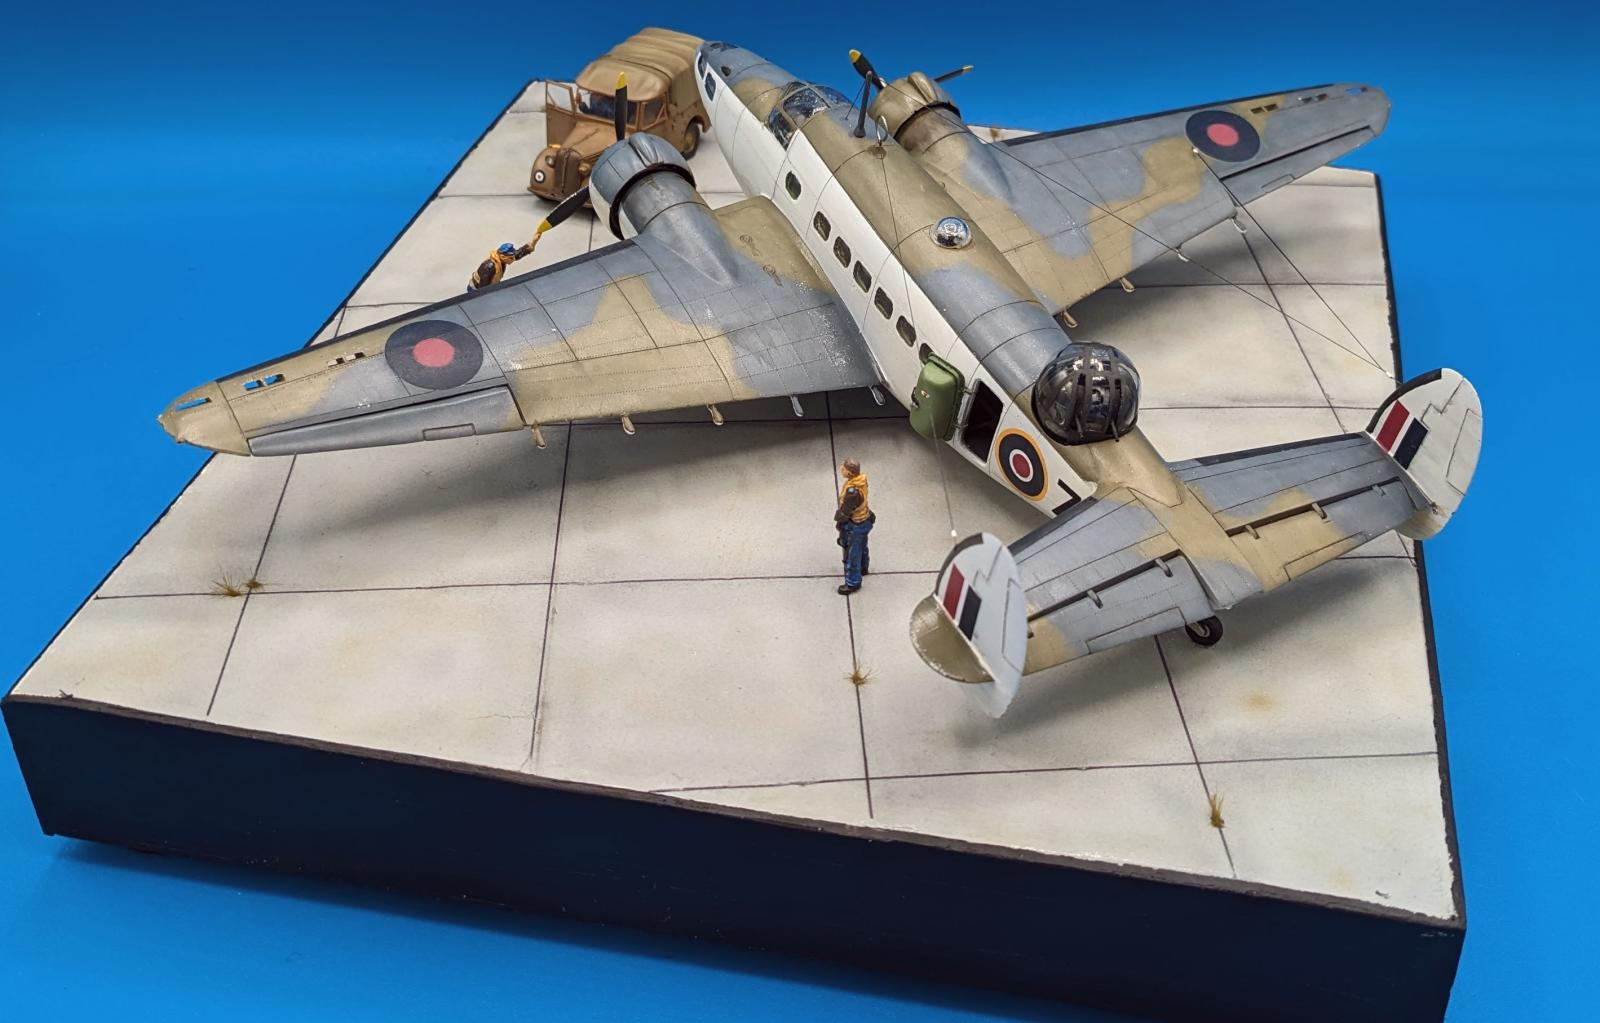
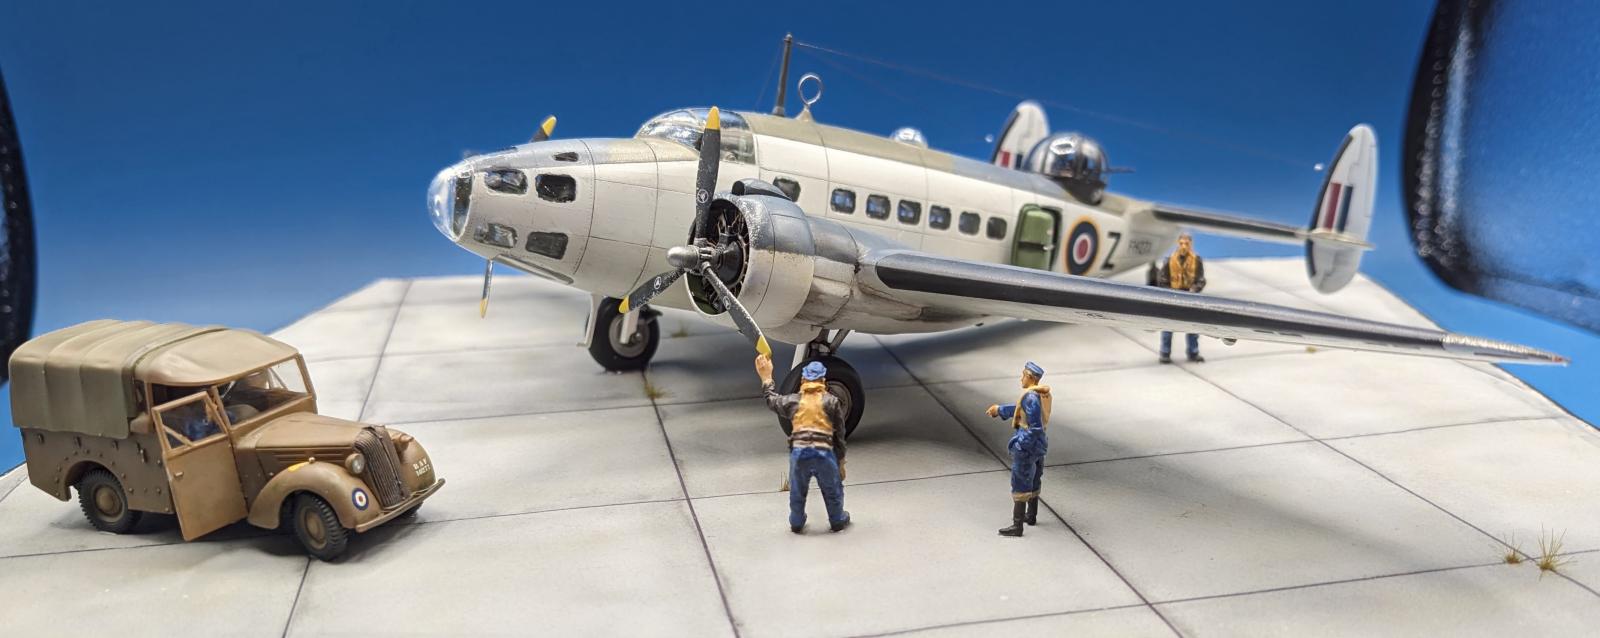
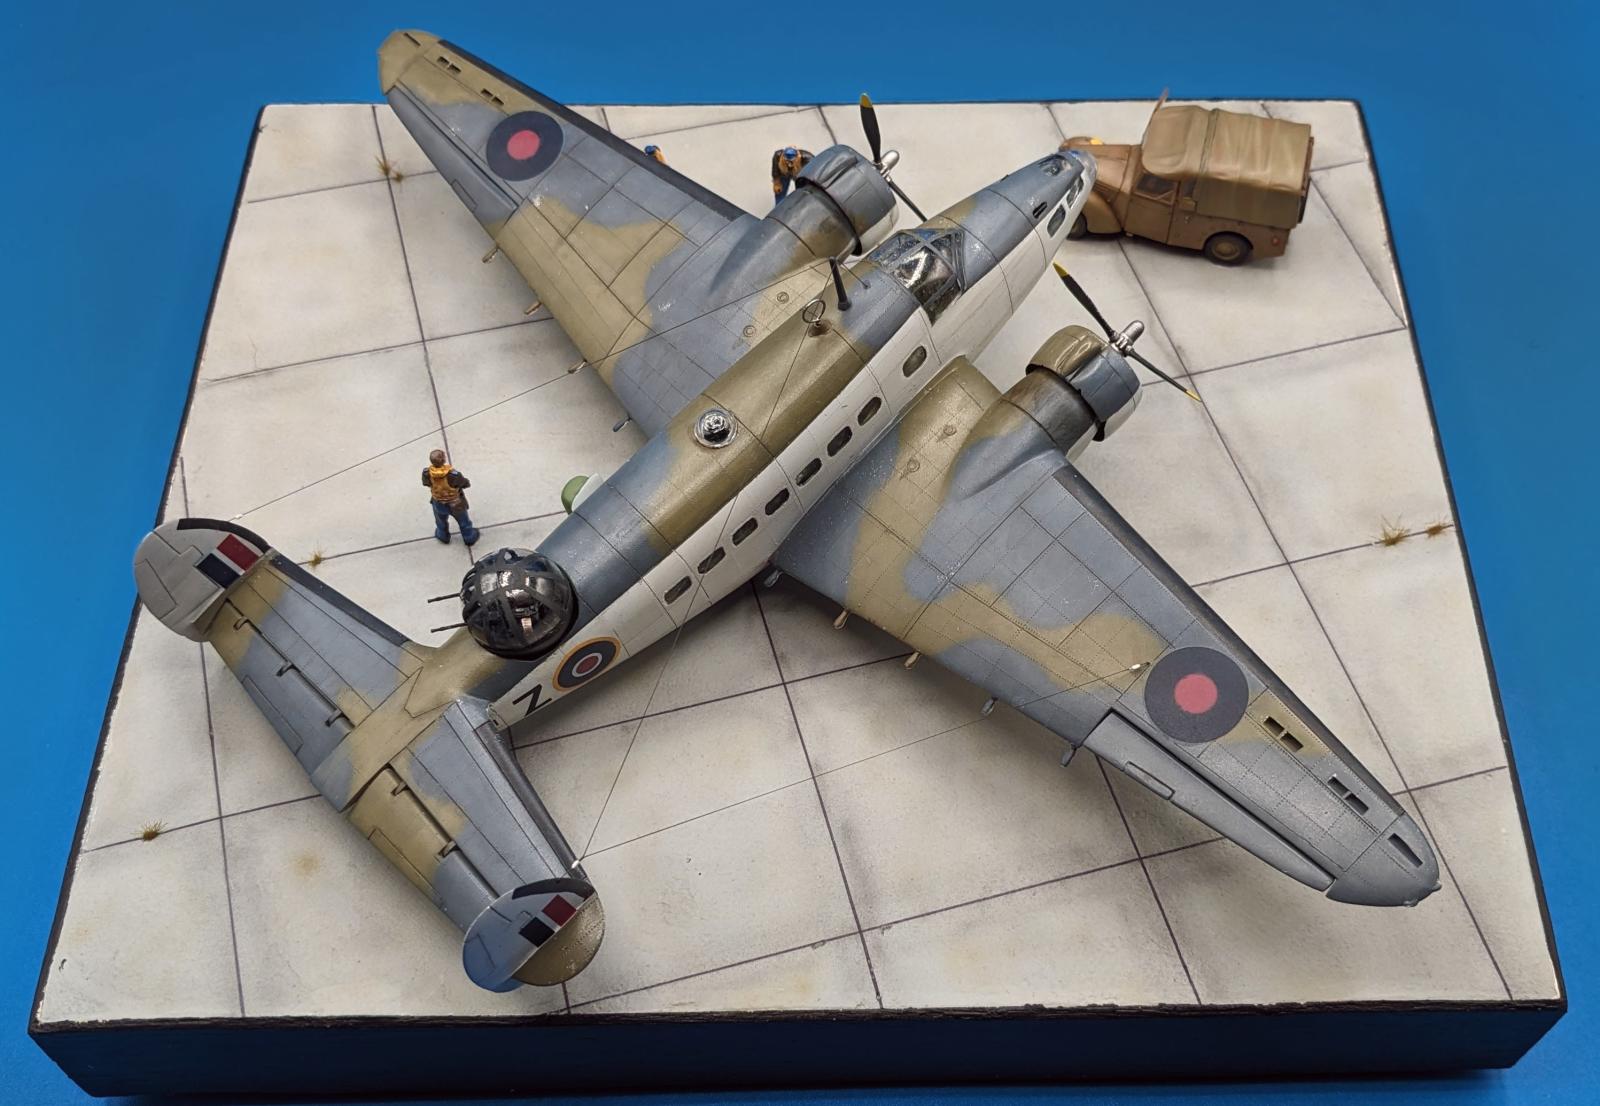
I did take some artistic liberties here, mainly the original kit is a Hudson Mk I and my presentation is a Hudson Mk III. The kit was very basic and I added a scratchbuilt interior, and added the fixed wing slots. The kit cowlings and engines left a lot to be desired, so it now has aftermarket engines and vacuformed cowlings. The landing gear is made from brass tubing and the landing gear wells were detailed. The gun turret is a vacuformed and has scratch built internals. The propellers were borrowed and reshaped from the Minicraft Lockheed Ventura kit. The "Tilly" is from the Airfix RAF Bomber Resupply set and the figures are CMK. Base is made from foam and balsa, painted to look like a parking area.
The presentation represents the crew just returning from a patrol over the Atlantic.
I'd like to thank George Blair (@gblair) for sending me the cabin door from his MPM Hudson kit. This allowed me to open the cabin door on my build.
I have a build thread in the "Work In Progress - Aircraft" group under the title "Airfix 1/72 Lockheed Hudson I" if you would like to see more build photos. I used this build to do additional exploring of the use of water based acrylics. I am still trying to learn to use these properly.
https://imodeler.com/groups/work-in-progress-aircraft/forum/topic/airfix-1-72-lockheed-hudson-i/
Hope you enjoy the photos and thanks to everyone who responded to my posts in the build thread.
Carl, I don't know which is the better of the two, reading and seeing your article or following the "Work in Progress-Aircraft" both are a huge success. Proving that old school models and methods combined with today's technology i.e. posting your progress to the community and getting feed back and some parts on the internet can be a real game changer. The Hudson is one of my favorite aircraft and you've made this kit really stand out with all of the details that one would see on the tarmac. The photography and the figures all add to the experience of viewing your gifts, talents and efforts in making this kit a show stopper.
Two thumbs up.
Thank you Stephen (@stephen-w-towle) for your extremely kind comments. It is very much appreciated. Like most modelers, I am benefiting from the knowledge that can be had from using the Internet to see the work of others and then trying it for myself. I love the Internet for this very reason.
I very much like taking these old kits and doing this sort of makeover on them, as the process is very satisfying. Of course, one could easily get burned out doing this, so these types of projects should be interspaced with more easily built projects or more modern projects.
Carl, that is a really great looking vignette. I like every element. One would never know it's an old Airfix kit.
Thank you Pip (@seawinder). I've only recently started doing dioramas (last year and they definitely do lend an additional element to the display of models. I am still learning the techniques, but one thing I am becoming aware of is that some of this work should be done earlier in the build if possible because the tendency is to want to get the model done near the end, meaning that the display may suffer.
A wonderful finish after an equally awesome build thread, Carl. Your overall job is simply superb, the result utterly realistic! What a departure from the original Airfix kit!
Congratulations!
Thanks Spiros (@fiveten), it was a lot of fun. Of course, you can see very little of the interior and unfortunately, quite a bit of sanding residue was trapped inside on the canopies despite my best efforts to avoid this. But I am gaining confidence to complete one of my upcoming projects (USN FJ-4B Fury on a carrier deck).
There is absolutely no inprovement required in your skills, Carl @clipper
The build of this Hudson, the way it looks and all the extras added, clearly show your expertise in modelling.
Also the way you presented it on this base is superb.
Having fun and coming up with this kind of result is what makes it proud to be a modeller.
Thanks John (@johnb). I truly appreciate the comments. What really gave me the most trouble was the acrylic paint. It goes down well enough when it has good coverage (as in dark colors), but lighter colors are still requiring too many coats. This gave me trouble around the windows when I removed the masks. But I just read about a different way of going about it which I will try next time. I'm hoping that will yield improvements I am looking for.
That's a superb result, a great build and interesting presentation. An old kit can be made into a winner with enough elbow grease!
Thanks Chas (@chasbunch), this is what makes these so intriguing. And surprisingly, more fun than one might imagine.
This is wonderful work. What a superb result!
I don't see what could be improved, but we all know that each of us is the most critical judge of what we do, since we are the ones who know what wasn't/couldn't be done. The day we arrive at the end of the project and don't tell ourselves "as usual for me, it highlighted some areas of my building skills that still need improvement," that is the day when we have stopped growing and progressing. There's never going to be a perfect model.
A friend once gave me a thought experiment: we have "special boots" that allow us with each step to get halfway to our goal. Will we ever achieve it? The steps become smaller and smaller and finer and finer, but they're always going to be there.
Again, super work in transforming what was in the box into this amazing model.
Thanks for the kind and encouraging comments Tom (@tcinla). It's all too easy for me to fall into the trap of comparing myself to other modelers whose work I consider superior. I get especially vexed by paintwork that I struggle to duplicate. I know this is an experience thing, and I agree that there is no such thing as a perfect model. Thanks for reminding me that I can be less critical of myself. I do enjoy the discussion of modeling very much and I love how we can all benefit from the interaction with one another, but dang, that paintwork! 🙂
This really came out well, Carl (@clipper). All the extra work you did on this Airfix kit certainly was worth the effort. And the diorama came out as a perfect accompaniment to the plane. It was a lot of fun following along on the build. Well done.
Thanks George (@gblair) and thanks again for sending me the cabin door which made it possible to have that added bit of detail. It was a fun experience building this one and I look forward to some future date when I tackle another one.
A superb model in every way, Carl, you must be very pleased.
Thank you George (@chinesegeorge). It was a satisfying build.
Outstanding work, Carl.
Thank you John (@j-healy).
Very nice build, of a pretty plane. Nice way to display it, well done. Looks a bit different with the British scheme and turret in the rear, but I like it.
Thank you Walt (@luftwaffe-birdman). The Hudson benefits from the looks of its airliner heritage. The white and camo scheme seem to go well with most aircraft, but especially with the Hudson.
Dear Carl @clipper
I love the Coastal Command scheme and you simply did a beautiful job with it. Absolutely fantastic with the subtle weathering! The diorama is the icing on the cake. Love looking at the pictures!
Thanks Felix (@fxrob). I too very much like the Coastal Command scheme which is why I decided to take some artistic liberties with this build and present it as a Hudson Mk III instead of the Hudson Mk I the kit provides. The weathering is something I am still working on, but using oils has dramatically improved what I used to do. I can thank the Internet for that knowledge.
Carl, Very nice work, I really like your paint work and the very attractive scheme. I've always wondered about the large looking gun turret on these, you think they could have found a bigger one ?
Thanks Terry (@shoobiz). That turret definitely is not the most aerodynamic installation I've seen. If you look at my build thread, you can see that the Airfix kit's original turret stuck up even more. I believe that Britain, being in the situation they were in, needing aircraft quickly, tried all sorts of short cuts including sticking big 'ol turrets on airliners.
What a beautiful scene you’ve made, Carl!
The model really comes “alive” and the upgrade surely pays off the extra work required to get this kit up to the level of more contemporary kits.
A job well done. 👍
Thanks Alfred(@alfred). It's a shame that the clear parts weren't better because a lot of the interior is not visible at all except in my build photos. But it was fun doing it and that's what matters.
Couldn’t agree more, Carl! @clipper
Most important is the fun we all have when building models.
I have this kit, and love the Coastal Command schemes, so I'm planning to use your efforts as a template for my build! It looks fantastic, and even though I haven't looked at the build thread yet, I'm going to glean everything I can from it! Thanks for blazing a trail for me!
Thanks for the compliment Greg (@gkittinger). Depending upon how far you want to go, you might consider looking for the MPM kit or even one that is built already (if you can get it cheap enough) and use the best parts of that with the best parts of the Airfix kit. I would suggest definitely checking out my build thread as well as the recent build thread from George Blair (@gblair) for his triple Hudson build (using MPM and derivative kits). There are some definite gotchas in both kits.
As a follow on to my build article and thread, I would like to add some observations from my own experience with this build.
First off, the cabin windows technique I used, (UV curing resin), is not really clear enough to see much detail inside the fuselage. In retrospect, I think I would have been better off deepening the landings for the windows so the clear parts stood proud of the surface and then sanded them down after installation. With polishing, they would have been clearer I think.
Secondly, the Airfix gun turret sits way too tall the way it is molded. I am not sure about how the MPM turrets are, but the if you use the Airfix turret, something will need to be done. Since I vacuformed mine, I no longer needed the original mounting system from the kit and ended up grinding away a several millimeters of plastic on the mounting base and enlarging the opening for the turret in the fuselage halves to allow it to sit much lower in the fuselage.
You might also consider either vacuforming a replacement for the main cabin canopy or trying to smooth it out some to better define the frame edging. Depending upon how you do that, you may have to add some shims to get it to properly blend in with the fuselage halves. It fits okay as molded, but the detail is kind of soft.
Carl Smoot (@clipper)
I think our friend Tom Tom Cleaver (@tcinla)
is spot on with his comments about us all being too hard on ourselves. We are not perfect as human beings, nor will we ever be. Neither will our models because of this.
But I will say this: Yours is as close to perfect as I have ever seen. It is hard to believe you have incorporated SO much detail into a 1/72 scale kit. I am also very impressed with your photo base. It's like icing on the cake. Lately I have been working on several different photo shoot bases too, for the same reason... they make our models look more lifelike and realistic.
I have not stopped by to make as many comments on your build journal as I would have like to, or should have. Life has been in the way recently. My wife had another abdominal surgery because they found two large lumps that concerned her oncologist. She has a history of cancer, gone through 8 rounds of chemo and still has her chemo port.
So when I'm not spending time with her, I drift off into never never land and cut, sand and paint plastic when I can. Even though we have been married for almost 30 years, she still enjoys my company, as do I enjoy hers. Sounds a bit sappy, and I'll probably loose my man card over this, but it's true. She is still my best friend too, as I am hers.
Thank God the results of the biopsies were not cancerous. So for now, it's been 5 years since this nightmare began for us.
You reminded me that I recently picked up a 1/48 scale Revell PV-1 Ventura. I want to build it up as a nearby NAS Sanford plane, and it will be a good companion for the recent NAS Deland bird I built last year.
I clicked on several of the various "like" buttons, and look forward to what you have in store for us next.
Keep it going my friend !
Thanks for the kind compliments Louis (@lgardner). Congratulations on a successful and long marriage. I too have been married for a long time and I give my wife the credit for putting up with me for its success. I am truly sorry to hear of the health difficulties. I have dealt with this with my parent twice and its never easy. Hopefully all the pain and suffering she has to endure will yield a positive outcome. And no, it's not sappy. It's success.
Take care.
🤣🤣🤣😉 Shortcomings my arse🤣
What you mean is what can be achieved with old kits with some thought and willingness to try, after all, it all adds to your experience Carl.
Nice one matey👍❤️😎
Ha Ha Chris (@chrisballard), thanks for the humorous response. So many excellent modelers out there and then seeing many of their excellent works in person at the last IPMS Nationals tends to make one hard on themselves. I do not let it get me down, nor do I overly criticize myself, I just resolve to keep working at learning to do the job better.
Absolutely mate, and don't forget that much of the praise is subjective and based on style and taste. Reality sometimes comes second sadly. Nice job, keep on learning...I do😉❤️
Nicely done, Carl!