Consolidated PBY-4 Academy 1/72
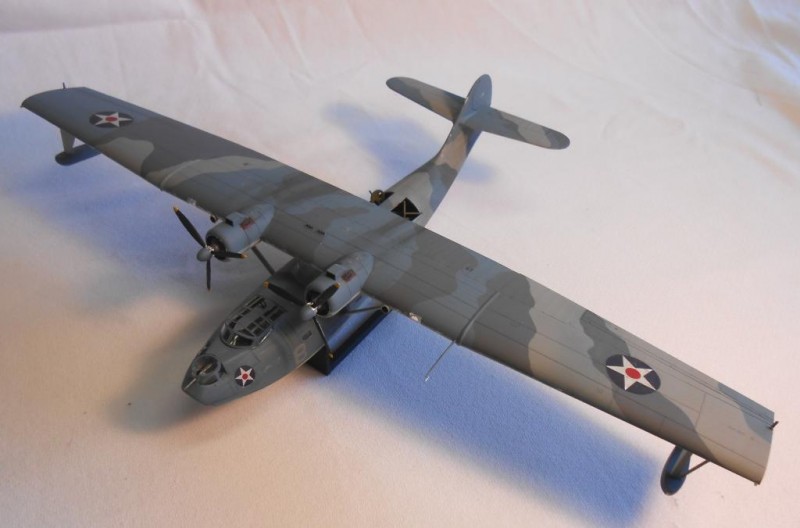
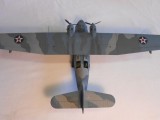
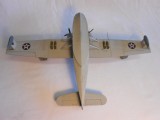
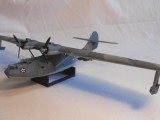
While waiting for stuff for my Phantom build to arrive, this kit was given to me by a good friend. The camo intrigued me, so I decided to build it. The airplane represents a Catalina of VP-101 stationed in the Philippines just after Pearl Harbor in late December 1941. The camouflage was either an experimental Navy scheme or field applied but there was not a lot of info to confirm this. I tend to lean toward the latter, as these aircraft saw quite a bit of combat attacking Japanese naval forces before evacuating US military personnel from the Philippines,including General Douglas McArthur. I had one grainy photo and a side view color plate to go from. This is what I think it looked like, any further info would be greatly appreciated!
Kit was a straightforward and easy build, apart from the wing struts, which are a butt join and have to be fitted individually to get a good fit. Kit decals were used over Model Master enamels. I couldn't bear to ruin the art deco lines of this airplane by using the beaching gear, so I built a small cradle from scrap light plywood.
Many thanks to Joe Caputo, who was a great help in researching the camo colors.
Beautiful job, Jaime. It came out exactly as you planned.
Excellent and a different finish than is usually seen! I like it very much!
Very nicely done and a nice variation from the usual paint schemes seen on the Catalina's of that time period.
Nice work, Jamie...and I, too, like that camo job.
Greetings :
Nice work on that Catalina, the camouflage on it sets it apart from the usual scheme.
Great work on this type, the camo scheme is really nice
Nice work Jaime,gotta love a Catalina ! N.
Superb looking Catalina. Well done!
Like
NICE !
Nice work, Jaime. I did the 1/48 version and it's a really large model. This looks a little more sensible to cope with.
Jaime - looks great! In fact, I've got three cats in my stash, and would love to build one in this color scheme. Would you mind sharing the FS numbers or some other reference to the paint colors you used?
Really cool paint job indeed!
Brilliant scheme and paintwork. I like the subtle contrast of the colors. They almost blend together. I have never been much of a PBY fan but this one is very nice to look at.
Very different, a refreshing look at an iconic aircraft. Do the waist doors come with the kit or are they a scratchbuild?
Mike, the blisters we're familiar with came in with the -5 and -5A. Sliding hatches on the prior versions. I'm surmising this is a -4, and that the hatches came with the kit.
Jaime, great take on the mysterious scheme. Catalinas went into the blue grey uppers, light grey lowers in early 1941. PATWING 10 or the unit depicted did their own variation, and I suspect we'll never know what it was. Given that the Phillipines were at the end of the supply chain, either mixed from whatever was available, locally produced paints, or any combination thereof, my opinion. Any records, if kept, were probably lost or destroyed in the fighting retreat to Australia
I remember reading that the Army AF in the Phillipines prewar was using gloss OD bunk paint on the B-17s, in an all out effort to get them painted.
Thanks for the kind words, everyone, I do appreciate it.
As for your questions:
Rob, the wingspan is about 18 inches, so it does have some shelf presence, but it won't take up an entire wall!
Mike, the -4 and earlier PBY's had sliding hatches in the waist instead of the clear blisters, which were added on the PBY-5. There were 33 PBY-4's built, the last one was the prototype for the -5 series. The hatches come in the kit, molded separately. The problem was how to glue them to the fuselage, as the hatches have a window in them. I used a couple of pieces of thin plastic strip on either side of the window, and glued the hatches to the airplane with small dabs of 5 minute epoxy.
Greg, this might get a bit long winded, so bear with me. I didn't really have any definite references on this scheme apart from a few internet articles and the older Squadron "PBY In Action" book. This airplane is depicted on the cover art, and there is a second color plate captioned as an "experimental Navy scheme", but no three views or color references. If you do an internet search on the Academy PBY-4, you'll see all sorts of interpretations, from pastel grays and blues to shades of green, none of which looked right. The kit painting instructions list the following FS numbers:
Dark Blue Gray FS 35164
Blue Gray FS 35177
Light Gull Gray FS 36440
Light Gray FS 35630
The dark blue gray turned out to be USN intermediate blue, and going on the assumption that the airplane was in standard colors for the period and was then painted in the field, I used the intermediate blue FS 35164 on the upper surfaces and the light gull gray FS 36440 lightened with a bit of white for the lowers. I didn't have the other two colors, so began looking through my grays to see what I would have. I figured that these airplanes were in the Philippines, a major US naval base, and that any US naval base worth its salt would have all kinds of gray paint lying around. About then, Joe Caputo sent me a color photo of a Boeing 314 Clipper in a blue-gray camo that was applied when that aircraft was requisitioned for military use. The pic is posted here on iModeler under Joe's Clipper build.
That looked like what I wanted, so after looking at all my gray paint, I chose USAAF neutral gray FS 36270(with a very little bit of white added) and USAF Gunship Gray FS 36118 (darkened just a touch with black) as the two other upper surface colors. I used the kit painting drawings as a guide and went from there. It's basically my interpretation of what I thought this airplane would look like if it had been hurriedly done in the field. I can't vouch for its accuracy, but it looks right to me, so I went with it. Hope that's what you needed. I can scan or send the kit painting instructions to you if you'd like them.
I also remembered why I don't do 1/72 much any more. Anyone watching me trying to glue that itty bitty DF loop on top of the cockpit would have died of laughter... 🙂
Yes, very nice Jaime.